Blending Modes in Photoshop: Ultimate Guide for Stunning Visuals
Blending Modes in Photoshop: Ultimate Guide for Stunning Visuals
Introduction to Blending Modes in Photoshop
Blending modes in Photoshop are essential tools for combining layers in various ways to achieve different effects. Photoshop blending techniques involve using layer blending options to manipulate these interactions and even blend pictures, resulting in more dynamic and visually appealing compositions. Understanding these techniques is crucial for both beginners and advanced users, and I am going to teach everything here in this blend modes tutorial.
When working with images from different digital cameras, such as CR2 or JPEG and NEF or JPEG formats, blending modes can unify the look of the photos. Suppose you have a wedding photo taken with different cameras. By using blending modes like multiply and Screen, you can enhance the contrast and brightness uniformly, creating a cohesive and professional-looking album. Knowing the difference between Photoshop and Lightroom can also help you decide the best tool for your specific needs. Let’s get to this blend modes tutorial for a better insight into this.
Table of Contents
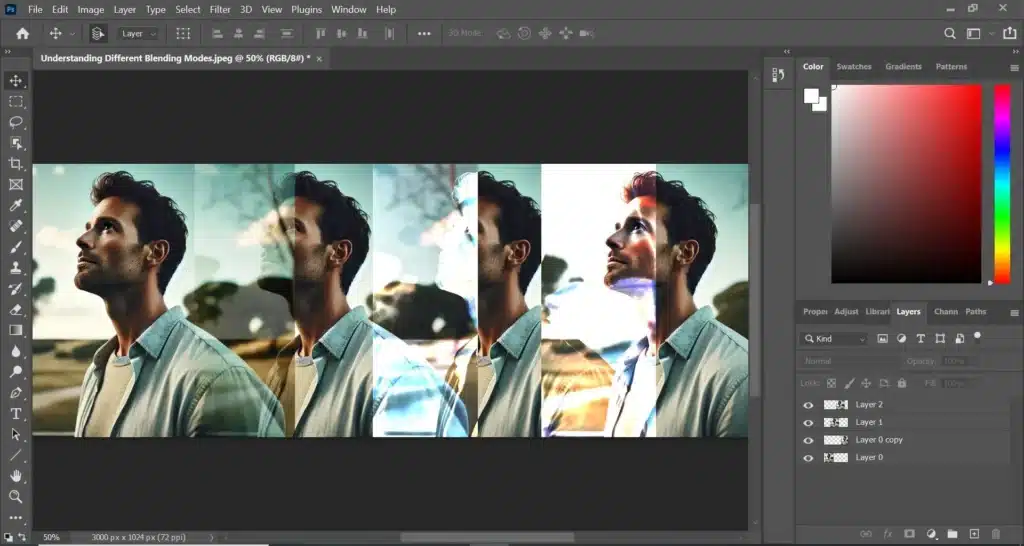
Understanding Different Blending Modes
Blending modes in Photoshop are crucial for creating various visual effects by controlling how layers interact. They are part of the essential Photoshop blending techniquesand provide a rangeoflayer blending optionsto enhance your images. Each blending mode has a specific function that affects the way colors and tones combine across layers.
Common Blending Modes and Their Uses
Multiply Mode
The Multiply blending mode multiplies the base color by the blend color, resulting in a darker image. This mode is useful for enhancing shadows and details in your images. For instance, applying multiply mode to a photo with dull shadows can make them richer and more defined.
Screen Mode
The Screen blending mode multiplies the inverse of the blend and base colors, creating a lighter effect. This mode is ideal for brightening images or adding a soft glow. For example, using Screen mode can effectively brighten a dark photo or add a dreamy glow to portraits.
Overlay Mode
The Overlay blending mode combines the effects of multiply and Screen modes. It darkens the dark areas and lightens the light areas, making it perfect for adjusting contrast. Overlay mode is commonly used to add depth and enhance the overall contrast of an image.
Soft Light Mode
The Soft Light blending mode softens the light and dark areas of an image, providing a subtle lighting effect. It is useful for gentle enhancements, such as smoothing out harsh highlights or adding a soft glow to an image without making drastic changes.
How to Use Blending Modes in Photoshop
Blending modes in Photoshop are powerful tools that help create various visual effects by combining layers in different ways. Understanding and using these modes effectively can enhance your images dramatically. This blend modes tutorial covers essential Photoshop blending techniques and layer blending options to get you started.
Steps to Apply Blending Modes
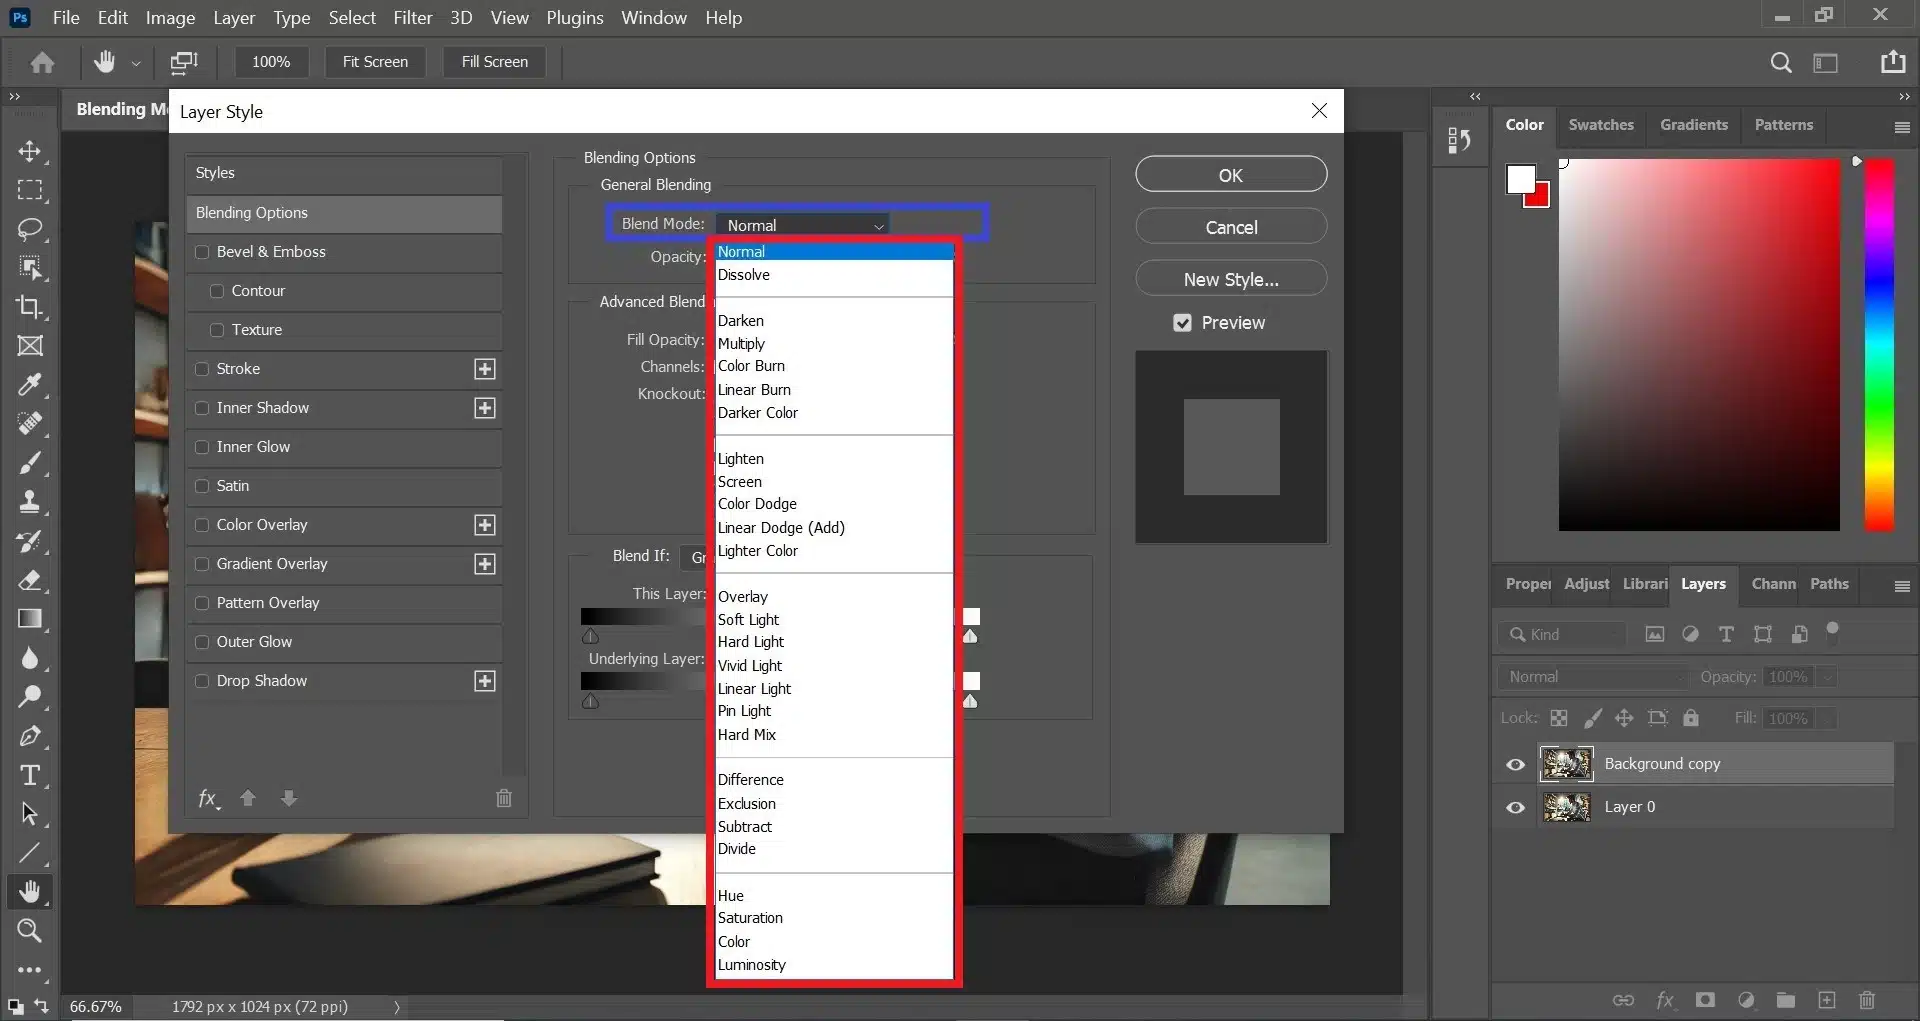
To apply blending modes, open your project in Photoshop and ensure you have multiple layers. Select the layer you want to blend from the Layers panel. In the dropdown menu labeled “Normal,” you’ll find various blending modes. Hover over each option to see a live preview of how it affects your layer. For instance, Screen is excellent for lightening, while multiply can add depth and shadow.
Photoshop Blend Effects: Practical Applications
Common Blending Modes and Their Uses
Here’s a table summarizing some blending modes and their applications:
Blending Mode
Description
Typical Use
Example Effect
Multiply
Multiplies base color by blend color
Darkening
Enhancing shadows and details
Screen
Multiplies inverse of blend and base colors
Lightening
Brightening images, adding glow
Overlay
Combines Multiply and Screen modes
Contrast adjustment
Adding depth and contrast
Soft Light
Softens the light and dark areas
Subtle lighting effects
Gentle enhancement of image tones
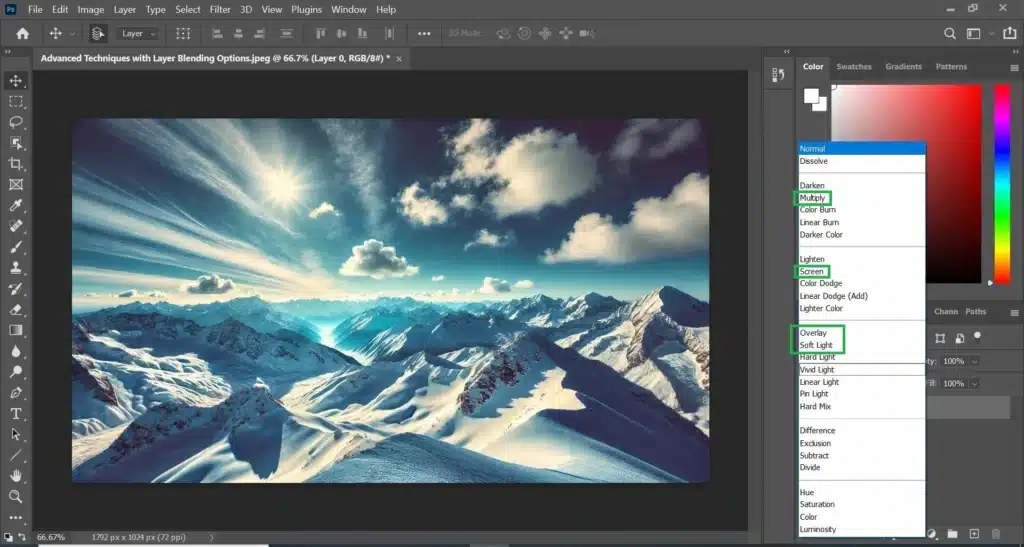
Advanced Techniques with Layer Blending Options
Using Plugins for Enhanced Blending
Best Plugins for Lightroom
While working in Photoshop, you might find the need to switch to Lightroom for certain tasks. Lightroom Plugins can enhance your workflow, especially for Batch Edit in Lightroom or adjusting the Aspect Ratio in Lightroom.
Combining Photoshop and Lightroom Techniques
For example, after applying blending modes in Photoshop, you can use Lightroom to batch edit your photos or apply final tweaks with the best Lightroom plugins.
Practical Applications of Blending Modes
Blending modes in Photoshop offer powerful ways to combine layers, resulting in unique and creative visual effects. By understanding Photoshop blending techniques and utilizing various layer blending options, you can achieve professional results in your projects. This guide covers the practical applications of blending modes, highlighting how they can be used to enhance your images effectively.
Photoshop Layer Blending for Image Enhancement
Blending modes like Multiply, Screen, Overlay, and Soft Light are commonly used in Adobe Photoshop to improve images by adjusting brightness, contrast, and color. For instance, the multiply mode multiplies the base color by the blend color, making the image darker and enhancing shadows. On the other hand, the Screen mode multiplies the inverse of the blend and base colors, creating a lighter result perfect for brightening images.
Blending Modes in Photo Editing
Multiply Mode: This mode darkens the image by multiplying the base color by the blend color, making it ideal for enhancing shadows and details. It is especially useful when working with photos that need more depth and richness in dark areas.
Screen Mode: Screen mode lightens the image by multiplying the inverse of the blend and base colors. This is perfect for brightening images and adding a glow to lighter areas. It works well for creating high-key effects or lightening dark photos.
Overlay Mode: Overlay combines the effects of multiply and Screen modes, enhancing contrast by darkening dark areas and lightening light areas. This mode is excellent for adding depth and making images pop, making it a popular choice for various photo edits.
Soft Light Mode: Soft Light mode provides a subtle lighting effect by softening light and dark areas. It is used for gentle enhancements, such as smoothing out harsh highlights or adding a soft glow, making images appear more refined and polished.
Using Special Blend Modes
Some blend modes, like Color Dodge and Linear Burn, offer unique ways to interact with the luminosity, hue, and saturation of an image. Color Dodge brightens the base color to reflect the blend color, increasing contrast and making highlights brighter. Linear Burn darkens the base color, enhancing shadows and providing a more intense effect.
Practical Examples with Blending Modes
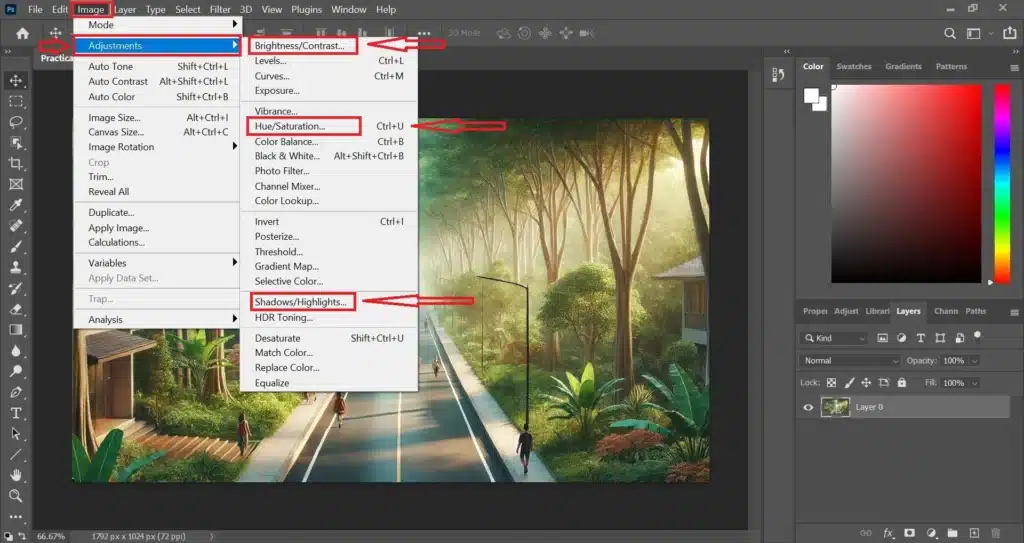
Adjusting Brightness and Contrast
Using blending modes like Overlay on a top layer can enhance both shadows and highlights, providing a balanced and dynamic look.
Creative Color Effects
Blending modes such as Hue and Saturation allow for creative color adjustments. Hue mode shifts the base color to match the blend color, while Saturation mode changes the intensity of colors, useful for stylizing photos.
Adding Texture and Depth
Modes like Hard Light can add texture and depth by combining shadows and highlights in a pronounced way, enhancing the overall texture and making images more engaging.
Tips and Tricks for Using Blending Modes
Blending modes in Photoshop are versatile tools that can significantly enhance your editing process. By mastering Photoshop blending techniques and layer blending options, you can create stunning visual effects. Here are some tips and tricks to help you get the most out of blending options in Photoshop.
Blending Options in Photoshop: Practical Tips
Adjusting opacity and fill levels is crucial. Lowering the opacity allows the underlying layers to show through, creating a more subtle effect. This is particularly useful in urban landscape photography where you might want to blend textures without overpowering the main subject.
Using neutral colors like black and white effectively can enhance blending modes like Darken and Lighten. For example, Darken mode will only change areas lighter than the blend color, adding shadows without affecting the entire image. Learning how to use manual mode on your camera is a game-changer for photographers while doing photoshop editing by themselves.
Leveraging channels helps achieve specific effects. For instance, blending modes on the luminance channel can enhance brightness and contrast without altering colors, which is beneficial for sharpening in Photoshop.
Advanced Techniques with Blending Modes
Grouping layers and applying a blending mode to the group can create a unified effect across multiple layers. This technique benefits wildlife photography where enhancing the overall mood is key without altering individual elements.
Shift colors using blend modes like Hue and Color. These modes alter the color scheme without affecting brightness or contrast, perfect for creative projects.
When editing wildlife photos, blending modes can enhance textures and details. Hard Light mode can bring out the texture in fur or feathers, making the subject stand out more.
Variety of Advanced Technique
Blending modes in Photoshop offer a variety of advanced techniques for enhancing your photos. This blend modes tutorial will help you understand how to use these modes effectively. By mastering these techniques, you can improve your skills in Retail Photography and other photography genres.
Photoshop Blend Effects: Advanced Techniques
One advanced technique is using blending modes with Smart Objects in Photoshop. This allows you to apply non-destructive edits, preserving the original pixels and values of your layers. Smart Objects maintain their integrity, making them ideal for applying multiple blending effects.
Blending modes can also enhance Tilt-Shift Lens effects. For example, using Gaussian Blur with blending modes can simulate the shallow depth of field achieved with a Tilt-Shift Lens. This technique is particularly useful in Retail Photography where you want to highlight specific products while keeping other areas blurred.
Using the Gaussian Blur in Photoshop in combination with blending modes can create soft, dreamy effects. This is great for Long Exposure Landscape Photography, where you want to blend moving elements like water or clouds with static elements. Applying Gaussian Blur from Photoshop blur gallery and using blending modes like Soft Light can enhance the ethereal quality of these photos.
Blending modes can also aid in Photographing a Lunar Eclipse. By combining multiple exposures with different blending modes, you can highlight the lunar surface’s texture and values. This method can reveal details that are not visible in a single exposure, making your Photographing a Lunar Eclipse project more striking.
Practical Examples with Blending Modes
Prime and Zoom Lens: When using different lenses, blending modes can help adjust the visual weight in composition. For example, if you switch from a 35mm to a 50mm lens, blending modes can help balance the image by adjusting light and shadow values.
Retail Photography: In Retail Photography, blending modes can enhance product photos. For example, using Softbox lighting and Umbrella Lighting together with blending modes can highlight products effectively.
Develop Film at Home: When you develop film at home, scanning and digitizing the film can benefit from blending modes. These modes can correct color values, remove dust, and improve the overall quality of the scanned image.
Table of Advanced Blending Modes and Effects
Blending Mode
Effect
Typical Use
Example
Hard Light
Enhances light and dark areas
Texture enhancement
Retail product detail
Soft Light
Softens and enhances midtones
Subtle lighting effects
Long exposure landscapes
Color
Adjusts hue and saturation
Color grading
Lunar eclipse details
Luminosity
Affects luminance values
Sharpening and clarity
Film scan correction
Integrating Blending Modes with Smart Objects in Photoshop
Integrating blending techniques with Smart Objects in Photoshop can significantly enhance your editing capabilities. Smart Objects preserve the original pixel data of your layers, allowing you to apply non-destructive edits. This is particularly useful when working on complex projects where you need to make frequent adjustments.
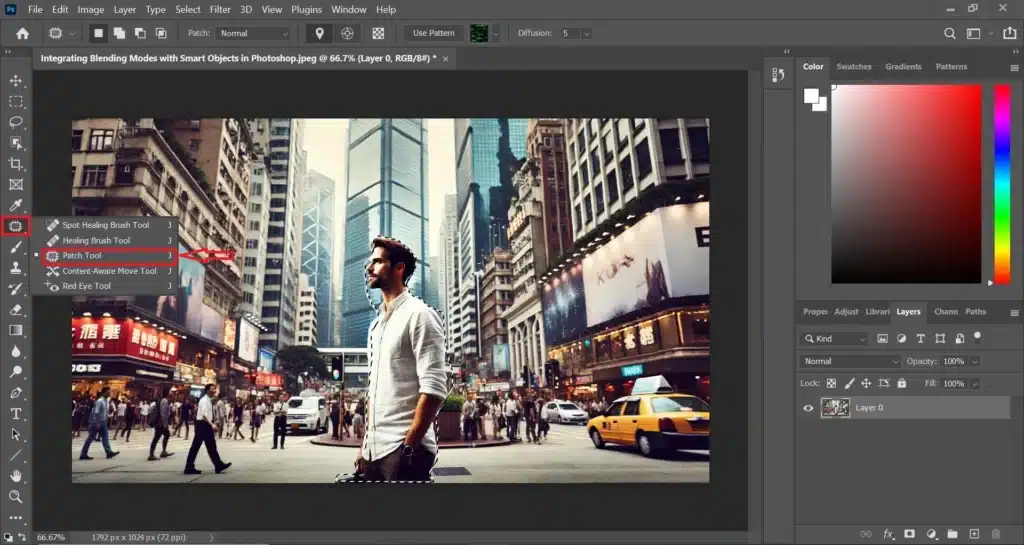
Using Smart Objects for Advanced Editing
To start, convert your layers to Smart Objects by right-clicking the layer and selecting “Convert to Smart Object.” This step ensures that any adjustments you make, such as using the Patch Tool or Content-Aware Fill, do not permanently alter your original content. This is crucial for maintaining high-quality edits, especially in Editorial Photography where precise adjustments are necessary.
Applying Blend Modes
In your Blend Modes Tutorial, you’ll learn that blending techniques can be applied to Smart Objects just like regular layers. However, the advantage of Smart Objects is that you can edit and re-edit the effects without losing quality. For example, if you need to adjust the Aperture Priority Mode effects on your photo, Smart Objects allow you to do so seamlessly.
Practical Examples
Smart Objects are particularly useful in Pet Photography and Portraits in Lightroom. By converting your portrait layers into Smart Objects, you can apply various adjustments such as using the Patch Tool to remove blemishes or adding special effects like Smoke Bomb Photography ideas. This flexibility is also beneficial in Smoke Bomb Photography, where multiple adjustments are often needed to achieve the desired look.
Benefits of Smart Objects
One of the main benefits of using Smart Objects with blend techniques is the ability to maintain high-quality edits. This is especially important when working with high-resolution files from the Best Mirrorless Cameras. Additionally, integrating Blend Modes Tutorial techniques with Smart Objects allows you to experiment with different Photography Lighting Tips without making permanent changes.
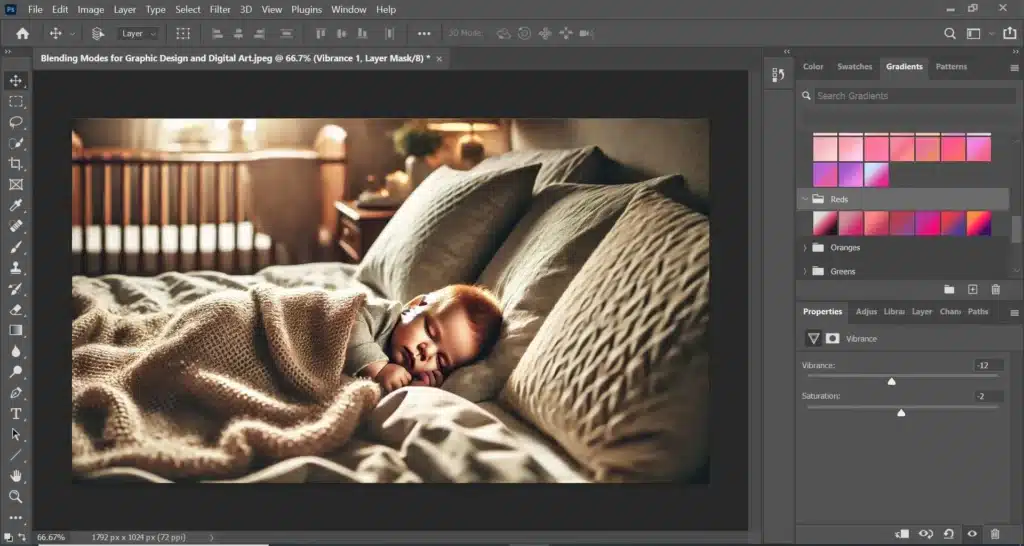
Blending Modes for Graphic Design and Digital Art
Blend techniques in Photoshop are vital for creating compelling graphic designs and digital art. By mastering various blend modes tutorial concepts, you can significantly enhance your creative projects.
Enhancing Textures and Depth
Using blend techniques adds depth and texture to designs. When creating digital art, applying different blend techniques to layers can give a more natural and rich appearance. This is particularly useful for creating shadows and highlights, which make your artwork look more realistic. For example, if you need to remove shadows in Photoshop, blend techniques help blend out harsh shadows seamlessly, maintaining the artwork’s integrity.
Creative Effects and Adjustments
Blend techniques are essential for applying creative effects. Whether you’re working on NFTs and photography or creating a collage in Lightroom, these techniques allow for seamless integration of different elements. You can use the Refine Edge Tool to fine-tune selections and ensure smooth transitions between layers. This is crucial in newborn photography, where soft and delicate transitions are necessary.
Pro Tip: Use the path selection tool to help you when choosing specific parts of an image.
Practical Applications
In digital art, blend techniques help achieve unique visual effects. For example, when working on reviews for the best telephoto lens to buy, blend techniques can highlight specific features of the lens. Additionally, blend techniques are useful for snow photography tips, allowing you to adjust exposure and highlights to bring out the best in snowy landscapes.
Advanced Techniques
For advanced users, blend techniques can be combined with other Photoshop tools to create complex effects. Techniques like removing shadows in Photoshop can be enhanced by using blend techniques to ensure shadows are removed smoothly. Similarly, in Lightroom editing tips, blend techniques can help achieve professional-grade edits by meticulously adjusting layers and effects.
By following these blend modes tutorial tips, you can elevate your graphic design and digital art projects. Whether editing portraits, creating digital paintings, or working on complex compositions, mastering blend techniques will greatly enhance your work.
Transform Your Daily Photos: Using Blending Modes Every Day
Blending modes in Photoshop are powerful tools that can transform your photos and artwork in various creative ways. Here are some real-life examples showcasing how to use these techniques effectively, as explained in many blend modes tutorials.
Enhancing Product Photos
In retail photography, blending techniques can be used to highlight product features. For example, a jewelry photo can benefit from using a Soft Light blend to enhance the sparkle and shine of the metal and gems. This method ensures that the jewelry stands out while maintaining a natural look.
Creating Dramatic Portraits
When working on portraits in Lightroom, you can use blend techniques to add depth and drama. For instance, using a Linear Dodge technique can brighten the eyes and highlights, making the portrait more engaging. Combining this with a Refine Edge tool helps to maintain sharpness around the subject’s features.
Improving Landscape Photos
For long exposure landscape photography, blend techniques can be used to emphasize the movement of water and clouds. By using a Soft Light blend, you can enhance the ethereal quality of the water, making it appear smooth and dreamy. This technique is especially useful when editing photos with high dynamic range.
Correcting Shadows and Highlights
When learning how to remove shadows in Photoshop, blend techniques come in handy. For example, using a Lighten blend can effectively remove unwanted shadows without altering the overall look of the photo. This technique is beneficial for product photos and portraits where shadow correction is needed.
Enhancing Color and Texture
For snow photography, blend techniques can help in emphasizing the brightness and texture of the snow. Using a Linear Light blend can enhance the details in the snow, making it look more vibrant and detailed.
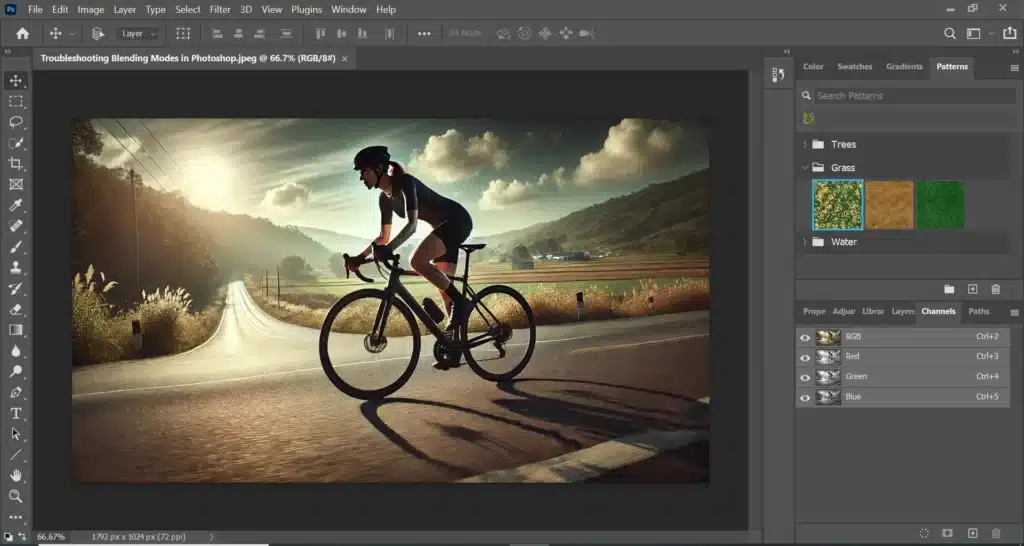
Blending techniques in Photoshop are powerful tools for enhancing your photos and artwork. However, sometimes issues arise when using these techniques. Here are some common problems and their solutions, based on various blend modes tutorial insights.
Photoshop Blend Effects: Common Issues and Solutions
When using blending techniques, you might notice unexpected color changes in your photos. This usually happens because the blend is interacting with the underlying colors in ways you didn’t anticipate. To fix this, check the color channels and adjust them as needed. Sometimes, the issue lies in a specific channel (red, green, or blue). Ensure that you are working with neutral colors like white, black, and gray, which can minimize unwanted color shifts.
Another common issue is the loss of detail, making your photos look flat. To solve this, adjust the opacity of the layer to bring back some of the original detail. You can also use a layer mask to selectively apply the blend, preserving key details in certain areas.
Overcoming Brightness and Darkness Issues
Blending techniques can sometimes make your photos too bright or too dark. This can be adjusted by changing the blend mode and experimenting with different options to find a more balanced result. Additionally, using adjustment layers to correct the brightness and exposure can help achieve the desired look. This method ensures that the overall image remains balanced, with neither overly bright nor excessively dark areas dominating the final result.
Practical Application
When using blending techniques for projects like photographing a Lunar Eclipse or How to Remove Shadows in Photoshop, these troubleshooting tips can help ensure you achieve the desired result. For instance, if your lunar eclipse photo turns out too bright, adjusting the blend mode and using layer masks can help balance the exposure, highlighting the moon’s details.
Blending Modes in Web and UI Design
In web and UI design, blending techniques in Photoshop can greatly enhance visual elements and create dynamic, engaging interfaces. By utilizing various blend modes tutorial concepts, designers can achieve unique effects that improve user experience and interface aesthetics.
Enhancing Text and Icons
Blending techniques can make text and icons stand out or integrate smoothly with the background. For instance, using a Lighten blend can make white text pop against darker backgrounds, ensuring readability. Similarly, Darken blends can help black text remain prominent on lighter backgrounds, making sure that all text elements are easily readable.
Creating Depth and Texture
Blending techniques are essential for adding depth and texture to UI elements. For example, applying a Soft Light blend to buttons or icons can give them a more tactile feel, making them appear more interactive. This method enhances the user experience by providing visual cues about the functionality of different elements.
Using Blending Techniques for Overlays
Overlays in web design often use blend techniques to integrate elements seamlessly. For example, using an Overlay blend can merge a textured background with a UI element, creating a cohesive look without overpowering the main content. This technique is particularly useful for background textures or subtle effects that add to the overall design without distracting the user.
Table of Blending Techniques in Web and UI Design
Technique
Effect
Typical Use
Example
Lighten
Makes lighter colors more prominent
Highlighting text on dark backgrounds
Ensuring white text stands out on black backgrounds
Darken
Makes darker colors more prominent
Highlighting text on light backgrounds
Ensuring black text stands out on white backgrounds
Soft Light
Adds subtle texture and depth
Enhancing buttons and icons
Making buttons appear more interactive
Overlay
Integrates elements with background
Creating cohesive overlays
Merging textured backgrounds with UI elements
FAQs about Blending Modes in Photoshop
What are blending modes in Photoshop?
Blending modes in Photoshop are functions that determine how layers interact with each other. They control how the colors and textures of one layer blend with those of another layer, affecting the overall appearance of the combined layers. Blending modes are crucial for enhancing shadows, highlights, and colors in your photos. Each mode has a specific function that alters the way pixels combine, enabling various artistic effects.
What is the blending tool in Photoshop?
The blending tool in Photoshop is not a single tool but a combination of blending modes and layer adjustments available in the Layers panel. By selecting different blending modes from the dropdown menu (such as Darken, Lighten, Color, and Luminosity), you can blend layers in different ways to achieve desired effects. These tools allow for detailed control over how different elements in your project merge and interact.
What are the 4 most popular blend modes in Photoshop?
The four most popular blend modes in Photoshop are:
Darken: This mode compares each pixel of the blend layer and base layer, retaining the darker pixel values.
Lighten: This mode does the opposite of Darken, keeping the lighter pixel values.
Color: This mode changes the hue and saturation of the base layer while keeping the luminance values intact.
Luminosity: This mode affects only the luminance, or brightness, of the base layer, leaving the hue and saturation unchanged.
These modes are frequently used because they offer versatile and powerful ways to enhance and adjust photos.
What are the blending modes in processing?
Blending modes in processing, particularly in image editing software like Photoshop, refer to how different layers are combined based on their pixel values. Modes such as Darken, Lighten, Color, and Luminosity control how the layers interact. They are used to achieve various visual effects, from subtle shading and highlighting to more dramatic color shifts and texture enhancements. These blending techniques are essential for tasks like photo editing, graphic design, and digital art creation.
Conclusion
In my own experience as a web and UI designer, mastering blending techniques in Photoshop has been transformative. I remember working on a project where the client wanted their website to have a seamless blend of textures and interactive elements. By applying the techniques I learned from various blend modes tutorials, I was able to create a visually stunning interface that not only met but exceeded their expectations. Using light and dark blends effectively made the text readable and ensured that important elements stood out, significantly enhancing the user experience.
If you’re eager to improve your Photoshop and Lightroom skills and apply these techniques in your own projects, I highly recommend our comprehensive courses. Our Photoshop course and Lightroom course are designed to provide you with in-depth knowledge and practical skills. Whether you’re a beginner or looking to refine your expertise, these courses will help you master the tools and techniques needed for professional-grade design and editing.
If this article has helped you, then Like and Share it with your friends!
$2,061.00Original price was: $2,061.00.$1,061.00Current price is: $1,061.00. 27639
Download Your Free Guide Now!
Discover the secrets of photography with our printable guide! Master essential techniques like aperture, shutter speed, and ISO to create stunning images. Get your free printable PDF now and start turning your snapshots into masterpieces!