Introduction to Smart Objects in Photoshop
Smart Objects in Photoshop represent a powerful feature designed for both novice and experienced users aiming to elevate their digital artwork. By utilizing Smart Objects, Photoshop enthusiasts can harness a layer’s full potential, enabling non-destructive edits and sophisticated manipulation with ease. This innovative feature allows users to scale, rotate, and modify a layer without compromising the original image quality, a significant advantage for those who demand precision and flexibility in their editing process.
Initially introduced to cater to the evolving needs of graphic designers and photographers, Smart Objects simplify complex workflows by maintaining an image’s source content with all its primary characteristics. This means any transformations applied to a Smart Object can be adjusted at any stage of the editing process, providing an unparalleled level of control.
Table of Contents
How to Create and Convert Smart Objects in Photoshop
Creating Smart Objects
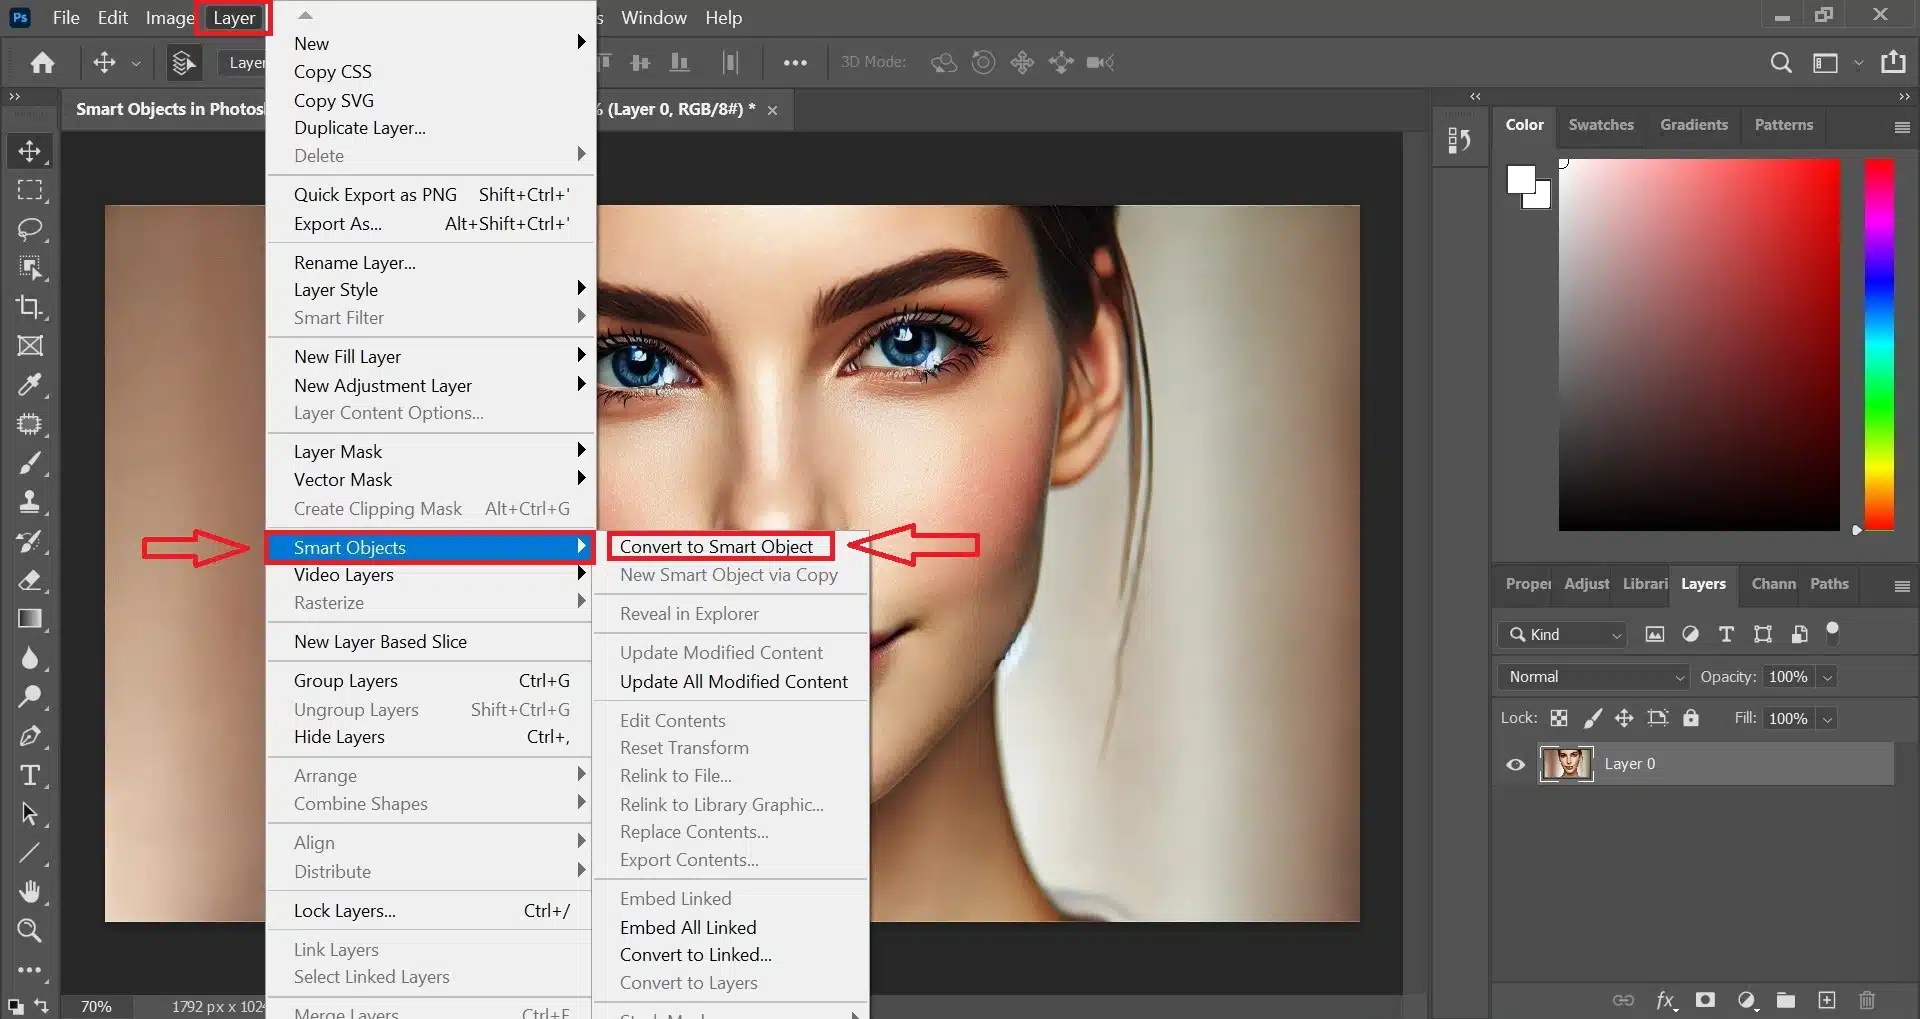
Smart Objects are essential tools in Photoshop that allow you to maintain the highest excellence of your images while enabling complex adjustments. To create a Smart Object, you can start by selecting a layer or group of layers in your document. Right-click on the selected layer and choose Convert to Smart Object. This conversion encapsulates the genuine properties of the image or images, ensuring that any transformations applied do not degrade the primary pixels.
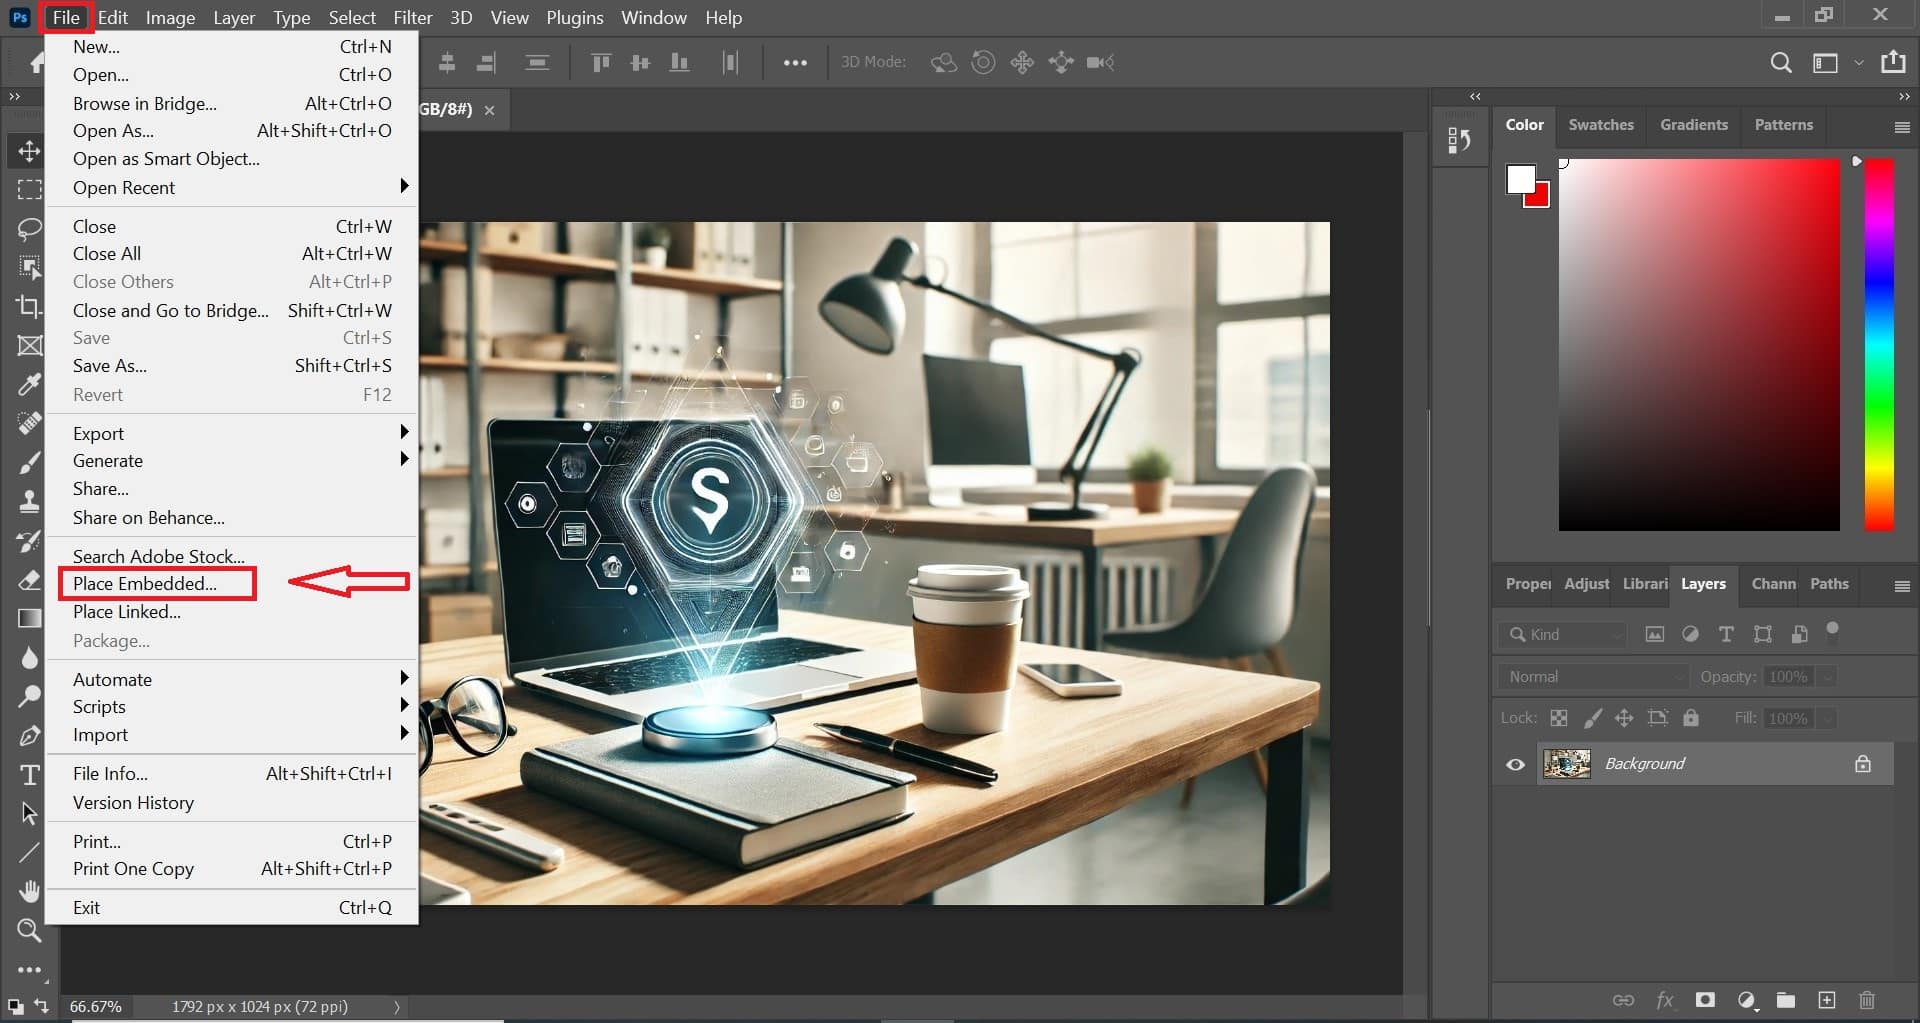
For designers working with multiple files, another method to create a Smart Object is through the File menu. Go to File > Place Embedded or Place Linked to insert an external image file directly into your current Photoshop document as a Smart Object. ‘Place Embedded’ incorporates the entire file within the document, while ‘Place Linked’ creates a reference to the file’s location on your computer, keeping the document size smaller and allowing for updates that reflect across all linked instances.
Converting Existing Layers to Smart Objects
When you have existing layers that need the flexible, non-destructive capabilities of Smart Objects, converting them is just a click away. Select the layer or layers you wish to convert, then right-click and choose Convert to Smart Object. This is particularly useful when dealing with layers that involve detailed refining and frequent adjustments.
- Non-Destructive Editing: Every filter or transformation you apply to a Smart Object is non-destructive, meaning you can edit or remove it later without any permanent change to the primary layers.
- Manage Complex Compositions: By converting multiple layers into a single Smart Object, you can manage and edit complex compositions more efficiently. This is ideal for scenarios where different elements like text, images, and graphics must be adjusted collectively. Smart layers in Photoshop function as a cornerstone for sophisticated image refining, allowing you to manage complex graphics without compromising the integrity of the authentic files.
Smart Filters are another advantage of using Smart Objects. Once your layer is a Smart Object, any filter applied becomes a Smart Filter, allowing you to go back and adjust its settings at any time without starting over. Learn about the How to edit wildlife Photos!
Benefits of Using Smart Objects in Digital Modification
1. Enhanced Flexibility with Smart Layers
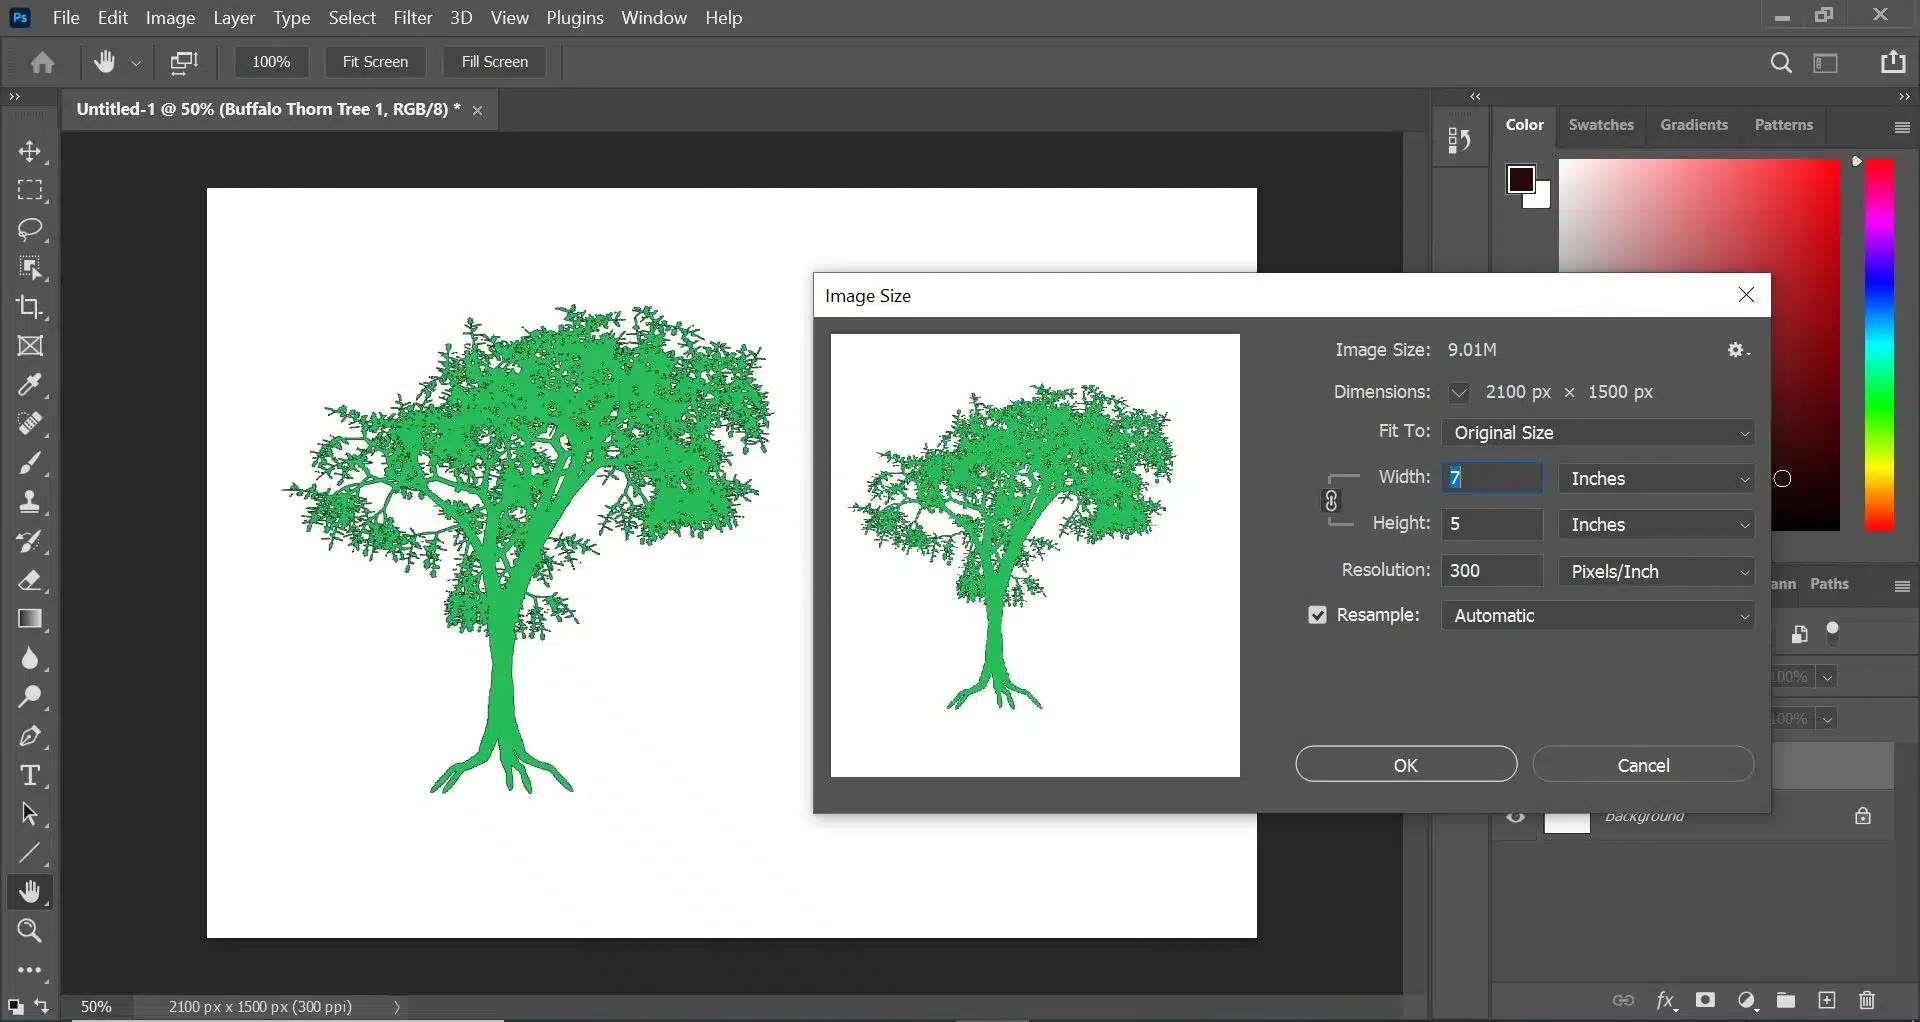
Smart Objects revolutionize how designers approach complex projects by offering unmatched flexibility. When you convert a layer into a Smart Object in Photoshop, it preserves the primary attributes, allowing unlimited scalability without loss of quality. This feature of Smart Layers not only simplifies resizing and transforming images but also ensures that every adjustment is reversible, catering to the dynamic needs of digital modification.
2. Efficient Workflow with Smart Editing
Smart Editing is at the core of using smart objects. Each smart object acts as a container that holds your image data, effects, and transformations. This encapsulation allows you to apply non-destructive refines, meaning you will experiment with different effects without altering the primary layer permanently. Whether adjusting the color balance, applying complex filters, or testing various compositions in photography, smart objects provide a safety net that encourages creative exploration with the assurance of faultless reversibility.
3. Consistency and Control with Smart Object Features
Smart Objects enhance consistency across multiple documents. By using Linked smart objects, you can maintain a single source file that updates all linked instances across your Photoshop documents whenever you make changes. This is particularly beneficial for branding elements like logos or specific graphics used across various marketing materials. Maintaining consistency becomes effortless, as updates are automatically synchronized, ensuring all materials are up-to-date without manual adjustments.
4. Streamlined Processes with Smart Workflow
Incorporating smart objects into your refining routine leads to a Smart Workflow, where efficiency and effectiveness are maximized. Managing complex alters, such as blending multiple images or creating detailed composites, is more organized where you can manage or wrap text, images, and graphics. Layers can be adjusted, swapped, or modified without disrupting the overall composition. For those working in environments where revisions are frequent, smart objects offer a structured approach that minimizes errors and streamlines the revision process.
Utilizing smart objects in Photoshop not only elevates the quality of your digital creations but also enhances your productivity, ensuring every project benefits from advanced techniques that are both time-saving and result-enhancing. This integration of Smart Layers, Smart Editing, and Smart Workflow into your digital toolkit transforms challenges into opportunities, making complex modifications simpler and more intuitive.
Editing Techniques with Smart Objects

Refining Edits with Non-Destructive Techniques
Smart Objects are a cornerstone in Photoshop for professionals who prioritize quality and flexibility in their workflow. By leveraging smart objects, you can apply complex refines without permanently altering the original files. This non-destructive approach allows for endless creativity and experimentation with image adjustments.
When working with smart objects, choose your alters from the vast array of Photoshop enhancements. Each filter applied to a smart object turns into a Smart Filter, allowing for easy adjustments or removal at any time. Using Editable Objects streamlines the workflow significantly, as it reduces the need to recreate assets and allows for quick adaptations to client feedback or creative direction shifts. This flexibility is crucial when refining the visual elements of a project, as it permits you to test different settings without the risk of degrading the original image.
Utilizing the Layers Panel for Enhanced Workflow
The Layers panel in Photoshop becomes even more powerful when you work with Smart Objects. For instance, if you need to combine effects or adjust the blending modes, simply access the Layers panel and choose the appropriate settings for your Smart Object. This method ensures that all modifications are manageable and reversible, enhancing the overall Smart Workflow.
Seamless Integration with Camera Raw
Smart Objects seamlessly integrate with Camera Raw, providing an efficient way to edit raw files. Open your unprocessed images directly into Camera Raw and, from there, convert them into smart objects before moving them into Photoshop. This technique allows you to harness the powerful modifying capabilities of Camera Raw with the flexibility of smart objects. Adjust long exposure, contrast, color, and more, all while retaining the ability to revisit and modify these settings anytime without any loss of caliber.
Automating Repetitive Tasks
For repetitive tasks, smart objects can be remarkably effective. Create a Smart Object that contains the adjustments or affects you frequently use and apply these smart objects across numerous files in your project. This standardization not only saves time but also ensures consistency throughout your work, which is particularly beneficial in projects requiring a unified look across various media.
Smart Filters: Extending the Functionality of Smart Objects
Smart Filters represent a pivotal advancement in Photoshop, offering unparalleled flexibility and control over non-destructive adjustments. These modifications allow you to apply complex visual effects and modifications to smart selections without permanently altering the underlying data. This capability ensures that your original content remains intact, providing both safety and versatility in your creative process.
Enhancing Images with Smart Filters
When you choose to use Smart Filters, you can experiment with a variety of effects without the risk of permanently modifying your original images. To start, simply open your image as a smart object, then select a filter from the vast array of tools available in Photoshop using the object selection tool. Whether adjusting the color balance, applying blur effects, or enhancing sharpness of image, Smart Filters make these tasks reversible and adjustable at any stage of your workflow.
Integration with Camera Tools
Smart Filters are especially beneficial when combined with camera data for professional photographers and designers working with original images. Open your unprocessed files in Camera Raw, and then bring them into Photoshop as smart objects. This process allows the application of Smart Filters directly onto the camera data, enabling detailed refinement while preserving all the genuine image attributes.
Workflow Flexibility on Various Devices
With the integration of Adobe Photoshop on platforms like the iPad, Smart Filters enhance mobile workflows, allowing creative professionals to refine their projects on the go. Adjusting filter settings and applying effects can now be done with the same depth as on a desktop but with the ease of a touch interface. This flexibility ensures that your creative process is fluid and continuous, regardless of the device you use.
Below is a table showcasing various Smart Filters, their typical uses, and benefits, providing a clear overview of how these tools extend the functionality of Smart Objects:
| Smart Filter | Use Case | Advantages | Best for Device |
|---|---|---|---|
| Gaussian Blur | Softening image details | Easily adjustable; perfect for refining focus and adding noise and depth | Desktop & iPad |
| High Pass | Sharpening edges | Enhances edge details without affecting overall image harmony | Desktop |
| Hue/Saturation | Color correction | Offers precise control over color tones | Desktop & iPad |
| Camera Raw Filter | Comprehensive image adjustments | Access to all Camera Raw adjustments in a non-destructive layer | Desktop |
Common Challenges and Solutions with Smart Objects
1. Navigating Nondestructive Transformations
One common hurdle in utilizing Smart Objects in Photoshop involves nondestructive transformations, such as scaling, rotating, or warping a photo. While Smart Objects preserve the original data, these operations can sometimes lead to unexpected results or performance slowdowns, particularly with large images.
Solution: To mitigate these issues, frequently save your progress and manage image resolutions wisely. Implementing Smart Layers effectively also helps by maintaining organization and reversibility, enhancing the Smart Workflow, and ensuring that transformations are handled smoothly.
2. Streamlining Smart Layer Adjustments
Applying modifications with Smart Objects can complicate the refining process, especially when layer adjustments do not produce the expected outcomes. Since Smart Objects allow for nondestructive modifications, they can be revised and tailored without altering the original layer.
Solution: Embrace smart editing by methodically adjusting layer settings. Utilize the Layers panel to individually tweak or reset each adjustment, thus maintaining flexibility and control within your Smart Workflow.
3. Integrating Layer Masks with Smart Objects
Combining layer masks with Smart Objects presents challenges, particularly when you attempt to directly apply a mask to a Smart Object, which can limit the ability to independently adjust the mask.
Solution: Create a standalone layer for the mask to maintain flexibility. This separation allows for independent modifications of the mask without affecting the Smart Object. This strategy promotes a versatile Smart Workflow and supports more advanced smart editing practices.
4. Duplicating and Reutilizing Smart Objects
The need to copy and reuse Smart Objects across various projects can introduce complications, particularly when updates to the original Smart Object need to be reflected in all duplicates.
Solution: Use Linked Smart Objects for elements that require uniformity across numerous documents. This setup ensures that any adjustments to the original are automatically updated across all instances, fostering a consistent Smart Workflow and ensuring that Smart Layers are uniformly adjusted.
5. Optimizing File Size and Performance
Managing file size and system performance becomes crucial when dealing with extensive use of Smart Objects, especially when many non-destructive modifications are applied.
Solution: Limit the use of Smart Objects to those layers essential for nondestructive modifications. Periodically consolidate Smart Layers that no longer require separate adjustments. This practice enhances the Smart Workflow by maintaining system performance while still leveraging the flexibility of Smart Editing.
6. Enhancing Smart Workflow Efficiency
Keeping a Smart Workflow efficient can be challenging with complex projects that utilize many Smart Objects and Smart Layers. Managing these elements efficiently is key to maintaining project momentum and accuracy.
Solution: Organize your Photoshop workspace by clearly categorizing Smart Objects into well-defined Smart Layers. This organization aids in quickly locating and adjusting specific elements, streamlines the application of non-destructive modifications, and facilitates quicker overall project progression.
Advanced Uses of Smart Objects for Professional Projects

Elevating Composite Photo Creation
Smart Objects are instrumental in creating high-level composite images, allowing professionals to seamlessly combine elements from various sources. By using Smart Objects, you can transform and adjust individual components without losing the integrity of the original contents. This capability is crucial when precision and nondestructive modifications are required to blend elements naturally.
Streamlining Design Iterations
In professional environments, where client feedback often leads to numerous iterations of a design, Smart Objects can significantly streamline the revision process. By storing the original assets as Smart Objects, you can easily revert to the initial versions or explore new directions without the need to start from scratch.
Maintain a library of commonly used assets as Smart Objects. This approach saves significant time and ensures consistency across different versions of a project. Leveraging Smart Layers allows quick swaps and adjustments, crucial for rapid testing of new ideas within a robust Smart Workflow.
Enhancing Motion Graphics with Smart Objects
For creative professionals working in motion graphics, Smart Objects provides a bridge between Photoshop and video directing software. By preparing graphics as Smart Objects, you ensure that every copy used in the timeline retains its resolution and can be updated globally.
Utilize Linked Smart Objects to maintain synchronization between assets used in different compositions. Changes made to a single Smart Object can be reflected across all instances in the video project, thus facilitating a dynamic and efficient Smart Workflow.
Automating Repetitive Tasks
Smart Objects can automate repetitive tasks in large-scale projects, such as graphic updates across many campaign materials or web design elements. By incorporating actions and scripts that target smart objects, designers can apply modifications across an array of copies, ensuring uniformity and coherence.
Develop custom scripts to automate transformations and updates to Smart Objects. This strategy maximizes efficiency and ensures that all modifications are carried out uniformly, reinforcing a streamlined smart workflow and reducing manual labor.
Leveraging Smart Objects for Testing and Prototyping
Smart Objects are invaluable for professionals who engage in testing and prototyping different design scenarios. By using Smart Objects, designers can swiftly swap contents and simulate how a design would appear under various conditions or in different formats.
Set up a prototype with interchangeable Smart Objects to test different design elements such as logos, banners, or user interface components. This flexible setup allows rapid adjustments and precise transformations, providing immediate feedback and accelerating the design process within an effective Smart Workflow.
FAQs About Smart Objects in Photoshop
Should you always use Smart Objects in Photoshop?
Using Smart Objects in Photoshop is highly beneficial for maintaining flexibility and nondestructive editing capabilities in your workflow. However, they are not necessary for every task. For simple edits that don’t require resizing or repeated modifications, regular layers may suffice.
Are Smart Objects Destructive in Photoshop?
No, Smart Objects are nondestructive. This means that any transformations, adjustments, or applied effects can be edited or remove an object at any time without permanently altering the original image. This feature allows you to experiment and make revisions without the risk of losing the original details or quality of your images.
How do you use Smart Objects in Photoshop Elements?
Using Smart Objects in Photoshop Elements is similar to their use in Photoshop. You can create a Smart Object by right-clicking on a layer and selecting “Convert to Smart Object.” This allows you to perform nondestructive refines, such as scaling, rotating, or applying adjustments. However, the functionalities may be slightly limited compared to the full version of Adobe Photoshop. It focuses mainly on basic transformations and adjustments.
What is a raster smart object in Photoshop?
A raster Smart Object in Photoshop refers to a Smart Object created from raster images, such as JPEGs or PNGs. When you convert a raster image into a Smart Object, you can perform nondestructive transforms and apply enhancements without losing the original image caliber.
Conclusion
In my own experience, embracing the use of Smart Objects in Photoshop has revolutionized the way I approach digital editing. For instance, I once worked on a complex digital painting that required frequent adjustments to various elements without losing detail or compromising the overall composition. By converting my layers into Smart Objects, I was able to scale, transform, and apply numerous adjustments nondestructively. This not only saved me countless hours but also preserved the integrity of my original vision, allowing for endless creativity and precision.
Smart Objects are undoubtedly a powerful tool in any digital artist’s arsenal, providing the flexibility to explore creative possibilities with confidence. If you’re looking to deepen your understanding and mastery of Adobe Photoshop or Lightroom, consider enrolling in our comprehensive courses. These are designed to help you enhance your skills, whether you’re a beginner looking to learn the basics or an experienced professional aiming to refine your techniques. Explore our Photoshop course and Lightroom course to start your journey toward mastering these essential tools and bringing your creative visions to life.
If this article has helped you, then Like and Share it with your friends
Have a nice photoshoot!
Learn more about Photo Editing with Lightroom and Photoshop: