Gaussian Blur in Photoshop: Master the Perfect Blur Effect
Gaussian Blur in Photoshop: Master the Perfect Blur Effect
Introduction
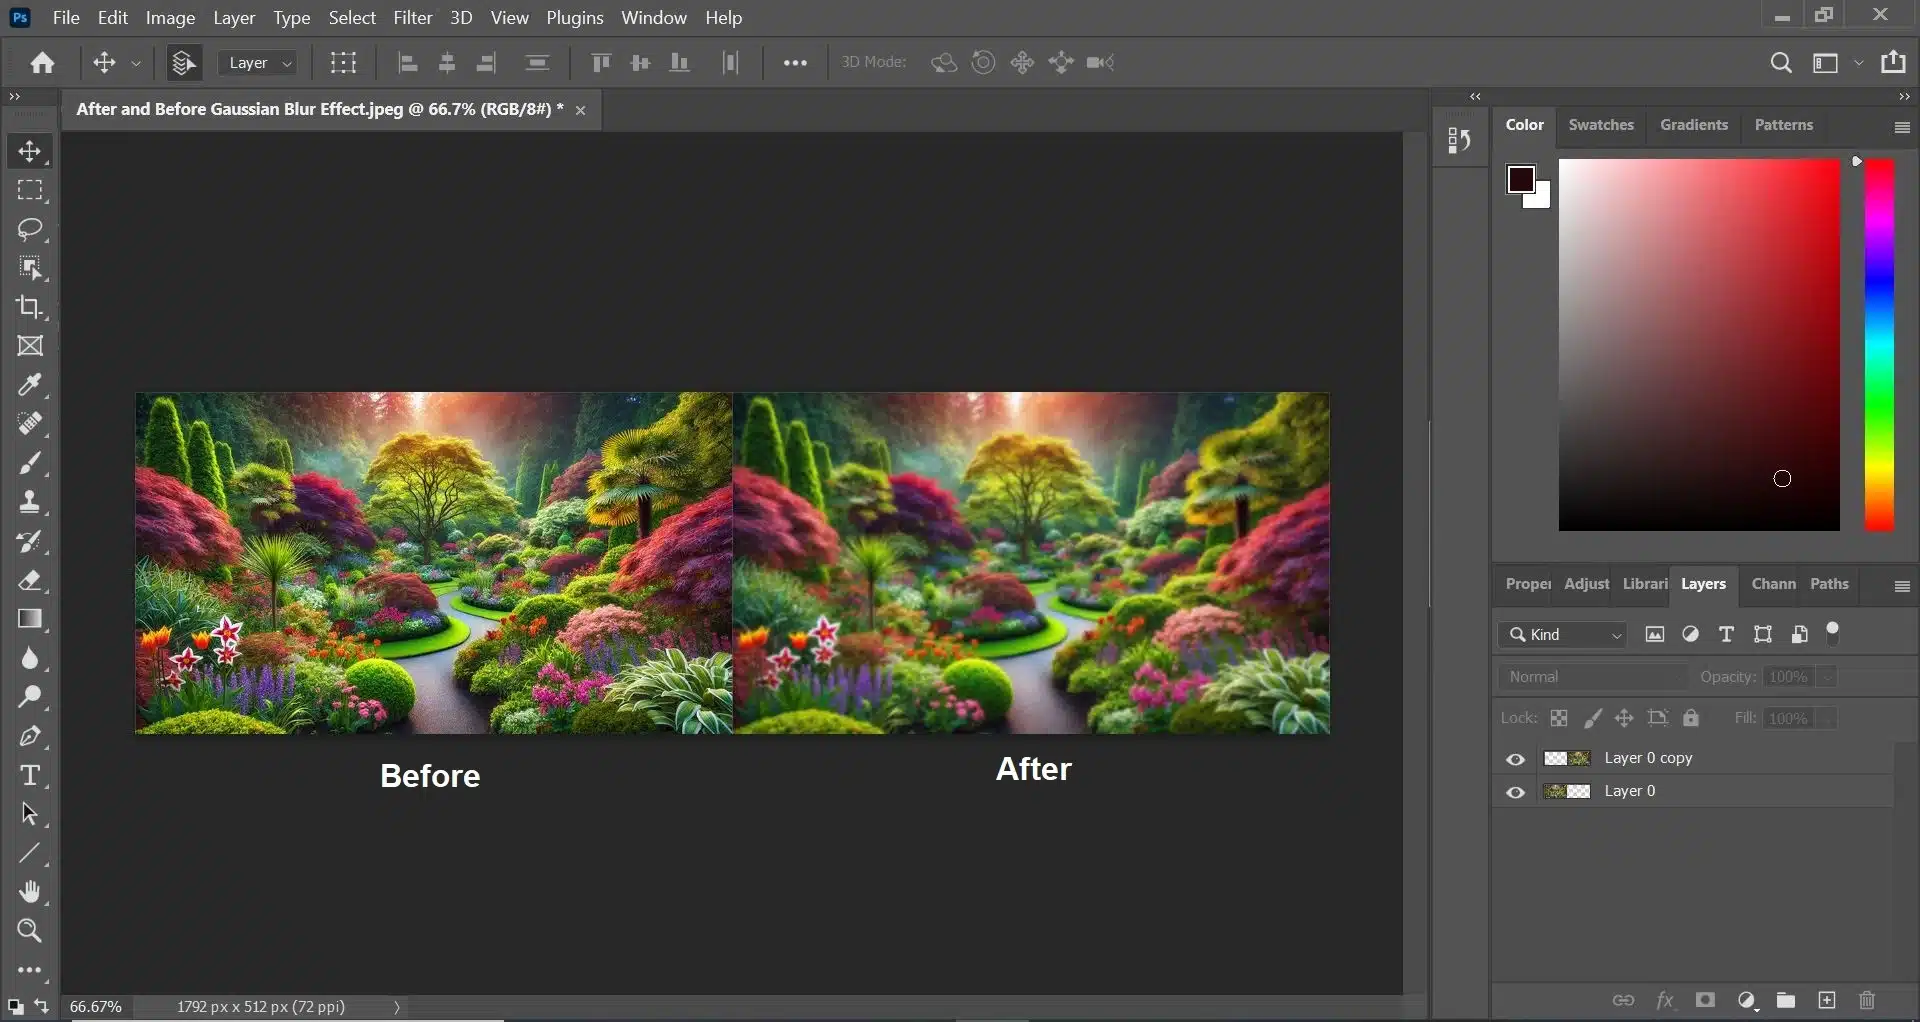
Gaussian Blur in Photoshop is a powerful feature used to enhance images by executing a uniform blur effect. This technique, often referred to as a Gaussian filter, helps to reduce noise and create a more polished look. For instance, photographers frequently use Photoshop blur to soften backgrounds, making the subject of the image stand out more prominently.
A practical example of Gaussian Blur’s application is in portrait photography. Imagine a photo where the background is cluttered and distracting. By implying the Gaussian blur effect, you can create a soft, out-of-focus background that emphasizes the subject’s face. This not only improves the overall aesthetics but also guides the viewer’s attention to the most important part of the image. Whether you’re a beginner or an experienced user, mastering the Gaussian Blur in Photoshop can significantly enhance your photo editing skills. And this is what I would like to teach you in this tutorial.
Table of Contents
Why Use Gaussian Blur in Your Images?
Enhancing Images with Photoshop Gaussian Filter
The Photoshop Gaussian filter is an essential feature for photographers and designers who want to improve the quality of their images. It helps to reduce noise and soften edges, creating a more professional look. For instance, in landscape photography, using the Gaussian filter can make the sky look flatter and less grainy, enhancing the overall aesthetic appeal. This feature is also valuable for eliminating minor imperfections in images, ensuring that the final product looks clean and polished.
Creating Depth with Photoshop Blur Effect
The Photoshop blur effect is particularly useful for creating depth in images. To blur the background, you can make the subject stand out more clearly. This technique is widely used in portrait photography to keep the focus on the subject while making the background less distracting. Additionally, the blur effect can be used to simulate a shallow depth of field, which is often challenging to achieve with certain camera settings. This makes it easier to highlight specific areas of an image, directing the viewer’s attention precisely where you want it.
Useful and Proven Tips with Gaussian Blur
Enhancing with Photoshop Image Blur
When working with Photoshop image blur, you can execute advanced techniques to achieve more refined results. For example, using smart objects allows for non-destructive editing, meaning you can make changes without altering the exclusive content. To do this, convert your layer to an object before implying Gaussian Blur in Photoshop. This way, you can adjust the motion blur settings later if needed.
Another technique involves using multiple layers and precise selections to create depth. By duplicating the background layer, you can selectively blur parts of an image while sharpening the other parts. For instance, you may choose to blur the background while keeping the foreground in focus. This method is particularly useful in portrait photography.
Technique
Description
Use Case
Benefit
Tool Required
Smart Objects
Convert layer to astute object for non-destructive editing
Using the Photoshop blur feature to backgrounds can significantly enhance the focus on the main subject of your image. For instance, in portrait photography, using a Gaussian filter to blur the background can make your subject stand out sharply against a soft, uniform backdrop. This technique is also popular in astrophotography, where blurring the sky can emphasize celestial objects.
Creating Smooth Backgrounds with Image Smoothing
Image smoothing with Gaussian Blur is essential for achieving a professional look in various types of photography. Whether you’re working with street photography or portrait photography ideas, using the blur feature to soften backgrounds can reduce distractions and enhance the overall composition. To do this, select the background layer, duplicate it, and then use the Gaussian Blur filter. This approach allows you to refine your edits without affecting the novel image.
Refining Edges with Selection and Mask Tools
For more precise control, use selection and mask tools before using the Gaussian Blur in Photoshop. This method works well for photojournalism, where maintaining the integrity of the main subject is crucial. By creating a clean selection around the subject and executing the blur effect to the background, you ensure that the focus remains on the important elements of your image. Additionally, using dodge and burn techniques can further enhance the contrast between the blurred background and the sharp subject.
Technical Benefits of Gaussian Blur for Background Effects
Technique
Description
Benefit
Tool Required
Background Blur
Execute Gaussian Blur to the background layer
Emphasizes main subject
Gaussian filter
Image Smoothing
Smooth out noise and distractions in the background
Cleaner, professional look
Blur Technique
Selection and Masking
Use selection and mask feature to control blur application
Precise control
Selection tools
Dodge and Burn
Enhance contrast between blurred background and subject
Better subject focus
Dodge and burn tools
Advanced Techniques with Gaussian Blur
Refining Photos with Layer Techniques
When working with advanced techniques in Lightroom, it’s essential to make duplicates of your original layer. This way, you maintain the integrity of the image while experimenting with effects. To start, right-click the layer and click “Duplicate Layer.” This creates a new layer to work on, allowing you to revert back if needed.
Adding Depth with Masking
Using masks can significantly improve the detail and depth in your images. By masking certain areas, you can add subtle effects without altering the entire photo. This method is part of creating a respectful and kind editing environment where changes are non-destructive. Apply masks to focus on specific parts of your photo, enhancing only what needs improvement.
Enhancing Photos with Color Adjustments
Adjusting colors can translate to better-looking photos. Use the adjustment layers to tweak colors, brightness, and contrast. This process can upvote the quality of your photo, making it more appealing. Be sure to follow community guidelines for proper color usage and respect the original tone and mood of the image.
Quick Workflow with Keyboard Shortcuts
To speed up your editing workflow, familiarize yourself with Photoshop’s keyboard shortcuts. For example, using shortcuts to click through different layers and tools can save time. This quick access improves efficiency and helps maintain a smooth editing process.
Find out the most relevant details in the given table:
Technique
Description
Use Case
Benefit
Tool Required
Layer Duplication
Create duplicates to apply selective effects
Portraits, product photos
Focus on main subject
Layers panel
Masking
Use masks to refine effects application
Complex photos
Precise control
Masks tool
Color Adjustments
Adjust colors, brightness, and contrast
Various types of photos
Enhanced photo quality
Adjustment layers
Smart Objects
Convert layers to smart objects for non-destructive editing
All photo types
Adjustable settings
Smart objects option
FAQs on Gaussian Blur in Photoshop
What is the Gaussian blur function?
The Gaussian blur function is used in photo editing to smooth and soften the details in an image. It works by averaging the pixel values in a specified radius, which helps reduce noise and harsh edges. This function will make your images look more cohesive and polished. It’s important to follow community guidelines and give credit when using this technique in your work. When posting your edited images, ensure you acknowledge any sources.
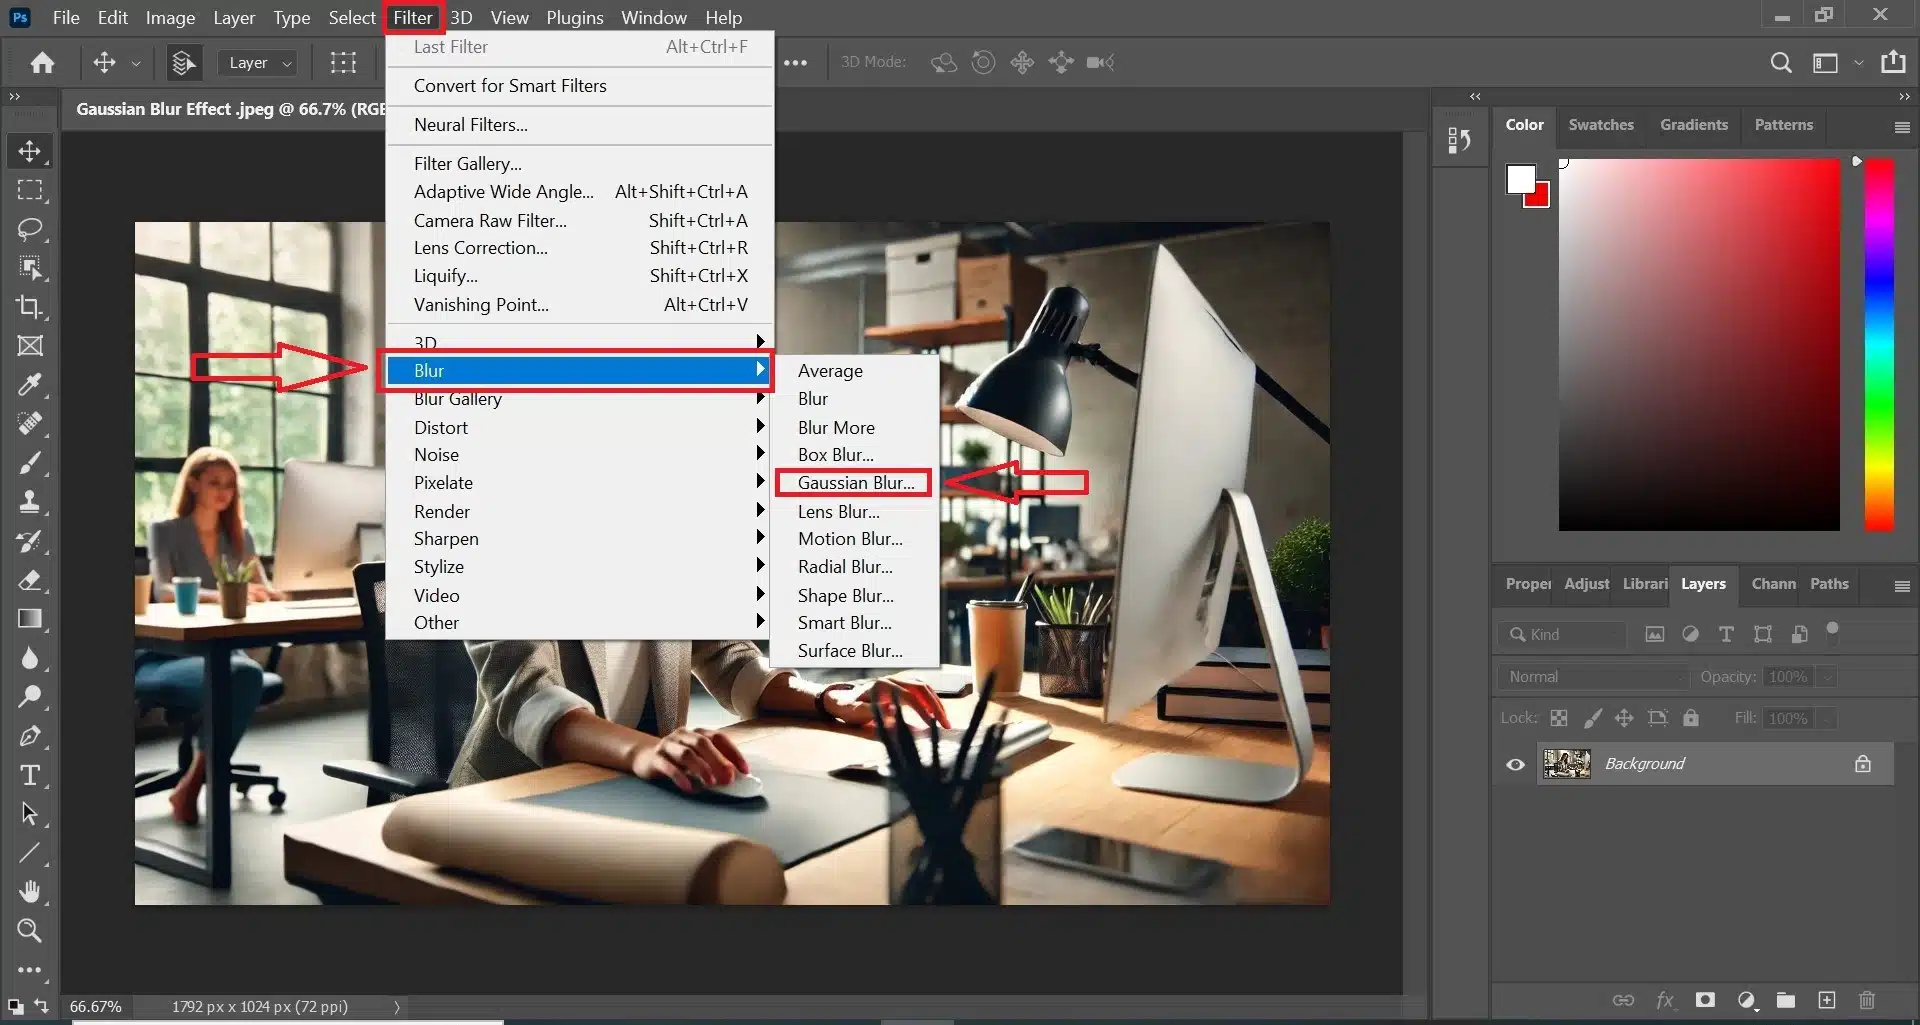
How do you create a Gaussian blur effect?
To create a Gaussian blur effect in Photoshop, follow these steps:
Report the Layer: Duplicate the layer to preserve the original image.
Add the Effect: Go to the Filter menu, choose Blur, and then select Gaussian Blur.
Adjust Settings: Adjust the radius slider in the dialog box to control the intensity of the effect.
Click OK: Apply the changes by clicking OK.
This process will help you achieve a smooth and professional look. Remember to keep track of your edits using a clipboard.
How to use the Gaussian blur Tool?
Using the Gaussian blur tool in Photoshop is simple:
Open the image: Load your image into Photoshop.
Create a Duplicate: Duplicate the layer to ensure the original content remains unchanged.
Apply the Effect: Go to Filter > Blur > Gaussian Blur.
Adjust Radius: Adjust the radius in the dialog box to get the desired level of smoothness.
Click OK: Confirm the effect by clicking OK.
This method ensures that the effect is applied non-destructively. Always be respectful and kind in your community posting and follow ecosystem guidelines.
What is the shortcut for Gaussian blur in Photoshop?
The shortcut for applying Gaussian blur in Photoshop is Ctrl+F (Windows) or Cmd+F (Mac). This command re-applies the last used filter, making it a quick way to add the effect again. For the initial application, you may need to navigate through the Filter menu manually. Using shortcuts can streamline your workflow and save time. Be sure to give credit to any sources you use and respect the community guidelines when sharing your edits online. This will help you gain positive votes and support from the community.
Conclusion
In my experience, mastering advanced techniques with Gaussian Blur in Photoshop has significantly improved my editing skills. I recall working on a wildlife photography where the background was too distracting. By duplicating the layer and using astute objects, I was able to apply Gaussian Blur selectively, enhancing the focus on the animal without affecting the entire image. This method not only improved the overall quality but also maintained the integrity of the image.
If you’re looking to elevate your photo editing skills, I highly recommend exploring our comprehensive courses. Our Photoshop course and Lightroom course offer in-depth tutorials and practical tips to help you achieve professional results. Sign up today and transform your editing workflow with expert guidance.
If this article has helped you, then Like and Share it with your friends
Facebook
Twitter
LinkedIn
Pinterest
Have a nice photoshoot!
Learn more about Photo Editing with Lightroom and Photoshop:
Discover the secrets of photography with our printable guide! Master essential techniques like aperture, shutter speed, and ISO to create stunning images. Get your free printable PDF now and start turning your snapshots into masterpieces!