Content-Aware Fill in Photoshop: A Guide to Effortless Editing
Content-Aware Fill in Photoshop: A Guide to Effortless Editing
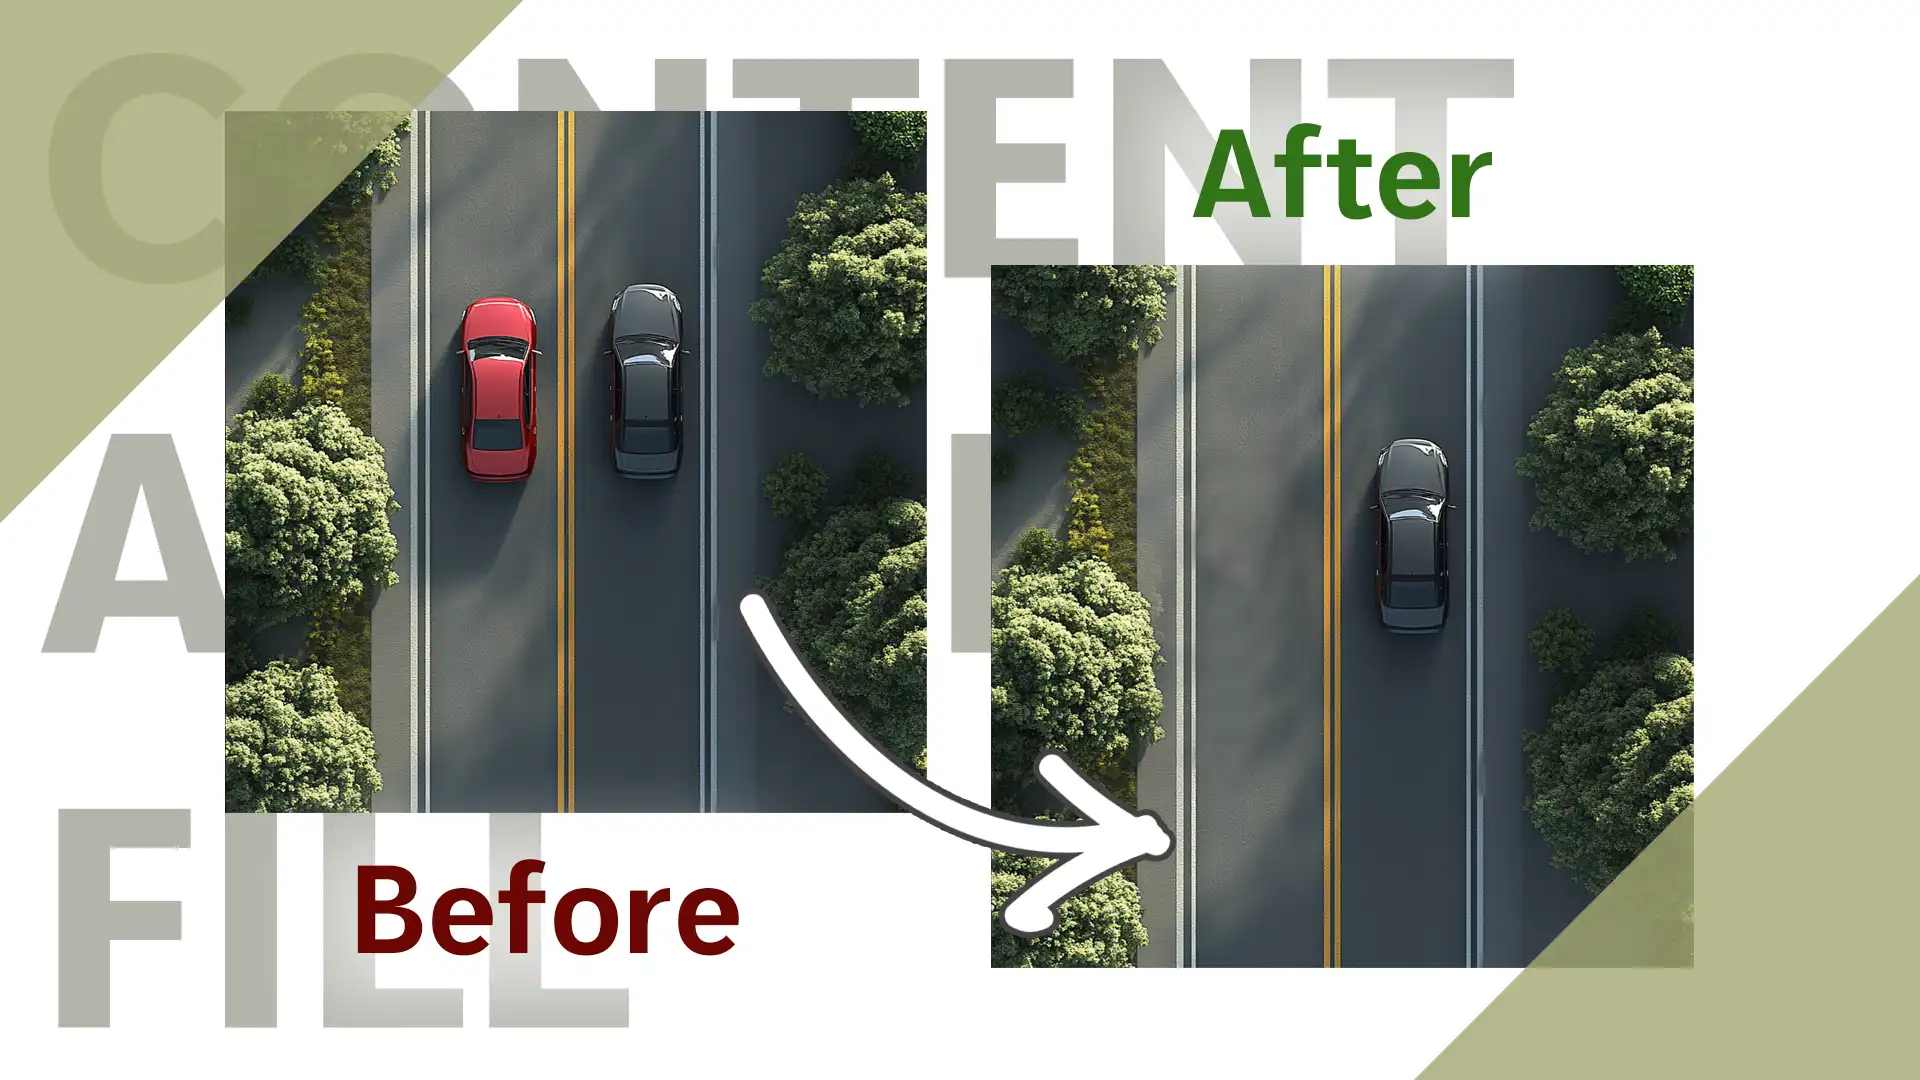
If you’ve ever wanted to magically remove unwanted elements from your photos, then the “content-aware fill-in Photoshop” is your new best friend.
Imagine transforming your images with just a few clicks, making distractions disappear as if they were never there. Intrigued?
Let me guide you through this powerful tool that can turn your creative visions into reality.
Discover how this feature saves you time and elevates your photo editing game to professional levels. Whether you’re a hobbyist or a seasoned photographer, embracing this technique will captivate your audience and leave them in awe of your seamless edits.
Don’t miss out on mastering this significant skill that redefines your images and sets your work apart.
Ready to explore the magic behind your future flawless photos?
Let’s get started!
Table of Contents
What is the Content-Aware Fill in Photoshop?
The content-aware fill feature in Photoshop allows users to seamlessly remove elements from photos while maintaining a natural look. You select an area to edit, and the tool intelligently fills the space with surrounding content.
Understanding this tool helps save time and produce polished images without needing advanced skills. The user-friendly interface of content-aware fill makes it accessible to everyone.
Benefits of Using the Content-Aware Fill
Using the Content-Aware Fill in Photoshop can significantly improve your editing process. Here are some fundamental benefits that can help make your workflow smoother and more efficient.
Easier editing: Quickly eliminate unwanted objects without leaving noticeable traces.
Efficient workflow: Speeds up editing time compared to traditional methods.
Also, it selects the best sampling area, ensuring seamless integration into the original image.
How to Use the Content-Aware Fill Tool
Here are the steps on how to use the content-aware tool:
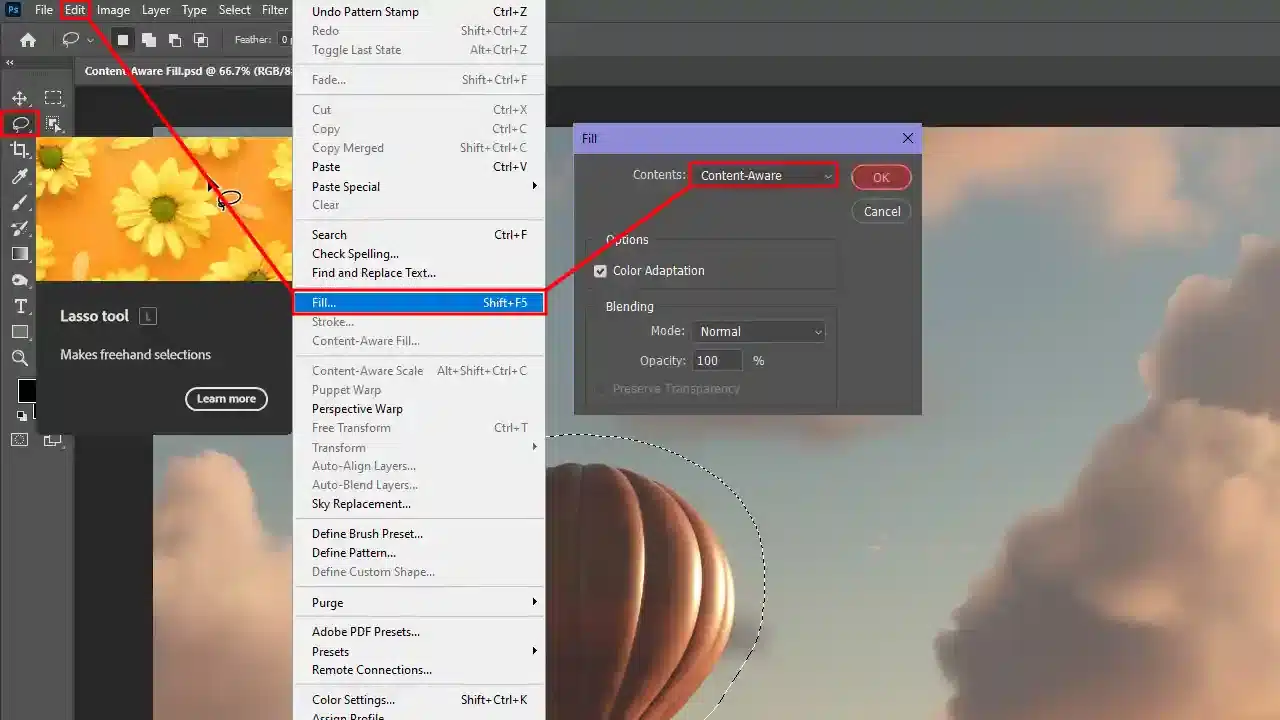
Select the area: Use the lasso tool or object selection tool for precise selection.
Choose the option: Head over to the fill settings menu and apply content-aware fill.
Adjust the fill: Use the aware fill panels to refine sampling area overlay settings.
Finalize your edit: Confirm changes and enjoy the seamless result.
Utilizing the aware fill workspace effectively can transform your image editing experience, helping you remove unnecessary objects or even remove a person completely or even remove shadows smoothly.
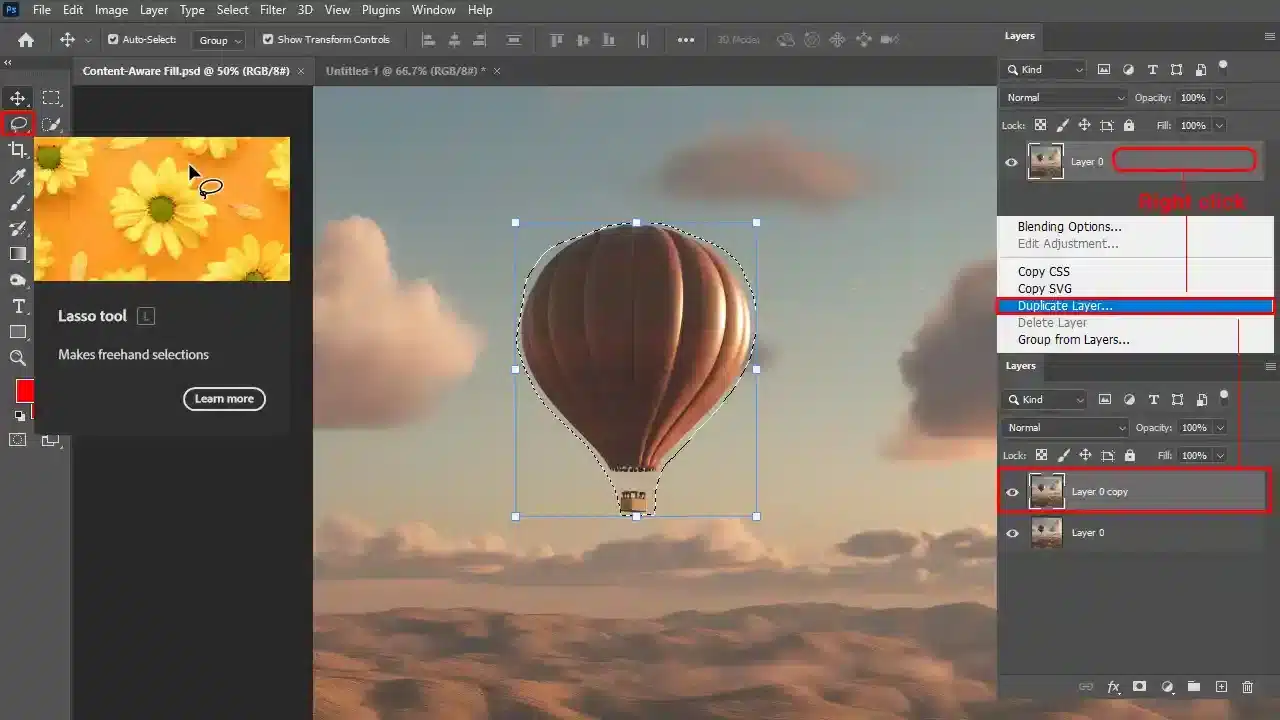
Pro tip: Duplicate your original layer before making edits. This will keep your base safe and allow you to experiment without fear.
Additionally, mastering Photoshop shortcuts can significantly speed up your editing process, making it more efficient and enjoyable.
Step-by-Step Guide to Using the Content-Aware Fill Tool in Photoshop
I’ve always found using the content-aware fill in Photoshop to be relatively straightforward.
First, open your image, ready for some magic.
Select the area you want to edit with the trusty lasso tool or object selection tool. You know the spot; it’s where you want miraculous adjustments.
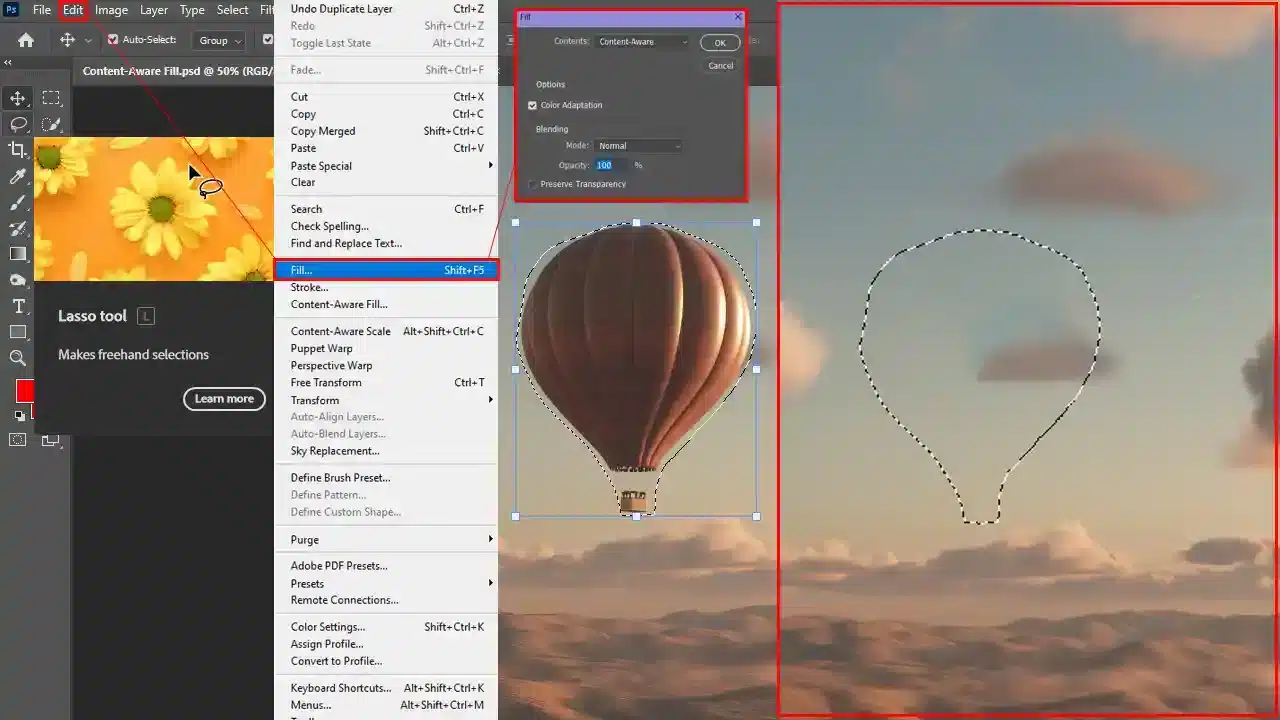
Once selected, head over to the edit menu, and choose content-aware fill.
This command brings up the content-aware fill workspace. Here, you’ll see your image alongside the aware fill panel. It’s like having a personal editing station.
Inside this workspace, you’ll see areas of your image highlighted.
The green overlay indicates the sampling area or parts of the image that Photoshop plans to use when filling out your selection. You can adjust this using the sampling brush tool.
It’s like painting over areas you want to include or exclude. You might think it’s complicated, but once you start, it feels intuitive.
After tweaking, you’ll want to observe the preview to see changes. It’s interesting to see Photoshop’s content-aware fill option at work. It almost feels like you have an artistic assistant right there with you.
If satisfied, hit OK. The magic will spread across the image, and voila! Your distracting elements will disappear.
Simple, right?
Tips for Effective Use
Sometimes, using the content aware fill isn’t just about easy fixes. It’s about mastering it.
For example, always remember to duplicate layers before starting your edit. This action safeguards your original, just in case. The aware fill-in Photoshop allows for more refined edits.
I often use the Zoom tool within the aware-fill workspace to focus on intricate details. Knowing how to zoom in on Adobe Photoshop allows me to examine those areas more closely and make precise edits.
When aware fill works right, it closely mimics and complements existing patterns, even against rotated or curved patterns.
Additionally, exploring the content-aware fill panel will unlock various settings.
You’ll find alternative options like adjusting the sampling area or playing with the default fill settings, helping create more seamless fills. Over time, the aware fill tool becomes invaluable.
Ah, almost forgot about the clone stamp tool. It pairs neatly with content-aware for more customized changes. Try different tools side by side, and you’ll surprise yourself with the results.
Pro Tip: Always pay attention to lighting and texture in the sampling area. Matching these ensures that filled areas blend more naturally.
Exploring the Content-Aware Fill Workspace
The Content-Aware Fill workspace offers advanced features that enhance precision and control. One of these is the Sampling Brush Tool, allowing you to fine-tune the areas used for seamless edits.
Advanced Features in the Content-Aware Fill Workspace
One standout feature is the sampling brush tool, which lets us decide what stays and what goes in our images.
It’s quite a nifty little tool that gives you control to quickly refine the sampling area.
Sampling Brush Tool
One standout feature is the sampling brush tool, which lets us decide what stays and what goes in our images.
It’s quite a nifty little tool that gives you control to quickly refine the sampling area.
Content-Aware Fill Panel
You might become curious about the content-aware fill panel, which offers different fill settings to match precise editing needs.
Fundamental Tools and Tips
Ensure your layers are ready. Always duplicate layers to safeguard original content before making any edits.
Select the lasso tool to delineate specific areas. Trust me, it’s a game-changer.
Alternatively, try the object selection tool for quick selections. It’s like having a secret shortcut on hand.
Creative Possibilities
Editing photos becomes not just efficient but also fun.
Knowing the content-aware fill panel and its different options can open up vast creative possibilities.
And don’t get me started on the patch tool, which is often overlooked yet important for more targeted modifications.
Blending Techniques
When using the aware fill, always be mindful of lighting and texture. Matching them ensures natural blending, completing your illusion of perfection.
The Magic Behind Content-Aware Fill
Oh, and here’s my favorite part: how the content-aware fill in Photoshop really works its magic.
It operates by evaluating nearby textures and colors to blend seamlessly, making tweaks barely noticeable.
Experimentation and Creativity
Engage with each feature of the content-aware fill workspace. Don’t rush!
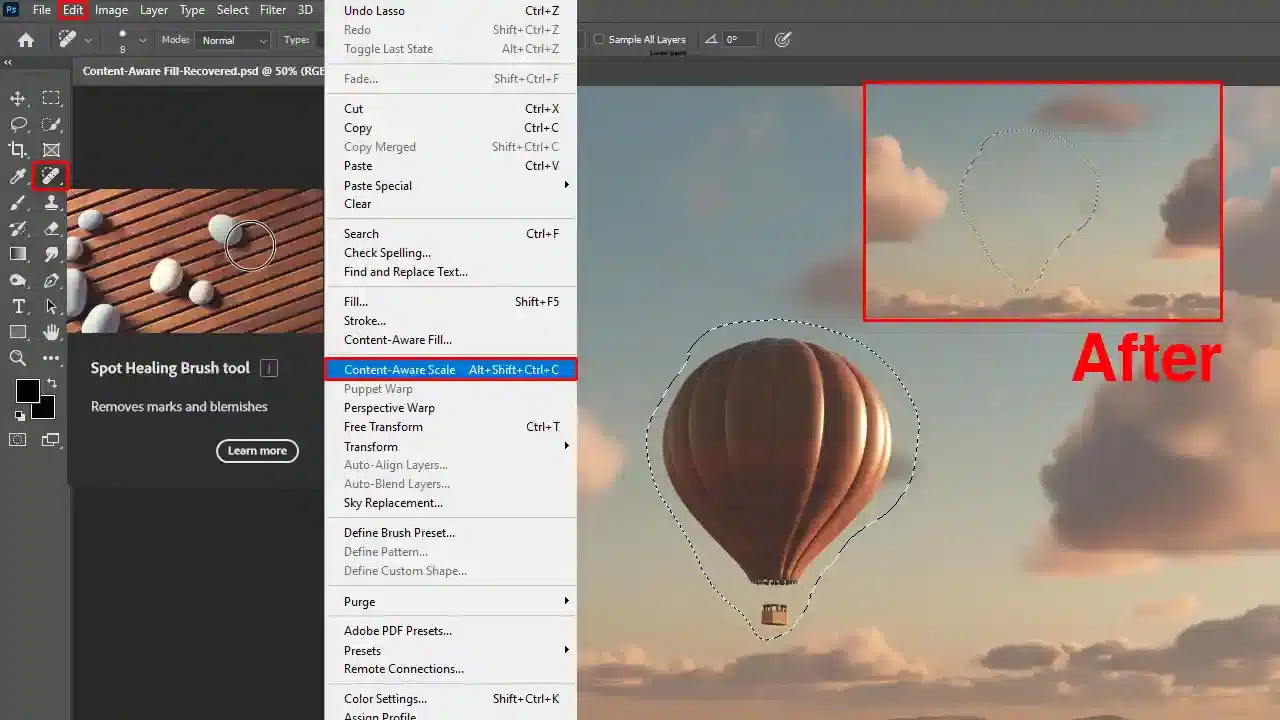
Experiment with the content-aware scale for resizing without distortion and apply these skills within your project journey.
Pro Tip: Check out how to use the content-aware scale in Photoshop for an even deeper understanding of the possibilities!
Combining different features makes edits feel less edited and more accurate. Learn how to use the aware move tool to be ready when needed!
Lightroom vs. Photoshop
While Lightroom offers fantastic capabilities for photo management and basic edits, Photoshop’s content-aware fill and other Photoshop essential tools provide unparalleled precision for intricate adjustments.
When traveling, capturing the perfect shot is important. Use content-aware fill to remove distractions from your travel photos, ensuring your memories are as beautiful as the moment itself.
When working with Content-Aware Fill, you might run into some challenges. Let’s go through a few common issues and how to spot them quickly.
Identifying Common Problems
You might encounter several challenges while working with content-aware fill in Photoshop. Here are some common issues:
The sampling area isn't correctly selected, leading to mismatched textures in your final image.
The content-aware fill tool might leave obvious borders where the image is edited.
It may generate patchy or amorphous zones, especially when working with complex backgrounds.
Sometimes, it doesn’t fill the entire selected region adequately.
If your selection is too close to the edge of an image, results can look unpolished. These issues can deter your creative process.
Solutions and Fixes
Here are some solutions to address content aware fill errors:
Consider refining your selection using the lasso tool. A precise selection often results in a cleaner edit.
Modifying your sampling area with the sampling brush tool ensures optimal coverage and reduces unintentional artifacts.
If things still look unreliable, create a duplicate layer and try to apply content aware fill on this new layer to observe any differences.
The patch tool becomes invaluable here. It allows for meticulous touch-ups that the primary tool might miss, ensuring your picture conveys the intended message.
Adjust fill settings in the content-aware fill workspace for a more tailored approach suitable for complex regions.
If you’re not satisfied with just being content-aware, test the waters with the aware move tool. This tool gives you more control over manipulated areas, potentially leading to more dynamic adjustments.
A quick trip to the drop-down list allows you to access other fill settings, broadening your range of tools.
Ultimately, using resources smartly means selecting the right tool for the job and choosing settings that align with your editing needs. Good news! It’s all about trial and error. Practice leads to proficiency.
Pro Tip: Before making changes, always create a duplicate layer first. This preserves the original, letting you experiment freely with Photoshop smart fill or any other feature without fear of loss.
Consider the power of experimentation, giving yourself room to learn and explore.
Creative Uses of the Content-Aware Fill in Photoshop
Hey there, fellow enthusiasts eager to dive into the wonders of Photoshop!
Today, we’re working with this fantastic feature called the content-aware fill in Photoshop.
You’ve likely heard about it, maybe even dabbled a bit. Let’s explore how it takes our creativity up a notch, shall we?
Below is a comparison of different creative ways to use the Content-Aware Fill in Photoshop. Each aspect highlights how this tool can transform your editing process, offering unique ways to enhance your images.
Aspect
Overview
Transform Ordinary Images
Easily turn regular images into creative masterpieces by removing unwanted elements and adding new ones seamlessly.
Remove Unwanted Objects
Quickly remove distracting objects from your photos for a cleaner, more appealing composition.
Artistic Challenges
Experiment with combining tools like Content-Aware Fill and the Patch Tool to enhance image details creatively.
Expand Areas Creatively
Use Content-Aware Fill to expand or reshape parts of your image, making elements adapt naturally to new spaces.
Precision with the Lasso Tool
Utilize the Lasso Tool to make precise selections before using Content-Aware Fill, ensuring seamless edits.
Innovative Projects with the Content-Aware Fill
Innovative projects come to life with Photoshop’s Content-Aware Fill. This powerful tool allows you to effortlessly remove, replace, or reshape parts of an image, opening up endless creative possibilities.
Transform Ordinary Images
Transform ordinary images into stunning visuals with the Content-Aware Fill tool in Photoshop.
This feature allows you to seamlessly remove distractions, enhance backgrounds, reshape elements, and easily add shapes in Photoshop, turning simple photos into creative masterpieces.
Remove Unwanted Objects
You can use content-aware fill to seamlessly remove an object and fill gaps. It feels like those unwanted items were never there.
Imagine diving into a scenic photo crowded with people. Bothered by the tourists?
Not anymore! Effortlessly make them disappear with this technique.
That’s one way to flaunt some mystery in your digital artwork!
Feeling extra adventurous? Let’s take on more artistic challenges.
Experiment with the patch tool in Photoshop to fine-tune areas that need detail clarity. By combining tools, you’ll become a Photoshop virtuoso.
With the right mix, bring unexpected vibrancy to life! With just a few clicks.
Expand Areas Creatively
Remember when you wanted to try something intricate? The content-aware fill works its charm by expanding areas creatively.
You’re not left wondering if features fit; they adapt with grace. Choose content-aware fill to play with space and symmetry, revealing the genius behind your artwork.
Precision with the Lasso Tool
Speaking of which, the lasso tool in Photoshop can be critical in pinpointing sections requiring a bit more finesse. Remember, the goal is to perfect the sampling area to guide it better.
Seamless works of art await as you edit with precision and ease.
Frequently Asked Questions (FAQs)
How do I create a content aware fill in Photoshop?
Open your image in Photoshop.
Select the area you want to fill using any selection tool like Lasso or Marquee.
Go to the Edit menu and choose 'Content-Aware Fill'.
Adjust the settings in the Content-Aware Fill panel as needed.
Preview the results; if satisfied, click 'OK' to apply.
Why can't I use Content Aware to fill in Photoshop?
Ensure you're using a compatible version of Photoshop; Content-Aware Fill is not available in older versions.
Check if the layer is locked or if it's a background layer. If so, double-click it in the Layers panel to convert it to a normal layer.
Verify that you have made a selection. Content-Aware Fill requires a selection to operate.
How do you use Content Aware Fill in Photoshop?
Open your project and make a selection around the area you want to fill.
Navigate to 'Edit' and select 'Content-Aware Fill.'
In the Content-Aware Fill workspace, adjust the settings to get the desired fill.
Use the preview panel to check the fill results and tweak as necessary.
Click 'OK' to apply the fill to your image.
How to do content aware fill in Photoshop 2024?
Ensure you are using Photoshop 2024, as this version may have updated features.
Select the area you want to modify with a selection tool of your choice.
Go to 'Edit' and click on 'Content-Aware Fill.'
Adjust the settings in the new Content-Aware Fill dialog box to suit your project needs.
Preview the changes, and once satisfied, confirm by clicking 'OK.'
Mastering the Content-Aware Fill in Photoshop has transformed my editing process. It’s saved me hours while enhancing the quality of my work.
I remember editing a complex landscape photo where distractions ruined the composition. With a few clicks, the Content-Aware Fill tool removed them seamlessly, leaving no trace. It felt like magic.
Whether you’re working on professional projects or your own photos, this tool always impresses. If you’re looking to take your editing skills to the next level, check out my Photoshop Course and Lightroom Course. They offer step-by-step guides to boost your creativity and efficiency.
Discover the secrets of photography with our printable guide! Master essential techniques like aperture, shutter speed, and ISO to create stunning images. Get your free printable PDF now and start turning your snapshots into masterpieces!