How to Add Texture in Photoshop: A Step-by-Step Guide
How to Add Texture in Photoshop: A Step-by-Step Guide
How to Add Texture in Photoshop: An Introduction
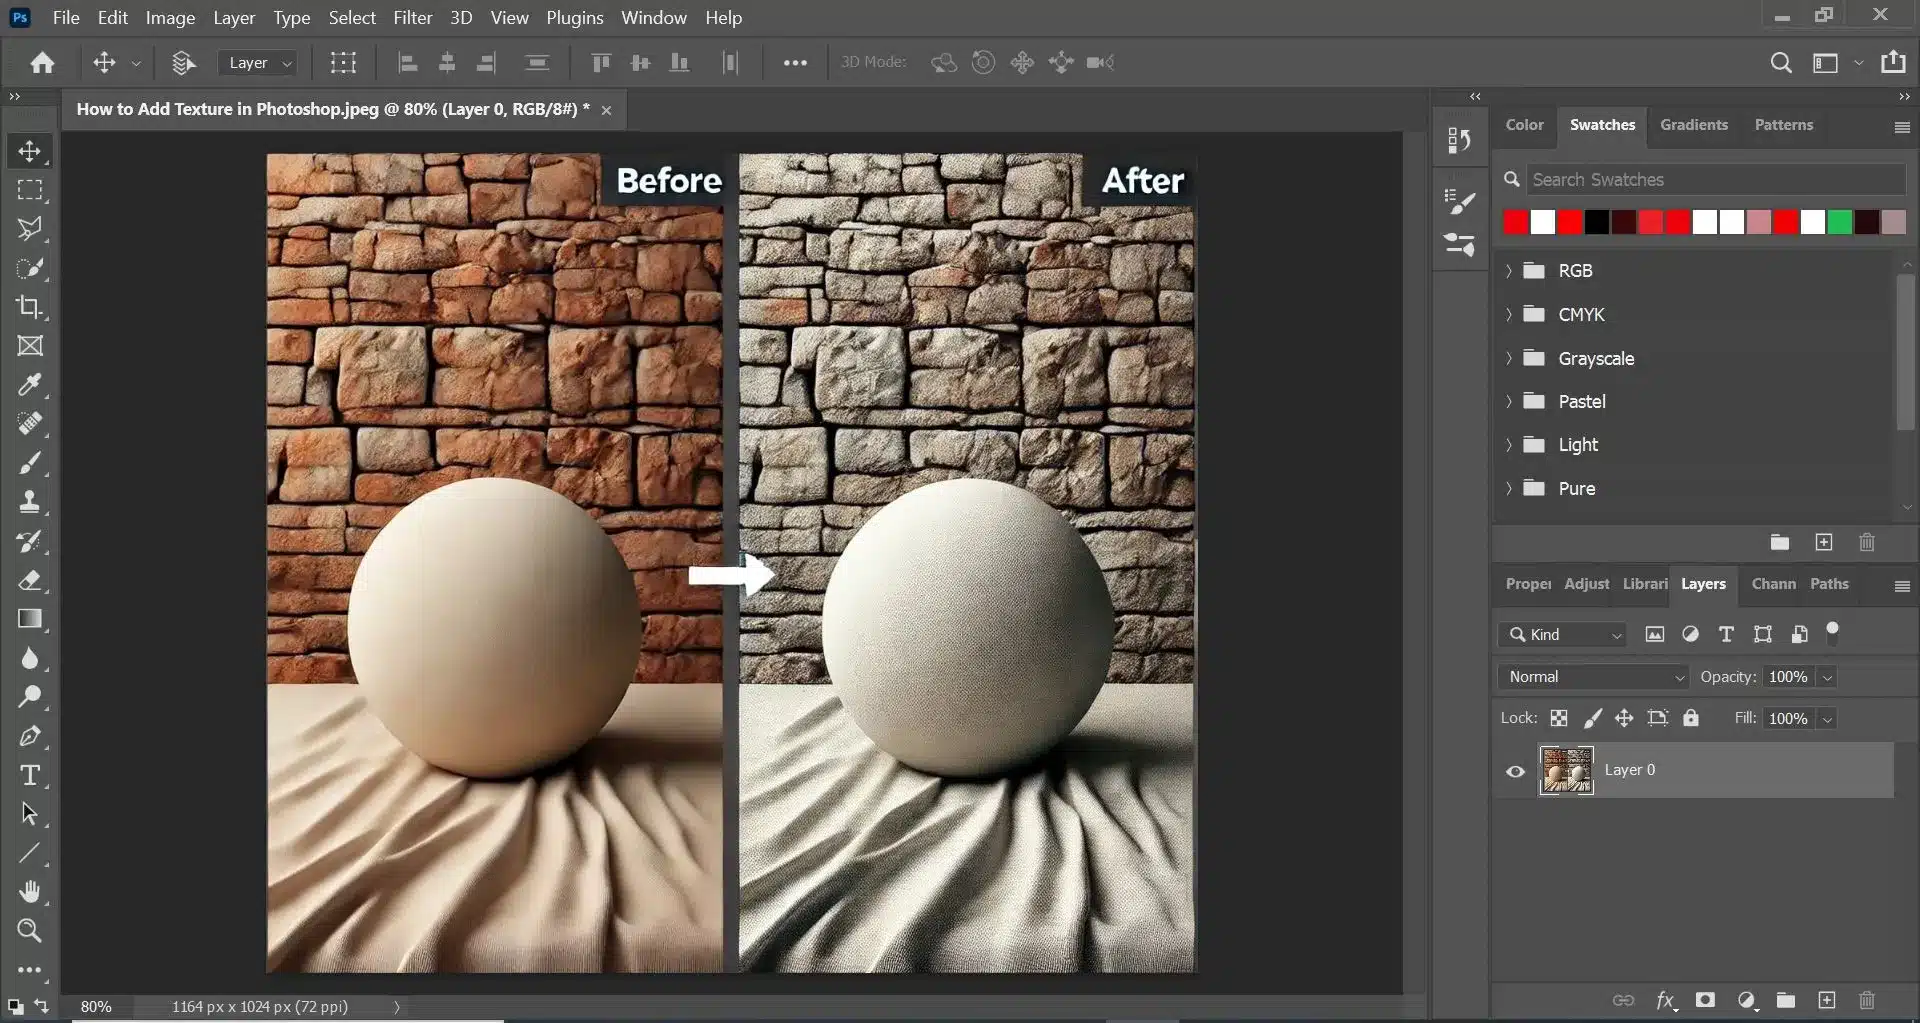
Adding texture to your photographs in Photoshop can dramatically enhance their visual appeal, providing depth and a tactile quality that plain, flat photographs often lack. Whether you’re working on a digital painting, enhancing a photo, knowing how to add texture in Photoshop is an essential skill. This process involves using various techniques to apply and manipulate textures, allowing you to transform ordinary images into extraordinary works of art. From subtle grain to intricate repeating patterns, textures can elevate your work to a professional level.
Imagine you are designing a vintage poster for a music festival. A plain background might not convey the nostalgic feel you’re aiming for. By adding a distressed paper texture, you can instantly transport viewers back in time, giving your poster an authentic aged look. This is a practical example of how texture can enhance your designs, making them more engaging and visually compelling.
Table of Contents
Understanding Textures and Their Importance
What Are Textures?
Textures in digital imagery refer to the perceived surface quality or feel of a photograph, which can range from smooth and soft to rough and gritty. These textures can mimic real-world surfaces like wood, metal, fabric, or stone, and can be created using various techniques within Adobe Photoshop. For example, you can use a texture overlay to give a photograph a weathered, vintage look or use brush to add subtle, realistic textures to digital paintings. By adding textures, designers can make images more lifelike and engaging, bridging the gap between the digital and physical worlds.
Why Are Textures Important in Design?
Textures are vital in design because they use visual interest and a sense of realism to otherwise flat snaps. They help to establish a mood or atmosphere, making the viewer feel more connected to the photograph. For example, a rustic wood texture can evoke feelings of warmth and nostalgia, while a sleek metallic texture can suggest modernity and sophistication. Moreover, textures can guide the viewer’s eye through the composition, highlighting important elements and adding depth and dimension to the design. This is particularly useful in web and graphics, where visual appeal can significantly impact user engagement and retention.
Benefits of Using Textures in Photoshop
Using textures in Photoshop allows for endless creative possibilities. They can enhance the narrative of a snap, making it more compelling and relatable. For instance, adding a grunge texture to a photograph can convey a sense of decay or rebellion, suitable for certain artistic or advertising projects. They also improve the overall aesthetic quality of designs, making them more visually appealing and professional. By mastering texture application, designers can develop unique and memorable images that stand out in the digital space, improving the visual storytelling and emotional impact of their work.
Step by Step Guide to Add Texture in Photoshop
Step 1: Open Your Image
Begin by opening your desired photograph. You can do this by dragging the file directly into the workspace or by selecting File > Open and navigating to your photograph. Ensure the picture is active in the Layers Panel for the following steps.
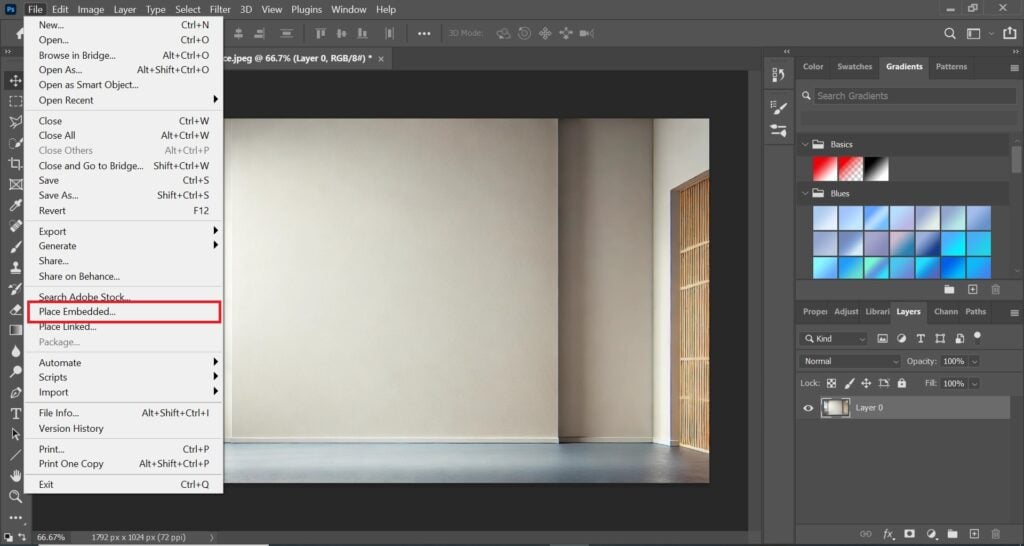
Step 2: Import the Texture
Next, you need to import the texture you wish to use. You can drag the file into the workspace or use File > Place Embedded. Resize the imported texture to fit your main snap using the Transform Tool (Ctrl+T). Holding the Shift key while resizing helps maintain the aspect ratio.
Step 3: Rename and Arrange Layers
In the Layers Panel, rename the newly imported texture layer for better organization. Ensure this layer is positioned above the real image layer to use the effect correctly.
Step 4: Apply Blending Mode
With the texture layer selected, navigate to the Blending Modes drop-down menu in the Layers Panel, which defaults to “Normal“. Experiment with different blending modes like Overlay, Soft Light, or Multiply to see which effect best suits your photograph. All the modes interact differently with the underlying snap, providing various creative outcomes.
Step 5: Adjust Opacity
Fine-tune the intensity of the texture by adjusting the opacity of the texture layer. Lowering the transparency level can develop a more subtle effect, allowing the underlying image to show through more prominently.
Step 6: Use a Layer Mask
To use the texture selectively, use a layer mask to the texture layer. Go to Layer > Layer Mask > Reveal All. With the selected option, set your foreground color to black and use the Brush Tool to paint over areas where you want to hide the texture, allowing for precise control over the effect.
Make any final adjustments to the layers, such as further tweaking the blending option. Ensure the overall composition looks cohesive and balanced before saving your work.
Summary Table
Steps
Action
Description
1
Open Picture
Open your picture file in the workspace
2
Import Texture
Drag or embed the texture, then resize it
3
Rename and Arrange Layers
Rename texture layer and position it above the real photograph
4
Use Blending Mode
Experiment with different blend modes to find the best effect
5
Adjust Opacity
Fine-tune the intensity by adjusting the transparency level of the texture layer
6
Use a Layer Mask
Use it to selectively put the texture
7
Final Adjustments
Make final tweaks to blend and overall composition.
Techniques for Creating Custom Textures
Using the Brush Tool: One of the simplest ways to create custom textures is by utilizing the Brush in Photoshop. You can choose from a variety of preset brushes or make your own by defining a new brush preset. Adjusting the size, hardness, and transparency level of the brush can help you achieve different texture effects, from soft and subtle to bold and pronounced. This technique allows for a high degree of customization and creativity, making it ideal for unique projects.
Applying Filters: Filters offer another effective method for generating unique textures. Photoshop’s Filter Gallery provides a range of options, such as Noise, Blur, and Texture filters, each capable of adding different effects to your photograph. By combining multiple filters, you can create complex and interesting textures that enhance the visual depth of field of your projects. For example, using the Grain filter can add a rough, film-like quality, while the Ocean Ripple filter can create a watery effect.
Using Adjustment Layers: Adjustment layers can modify the appearance of an image to develop texture-like effects. For example, adding a Gradient Map or Levels adjustment layer can change the tonal range and contrast, producing a textured appearance. This method allows for non-destructive editing, meaning you can tweak the texture at any point without altering the real photograph. It also provides flexibility in creating both subtle and dramatic effects.
Creating Patterns: Patterns are a powerful way to add texture. You can create a pattern from any image element and then use it to your project using the Pattern Overlay option in the Layer Stylesmenu. To make a seamless pattern, ensure the edges match perfectly, which can be achieved by using the Offset filter.
Using Stock Photos: Sometimes the easiest way to use texture is by using stock photos. Many online resources offer high-quality texture photographs that you can overlay onto your project. Once imported, you can blend them with your original photo using blend modes and transparency level adjustments. This method saves time and often provides more realistic results than creating textures from scratch.
Customizing with Layer Styles: Layer Styles, such as Bevel & Emboss, Satin, and Stroke, can add texture to your layers. These styles can be applied to any layer to make effects that mimic three-dimensional textures. By adjusting the settings within each style, you can achieve a wide range of textures, from metallic sheens to fabric weaves. This approach is highly customizable and can significantly enhance the visual appeal of your designs.
Using Displacement Maps: Displacement maps allow you to wrap textures around the contours of a snap. By creating a grayscale map that defines the high and low points of your photograph, you can use the Displace filter to use textures that follow the underlying shapes. This technique is useful for adding realistic textures to three-dimensional objects or creating effects like cracked surfaces.
One of the most common errors is applying the effect too heavily. This can overwhelm the real snap, making it look artificial and detracting from the overall aesthetic. Subtlety is key to maintaining a natural and professional appearance.
Ignoring Photograph Compatibility
Not all photographs are suitable for every type of effect. Using a rough effect on a picture with a busy or dark background can result in a cluttered and unappealing result. It’s important to choose images that complement the effect to achieve the best results.
Incorrect Blending
Using the wrong blend mods can significantly impact how the effect interacts with the original picture. Different modes can create various effects, and not experimenting with these options can lead to a flat or inappropriate outcome. Always test multiple blending modes to find the most effective one for your specific project.
Mistake
Description
Consequence
Solution
Overusing the Effect
Applying the effect too heavily
Artificial and unprofessional appearance
Use subtlety and balance
Ignoring picture Compatibility
Using inappropriate images for the chosen effect
Cluttered and unappealing results
Choose images that complement the effect
Incorrect Blending Modes
Not experimenting with different blending modes
Flat or inappropriate outcomes
Test multiple blending modes
Advanced Tips for Professional Texture Effects
Experiment with Filter Combinations
One of the most powerful ways to enhance your photos is by experimenting with different filters combinations. Filters like Grain, Noise, and Emboss can be combined to produce unique effects that add depth and character. For instance, using the Grain filter can give your image an old-school film look, while the Emboss filter can add a three-dimensional effect. These combinations can be fine-tuned to match the specific aesthetic you’re aiming for, making your work stand out in the creative field.
Utilize Adjustment Tools for Precision
Adjustment tools such as Levels, Curves, and Hue/Saturation are essential for fine-tuning your effects. These tools allow you to modify the brightness, contrast, and color balance without altering the original elements of your photo. For example, using the Curves tool, you can adjust the tonal range and contrast to enhance the visual appeal. This approach ensures that your edits are non-destructive, providing greater flexibility and control over the final outcome.
High-Resolution Sources for Quality
Using high-resolution sources is crucial for maintaining the quality and sharpness of your work. Low-resolution images can look pixelated and unprofessional, especially when scaled up. By starting with high-quality sources, you ensure that your final piece remains clear and detailed. This practice is essential for professional-grade projects where every detail matters.
FAQs About How to Add Texture in Photoshop
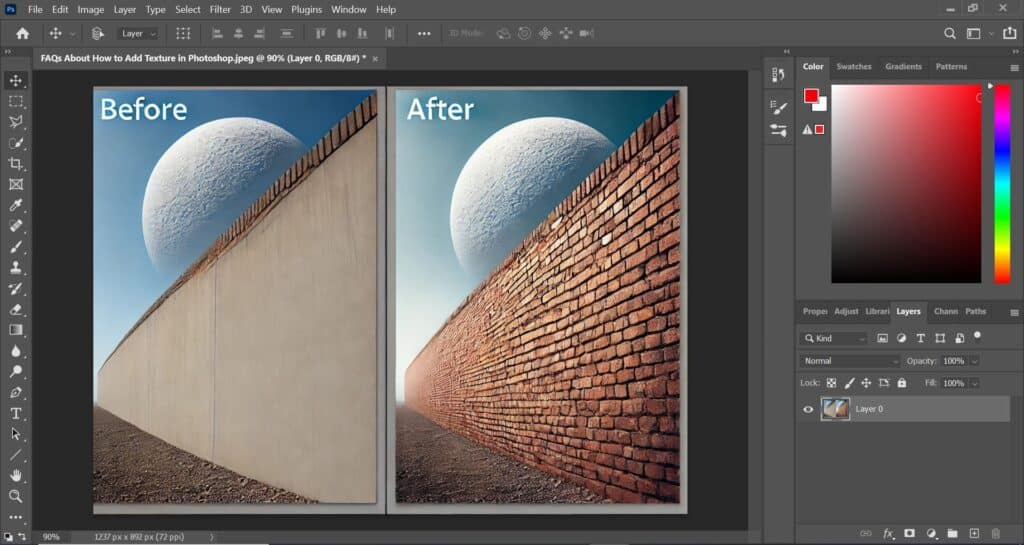
How to Add Rough Texture in Photoshop?
To create a rough surface effect, start by opening your chosen image. Then, import an image with a rough surface, like concrete or sandpaper, as a new layer above your base image. Resize and position the rough surface layer to cover the entire base snap using the Transform Tool (Ctrl+T). Next, change the blending modes of the rough surface layer to Overlay or Multiply in the Layers Panel to integrate it effectively with the base image.
Where Is the Texture Tool in Photoshop?
Photoshop doesn’t have a specific “texture tool,” but you can create and apply textures using a combination of tools and features. Common methods include using the Brush with textured brushes, applying filters from the Filter Gallery, and using blending modes to combine different layers.
How to Add Texture Mask in Photoshop?
Start by selecting the layer you want to modify. Go to the Layers Panel and click on the “Add Layer Mask” icon at the bottom. A white mask will appear next to the layer, indicating that the entire layer is visible. Select the Brush option, set the foreground color to black, and paint over areas where you want to hide the texture. Use white to reveal the hidden parts again.
How Do I Import a Pattern Texture into Photoshop?
Importing a pattern involves a few steps. First, open the pattern image you want to use. Then, go to Edit > Define Pattern and name your pattern. This saves the pattern in the pattern library. To use it, open the image you want to apply the pattern to, select the layer, and go to Layer > New Fill Layer > Pattern. Choose your saved pattern from the list and adjust the scale and positioning as needed. This technique allows for seamless application of patterns across your projects.
Conclusion
Mastering how to add textures, particularly rough ones, can significantly elevate your creative projects. I recall a time when I was working on a vintage photography project. The images initially looked flat and uninspired, but by incorporating rough textures, I was able to infuse them with a rich, tactile quality that brought the entire project to life. This transformation not only improved the visual appeal but also made the final output more engaging and professional.
If you’re eager to learn more about enhancing your skills, our courses are designed to provide you with the top tips and comprehensive knowledge you need. Whether you’re into photography or graphics, our courses cover everything from the basics to advanced techniques. Check out our Photoshop course and Lightroom course for more details. Sign up today and start creating stunning, professional-quality images with ease!
If this article has helped you, then Like and Share it with your friends!
Facebook
Twitter
LinkedIn
Pinterest
Have a nice photoshoot!
Learn more about Photo Editing with Lightroom and Photoshop:
Discover the secrets of photography with our printable guide! Master essential techniques like aperture, shutter speed, and ISO to create stunning images. Get your free printable PDF now and start turning your snapshots into masterpieces!