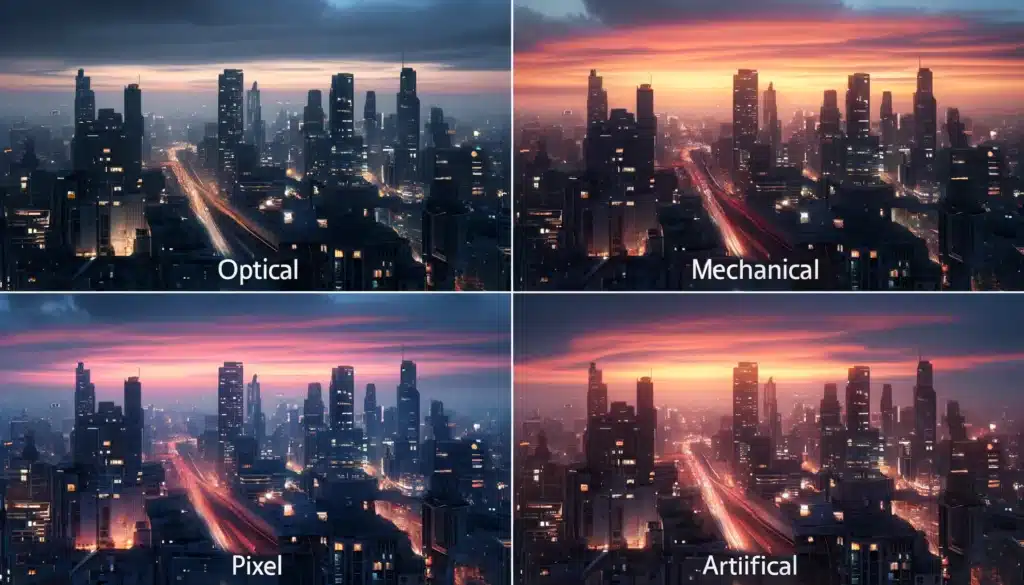
Vignetting in Photography: Transforming Ordinary Shots into Art

Hey fellow photography fans! Ever wondered how to make your pictures pop? Let’s talk about vignetting. It’s like a magic touch that adds depth and drama to your pictures. We’ll explore what it is and easy ways to use it. Whether you’re a pro or just starting with your camera, learning about vignetting will make your images stand out.

And if you love taking pictures of cities, you’re in luck! I’ll show you how vignetting can make urban landscapes look even cooler. So, grab your device, and let’s make some awesome shots together!

Table of Contents

Types of Vignetting

Vignetting types: Optical, Mechanical, Pixel, and Artificial applied to cityscape at dusk.

Are you ready to transform your lens work and add a professional touch to your urban landscape shots? Let’s explore the world of vignetting!

Type Causes Characteristics Mitigation
Optical Lens design, angle of light entry Most pronounced at wide apertures, common in fast prime lenses Use a narrower aperture (higher f-number)
Mechanical Physical obstructions like lens hoods, filters, or accessories Shadows block light, causing darkened corners Use the correct lens hood and avoid stacking filters
Pixel Center pixels receive light directly, edge pixels receive light at a steeper angle More pronounced in smaller sensors, unaffected by aperture changes Use software correction in post-processing
Artificial Intentionally added during post-processing for aesthetic effect Deliberately added using editing software Use Post-Crop Vignetting slider in Lightroom or Lens Correction filter in Photoshop

Understanding the different forms of vignetting can help photographers manage or creatively use this effect in their work. Here are the main kinds of vignetting:

Optical Vignetting

It occurs naturally due to the design and properties of lenses. It is influenced by the angle at which light rays enter the optic and how these rays are blocked by the lens barrel. This sort of vignetting is more noticeable with optical that have wide passages, particularly prime lenses. The larger front element of the lens tapers down to a smaller barrel, blocking some of the peripheral light rays, leading to darker sides in the image. In digital photography, the sensor can also contribute to this effect as it captures the light screened through the optical components of the equipment.

Mechanical Vignetting

It is caused by physical obstructions in the light path, such as optical element hoods, sifters, or other accessories. This sort of vignetting is common when using improperly sized lens hoods or stacking multiple cleaners.

Pixel Vignetting

It is specific to digital sensors. This occurs because the pixels at the mid of the sensor receive light directly, while those at the borders receive light at a steeper angle, resulting in less light and darker boundaries. This profile of vignetting is more prominent in lens work with smaller sensors.

Artificial Vignetting

It is intentionally added during note-operating to create a specific aesthetic effect. This form of vignetting can help draw attention to the core of the image or add a vintage feel.

By understanding these kinds of vignetting and how they occur, you can better manage or creatively employ this effect in your picture art. 

How to Reduce Vignetting

Photograph of a serene landscape with even lighting, featuring trees, mountains, and a clear sky, demonstrating reduced vignetting.

Vignetting can either be a desirable artistic effect or an unwanted defect. If you’re looking to reduce or eliminate it in your prints, here are several effective methods, both in-camera and during upload-addressing.

In-Camera Solutions

Use a Narrower Aperture

Vignetting is often more pronounced at wider openings. Stopping down the lens to a smaller depth of field (e.g., f/8 or f/11) can reduce or eliminate the effect.

Check for Lens Obstructions

Ensure that there are no physical obstructions such as dislodged lens hoods, stacked refiners, or improperly mounted accessories that could block light and cause mechanical vignetting​.

Use Manufacturer-Specified Accessories

Always use this and Screens designed specifically for your lens model to avoid unnecessary vignetting caused by incompatible accessories.

Adjust the Zoom Range

Vignetting can be more pronounced at the extreme ends of the zoom range. Adjusting the zoom can help mitigate this effect. Prime optical often exhibit less blurring compared to zoom opticals.

Post-Processing Solutions

Lens Profile Corrections in Lightroom and Photoshop

Both Adobe Lightroom and Adobe photoshop have built-in lens profile reformation that automatically detect and fix for vignetting based on the lens used. In this, it can be found under the Lens modification panel in the Develop module. In graphic editor, use the RAW filter.

Manual Corrections

If automatic improvements are not available, you can manually adjust the vignette using tools like the Graduated or the Radial Filter in editing software. In picture edit, you can use the lens rectification cleaner under the Filter menu.

Cropping

Cropping the image can help remove the shading effect, especially if the darkened corners are not critical to the composition of the photograph.

Practical Tips

By following these methods, you can effectively reduce or eliminate unwanted vignetting in your shots.

Understanding the Impact of Vignetting on Image Quality

Comparison of a photo with vignetting and without it on cityscape at dusk.

It is often seen as a darkening towards the corners of an image, can significantly influence the overall quality and aesthetic of a photograph. It can be both a flaw and a creative tool, depending on its application and the photographer’s intent. Here’s a closer look at  how you can leverage it in your photographic device artistry.

Enhancing Visual Focus

One of the primary benefits of vignetting is its ability to direct the viewer’s attention toward the core of the image. By subtly darkening the margins, vignetting creates a natural frame that highlights the main subject, making it stand out more prominently. This technique is particularly effective in portrait landscape, where the focus is usually on the subject’s face.

Adding Depth and Drama

Vignetting can also add depth and drama to your pictures. The gradual darkening at the borders creates a visual gradient that enhances the perception of depth, making the central subject appear more three-dimensional. This effect is beneficial in both landscape and portrait photography, as it helps emphasize the main elements of the scene​.

Creating Nostalgia and Vintage Effects

Shading is often associated with a vintage or nostalgic look. In the days of film image creation, natural vignetting was common due to the limitations of lens designs. Modern photographers replicate this effect to evoke a sense of nostalgia or to give their photos a timeless, classic feel. This is particularly popular in black-and-white photography or when creating retro-themed captures.

Potential Drawbacks

While vignetting can be used creatively, it can also detract from image quality if not managed properly. Heavy or uneven vignetting can make an image look unbalanced or overly dark at the limits, distracting from the main subject. It can also reduce overall brightness and detail in the corners, which might be undesirable in certain groups of pictures, such as product or architectural visual documentation, where uniform lighting and detail are crucial.

Practical Tips for Managing Vignetting

By understanding and effectively managing vignetting, you can improve the overall quality of your graphics and use this effect to enhance your photographic style. Whether you choose to reduce or embrace vignetting, knowing its impact allows you to make more informed decisions in your photography.

Frequently Asked Questions about Vignetting

Photoshop-Masterclass-Advanced-Editing-Layer-Manipulation

What is image vignetting?

It refers to the gradual darkening or reduction in brightness at the periphery of a photograph compared to its center. This phenomenon can occur naturally due to the lens design or be added intentionally during editing to draw attention to the central subject.  Understanding how correction tools like filters and adjustments affect the values at the edges and center of a digital photo is crucial.

Is vignetting good or bad?

Whether it is good or bad depends on its usage and the photographer’s intent. Technically, it can be seen as a flaw if it unintentionally darkens important areas of the photo. However, when used creatively, it can enhance a photo by focusing the viewer’s attention on the subject and adding depth or a vintage feel to the image. In digital photography, this type of vignetting occurs due to the sensor. Pixels at the center receive exposure directly, while those at the corners receive it at a steeper angle, resulting in lower brightness and darker corners. The optical design of imaging apparatus can influence this effect. Correction during adjustment can adjust the values of brightness to mitigate this natural phenomenon, depending on the desired outcome.

What causes vignetting?

How do you reduce vignetting?

To reduce it, you can:

Conclusion

Photographer reviewing images with vignetting adjustments on a computer screen in a well-lit studio.

Vignetting is a powerful tool for photographers, turning ordinary shots into extraordinary ones. During a family event shoot, natural vignetting from my prime lens beautifully focused on the central subjects, adding warmth and intimacy. Initially seen as a flaw, I now embrace vignetting as a creative technique that enhances my work’s visual appeal.

If you’re eager to refine your skills in techniques such as vignetting and more, I highly recommend enrolling in our comprehensive courses. Our curriculum provides detailed tutorials and practical insights that will empower you to elevate your expertise and achieve results at a professional level.

Don’t miss the opportunity to unlock your creative potential with expert guidance and structured training. Enroll now at Photoshop Course and Lightroom Course.

If this article has helped you, then Like and Share it with your friends!

Facebook
Twitter
LinkedIn
Pinterest

Have a nice photoshoot! 

Read more about: Photography Techniques

Download Your Free Guide Now!

Discover the secrets of photography with our printable guide! Master essential techniques like aperture, shutter speed, and ISO to create stunning images. Get your free printable PDF now and start turning your snapshots into masterpieces!