Dodge and Burn in Photoshop: Everything You Need to Know
Dodge and Burn in Photoshop: Everything You Need to Know
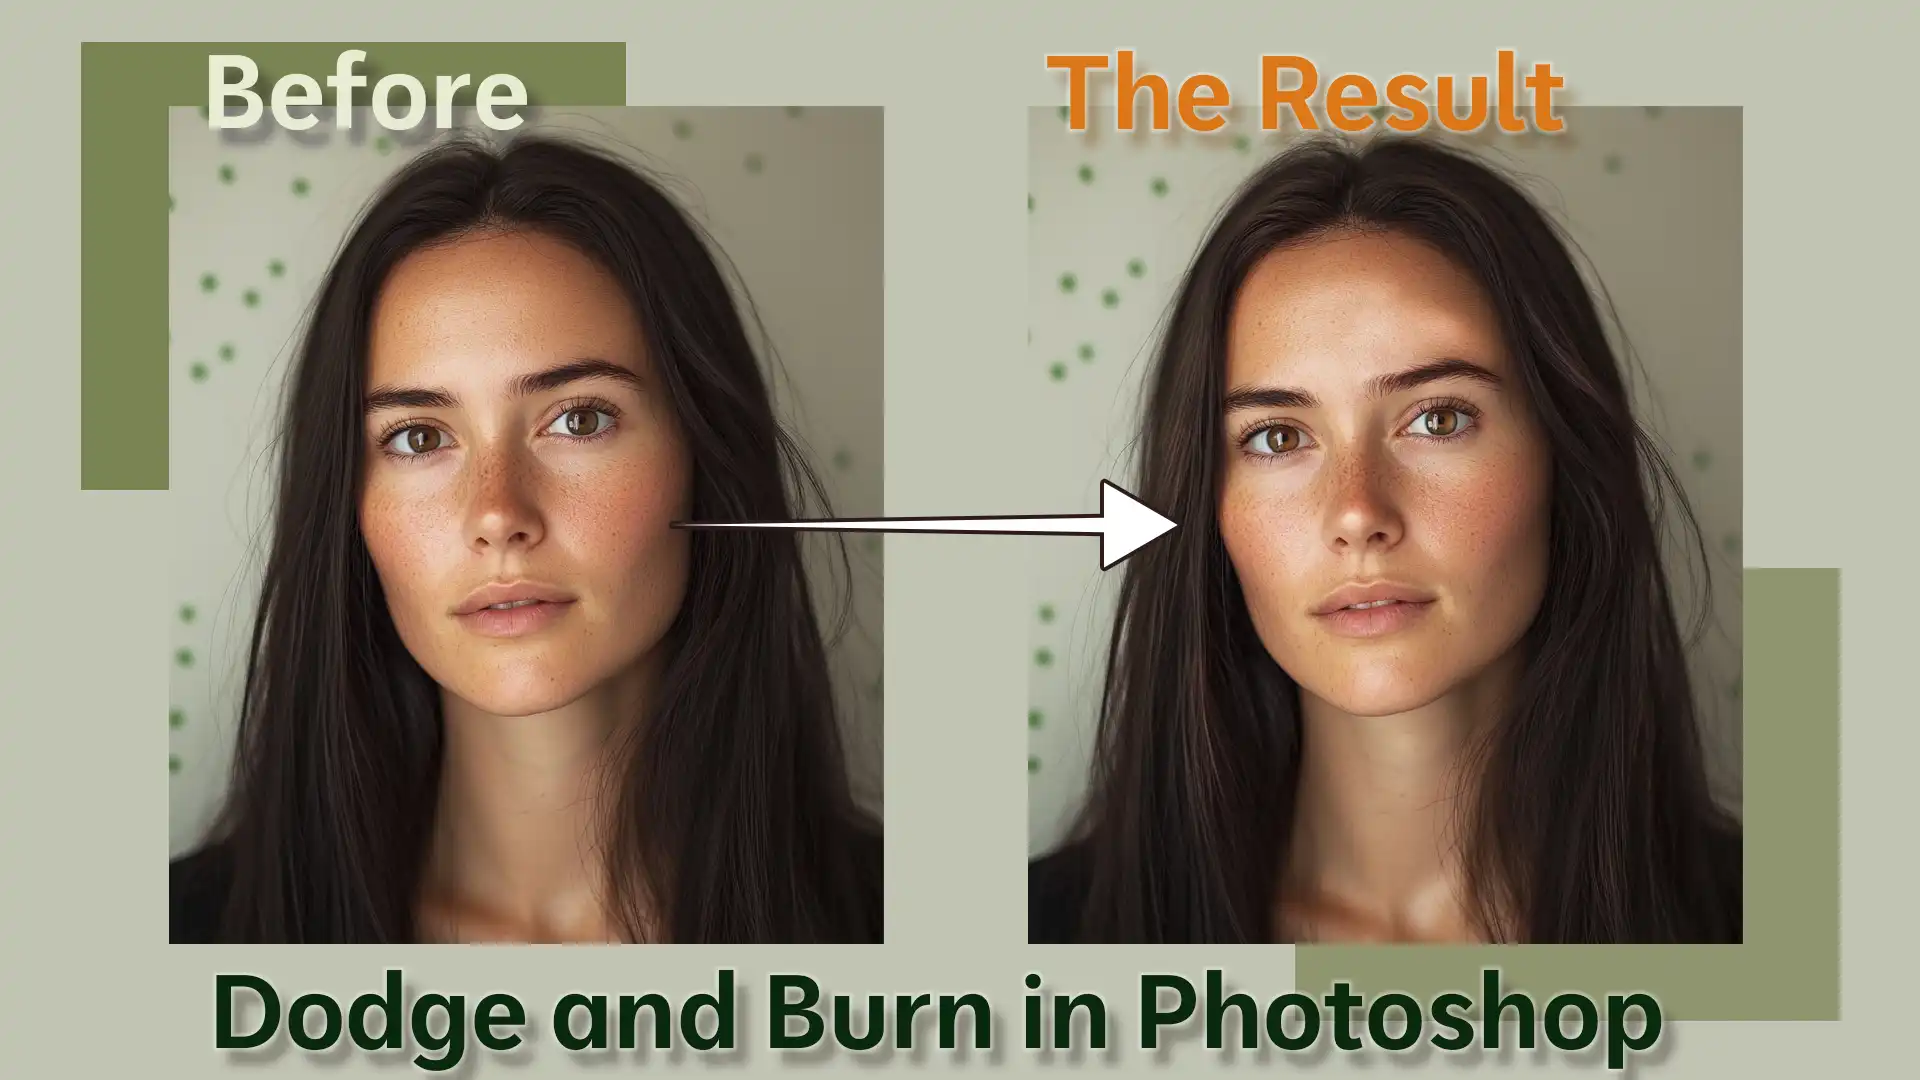
One of the most powerful techniques you can use when perfecting photos is dodge and burn in Photoshop.
This method, which involves selectively lightening and darkening areas of your image, can add depth and dimension to make your photos stand out. Imagine taking your flat, lifeless photos and transforming them into dynamic, eye-catching masterpieces.
You can guide the viewer’s eye, emphasize important details, and create a polished, professional look with just a few simple steps.
Curious about how to achieve this? Keep reading to discover how dodge and burn in Photoshop can elevate your photo editing skills to the next level.
Table of Contents
Getting Started with Dodge Tool
The dodge tool in Photoshop is a fantastic way to lighten areas of an image. It helps you brighten specific parts without altering the entire picture. The tool works much like traditional darkroom techniques used in developing photographs.
Dodge and burn tools are essential for enhancing photos. They balance the light and dark areas perfectly, making your photo look polished.
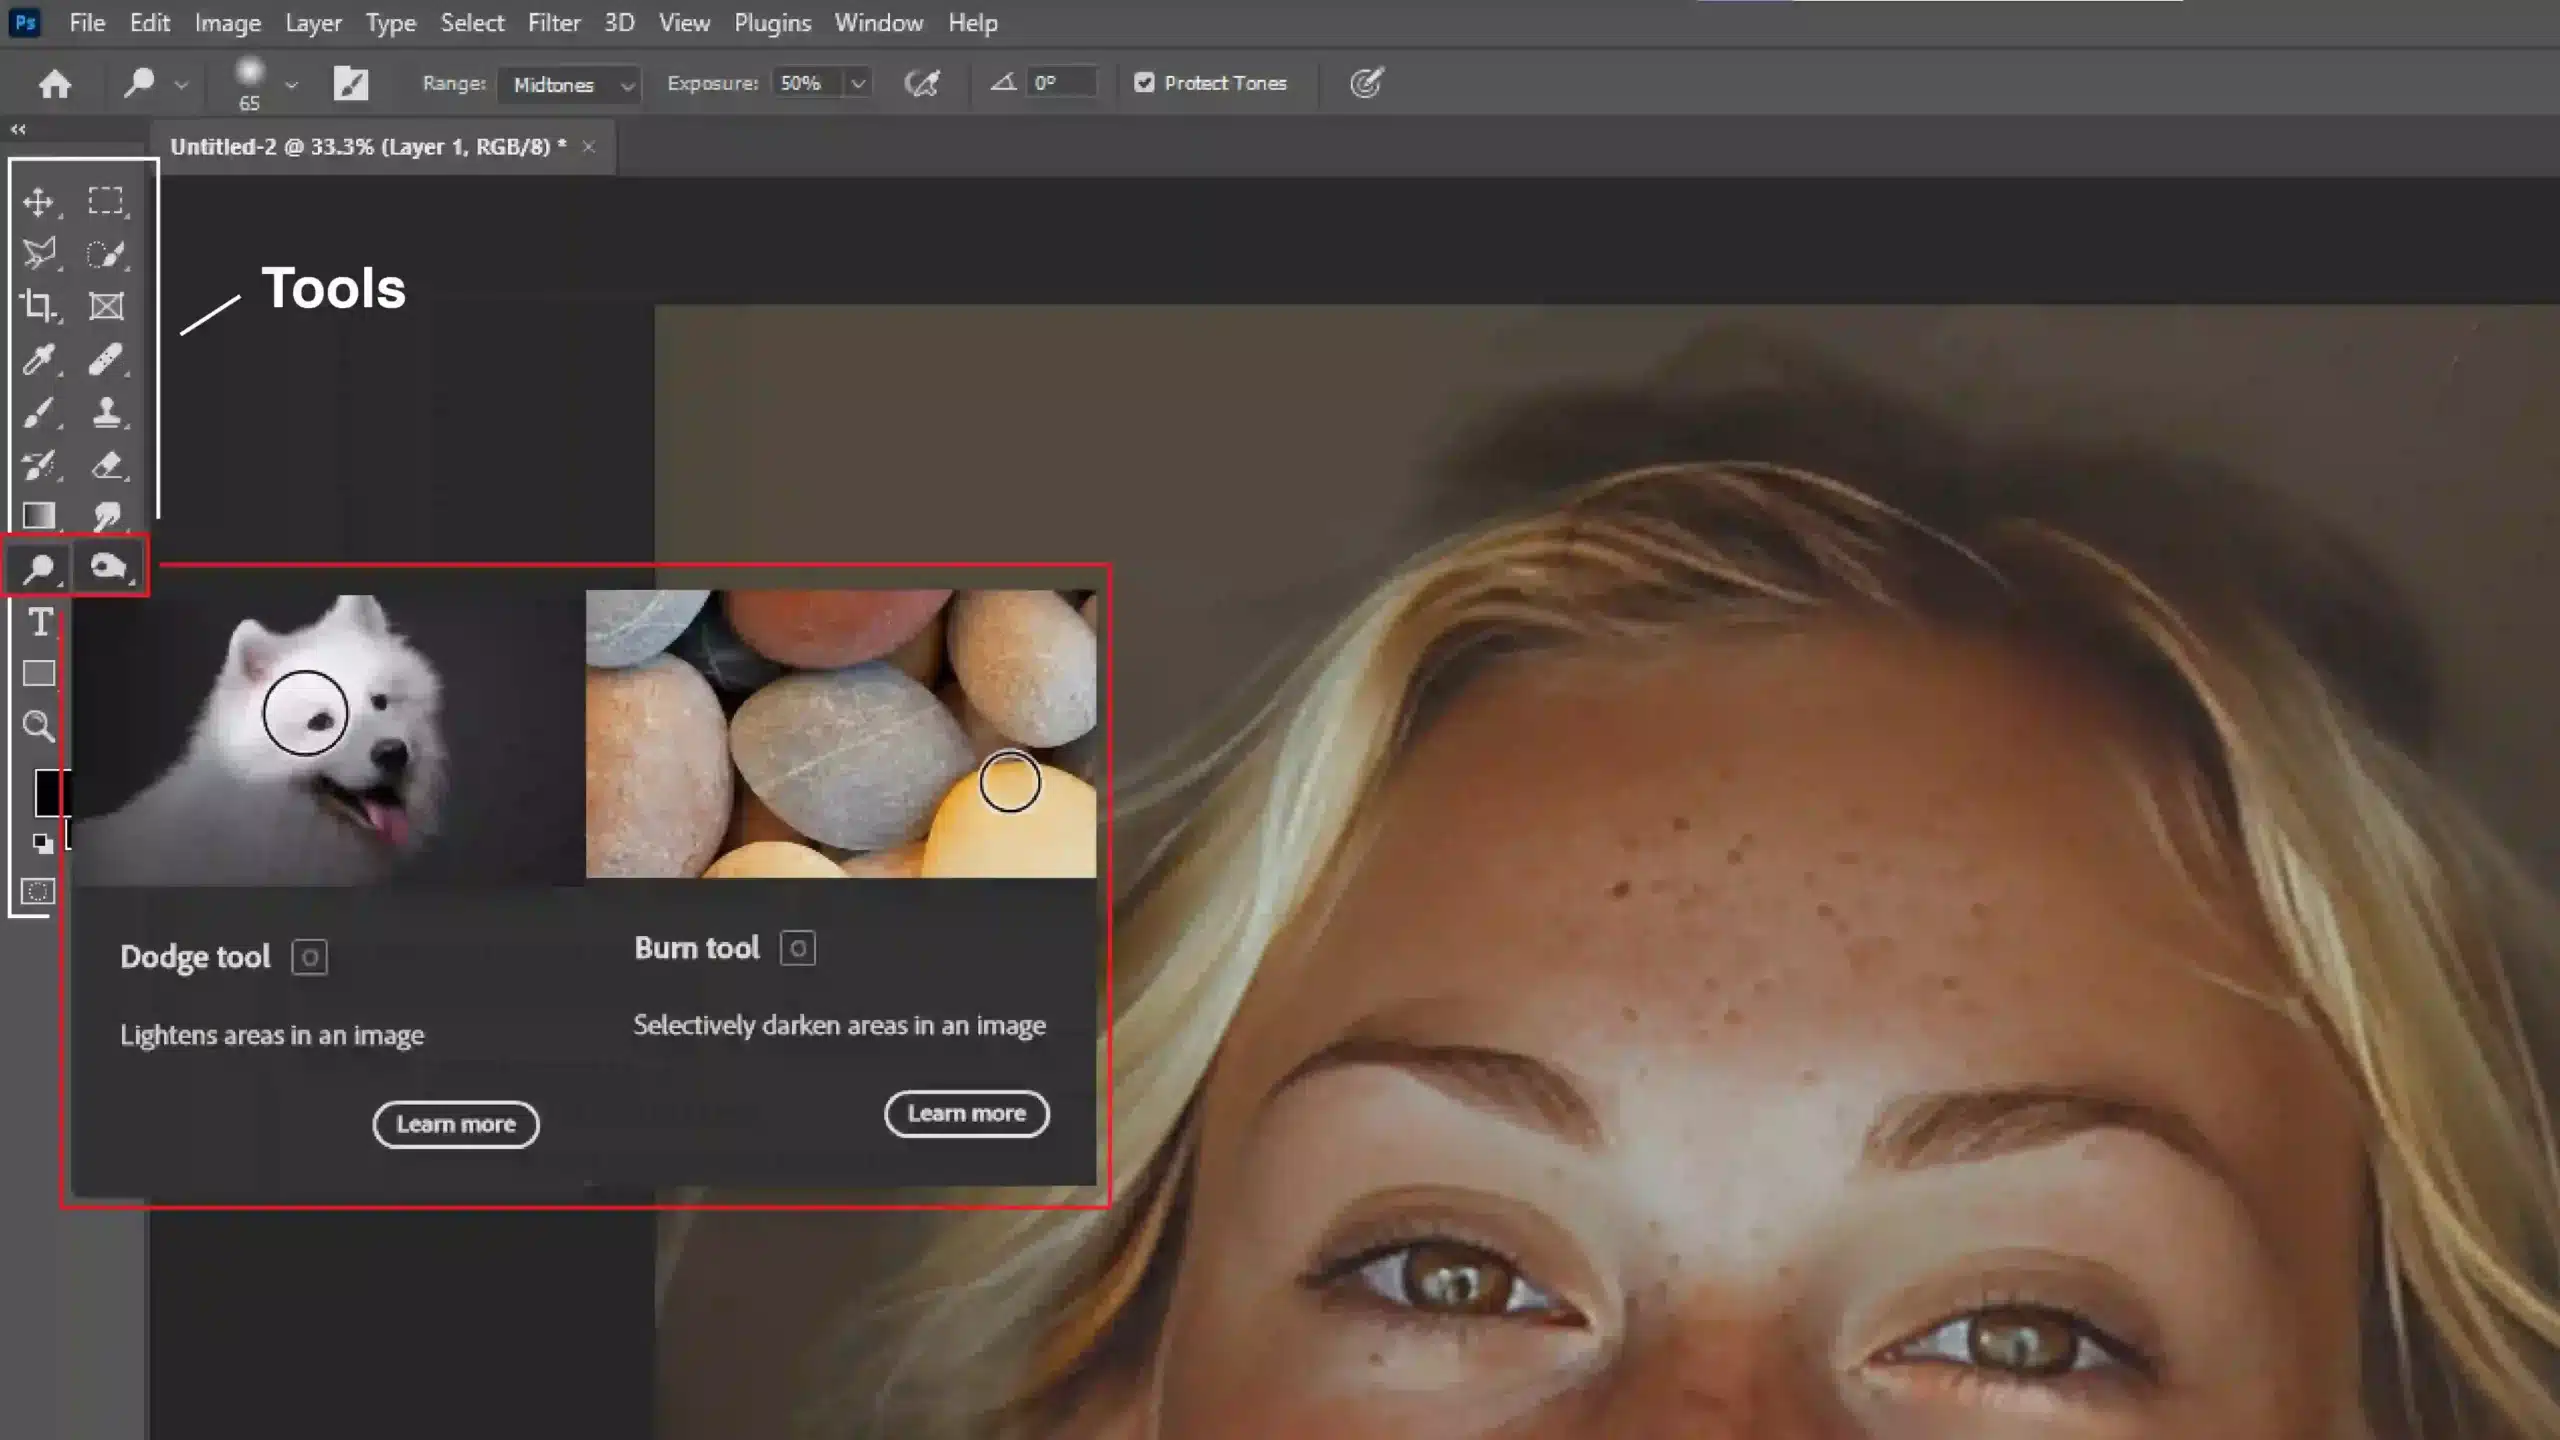
How to Access the Dodge Tool
To access it, open your Photoshop program. Find the Tools Palette on the left side of your screen. Click the Dodge icon. It looks like a loupe or magnifying glass. That’s it!
Hold down the Alt key while selecting the burn tool to toggle between dodge and burn in Photoshop. Now you can switch easily
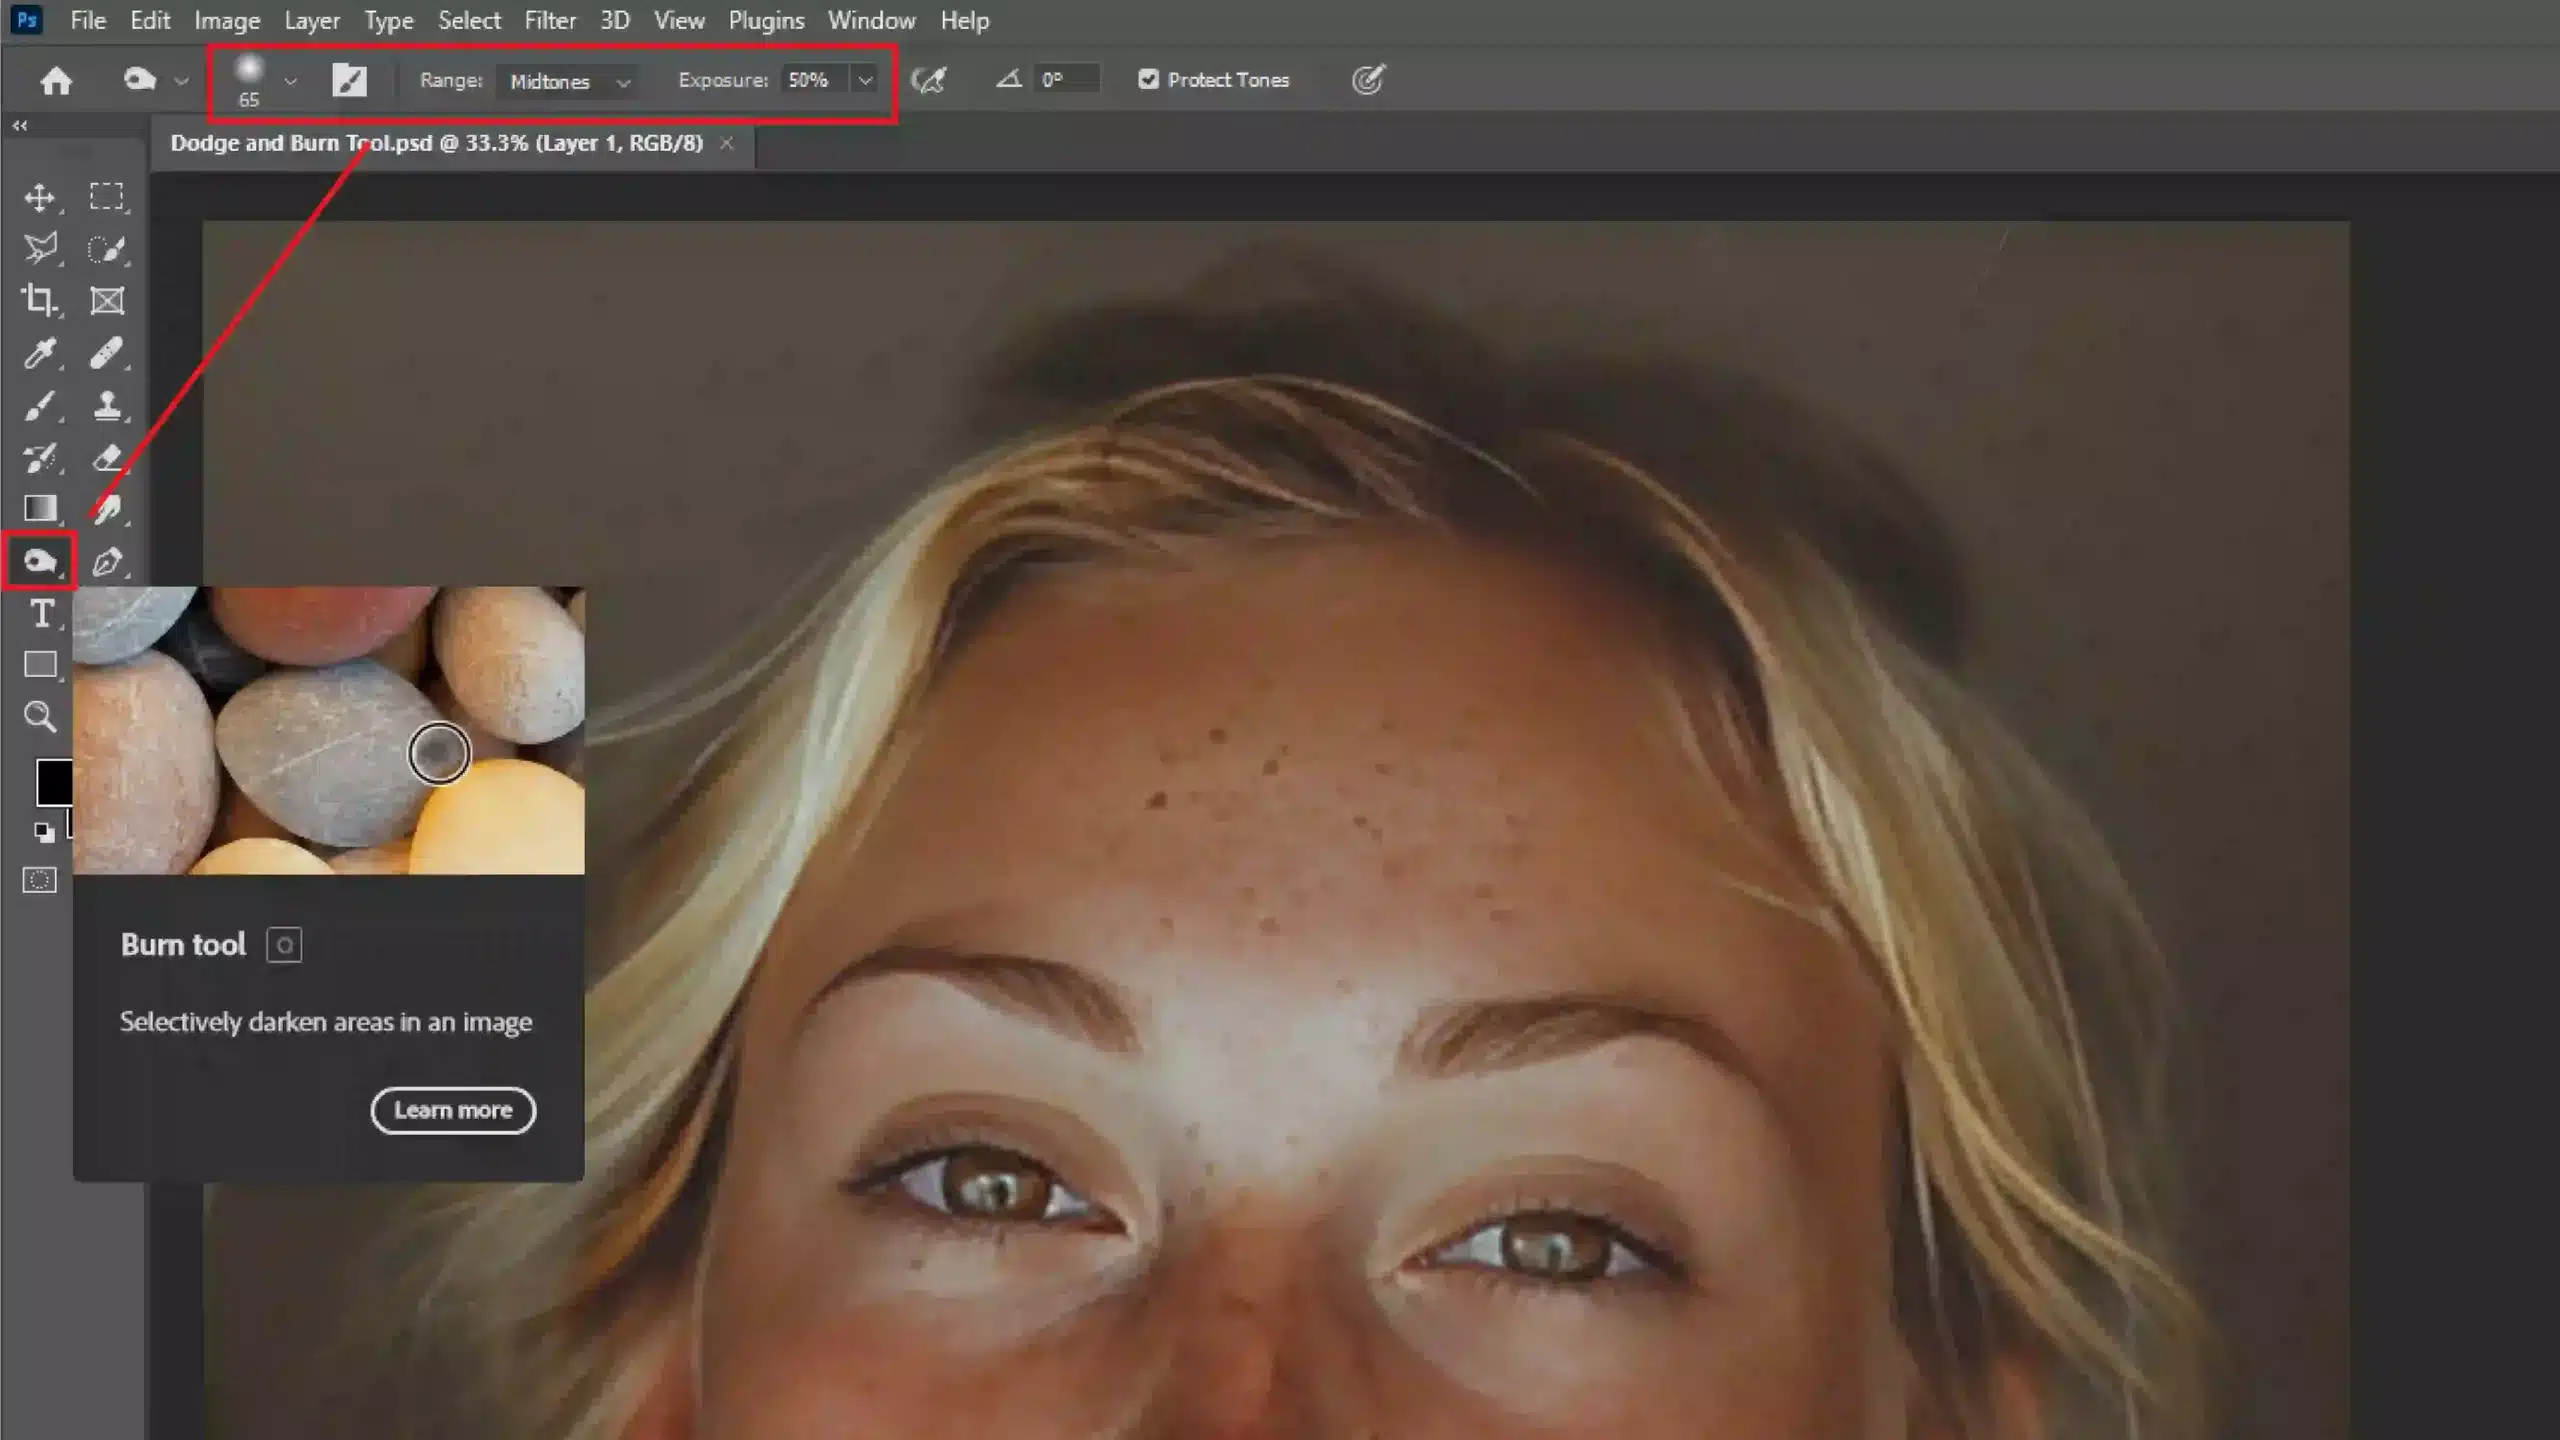
Dodge Tool Settings and Options
Next, explore its settings. At the top, you’ll see the Options Bar. Here, you can adjust the brush size, range, and exposure. Use the range setting to select highlights, mid tones, or shadows while working. That helps you better target specific areas.
The Protect Tones option is a lifesaver. It ensures the natural tones of your image remain intact as you lighten areas. Don’t skip this. Set the Exposure setting above 50% if you want a notable effect; lower for subtlety.
Pro Tip: While using the dodge tool, selecting an overlay blend mode can make the changes less harsh. This great technique creates a more natural look in your photos.
Overusing the tool can lead to unnatural results. Always zoom in to ensure you’re making precise adjustments.
Difference Between Photoshop and Lightroom
While Photoshop offers powerful tools like the Dodge and other essential tools, it’s counterpart, Lightroom, excels in batch editing and organizing your photo library. Both have unique strengths, making them complementary tools for photographers.
The burn tool in Photoshop enhances images by darkening specific areas.
The central idea is to increase the exposure in those areas, making them appear darker and thus adding depth and complexity. This tool is the opposite of the dodge tool, which lightens areas.
When you master the burn tool, you elevate your ability to create more detailed, compelling photographs.
How to Use the Burn Tool Effectively
To use the burn tool, first, open Photoshop and locate the Tools Palette. Click on the burn tool icon. Set your brush size according to the area you want to burn.
In the Options Bar, choose the range you wish to target: shadows, midtones, or highlights.
Adjust the exposure level carefully; a lower percentage offers subtle darkening, while a higher percentage gives a stronger effect. Apply the burn tool by simply painting over areas that need darkening.
Remember to toggle between dodge and burn for balanced corrections.
Burn Tool Tips and Tricks
To achieve the best results when using the Burn Tool in Photoshop, follow these practical tips. These strategies will help you enhance your images effectively while maintaining control over your edits.
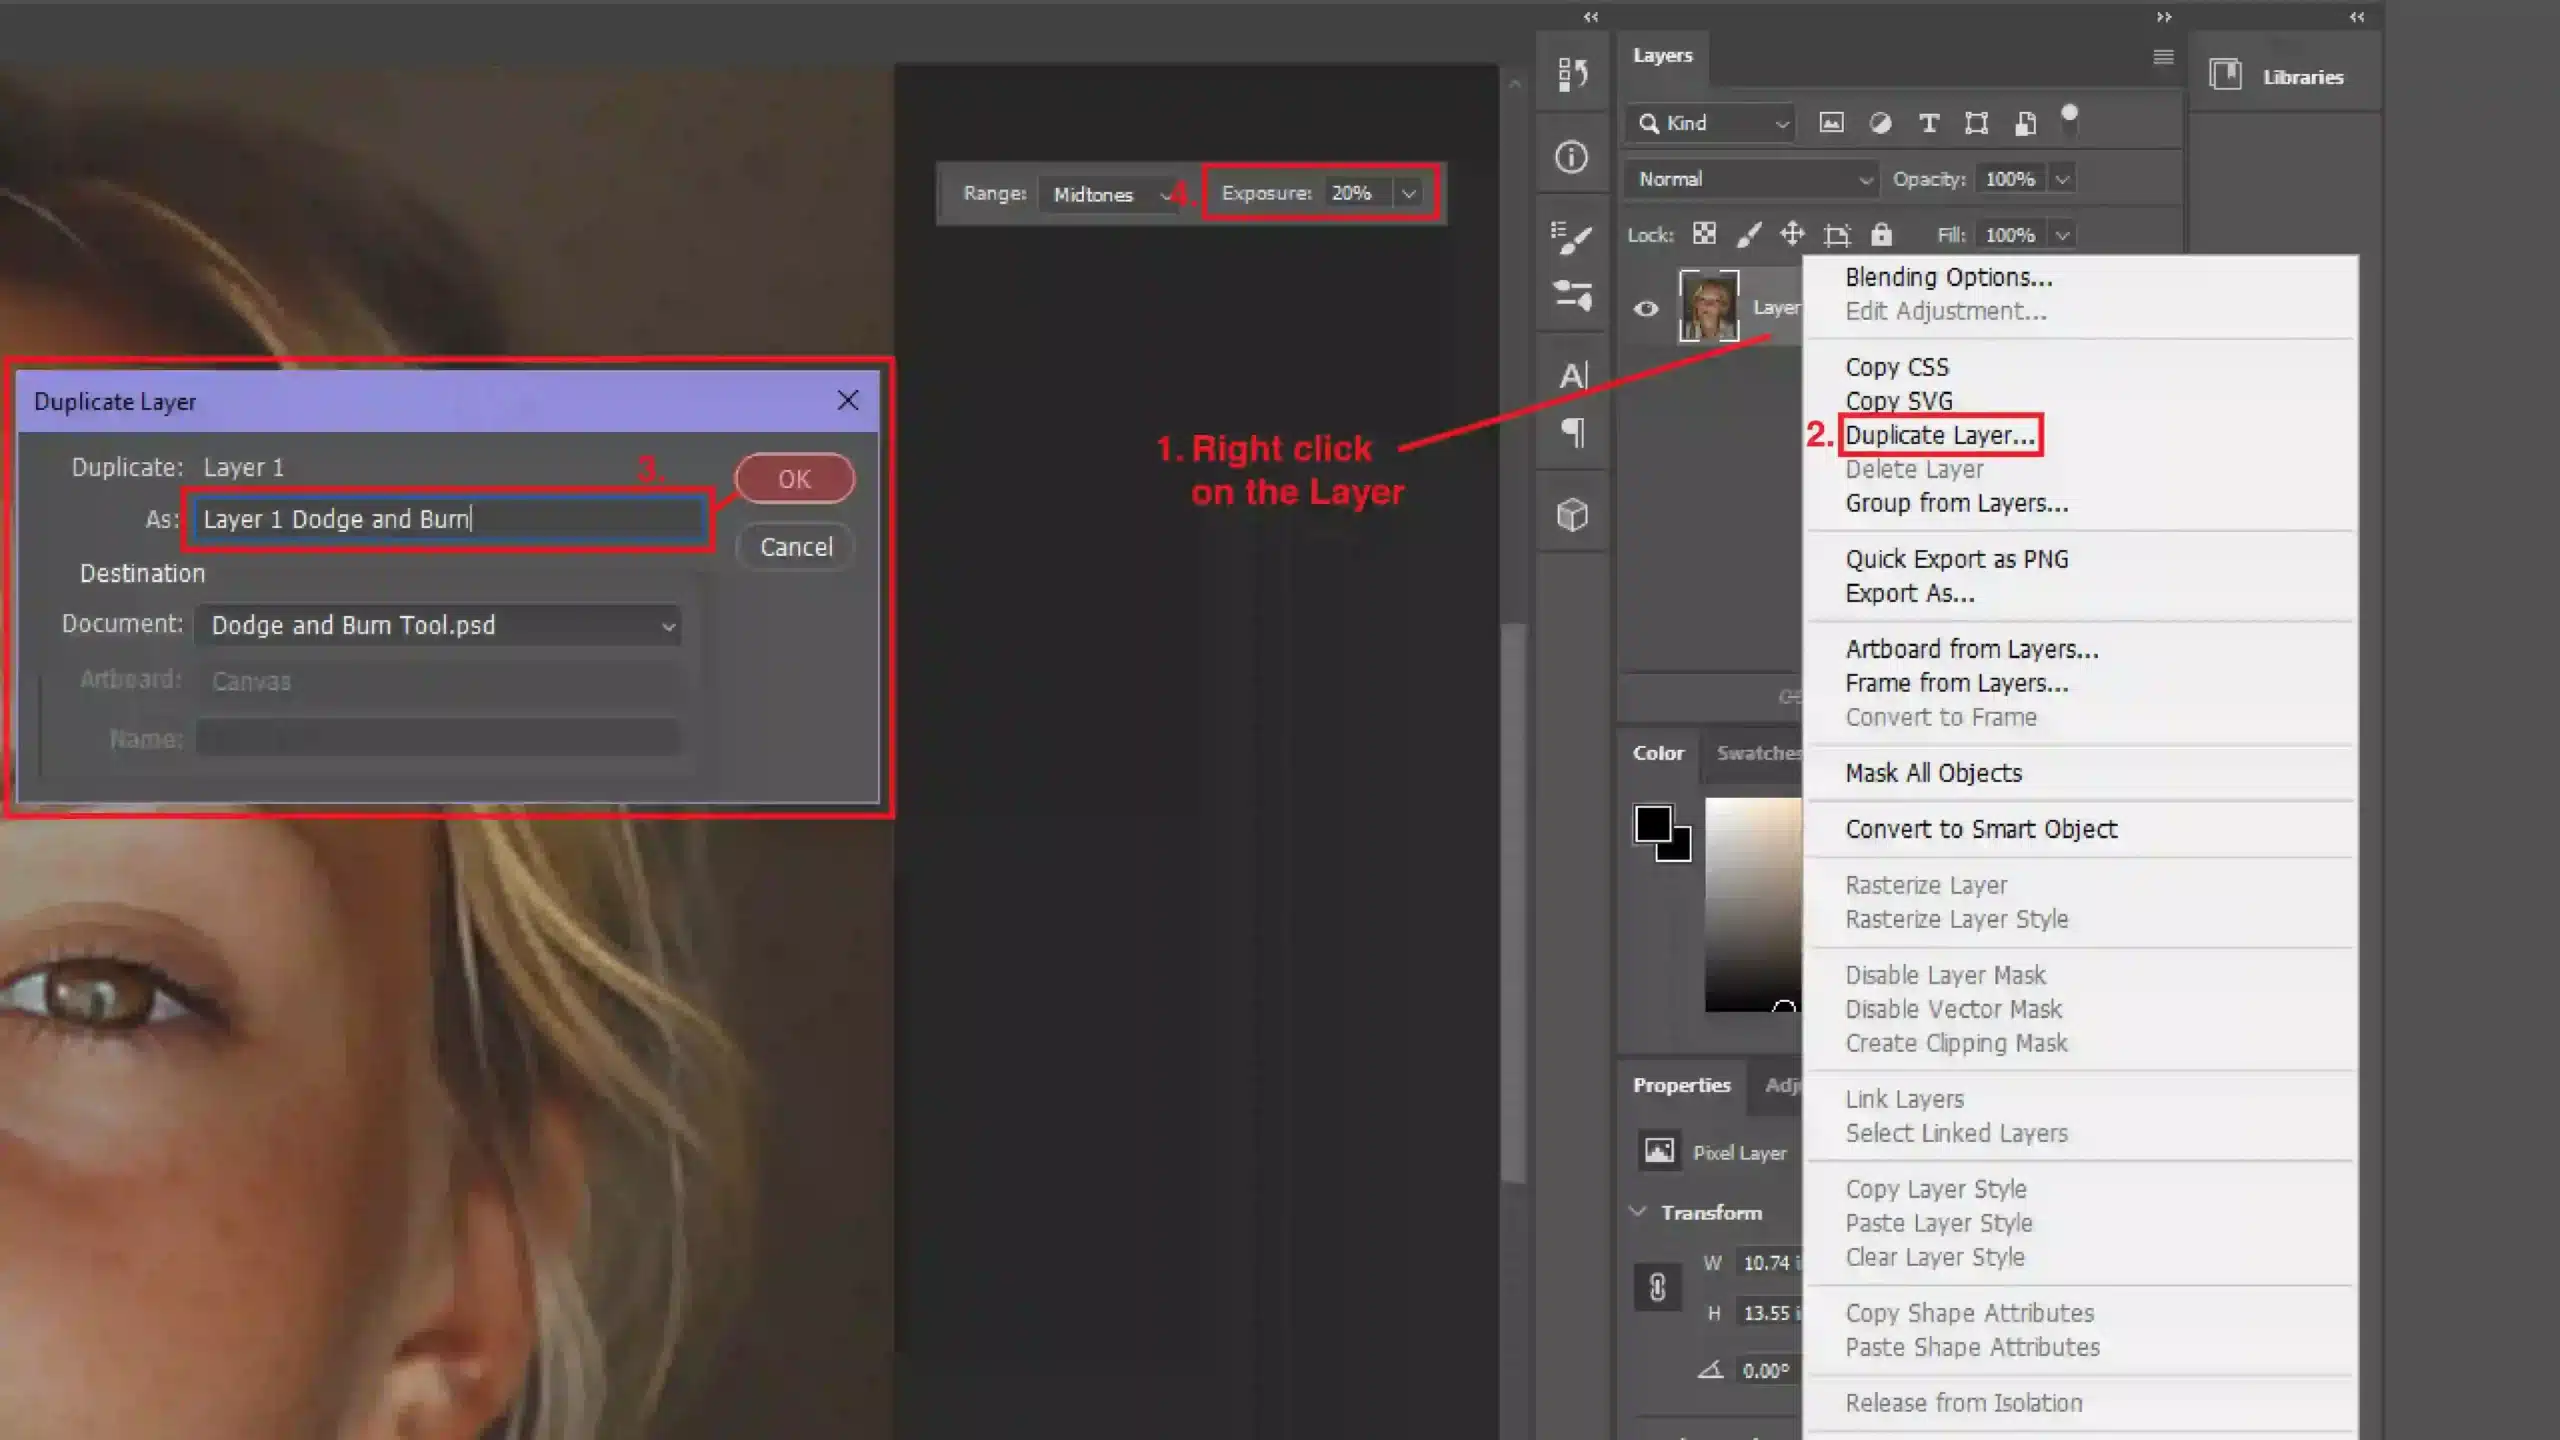
Use New Layers: Always use a new or duplicate layer before applying changes. This allows greater control and non-destructive editing.
Choose Your Brush Wisely. A softer brush creates smoother transitions, while a harder brush tip can make precise adjustments faster.
Practice Gentle Strokes: Avoid using harsh strokes. Opt for a lower exposure setting and build up gradually. Also, consider using the soft light blend mode to enhance the effect.
Combine with Dodge Tool: Learn to switch between dodge and burn tools for a balanced image. Lighten and darken areas to achieve the desired contrast.
Overlay Blend Mode for Realism: An overlay blend mode can produce more natural-looking edits. Apply it judiciously to maintain texture and detail.
Protect Tones Option: Utilize the 'Protect Tones' setting to ensure that the colors in your image remain natural as you darken other areas.
Pro Tip: Blend different techniques using the dodge and burn tools on separate layers. This way, you can revert or adjust changes without affecting the original image.
Using the Brush Tool with Dodge and Burn in Photoshop
The brush tool is a versatile feature in Adobe Photoshop and is essential for painting your image. You can adjust the brush tip’s size, shape, and hardness. It’s crucial in retouching because it allows precision in areas you want to paint.
When using the brush tool, access the options bar to switch between different settings effortlessly. Here, you can choose between various types and modes to suit your needs; whether you aim to create smoother transitions or define areas clearly.
Combining the Brush Tool with Dodge and Burn
The magic happens when you combine the brush anddodge and burn tools. Dodging means lightening and burning means darkening specific parts of your image. This technique helps enhance overall contrast and bring details to focus.
To keep things non-destructive, always use a new layer or a new blank layer. You paint on it without affecting the background. With Dodge, select light areas to make them brighter. For Burn, you darken sections that need more depth.
Remember to adjust the exposure gently, as too much can make the adjustments appear unnatural. Use low settings around 10-20% and build up. This keeps your edits subtle and refined.
Advanced Techniques with the Brush Tool in Photoshop
For those who want to go beyond basic dodging and burning, try advanced techniques like using the blend mode. Soft Light mode enhances natural light and shadow areas. Experiment by painting with black to darken and white to lighten.
Utilize adjustment layers such as Curves or Levels for added control. This lets you fine-tune your image without modifying the main layer. You can always revisit these layers and make further adjustments.
Moreover, integrating masks ensures that parts of your image stay unaffected while you focus on certain areas. It’s an indispensable approach for detailed work.
Mastering these techniques makes your Photoshop process efficient and professional.
Pro Tip: Utilize layers to organize your edits and make changes easily later. Check out this Photoshop layering tutorial to find out everything you need!
Advanced Techniques for Dodge and Burn in Photoshop
We often overlook simple yet effective techniques when we think about perfecting our photos. So, let’s discuss advanced methods to use dodge and burn tools in Adobe Photoshop.
These techniques might seem intimidating initially, but trust me, they are easier than they look.
Layer Masks and Dodge and Burn
Layer masks are your best friend when using dodge and burn tools. They allow you to target specific areas without affecting the whole image.
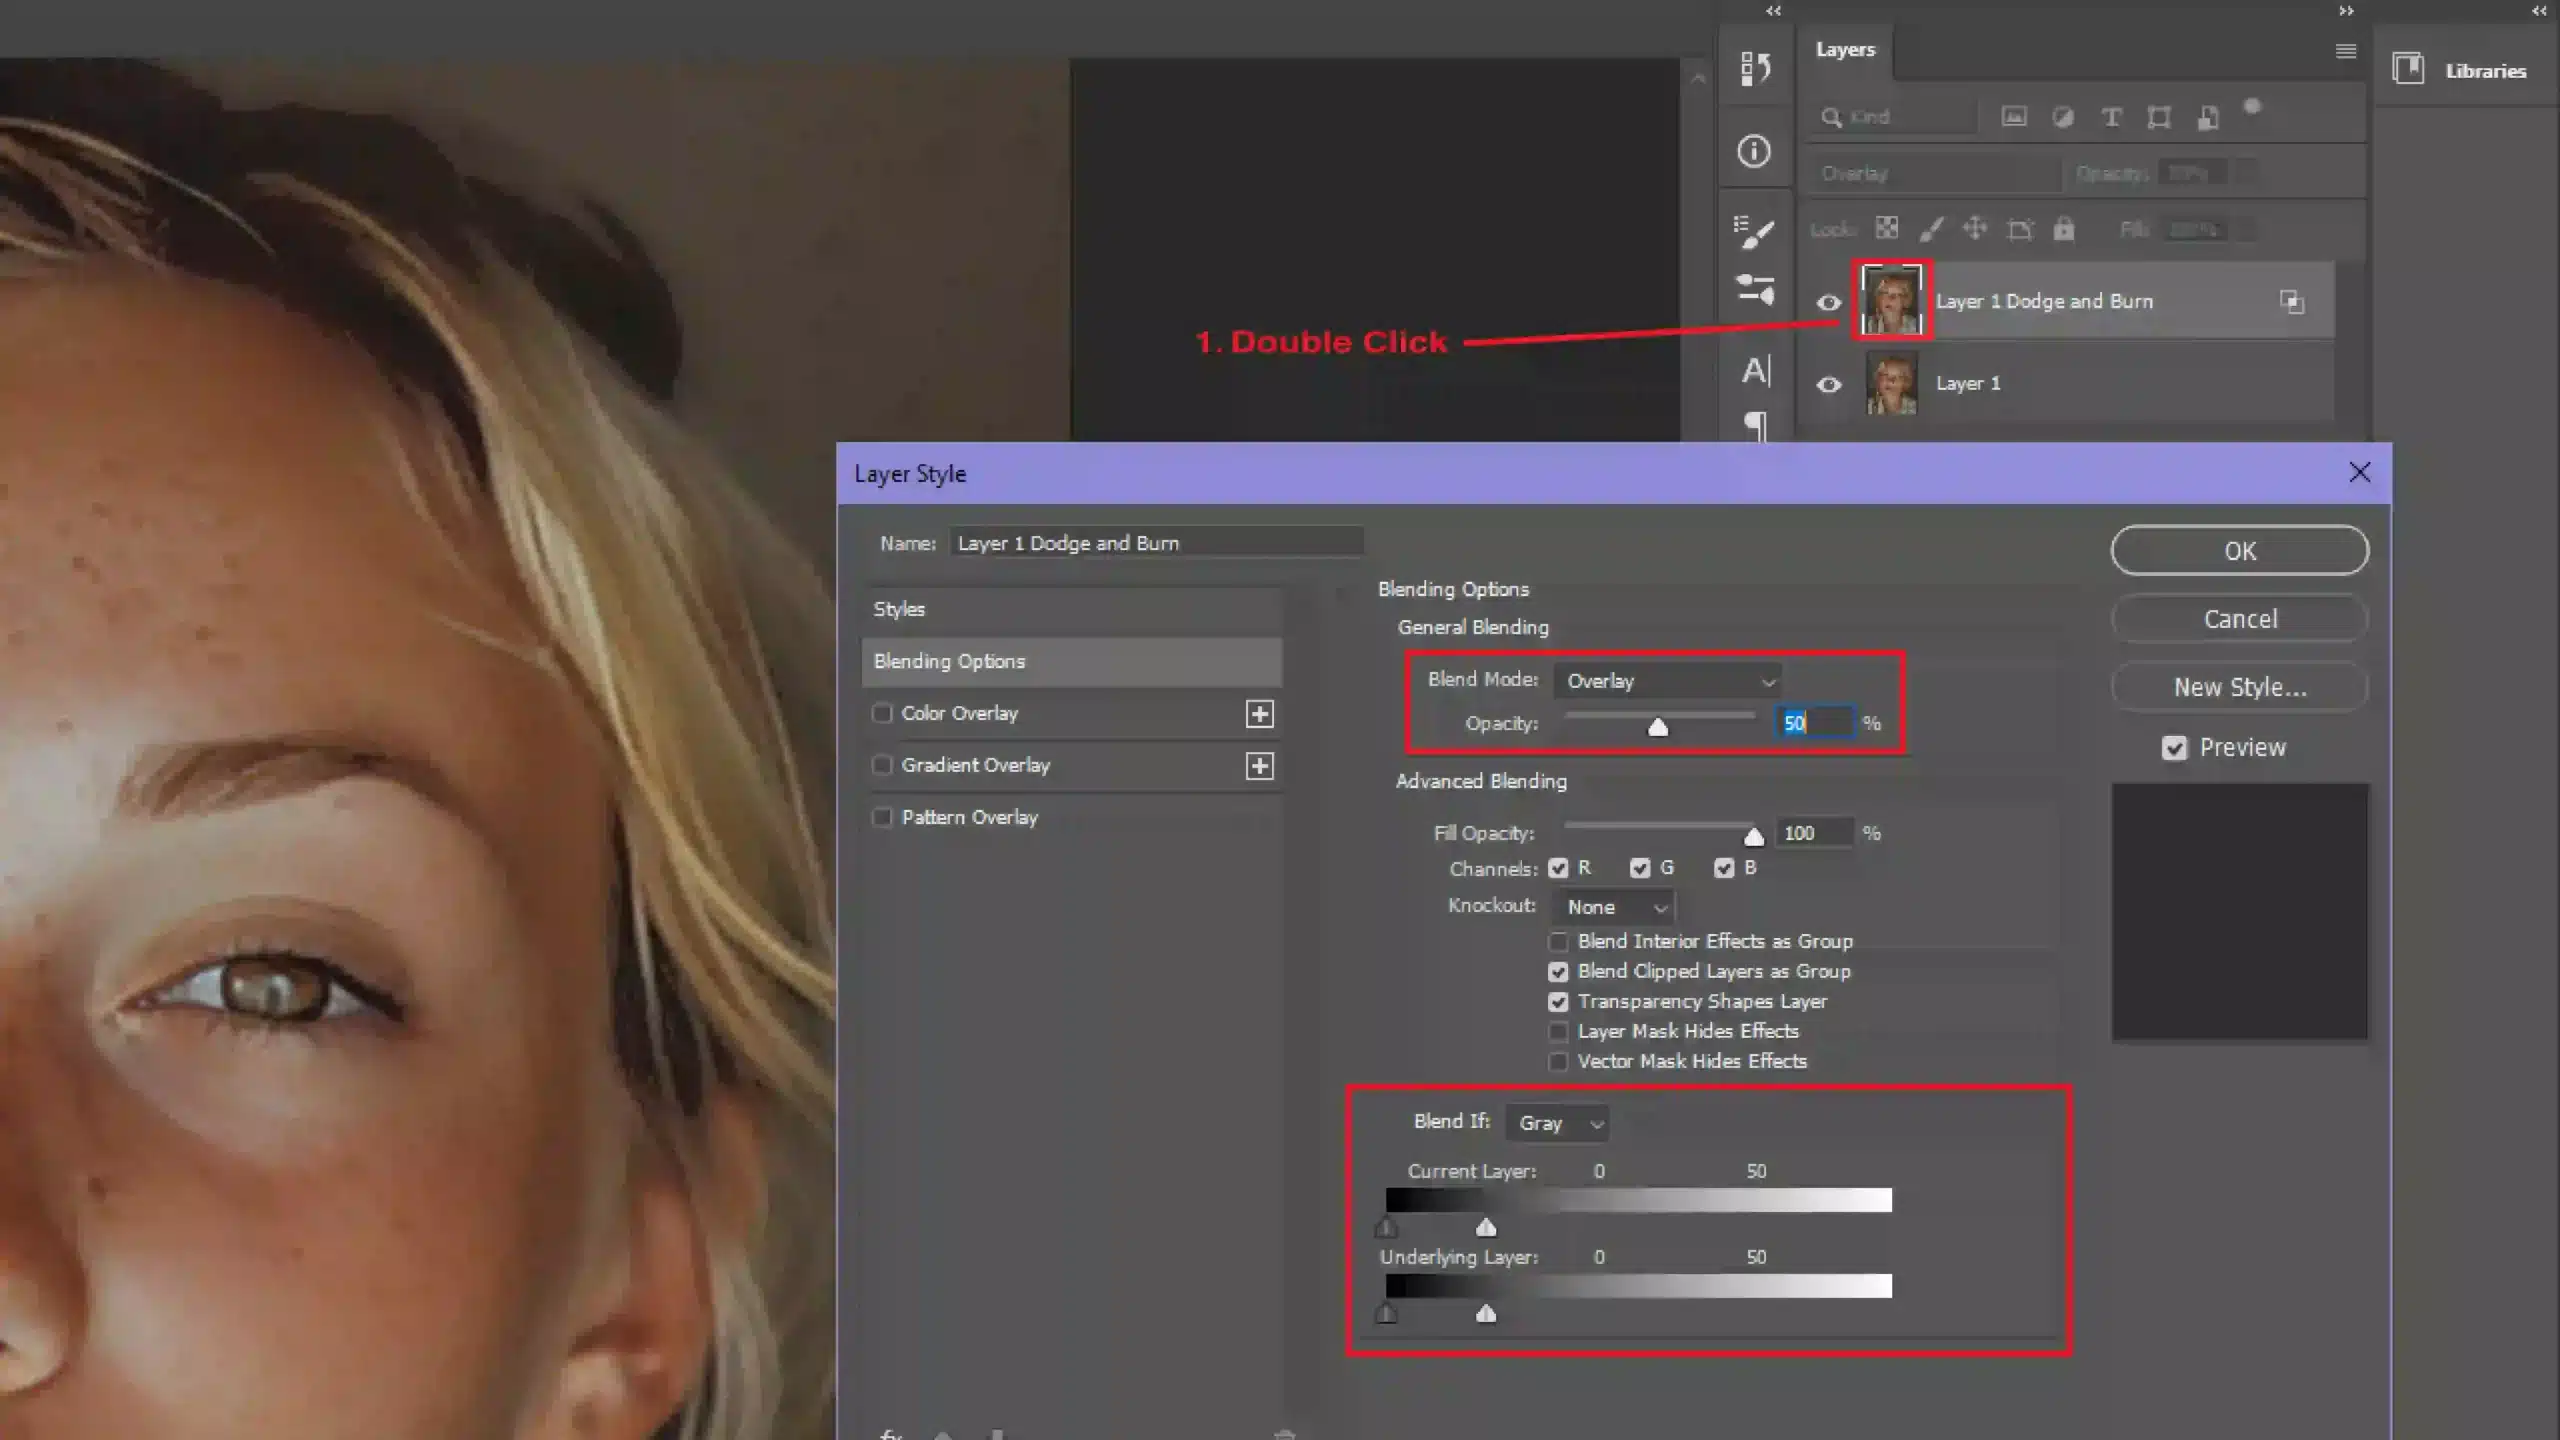
1. First, fill a new layer with 50% gray.
2. Set the blending mode to Overlay.
3. Next, use the dodgetool to lighten the areas you want and the burn tool to darken others.
This non-destructive method means you’re not altering the original image. Keep adjusting the opacity of the brush for subtle effects.
Using Gradients with Dodge and Burn
Gradients add a soft transition between light and dark areas.
1. Create a new layer and set it to Overlay blending mode.
2. Use the gradient tool to apply a black-to-white gradient over the image.
This technique is great for self portraits, as it helps emphasize the lighting. Switch between the dodge and burn tools to make adjustments where necessary.
Creating Depth and Dimension
Creating depth and dimension in your photos is essential for a professional look. Strategically using dodge and burn tools, you can highlight certain areas and cast shadows on others.
1. Start by creating a new layer.
2. Use the dodge tool to lighten high points like the nose or cheekbones.
3. Switch to the burn tool to darken shadows under the cheekbones and around the jawline.
Creating a Background Layer for Non-Destructive Editing
Having a background layer for non-destructive editing saves you from irreversible changes.
1. Always duplicate your background layer before making any edits.
2. Using an adjustment layer such as curves and levels to fine-tune your image without touching the original.
Combining these adjustments with dodge and burn tools ensures a high-quality final image. Using a new layer also helps you organize your edits better.
Pro Tip: Start with a low-exposure setting for your dodge and burn tools for the most naturalresults, around 10-20%.
Frequently Asked Questions (FAQs)
What is the difference between the Dodge and Burn tools of Photoshop?
Dodge Tool: Used to lighten areas of an image, enhancing details in shadows or mid-tones.
Burn Tool: Used to darken areas of an image, increasing the contrast and depth, particularly in highlights or mid-tones.
What is the shortcut key for the Dodge Burn tool in Photoshop?
The shortcut key for toggling between Photoshop’s dodge and burn tools is O. Pressing O will switch between these tools, depending on which was last used.
What is Dodge and Burn in photo editing?
Dodge and Burn are techniques used in photo editing to selectively adjust an image's exposure. The Dodge tool lightens parts of the image, while the burn tool darkens them. This manipulation helps enhance the photo by correcting exposure in specific areas and bringing out more details or depth.
Where is the Dodge and Burn tool in Photoshop Elements?
In Photoshop Elements, the dodge and burn tools can be found in the 'Enhance' menu under 'Adjust Lighting.' These tools can also be accessed from the toolbar on the left-hand side of the workspace, typically represented by a hand (Dodge) and a clenched fist (Burn) icon.
In conclusion, mastering dodge and burn in Photoshop has been a game-changer for my photography.
This technique has allowed me to add depth and dimension to my images, making them stand out and look more professional. When I first started learning this skill, it completely transformed my editing process and results.
It’s an essential tool for anyone serious about photo editing. If you want to enhance your skills, I highly recommend checking out this Photoshop course and Lightroom course.
Both have provided me with invaluable knowledge and practical tips that have elevated my work to the next level.
If this article has helped you, then Like and Share it with your friends
Discover the secrets of photography with our printable guide! Master essential techniques like aperture, shutter speed, and ISO to create stunning images. Get your free printable PDF now and start turning your snapshots into masterpieces!