
Have you ever wondered how Photoshop’s black and white conversions can add a whole new perspective to your projects?
This article is tailor-made to guide you through the fascinating process so that by the end, the world may seem just a tad more colorful.
Let’s get right into it!
Table of Contents
Reasons for Converting Images to Black and White
Converting images to black and white offers several compelling benefits, each improving the visuals.
Understanding these reasons, along with learning both the essential tools in Lightroom and the essential tools in Photoshop, will guide you in making the right adjustments to create an impactful black and white Image.
Enhanced Emotional Impact
Black and white images often carry a nostalgic and timeless quality. They draw viewer attention by emphasizing emotions over color details.
The absence of color can make an image black by focusing on expressions, gestures, and interactions.
Also, proper white balance in photography can significantly affect the mood and emotion conveyed in an image black and white by ensuring accurate tones.
Improved Focus on Composition
Without the distraction of colors, compositional elements become more prominent. Lines, shapes, textures, and tones gain importance.
This approach can simplify complex scenes into their fundamental components, making it easier to understand the principles of composition, such as the exposure triangle and depth of field.
Highlighting Contrast and Lighting
Black and white conversion draws attention to the contrast between light and shadow. Use this to bring out details lost in colorful distractions.
For instance, using a black and white adjustment layer in Photoshop clarifies these elements meticulously.
Versatility with Adjustment Tools
You can use methods such as the Channel Mixer or Gradient Map to precisely convert images while controlling brightness, contrast, and individual color channels.
Pro Tip: Features like the dodge and burn tools can further enhance your black and white photos.
Eliminating Color Distractions
Removing unwanted color nuances minimizes distractions from the primary subject. A white adjustment layer can target specific areas within an image without affecting other parts.
Understanding how to use selective color in Photoshop can also enhance your white in Photoshop by allowing selective adjustments of certain colors before conversion.
Creating Artistic Effects
Working with monochromes makes creating a unique visual style easier. Experimenting with various adjustment layers can yield great effects that are not possible with colored versions.
- Use High Contrast B&W for dramatic storytelling.
- Soft Light B&W adds subtlety to portraits.
To achieve even more refined artistic effects, consider using smart filters in Photoshop.
By understanding these aspects of black-and-white photography, you leverage powerful editing techniques to produce better imagery.
Simple Black and White Image Conversion in Lightroom
Converting your images to black and white can elevate the emotional impact of your photos. Lightroom offers a straightforward way to achieve stunning black and white versions without losing essential details.
Basic Conversion Method
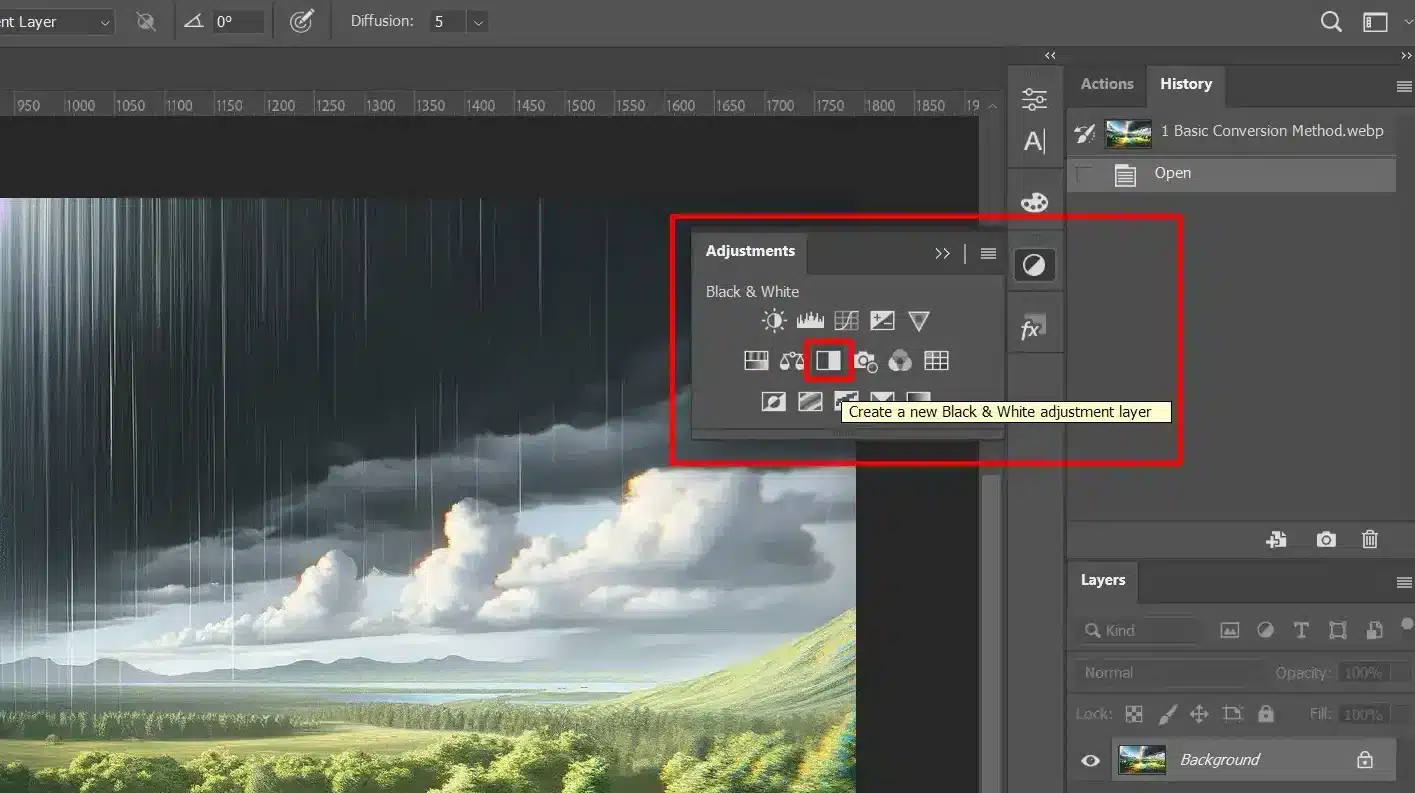
The basic conversion method in Lightroom is simple yet effective in creating powerful black and white photos. Start with your original photo, and head over to the Develop module.
Pro Tip: Utilize the Lightroom shortcuts to quickly access the necessary tools, and explore different types of filters in Photoshop to enhance specific areas of your photo.
From there, follow these steps for a successful black and white conversion:
- Select the image you want to convert. The white border around that thumbnail tells you it's selected.
- In the right panel, locate the Basic panel.
- Click on the "Black & White" option, which should automatically convert your colorful shot into a black and white masterpiece.
With this method, you can quickly convert any color photo into a black-and-white image, offering both efficiency and quality.
As a side note, before converting to black-and-white, it’s beneficial to understand how to adjust white balance so your image has the correct tones and contrast.
Color Adjustment in Black and White
After conducting a simple conversion, fine-tuning individual colors still plays a crucial role in enhancing your black and white image’s depth.
The HSL/Color/B&W panel allows for precise adjustments of different tones which can make or break your final image.
- Open the HSL/Color/B&W panel.
- Adjust sliders like Red, Orange, Yellow, etc., to enhance specific areas.
- Focus on important aspects such as highlights or shadows for better control.
Pro Tip: Understanding how to use lens correction in Lightroom can further refine your image, and using the content-aware fill in Photoshop can help remove any unwanted elements seamlessly.
Simple Photoshop Black and White Images Conversion
If you make an image black and white it can give it a timeless appeal. With Photoshop, you can achieve stunning results with just a few steps.
The simplest methods involve desaturation and grayscale mode, both of which allow for effective monochrome conversion.
Desaturate the Image
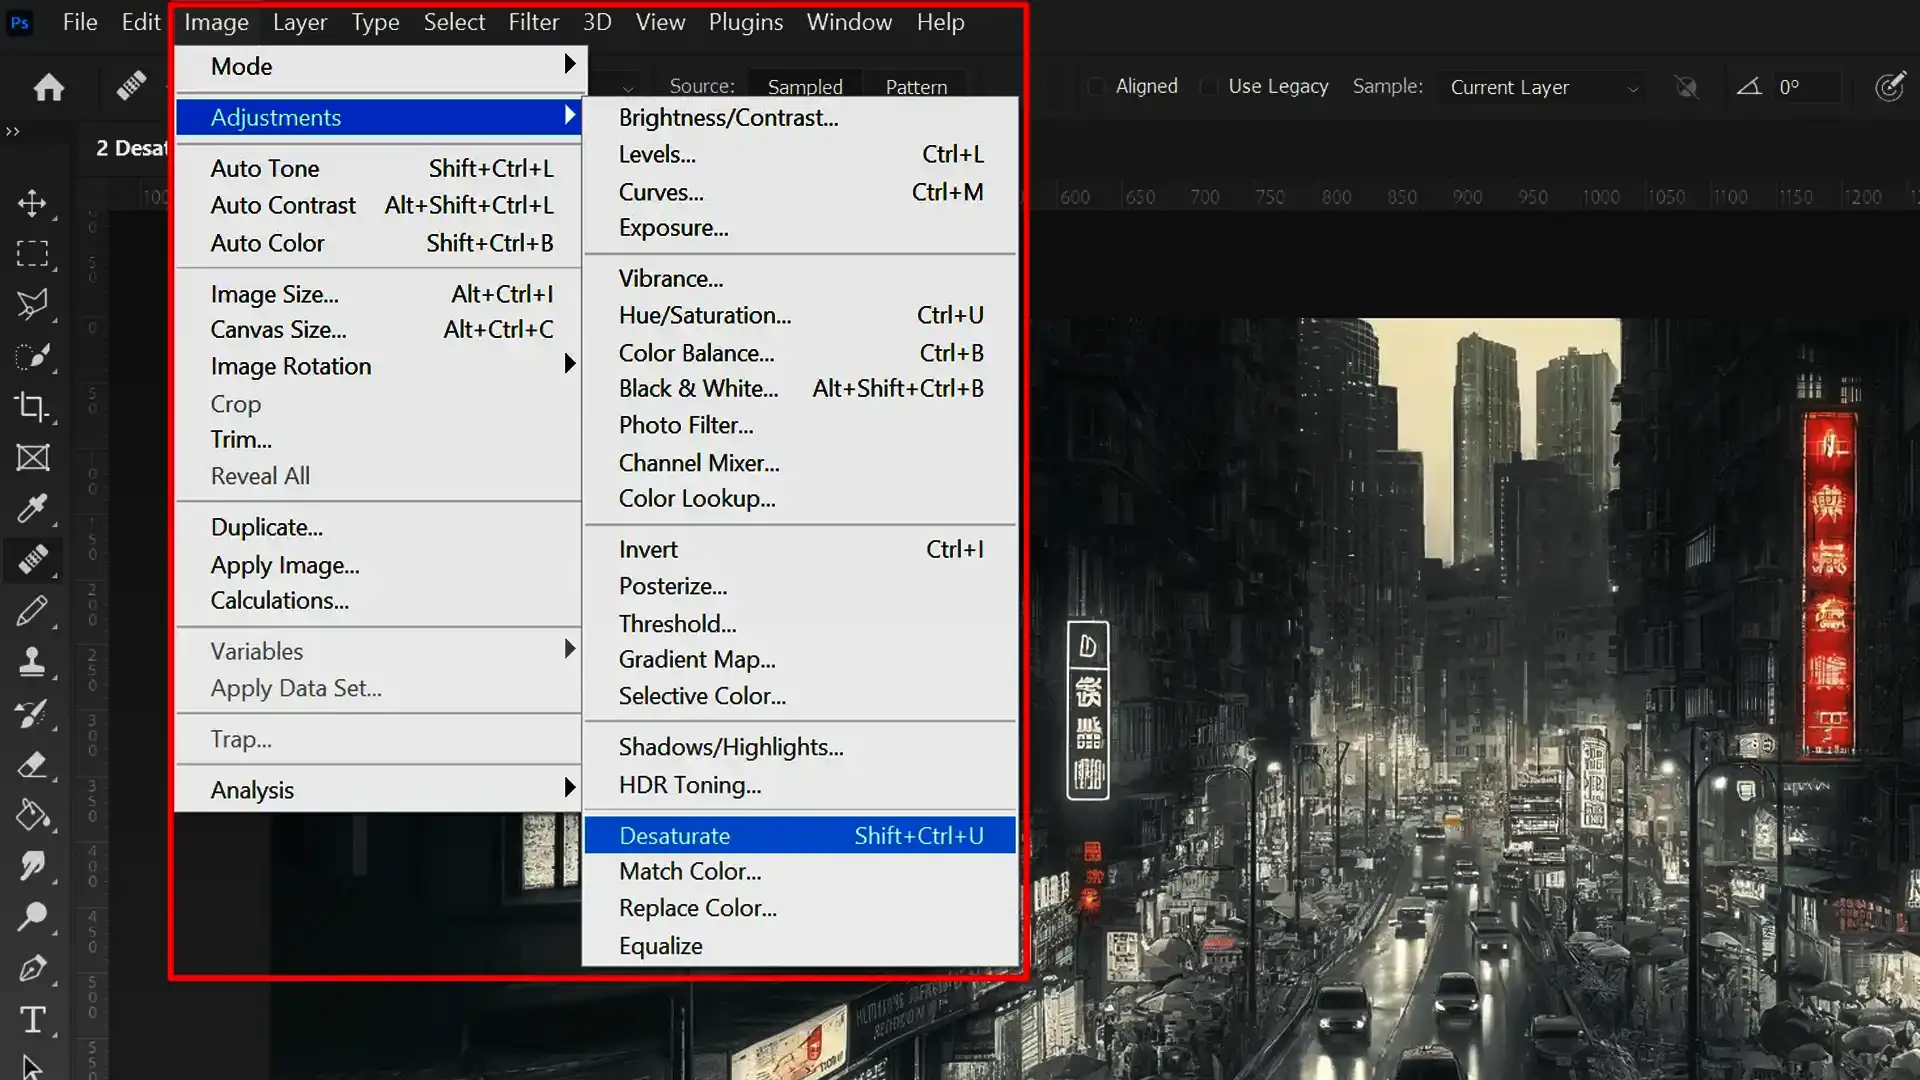
One of the quickest ways to convert a color image to black and white is by desaturating it. This method removes all color saturation from the image, leaving you with shades of gray.
However, this technique can sometimes lead to flat-looking results as it doesn’t offer much control over how different colors are converted into grayscale tones.
- Open your image in Photoshop.
- Go to Image > Adjustments > Desaturate.
- Observe the immediate transformation to a black and white photo.
When using desaturation, it’s important to keep in mind how areas like midtones and dark sections will appear once converted.
To achieve more dynamic results, consider using techniques like the patch tool in Photoshop to refine specific areas.
Grayscale Mode
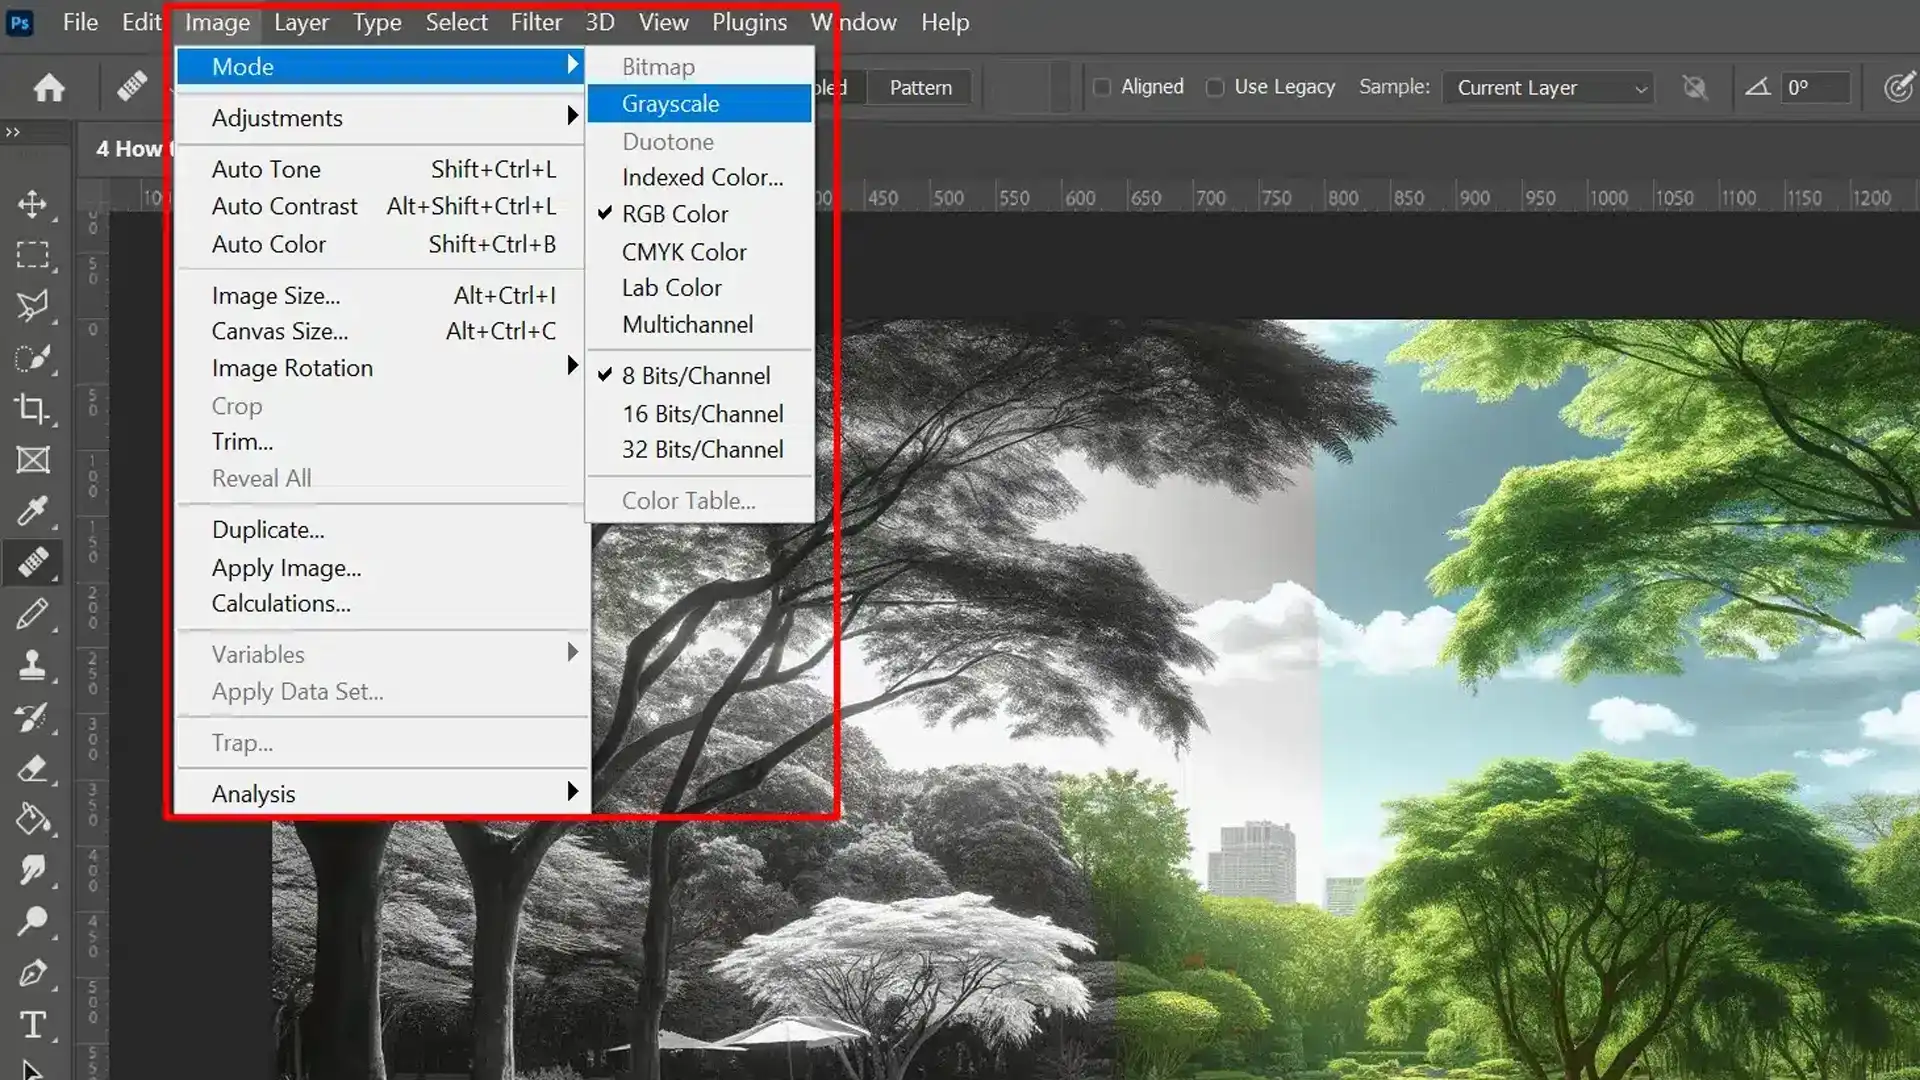
Another straightforward method involves switching the entire document to Grayscale mode.
This process eliminates the color information altogether, simplifying your editing experience but losing flexibility if future color changes are needed.
- With your image open, go to Image > Mode > Grayscale Mode.
- Confirm the dialog box prompt asking if you want to discard color information.
- Your image will now show up as grayscale in your work area.
While using grayscale mode streamlines creating a black and white version, remember that converting it back to color later on won’t retain any former hues or shades accurately.
Both techniques help achieve beautiful monochrome conversions quickly but might require further tweaks, such as using an adjustment layer or gradient techniques, for refined outcomes.
Advanced Black and White Conversion in Photoshop
Converting photos to black and white in Photoshop can dramatically change the feel of an image.
Using advanced techniques, you can achieve powerful results that highlight texture, contrast, and mood.
Let’s dive into a method that offers you both flexibility and control: the Black and White Adjustment Layer
Black and White Adjustment Layer
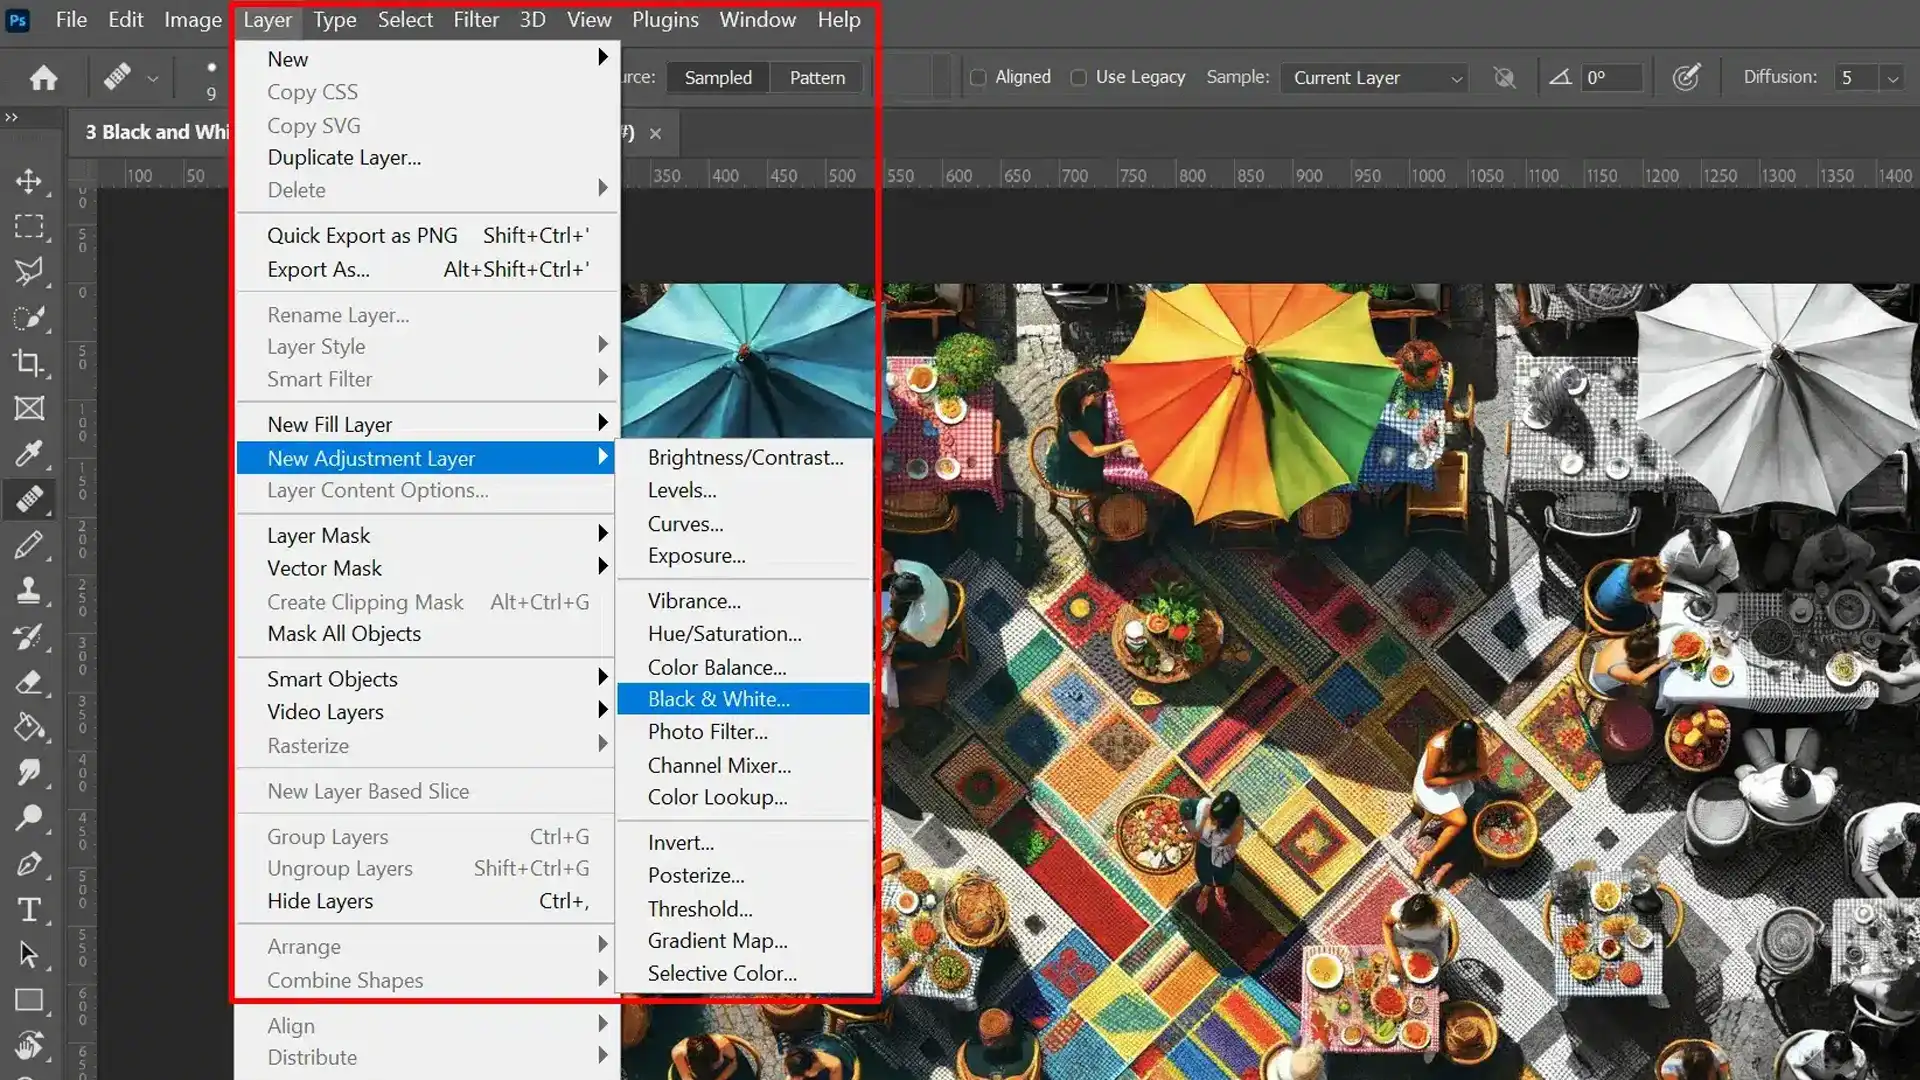
This is a fantastic tool for converting color images to black and white while maintaining full control over the brightness levels of different colors.
With this method, all your important details remain visible, which improves the quality of your final photo.
Create a New Adjustment Layer
- Open your image in Photoshop.
- Go to the "Layer" menu, choose "New Adjustment Layer," then select "Black & White."
- This will add a new adjustment layer to your workspace.
Fine-Tune Each Color with Sliders
Once you add the layer, use sliders under reds, yellows, greens, cyans, blues, and magentas to adjust how each color converts to grayscale. This allows you to highlight critical elements more effectively than simply converting directly to gray.
Use Presets if Necessary
- Press on the dropdown menu beside "Presets" within the properties panel.
- Choose from options like "Maximum Black," "Infrared," or other presets that might fit your vision.
For non-destructive editing, consider converting your layers into smart objects in Photoshop. This will allow for more flexibility in adjustments.
Example of Adjusting Specific Layers for Improvements
Below is an example of how adjusting specific layers can make substantial improvements:
| Effect | |
|---|---|---|
| Reds | Affects skin tones | |
| Yellows | Maintains highlights | |
| Greens | Best for foliage | |
| Cyans/Blues | Adjusts skies |
End by fine-tuning any further adjustments:
- Use curves or levels for further contrast refinement.
- Add grain effects if desired for a vintage look.
Frequently Asked Questions
What is the shortcut for black and white in Photoshop?
The shortcut is Alt + Shift + Ctrl + B (Windows) or Option + Shift + Command + B (Mac).
How to Grayscale in Photoshop?
Go to Image > Adjustments > Desaturate to quickly convert your image to grayscale.
What is the command for black and white in Photoshop?
Use Image > Adjustments > Black & White for precise control over grayscale conversion.
Why can't I use black and white in Photoshop?
Ensure your image mode is set to RGB or CMYK, not Bitmap or Indexed Color.
Conclusion
Mastering black and white photography opens up a whole new world of creative possibilities. Through my own experience, I’ve found that the journey from color to monochrome can dramatically enhance the emotional impact and compositional strength of my images.
Whether I’m adjusting the white balance for a perfect tone or using smart filters to experiment with various effects, each step adds depth and clarity to my work.
Ready to take your photography to the next level? Explore our Photoshop Course or Lightroom Course to gain invaluable insights and techniques to unlock the full potential of your images.
Don’t miss out on the opportunity to enhance your skills and create stunning, timeless photographs.


