Lightning Photoshop: Master Layer Styles for Stunning Effects
Lightning Photoshop: Master Layer Styles for Stunning Effects
Creating strikinglightning effects in Photoshop can transform your images dramatically.
In this guide, I’ll walk you through the process of setting up your document, adding a gradient background, crafting realistic lightning bolts, and enhancing them for a professional finish.
Ready to electrify your designs? Let’s dive in!
Table of Contents
Step 1: Setting Up Your Document
Prepare your workspace with these initial steps. Next, delve into creating a new document to kickstart your project.
Creating a New Document
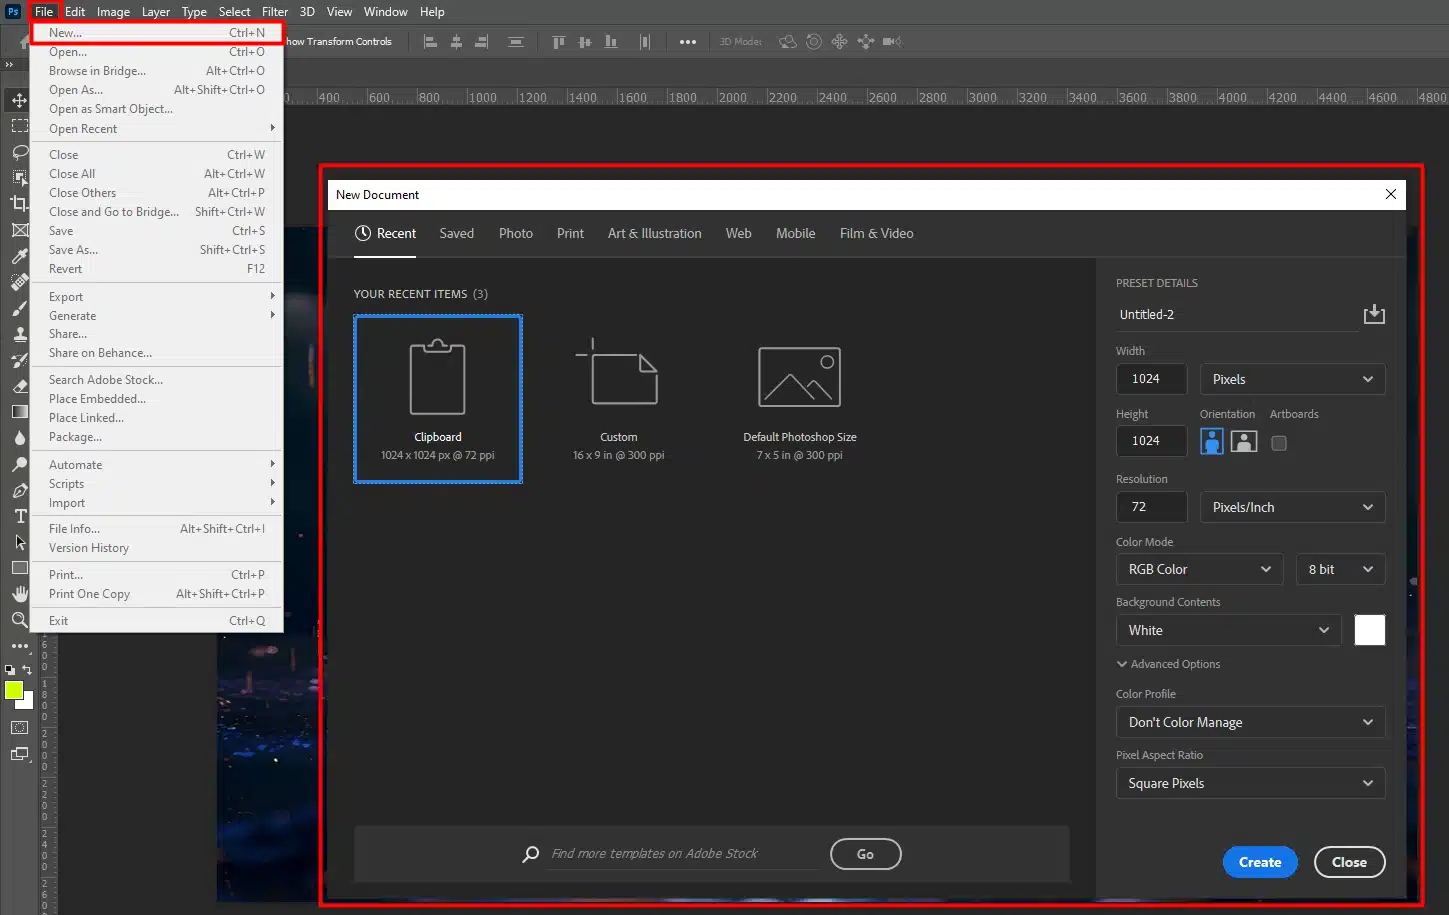
First, open Photoshop and select “File” followed by “New.” A dialog box pops up.
Set the dimensions and resolution. Start simple.
Choosing the Right Dimensions
Dimensions matter. In the dialog box, type the width and height. Standard dimensions are 1920×1080 pixels.
After setting everything, hit “Create.” You now have a empty layer to work with.
Selecting the Background for Lightning Layer
On the right side, you see the layers panel. The background layer is automatically created.
This layer is your canvas. It’s always at the bottom of the stack. Don’t edit this; keep it as your base.
Adding a New Layer
Click the new layer icon to add another layer on top of the gradient layer.
This extra layer can hold your design elements or effects. Always keep different elements on separate layers. This makes editing easier later on.
In Photoshop, using your layers efficiently is important. Remember, having different elements in separate layers helps when making adjustments.
Pro tip: To create realistic lightning, use the brush tool on a fresh layer and play around with layer blending modes for a stunning effect.
For more advanced techniques such as the rainbow gradient, the patch tool is ideal for removing unwanted elements from an image by seamlessly blending the selected area with the surrounding pixels
Step 2: Adding a Gradient Background
With your gradient background in place, the next step is to choose the right gradient tool for fine-tuning your design
Selecting the Gradient Tool
Open Photoshop and get your document ready. On the left toolbar, find the Gradient Tool. It looks like a rectangle with a gradient. Click on it. The options bar at the top will change, showing gradient settings.
Pick a gradient type:
Linear
Radial
Angular
Each one gives a different look. Play around until you find one you like.
Implementing Gradient Effects
With your tool and gradient type chosen, it’s time to apply it:
Make a new blank layer to keep things separate.
Click and drag across your canvas to apply the gradient. The direction of your drag changes how the gradient spreads.
Adjust the opacity to blend the gradient with other elements. Opacity control is significant for a smooth finish.
Use layer masks if needed to refine the gradient. This helps make the transition look perfect.
Adding Texture With Difference Clouds:
Want to add some texture? Use the cloudsdifference filter. It adds cool patterns to your gradient.
Just go to Filter > Render > Difference Clouds and watch the magic happen.
Step 3: Create Realistic Lightning Effect Using Photoshop
To enhance your lightning effect, adding an additional layer is significant for achieving a more dynamic and realistic result.
Incorporating a New Layer into Your Design
First, add a new blank layer. In Photoshop, open your document and press Shift + Ctrl + N. Name it “Lightning Layer” to stay organized. This layer will hold your lightning bolt.
Keeping layers separate makes editing easier without messing up other parts of the image.
It gives you better control, similar to how using Smart Objects in Photoshop can help manage complex edits.
Using the Brush Tool
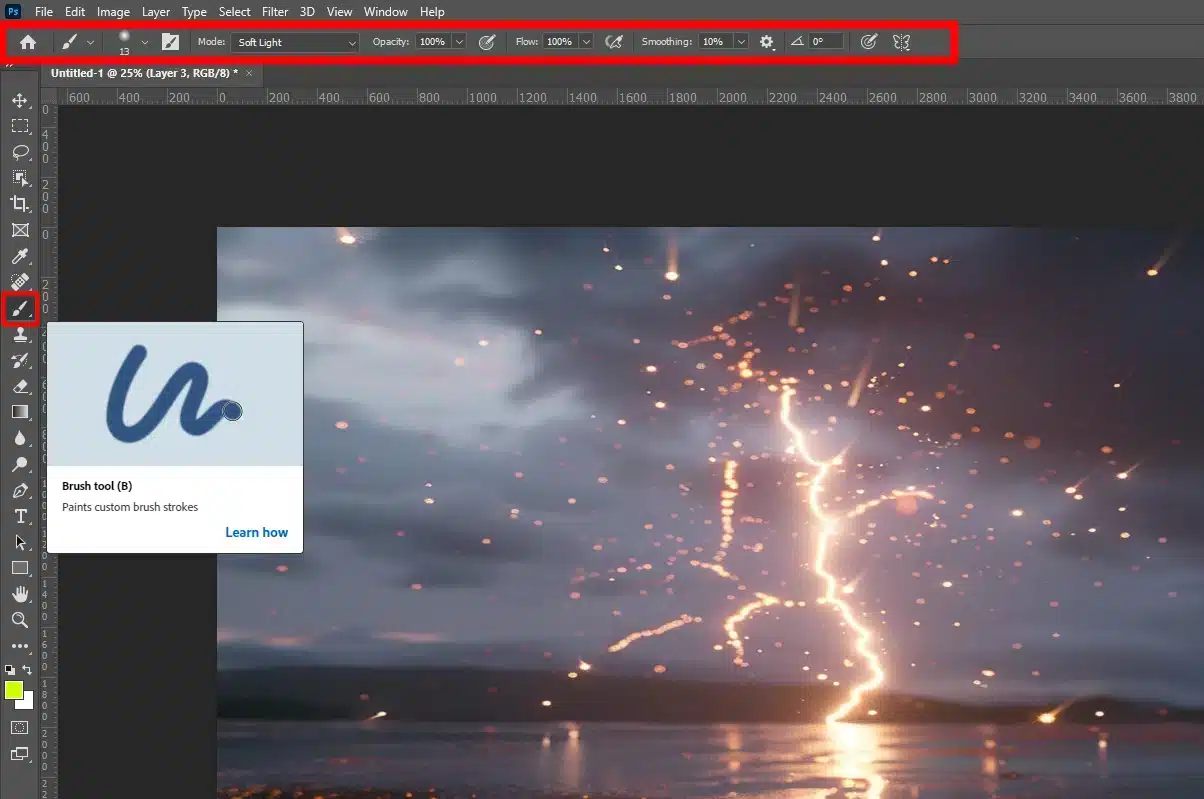
Next, grab the Brush Tool from the toolbar on the left. Pick a small, round, soft brush. Adjust the size as needed. Use white for drawing bolts.
Start painting jaggedlines to form the shape of your lightning bolt. Don’t worry about perfection. Real lightning is random.
Once you finish a stroke, you can free transform it, press Ctrl + T. This way, you can twist and turn your bolts as needed.
Drawing the Lightning Bolts Using Photoshop
Begin drawing your bolts with quick strokes. Ensure each line connects or overlaps for a natural look. Lightning strikes are random, so don’t stress about symmetry.
Next, add some details:
Switch to a smaller brush size for finer branches.
Mix big and small lines for realism.
Change the blend mode of your "Lightning Layer" to "Screen". This removes any dark backgrounds and keeps just the white lines visible.
If you want more depth, duplicate the layer, set one to "Normal", and adjust the opacity. This gives a more dynamic look.
Pro tip: To add texture to your lightning, use the clouds difference filter. Go to Filter > Render > Difference Clouds. This adds realistic variations and makes your lightning pop of the area surrounding the sky.
To effectively remove backgrounds in Photoshop , use tools like the Magic Wand or Quick Selection tool to eliminate dark backgrounds and achieve a clean cutout.
For more advanced techniques, consider using the dodge and burn features allowing you to lighten or darken specific areas of an image, enhancing contrast and adding depth to your photo.
Also, smart objects enable non-destructive editing by preserving the original image data, allowing you to apply transformations and filters without permanently altering the source.
Step 4: Important Settings for Achieving a Realistic Glow Effect
When creating a realistic glow effect in your design projects, several aspects need careful adjustment.
The table below outlines important settings and their functions to help you achieve a natural and visually appealing glow.
Blend Mode, Opacity, Noise, Spread, and Size are important elements to consider for a balanced and effective result.
Aspect
Overview
Blend Mode
Set it to “Screen” to blend the glow naturally with the background.
Opacity
Adjust to control the glow’s intensity. Lower it if it looks too overpowering.
Noise
Add a little noise to give the glow some texture. This makes it look more natural.
Spread
Helps you adjust the glow’s spread. A little spread usually works well.
Size
Adjusts the size of the glow effect. A bigger size usually works well.
Techniques to Apply Outer Glow for the Lightning effect
Alright, let’s make our lightning bolt really pop. Time to add an Outer Glow.
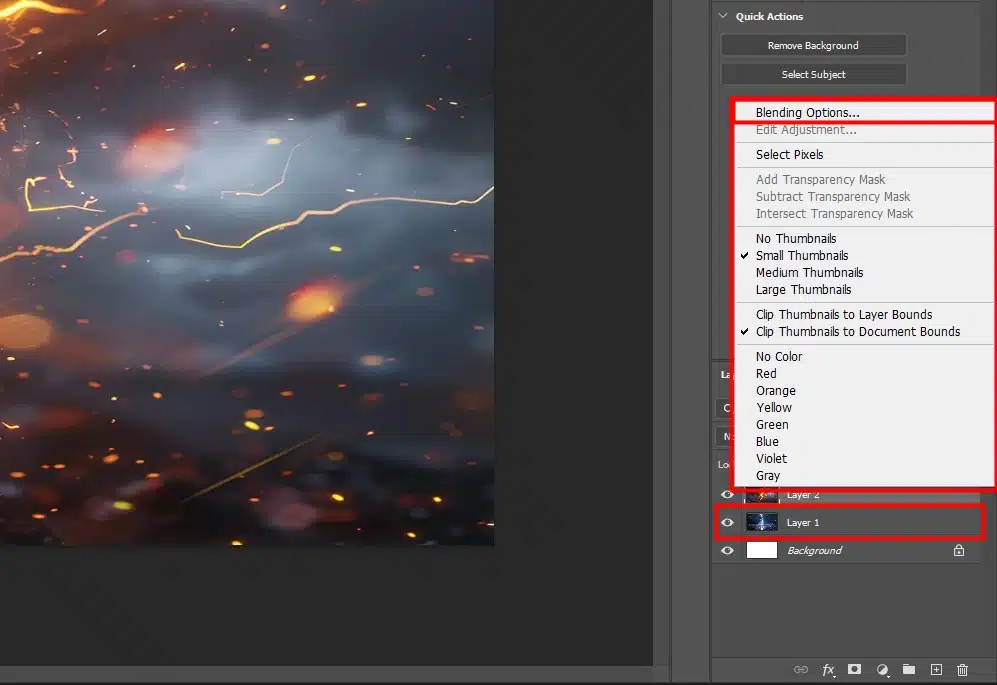
Select your lightning layer. In the Layers panel, right-click and choose "Blending Options". A dialog box opens.
Look for the "Outer Glow" option and check it.
Pick a bright color for the glow; white or light blue works great. Adjust the size slider to see the glow easier.
This step makes the lightning bolt stand out. Think of an eye-catching glow around it. Keep adjusting until it looks just right. It takes a few tries, but don’t rush.
Adjusting the Glow Settings For The Lightning Photoshop
Now, let’s fine-tune our glow to create lightning more realistic. Select “Outer Glow” and find the settings on the right.
Significant Settings to Fine-Tune for Optimal Glow Effects:
Blend Mode: Set it to "Screen". It makes the glow blend with the background naturally.
Opacity: Adjust this to control the glow’s intensity. Lower it if it looks too overpowering.
Noise: Add a little noise to give the glow some texture. This makes it look more natural.
Spread and Size: These sliders help you adjust the glow’s spread. A little spread and bigger size usually work well.
Each change alters how your lightning looks. Play with these settings. Make sure the glow enhances, not overwhelms. Remember, less is sometimes more.
Pro tip: Combine the glow with a subtle gradient layer in the background. This adds depth and makes the lightning bolt look even more engaging. Enjoy creating your electric masterpiece!
For more tips on enhancing your photos, using Lightroom can transform your photo editing process, allowing you to enhance colors, adjust exposure, and achieve professional-quality results with ease.
Also, mastering Lightroom shortcuts can significantly speed up your workflow and improve your photo editing efficiency. These can greatly speed up your workflow and help you achieve professional results.
Step 5: Final Touches For Lightning Effect
We’re almost done, and it’s time to wrap things up.
Adding Colors
Color can make your lightning layers pop. Here’s the plan:
Create a new layer above your lightning layers.
Select the Brush Tool and choose a soft round brush. Pick a bright color like electric blue or yellow.
Gently paint over the lightning bolt on the additional layer. It might look odd now, but hang tight.
Change the layer blending mode to "Color". This makes sure only the color is applied without messing with the intensity.
Adjust the opacity until it blends naturally.
And just like that, your lightning has some dramatic flair! You can add advanced effects like sparkle effects, or even text effects in some cases, for more realism and contact with some element.
If you would like to upgrade your knowledge, you can use the background blur or soft glow feature to create a shallow depth of field effect, which highlights your subject by softening the background.
Blending the Lightning
Let’s make the lightning fit in smoothly:
Select your lightning layer.
Go to Blending Options.
Set the layer blend mode to "Screen". This keeps the lightning visible and removes the dark background.
If you want to experiment, try "Overlay" or "Soft Light" for different effects.
Use the Lasso Tool to clean up the edges. This tool helps you edit specific parts of the image.
Pro tip: For a touch of realism, use the Difference Clouds Filter. Go to Filter, then Render, and select Difference Clouds. This adds texture and create lightning look more natural.
Remember, practice makes perfect. Keep playing with the blend mode to screen and colors until your lightning looks just right. By blending and adding color carefully, your final image will have both style and realism.
For precision edits, consider using the lasso tool to fine-tune your work. Good luck!
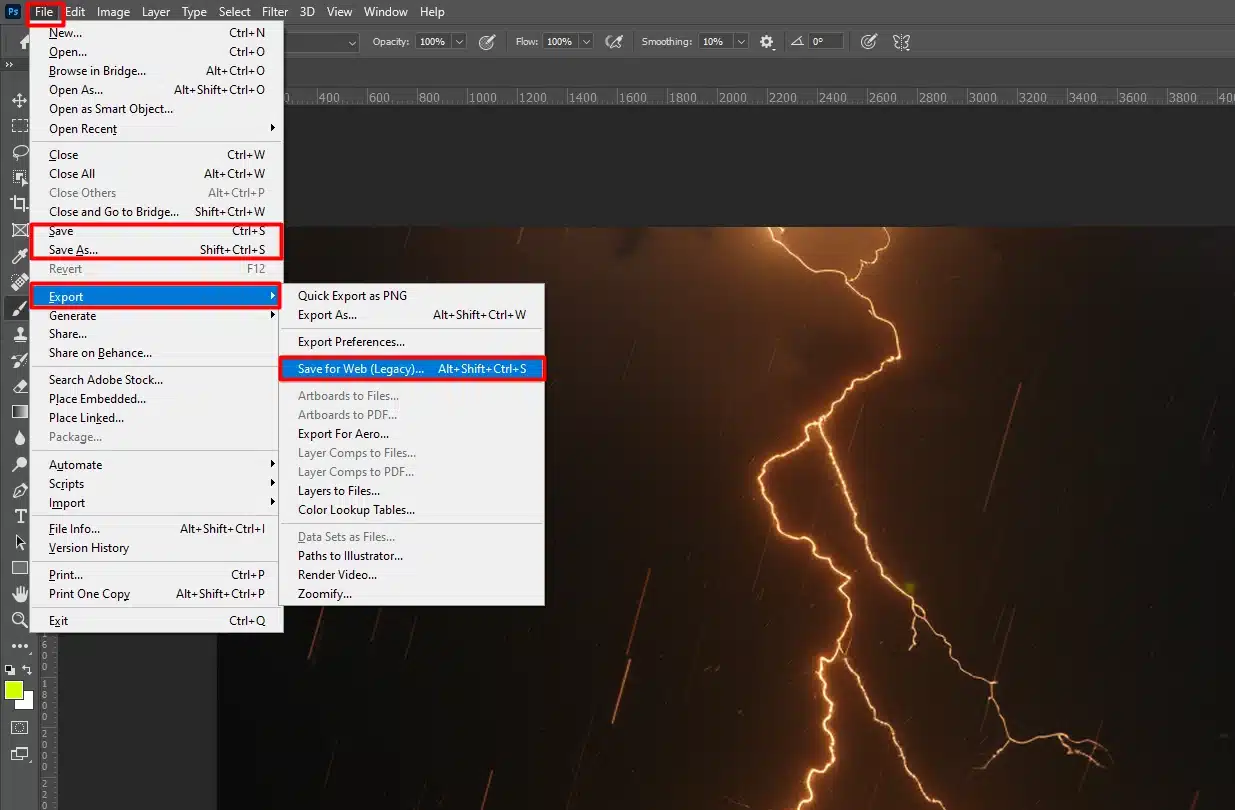
Step 6: Saving and Exporting Your Project
You’ve put in the hard work, now it’s time to save and share your masterpiece. First, save your document in Photoshop’s PSD format to keep all your layers intact for future editing.
Simply go to “File” > “Save As” and choose .PSD. For sharing online or using in other projects, export your image.
Go to “File” > “Export” > “Save for Web (Legacy).” Choose your file type: JPEG for photos, PNG for transparent backgrounds, or GIF for simple animations.
Adjust the quality settings to balance file size and image quality. Hit “Save” and you’re done! Now your stunning, create lightning-filled image is ready to amaze the world.
Common Mistakes When Creating Lightning
While creating lightning effects in Photoshop can be incredibly rewarding, there are several common mistakes that can hinder the quality of your work. Here are some pitfalls to avoid:
Overusing Glow Effects
It’s easy to get carried away with outer glow and other lighting effects. Too much glow can make your lightning look unrealistic and overly stylized.
Always use a subtle touch and adjust opacity to blend the glow naturally with the background.
Ignoring Layer Management
Proper layer management is important. Many users forget to name their layers or merge too many elements into a single layer, making later adjustments difficult.
Always create separate layers for each element and name them for easy navigation.
Inconsistent Lighting
Lightning should look natural and blend well with other light sources in your image.
Avoid using colors or brightness levels that do not match the ambient light in your scene.
Consistency is important for a realistic effect.
Poor Brush Selection
Selecting the right brush is critical for a realistic lightning effect. A brush that’s too hard or too soft can ruin the appearance of your bolts.
Always use a small, round, and soft brush to create lightning, and adjust the size as needed.
Overcomplicating the Design
Sometimes, less is more. Adding too many details or effects can clutter your image and divert attention from the focal point.
Stick to important elements and make subtle adjustments to enhance the overall look.
Skipping Editing Steps
Many users are eager to finish quickly and skip important editing steps like fine-tuning the glow, adjusting blend modes, or refining with layer masks.
These steps are important for adding depth and realism to your lightning and storms
Ignoring Image Resolution
Low-resolution images can create lightning effects appear pixelated and unprofessional. Always work with high-resolution files to ensure crisp and clear results.
Adjust the document dimensions and resolution settings at the start of your project.
Forgetting to Save Progress
Photoshop can be resource-intensive, and crashes do happen. Regularly saving your work ensures you don’t lose hours of effort. Use the .PSD format to keep all your layers intact for future adjustments.
By avoiding these common mistakes, you can create stunning and realistic lightning effects that enhance your photos and projects. Practice, attention to detail, and proper technique will help you improve over time.
Frequently Asked Questions (FAQs)
How to Get Lightning in Photoshop?
Open your project in Photoshop.
Go to the 'Layers'panel and create an extra layer for the lightning effect.
Use the 'Brush Tool' from the toolbox and select a suitable lightning brush.
Adjust the brush size and opacity to suit your needs.
Click and drag on the canvas to draw and create lightning.
Is There a Lightning Brush in Photoshop?
Yes, Photoshop includes various brushes, and you can often find lightning brushes in the default set or download them from the internet.
To access or add new brushes, go to 'Window' then 'Brush Settings' and explore the available options or import new ones.
How Can I Add Lightning Effects to a Photo
Open the photo in Photoshop.
Create a new layer for the lightning to preserve the original image.
Select a lightning brush or use the 'Pen Tool' to create custom lightning shapes.
Apply the lightning on the fresh layer and adjust its position and blending mode for a realistic effect.
Enhance the lightning effect by adjusting brightness, contrast, and color settings.
How to Make a Lightning Bolt Shape in Photoshop?
Open a new or existing project in Photoshop.
Select the 'Pen Tool' from the toolbox.
Click to create points and drag to adjust the curves to create lightning bolt shape.
Close the path to complete the shape.
Fill the shape with white or a bright color to mimic lightning.
Add effects like glow or blur for a more dynamic look.
Creating lightning effects in Photoshop can transform ordinary photos into electrifying masterpieces. By following these simple steps, I’ve turned bland images into dynamic, eye-catching visuals.
From setting up your document to adding a gradient background and crafting realistic lightning bolts, each step is straightforward yet powerful. Remember to use layers efficiently and fine-tune your glow settings to make your lightning look natural.
For anyone looking to deepen their skills, I highly recommend my Photoshop course and Lightroom course. They offer step-by-step guidance that will help you master various techniques, including the creation of stunning lightning effects.
Keep experimenting and let your creativity shine. Remember, practice makes perfect.
Happy editing!
If this article has helped you, then Like and Share it with your friends
$2,061.00Original price was: $2,061.00.$1,061.00Current price is: $1,061.00. 27585
Download Your Free Guide Now!
Discover the secrets of photography with our printable guide! Master essential techniques like aperture, shutter speed, and ISO to create stunning images. Get your free printable PDF now and start turning your snapshots into masterpieces!