How to Blur Background in Lightroom: A Step-by-Step Guide
How to Blur Background in Lightroom: A Step-by-Step Guide
Introduction to How to Blur Background in Lightroom
Creating a blurred background in your pictures can put on a professional touch and make your matters stand out. If you’re looking to achieve this effect, Adobe LR is fantastic to use. This guide will provide you with practical tips on how to blur background in Lightroom effectively, with great blur background tips.
Blurring the background in Lightroom helps to draw focus to the main object, creating a beautiful bokeh effect. In this introduction, we’ll walk you through the basics and set the stage for more detailed techniques. Whether you are a beginner or an experienced photographer, mastering these techniques in Adobe Lightroom will significantly improve your photo modification skills.
Table of Contents
Importing and Preparing Your Photo in Lightroom
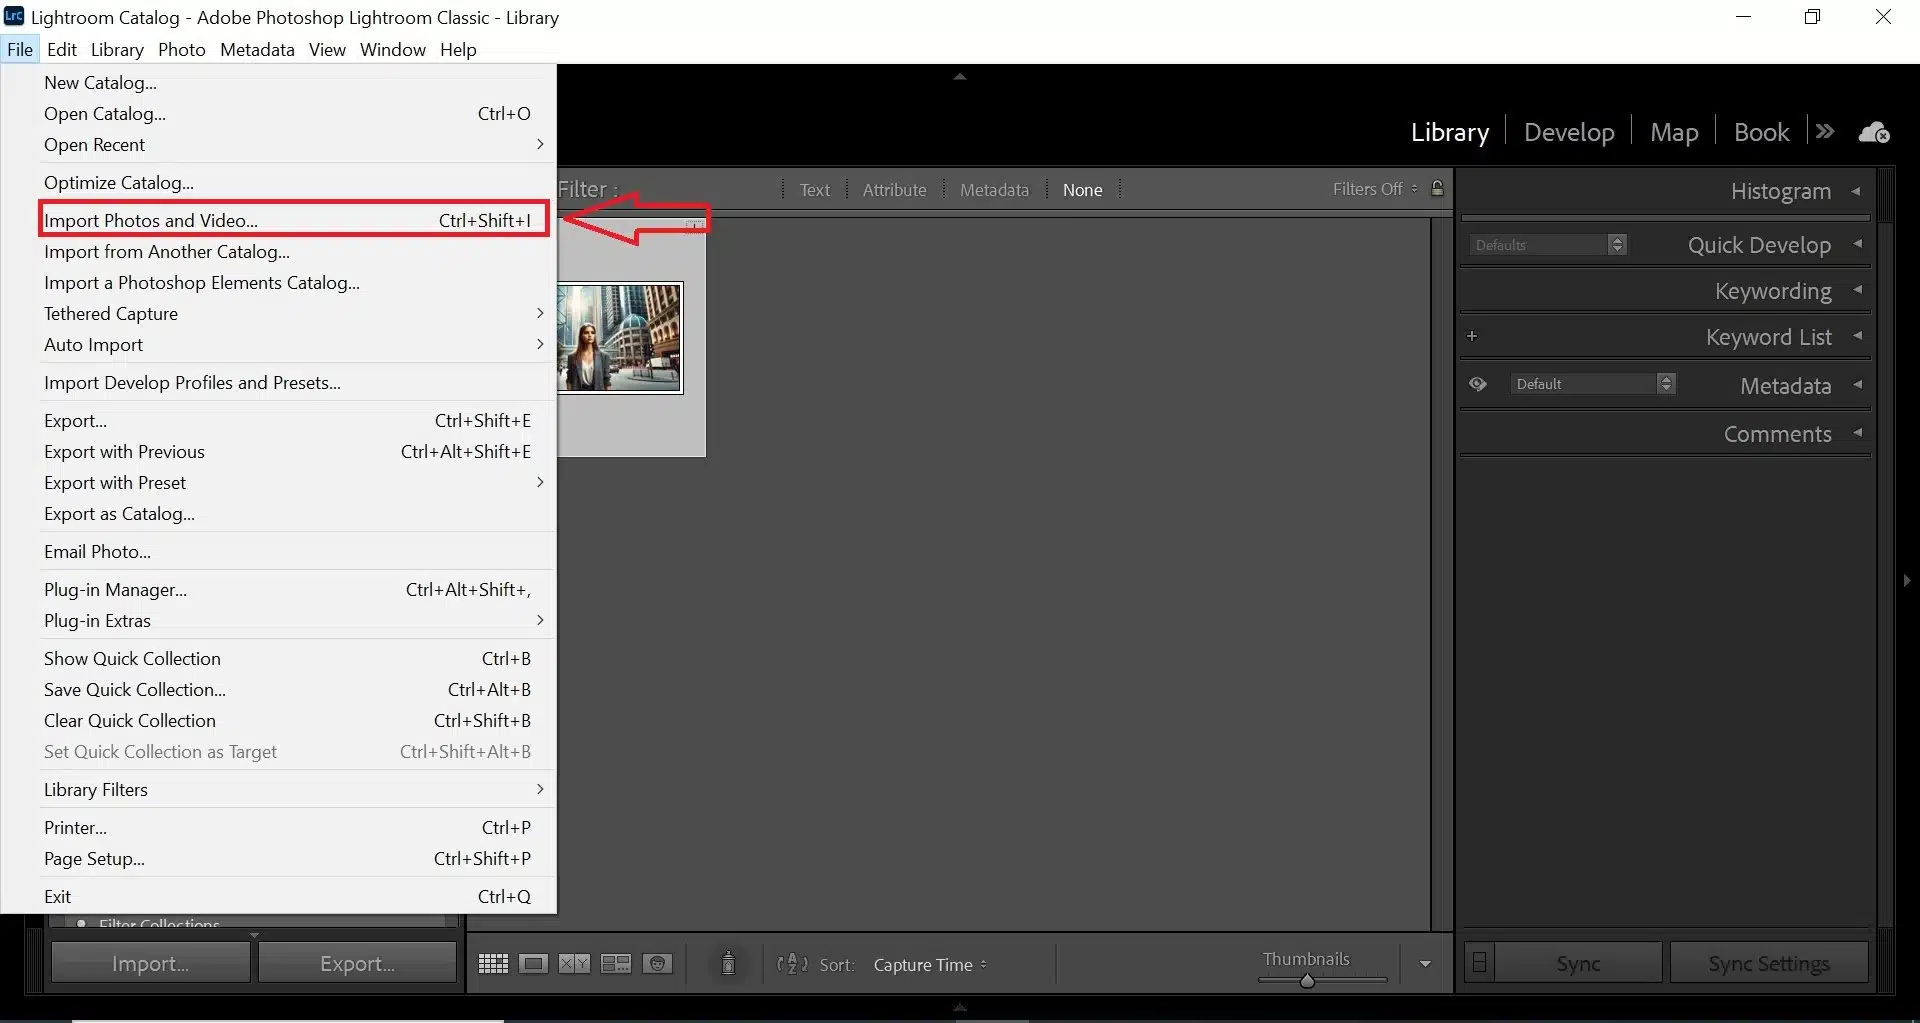
1. Importing Your Photo
Before diving into how to blur background in Lightroom, it’s crucial to start with the basics of importing and preparing your photo. Open LR and select the “File” menu, then select “Import Photos and Videos.” This will open a browser window where you can select the pictures you want to edit. After choosing your images, click “Import” at the bottom right to load them into the Lightroom library. This process ensures your images are correctly loaded and ready for modification.
2. Organizing Your Photo Library
Once your pictures are imported, it’s helpful to organize them within LR. Use collections to group similar pictures together. For example, make a collection for portraits, landscapes, or events. This makes it easier to find and edit specific pictures later. You can also give keywords and ratings to your pictures to streamline your workflow further.
3. Basic Modifications
Switch to the “Develop” module, where you’ll have access to various options for enhancing your images. Start with basic modifications such as exposure, contrast, and white balance to improve the overall look of your photo. If you’re working with presets, apply them now to give your pictures a consistent look and feel. Presets can save time and maintain uniformity across your edits.
4. Preparing for Detailed Editing
For those concentrating on editing portraits, fine-tune these changes to make your picture stand out. Modify the highlights and shadows to bring out the details in your subject’s face. Use the clarity and vibrance sliders to enhance the overall look without overdoing it. With these initial modifications, your photo will be ready for more detailed edits, such as applying blur background tips.
How to Blur Background in Lightroom Using the Adjustment Brush
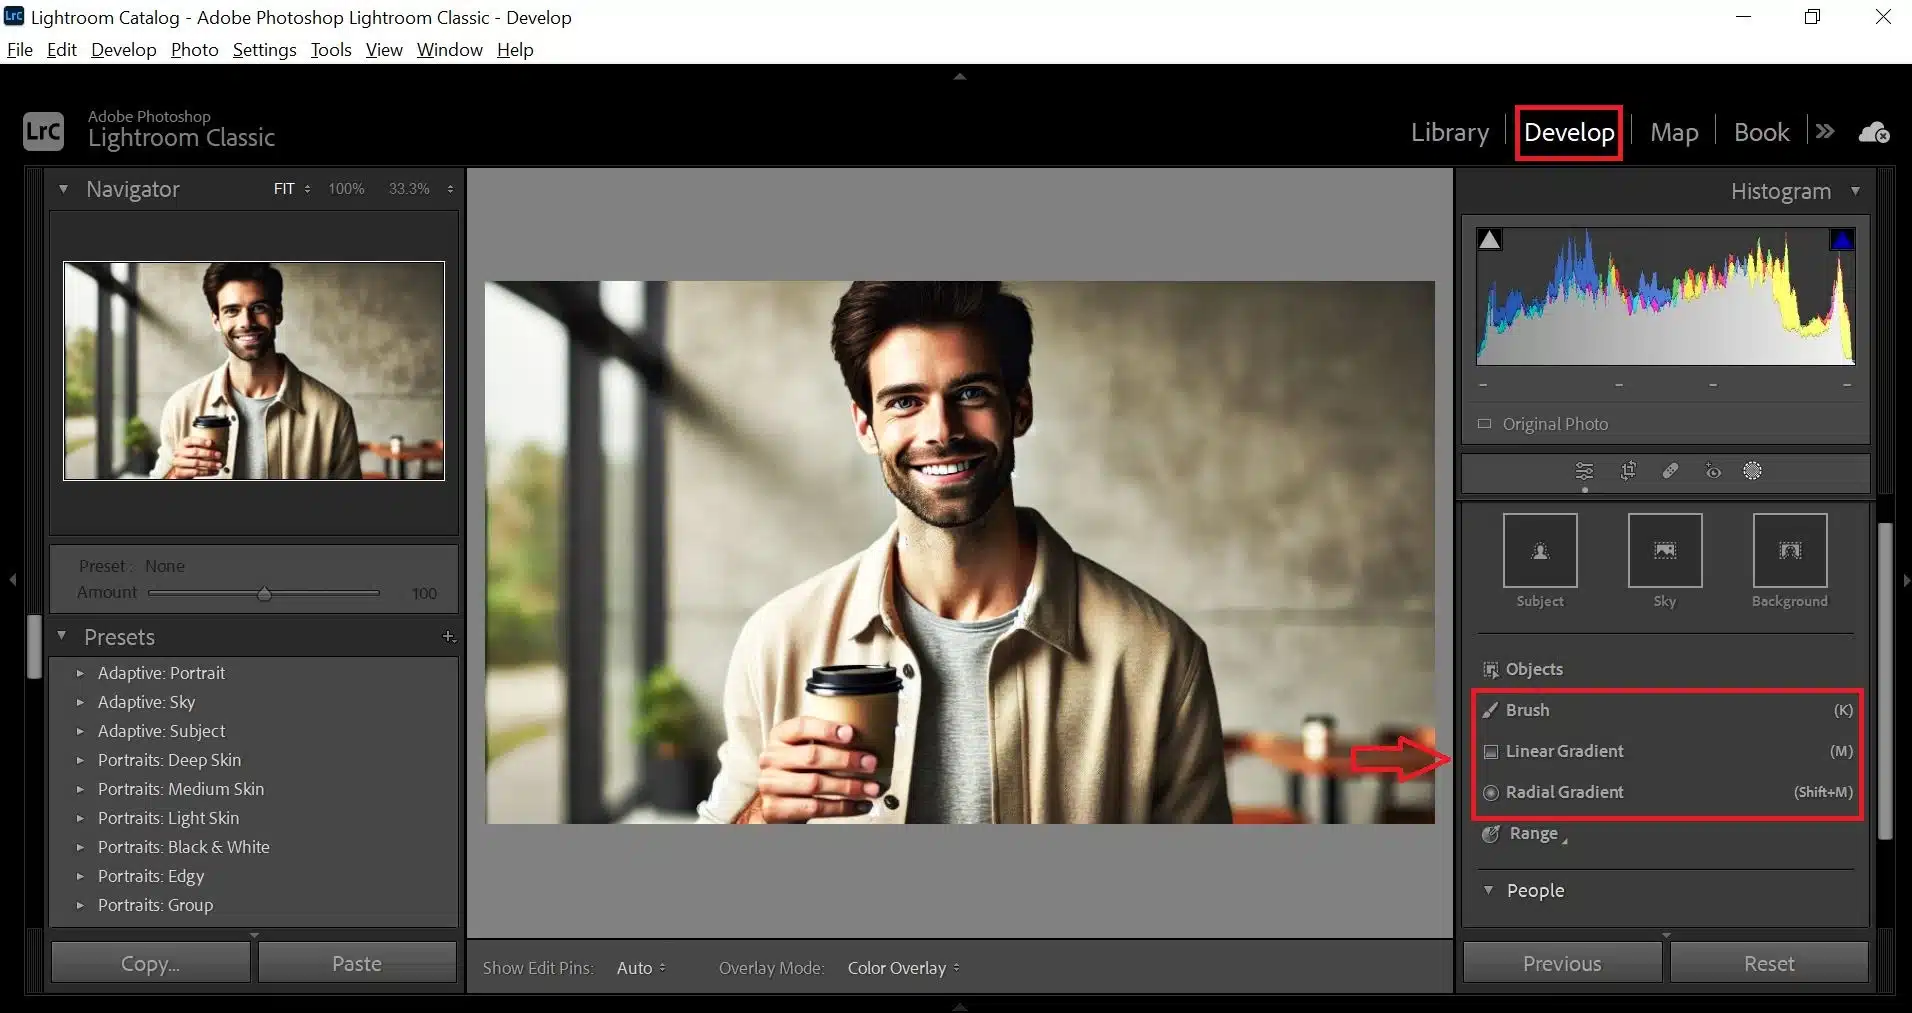
Selecting the Adjustment Brush
To start blurring backscene, you need to select the Adjustment Brush tool. It allows for precise control over specific places of your photo. Open Lightroom and move to the “Develop” module. At the top right of the editing panel, you’ll find its icon. Click on it to activate the tool, to answer your query on how to blur background in Lightroom.
Configuring the Brush Settings
Modify the size, feather, and flow of the brush to match your needs. A larger brush size covers more area, while a smaller size allows for more precision. The feather setting controls the softness of the brush edges, creating a smooth transition between the blurred and sharp areas. Using these methods effectively is crucial for lightroom editing to attain the best results.
Painting the Background
Begin painting over the background areas you want to blur. It’s essential to avoid the subject as much as possible to keep it sharp and concentrated. If you make a mistake, you can hold the Alt key and paint over the areas to erase the modifications. As you paint, you will notice the background starting to blur, achieving the desired effect. This technique is especially useful in wedding photography where the background should not distract from the concentrate point.
Fine-Tuning the Blur Effect
After covering the background with the brush, rearrange the blur effect using the sliders in the adjustment panel. Lower the “Sharpness” sliders to increase the blur effect. For additional fine-tuning, you can also play with the “Contrast” and “Exposure” sliders to get the perfect look. These blur background tips will help you achieve a professional quality blur.
Applying the Radial Filter and Graduated Filter for Blurring background in Lightroom
Mastering how to blur background in Lightroom can transform your images, making your picture pop with stunning clarity against a beautifully softened backdrop. Master these blur background tips to create stunning visual effects.
Using the Radial Filter
Creating a Radial Filter: To apply the Radial Filter for background blur, first, select the Radial Filter tool from the Develop module. Click and drag on the area you want to keep in concentration, usually the main point of the photo. This creates an oval or circular selection. Modify the size and position of the filter to ensure it covers the main point adequately without including too much of the background. For more detailed modifications, you can use the feather slider to control the softness of the transition.
Modifying the Blur Effect: After creating the selection, use the adjustment sliders to blur the background. Lower the "Sharpness" sliders to achieve the desired blur effect. This technique is useful for drawing attention to the main subject while softening the surroundings. Remember to check the "Invert Mask" button if you need to switch the focus from the inside to the outside of the selection.
Using the Graduated Filter
Creating a Graduated Filter: The Graduated Filter is ideal for pictures with a straight horizon or when you want to apply a gradual blur effect. Select the Graduated Filter from the Develop module and select and drag across the area where you want the blur to start. Typically, you would drag from the bottom or top of the photo towards the matter to create a smooth transition. Modify the angle and width of the filter to match the natural lines in your photo.
Fine-tuning the Blur: Once the Graduated Filter is in place, Modify the sliders to blur the background. Lower the "Sharpness" and "Clarity" sliders to add blur. For additional effects, you can also tweak the "Exposure" and "Contrast" sliders to create a more dramatic look. This method works well when enhancing landscapes or cityscapes where the foreground needs to remain sharp.
Enhancing with White Balance and Lens Correction
Adjusting White Balance: While applying blur effects, ensure your photo's colors are accurate by adjusting the white balance. Proper white balance helps maintain the natural look of your photo and enhances the overall modifying effect. Use the white balance to click on a neutral area in your photo or manually Modify the temperature and tint sliders.
Using Lens Correction: To further refine your photo, apply lens correction to remove any distortions caused by your camera lens. This step ensures that the edges of your photo are straight and free of any unwanted curvature, which can be particularly noticeable after applying blur effects. Lens correction helps maintain a professional and polished look in your final image. These are some effective blur background tips for getting professional-looking results.
Here is the plan list of LR to help you choose the most suitable plan according to your needs:
Plan
Monthly Price
Features
Lightroom (1TB)
$9.99
Includes 1TB of cloud storage, and access to LR on mobile and desktop.
Photography Plan (20GB)
$9.99
Includes 20GB of cloud storage, and access to Lightroom and Photoshop.
Photography Plan (1TB)
$19.99
Includes 1TB of cloud storage, and access to Lightroom and Photoshop.
How to Motion Blur in Lightroom
Here are some essential motion blur background tips to enhance your images effortlessly. Creating a motion blur effect in LR can put on a sense of depth and dynamism to your pictures. This technique is different from simply learning how to blur background in Lightroom; instead, it involves simulating movement within your image.
Motion blur can be particularly effective in motion blur photography, where the goal is to convey speed and motion. By using Lightroom creatively, you can reach this classic effect without the need for advanced camera techniques.
Setting Up for Motion Blur
Begin by selecting the photo you want to edit in the Develop module of LR. To make a motion blur effect, you’ll need to use the filters like Adjustment Brush or Radial Filter to isolate the places where you want to simulate motion. This allows you to maintain sharpness in the places you want to keep in concentration while blurring the rest to suggest movement. This approach is similar to background blur techniques in Lightroom but focuses on linear movement.
Applying the Motion Blur Effect
With your area selected, adjust the “Sharpness” and “Clarity” sliders to introduce the bokeh effect. To enhance it, you can also play with the “Contrast” and “Exposure” settings. This helps to make a more realistic and dynamic overlay effect. If you want more control over the bokeh, consider using a plugin designed specifically for creating motion blur effects in LR.
Fine-Tuning and Enhancing the Effect
To ensure your looks are natural, use the feather and flow settings to blend the edges of your selection smoothly. This makes a seamless transition between the blurred and sharp places of your photo. Additionally, you can use the erase tool torefine the edges and remove any unintended blur from key places in your image. Incorporating these blur background tips will help you reach a polished and professional result.
Combining Motion Blur with Wildlife Filming
Motion blur can be particularly effective in wildlife photography, where it can simulate the natural movement of animals. For instance, capturing a running deer or flying bird with a motion blur effect can give a sense of realism and excitement to your photo. Shutter speed is also an important aspect to keep in view while photography. By mastering this technique, you can enhance your wildlife shots and bring them to life.
Here’s a table showing different tools other than LR:
Transforming the color behind your main element can significantly alter the mood and feel of your image. By focusing on color manipulation, you can create a striking contrast or a harmonious blend, depending on your artistic vision.
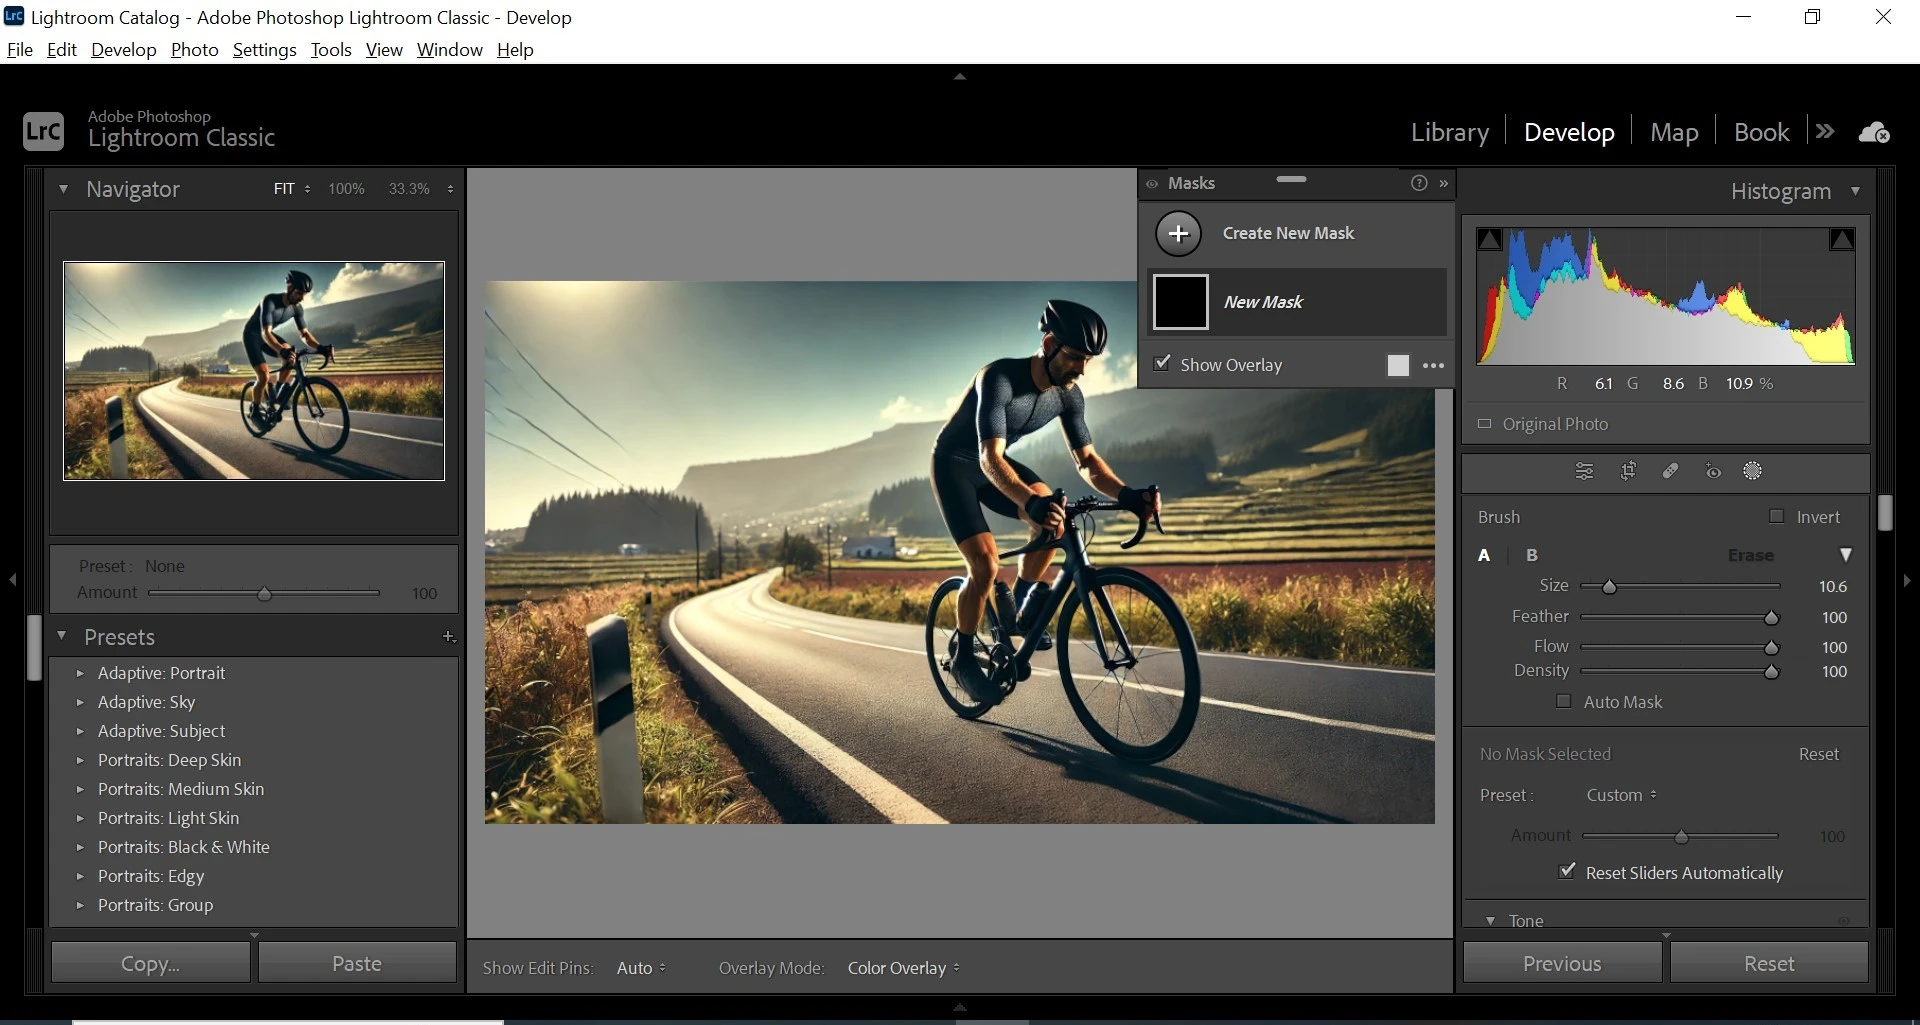
2. Using the Masking Feature
Begin by using the masking feature to isolate your primary element. This ensures that any changes you make will only affect the chosen parts. Carefully trace around the edges to ensure precision and avoid affecting the primary element itself.
3. Applying the New Hue
Once the mask is in place, navigate to the color options and choose the new hue you wish to apply. Experiment with different shades to see which one best complements your primary element. Adjust the intensity and saturation to match your desired effect.
4. Fine-Tuning the Edges
After applying the new color, it’s essential to refine the edges to ensure a seamless transition. Use the feather option to soften the edges, creating a more natural blend between the main element and the surrounding color. This final step will enhance the overall appearance of your modified image.
FAQs on How to Blur Background in Lightroom
How do I blur the background of a photo?
To create a soft focus around the subject, select the part you want to keep sharp and use the brush to make the surrounding areas less distinct. Lowering sharpness will help in creating the desired effect. This technique highlights your subject, making the surrounding elements less noticeable.
Can you blur an area in Lightroom?
Yes! You can begin by selecting the subject using the masking option. Once the subject is isolated, apply the desired edits to the background, such as changing color or adding effects. This allows for a complete transformation of the scene without affecting the main subject.
How do you add a blur mask in Lightroom?
To make the masking effect, start by selecting the brush and lowering the detail settings. Apply this effect to the desired area, adjusting the size and softness of the brush for a smooth transition. Fine-tune the effect to achieve the level of blur you want.
How to Bokeh background in Lightroom?
Start by opening the Develop module and use the radial configuration to draw an oval around the subject. Adjust the feather and blur settings to create a smooth transition between the subject and the background. This will give a beautiful, soft focus effect, perfect for portraits.
Conclusion
Blurring the background in your pictures can truly transform an image, drawing attention to your main subject and creating a professional look. I remember the first time I experimented with how to blur background in Lightroom for a wildlife photo. The result was stunning, with the animal sharply in focus against a beautifully blurred backdrop, bringing the photo to life in a way I hadn’t reached before.
Using the Adjustment Brush, and Radial Filter, and even incorporating blur background tips, you can achieve similar results. Each tool offers unique advantages, and mastering them can elevate your filming to new heights.
If you’re eager to enhance your photo modification skills further, consider enrolling in our courses. Our Photoshop Course and Lightroom Course are designed to help you master these powerful tools. Start your journey towards creating stunning pictures today!
If this article has helped you, then Like and Share it with your friends
Facebook
Twitter
LinkedIn
Pinterest
Have a nice photoshoot!
Learn more about Photo Editing with Lightroom and Photoshop:
Discover the secrets of photography with our printable guide! Master essential techniques like aperture, shutter speed, and ISO to create stunning images. Get your free printable PDF now and start turning your snapshots into masterpieces!