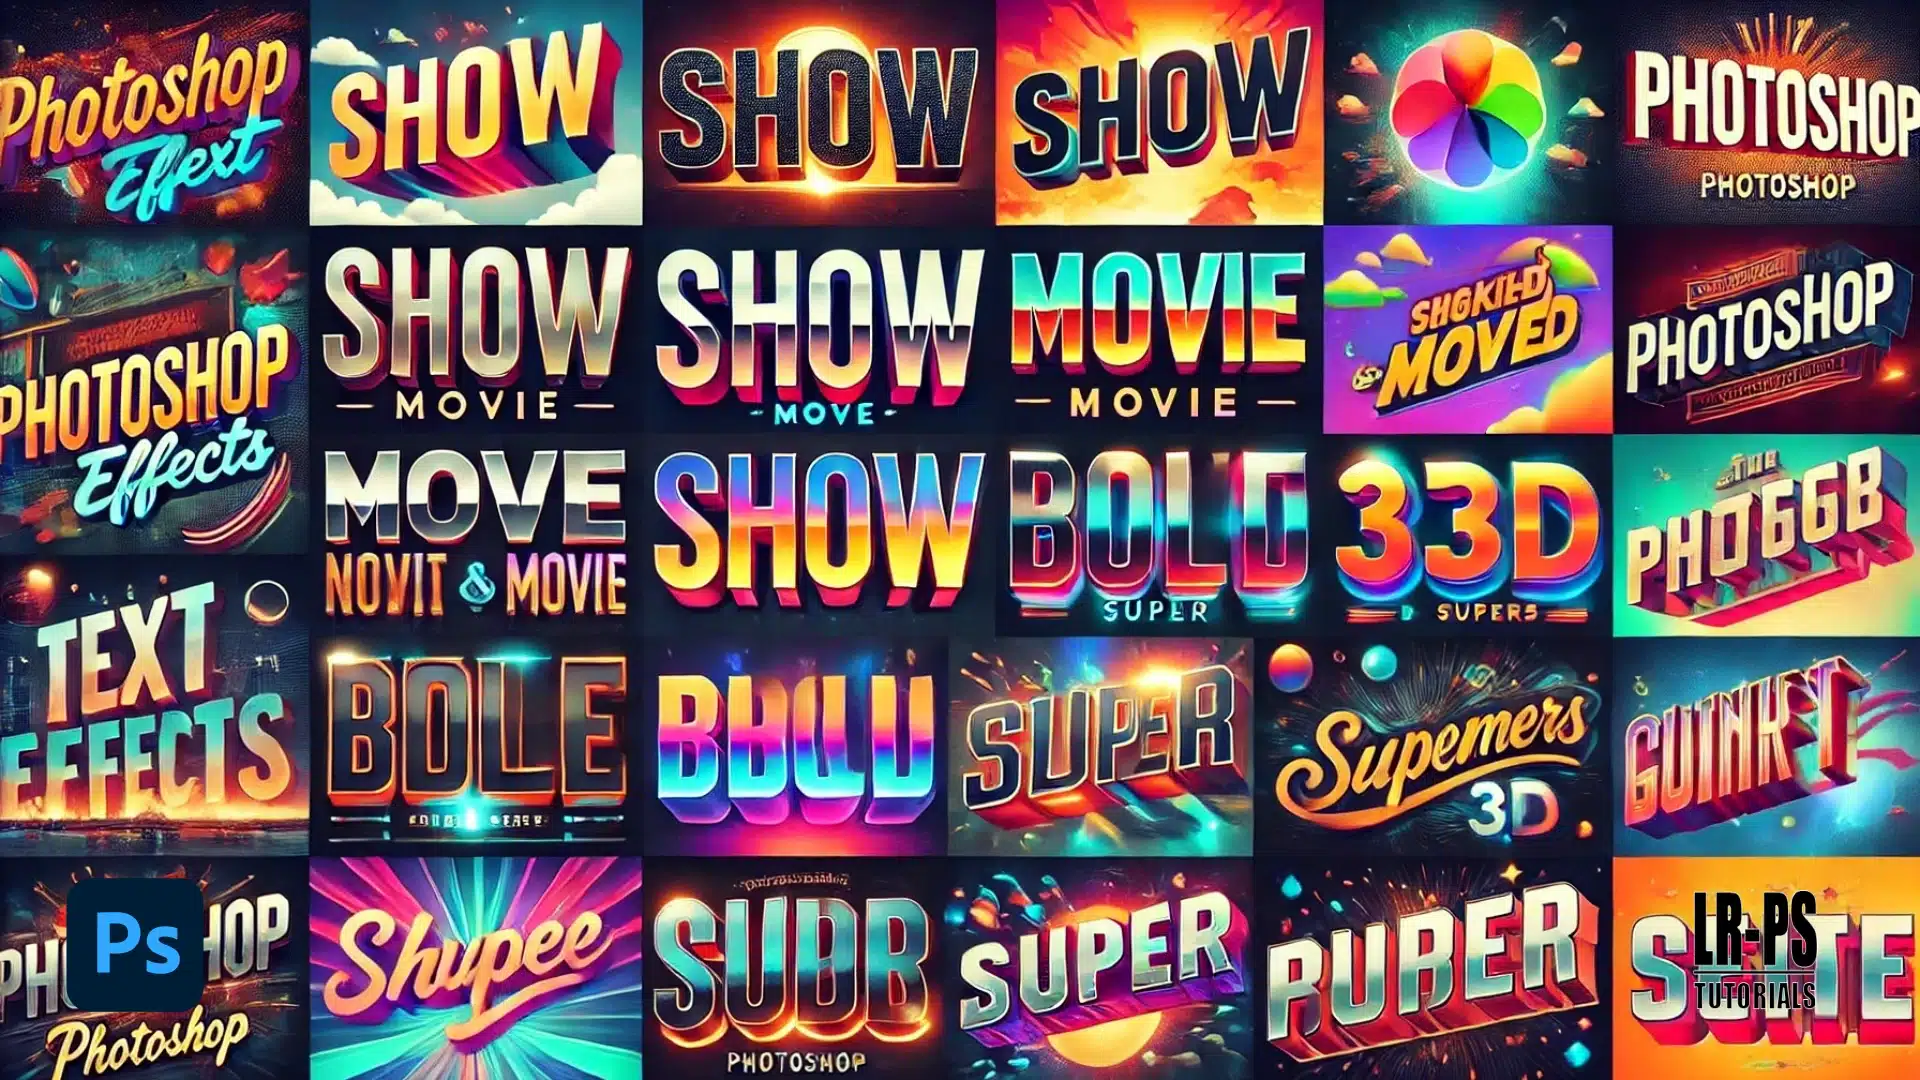
Photoshop text effects can transform any ordinary design into something eye catching and memorable. In this article,
I’ll guide you through some of the most exciting ways to use text effects to enhance your projects.
Whether you’re a beginner or looking to refine your skills, these tips will capture your interest and inspire you to experiment with text effects.
Ready to dive in? Let’s make your text stand out
Table of Contents
Transform Your Typography with Text Effects
Let’s make your words pop. Adobe Photoshop has tools to turn plain text into eye–catching designs.
With immaculate text effects.
Getting Started with Layer Styles
Layer styles add flair to your text. To get started:
- Select your text layer in the Layers panel.
- Double-click the text layer to access Layer Style options.
Play around with shadows, glows, and bevels. Your text will go from dull to dazzling.
Using Smart Objects for Flexible Editing
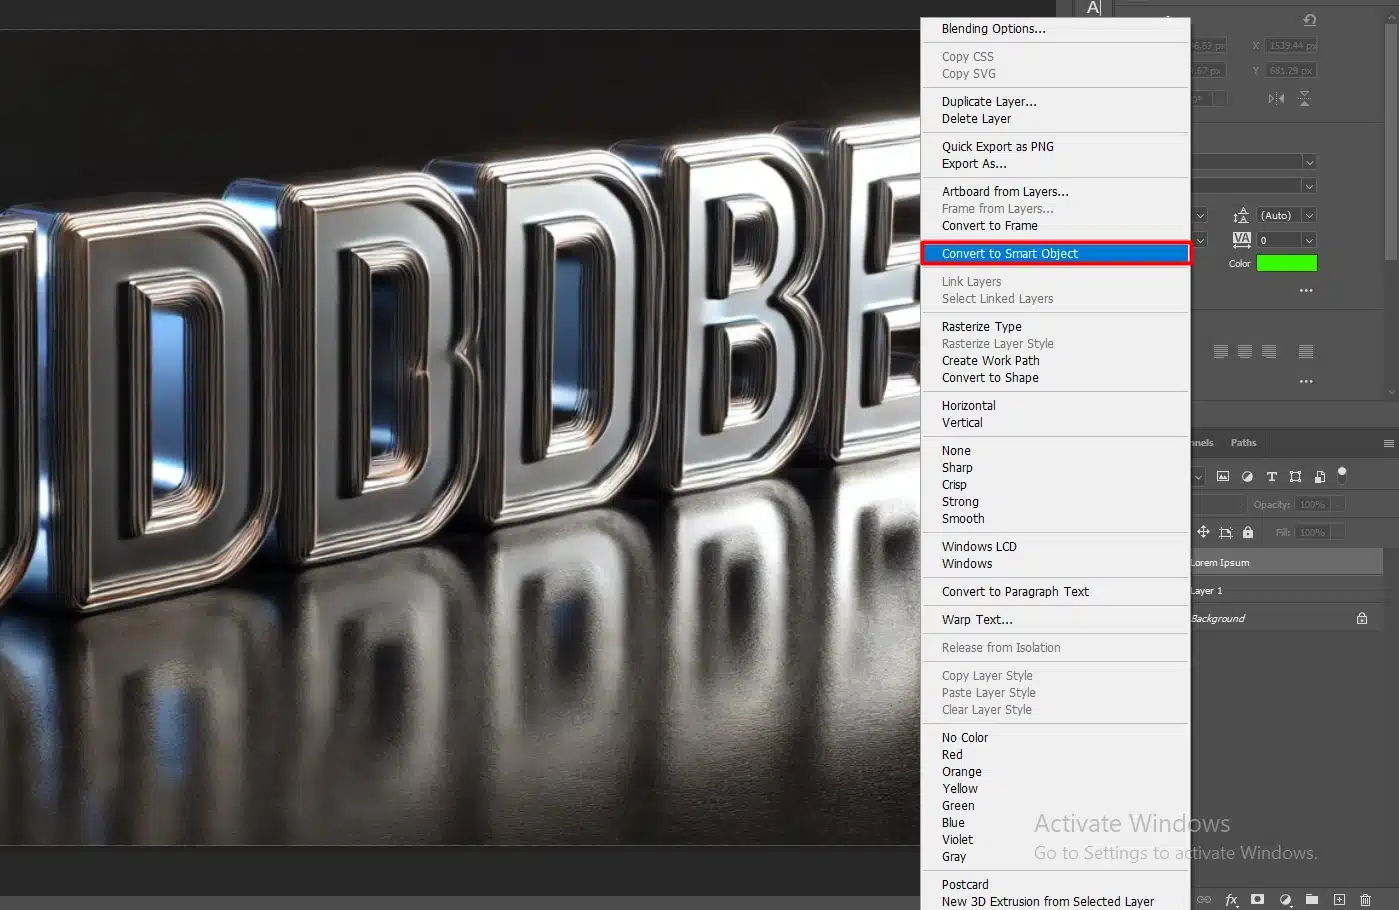
Convert your text into a smart object for easy editing:
- Right-click the text layer and choose “Convert to Smart Object.”
- This lets you tweak filters and transformations later.
Enhancing Text with Vector Shapes
Convert your text into a smart object for easy editing:
- Use the Shape tool to draw shapes in the Layers panel.
- Overlay text on these shapes for unique designs.
Text Effect Techniques
Here are some techniques to enhance your text:
- Metal text: Use gradient overlays and textures for a metallic look.
- Create neon text with outer glows and bright colors.
- Add backgrounds like images or textures for depth.
- Experiment with opacity and blending modes for cool effects.
Practical Applications
Use these text effects to:
- Design ads, posters, and web graphics.
- Highlight key text in your projects.
- Customize fonts and text for logos, banners, and marketing materials.
Pro Tip: Always save your work as a smart object. This way, you can make changes without starting over.
For more advanced editing, consider using the patch tool to blend text with complex backgrounds seamlessly.
Additionally, mastering the Photoshop shortcuts and Lightroom shortcuts can significantly speed up your workflow and make your text effects even more efficient.
Creating Basic Text Effects
Adding cool effects to text in Photoshop is easier than you think. You just need to open the text box from the dropdown menu in Photoshop’s interface.
You can learn to make your text stand out with shadows, layers styles, and gradients.
Let’s walk through some basic techniques to make interesting text.
Adding Shadows and Highlights
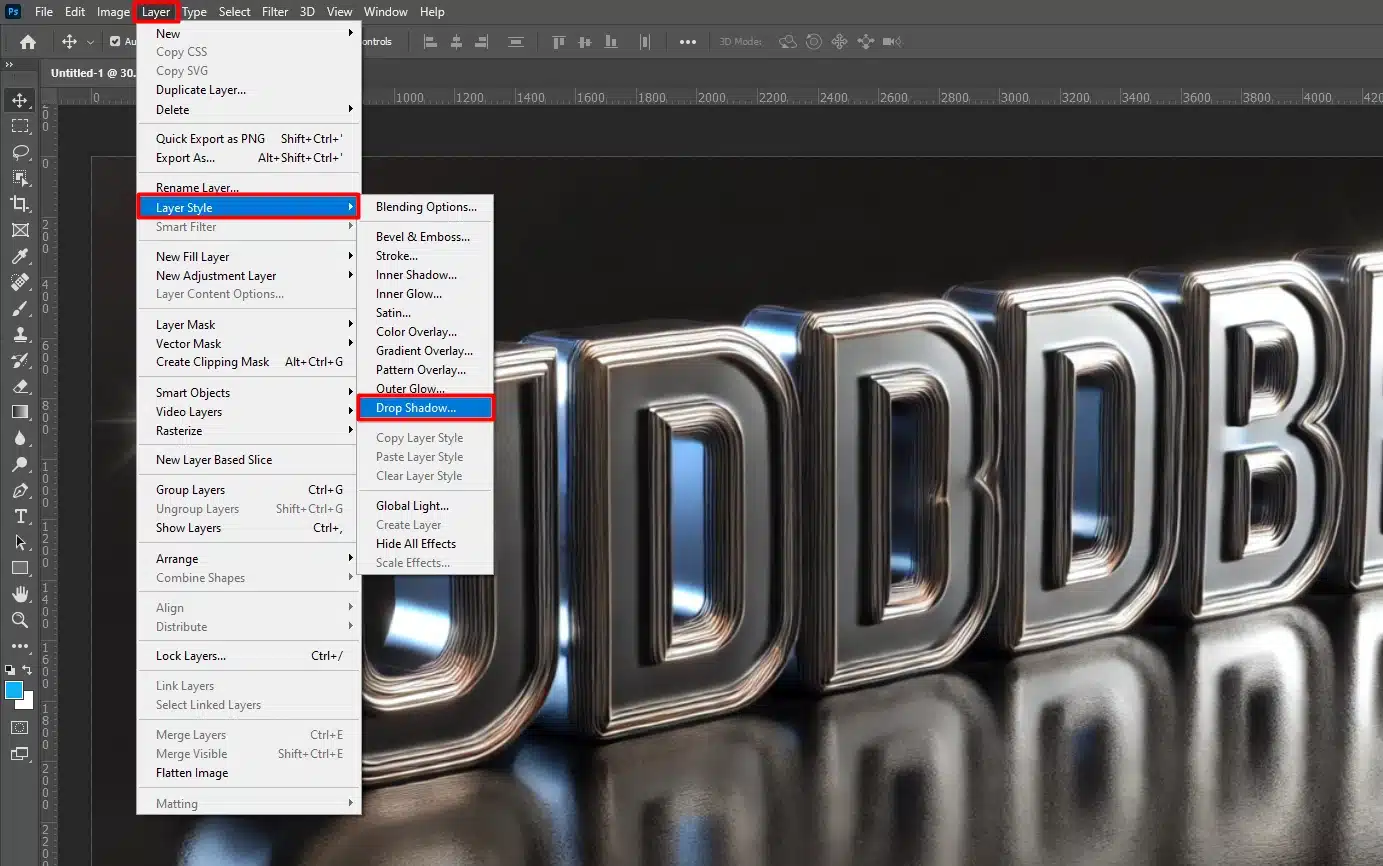
First, let’s add shadows and highlights. Shadows give depth and make your text pop.
- Open your Photoshop document and select the text layer from the layers panel.
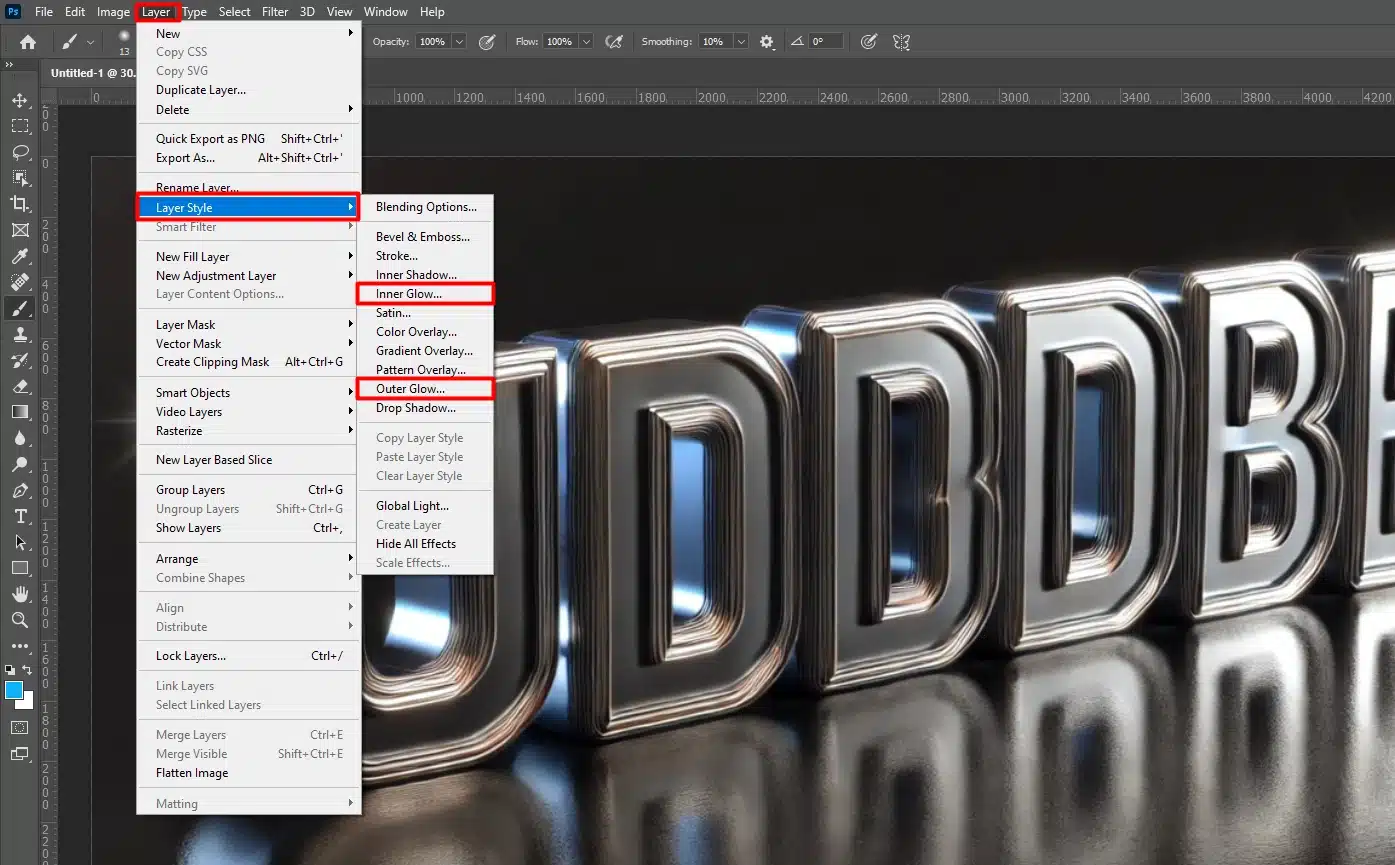
- Go to the Layer menu, choose Layer Style, and click on Drop Shadow.
- Adjust the distance, spread, and size.
- Play around with the opacity until you're happy.
For highlights, choose Inner Glow from the layer style options. Customize the glow until your text looks just right.
Using Layer Styles
Layer styles offer various options like shadows, glows, and bevels. Here’s how to get started:
- Select your text layer in the layers panel.
- Double-click the text layer to open the Layer Styles window.
- Experiment with different layer style options.
The Stroke option is useful for outlining text. Customize the styles to fit your desired look and click OK when satisfied.
Pro Tip: This technique is especially useful when working with text portrait effects in Photoshop.
Applying Gradients
Gradients add a smooth transition of colors, making your text effect in photoshop visually interesting. Here’s how to apply one:
- Select your text layer in Photoshop.
- Double-click to bring up the Layer Style menu.
- Choose Gradient Overlay.
Customize the default gradient by clicking the gradient bar. Adjust the colors, angles, and opacity for a unique effect.
Tip: Save your work frequently to avoid losing progress. Practice these techniques to improve your Photoshop skills.
Mastering blending modes is crucial when applying gradients to your images. This technique allows for seamless transitions and enhances depth, offering a refined visual experience with every layer adjustment.
Advanced Text Effects
In my experience with image design, I’ve found that mastering text effects is crucial for creating impactful visuals.
These effects, like shadow, soft glow, or 3D transformations, allow me to elevate simple text into eye-catching elements that engage viewers.
3D Text Effects
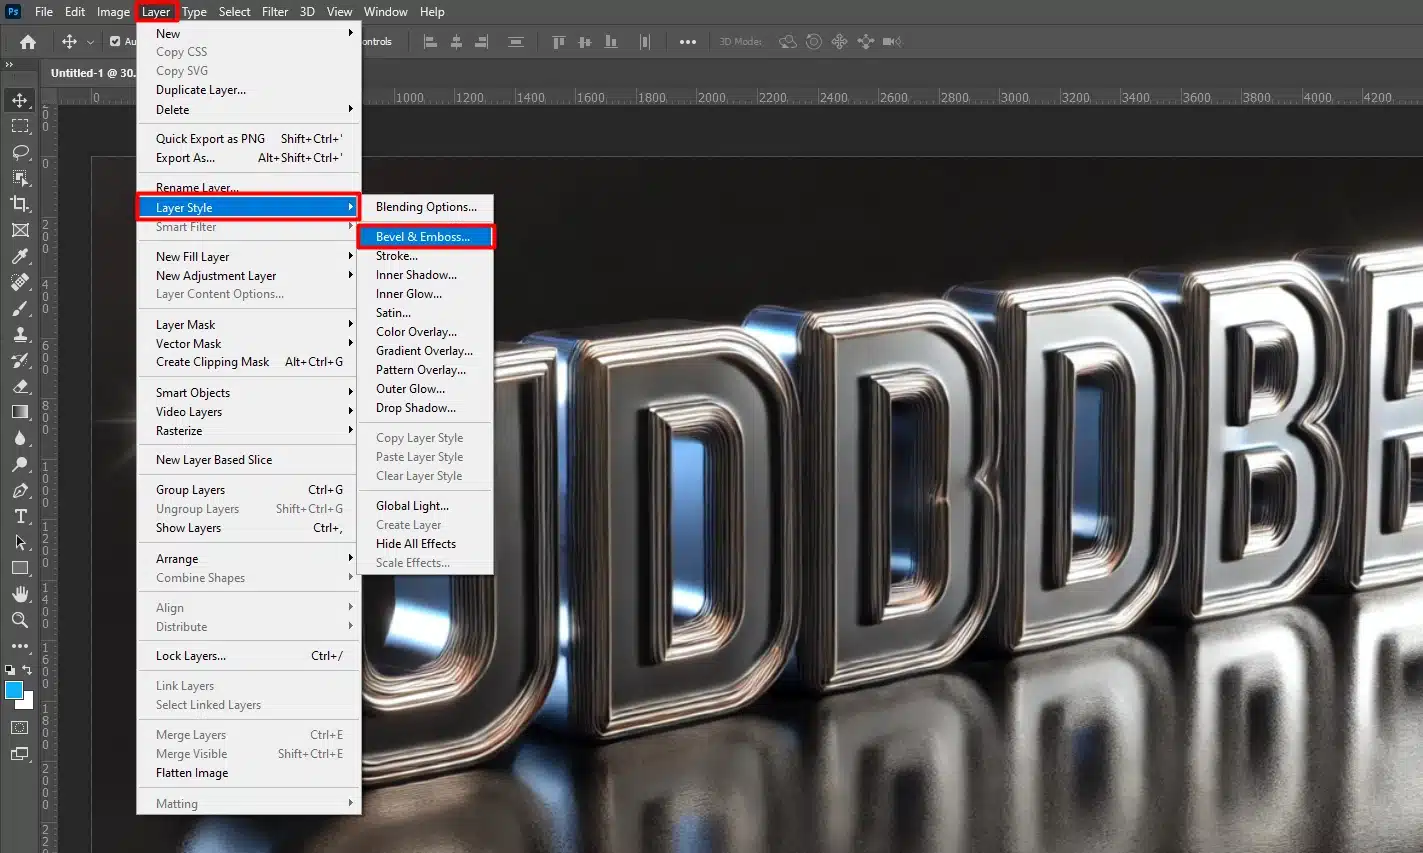
Creating 3D text effects in Photoshop adds depth to your designs. It’s manageable with a few steps:
- Select your text layer.
- Navigate to "Layer" and choose "Layer Style."
- Click on "Bevel & Emboss" and tweak the settings to get the desired look.
- Play around with the depth and size until satisfied.
For an extra kick, add a shadow to your text:
- Choose "Drop Shadow" from the same Layer Style menu.
- Adjust the distance, spread, and size to complete your look.
Remember, practice makes perfect.
By warping text, you can create stunning 3D text effects that pop off the page. This technique adds a dynamic touch to your visuals, enhancing both the depth and impact of your designs.
Text Masking Techniques
Text masking in Photoshop fits text inside images seamlessly:
- Start with a background image.
- Add your text on top.
- Hold down the "Alt" key and click between the text and background layers in the Layers Panel.
Your text now shows the background image within it.
This technique easily create engaging effects easily. With a bit of practice, you’ll master it.
Creating Neon Text
Neon text effects bring your design to life with a vibrant glow:
- Type your desired text.
- Go to the Layer Style menu and select "Outer Glow."
- Choose a bright color and adjust the spread until you achieve the neon look.
Don’t forget to add an “Inner Glow” for a complete effect. This gives an additional light effect enhancing the vibrancy.
Keep practicing, and you’ll master the neon text style in no time.
Special Pro Tip: Always experiment with different settings in Photoshop. This helps you discover new techniques and perfect your skills.
Remember, Photoshop tutorials are a great way to advance quickly. Additionally, learning essential tools in Photoshop can significantly speed up your workflow.
Creative Text Effects
With these creative text effects tutorials and examples. From bold and bright to subtle and sophisticated, learn how to add an extra layer of depth and visual interest to your designs.”
Grunge Text Effects
Let’s get grungy! Start by creating a new Photoshop file with your background image. The background sets the tone.
Next, use the Path tool to convert your type layer. Choose a messy font and write your text.
Double–click your text layer and go to Layer Style. Add depth with shadow, bevel, and texture settings.
The rougher, the better. Overlay a grunge texture for extra effect.
Watercolor Text Effects
Watercolor effects are fun! Begin with a blank canvas. Add your text using a soft, calligraphic font.
Go to the Layer Style menu.
Apply Inner Glow and Outer Glow with pastel colors for that dreamy look.
Use the Brush tool with a watercolor brush from your presets. Paint over the text layer for texture.
Experiment to see what looks best.
Explore the nuanced differences between Photoshop and Illustrator in our comprehensive comparison guide.
Gain a deeper understanding of each software’s unique strengths, applications, and how they can enhance your creative projects!
Metallic Text Effects
Time to shine with Metallic Text Effects!
- Type your text and convert the type layer. Pick a bold font.
- Go to Layer Style and select Bevel & Emboss. Adjust the settings for a metallic shine.
- Add a Gradient Overlay with a metal-like gradient, such as gold or silver. Apply an Inner Glow to enhance the look.
- Don't forget a drop shadow for a 3D pop. It makes all the difference!
Pro Tip: Play with blending modes in Photoshop. They make creating unique text effects easier.
Using content-aware fill in Photoshop, you can seamlessly integrate metallic text effects into any design.
This technique allows for filling gaps or removing objects, making it perfect for creating polished, professional-looking metallic typography.
Tips and Tricks for Better Text Effects
When working on text effects in Photoshop, there are several key aspects to keep in mind to ensure your text stands out and complements your design. Here are some tips for each important aspect:
| Aspect | Tips for Better Text Effects in Photoshop |
|---|---|
| Font Choice | Choose clear, readable fonts over fancy ones. Use the Path tool for flexibility. |
| Effect Combination | Layer effects like shadows and gradients for depth. Experiment with Layer Styles. |
| Readability | Balance creativity with clarity. Avoid cluttering with too many effects. Use Path tool for alignment. |
| Consistency | Maintain a consistent style throughout your project. |
Choosing the Right Font
Picking a font is the first step. Clear and easy to read fonts work best. Fancy fonts look cool but can be hard to read. Use the Path tool to convert type layers.
This gives you more ways to shape and style your text.
Combining Multiple Effects
Mixing effects makes your text stand out. Start with a shadow or gradient. Then add bevels, glows, and textures.
The order of effects matters, so play around. Double-click the layer for Layer Styles. It’s your toolbox for cool stuff. Combining effects can give your text a unique look.
Valuable insights and tips on mastering photography lighting, delve into our comprehensive guides to enhance your photography skills and capture stunning images with expert techniques!
Maintaining Readability
Your text should be easy to read. Too many effects can make it messy. Use the path tool to fix spacing and alignment.
When you turn type layers into shapes, keep the message clear. Stick to simple fonts and effects unless needed.
Pro Tip: Keep it consistent. Use the same style throughout your project. This keeps your text cohesive and less distracting.
Try making text effects in Photoshop. It’s easier than you think with online tutorials. Go ahead and experiment!
Effectively removing shadows can enhance the clarity and readability of your text.
By clearing unwanted shadows, your messages remain visually clear and engaging, maintaining essential readability in any design.
Frequently Asked Questions

How to do text effects on Photoshop?
Here is simple step-by-step guide for creating text effects in Photoshop:
- Open your project in Photoshop.
- Select the Text Tool and type your text.
- Go to the Layer menu, hover over 'Layer Style', and choose 'Blending Options'.
- Explore different styles like Drop Shadow, Stroke, or Bevel and Emboss to apply to your text.
How do I add filters to text in Photoshop?
- Ensure your text is on a separate layer.
- Right-click the text layer and select 'Convert to Smart Object'-this allows you to apply filters non-destructively.
- Go to the Filter menu and select a filter to apply to your text.
- Adjust the filter settings as needed and click OK.
How do I make text attractive in Photoshop?
Here is simple step-by-step guide for creating text more attractive:
- Use contrasting fonts and colors to make your text stand out.
- Experiment with text effects under 'Layer Style' such as Stroke, Drop Shadow, or Glow.
- Adjust the spacing and alignment of your text using the Character and Paragraph panels.
- Incorporate graphics or images as part of your text design for visual interest.
How to create text style in Photoshop?
- Start by selecting your text layer.
- Access the 'Character' window to adjust font, size, color, and spacing.
- Use the 'Layer Style' options to add effects like shadows, outlines, or gradients.
- Save your style by right-clicking the text layer, selecting 'New Style', and giving it a name.
Conclusion
In conclusion, exploring Photoshop text effects has been a game-changer for me.
Learning to enhance my designs with simple yet powerful techniques like shadows, glows, and gradients has made my projects more visually appealing.
These effects are not just for professionals; they’re accessible to anyone willing to experiment and learn.
If you’re eager to elevate your design skills, I highly recommend checking out these comprehensive courses: Photoshop Course and Lightroom Course.
They provide valuable insights and practical tips that have greatly benefited me on my creative journey.
Don’t miss out on mastering Photoshop text effects, it’s a creative tool that can truly transform your work.
Start experimenting today and see how these techniques can bring your designs to life. Explore more about Adobe Photoshop and Adobe Photoshop Lightroom.
Start creating with confidence and unleash your creativity today!
Read more about Photoshop:


