Introduction to Replace Color Tool in Photoshop
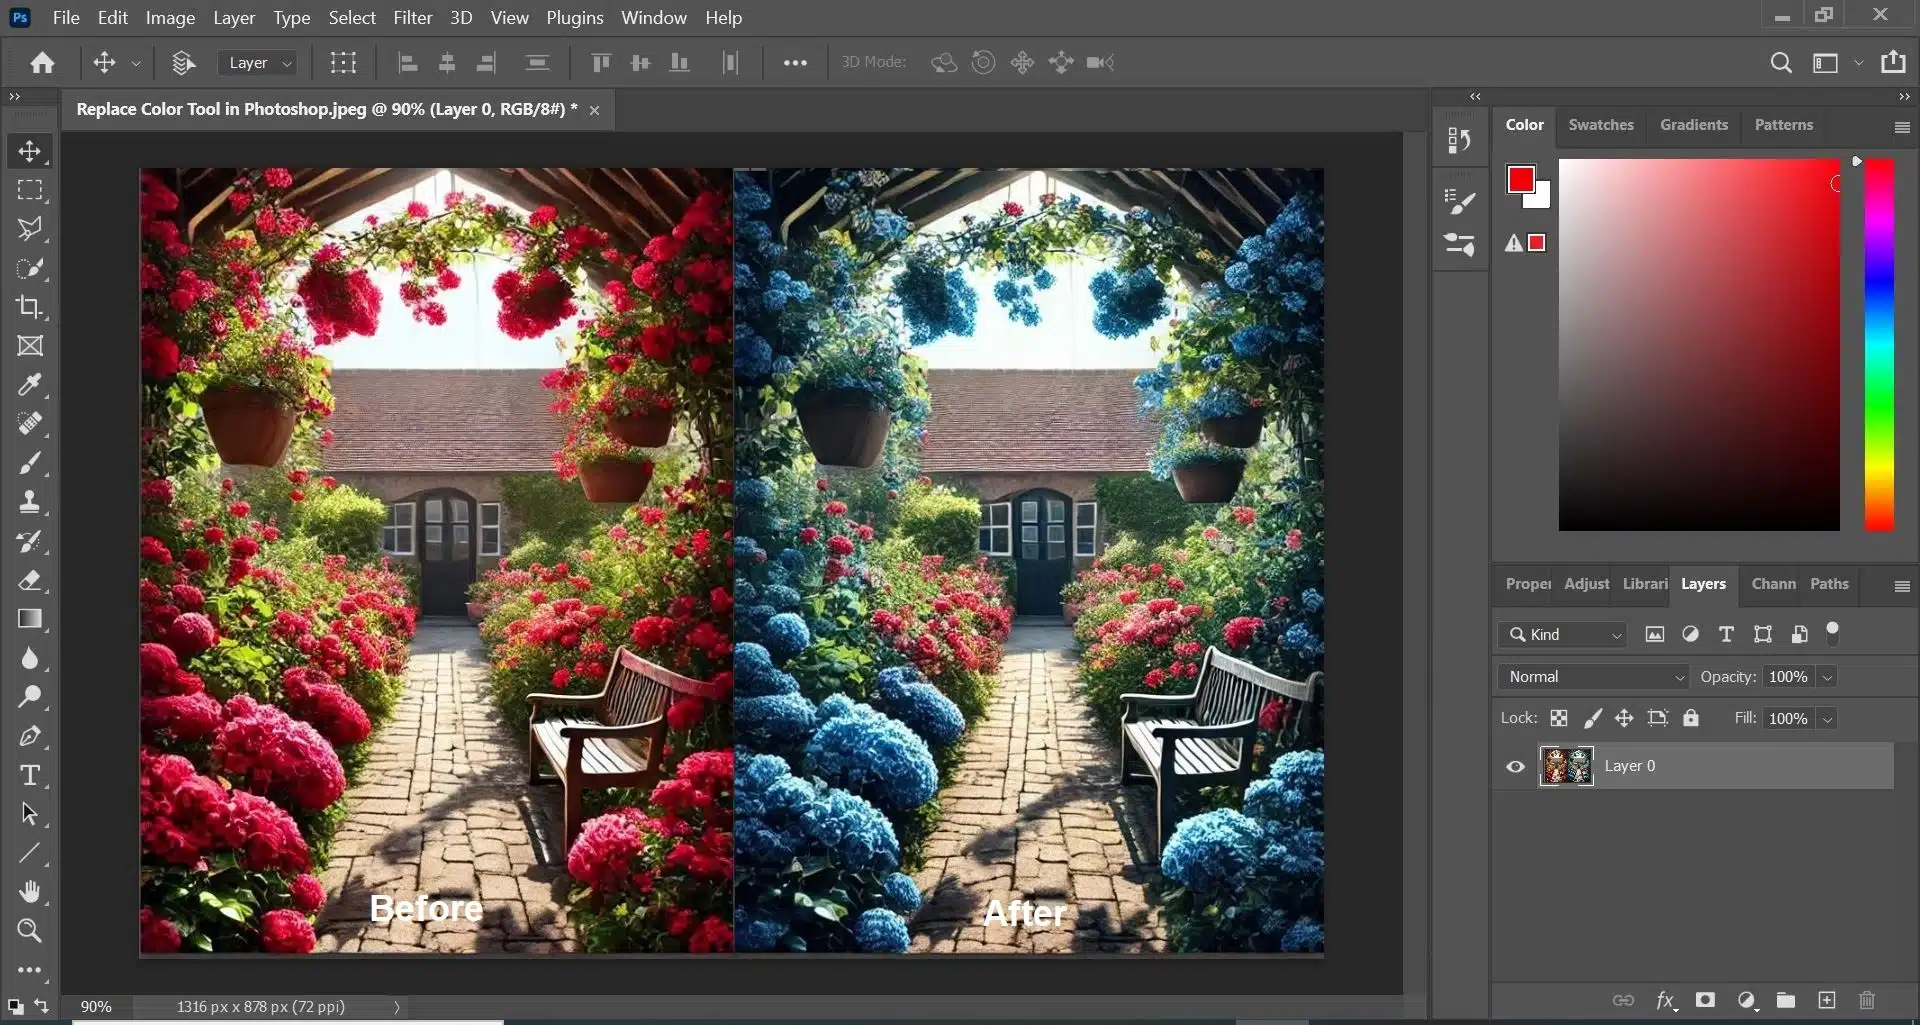
The replace color tool in Photoshop is an indispensable feature for both photographers and graphic designers. Consider a scenario where you’ve captured a perfect landscape photo, but the sky is overcast, and you wish for a more vibrant sunset. Instead of waiting for the perfect weather, you can utilize this tool to effortlessly swap sky with a more colorful one, transforming your image instantly. Its capability to change colours precisely and efficiently makes it a favorite among professionals aiming for flawless results without the need for extensive manual editing.
Whether you’re working on enhancing product photographs to better align with a brand’s color scheme or correcting colours in a portrait to improve aesthetic appeal, the Replace Color Tool in Photoshop is your go-to solution. By mastering this tool, you can save valuable time and ensure your images are always visually appealing and consistent with your creative vision.
Table of Contents
Understanding the Replace Color Tool

The Replace Color Tool in Photoshop is a powerful yet intuitive feature designed to change specific colours within an image with precision and ease. Unlike traditional methods of removing objects that may require complex selections and masking, this tool simplifies the process by allowing users to target and modify colours directly. This makes it particularly useful for quick edits and creative projects where colour plays a crucial role.
To understand how it works, consider it as a smart brush that identifies the color you want to change and replaces it with your chosen tone. For instance, if you’re working on a photo of a red apple but prefer it to be green, the Replace Color Option can make this adjustment seamlessly without affecting the overall texture and shading of the apple. By sampling the colour directly from the image or selecting a new colour from the palette, you can ensure that the final result looks natural and cohesive. This tool’s user-friendly interface and accurate results make it an essential part of any Photoshop user’s toolkit.
Why Color Replacement is Important
Enhancing Visual Appeal
Color plays a crucial role in visual communication, affecting how a photograph is perceived by viewers. When colours in an image clash or don’t align with the intended mood, it can detract from the overall aesthetic. For instance, if a product photo for an online store features colours that are dull or not aligned with the brand’s palette, it might not attract customers. By using the Replace Color Tool, you can adjust the colours to create a more harmonious and appealing photograph, making it more likely to catch the eye of your audience and convey the desired message effectively.
Correcting Imperfections
Photographs often don’t turn out exactly as planned due to various factors like photographic lighting conditions and camera settings. Sometimes, the colours captured are not true to life or as vibrant as they should be. This can be especially problematic in professional photography, such as wildlife photography, where accuracy is paramount. It allows for the correction of such imperfections, ensuring that the colours in the image accurately represent the real-life scenario or meet the artistic vision intended.
Saving Time and Resources
In many professional settings, reshooting a photograph due to color issues can be time-consuming and costly. Whether it’s a fashion shoot where the clothing color needs to match a specific theme, or a product photo that must fit within a brand’s colour guidelines, redoing a shoot is often not a practical solution. The Replace Color Tool offers a quick and efficient alternative, enabling photographers and designers to make necessary adjustments without the need for a reshoot, thus saving valuable time and resources.
Consistency Across Projects
Maintaining colour consistency across multiple images or projects is vital for branding and professional quality. Inconsistent colours can lead to a disjointed visual experience and weaken the impact of marketing materials. By using the Replace Color Tool, designers can ensure that colours remain consistent across all images, whether it’s for a website, social media campaign, or printed materials. This consistency helps in building a cohesive brand identity and ensuring that all visual elements work together seamlessly.
| Enhancing Visual Appeal | Correcting Imperfections | Saving Time and Resources | Consistency Across Projects |
|---|---|---|---|
| Adjust colors to create a harmonious photograph | Correct colours to represent true-to-life scenarios | Avoid costly and time-consuming reshoots | Ensure uniform color schemes across all projects |
| Improve overall aesthetic appeal | Fix colours affected by poor lighting or camera settings | Make quick adjustments without compromising quality | Maintain a cohesive brand identity |
| Attract and engage your audience | Achieve professional-quality images | Efficient solution for meeting brand colour guidelines | Strengthen the visual impact of marketing materials |
| Convey the desired message effectively | Match the artistic vision accurately | Save valuable resources for other creative tasks | Create a seamless visual experience |
Step-by-Step Guide to Using the Replace Color Tool
Step 1: Duplicate the Background Layer
Before making any changes, it’s essential to duplicate your background layer. This practice ensures that your original snap remains untouched and allows for non-destructive editing. To duplicate the layer, right-click on the background layer in the Layers panel and select “Duplicate Layer.” Alternatively, you can use the shortcut Ctrl+J (Cmd+J on Mac).
Step 2: Access the Replace Color Tool
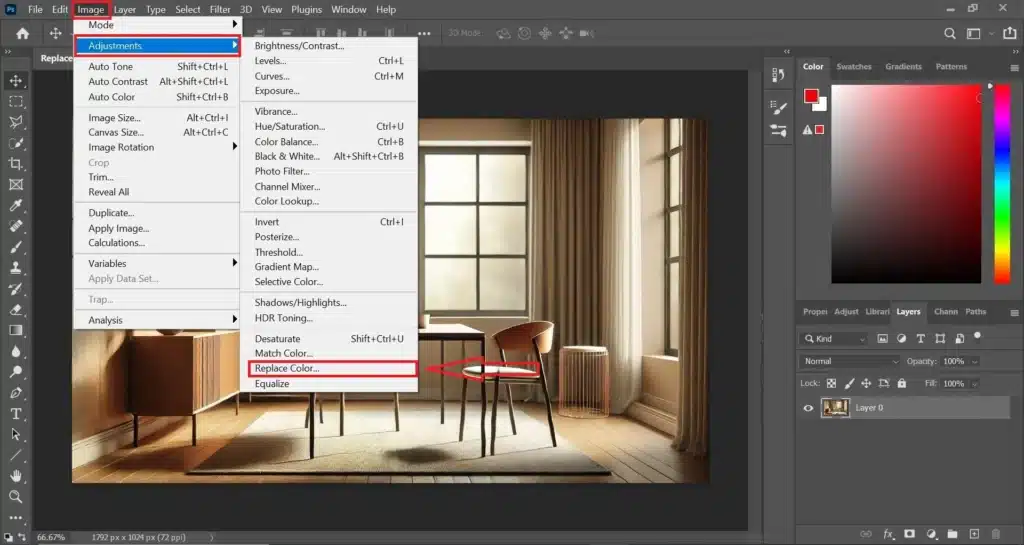
Navigate to the Replace Color Tool by selecting Image > Adjustments > Replace Color from the top menu. This will open the Replace Color dialogue box where you can start the color replacement process.
Step 3: Select the Target Color
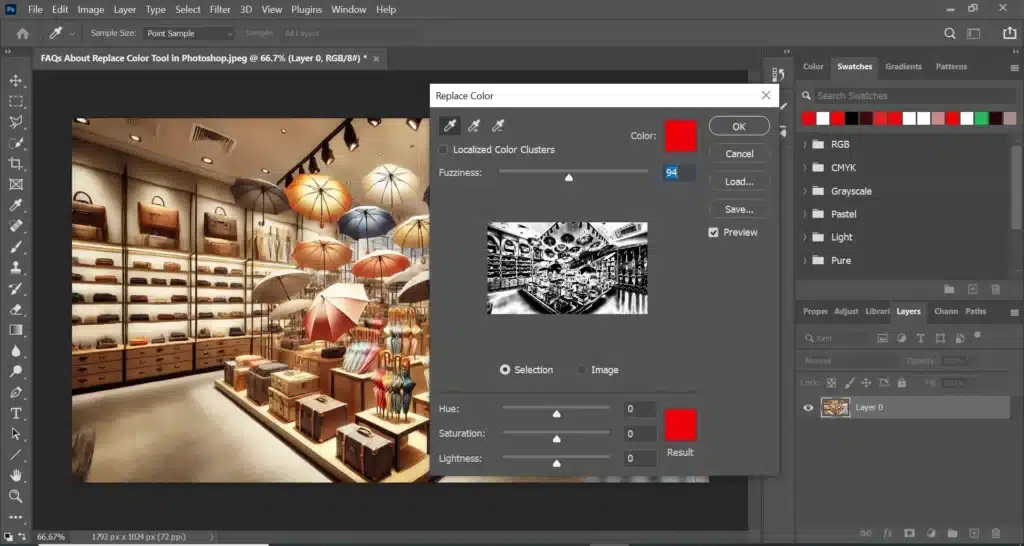
In the Replace Color dialogue box, use the Eyedropper Tool to click on the color in the image that you want to exchange. You can refine your selection by using the + Eyedropper Tool to add more shades of the color or the – Eyedropper to subtract areas. The Fuzziness slider helps to control the tolerance of the color selection, determining how closely colours need to match the sampled color to be replaced.
Step 4: Choose the Swapping Color
Next, choose the color you want to exchange the selected color with. Click on the color swatch in the Replace Color dialogue box to open the Color Picker and select your desired hue. Adjust the Hue, Saturation, and Lightness sliders to fine-tune the new color until you’re satisfied with the result.
Step 5: Apply the Color Change
Once you have selected the new color and adjusted it to your liking, click OK to apply the changes. The areas of the photograph that matched the target color will now be replaced with the new color.
Step 6: Refine the Edges
To ensure a smooth transition between the new color and the rest of the image, you may need to refine the edges. Use a layer mask on the duplicated layer to hide any unwanted color changes. Select the mask, then use a soft brush to paint over the areas where the color change should not apply.
Optional Step: Adjust the Tolerance
If the color swapping does not look seamless, adjust the Tolerance setting in the Replace Color dialogue box. Increasing the tolerance will include a broader range of colors, while decreasing it will make the selection more specific. This step helps to blend the new color more naturally into the photograph.
Advanced Techniques for Color Replacement
Selective Color
Selective color swapping involves targeting specific areas of an image while leaving the rest untouched. This technique is particularly useful when you need to translate only certain colors without affecting the entire photograph. For instance, if you want to change the color of a flower in a garden scene while keeping the foliage intact, you can use masks and adjustment layers. By creating a mask, you can isolate the flower and apply the color swapping tool only to that section, ensuring precision and control over the final result.
Gradient Map Adjustments
Using gradient maps is an advanced method to exchange colours in a photograph, offering more nuanced control over color transitions. This technique can be especially effective when you want to create a specific mood or effect. For example, applying a gradient map can help translate a daytime scene into a sunset ambiance by subtly shifting the hues across the image. This method involves creating a gradient map adjustment layer, then selecting and customizing the gradient to achieve the desired effect. The flexibility of gradient maps allows for intricate and sophisticated color changes.
Utilizing Blend Modes
Blend modes provide another layer of complexity and creativity in color replacement. By experimenting with different blend modes, such as Hue, Saturation, Color, and Luminosity, you can achieve various effects that would be difficult to accomplish with standard color swapping methods. For instance, the Color blend mode changes both hue and saturation while preserving the original brightness, making it ideal for maintaining the natural look of the image. Copying the layer and applying different blending modes can help achieve the perfect balance and ensure the final content looks seamless.
Working with Adjustment Layers
Adjustment layers offer a non-destructive way to swap colors and refine your edits without permanently altering the original snap. This method allows you to follow a more flexible workflow, where changes can be revisited and adjusted at any time. Using adjustment layers like Saturation or Color Balance, you can fine-tune colours with precision. Additionally, linking these adjustment layers to specific parts of the image using clipping masks ensures that the color changes only affect the intended areas, providing greater control over the final look.
Advanced Masking Techniques
Advanced masking techniques enable more precise and intricate colour swapping. Using tools like the Quick Selection or the Pen Tool, you can create detailed masks that isolate even the most complex shapes within your image. This precision allows for accurate color swapping, ensuring that edges are clean and transitions are smooth.
| Technique | Description | Benefits |
|---|---|---|
| Selective Colour | Target specific areas for color changes using masks and adjustment layers | Precision and control over color modifications |
| Gradient Map Adjustments | Use gradient maps to create nuanced color transitions | Achieve specific moods and effects |
| Utilizing Blend Modes | Experiment with blend modes for complex colour effects | Maintain natural look while altering saturation |
| Working with Adjustment Layers | Apply non-destructive color changes with adjustable layers | Flexibility to revisit and adjust changes |
Common Mistakes During Color Replacement
Inaccurate Color Selection
One of the most common mistakes is selecting the wrong color range for swapping. This often happens when users do not accurately sample the color they want to change. For instance, if you’re trying to swap a specific shade of blue but mistakenly include other shades, the result will be inconsistent. To avoid this, always use the Eyedropper Tool precisely and modify the Fuzziness slider to fine-tune the selection. Proper selection ensures that the color swapping is uniform and doesn’t affect unintended areas.
Ignoring Layer Duplicates
Not creating layer duplicates before making changes can lead to irreversible mistakes. When you directly modify the original layer, any errors made cannot be easily corrected. Always duplicate the layer before starting any color swapping process. This way, you can always revert to the original if something goes wrong, ensuring a non-destructive workflow.
Overlooking Masking Techniques
Neglecting to use masks can result in rough and unprofessional edges where colors transition. Masks allow for precise control over where the color change is applied, ensuring smooth and natural-looking results. For example, if you’re replacing the colour of a subject’s shirt, using a mask can prevent the new color from spilling onto the background. This technique is especially important when posting the final image to professional portfolios or social media, where attention to detail is critical.
Misusing Blend Modes
Blend modes can significantly impact the outcome of color replacement, but using them incorrectly can lead to undesired effects. For instance, the Hue blend mode changes only the hue while preserving the lightness and saturation, which might not be suitable for all images. Experimenting with different blend modes and understanding their effects can help achieve the desired response and ensure the final photograph looks cohesive.
Neglecting to Adjust Tolerance
Failing to modify the tolerance setting appropriately can result in incomplete or excessive color changes. If the tolerance is too low, not all shades of the target colour will be replaced. Conversely, if it’s too high, colours that should remain unchanged might be affected. Finding the right balance is key to ensuring a seamless color swapping process.
Improper Use of Gradient Maps
While gradient maps are powerful tools for color swapping, they can be complex to use. Applying them without understanding their function can lead to unnatural and jarring color transitions. It’s crucial to experiment and modify the gradient settings to match the desired effect, ensuring that the final snap appears natural and visually pleasing.
Inconsistent Color Grading
Inconsistent color grading across multiple images can lead to a disjointed appearance, especially when working on a series of photos for a project. Maintaining consistency in colours swapping helps in creating a uniform look, which is essential for professional presentations and cohesive visual storytelling. This is particularly important when images are copied and used across various platforms or for community events where brand consistency matters.
Failure to Search for References
Before making color replacements, it’s essential to search for references and understand how colours interact within the scene. Without proper reference, the new colours might look out of place or unnatural. Studying similar images or consulting color theory can provide valuable insights and help achieve more realistic results.
Credit Mismanagement
Not crediting the sources of any elements used, such as textures or additional images, can lead to legal and ethical issues. Always credit the original creators if you use their work in your projects. This practice fosters a respectful and trustworthy community of artists and designers.
Overlooking Feedback
Ignoring feedback from peers or the community can result in missed opportunities for improvement. Posting your work and seeking constructive criticism can provide new perspectives and help refine your techniques. Being open to feedback ensures continuous learning and skill enhancement.

FAQs
How do you replace one color with another in Photoshop?
To swap one color with another in Adobe Photoshop, you can use the Replace Color Tool. Start by duplicating your background layer to preserve the original snap. Then, go to Image > Adjustments > Replace Color to open the Replace Color dialog box. Use the Eyedropper Tool to select the color you want to change, and alter the Fuzziness slider to refine the selection. Finally, choose the new color by adjusting the Hue, Saturation, and Lightness sliders or by selecting a color from the color picker, and click OK to apply the changes.
What is the Color Replacement Brush tool?
The Color Replacement Brush in Photoshop is a versatile option that allows you to change the color of specific areas in a snap while preserving the underlying texture and shading. Unlike the Replace Color option, which affects the entire selected color range, the Color Replacing Brush works like a brush, enabling you to paint over the areas you want to change.
Is there a recolor tool in Photoshop?
Yes, Photoshop offers several tools for recoloring, including the Replace Color Tool and the Color Replacement Brush. Additionally, the Tone and Saturation Adjustment Layer can be used to recolor parts of an image. By adding this adjustment layer, you can use the Hue slider to change the color, and the Saturation and Lightness sliders to refine the intensity and brightness.
How do I reset the color tool in Photoshop?
To reset the color tool in Photoshop, you can reset the foreground and background colors to their default settings of black and white. Simply press the D key on your keyboard, or click on the small black and white squares icon at the bottom of the toolbar. If you need to reset the settings of a specific utility, right-click on it in the options bar and select “Reset Tool” from the context menu.
Conclusion
Using the Replace Color Tool in Photoshop has been a game-changer in my workflow. The Replace Color option allows you to copy the modified tones and link them to other layers for uniformity. I remember working on a project where the client’s product photos needed to match their updated brand colours. Instead of reshooting hundreds of images, I used the Replace Color Tool to quickly modify the colours, saving countless hours and meeting the client’s expectations perfectly. This tool’s ability to make precise and efficient colour changes is invaluable for any professional working with images.
If you’re looking to enhance your Photoshop skills and master tools like the Replace Color Tool, I highly recommend checking out our courses. Whether you’re new to Photoshop or looking to refine your skills, our Photoshop Course and Lightroom Course offer comprehensive lessons that cover all you need to know. Don’t just take my word for it; explore and learn our courses and see the difference they can make in your creative projects. If you have any questions or need further assistance, feel free to reply to this post or visit our site for more information. Start your journey to becoming a Photoshop expert today!
Have a nice photoshoot!
Learn more about Photo Editing with Lightroom and Photoshop:


