As an expert photographer, I know that creating stunning visual effects in Photoshop can create a world of difference in your images. One technique that enhances the symmetry and adjust balance of your photos is mirroring a layer. Whether you’re a seasoned graphic designer or an enthusiastic hobbyist, mastering this art can add a professional touch to your work.
In this comprehensive guide, I’ll walk you through various methods and tips for achieving Photoshop mirror layer effects, complete with point-to-point instructions and practical applications to elevate your photo editing skills. Let’s dive in and transform your photos with these powerful techniques!
Table of Contents
The Importance of Mirroring in Photoshop Projects
It plays a crucial role in enhancing design quality, creating symmetry, and achieving balance in visual weight projects. Here’s a detailed comparison highlighting this in various Photoshop projects:
| Aspect | Description | Best Used For | Advantages |
|---|---|---|---|
| Symmetry and Balance | It ensures both halves of an image are identical, enhancing visual balance. | Logos, icons, and patterns. | Provides a professional and polished look, ensures visual harmony. |
| Design Efficiency | Speeds up the design process by duplicating and flipping elements rather than recreating. | Complex patterns and repetitive elements. | Saves time, increases productivity, ensures consistency across the design. |
| Visual Appeal | Creates aesthetically pleasing designs by using symmetry to draw the viewer’s eye. | Artworks, advertisements, and posters. | Enhances the attractiveness of the design, captures viewer attention. |
| Realism in Reflections | Mirrors can simulate reflections in water, glass, and other surfaces. | Photography, product presentations, and digital art. | Adds depth and realism, creates convincing visual effects. |
| Correction of Asymmetry | Fixes imperfections in photos by flipping elements to achieve symmetry. | Portraits and product photos. | Improves the quality and appeal of photos, corrects minor flaws. |
| Pattern Design | Helps in designing seamless patterns and textiles by ensuring elements repeat perfectly. | Textile design, wallpapers, and backgrounds. | Ensures continuity and seamless transitions in patterns. |
| Creative Experimentation | Allows designers to explore different symmetrical patterns and abstract designs. | Abstract art, conceptual designs. | Fosters creativity, allows for unique and innovative designs. |
Let’s explain in detail:
Enhancing Visual Appeal and Symmetry
- Balance and Harmony: It creates symmetry in your designs, which is often aesthetically pleasing. Symmetry can make images look more professional and polished.
- Improved Composition: By its elements within an image, you can achieve better composition in photography. This command is particularly useful in graphic design, where the balance of elements can draw the viewer’s eye to the focal point of the design.
- Creative Effects: It can be used to make interesting and unique visual effects. For example, flipping a landscape photo horizontally can give it a surreal, other-worldly look.
Practical Applications in Digital Design
- Logo and Icon Design: Ensuring that both halves of a logo or icon are symmetrical can enhance the overall design and make it more memorable. Mirroring helps in maintaining consistency and precision.
- Pattern Creation: When designing patterns, especially those meant to tile seamlessly, Photoshop mirror can save time and ensure perfect alignment. This technique is invaluable in textile design, wallpaper patterns, and digital backgrounds.
- Correcting Imperfections: Sometimes, an photo might have imperfections that can be corrected by mirroring. For instance, minor asymmetries in portraits or product photos can be adjusted by flipping parts of the photo to achieve a balanced look.
Time-Saving and Efficiency
- Quick Adjustments: This efficiency is particularly beneficial in commercial design work where time is often limited.
- Automation: This is particularly useful when working with a large batch of images.
Examples of Mirror Layer in Photoshop
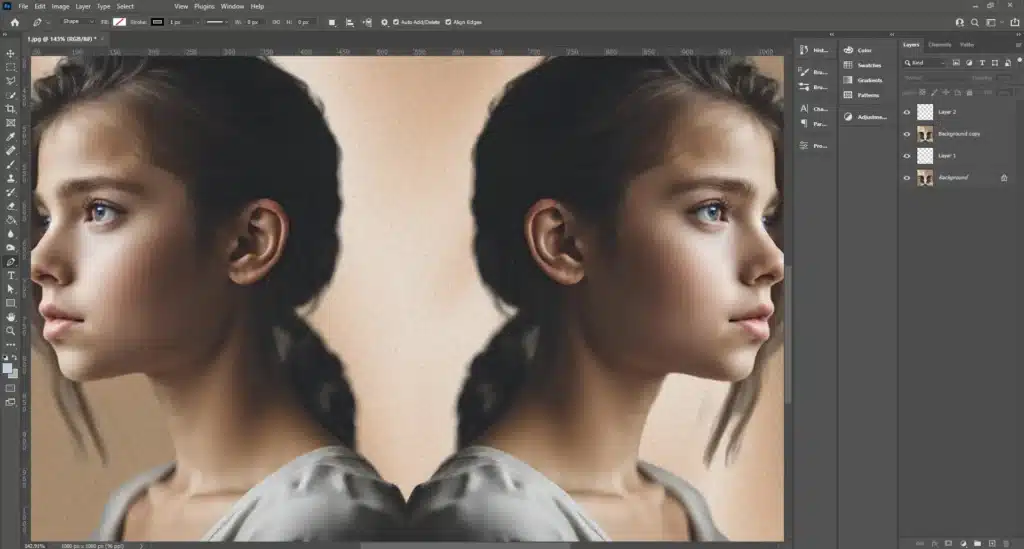
- Creating Reflections: To make a mirror reflection, duplicate your levels and flip it vertically. This technique is often used in product photography to give the illusion of a reflective surface below the object in photoshop.
- Artistic Effects: Mirror effects can be used to form kaleidoscope patterns and other artistic designs. By combining multiple mirrored tiers, designers can produce intricate and captivating visuals.
- Consistency in Branding: For brands that require a consistent look across various platforms, It helps in creating symmetrical logos and icons that maintain their integrity regardless of where they are displayed.
These advanced techniques will allow you to push the boundaries of your creative projects. Whether you are creating logos, patterns, or simply enhancing photos, the ability to mirror images effectively is a valuable skill in any designer’s aid kit
Step-by-Step Guide: How to Create a Photoshop Mirror Layer

It can enhance the symmetry and visual appeal of your design. Follow these detailed levels to master this technique.
1: Open Your Photo and Unlock the Layer
- Launch Photoshop and open the image you want to work on.
- By default, your photo will be on a locked layer named "Background."
- To create it editable, double-click on the "Background" layer in the Layers panel.
- A dialog box will appear asking you to rename the layer. You can rename it and click OK.
2: Duplicate the Layer
- Select the layer you just unlocked.
- Press Ctrl + J (Windows) or Cmd + J (Mac) to duplicate it. This step ensures you have a backup and can work non-destructively.
3: Flip the Layer
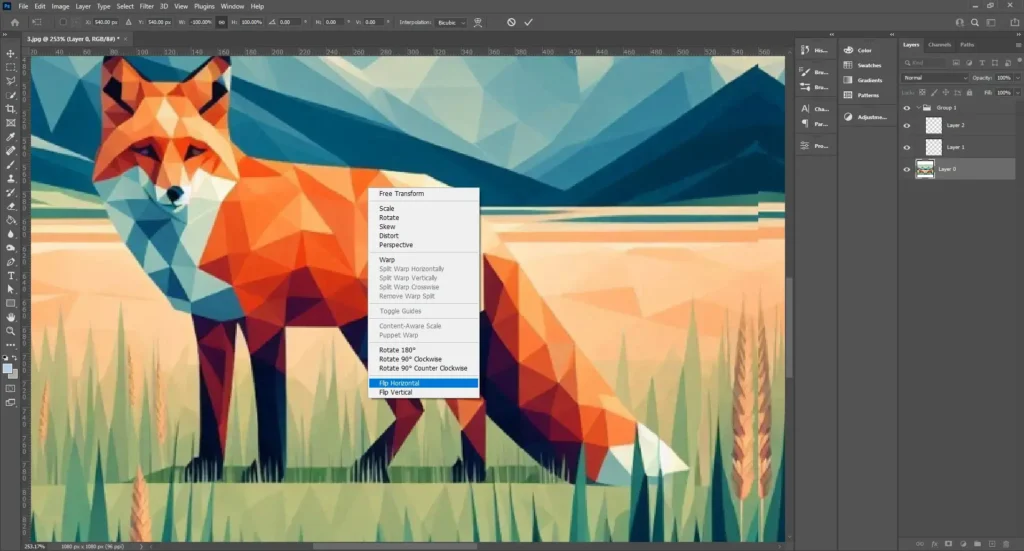
- With the duplicated layer selected, go to Edit > Transform > Flip Horizontal or Flip Vertical, depending on your desired effect.
- Alternatively, use it by pressing Ctrl + T (Windows) or Cmd + T (Mac), then right-click and choose Flip Horizontal or Flip Vertical.
- Press V to position the flipped layer. Hold down the Shift key while dragging to constrain the movement to a straight line.
4: Adjust Layer Transparency
- To blend the flipped layer more seamlessly with the original, adjust the opacity.
- Select the flipped one, and then use the Opacity slider in the Layers panel to decrease the opacity until the mirrored effect looks natural.
Pro Tip: Learn how to blend images for an even better workflow.
5: Use Layer Masking for Seamless Integration
- With the flipped layer selected, click the Add Layer mask icon at the bottom of the Layers panel.
- Select the Brush Device (press B) and set the foreground color to black.
- Paint over the areas where you want to hide parts of the flipped layer, creating a seamless blend with the underlying layer.
6: Refining the Mirrored Layer
- For more realistic reflections, use the blur tool (Filter > Blur > Gaussian Blur) to soften the edges of the flipped layer.
- The Smudge device can help blend the edges more naturally, especially useful for surfaces like water or glass.
7: Final Adjustments
- Ensure there are no visible artifacts or unwanted elements. Common issues include text or distinctive marks that appear reversed.
- Use the clone stamp to correct any inconsistencies.
- Once satisfied with your adjustments, you can flatten the photo by going to Layer > Flatten Image.
- Save your final work in the desired format (File > Save As).
By following these phases, you can effectively mirror a layer in Photoshop, adding symmetry and depth of your designs. This technique is particularly useful for creating reflections, enhancing product photos, and achieving artistic effects.
Pro Tip: Learn how to add texture to make your designs stand out even more.
FAQs on Photoshop Mirror Layer

How to Mirror a Layer in Photoshop?
To create a mirror effect in Adobe Photoshop, start by loading your photo and unlocking the background layer. Duplicate the layer using Ctrl + J (Windows) or Cmd + J (Mac). Next, rotate the layer by selecting Edit > Transform > flip Horizontal or flip Vertical. Use the Move tool (press V) to drag and rotate the canvas. Finally, adjust the opacity or use a blend mode from the Layers panel to blend the flipped layer with the original for a seamless effect.
What is Mirror in Photoshop?
It refers to flipping a selected layer or element horizontally or vertically. This technique is commonly used to achieve symmetry in a design, such as in portrait photography or model shots, where creating a balanced visual effect is crucial. It’s also handy for simulating reflections, making it versatile for different types of photo editing. Adobe Photoshop offers free access to these features via the top menu, making it an essential tool for photographers
What is a Layer Mirror?
In Adobe Photoshop, this involves duplicating a layer and flipping it horizontally or vertically to form a mirror effect. This technique is often used in fashion photography to ensure models appear symmetrically balance in photography to produce visually appealing reflections. By flipping and positioning layers accurately and drag them into place, you can enhance the overall aesthetic of your images.
How do you reflect a Selection in Photoshop?
For this:
- Use any selection device (like the Lasso or Marquee) to select the part of the image you want to reflect.
- Press Ctrl + J (Windows) or Cmd + J (Mac) to copy the selection to a new layer.
- With the new one selected, go to Edit > Transform > Flip Horizontal or Flip Vertical.
- Press V to position the flipped selection accurately.
By understanding these options, you can utilize adobe Photoshop’s mirroring capabilities to enhance your photo editing projects, ensuring they look professional and visually appealing. Mastering these techniques helps create balanced and dynamic compositions.
Conclusion: Photoshop Mirror Layer

Reflecting on my own experience, mastering the art of flipping layers in photoshop has significantly enhanced my workflow and the quality of my designs. I recall working on a portrait project where the model’s pose needed perfect symmetry for a balanced composition.
By these techniques, I get a professional look that impressed both the client and the audience. Ready to take your skills to the next level? Join our Photoshop course and Lightroom course to master image editing skills. So what are you waiting for? sign up today!
If “Photoshop Mirror Layer” article has helped you, then Like and Share it with your friends!
Have a nice photoshoot!
Read more about: Photo Editing with Lightroom and Photoshop


