When it comes to mastering the art of photo editing, understanding “Photoshop how to” techniques can be a game-changer.
Imagine transforming your photos from ordinary to extraordinary with just a few clicks. This guide is designed to grab your attention, spark your interest, and show you the incredible possibilities Photoshop offers.
I promise you, by the end of this article, you’ll feel inspired and equipped to take your editing skills to the next level.
Let’s get started on this exciting journey and uncover the secrets of Photoshop together.
Table of Contents
Step-by-Step Photoshop How To
Explore important Photoshop tutorials with easy, step-by-step instructions.
Whether you’re a beginner or seasoned user, these guides will help you master tools and techniques to enhance your editing skills.
Getting Started with Photoshop Tutorial
First, open Adobe Photoshop from your applications. When you start the program, you’re greeted by the home screen. Here, you can:
- Create a new project
- Open an existing image using the file menu
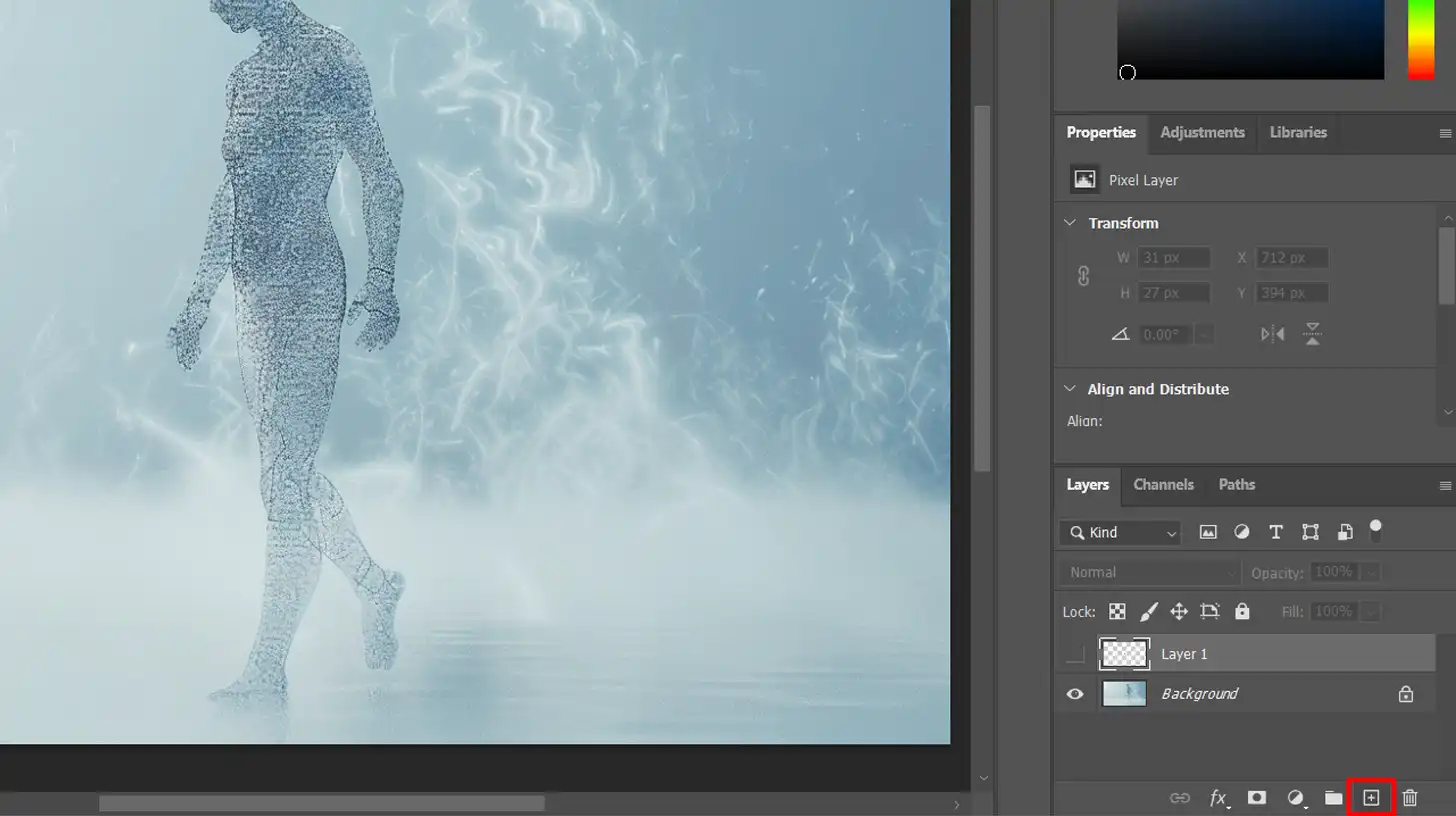
To create a new layer, go to the layers panel, and press the new layer button.
Photoshop Tutorial: Understanding the Interface
The interface may seem complex at first, but it’s straightforward with some practice. Important components include:
- Layers Panel: Located on the right, it shows all your visible layers. You can create a new layer, duplicate layers, and add adjustment layers here.
- Toolbar: Found on the left, it includes tools like the brush tool and the gradient tool.
Photoshop How To: Basic Tools and Their Functions
These tools will be your foundation for creating and editing images, allowing you to navigate the software with confidence and ease.
Essential Tools:
- Brush Tool: Great for painting and adding details. Adjust brush size at the top.
- Crop Tool: Useful for cutting down parts of your image to focus on what matters.
- Spot Healing Brush Tool: Spot healing brush tool removes small blemishes or unwanted objects by blending with nearby textures.
- Clone Stamp Tool: Clone stamp tool copies one part of your image to another area.
Layers are important. They let you work on different parts of your image separately. To add layer effects like a drop shadow, choose your active layer, go to layer style, and select your desired effect.
Pro Tip: Always keep an untouched version of your original image in a separate layer by creating a duplicate layer. This way, you can revert back if needed.
Happy editing, and remember, practice makes perfect!
Photoshop Editing Techniques: Brush Tool
The Brush Tool is one of the fundamentals of Adobe Photoshop. You use it for painting and adding details to your work. It’s found in the Toolbar on the left side of your screen.
To start, select the Brush Tool and click on your canvas to paint. Simple, right? Remember, a new layer helps you work non-destructively.
Customizing Brush Settings
Customizing the Brush Tool can make your work more precise. First, look at the top menu bar once the Brush Tool is selected. You see options like:
- Brush size
- Hardness
- Opacity
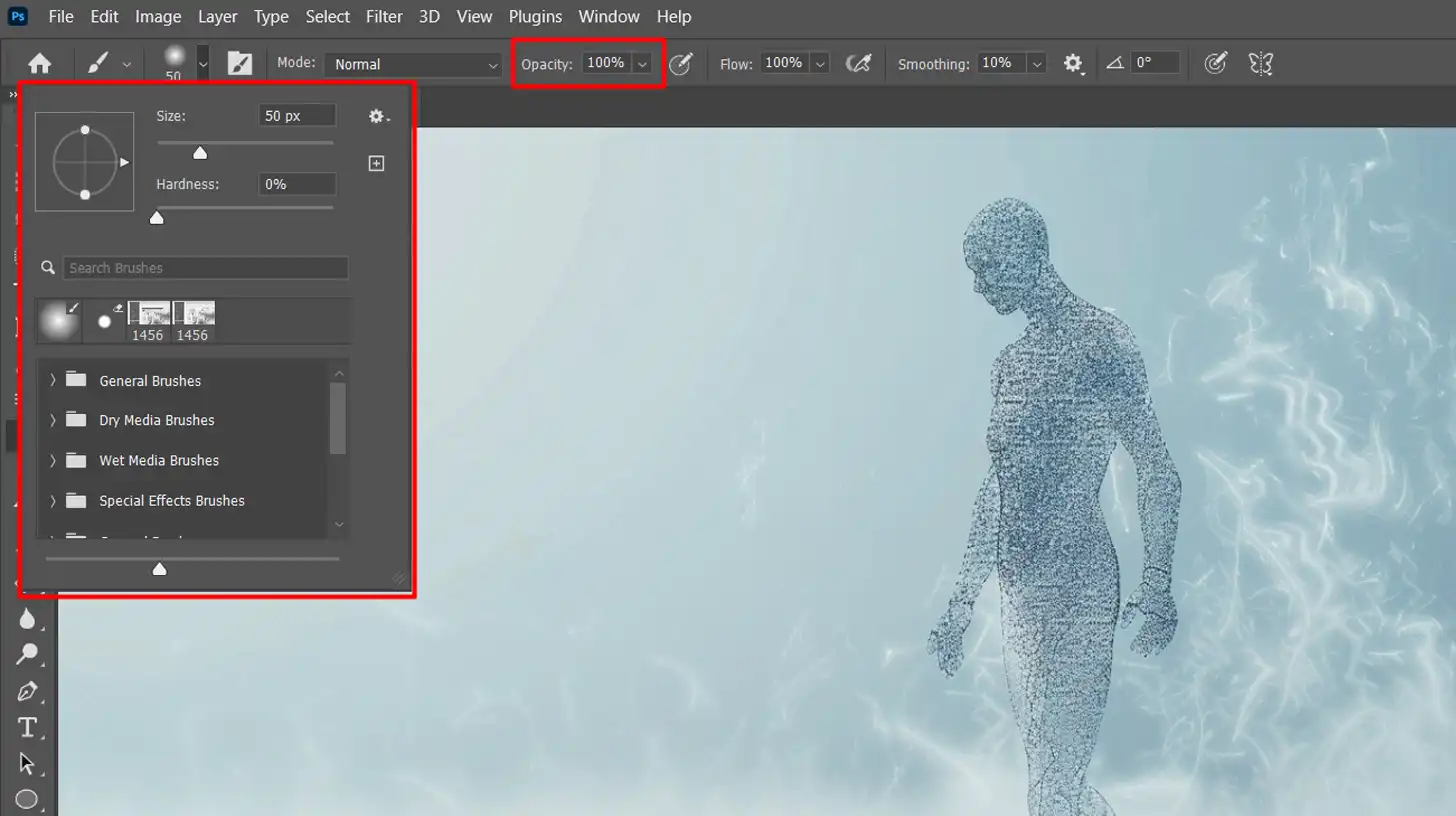
Adjust size to control how thick or thin your strokes are.
Opacity makes your stroke solid or see-through. Use the settings to match your project’s needs. Always consider creating a duplicate layer before making changes.
Using the Brush Tool for Different Effects
The Brush Tool can create different effects with adjustments. Change brush tip shapes to make unique textures. For instance:
- Fuzzy edges for a soft effect
- Hard edges for sharp lines
Use the brush with an adjustment layer to make color corrections. You can also combine it with the crop tool for precise edits; understanding how to crop effectively can make a big difference in your workflow.
Another cool trick is using it with the zoom tool to zooom in and focus on small areas. Mastering this tool takes practice, but it’s worth the effort.
Pro Tip: Save time by using keyboard shortcuts to quickly adjust brush size and hardness.
Try using the [ and ] keys for quick changes. For more efficiency, familiarize yourself with other Photoshop shortcuts to streamline your workflow.
Background Layer
The background layer is the base layer in Adobe Photoshop. It is usually the bottommost layer in your layers panel.
You can’t move it around like other layers since it’s locked by default. This layer typically contains the initial content or background of the image that you’re working on.
Creating and Managing Background Layers
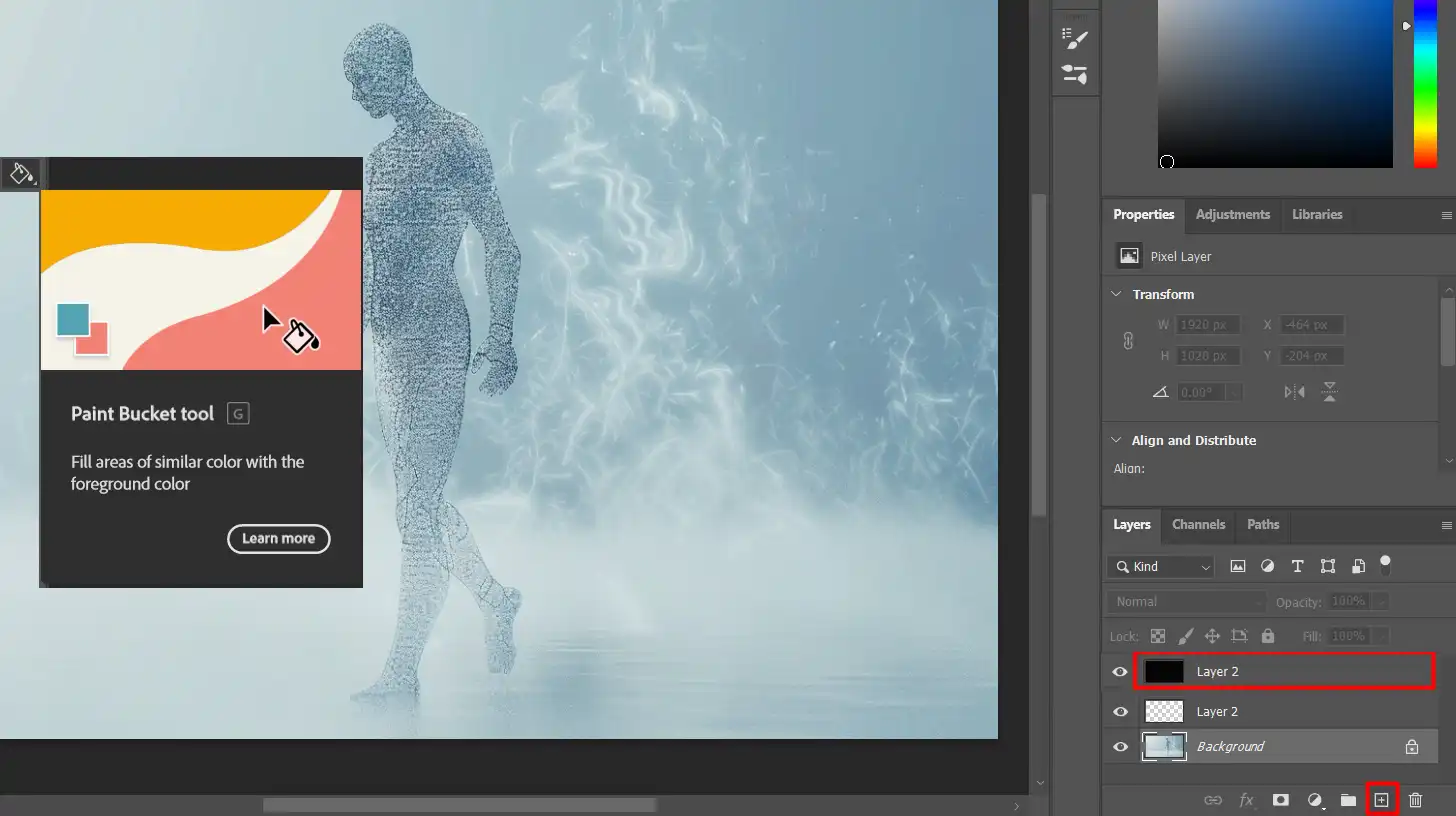
To create a new layer, click the layer button in the layers panel. This button looks like a square with a plus sign.
Use the paint bucket tool to fill your background layer with color or the rectangle tool for shapes. For photo editing, keeping the background layer intact is important.
Photoshop How to Edit the Background Layer
You can unlock the background layer by clicking the lock icon.
This action lets you edit it like any other layer. You can change its content, resize it, or apply layer effects.
For more intricate designs, use various layers to add elements on top without altering the same layer that forms your base.
Pro Tip: Here’s a quick tip: Always create a new layer before making significant changes. This way, your original image remains untouched, and you have more control over your edits.
Advanced Techniques
For even more control, consider using Smart Objects in Photoshop.
This feature allows you to make non-destructive edits to your layers, preserving the original quality of your images.
Additionally, learning how to remove background in Photoshop can help you isolate subjects and create more dynamic compositions.
Layers Panel
Understanding the layers panel is important in Adobe Photoshop basics.
It’s your workspace where all the visual components stack up.
Think of it as a digital sandwich where each layer is a different ingredient. Photoshop beginners often find this panel intimidating, but it’s the backbone of all Photoshop creations.
Organizing Layers
Every layer has its own task. You start by creating a new layer to separate elements.
This way, you can work on individual pieces without harming others.
To keep things tidy, name each layer based on its content. For example, name one layer “Background” and another “Text.” Group layers to streamline your workflow.
- Drag and drop layers to change their order, making visualization easier.
- Using colors to code layers adds another level of organization.
Layer Properties and Options
The properties and options of every layer enhance your control. These include layer opacity, blending modes, and layer effects.
Lowering opacity can make a layer see-through, while blending modes affect how layers interact.
Activating layer effects like shadows or glows can make elements stand out. Remember to experiment with adjustment layers for non-destructive edits.
Want a transparent background? Use opacity and masks to achieve it. If you’re looking to remove an object in Photoshop, the Content-Aware Fill tool can be incredibly useful for seamless edits.
Pro Tip: Use the zoom tool to inspect details and make precise image adjustments easily.
Taking the time to zoom in and fine-tune can make a world of difference. Additionally, familiarize yourself with essential tools in Photoshop to speed up your workflow.
Multiple Layers
Managing multiple layers is key to mastering Photoshop. Imagine each element of your design on a clear sheet stacked on top of each other.
This way, you can edit one part without touching the rest. For example, adding a new layer for text helps you modify or delete it without altering the background.
The layers panel is where all this magic happens. You’ll want your layers panel open at all times, so you always know what’s on what layer.
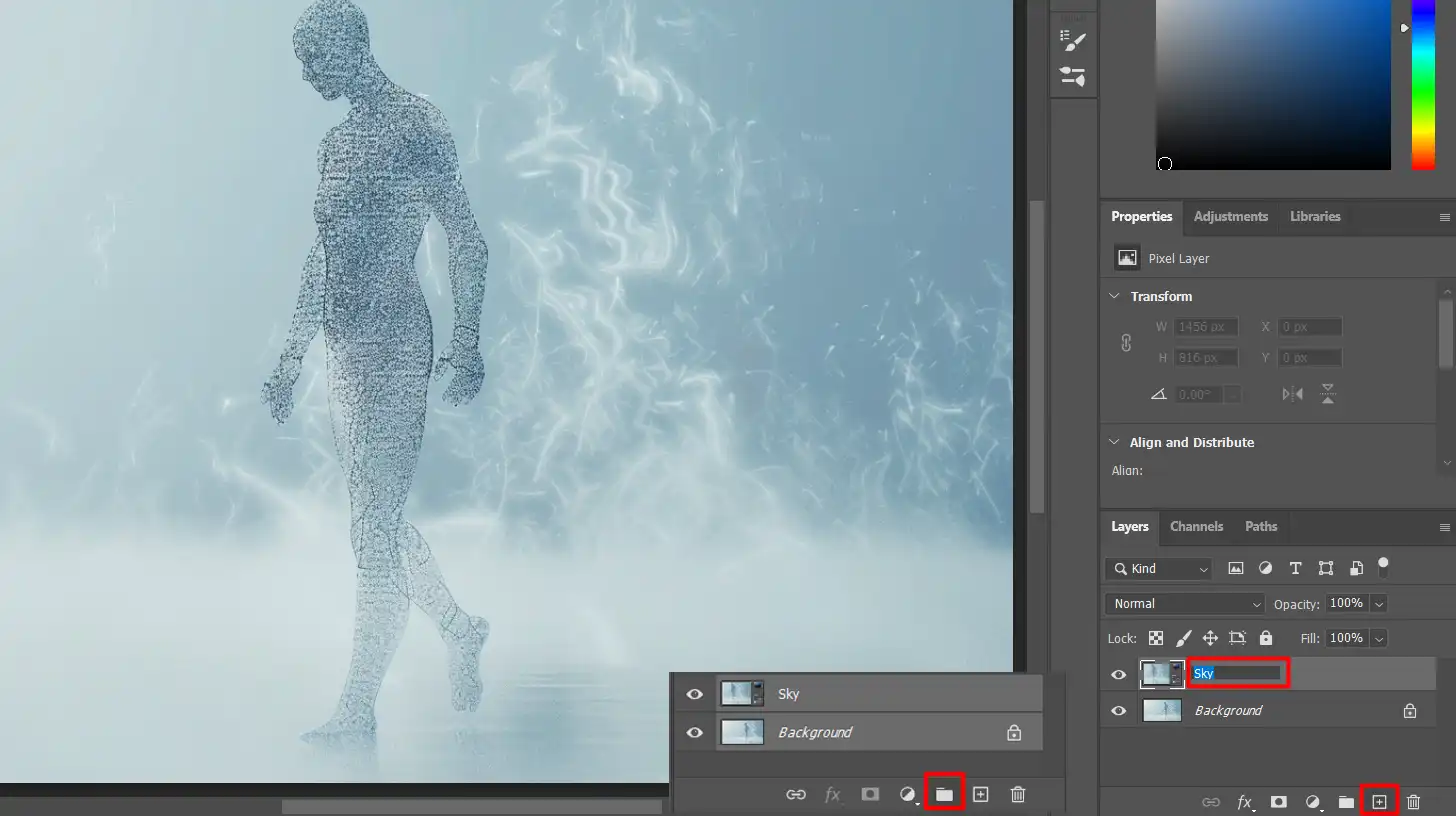
Keep it organized by naming each layer what it actually is. For instance, “Background,” “Text,” or “Sky.”
When you’re working with various layers in Photoshop, group similar layers together. This makes it easier to manage and keeps your layers panel neat.
To create a group layers, select the layers you want and click on the folder icon at the bottom of the layers panel.
Layer Masks and Clipping Masks
Layer masks and clipping masks are essential tools in Photoshop that allow you to hide parts of a layer you’re working on.
Think of a layer mask as a virtual eraser that can be undone. You can paint black to hide parts, white to reveal them. This is excellent for refining edges or creating special effects.
A clipping mask, on the other hand, works a little differently. Use it to apply an effect or adjustment to a specific layer without changing others.
Create a clipping mask by placing the layer you want to clip over the base layer, right-click it, then select “Create Clipping Mask.”
Blending Modes and Layer Styles
Blending modes change how one layer interacts with another. Experimenting with them can lead to beautiful results.
For example, use “Multiply” to darken an image, or “Screen” to lighten it. You can find blending modes in the dropdown menu at the top of the layers panel.
Layer styles add pizzazz to your artwork. They include shadows, glows, and bevels.
Apply them by double-clicking on a layer and exploring the options in the Layer Style dialog. You’ll see instant changes like shadows or gradients that make your designs pop.
Pro tip: Use the adjustment layer to make color and exposure changes non-destructive.
This means your original image stays intact while you experiment with different looks.
Combine it with the shape tools for precise adjustments, ensuring your final product shines without permanent alterations.
Additionally, mastering Photoshop shortcuts can significantly speed up your workflow when dealing with various layers.
For instance, pressing “Ctrl+J” (Cmd+J on Mac) quickly duplicates a layer, while “Ctrl+G” (Cmd+G on Mac) groups selected layers. These shortcuts can save you time and make your editing process more efficient.
Lastly, understanding the difference between Photoshop and Lightroom can help you decide which software to use for specific tasks.
While Photoshop excels in detailed layer-based editing, Lightroom is fantastic for batch processing and organizing large collections of photos. Knowing when to use each can streamline your overall photo editing workflow.
Photoshop How To Advanced Techniques
In advanced editing, mastering tools and techniques can elevate your work to the next level.
From the flexibility of Smart Objects and Adjustment Layers to the creative possibilities with different types of Filters and Effects, these techniques offer powerful ways to refine and enhance your images.
To help you understand the differences between basic and advanced Photoshop techniques, we’ve created a comparison table.
This table outlines the key features and tools used in each level, helping you identify where you are and what skills you can work on to advance your photo editing abilities
| Feature | Basic Techniques | Advanced Techniques |
|---|---|---|
| Skill Level | Beginner | Intermediate to Advanced |
| Tools Used | Basic tools like Brush and Crop | Advanced tools like Smart Objects |
| Editing Complexity | Simple adjustments | Complex manipulations |
| Layer Management | Single or few layers | Multiple layers and layer groups |
| Effects and Filters | Basic effects | Advanced filters and layer styles |
Smart Objects
Smart Objects transform your editing game. Ever made a change and wished you could go back? Smart Objects have you covered.
Convert a layer to a Smart Object to keep it editable. You can scale up or down without losing quality.
Nested Smart Objects allow you to make changes within changes.
Imagine working on a complex image where each element is a separate Smart Object. This workflow saves time and keeps edits non-destructive.
Adjustment Layers
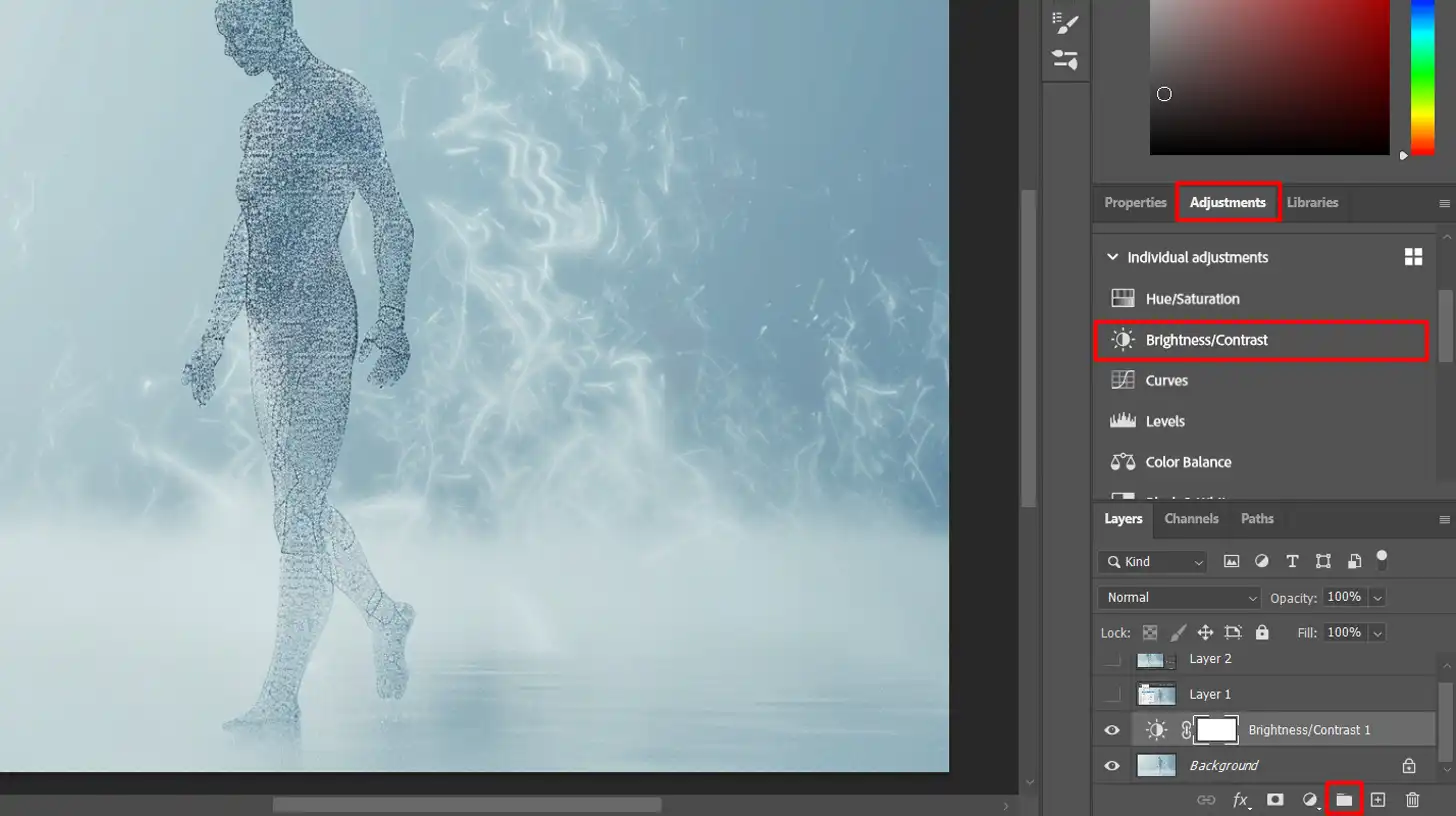
Adjustment layers offer non-destructive editing. They let you tweak colors, brightness, and contrast without altering the original image.
This means your adjustments are reversible. Layer them to apply multiple changes.
For example, use a Brightness/Contrast adjustment layer on top of a Color Balance layer.
Group adjustment layers for organized editing. Label them clearly for quick access. This practice helps, especially during complex edits.
Filters and Effects
These features add flair to your images. Filters like Gaussian Blur, Sharpen, and Noise can create a specific look.
Apply them in combination for unique results. Always remember, filters work best on Smart Objects because they’re adjustable and non-destructive.
Layer styles like shadows, glows, and bevels enhance elements. You want a text layer to pop?
Add a drop shadow for depth. Social media graphics? These styles save time and provide professional polish.
Pro Tip: When using the “Layer called” feature, always create a duplicate before making changes. This ensures you have a back-up and facilitates experimentation without fear.
Content-Aware Fill
One of the essential tools in Photoshop is the Content-Aware Fill. This feature allows you to remove unwanted objects from your image seamlessly.
Simply select the area you wish to remove, and Photoshop will fill it in with surrounding pixels, making it look natural.
Essential tools in Lightroom also complement this process, providing advanced options for color correction and overall image enhancement.
For best results, use Content-Aware Fill on a duplicate layer. This way, you can always revert back if needed. Combine this with Smart Objects for ultimate flexibility and non-destructive editing.
Lightroom Shortcuts
Mastering Lightroom shortcuts can significantly speed up your workflow. For instance, pressing ‘D’ takes you directly to the Develop module, while ‘G’ brings you back to the Library module.
Learning these shortcuts can save you a lot of time, especially during large editing sessions.
Additionally, use the ‘R’ key to quickly access the Crop tool, and ‘Q’ for the Spot Removal tool.
These shortcuts make navigating through Lightroom more efficient, allowing you to focus more on your creative process.
How to Use the Eyedropper Tool
The Eyedropper Tool is a handy feature in Photoshop that allows you to sample colors directly from your document window.
When working with transparent pixels, the tool helps you pick colors from underlying layers or adjust colors within a text box.
This tool ensures that your color choices blend seamlessly with the existing elements in your image, whether you’re dealing with transparent areas or text boxes.
By using the tool effectively, you can maintain consistency and precision in your design.
Marquee Tool
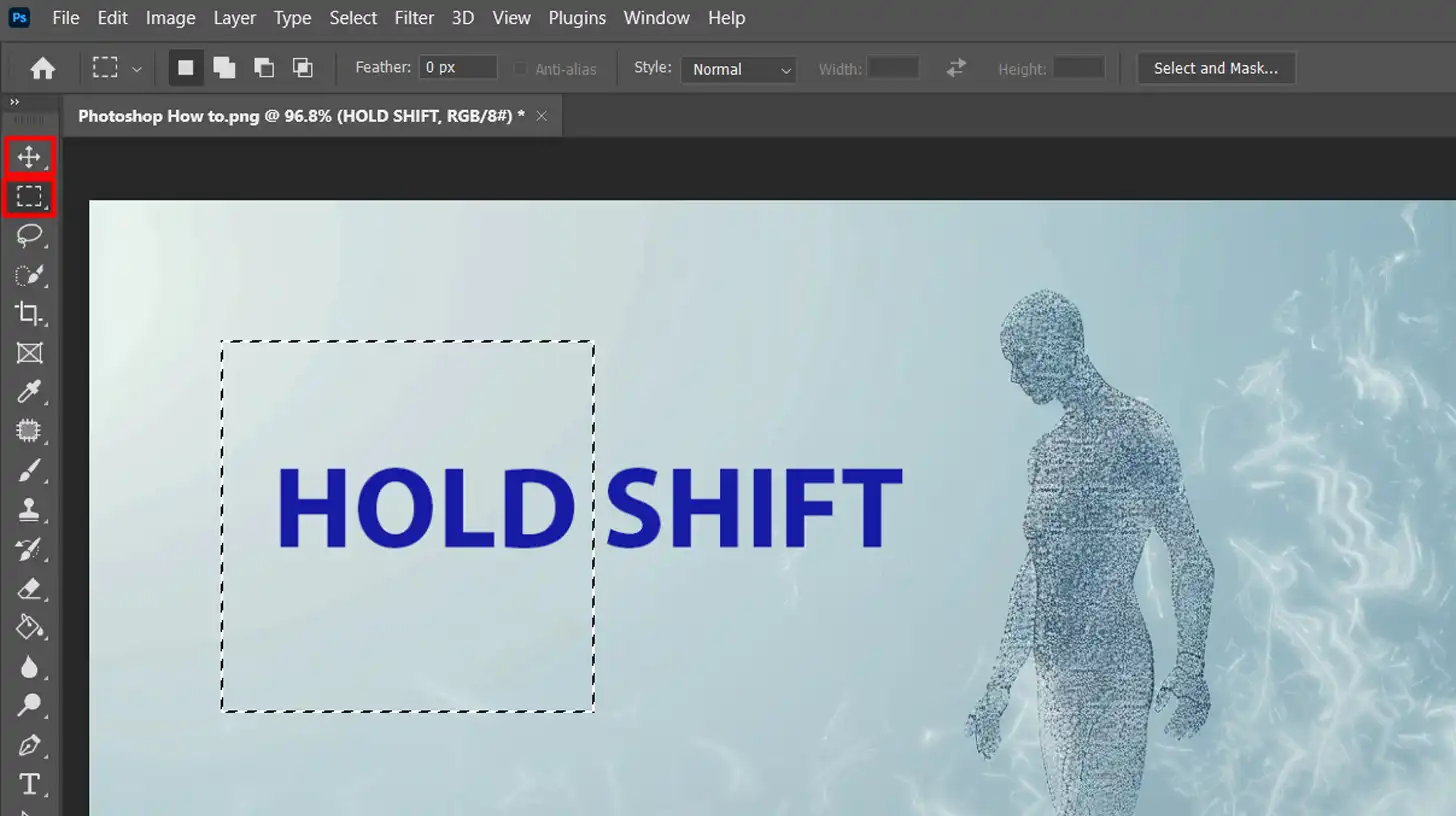
The Marquee Tool in Photoshop is essential for selecting specific areas of your image with precision.
To enhance your selection process, hold down the Shift key while using the tool to create perfect squares or circles.
Once you have your selection, you can easily switch to the Move Tool to reposition the selected area or drag it into a new document.
This combination of tools allows for efficient editing and helps you manage your image elements effectively.
The Marquee Tool in Photoshop is important for selecting specific areas of your image with precision.
For more complex selections, you can use the object selection tool to automatically identify and select the object you want to work with, making it easier to refine your edits.
Lasso Tool
The Lasso Tool in Photoshop is perfect for making freehand selections around complex shapes or objects.
It allows you to draw around an area with precision, providing more control than standard selection tools.
Once you’ve outlined your selection with the tool, you can easily refine or adjust the selected area to fit your needs.
Whether you’re isolating an object or creating intricate cutouts, the tool offers flexibility and accuracy in your editing process.
The Lasso Tool in Photoshop is perfect for making freehand selections around complex shapes or objects. You can also use Photoshop Select Subject for automatic selection of the main subject, then refine it with the Lasso Tool.
Text Tool
The Text Tool in Photoshop is a versatile feature for adding and customizing text in your projects. To start, select the Text Tool from the Toolbar and click on your canvas to create a text box.
You can then type in your desired text and adjust its appearance using the options in the Character panel.
This tool allows you to modify font style, size, color, and spacing, ensuring your text complements your design perfectly.
You can also use the Warp text option to bend and twist your text into creative shapes, adding a unique touch to your design.
For more control, you can also use the Move Tool to reposition your text or layer styles to add effects like shadows or gradients.
Whether you’re designing a flyer, a social media post, or a website, the Text Tool provides the flexibility to create eye-catching and professional text elements.
The Magic Wand Tool
The Magic Wand Tool in Photoshop is great for selecting areas of an image based on color similarity.
Click on a color in your image, and the wand automatically selects all pixels with similar colors, making it easy to isolate or edit specific areas.
You can adjust the tool’s tolerance to increase or decrease the range of colors included in your selection.
This tool is especially useful for quick selections of solid-colored backgrounds or objects and when combined with the Quick Selection tool, it allows for even more precise and efficient selection of complex areas
Frequently Asked Questions

What's the process for using Photoshop step by step?
- Open Photoshop: Start by launching the program on your computer.
- Create a new project: Go to File > New, and select the project settings according to your needs.
- Import images: Drag and drop images into the workspace or use File > Open to choose an image file.
- Use tools: Familiarize yourself with tools like the Brush, Eraser, and Clone Stamp tool for editing.
- Adjust layers: Work with layers to manage different elements of your image separately.
- Apply filters: Explore the Filter menu to enhance your image or add special effects.
- Save your work: Regularly save your progress by clicking File > Save and choose the appropriate format.
What's the best way to learn Photoshop on your own?
- Explore tutorials: Use online resources such as YouTube tutorials, blogs, and free courses.
- Practice regularly: The more you practice, the better you will understand the tools and features.
- Experiment with features: Try different tools and effects to see what they do and how they enhance your images.
- Join forums: Participate in online communities where you can ask questions and share your work.
- Set projects for yourself: Challenge yourself with specific projects to improve your skills.
How do you Photoshop a picture?
- Select the image: Open the image you want to edit in Photoshop.
- Make basic adjustments: Use the Adjustments panel to alter brightness, contrast, and color balance.
- Remove unwanted elements: Use the Clone Stamp or Healing Brush to remove blemishes or objects.
- Add effects: Use layers and filters to add artistic effects to your photo.
- Refine the image: Fine-tune your edits by zooming in and carefully working on details.
- Save the edited image: Save your work in the desired format and quality.
Is Photoshop easy to learn?
- Basic vs. Advanced: Basic features can be learned quickly, but advanced techniques require more time and practice.
- User-friendly interface: Photoshop's interface is user-friendly, making it easier for beginners to navigate.
- Abundant resources: There are numerous tutorials and guides available online that make learning Photoshop more accessible.
- Diverse community: A large community of users can provide support and answer questions as you learn.
Conclusion
In conclusion, mastering “Photoshop how to” techniques has been a transformative experience for me.
Learning the ins and outs of Photoshop has significantly improved my photo editing skills, making it easier to create stunning visuals.
If you’re eager to enhance your editing abilities, I highly recommend my Photoshop Course and Lightroom Course.
These courses provide practical insights and easy-to-follow guidance, perfect for anyone looking to unlock their creative potential.
Happy editing!
Read more about Photoshop:


