How to Make a Photo Grid in Lightroom: Tips and Tricks for Beginners

Introduction to How to Make a Photo Grid in Lightroom

Creating a Lightroom photo grid is an excellent way to showcase multiple images in a single, cohesive layout. How to make a photo grid in Lightroom is a valuable skill for photographers and enthusiasts alike. It offers powerful tools that make this process easy and efficient, allowing you to create stunning photo grids without needing advanced graphic design skills. This technique is perfect for creating social media posts, blog visuals, or printed collages.

For instance, last summer, I used Lightroom to create a photo grid of my family’s wedding photographs. We had dozens of photos from various events, and I wanted a way to present them beautifully without overwhelming our family blog with individual pictures. Using Adobe Lightroom’s Print module, I created a grid that highlighted our best moments in a clean, organized format. This not only saved time but also made our memories more engaging for everyone who visited the blog.

Table of Contents

Step-by-Step Guide to How to Make a Photo Grid in Lightroom

How to make a photo grid in Lightroom. Adobe Lightroom Classic interface showing the print module with a photo grid of various umbrellas. Layout settings are highlighted on the right panel to show Lightroom Photo Grid.

Setting Up Your Workspace

Pro Tip: Familiarize Lightroom’s essential tools to know which are most useful for each project.

Importing and Organizing Photos

Creating the Grid Layout

Customizing the Grid

Exporting the Photo Grid

Integrating Text and Watermarks in Your Lightroom Photo Grid

Adding Text to Your Photo Grid

When learning how to make a photo grid in Lightroom, adding text can be a great way to personalize your creation. Start by selecting the “Identity Plate” feature in the Print module. This feature allows you to add text overlays to your photo grid. Simply click on the Identity Plate Editor, type your desired text, and customize the font, size, and color to match your grid’s style.

Customizing Text Placement

Positioning your text is crucial to ensure it complements rather than distracts from your images. In the Identity Plate Editor, you can drag the text to different locations on the grid. Consider placing text in areas with less visual activity to maintain a balanced look. For instance, if you are showcasing different types of photography, you might label each section to highlight the genre.

Using Watermarks for Branding

Watermarks are essential for protecting your work and establishing your brand. In Lightroom, you can add watermarks through the “Watermark Editor.” Navigate to Edit > Edit Watermarks, where you can insert text or graphic watermarks. Adjust the opacity, size, and position to ensure your watermark is visible but not overpowering.

Positioning Watermarks Strategically

Strategically placing your watermark helps maintain the aesthetic of your photo grid. Typically, placing it in a corner or along the edge works best. This ensures your work is protected without distracting from the main content. If you’re creating grids for portrait editing, consider a subtle watermark to keep the focus on the subjects.

Finalizing and Exporting

Once you have added and positioned your text and watermarks, review your collage to ensure everything looks cohesive. Make any necessary adjustments to the text or watermark positions. After finalizing, proceed to export your grid. This step will ensure that your personal touches are embedded, making your photo grid unique and protected. Save the final product as a JPEG or PNG to maintain quality and easily share your classic design.

Pro Tip: Check out my guide on Lightroom collage techniques to achieve perfect layouts!

Here is the table that shows the additional features that support creating a photo grid in Lightroom:

Feature Description Benefit
Identity Plate Adds personalized text or logo to your photo grid. Customize and brand your photo grid.
Watermark Editor Allows you to insert text or graphic watermarks. Protects your images from unauthorized use.
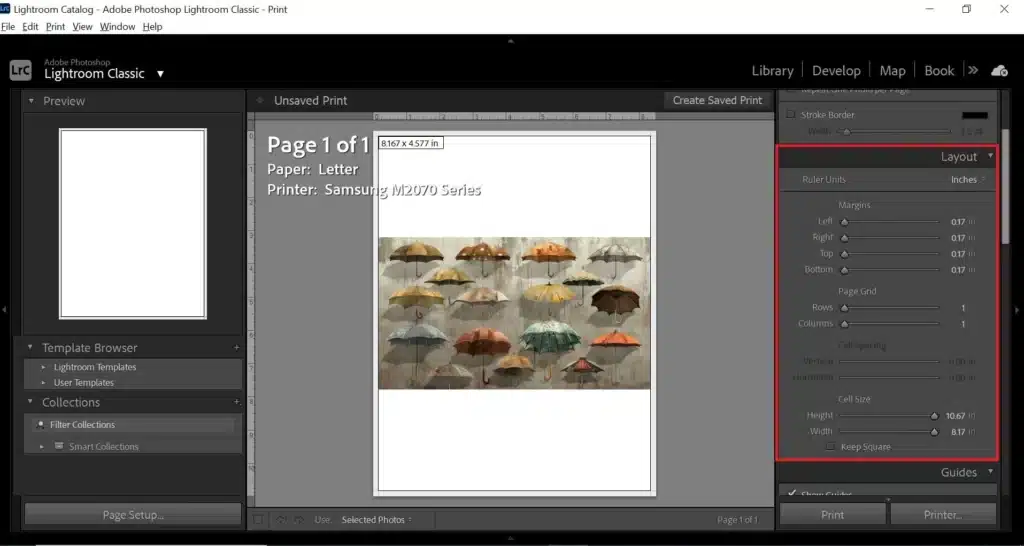
Print Module Layout Tools to create and arrange photocells for the grid. Designs cohesive and appealing photo grids.
Custom Package Create custom layouts with multiple photos and text. Flexible design tailored to your needs.
Page Background Color Set a background color for the page. Enhances the grid’s overall aesthetic.
Photo Borders Add borders around each photo. Adds a polished look and distinguishes individual photos.

Advanced Layout Techniques for Photo Grids

1. Using Custom Templates

When learning how to make a photo grid in Lightroom, starting with templates can save time and ensure consistency. Lightroom allows you to create custom templates that you can reuse for different projects. This is especially useful if you frequently create similar types of photo grids. To create a custom template, design your layout in the Print module, then save it by clicking on the “+” button in the Template Browser.

2. Adjusting White Balance Across the Grid

Ensuring consistent white balance is crucial for a cohesive look in your photo grid. Before arranging your photos, adjust the white balance for all images. This can be done in the Develop module. Synchronize the settings across all selected photos to maintain uniformity. This step is particularly important in projects like astrophotography, where color consistency is key.

3. Layering Photos for Depth

To add depth to your grid, experiment with layering photos. In Lightroom, you can adjust the order of your photos by simply dragging them within the grid. By placing certain photos behind or in front of others, you can create a dynamic, layered effect. This technique can make your photo grid more engaging and visually appealing.

4. Incorporating Elements from Adobe Photoshop

For more advanced customization, consider incorporating elements from Adobe Photoshop. After arranging your photo grid in Lightroom, export it to Photoshop for further editing. In Photoshop, you can add unique graphics, text, or additional photo effects that aren’t available in Lightroom. This integration allows for greater creative flexibility and precision. When considering advanced techniques, understanding how to make a photo grid in Lightroom can significantly enhance the presentation of your photography projects.

5. Maintaining Order and Symmetry

Keeping your Lightroom photo grid organized is crucial for a clean look. Use Lightroom’s alignment tools to maintain order and symmetry. Align your photos along the grid lines and ensure equal spacing between them. This not only enhances the visual appeal but also makes the grid more professional. Utilize the “Snap to Grid” feature to help with precise alignment.

Here’s a table that specifies different grid sizes and their suitable uses.

Grid Size Description Suitable Use
2×2 Four equal-sized photocells Simple and balanced, it is ideal for social media posts.
3×3 Nine equal-sized photocells Great for showcasing a series or event highlights.
4×4 Sixteen equal-sized photocells Best for detailed projects like product showcases or tutorials.
1 Large + 3 Small One large photo with three smaller ones below Perfect for storytelling with a main image and supporting details.
2×3 Six equal-sized photocells Suitable for blog posts and website banners, balancing quantity and size.

Comparing Lightroom with Other Tools

Lightroom vs. Canva

When considering how to make a photo grid in Lightroom, it’s essential to compare it with other popular tools like Canva. Canva is a popular tool for creating various visual content, but Lightroom excels when it comes to advanced image editing. While Canva offers easy-to-use templates and drag-and-drop functionality, Lightroom provides more powerful editing tools and precision. For example, in a lunar eclipse shoot, the ability to finely adjust exposure and color balance in Lightroom is unmatched, allowing for more detailed and professional results.

Lightroom vs. PicMonkey

PicMonkey offers basic image editing features and is user-friendly, but it lacks the depth and integration found in Lightroom. Lightroom’s ability to work seamlessly with other Adobe products like Photoshop gives it a significant edge. This integration is particularly useful in projects like night photoshoots, where starting with basic adjustments in Lightroom and then transferring to Photoshop for advanced edits can create stunning results that PicMonkey simply cannot match.

Lightroom vs. GIMP

GIMP is a free and open-source alternative to Lightroom, offering a wide range of editing tools such as tools used to warp images. However, Lightroom’s interface is more intuitive, and its performance is more efficient, especially when handling large batches of images. For high-volume tasks such as food photography, Lightroom’s speed and ease of use make it the superior choice, enabling photographers to edit and manage their work more effectively.

Lightroom vs. Apple Photos

Apple Photos is great for basic editing and organization, but it falls short in terms of professional features. Lightroom’s advanced editing capabilities, such as precise control over color and tone, are essential for producing high-quality images. For instance, when working on detailed projects like travel photography, Lightroom provides the tools needed to achieve a polished, professional finish that Apple Photos cannot offer.

Lightroom vs. Capture One

Capture One is a strong competitor to Lightroom, particularly known for its color grading capabilities. However, Lightroom’s integration with the Adobe ecosystem and its extensive community support make it a more versatile choice. For photographers working across various styles, from Silhouette Photography to portrait editing, Lightroom’s comprehensive toolset and resources provide a significant advantage over Capture One.

FAQ About How to Make a Photo Grid in Lightroom. Adobe Lightroom Classic interface showing the print module with a photo of a vase of flowers and books. Print settings are highlighted on the right panel depicting Lightroom Photo Grid.

Frequently Asked Questions

How to create a grid in Lightroom?

To arrange multiple images in Lightroom, start by going to the section where you can create prints. Choose a template or set up a custom arrangement with image cells. After arranging your images, export your project as a JPEG file.

How do I get the grid view in Lightroom?

To access the view showing multiple images in Lightroom, navigate to the Library section. Click on the Grid icon in the toolbar or press the “G” key on your keyboard. This will allow you to view and manage your images collectively.

How do I make a photo grid?

Begin by accessing the print section from the main menu. Select a suitable template or create your own by adding and adjusting image cells. After placing your images, export the project as a JPEG file. This simple approach will help you create visually appealing photo grids quickly and efficiently.

Can I make a photo collage in Lightroom?

Yes, you can design a collage in Lightroom by using the print section. Start with a custom or existing template, then drag your images into the designated cells. Adjust their size and placement before exporting the final JPEG file.

Conclusion

I want to emphasize how transformative these techniques have been for my own projects. When I first started using Lightroom, I found the flexibility and creativity it offered to display my work to be game-changing. For example, last year, I revamped my entire portfolio using these advanced layout techniques. The ability to customize layouts and add personal touches made my portfolio stand out and impress potential clients.

This not only saved time but also elevated the quality of my work to a more professional level. Whether you’re just starting or looking to refine your skills, mastering these techniques can truly make a difference. To enhance your skills further, consider enrolling in our comprehensive courses. Our Lightroom course and Photoshop course are designed to take your editing skills to the next level. You’ll learn how to install presets, utilize premium features, and much more. Start your journey today with our free introductory lessons, and see the difference for yourself!

If this article has helped you, then Like and Share it with your friends!
Facebook
Twitter
LinkedIn
Pinterest

Have a nice photoshoot!

Learn more about Photo Editing with Lightroom and Photoshop:

Download Your Free Guide Now!

Discover the secrets of photography with our printable guide! Master essential techniques like aperture, shutter speed, and ISO to create stunning images. Get your free printable PDF now and start turning your snapshots into masterpieces!