Old Paper Texture in Photoshop: Creating Vintage and Aged Effects
Old Paper Texture in Photoshop: Creating Vintage and Aged Effects
Want to create an old paper texture in Photoshop? You’re in the right place!
In this article, I’ll guide you through the steps to achieve that vintage look for your digital creations.
Intrigued? Stick around, and by the end of this guide, you’ll have mastered the art of crafting timeless textures in Photoshop.
Table of Contents
How to Create an Old Paper Texture Photoshop
Transforming your digital designs with an old paper texture is a simple way to evoke a classic, vintage aesthetic.
To get started, let’s focus on configuring your Photoshop workspace to make the process smooth and efficient.
Step 1: Setting Up Your Photoshop Workspace
Open Photoshop. Begin by setting up your workspace to create a vintage paper texture in Photoshop.
Navigate the menu bar, select File, and click New to create a new document. This is where we start.
Ensure the width and height match your preferences, and keep the resolution around 300 pixels per inch for a crisp result. Create a background layer which will host our initial elements.
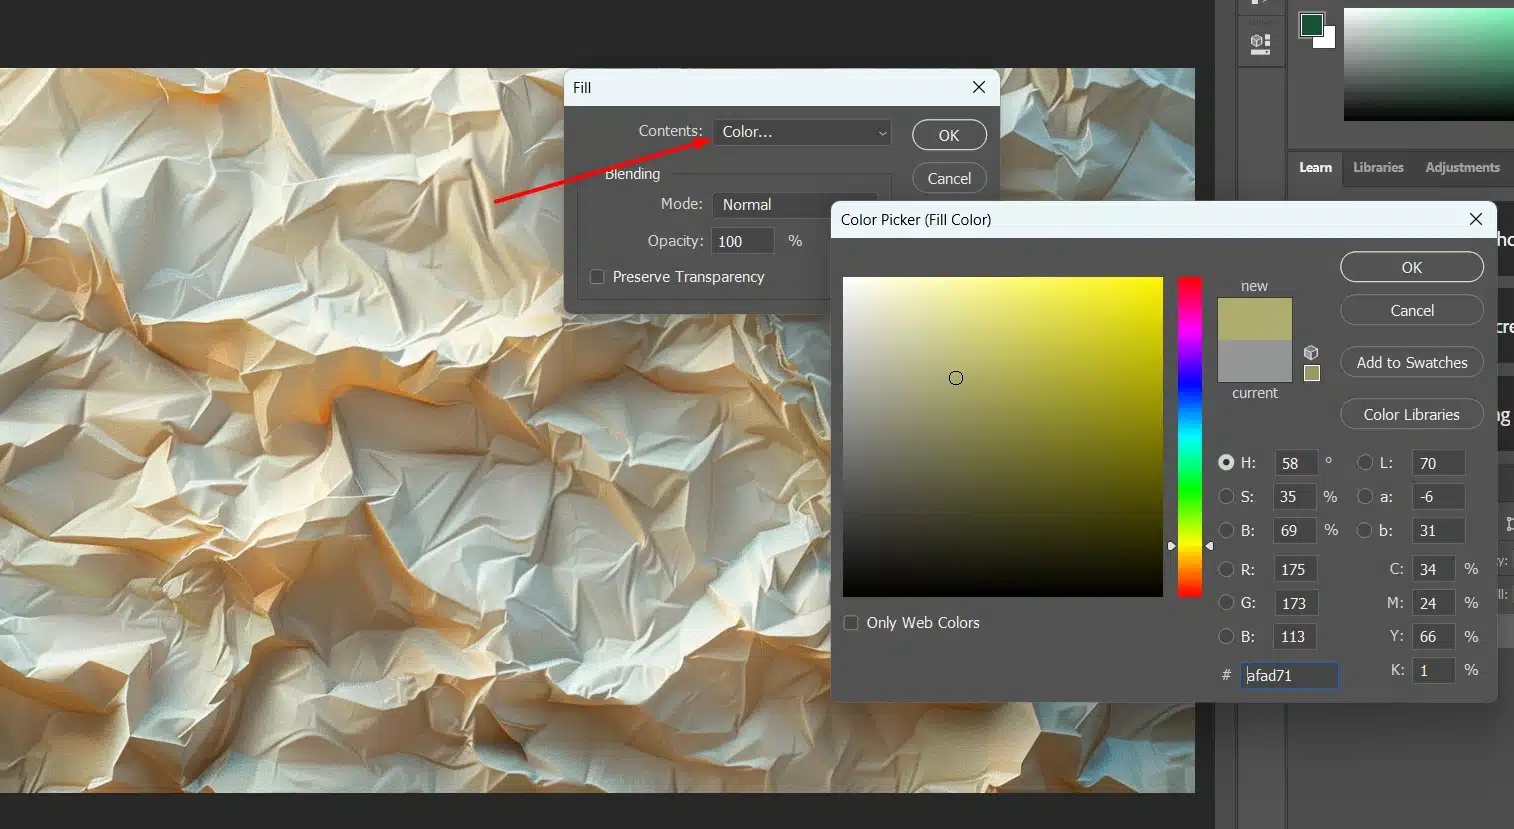
Now, let’s make the base layer. Select the background layer, then go to Edit, and select Fill. In the fill dialog box, choose a dull paper-like color from the color picker.
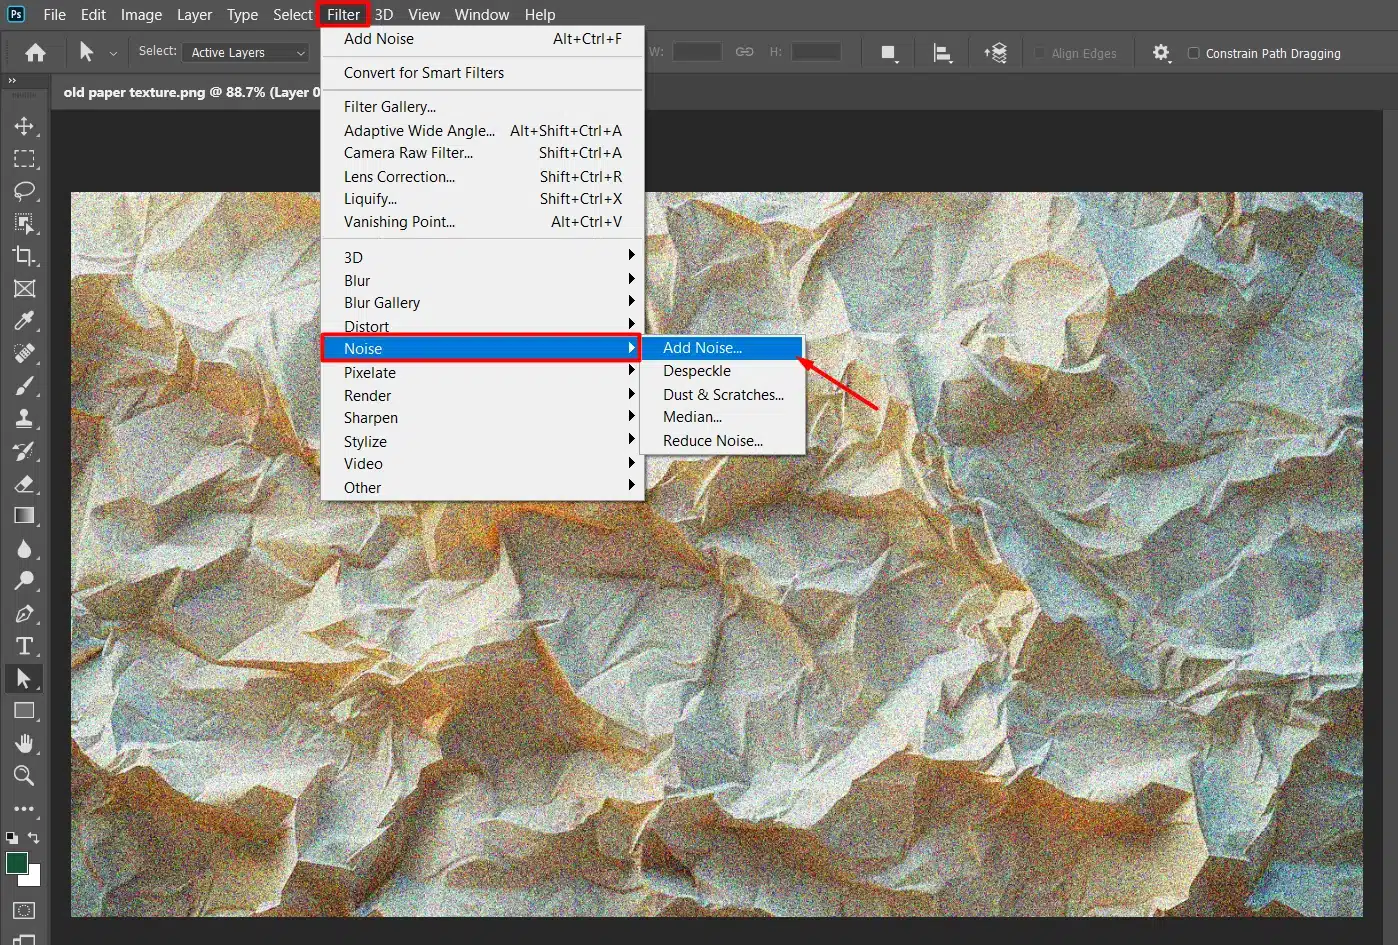
This creates a vintage paper feel. Next, add some noise by going to Filter > Noise > Add Noise. This enhances the look of old paper.
You might also experiment with the gaussian blur in Photoshop to slightly soften the noise, further enhancing the vintage look.
Step 3: Adding Texture to the Base Layer
Using Built-in Photoshop Textures
Navigate to the cutout Filter Gallery. The built-in textures offer commendable results. Go to the texture tab to add and explore options like Grain or Texturizer.
Adjust the settings to achieve the desired effect. Typically, setting the amount to something moderate helps balance the look.
Importing External Paper Textures
Sometimes, built-in filters don’t cut it. In that case, import an external vintage paper texture.
Download a high-resolution old paper texture image. Open it in Photoshop, then drag it onto your document.
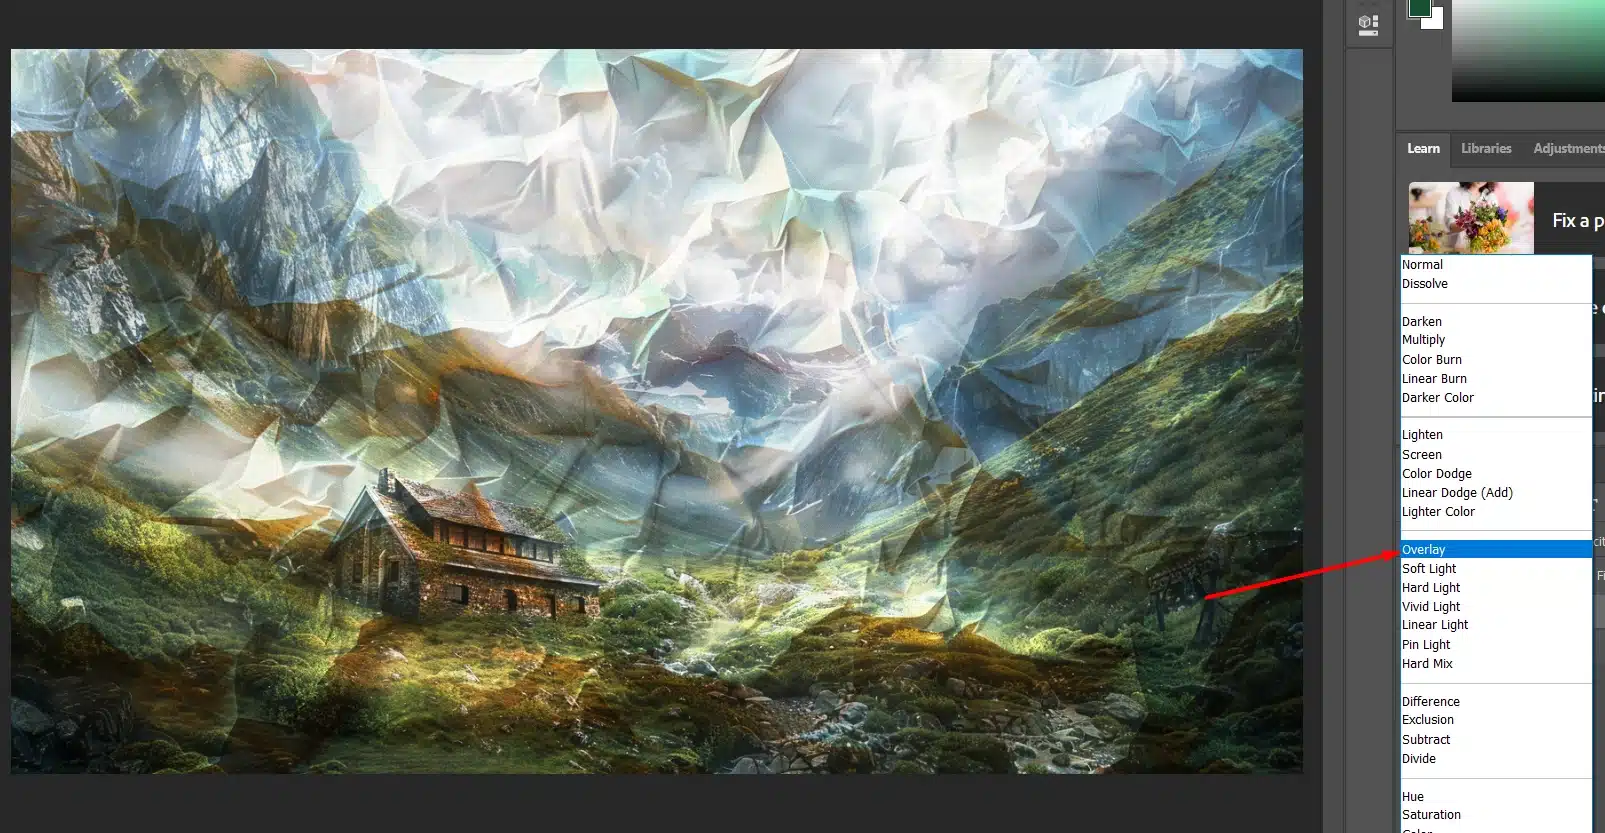
Use the layers panel to set the texture layer above the base layer. Change its blend mode to Overlay or Multiply for a blended look.
Vintage effects enhance authenticity. Use brush strokes to add light stains. Select a soft round brush and set the opacity to low.
Choose darker or lighter hues of your base color. Randomly place strokes across the texture.
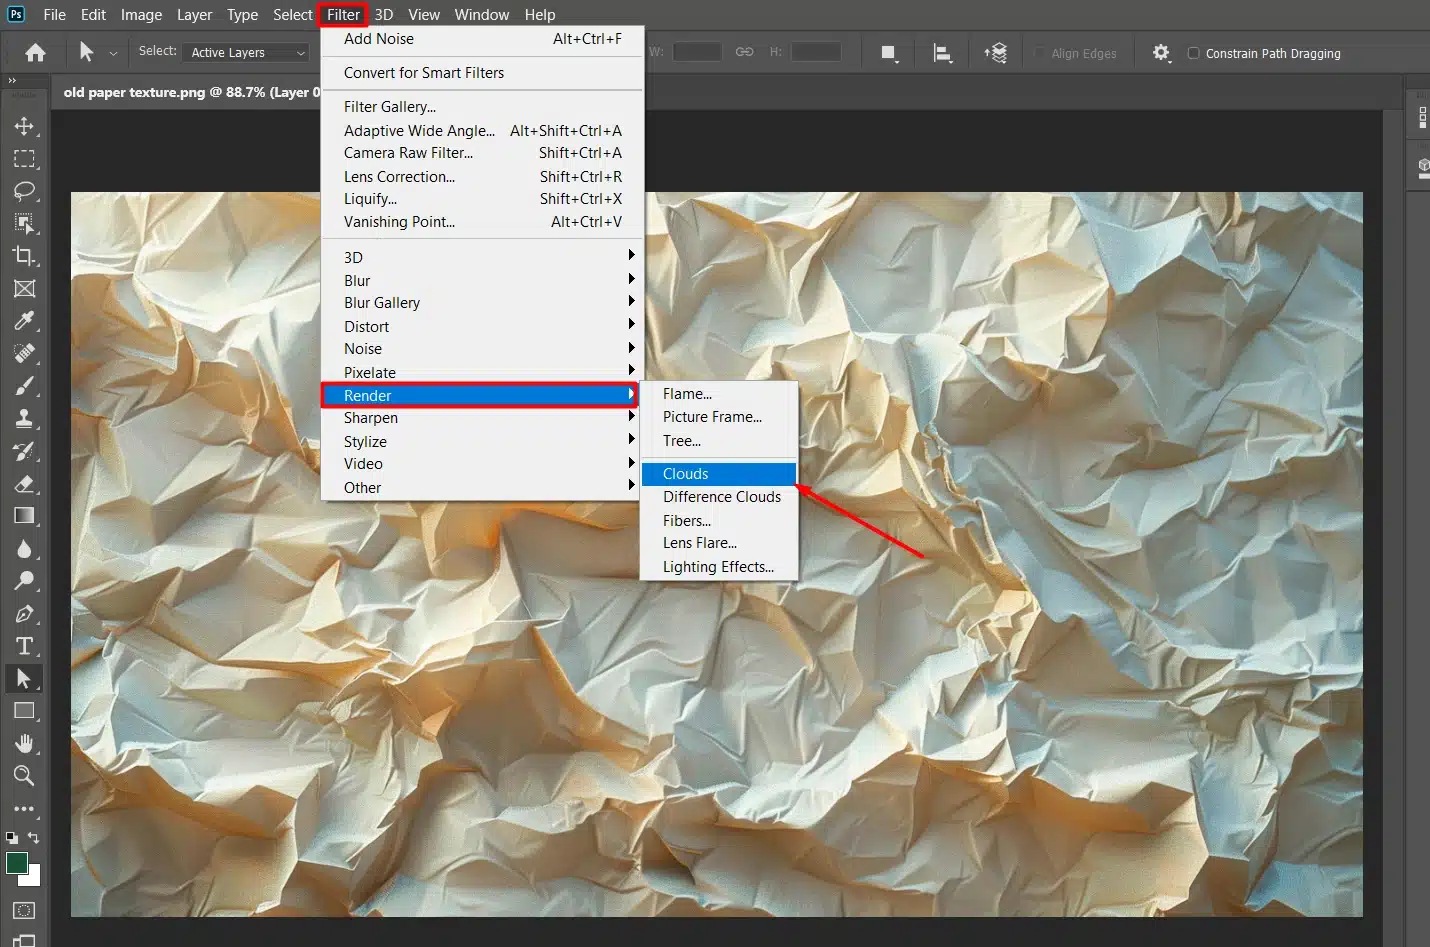
Also, consider using the clouds filter (Filter > Render > Clouds) to add random patterns.
Step 5: Final Adjustments and Tweaks
Review all the layers. Adjust the opacity of texture layers if needed.
Fine-tune the color balance and contrast. Make sure your vintage paper texture looks balanced and authentic.
Pro tip: Using the patch tool in Photoshop can help you make precise adjustments to specific areas, enhancing the overall finish of your design
Tips and Tricks for Perfect Paper Texture Background
Selecting the right old paper texture can significantly impact your design’s authenticity.
Explore how to choose the perfect texture to elevate your background and achieve the desired look.
Choosing the Right Old Paper Texture
Choosing the right vintage paper texture background is significant as it sets the foundation for your artwork. Follow these steps:
Go to the menu in Photoshop, click File, then New.
Create a document with your desired dimensions
Plain colors like beige or yellow make good starting points.
Visit free texture websites for high-resolution images.
Download and import them into your document.
Align your imported texture with the existing layers using the layers panel to position it correctly.
Adjust the blend mode to soft light for subtle effects. Stick with simpleoptions to avoid overwhelming your main design. Experimenting helps you learn what texture fits best.
Pro Tip: Experimenting with different options, such as the magic wand tool, can help you fine-tune selections and create a cohesive look.
Blending Techniques for Seamless Textures
Blending techniques make your textures look natural. Begin by adjusting opacity and blend modes in the layers panel.
Try modes like multiply or overlay to blend your texture seamlessly. Next, use the brush tool.
Select a soft brush and set the opacity low. Gently brush over edges using edge fidelity to smooth transitions.
A simple trick: apply the clouds filter. It adds randomness and breaks up uniform patterns. Navigate to Filter > Render > Clouds.
Alternatively, explore other types of filters, such as the cutout filter and spatter filter. They can help create unique blends. Practice makes perfect.
Implementing Layer Masks for Better Control
Layer masks give you more control. Follow these steps:
Add a new layer by clicking the new layer icon in the layers panel.
Place it on top of your texture layer.
Click the layer maskicon. A white box appears next to your new layer.
Select the brush tool with black as the foreground color.
Apply gentle strokes on the new layer icon mask to hide parts of the texture. Switch to white to reveal areas.
Toggle between black and white for precision. Adjust the brush size for detailed work. Use different brushes to create various effects.
This process refines your vintage paper background, providing smooth textures and realistic appearances.
By applying a layer mask, you can selectively blur specific areas of the background while maintaining sharp details in the foreground, offering better control and more refined results in your image adjustments.
Pro Tip: Save your project often as a PSD file. This keeps your layers intact for future edits.
Experiment with different types of filters along with layer masks to gain better control over the old paper texture. Use a layer mask in combination with a clipping mask to precisely apply the texture to specific areas of your design.
Exploring Different Types of Paper Textures
Differenttypes of paper textures can add unique touches to your projects. Here’s a quick comparison of how to achieve various textures and their important features:
Aspect
Overview
Vintage Paper
Steps to Achieve: 1. New document, beige background. 2. Add noise and grain filter. Features: Noise, grain filter.
Steps to Achieve: 1. Beige background, apply clouds filter. 2. Add noise, blend with overlay. Features: Clouds filter, noise.
Vintage Paper Texture
To create a convincing vintage paper texture, follow these steps to achieve an authentic and timeless look.
Steps to Achieve Vintage Paper Texture
Create a new document in Photoshop.
Select a beige color for your background layer.
Add some noise to make your digital canvas look aged.
Apply a grain filter (subtly).
Adjust blend modes to Multiply or Overlay for the desired effect.
Use different brushes for better texture diversity.
Grunge Paper Texture
Adding a grunge effect to your paper texture can create a rugged and edgy look that’s perfect for a variety of designs.
Steps to Achieve Grunge Paper Texture
Start with a dull grey background.
Import a high-resolution grunge texture to cover your entire canvas.
Blend it using the Overlay mode.
Use grunge brushes to add rough texture.
Lower the opacity to add layers without overwhelming the piece.
Vary brush pressure to create scratches and worn-out spots.
Parchment Old Paper Texture
For a refined and elegant look, creating a parchment old paper texture can add a touch of sophistication to your design.
Steps to Achieve Parchment Paper Texture
Begin with a yellowish beige background.
Apply the Clouds filter from the menu bar for a randomized texture base.
Add noise to simulate slight imperfections.
Use a soft brush to create subtle stains.
Blend it all with an Overlay mode.
Pro Tip: To add a unique touch to your parchment paper texture, try incorporating a double exposure effect by overlaying another image for a creative and layered look.
Save your progress in PSD format. It keeps layers intact, making future tweaks easier.
Applying Paper Textures to Various Projects
Now, we’ll explore different ways to incorporate old paper texture background into your creative work.
This is a fun and easy way to elevate your designs!
Scrapbooking and Collage Art
Remember your old scrapbook from school? Imagine giving it a facelift with digital textures. In Photoshop, follow these steps:
Create a new layer.
Select the old paper texture background you like.
Place it over your artwork.
Use options like Overlay or Multiply to merge it in naturally.
Adjust opacity until you're satisfied.
Integrating elements of fine art photography into your scrapbooking and collage art can elevate your projects by adding a touch of artistic sophistication and depth, transforming ordinary pages into visually stunning masterpieces
Incorporate and edit portraits into your scrapbooking and collage art to add a personal and meaningful touch to your projects.
Simple as that! Let those memories shine with an extra flair.
Digital Art and Illustrations
Digital art offers endless possibilities. Adding an old paper texture background to your illustrations can make them stand out. Here’s how:
Open your image.
Create a new layer and place the old paper texture background on top.
Adjust the blend mode to enhance the look.
The vintage touch gives your art an edge simplicity that captivates. Playing around with settings like spray radius can further refine your work.
Pro Tip: Utilizing Photoshop masking can help you control which areas of your image receive specific treatments, allowing for more precise adjustments and a polished final product.
Whether you’re designing posters, flyers, or web graphics, a well-chosen old paper texture background can add a lot. Import your texture into Photoshop and follow these steps:
Place it over your background layer.
Flatten your image to see how it looks.
If it's too dark, use the darken blend mode.
Need more contrast? Increase opacity.
It’s all about tweaking until you hit the sweet spot.
Pro tip: Save your work as a PSD file. This keeps your layers intact for future edits. Happy designing!
Adding vintage paper texture can transform any project from ordinary to extraordinary.
For graphic design projects involving importing old paper texture, mastering the essential tools in Photoshop will significantly enhance your ability to merge and manipulate the texture seamlessly.
Also Lightroom can be used to make initial adjustments to the texture before fine-tuning it in Photoshop.
Frequently Asked Questions
What's the process for creating an old paper effect in Photoshop?
Open your image in Photoshop and select a paper texture layer to overlay.
Use blending modes to integrate the texture naturally.
Adjust the levels and colors to enhance the vintage feel.
Apply a sepia or brown color overlay to give it an aged look.
How do you make a vintage texture in Photoshop?
Start with a new layer and fill it with a solid color that resembles an old paper.
Add the 'Add Noise' filter to mimic speckles and grain.
Use the 'Gaussian Blur' to soften the noise, creating a more realistic texture.
Alter the layer opacity to blend the texture into your base image effectively.
How do you get old paper texture?
Search online for free or paid old paper textures; many resources are available.
Scan a real piece of old paper texture if you have one.
Create your own texture using coffee stains, ink splats, and crumpling paper.
What's the method for making paper texture in Photoshop?
Create a new layer and fill it with a light brown or beige color.
Apply the 'Texturizer' filter from the Filter gallery and choose a paper texture style.
Adjust the scaling and relief to achieve the desired texture depth.
Enhance the realism by adding shadows and highlights with the Dodge and Burn tools.
In conclusion, using old paper texture Photoshop has truly transformed my design projects, adding a unique vintage feel that’s hard to achieve otherwise. I remember working on a historical poster where this texture was a game-changer, giving it an authentic, aged look that impressed my client.
By following the steps outlined, you can easily add this classic effect to your own designs, whether you’re working on posters, digital art, or scrapbooking. Experimenting with different textures and blending techniques will help you find the perfect look for your project.
If you want to enhance your skills further, I highly recommend checking out my Photoshop course and Lightroom course. These resources have been invaluable in honing my craft, and I can do the same for you.
Happy editing!
If this article has helped you, then Like and Share it with your friends
$2,061.00Original price was: $2,061.00.$1,061.00Current price is: $1,061.00. 27585
Download Your Free Guide Now!
Discover the secrets of photography with our printable guide! Master essential techniques like aperture, shutter speed, and ISO to create stunning images. Get your free printable PDF now and start turning your snapshots into masterpieces!