Are you struggling with how to paste an image into Photoshop?
You’re not alone, and I’m here to help.
I’ll walk you through the steps in this quick guide to make it a breeze.
By the end of this article, you’ll feel confident and ready to dive into your next Photoshop masterpiece.
So, let’s get started!
Table of Contents
Preparing Your Image Files
When preparing your image files, ensure they are optimized for the platform where they will be used.
Don’t miss the preparation , it’s the crucial first step in ensuring a smooth and successful experience.
Choosing the Right Image Files
When choosing an image file, consider the purpose:
- If you print, go for high resolution.
- For digital use, smaller files suffice.
JPEG and PNG are common formats. Make sure you understand the different formats since their qualities vary.
For photographers, knowing whether to use NEF or JPEG format can make a significant difference in post-processing.
| Format | Purpose | Quality | File Size |
|---|---|---|---|
| JPEG | Digital use, web | Good | Small to Medium |
| PNG | Digital use, web, transparency | Excellent for web graphics | Medium to Large |
| NEF | Photography, post-processing | High (raw format) | Large |
| TIFF | Printing, high-quality output | Very High | Very Large |
Opening an Image File in Photoshop
To open Photoshop and get started:
- Open the application.
- In the menu bar, click "File" then "Open."
- Locate the image files through the file explorer.
- Select it and click to open. The photo appears on your screen.
Adjusting the Resolution
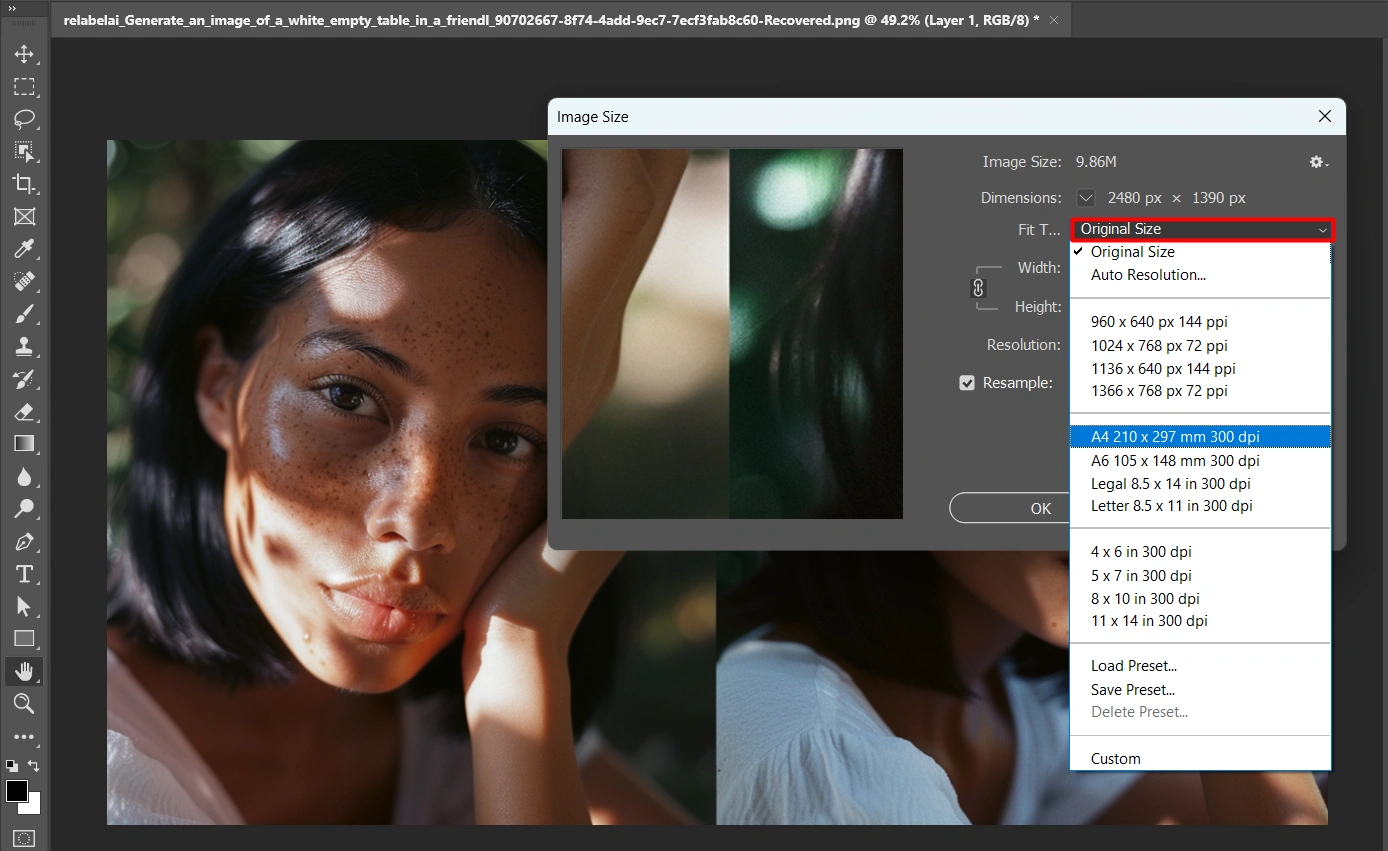
If the resolution isn’t correct, you can modify it:
- Go to the edit menu and choose "Image Size."
- A window pops up where you can adjust height, width, and resolution.
- For print, 300 DPI works well. For the web, 72 DPI is fine.
How to Paste an Image into Photoshop
To paste an image into Photoshop, start by copying the desired image from its source. Open Photoshop’s interface and create a new document or open an existing one.
Copying an Image from Another Source
Imagine you have found the perfect image on the web or in another program.
The first step is simple.
You need to copy and paste an image into Photoshop:
- Right-click on the image and select "Copy."
- On a Mac, press Command+C.
- On Windows, press Ctrl+C.
This action places the copied image inside onto your clipboard, ready for pasting the image in Photoshop.
Pasting an Image in a Photoshop file
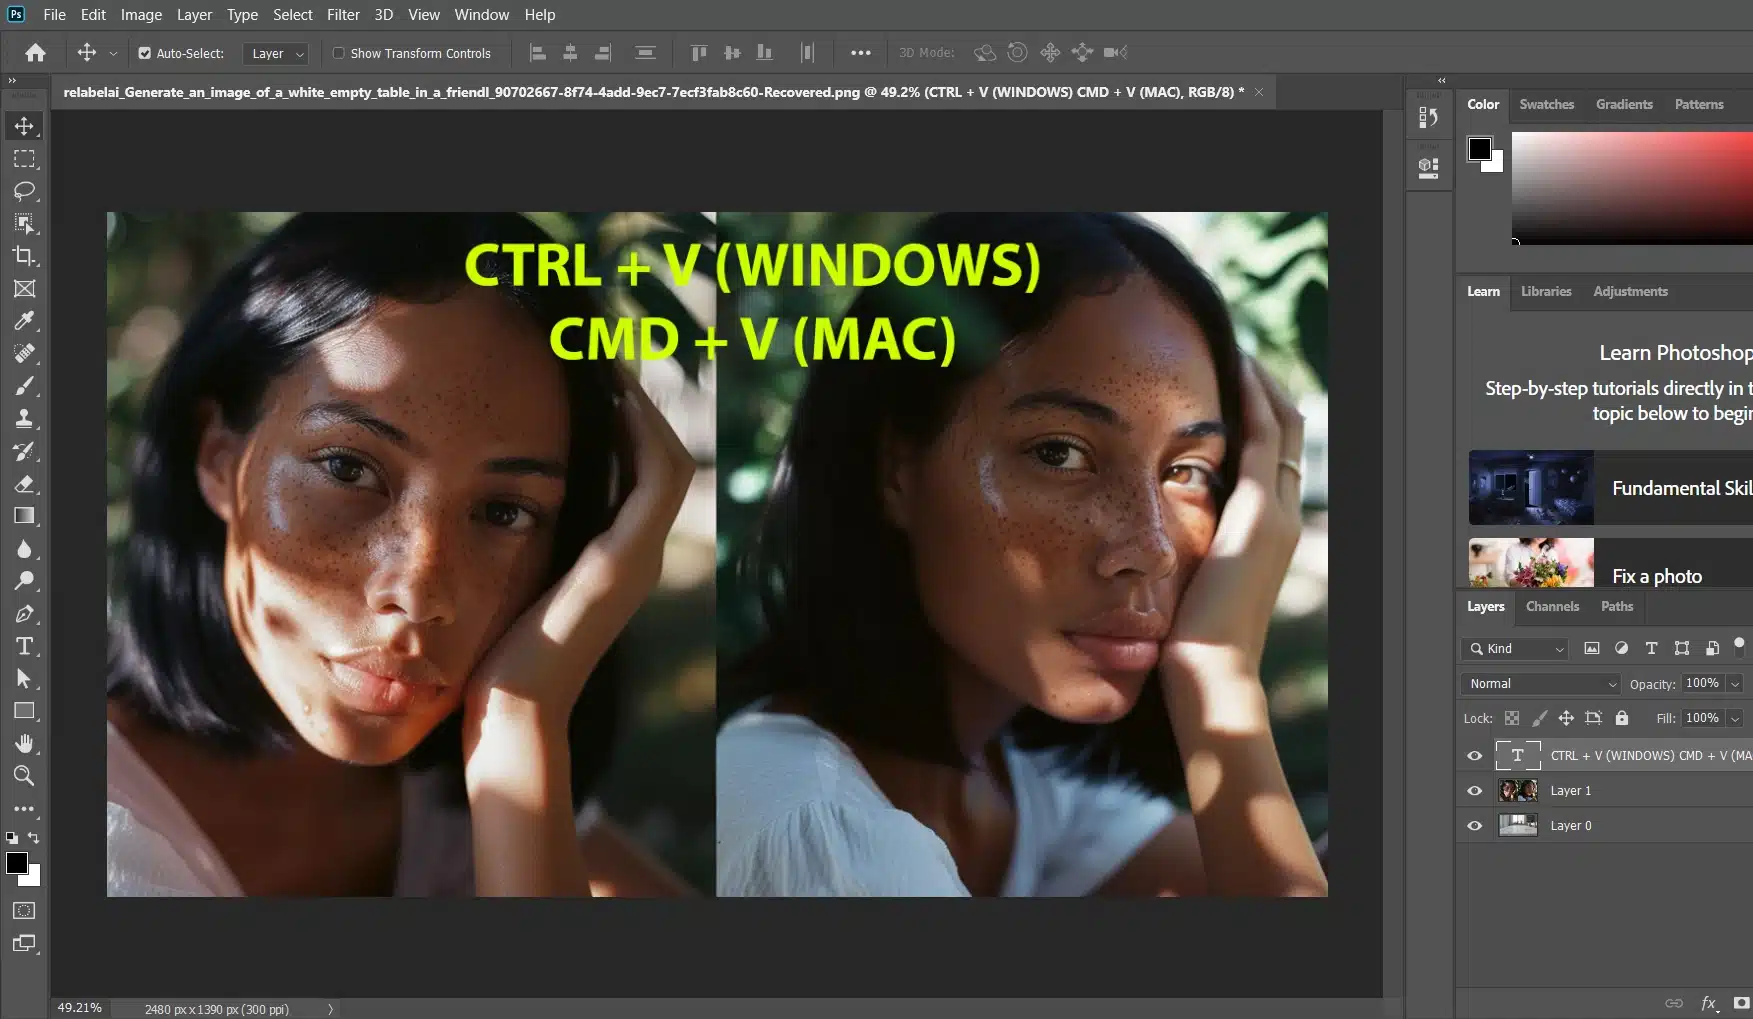
Next, you will open Photoshop. Once your desired Photoshop file is open, create a new document or go to an existing one where you want to paste the image:
- Press Command+V on a Mac or Ctrl+V on Windows to paste the image into Photoshop.
This action creates a new layer for the pasted image, ensuring your original composition stays intact. Easy, right?
Pro Tip: Learn the new layer shortcut to make working with pasted images even easier.
Adjusting the Pasted Image
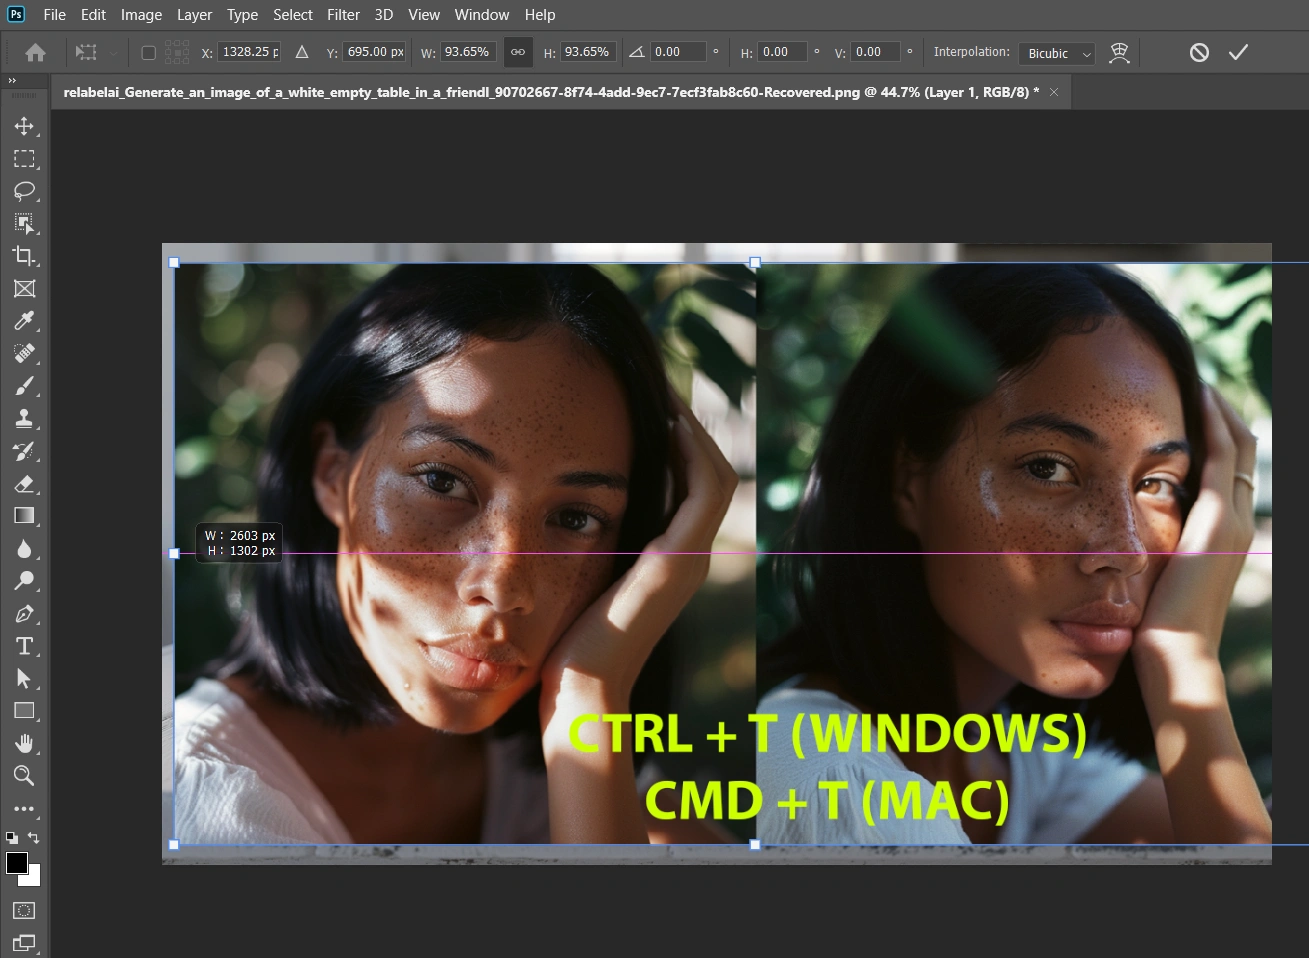
Now, it’s time to make the necessary adjustments to the pasted image:
- Select the Move Tool from the toolbar.
- With the Move Tool, you can drag the image around.
- Use Free Transform (Ctrl+T on Windows or Command+T on Mac) to resize and rotate it.
- Keep dragging until the pasted image perfectly fits your composition.
If you encounter any unwanted shadows, you can learn more about removing shadows to ensure your image looks its best.
Creating more complex compositions, such as collages in Photoshop and collages in Lightroom we have resources and a guide available to help you develop these skills.
Working with Photoshop Documents
When working with Photoshop documents, it’s essential to understand the fundamentals to maintain an efficient and organized workflow.
This ensures that your final output will be of the highest quality and suitable for its intended purpose, whether it’s for web use, print, or another medium.
Familiarizing yourself with different types of photography and knowing how to choose which camera lens to buy can also significantly impact the quality of your work. Additionally, learning how to use various tools in Photoshop, such as the replace color tool, can enhance your editing skills and streamline your workflow.
Creating a New Photoshop Document
Let’s dive right in! First, we’ll open Photoshop and create a new file. Go to the File menu in the top menu bar and select New.
This action brings up a window where you can set the dimensions and resolution for your project. Click the desired presets or manually enter your preferences.
For example, if you’re creating a document for digital art, set the resolution to 300 pixels per inch (PPI). You can also name your new Photoshop file at this stage. This keeps things organized right from the start.
After entering all the details, hit Create. Photoshop generates a new document with a background layer.
Pro Tip: If you need to adjust the dimensions or resolution later, remember that tools like the content-aware fill in Photoshop can be incredibly useful for seamlessly making changes.
Saving Your Photoshop Document
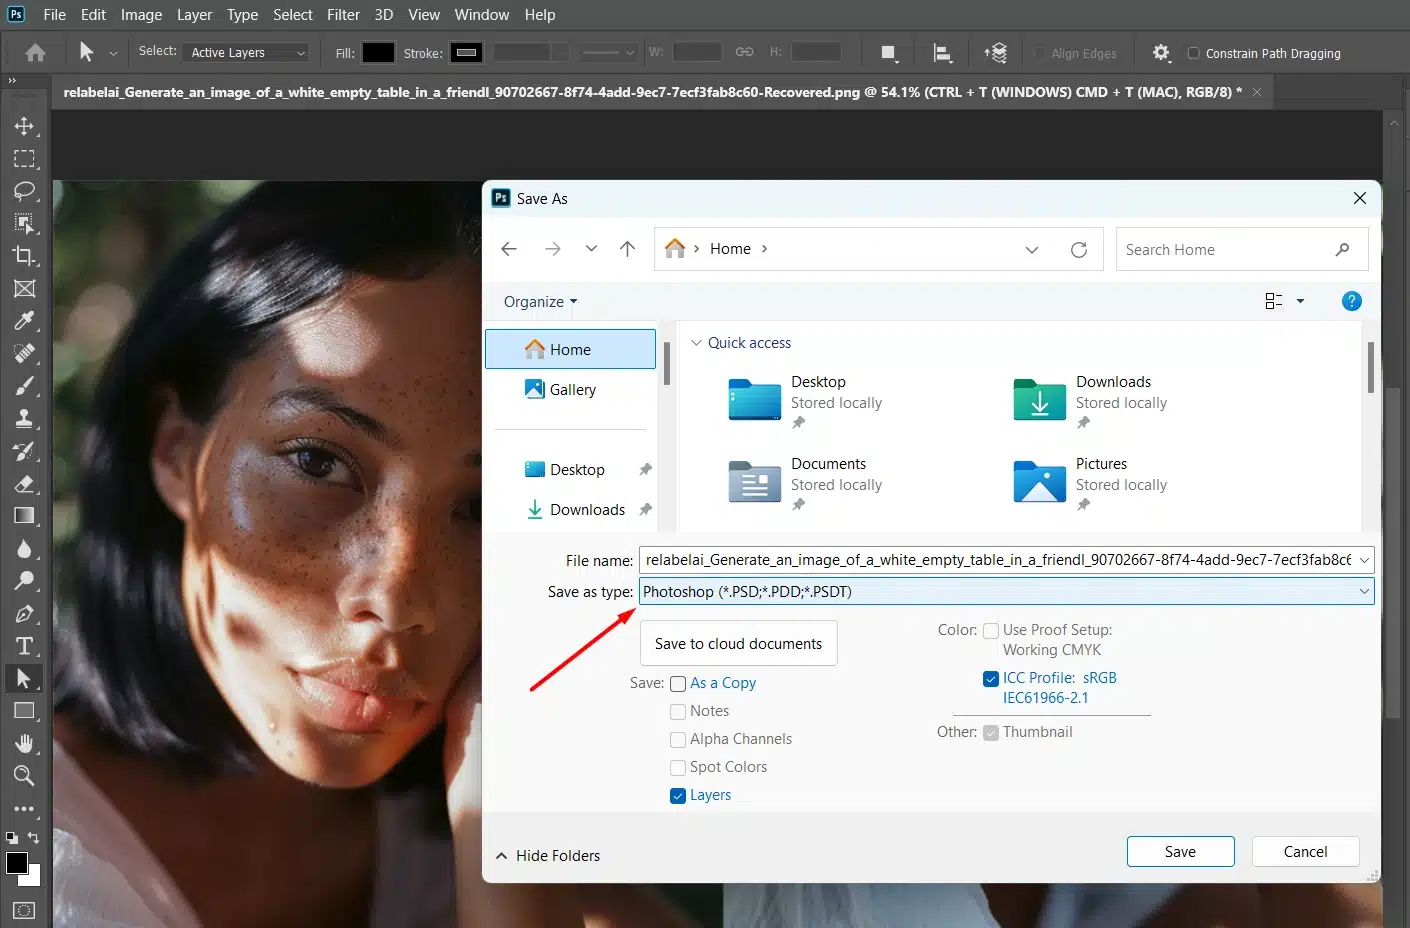
Now that we have the document ready, it’s crucial to save our work to avoid any loss later.
Click on the File menu in the menu bar and select Save As. Choose a destination on your computer to store the File. Save it as a PSD to keep all the layers intact.
Set a memorable file name, then click Save again. This action saves your document, ensuring all the intricate details of your work remain preserved.
It’s good practice to hit Ctrl+S (Windows) or Command+S (Mac) regularly to save any ongoing changes. This habit is essential when working on detailed projects learning advanced techniques such as the dodge and burn in Photoshop.
Advanced Techniques for Pasting an Image in Photoshop
When utilizing advanced techniques for pasting an image in Photoshop, you can enhance your workflow and achieve more precise results
Using Layers for Better Control
When you add a picture in Photoshop, using layers can make your work more manageable. Each pasted item goes into a new layer, giving you control over every element.
Simply go to the Layers panel, right-click on the selected layer, and you can manage specific adjustments.
For instance, to paste an entire image into your project:
- Open the image, select it, and copy it.
- Return to your working document and paste it as a new layer.
Using layers ensures flexibility. Let’s say we paste an image into Photoshop and want to resize the layers or the image as a whole.
We can do that by selecting the layer and using the transform tool.
That way, our original image remains safe. It’s like having a stack of papers to swap and change each sheet independently.
Understanding layers is crucial. They help you keep the elements separated to refine every detail. This method ultimately makes your Photoshop user experience simpler and more effective.
Tips and Tricks for Photoshop User
Enhance your Photoshop skills with these essential tips and tricks. First, familiarize yourself with keyboard shortcuts to streamline your workflow.
Avoiding common mistakes can make you better spotting flaws and help you achieve professional-looking results more quickly.
Keyboard Shortcuts for Pasting an Image in Photoshop
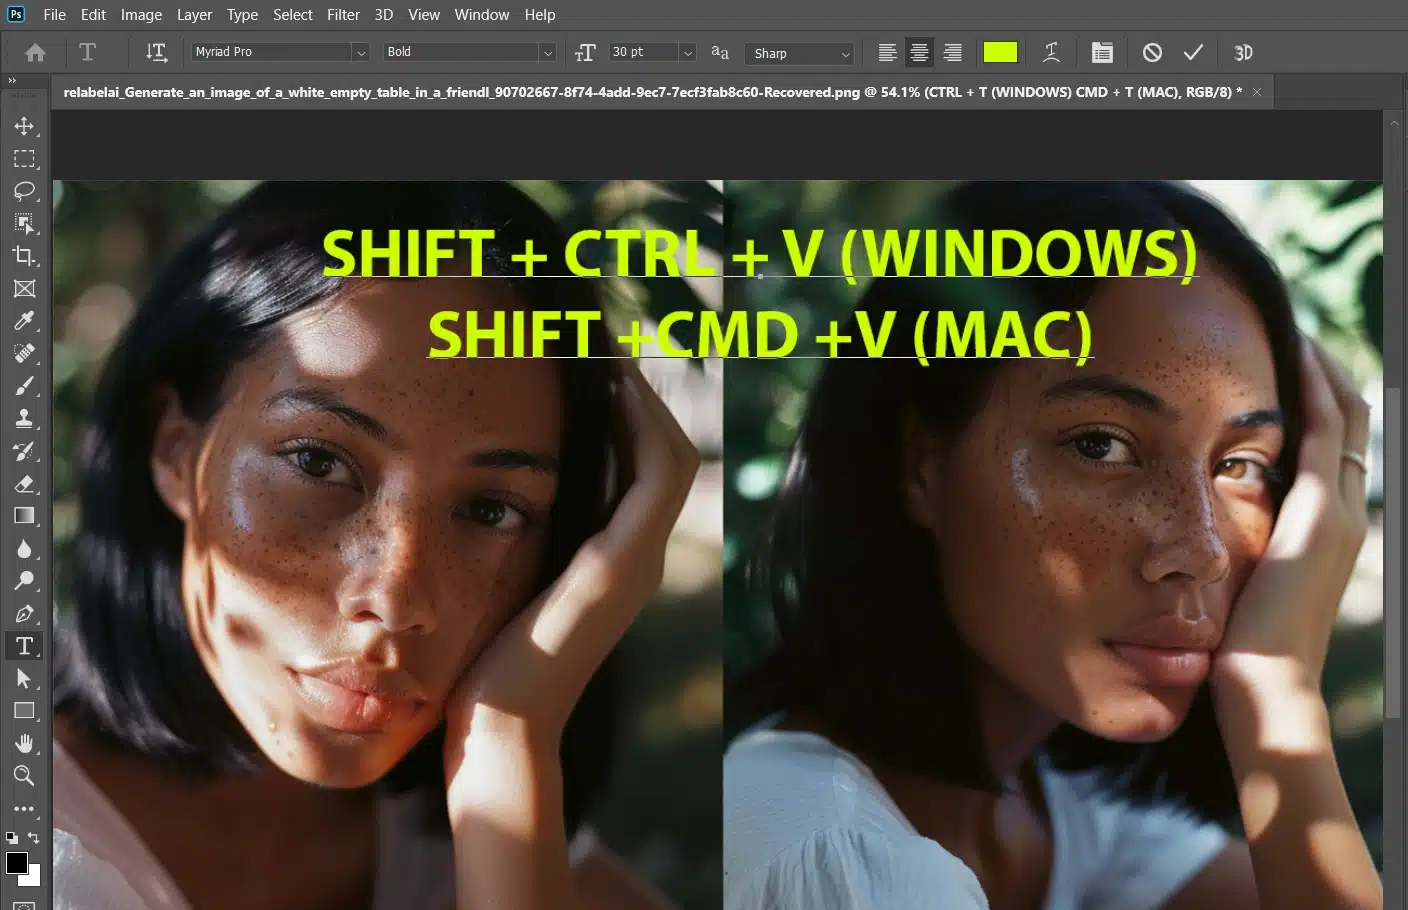
Efficiency matters in photo editing, especially with tasks like pasting an image in Photoshop repeatedly. Here are some valuable keyboard shortcuts to streamline your workflow:
- To paste an image into Photoshop, use Ctrl + V on Windows or Command + V on Mac. This is the simplest way to get your photo into the project quickly.
- Paste as a new layer using Shift + Ctrl + V (Shift + Command + V on Mac) for more control. This ensures each item goes into its layer.
- Quickly toggle between other layers with Alt + [ and Alt + ] (Option + [ and Option + ] on Mac). This makes it easier to find and edit the right layer without constantly relying on your mouse.
Remember, mastering shortcuts can transform how efficiently you work with Photoshop CC. This small investment of time in learning will pay off considerably.
If you want to improve your skills and make learning easier, consider using these Photoshop shortcuts and Lightroom shortcuts for a comprehensive list of time-saving commands.
Common Mistakes to Avoid
Even experienced users conflict with simple errors. Here are some common mistakes and how to avoid them:
- Forgetting to create a new layer: Always produce a new layer before pasting an image in Photoshop. New layers keep your edits clean and reversible.
- Accidentally pasting outside the selected area: Make sure you have a selected area properly defined if you intend to paste within it.
- Ignoring resizing issues: Don’t resize images directly. Convert them into Smart Object first. This keeps your photos sharp and intact.
- Confusing keyboard shortcuts: Memorize the most used keyboard shortcuts. Frequent usage creates muscle memory, and soon, they become second nature.
Pro Tip: When you import images, always save your files in an organized manner in the file explorer. Create specific folders for different projects or sessions, especially when working with a smart object.
A common mistake is made while working with action for portraits, after adjusting the pasted image, use actions to enhance skin tones, sharpen details, and add depth, ensuring your final portrait looks polished and professional.
Also, learning how to adjust the sharpness of a photo is essential in tasks such as fixing grainy photos in Lightroom.
Final note: Learning Photoshop and Lightroom is a continuous journey. Practice these tips, make fewer mistakes, and refine your skills.
Don’t be afraid to experiment; that’s the only way to master these powerful tools. Enjoy editing, and don’t forget to place your images mindfully!
Frequently Asked Questions (FAQs)
What steps do I take to copy and paste an image into Photoshop?
- Open the first image you want to copy in Photoshop or any other image viewing software.
- Right-click on the image and select 'Copy' or use the keyboard shortcut Ctrl+C (Windows) or Cmd+C (Mac).
- Switch to Photoshop and open the second image you want to paste the image into.
- Right-click on the document or use the keyboard shortcut Ctrl+V (Windows) or Cmd+V (Mac) to paste the image.
What steps do I take to insert an image into Photoshop?
- Open Photoshop and the document where you want to insert the image.
- Go to File in the menu bar, select Open, and choose the image file you want to insert.
- The image will open as a new document. Click on the image and drag it into your original document's tab.
- Release the mouse to drop the image into the document.
How to paste an image into an object in Photoshop?
- Open the document with the object where the image will be pasted.
- Open the image you want to paste in another Photoshop window or tab.
- Copy the image using Ctrl+C (Windows) or Cmd+C (Mac).
- Return to the document with the object, and select the object or the area where you want to paste the image.
- Use Ctrl+V (Windows) or Cmd+V (Mac) to paste the copied images
How do I import an image into another image in Photoshop?
- Open both the source image (the one you want to import) and the target image (where you want to import) in Photoshop.
- Select the source image window, and use the Move Tool (V) to drag the image into the target image window.
- Adjust the placement and size as needed after the image is imported.
Conclusion
In conclusion, learning how to paste an image into Photoshop has greatly improved my workflow.
It’s made layering and manipulating images easier and saved me time while enhancing my projects’ quality.
If you want to master this and other essential techniques, check out my Photoshop Course.
For improving your photography workflow, my Lightroom course is also a great resource. Both courses provide step-by-step guidance to boost your editing skills.
If you want to expand your knowledge and skill, check out all of our in-depth guides for these programs. Don’t wait, transform your editing skills today!
Read more about Photoshop:


