How to Add Noise in Photoshop: Quick Texture Enhancements
How to Add Noise in Photoshop: Quick Texture Enhancements
Are you curious about how to add noise in Photoshop step by step to give your photos a unique texture?
Whether you want to create a vintage effect by adding a film grain layer or adding artistic flair, understanding this technique can elevate your editing game.
In this article, I’ll walk you through the steps to seamlessly incorporate noise into your images.
Let’s dive in and explore how you can transform your photos with just a few simple adjustments!
Table of Contents
Step-by-Step Guide: How to Add Noise in Photoshop
Adding noise to an image in Photoshop can create a unique texture or vintage effect, enhancing the overall aesthetic.
This technique is often used in graphic design and photography to add character and depth to images
Step 1: Open Your Image in Photoshop
Open your image file in Adobe Photoshop. Go to the “File” menu, click “Open,” and choose your picture from your computer.
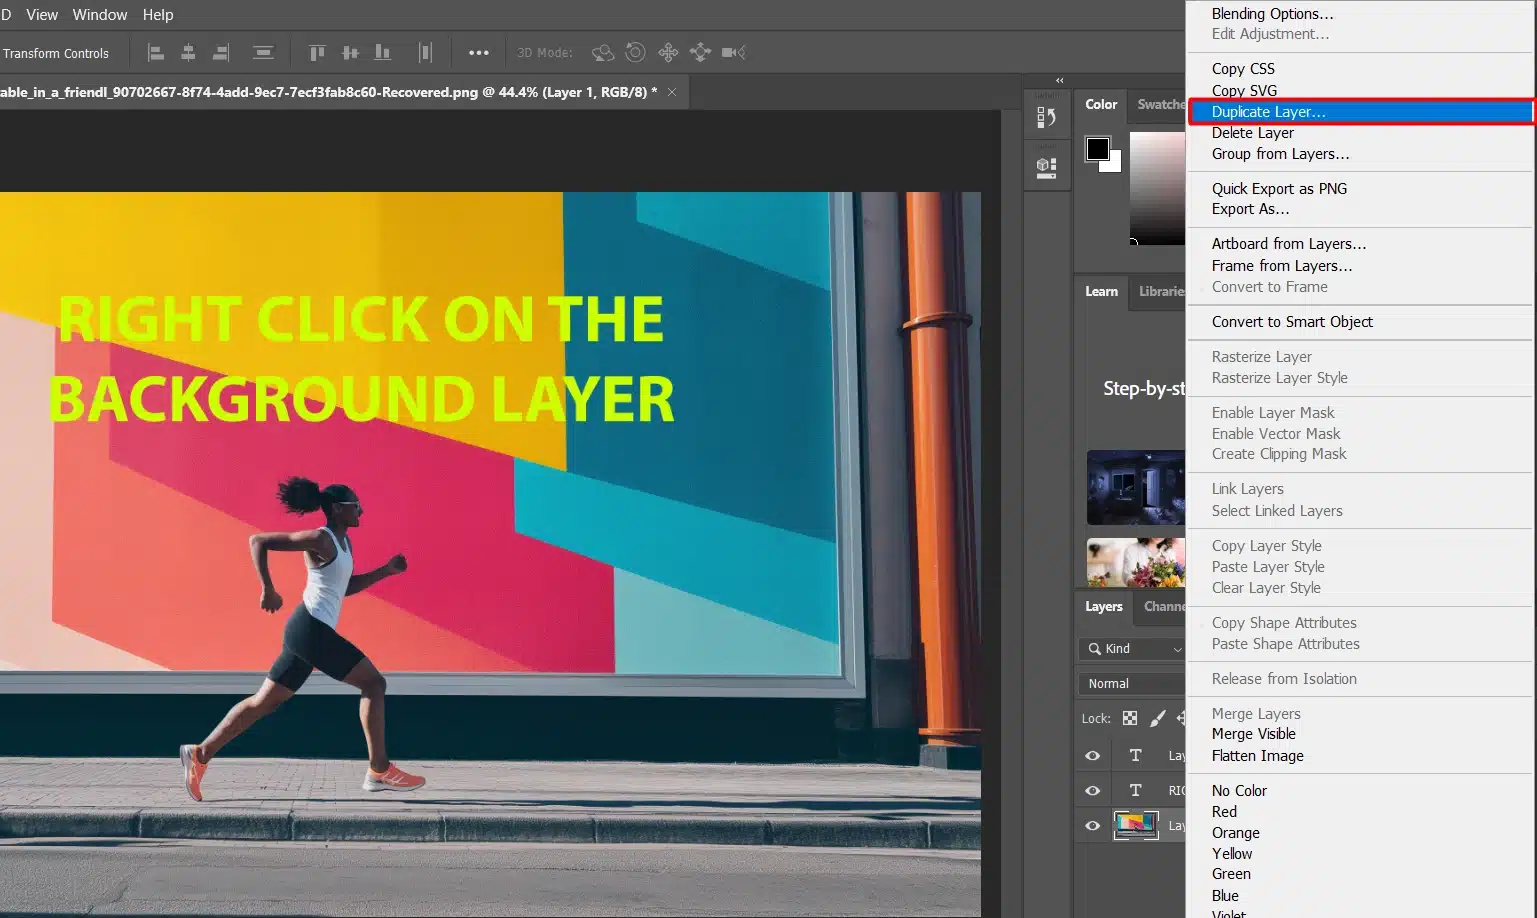
Step 2: Duplicate the Background Layer in the Layers Panel
Duplicate your background layer. This ensures you can always go back to the original image if needed. In the layers panel, right-click on the background layer and select “Duplicate Layer.”
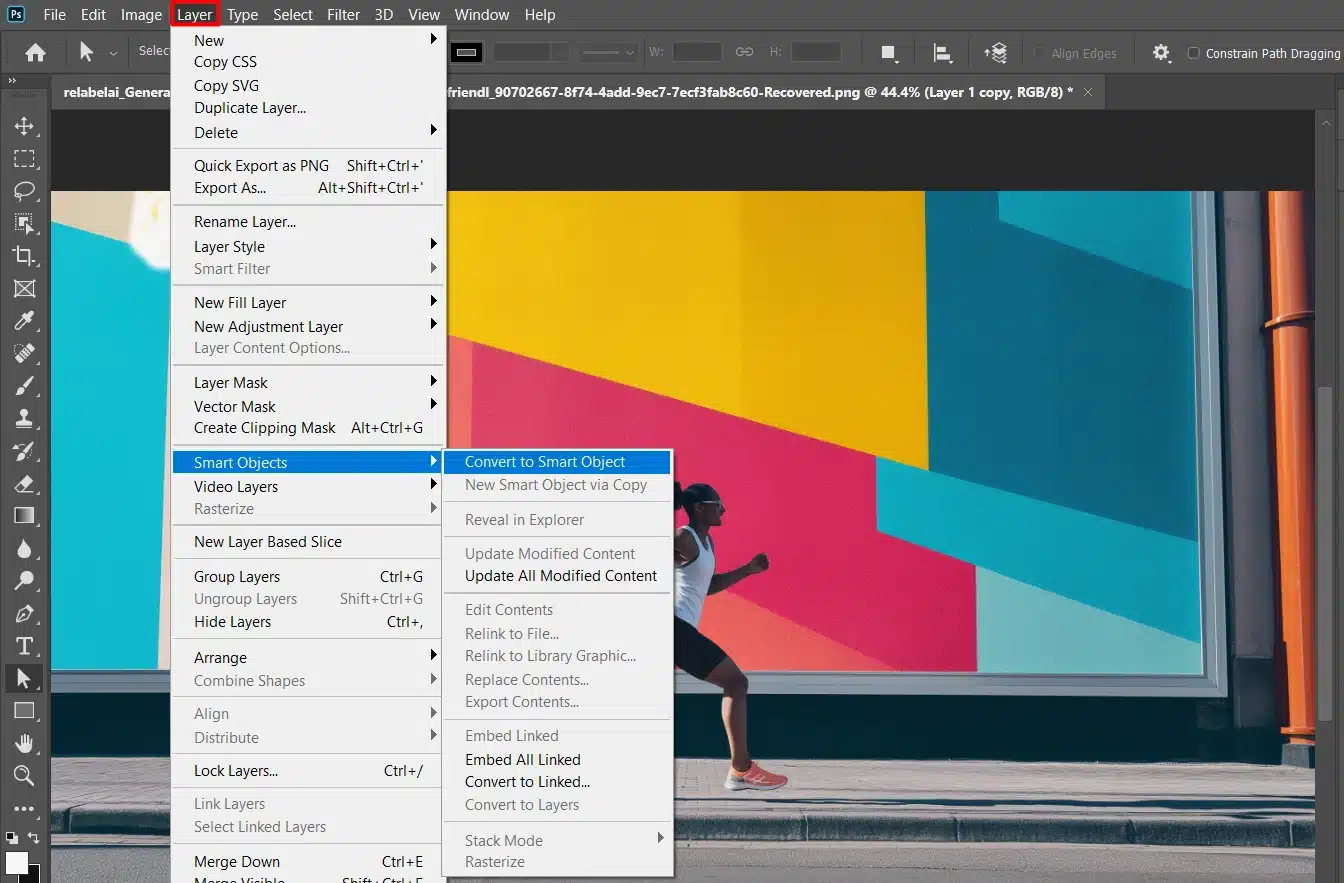
Step 3: Convert to a Smart Object Layer
Convert this duplicated layer into a smart object. Right-click on the new layer and select “Convert to Smart Object.” This allows for more flexibility in your editing process, especially when using essential tools in Photoshop.
Smart objects can help you with non-destructive editing, preserving the original quality of your images, and allowing you to make flexible adjustments.
Step 4: Apply the Noise Filter
Once you have your image and a duplicate layer ready, it’s time to apply the noise filter.
Choosing the Right Amount of Noise
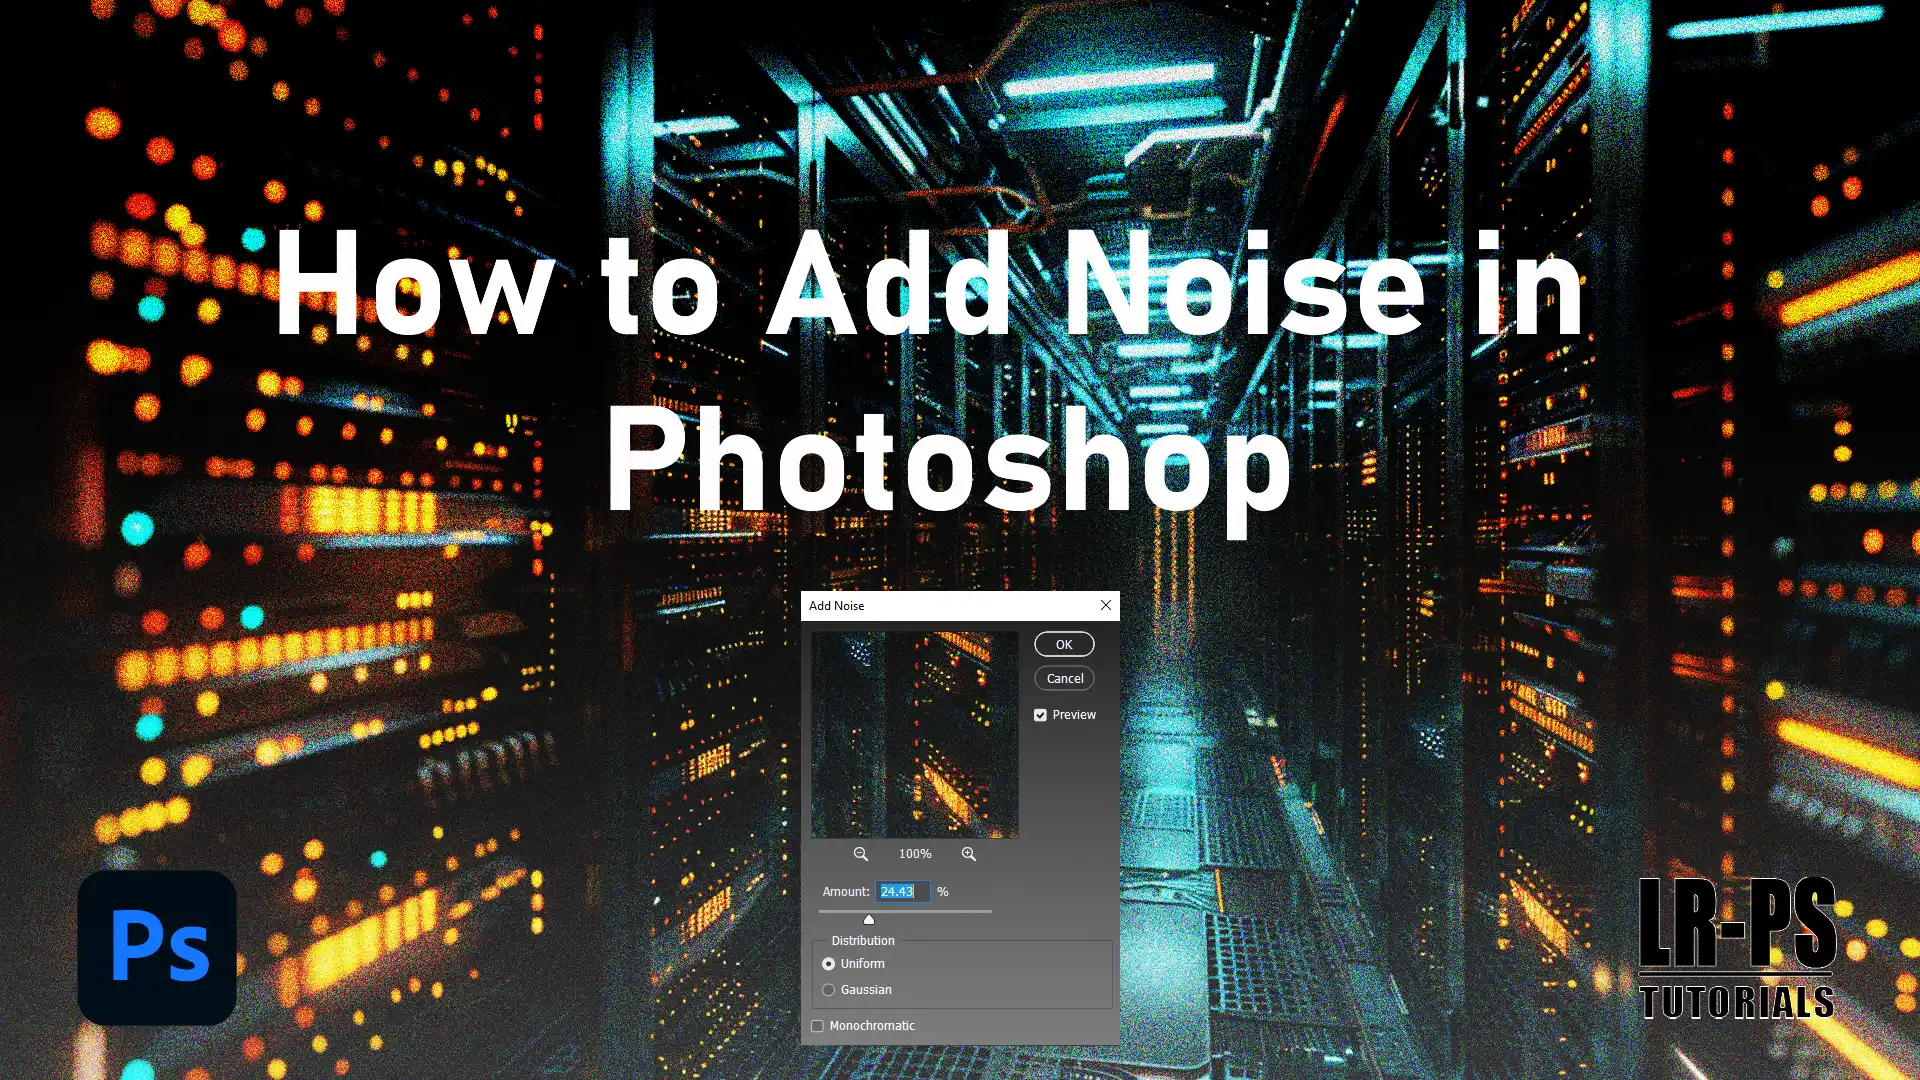
To add noise, go to the “Filter” menu, hover over “Noise,” and then click “Add Noise.” Adjust the slider to choose the amount of noise you want.
Various types of filters can help you with enhancing colors, adjusting lighting, applying artistic effects, and correcting distortions in your images.
Selecting the Noise Distribution
Decide between “Uniform” or “Gaussian” noise distribution in the same dialog box. Play around with both options to see what works best for your image.
Step 5: Adjust the Noise Settings
After applying the noise filter, double-click the smart object icon to adjust the settings further. This lets you tweak the noise without permanently altering the original image.
Use layer masks to fine-tune where the noise appears. Select the layer mask icon at the bottom of the layers panel to create a mask. Then, use the paintbrush tool to paint over areas where you want to hide the noise.
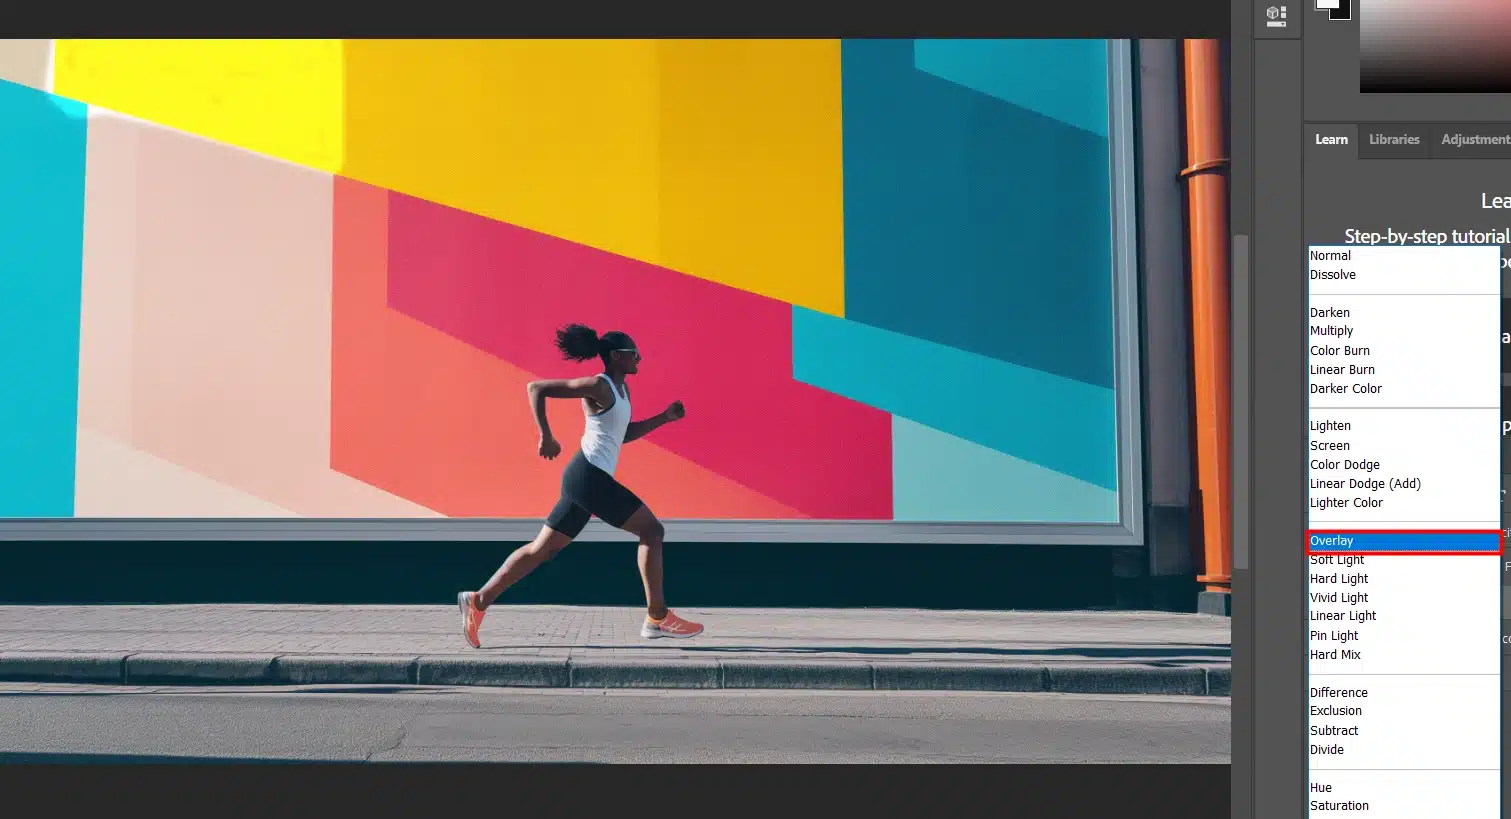
Pro Tip: Experiment with different blend modes like “Overlay” or “Multiply” to see how they affect the noise applied.
This can give your image a unique feel and highlight specific details. Additionally, consider using the gaussian blur to soften the noise effect for a more natural look.
Why Add Noise to Your Images?
Adding noise to images in Photoshop serves various purposes, each enhancingvisualappeal and technicalquality in distinct ways. Here’s a comparativeoverview of key reasons and their associated benefits:
Reason
Benefit
Achieving Vintage Look
Adds nostalgic film grain effect, giving photos a classic appearance.
Enhancing Texture and Depth
Adds visual interest and depth to flat images, making them more dynamic.
Reducing Banding in Gradients
Eliminates visible color banding, resulting in smoother transitions.
Achieving a Vintage Look
Adding noise to your images gives them that old-school film grain filter look. Old photos have a charm because of their grainy texture.
Many photographers and designers use the noise filter dialog boxes in Photoshop to recreate this effect. This makes your pictures look like they were taken decades ago.
Enhancing Texture and Depth
Adding noise isn’t just for making photos look old. It also adds texture and depth.
When you apply noise, you introduce new visual elements, adding a unique layer to your image. This makes flat images pop.
For example, adding film grain to a portrait can bring out the skin’s texture, making the picture more lifelike.
Reducing Banding in Gradients
Ever noticed weird stripes or bands in areas that should be smooth, like the sky?
That’s banding. To fix this, you can try to blend the colors or remove shadows for a smoother appearance. Adding a bit of noise or grain breaks up these patterns, resulting in smoother transitions.
This trick is useful in digital art and photography, ensuring more professional results. It’s especially beneficial when dealing with different types of photography, where maintaining smooth gradients is crucial.
Next time you spot banding, don’t stress. Just add a touch of noise to fix it.
Small Tips for Better Performance
Always convert your layer to a smart object before adding noise.
This allows for non-destructive editing, meaning you can tweak or remove the noise later without harming the original image.
This technique is one of the essential tools to enhance images that every photographer should master.
Remember, whether you’re chasing that vintagelook or fixing banding, knowing how to add noises in Photoshop will elevate your work.
This seems to be a simple yet powerful technique, so try it in your next project!
Advanced Techniques for Adding Noise
Adding just the noise application in Photoshop is not enough, refining the noise with several advanced techniques can elevate your work:
Using the Camera Raw Filter
Want that old-school film grain filter layer look? Follow these steps:
Open your image in Photoshop.
Convert it to a smart object to keep your edits non-destructive.
Go to the Filter menu and select Camera Raw Filter.
In the dialog box, head to the Effects panel and find the Grain sliders.
Adjust the settings to get the grainy look you want.
You can tweak it later since we’re working on a smart object layer.
Adding Noise with Gradient Maps
Gradient Maps can add noise in cool ways. Here’s how:
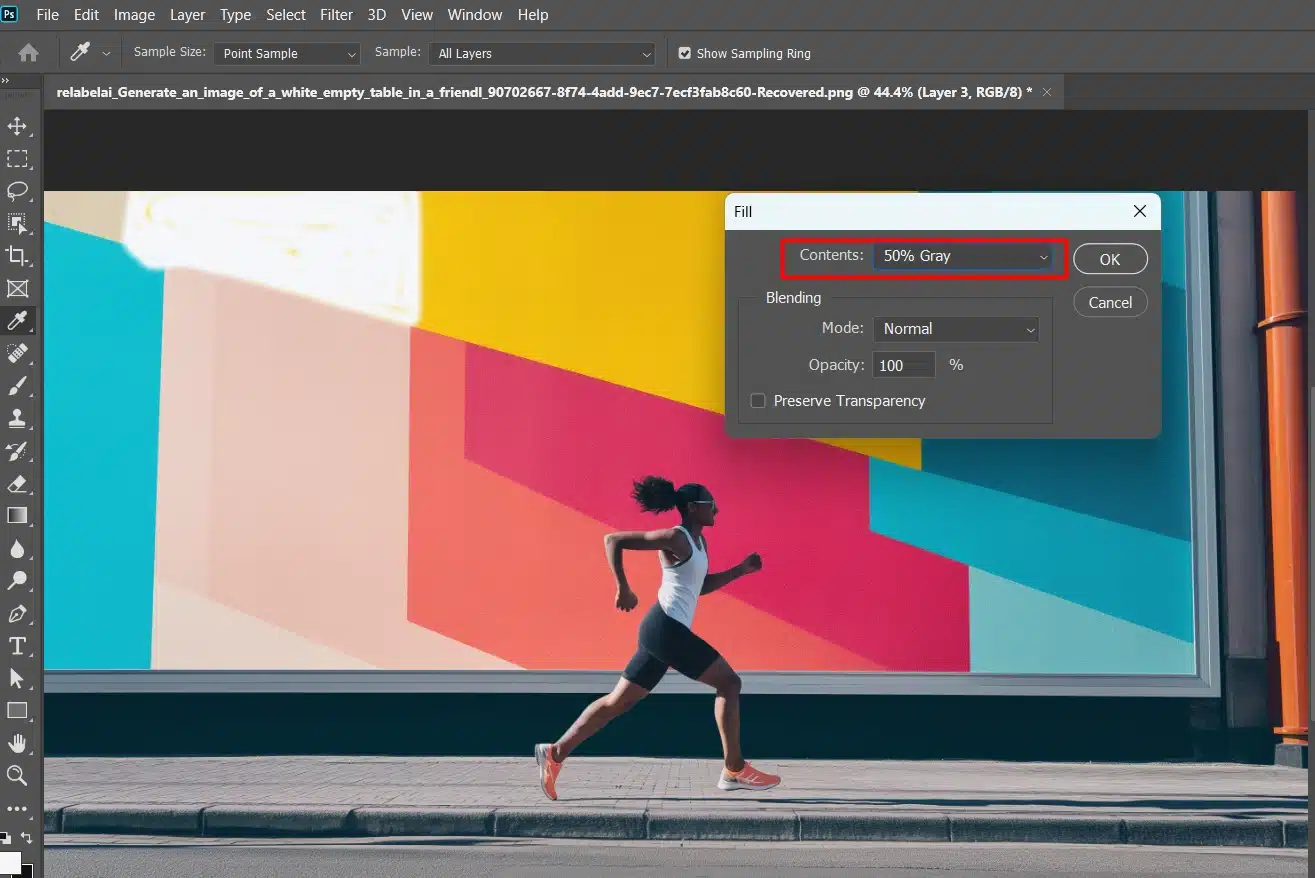
Create a new layer above your image and fill it with 50% gray from the Edit menu.
Set the blend mode of this layer to Overlay.
Add a noise filter by going to the Filter menu, selecting Noise, and then Add Noise.
Adjust the amount to your liking.
This creates a unique film grain layer effect that’s subtle but effective.
Combining Noise with Other Effects
Mixing noise with other effects can make your images pop. Follow these steps:
Create a new layer and fill it with 50% gray.
Set its blend mode to Overlay.
Add noise through the Smart Filter menu.
Go back to the Filter menu and choose Blur, then Gaussian Blur.
Adjust the Blur until you get a softer grain look.
Finally, adjust the opacityslider of the new layer to control how strong the effect appears on your original image.
Pro Tip: Always use a smart object layer when applying smart filters. It allows maximum flexibility and easy edits without damaging your original image.
Grainy photos can offer valuable insights for improving photo quality in Photoshop, including techniques for effectively handling grainy images.
Common Mistakes to Avoid
When adding noise to your images in Photoshop, it’s easy to make mistakes that can detract from the final result. Here are some common pitfalls to watch out for:
Overdoing the Noise Effect
Tricky is to add film grain . Too much grain makes your photo look bad. Always think about how you will use the photo. A little grain can make it sharp and good for print.
In Photoshop, double-click the layer thumbnail. Check how much grain you’ve added. Adjust if needed. Utilize essential tools to fine-tune the effect.
Ignoring Image Resolution
High-resolution images are key. Low-resolution images make the grain look pixelated. Always check the pixels before adding grain.
Make sure your layers are set correctly before making other adjustments.
Leveraging the user-friendly platform which Adobe offers such as Photoshop Express for quick resolution checks and adjustments.
Not Using Non-Destructive Editing
Convert layers to smart objects to keep your original image safe. Photoshop has tools like smart filters and blend modes to help.
Click the small icon at the top right of the layers panel. Select “Convert to Smart Object.”
You can then modify adjustments later without ruining the original image. Smart filters are great for this. And you can add film grain , and reduce noise on it later.
More in-depth strategies for improving your editing process with advanced techniques like smart filters. For non-destructive editing techniques are essential for maintaining the flexibility and quality of your images.
Pro Tip: Use a new layer filled with 50% gray. Set the blend mode to Overlay. This blends the grain naturally into the image, keeping it subtle.
The object selection tool, combined with non-destructive editing methods, allows for precise adjustments while preserving the original image.
Frequently Asked Questions
How to add a grainy effect in Photoshop?
Open your image in Photoshop.
Go to the 'Filter' menu, select 'Noise', then choose 'Add Noise'.
Adjust the amount of noise to achieve the desired graininess.
Click 'OK' to apply the noise.
How do I add noise in a picture?
Here’s how to add noise to a picture:
Open the image where you want to add noise in Photoshop.
Choose 'Filter' from the top menu, then 'Noise', and select 'Add Noise'.
Set the desired amount and distribution of the noise.
Apply the changes by clicking 'OK'.
How do I make a noise pattern in Photoshop?
Create a new layer in your Photoshop project.
Fill the layer with the color or pattern of your choice.
With the layer selected, go to 'Filter'> 'Noise'> 'Add Noise'.
Adjust the noise settings to create your preferred pattern.
Merge the layer down or adjust its opacity to blend it with your background.
What is the noise option in Photoshop?
The 'Noise' option in Photoshop is found under the 'Filter' menu.
It allows you to add pixel-level variations to your image, simulating graininess or texture.
You can control the amount, distribution, and type (Uniform or Gaussian) of noise.
Noise can be used for aesthetic effects or to create a sense of texture in digital images.
Learning how to add noise in Photoshop has been a game-changer for me. It’s a simple yet powerful way to give photos a unique texture, whether for a vintage look or adding depth to modern images. By duplicating layers and using smart objects, I ensure my edits are flexible and reversible.
Adjusting the noise filter settings and experimenting with blend modesallows me to customize the effect precisely. Layer masks help refine where the noise appears, maintaining control over the final look. Additionally, using the lasso tool in Photoshop can help you selectively apply noise to specific areas for a more controlled outcome.
$2,061.00Original price was: $2,061.00.$1,061.00Current price is: $1,061.00. 27585
Download Your Free Guide Now!
Discover the secrets of photography with our printable guide! Master essential techniques like aperture, shutter speed, and ISO to create stunning images. Get your free printable PDF now and start turning your snapshots into masterpieces!