Have you ever wondered how to create a striking Photoshop spray paint effect to make your image pop?
If you’re looking to add a gritty, urban flair to your image, you’re in the right place. In this article, I’ll guide you through the steps to achieve that perfect spray paint look.
Imagine transforming your ordinary pictures into vibrant, eye-catching masterpieces.
Excited to dive in?
Let’s get started and unleash your creativity!
Table of Contents
Getting Started with Photoshop Spray Paint Text Effect
Photoshop opens up a world of creative possibilities.
Today, we’re diving into the photoshop spray paint effect.
This fun technique can make your projects pop.
Setting Up Your Photoshop Workspace
First, let’s set up your workspace:
- Open Photoshop and create a new document.
- A blank canvas gives you a fresh start.
- Keep your layers panel visible, it is crucial for this task.
Choosing the Right Brushes
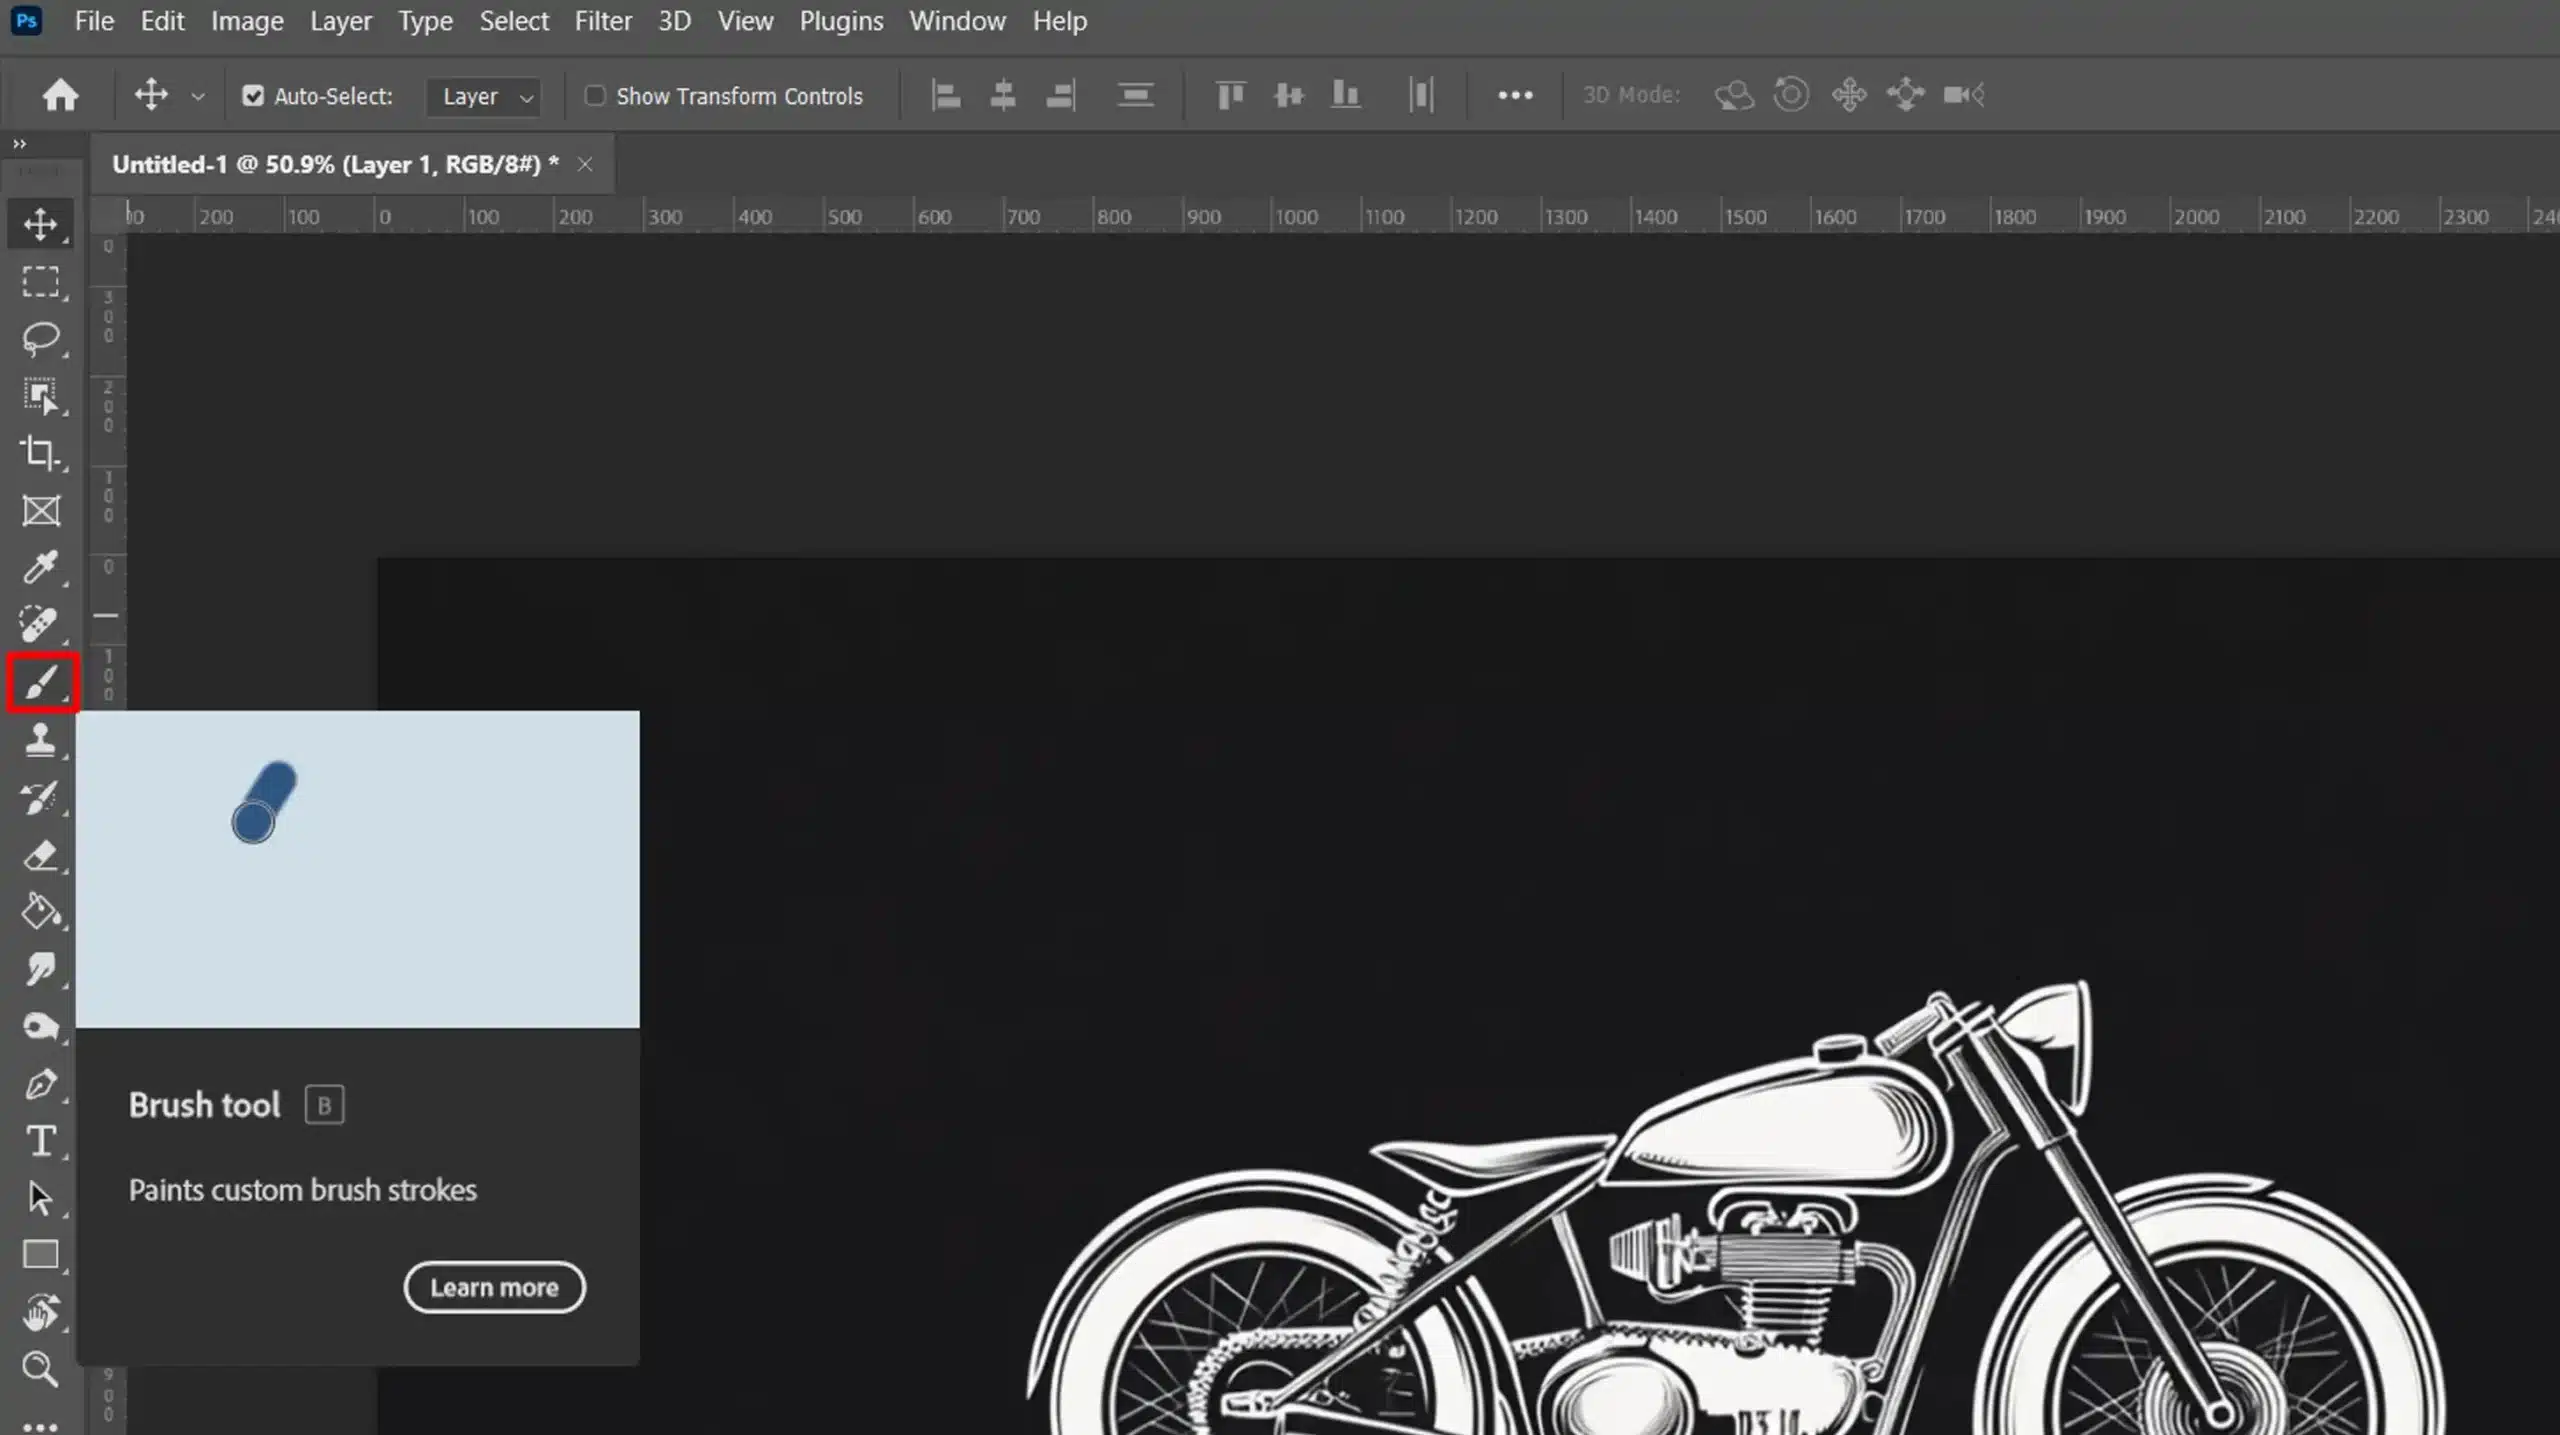
Next, find the perfect brush:
- Click on the brush tools icon.
- The presets offer various options, but focus on the spray paint brush.
- You can download additional brushes if needed.
Producing the Spray Paint Text Effect
Now, let’s dive into the process.
Here’s a step-by-step guide:
- Use the Type Tool: Select the type tool and write your text. Adjust the font size and style according to your preference. This text layer is where the magic happens.
- Rasterize the Type Layer: Right-click on your text layer in the layers panel. Choose 'Rasterize Type'. This step is necessary to apply the spray paint effect.
- Apply the Spray Paint Brush: Select the spray paint brush. Begin to apply the brush strokes around your text. Vary the opacity and brush size to add depth.
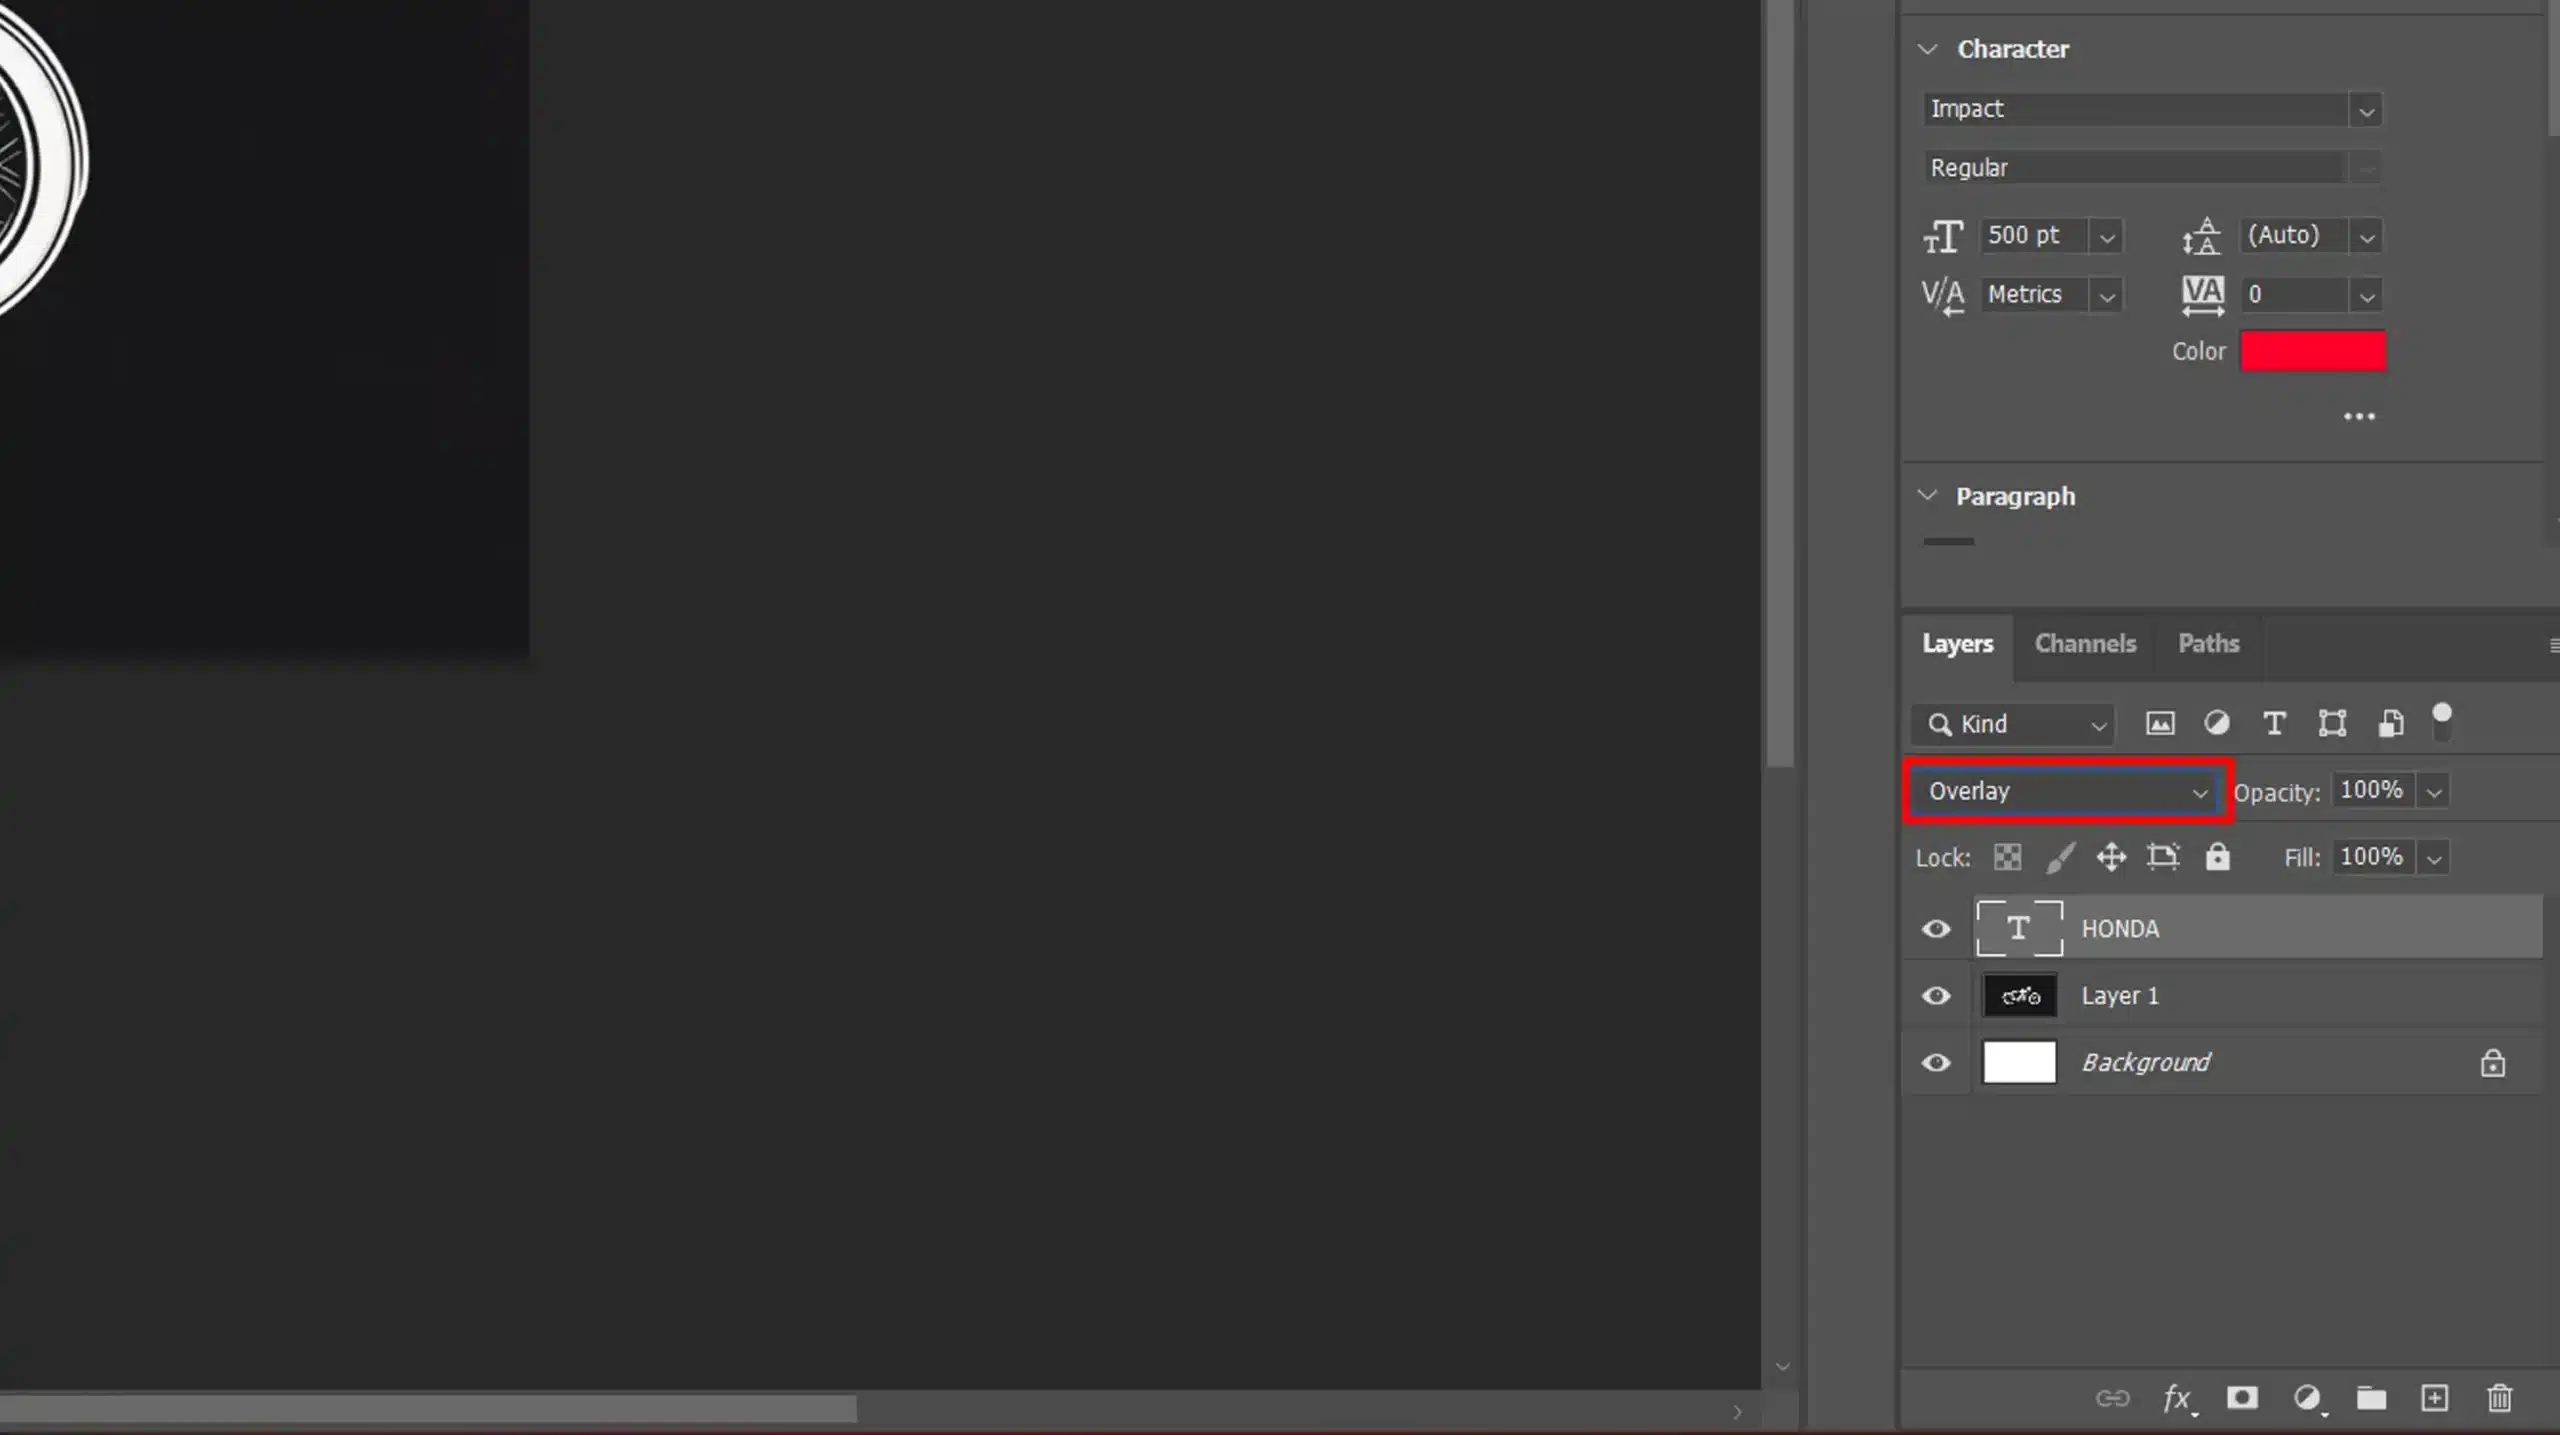
- Add a Blend Mode: Experiment with different blend modes for your layer. 'Overlay' or 'Multiply' often produce interesting results.
- Finishing Touches: Adjust the edges for a refined look. Play with opacity and noises settings to enhance the effect.
Final Adjustments
Your artwork is almost ready.
Here’s how to wrap things up:
- Check for Consistency: Review your work. Ensure the spray painted effect looks coherent across all text.
- Save Your File: Save your document. Consider saving in both PSD format and JPG or PNG for different use cases.
Pro Tip: Consider adding multiple layers of spray paint brush strokes. This technique builds texture and makes your text more dynamic.
Applying a spray paint text effect in Photoshop can significantly enhance your design projects.
With some practice, this skill becomes second nature.
Don’t fail to remember to experiment with different brushes and colors to achieve unique outcomes.
For more advanced techniques, explore the content-aware fill in Photoshop or learn how to remove an object in Photoshop to further refine your designs.
Highlighting key areas can enhance the overall effect, and highlighting different text layers will add depth and interest to your composition.
Creating the Base Text Layer for the Spray Paint Effect
Let’s get started on producing our photoshop spray paint effect.
This step focuses on setting up your text before applying the fun stuff.
If you’re comfortable with the basics of type layers and spray paint effects, you will breeze through these simple steps.
Selecting the Font
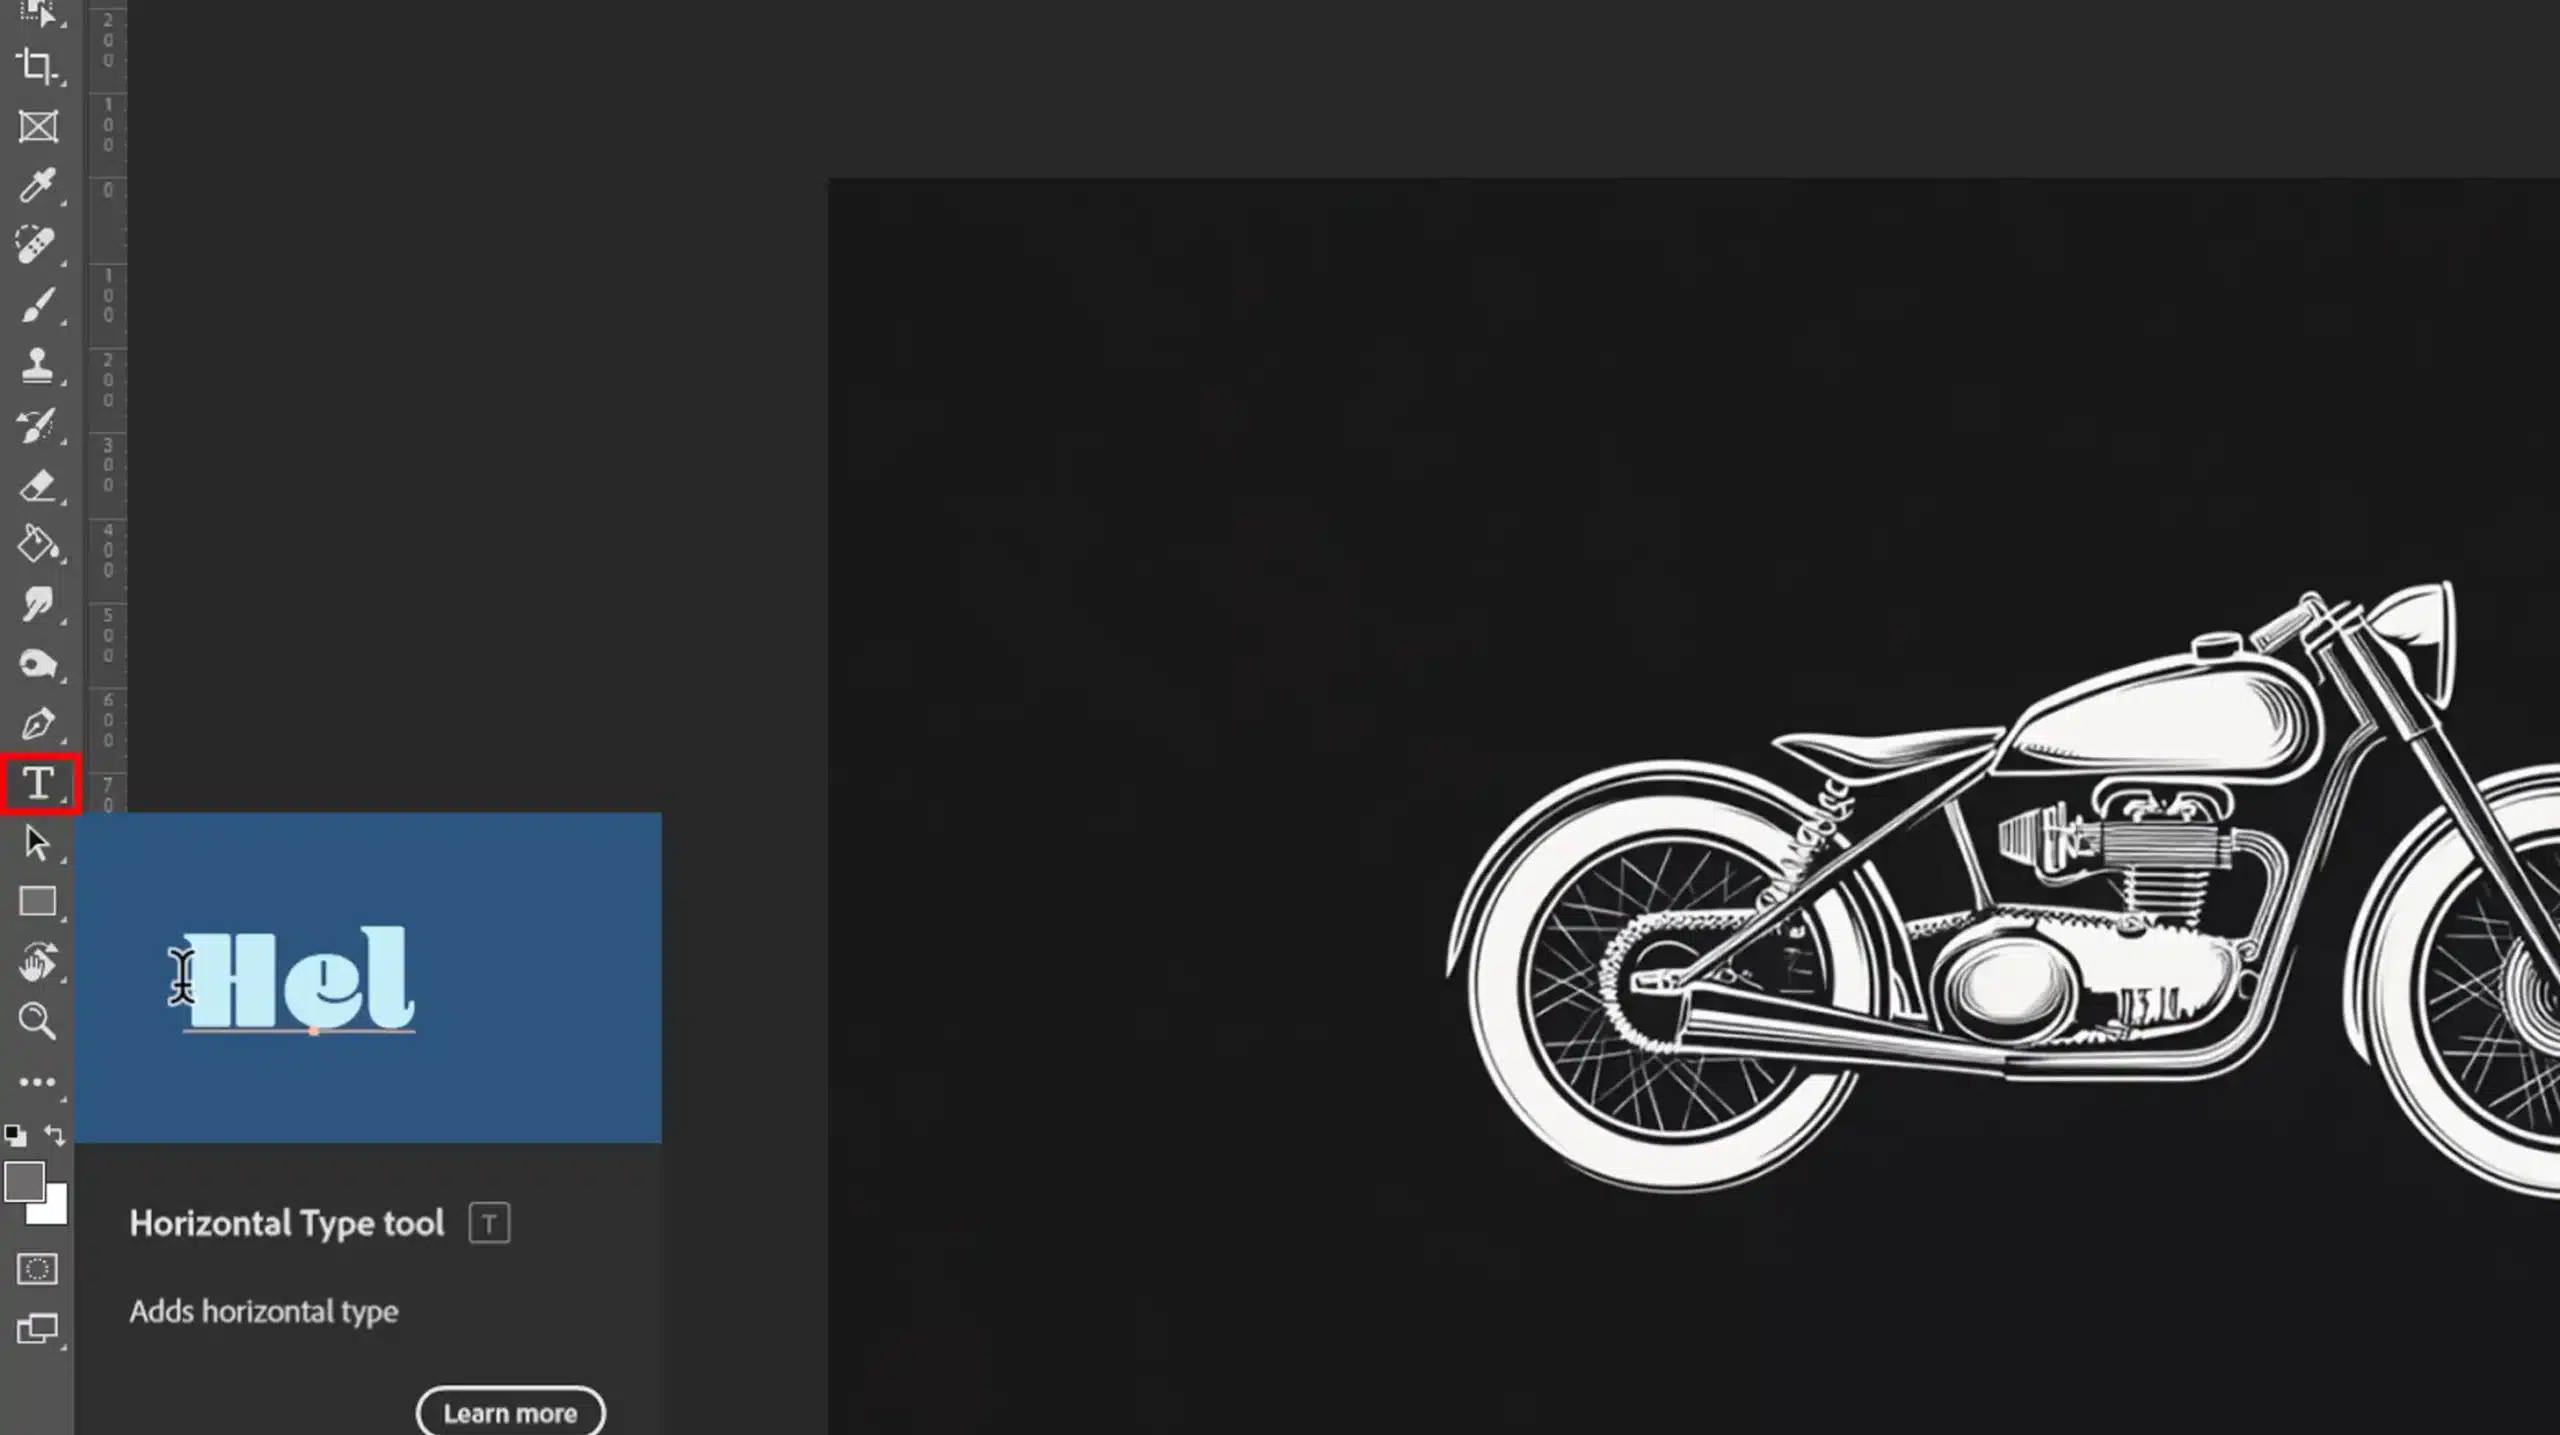
Choosing the right font is crucial.
Open Photoshop, select the type tool from the toolbar (it looks like a “T” icon), and click on the canvas to start typing. Make sure your font is bold and visible.
Think of fonts like “Arial Black” or “Impact” These work well for spray-painted text because they offer chunky letters perfect for text effects.
Adjust the font size if needed, it’s better to start big so you can see all your details clearly.
The icon for the type tools will help you adjust settings easily, and remember to use the icon options to explore different fonts.
This icon is essential for customizing your text and achieving the desired effect.
Ensure that the letters are well-defined in your image so that the final result looks sharp and professional.
Pay close attention to how the letters interact with each other to maintain a cohesive image and achieve the best effect with your text.
Positioning the Text
Next, you’ll want to position your text. Use the move tools to drag your text where you want it on the canvas.
Keep an eye on your composition here, the text should be centered or placed in a spot that makes sense for your design.
Adjusting the position from the defaults will help ensure your text fits perfectly within your overall layout.
If you’re not happy with your first placement, don’t fret.
You can always reposition the text by selecting the type layer and using the move tools again.
A solid initial position helps make the spray paint effects look consistent.
Make sure the letters are properly aligned within your image to enhance the overall impact.
Adjusting the text placement will ensure that the letters contribute effectively to your design, giving you a polished final result.
Applying the Spray Paint Effect
Applying the spray paint effect adds a dynamic, artistic touch to your designs.
This effect mimics the look of real spray paint, giving your text or graphics a gritty, textured appearance that stands out.
Choosing the Brush
The brush tools is where the magic happens.
First, select the brush tools and click the brush preset picker in the upper toolbar.
Choose a spray paint brush, there are several available by default or you can download custom brushes online.
Your brush size and opacity matter a lot here.
Start with a medium brush size.
You can always adjust as you go along.
Applying the Brush Strokes
Now, let’s apply the brush strokes around your text.
With your brush selected and the text layer highlighted, start painting around the edges of the text.
Use varying brush sizes and opacity levels to achieve a more natural spray paint effect.
The important point here is to build up the texture gradually.
Don’t rush, enjoy the process!
Utilizing Blend Modes
Blend modes can really enhance your spray painted text. In the layers panel, select your text layer and experiment with different blend modes like ‘Overlay’, ‘Multiply’, or ‘Screen’.
Each mode interacts with the underlying layer in different ways.
Find the one that best suits your photoshop spray paint effect.
Keep adjusting until you’re satisfied.
Refining the Edges
Once you’ve added the initial spray paint effect, it’s time to refine the edges.
Zoom in and carefully touch up any areas that need a bit more detail.
Pay attention to the corners and edges of the letters.
Lower the opacity of your brush to soften transitions.
This step makes your spray-painted letters look polished and professional.
Ensuring that the letters blend seamlessly with their background will enhance the overall effect.
Fine-tuning the letters can give your project a more cohesive and refined appearance.
Adding Layers of Texture
Don’t forget to add multiple layers of spray paint strokes.
This adds depth and texture, making your text more visually appealing.
Create new layers above your text layer and continue applying the spray paint effects.
Each layer brings a new dimension to your design.
Feel free to play around with different brushes and colors too.
Saving Your Project
Finally, review your project for consistency.
Ensure that your spray painted text looks cohesive and professional. Once you’re satisfied, save your file in both PSD format (for future edits) and JPG/PNG format (for sharing or printing).
And there you have it, a superb spray painted text effect in Photoshop!
Pro Tip: To add some extra flair, try incorporating a subtle noise filter over your final design. This can give your text a more gritty, realistic spray paint look.
Applying the Spray Paint Effects
When applying spray paint effects, focus on achieving a realistic and artistic look.
Start by layering various spray paint strokes to build texture and depth.
Adjust the opacity and blending options to integrate the effect seamlessly into your design.
Using Layer Styles
To start, we’ll use layer styles to give our text some pizzazz.
Follow these steps:
- Select your type layer in Photoshop.
- Go to the bottom of the Layers panel and click the "fx" icon.
- A menu will pop up with various options. Choose "Blending Options" first.
- Here, you can add things like shadows, strokes, and glows to your text.
Each of these can give your spray painted text a more dynamic look.
Adding Spray Paint Texture
Next, we want to introduce that gritty spray paint texture.
Follow these steps:
- Create a new layer above your text.
- Select the brush tools from your toolbar and choose a spray paint brush preset.
- If you don't have one, you can easily download free spray paint brushes online.
- Begin painting around your text, making sure to vary the brush size and opaqueness.
This will make the texture realistic.
Work slowly, layering your strokes to build up the desired effect.
Blending Modes and Opacity
Now, we move onto blending modes and adjusting opaqueness.
These settings can dramatically change how your spray painted text interacts with the layers beneath it.
Follow these steps:
- In the Layers panel, select the new layer you just created.
- Check the dropdown menu where it says "Normal".
- Try different blend modes like "Overlay", "Multiply", or "Screen" to see how they affect your image.
- Lowering the opaqueness can further refine the look, making the spray paint effects more natural.
Pro Tip: Add a final touch by applying a subtle noise filter.
This can enhance the grittiness of your spray painted text, making it look even more authentic.
For more advanced techniques, consider exploring how to use the patch tools in Photoshop or how to add texture in Photoshop to elevate your designs further.
Enhancing the Spray Paint Text Effect
Now that we’ve painted the basic text,
let’s make it pop.
Simplicity often belies depth, adding subtle shadows and highlights will elevate our text. We can make a simple spray paint text effect stunning.
Using warp text can significantly help in enhancing the spray paint text effect.
By applying warp text techniques, you can adjust and distort the text to better fit your design.
Adding Highlights and Shadows
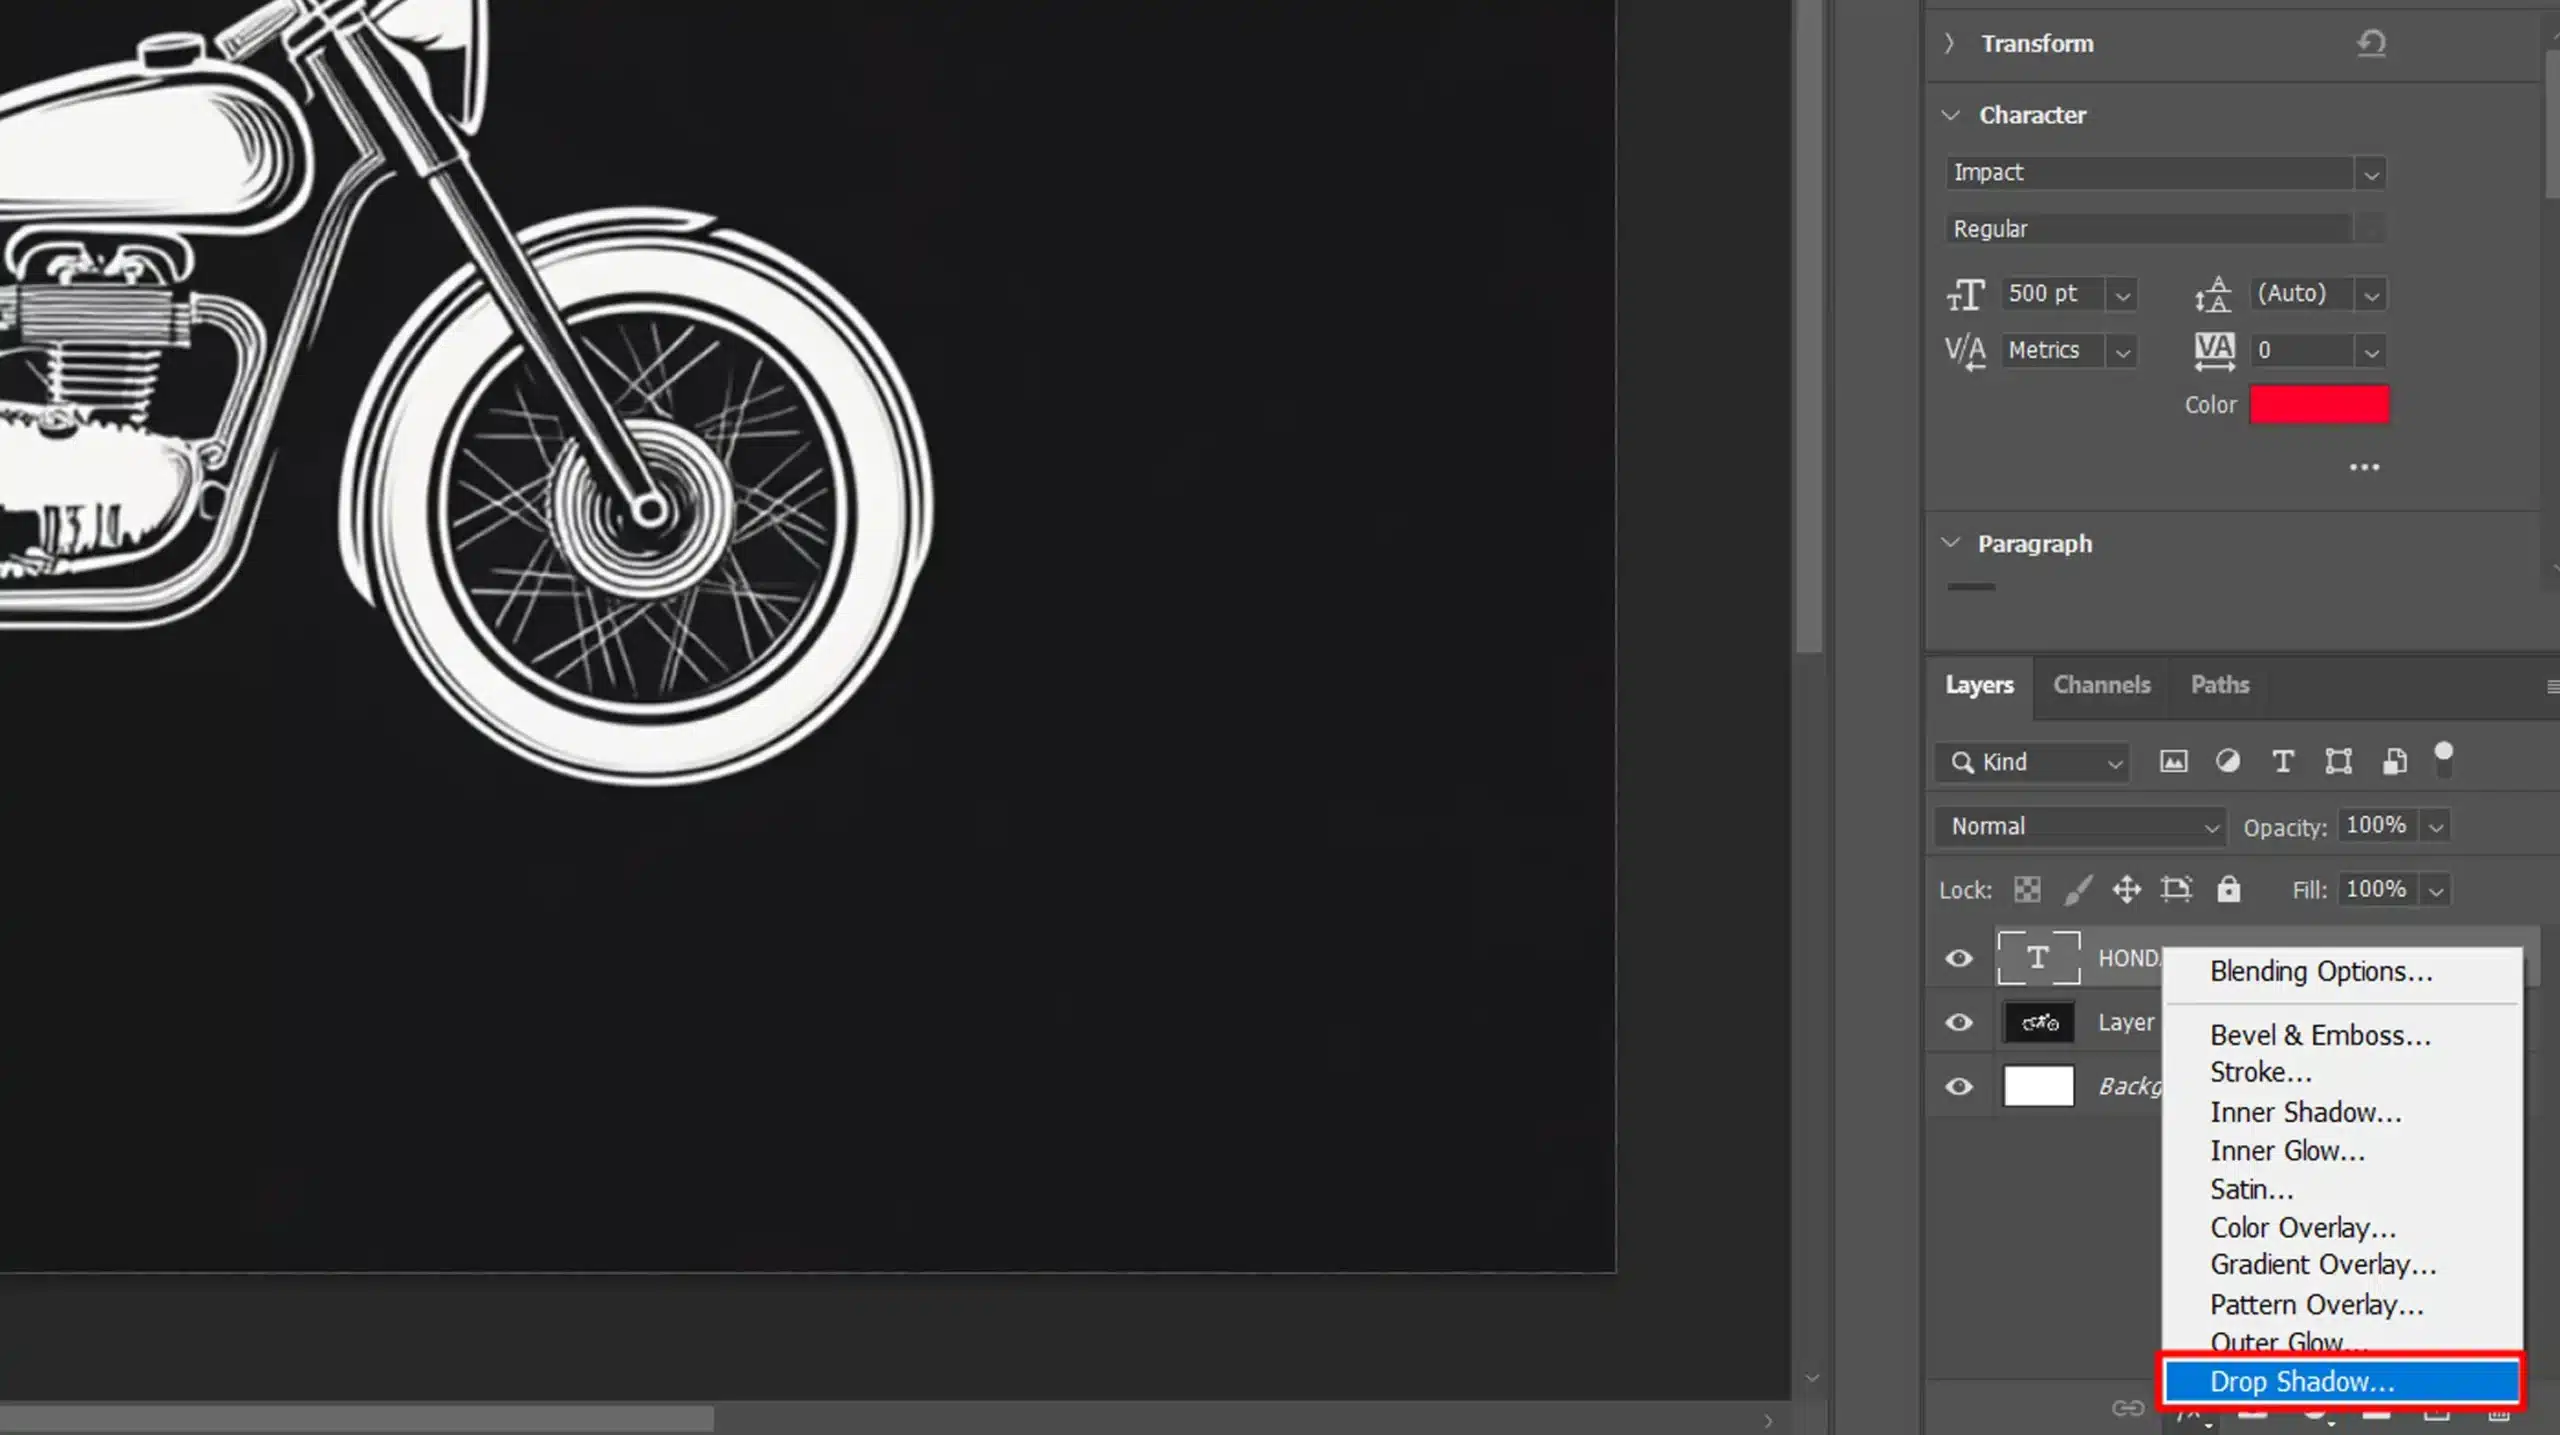
Steps to Add Shadows:
- Select your type layer.
- Go to the "fx" icon below the layers panel.
- Click "Drop Shadow".
- Adjust the angle and distance to mimic light hitting your text. A good starting point is setting the angle to about 120 degrees.
- Tweak the opaqueness to around 75% and set the color to black for a strong shadow effect.
This simple step makes your text stand out.
Steps to Incorporate Highlights:
- Create a new layer above your text.
- Change the blend mode of this new layer to "Overlay" or "Soft Light"
- With a soft round brush, use white to add highlights where the light logically hits your text. Focus on the top portions of each letter.
This trick adds dimension and interest to the text.
Incorporating Color Variations
Steps to Add Color Variations:
- Create a new layer above your text.
- Select the brush tools, choose a spray brush, and pick different colors.
- Apply the colors randomly across the text for that authentic spray look.
Experiment with Blend Modes:
For an added touch, experiment with different blend modes on these color layers.
“Multiply” “Overlay” and “Screen” are good ones to try.
They interact uniquely with the colors beneath, giving a richer and more complex final results. If something looks off, lower the opaqueness a bit until it blends in nicely.
Before you know it, you’ll have a vibrant, multi-dimensional piece of spray-painted text.
Pro Tip: To make your text truly striking, try adding a subtle layer of noises. It adds that extra chip of texture; set the layer’s blend mode to “Overlay” for best results.
For more advanced techniques, consider exploring how to use the dodge and burn tools in Photoshop. These tools can add even more depth and realism to your text effects.
Additionally, understanding the difference between Photoshop and Lightroom can help you decide which software is best suited for your specific editing needs.
Finalizing and Exporting Your Design
We’ve painted and perfected our text.
Now, let’s wrap it up and get it ready for display or print.
This step ensures that all your hard work isn’t wasted and that your design looks as good on paper or screen as it does in Photoshop.
Reviewing and Refining Your Work
When applying painting effects, it’s crucial to focus on reviewing and refining your work.
By carefully evaluating how the effects enhance your design, you can make necessary adjustments for a polished result.
Steps to Review:
- Review Your Project: Double-checking saves you from regrets later. Zoom in to close details. Is the photoshop spray paint effect consistent? Any rough corners needing refinement?
- Refine: Use the type tools to adjust text if needed. Maybe the color looks off or the blend mode needs tweaking. Switch between "Overlay", "Multiply", and more to see what works best. Ensure layers are properly labeled and organized.
- Additional Touches: Adding a touch of noise can provide texture or using the stroke effect to outline text adds depth. Keep refining until you’re totally happy.
Exporting for Web and Print
Now, exporting. It’s really straightforward if broken down.
Steps to Exporting:
- Save Your Project: First, save your work as a Photoshop (.PSD) file. This keeps all your layers intact for future edits.
- Web Export: For web use, go to File → Export → Save for Web (Legacy). Choose formats like PNG for transparency or JPG for quicker speeds. Set the quality to high, but not max, balancing between file size and image quality.
- Print Export: For print, use File → Save As and choose TIFF or high-quality JPG. Ensure the resolution is set to 300 DPI for crisp prints.
These steps make sure your designs look spot-on whether they’re online or printed in a magazine.
When exporting for web and print, using transparent text can enhance your design’s flexibility. By ensuring the text remains clear and adaptable across various formats, you achieve a polished result.
Pro Tip: When exporting, make sure that your color profile matches your output needs.. Use sRGB for web and CMYK for print. This ensures accurate colors.
For more tips and tricks, consider exploring tutorials on lightroom shortcuts and photoshop masking to further enhance your workflow.
Advanced Techniques for Spray Paint Effects
Let’s dive straight into producing fantastic spray paint effects.
We’ll explore two advanced techniques that will make your designs pop!
No need to worry, it’s simpler than it sounds.
Creating Custom Brushes
First, let’s talk custom brushes.
Photoshop’s default spray brushes can feel limiting.
Why not make your own?
Steps to Create Custom Brushes:
- Open a new document in Photoshop.
- Select the brush tools from the left toolbar.
- Click the upper right corner of the brush preset picker.
- Choose a shape you like. Resize if needed.
- Set the spacing to spread the dots apart evenly.
- Go to Edit > Define Brush Preset. Name your brush.
You’ve created your custom spray brush.
Use it to add unique textures around your text, making each stroke stand out.
Using Filters for Unique Effects
Filters add extra flair to our designs.
Let’s focus on two key filters: Gaussian Blur and Noise.
Steps for Gaussian Blur:
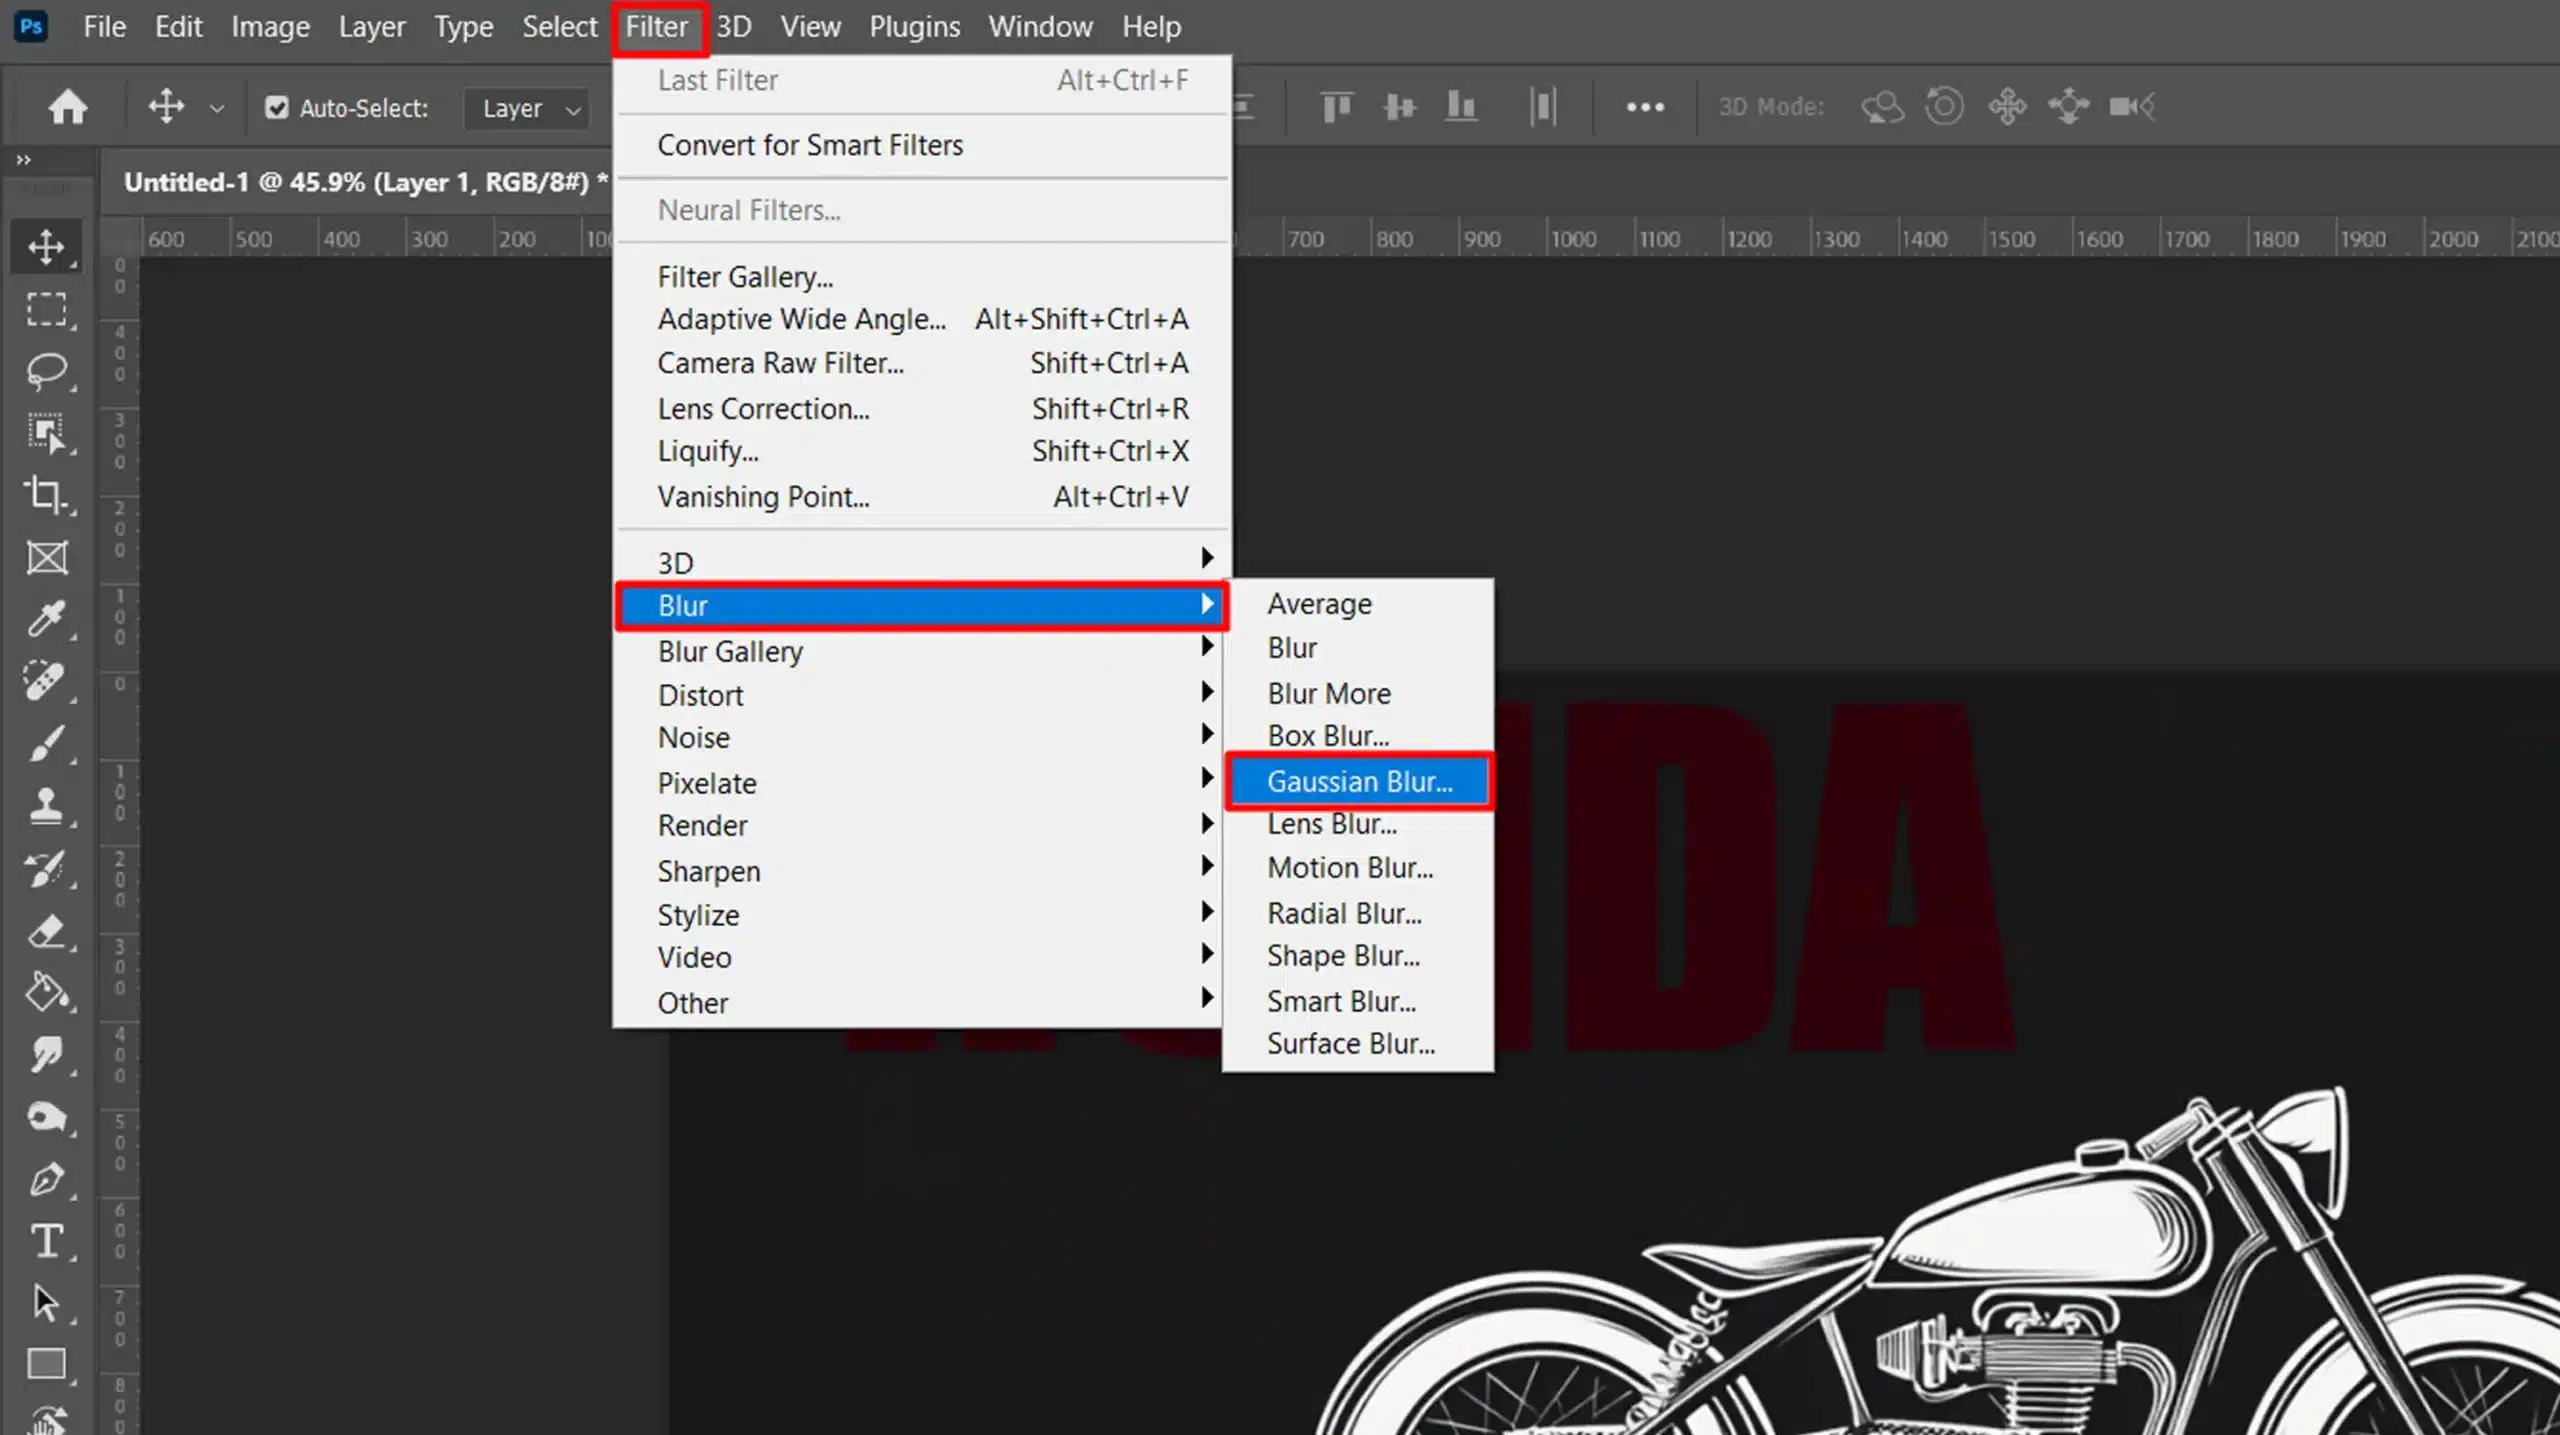
- Create or select your text layer.
- Duplicate the text layer to preserve the original.
- Go to Filter > Blur > Gaussian Blur.
- Adjust the radius until you achieve your desired blur. Keep it subtle.
This method softens the corners, producing a more realistic spray-painted effect.
Next, let’s add some noises to enhance the gritty texture and reinforce the spray-painted appearance.
Steps to Add Noises:
Follow theese steps to add noise:
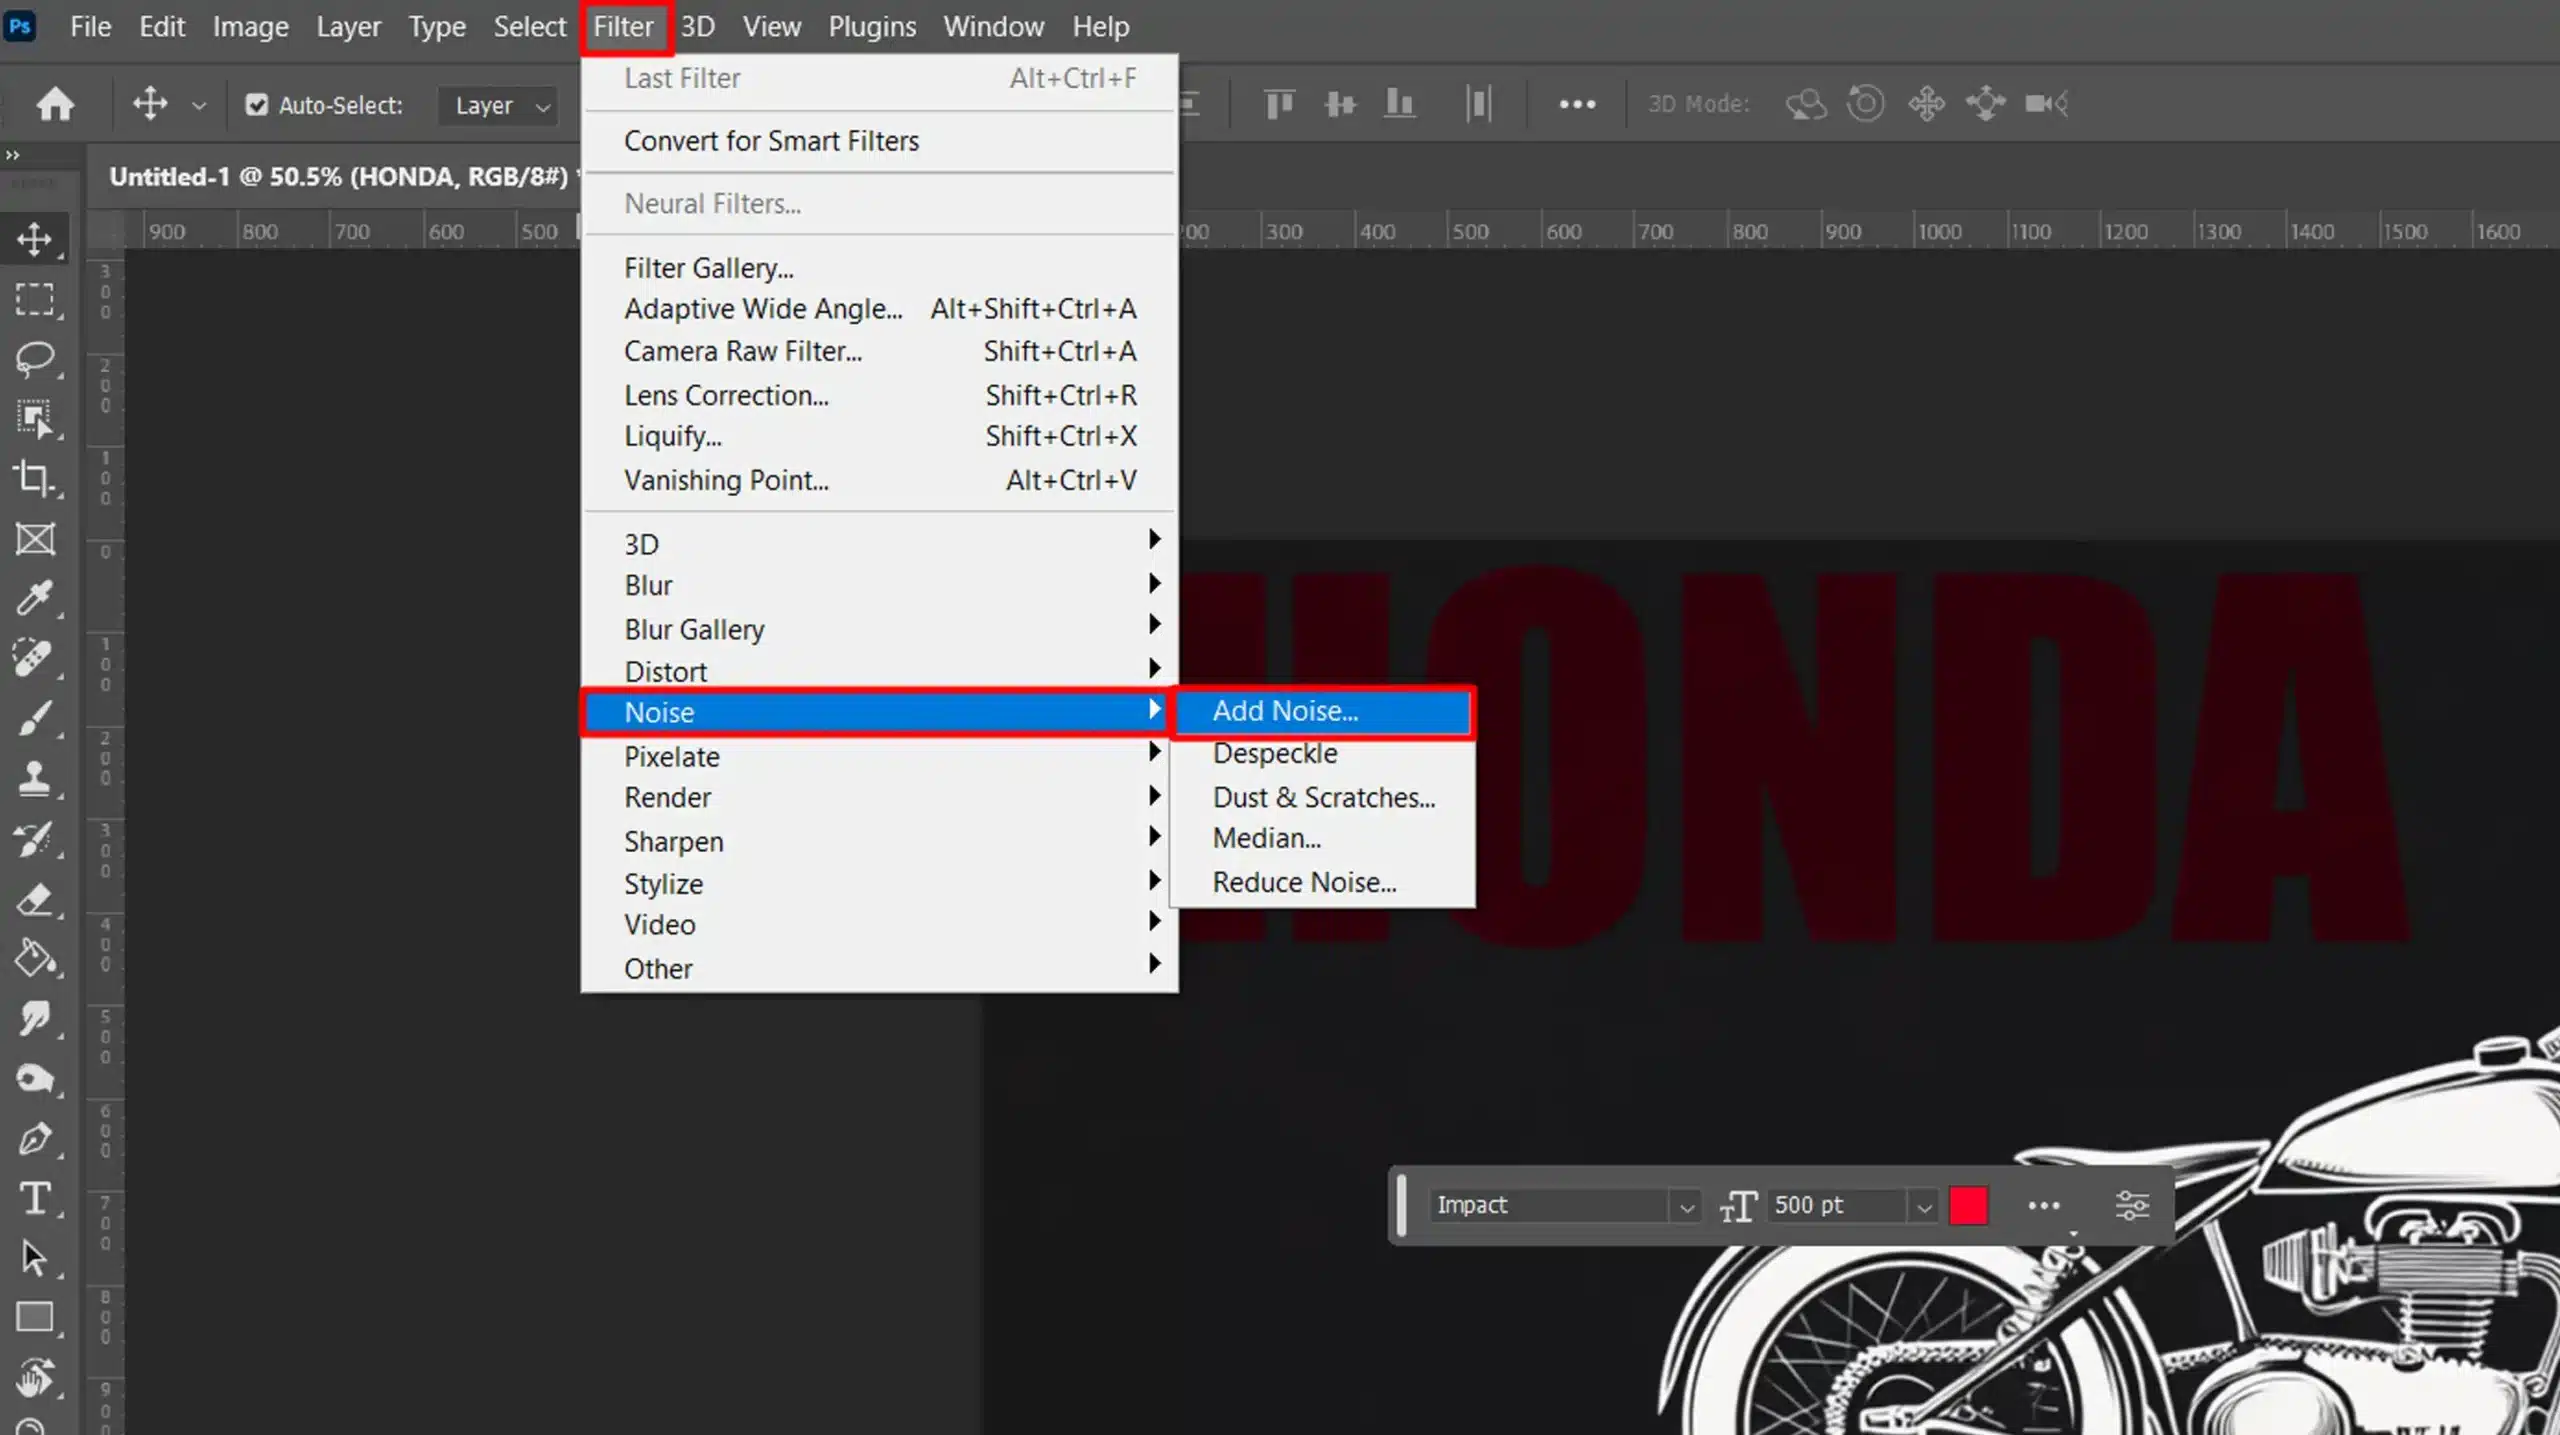
- Select your spray-painted text.
- Go to Filter > Noise > Add Noise.
- Adjust the amount and distribution. Aim for a fine, uniform texture.
The noise adds a gritty feel to your text, making it appear more authentic. These filters combined bring your spray-painted text to life.
By enhancing the details, you can achieve a more realistic spray-painted effect that truly captures the essence of spray-painted art.
Experimenting with different textures will further elevate the spray-painted look, adjoin depth and character.
Pro Tip: Experiment with blend modes on your brush and filter layers to discover exciting effects. Overlay and Multiply are great starting points.
Each point of adjustment can dramatically change the outcome, so explore different blend mode settings to find the best point for your design.
Exploring different blend modes like Screen can reveal unexpected results and enhance your design’s depth.
Adjusting the blend mode settings can further refine your visual impact and achieve the perfect look
We offer comprehensive Photoshop and Lightroom tutorials to turn you into an editing pro. Look at out our articles on essential tools in photoshop for more tips and tricks.
Alternative Use of Spray Paint Text Effect
Spray paint text effects hold a unique charm. People often use them for graffiti-style projects, but let’s think outside the box. How else can we use this effect in Photoshop?
From producing dynamic posters to adding an edgy touch to digital artwork, the effect in Photoshop can be versatile.
Experiment with different applications to explore new creative possibilities.
Exploring text portraits is an exciting alternative use of spray paint text effect. By incorporating photoshop spray paint effect styles into portrait designs, you can create unique, eye-catching visuals.
Create Unique Invitations
Easy steps to create a unique invitations:
- Start with the type tools to write your text.
- Follow the steps to apply the spray paint effects in Photoshop.
- Add some splatter brushes around the corners.
Imagine sending out custom party invitations with a spray paint text effect.
They stand out and give your invitation an edgy, creative feel.
Using the type tool for different fonts and sizes can enhance the overall look.
Don’t forget to adjust the type tool settings for perfect alignment and style.
You’ve created an eye-catching invite!
Design Posters and Flyers
Spray painted text is great for posters. Whether for a music festival or a garage sale, this effect gets attention.
You can design them in few steps:
- Add text with the type tool.
- Apply the spray effect in Photoshop.
- Use multiple layers to adjust colors and blend modes.
Personalize Social Media Graphics
- Write your message using the type tool.
- Apply the spray paint effects.
- Save the image and upload it to your social platform.
Who doesn’t want their social media posts to stand out?
Use spray painted text for your graphics and watch the likes roll in.
Enhance Web Design Elements
- Create a type layer.
- Apply the effect.
- Export as a transparent PNG.
Websites can benefit from the spray painted text effect too.
Use it for headers or banners to add an artistic touch to your web design projects.
Decorate Merchandise
- Create the design in Photoshop.
- Transfer it to your merchandise using print-on-demand services.
Think about putting spray painted text on T-shirts, mugs, or even phone cases.
Platforms like print-on-demand services make this process seamless and fun.
Pro Tip: Experiment with different blending modes in Photoshop to achieve stunning results.
Overlay and Multiply are fantastic starting points for enriching your text designs.
Common Mistakes and How to Avoid Them
| Common Mistake | Problem | Solution |
|---|---|---|
| Not setting up layers correctly | Inconsistent design | Organize layers before starting |
| Overusing effects | Messy and unprofessional look | Apply effects sparingly and uniformly |
| Incorrect use of blend modes | Unwanted visual results | Experiment and adjust blend mode settings |
| Ignoring color profiles | Colors appear differently on different media | Set color profile based on output needs |
| Skipping file format considerations | Loss of quality or details | Save in appropriate formats (PSD, JPG, PNG) |
To avoid and solve a problem, learn the proper techniques and look over your work to ensure effects are applied consistently for a polished result.
Overusing the Spray Paint Effects
Overusing this effect in Photoshop can make your project look messy and unprofessional.
It’s important to balance the effect in Photoshop to maintain clarity and quality.
Applying too many effects in Photoshop can overwhelm your design, so use the effect in Photoshop sparingly.
Properly managing the effect in Photoshop ensures your project remains polished and visually appealing.
Overuse or incorrect application of the effect in Photoshop can detract from your design, so adjust it carefully.
Pay attention to how each effect in Photoshop interacts with other elements to maintain a balanced and professional look.
One simple rule: Use the spray paint effects sparingly to highlight or accent specific parts of your text. This keeps your design clean and impactful.
Here’s a fun tip: Save your text layer separately before applying the spray effect. This lets you experiment without losing the original.
Ignoring Layer Management
Layers in Photoshop are like ingredients in a recipe. Mess them up, and your dish (or image) turns out wrong.
Layers keep your work organized, making edits easy. So, ignoring layers is a big no-no.
Always name your layers: Renaming “Layer 1” to “Main Text” might seem tedious, but it will save you tons of time later. Try using folders to group related layers together.
This helps you navigate through your project efficiently.
Also, proper layer management contributes to better transparency control, especially when dealing with multiple effects.
Transparency checks are crucial when blending layers for a seamless look.
Pro Tip: Lock your type layer after you’re done editing it.
Accidental edits won’t ruin your masterpiece, and you can always unlock it for future changes.
Overlooking Essential Tools in Photoshop
Another common mistake is overlooking essential tools in Photoshop that can significantly streamline your workflow.
For instance, the content-aware fill tool can help you remove unwanted objects from your image seamlessly, saving you hours of manual editing.
Not Using Lightroom for Photo Management
While Photoshop is excellent for detailed edits, Lightroom excels in image management and batch editing.
Ignoring Lightroom’s capabilities can lead to inefficient workflows, especially when dealing with large volumes of image.
Pro Tip: Utilize Lightroom for organizing and making quick adjustments to your image before diving into Photoshop for more detailed edits.
This dual approach can save you time and improve the overall quality of your work.
Frequently Asked Questions

How to Get Spray Paint Effects in Photoshop?
To get that spray paint effects you have to:
- Open your image in Photoshop.
- Select the Brush Tool from the toolbox.
- Choose a brush that resembles spray paint. You can find these in the Brush Preset Picker.
- Adjust the brush settings like size and opacity to suit your needs.
- On a new layer, start painting over the area you want to apply the spray paint effects.
- You can use layer masks and blending modes for more nuanced effects.
How to Get Spray Paint Effects?
To get spray paint effects follow theese steps:
- Start with a base layer to apply your paint on.
- Use a textured brush to mimic the spray paint. This can be done in any graphic software like Photoshop or GIMP.
- Vary the spray radius and opacity to create a realistic effect.
- Apply multiple layers if you want to have a more intense color or overlapping effects.
Which Tool is Used to Give the Effect of Spray Paint?
- In digital software like Photoshop, the Brush Tool is primarily used.
- Choose a brush that has a dispersed, irregular edge to mimic the spray paint.
- Adjust settings such as scatter, spacing, and opacity to enhance the effect.
How to Do Paint Effect in Photoshop?
- Open your project in Photoshop.
- Select the Brush Tool from the sidebar.
- Pick a brush that fits the paint effect you want to create.
- Experiment with different brushes and settings like flow and opacity to achieve desired results.
- Use layers to build up the effect gradually for more control.

Conclusion
In conclusion, creating a Photoshop spray paint effect can really make your designs pop.
By layering spray paint strokes, you add depth and texture, which makes your text stand out. It’s a fun way to add a creative touch to any project.
Remember to save your work in both PSD and JPG/PNG formats to keep your file ready for future edits and sharing.
If you’re looking to dive deeper into Photoshop, Look in my Photoshop Course and Lightroom Course.
For the latest tools, consider getting Adobe Photoshop and Adobe Lightroom.
Enjoy experimenting with your designs!
Read more about Photoshop:


Course

Light Effect Photoshop


Lightroom Course 2025

Adobe Photoshop Course 2025

Photo Editing Course


