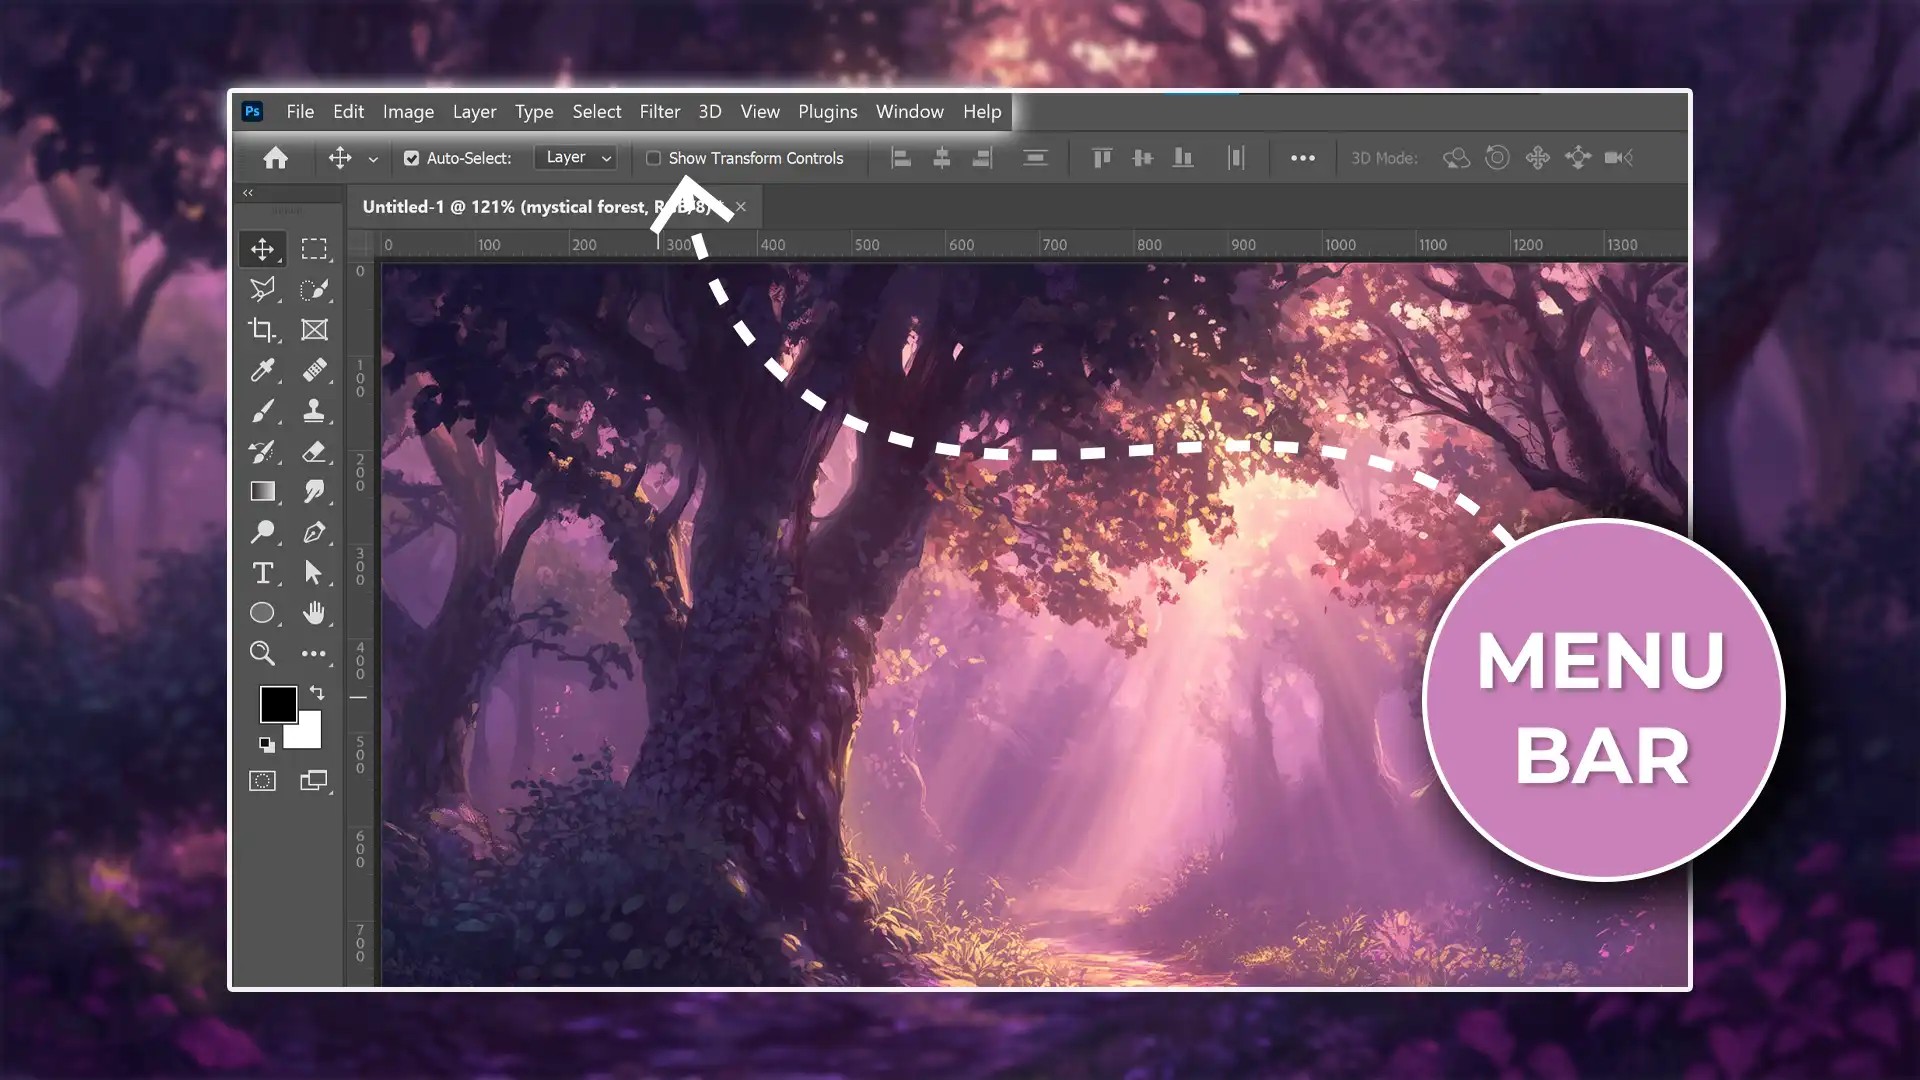
Have you ever wondered what all those options in the Photoshop menu bar do?
You’re not alone.
Whether you’re a beginner or looking to refine your skills, understanding this part of Photoshop can elevate your editing game.
In this article, I’ll guide you through the essentials of the Photoshop menu bar, making it easier for you to navigate and utilize its full potential.
Stick around to unlock tips that can transform your photo editing experience!
Table of Contents
Navigating the Adobe Photoshop Menu Bar
The Photoshop menu bar can be tricky, but let’s simplify it together.
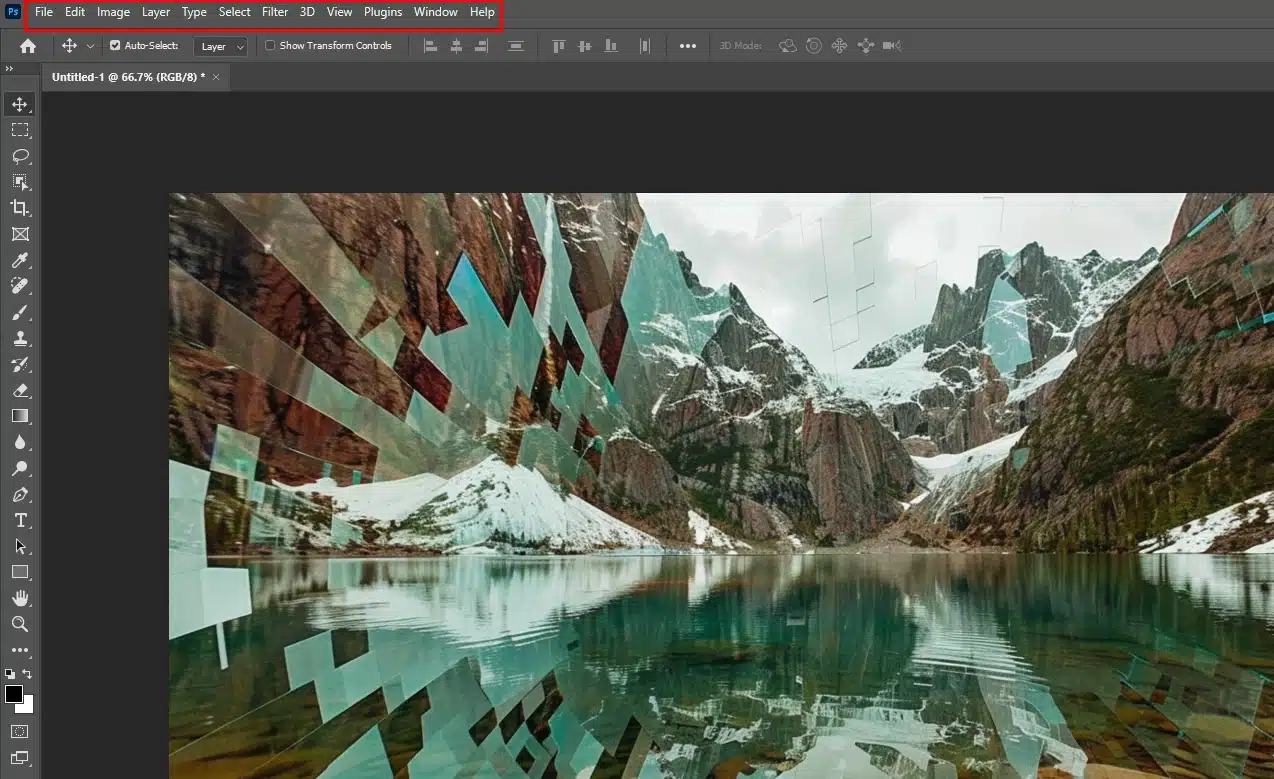
File Menu
The File menu includes Open, Save, and Export options. Use it to efficiently manage your files.
Remember, always keep your work saved to avoid any loss of progress.
Edit Menu
The Edit menu boasts functions like Undo, Redo, and Copy. It’s your go-to place for fixing mistakes.
A quick shortcut for Undo is Ctrl+Z, which can save you a lot of time.
Image Menu
The Image menu lets you adjust size, canvas dimensions, and rotation.
Anytime you need to change the overall dimensions of your project, this is where you’ll go.
Layer Menu
Layers are fundamental in Adobe Photoshop. The Layer menu lets you create, duplicate, or merge layers. .
To take your layer management to the next level, consider using smart objects. They make non-destructive editing a breeze.
Select Menu
Use the Select menu to isolate and focus on specific parts of your project, which is essential for precision.
The quick selection tool can make selecting parts of your image faster and easier.
Filter Menu
Filters can dramatically alter your image.
The Filter menu offers options bar like Blur and Sharpen. Experimenting with different filters can add unique effects to your work.
View Menu
The View menu helps you control how you see your project. You can zoom, change screen mode, and use rulers to ensure everything is aligned perfectly.
Full screen mode and standard screen mode are also available for a distraction-free workspace.
Window Menu
The Window menu manages all of your windows and tool tips panels.
Customizing your workspace to fit your workflow can make your editing process much smoother.
Help Menu
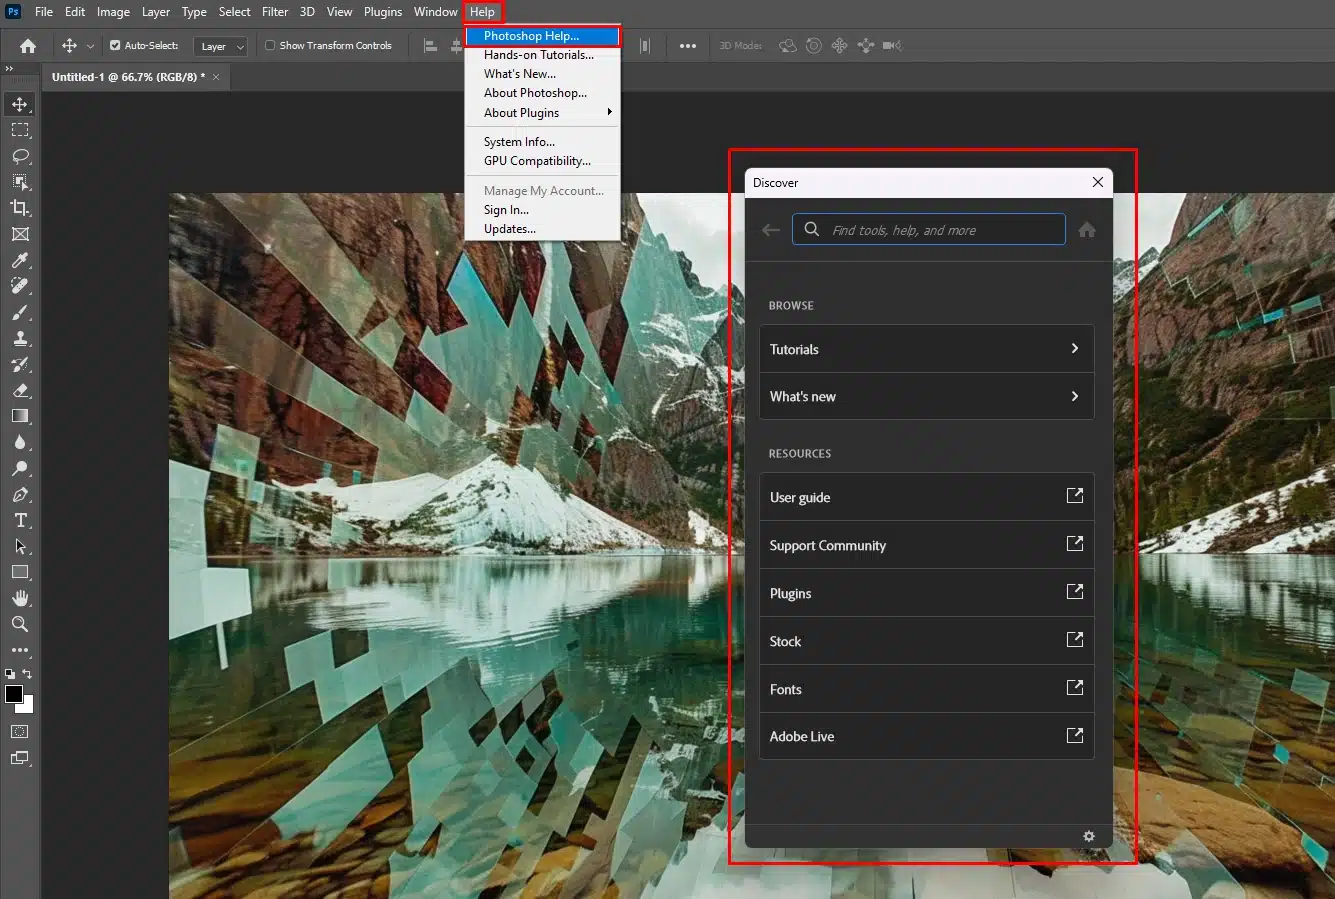
The Help menu offers various tutorials and support.
Whenever you’re stuck or curious about a new feature in Adobe Photoshop, don’t hesitate to explore this menu for guidance.
Pro Tip: Hold the shift key while resizing to keep proportions.
Using the Options Bar
The context-sensitive options bar in Photoshop helps you work faster. It lets you access options quickly. Whether you type text or adjust an image, the options bar is always there.
This horizontal menu is context-sensitive, changing its options based on the tool you select. Using the options bar efficiently can significantly speed up your workflow.
For instance, using a keyboard shortcut like ‘T’ for the type tool will immediately bring up text-related options in the bar.
Don’t forget to explore different display modes for a clutter-free workspace, especially when you’re focusing on fine details.
When using the options bar, understanding the essential tools in Photoshop and the essential tools in Lightroom as well can significantly enhance your workflow. The options bar offers quick access to vital functions.
Customizing the Options Bar
To make the most of your Photoshop editing experience, understanding how to customize the options bar is crucial.
The options bar offers quick access to essential tools and settings, helping you streamline your workflow and enhance your creativity.
Below is a comparison of key features in the options bar, including their descriptions and pro tips to optimize your use of Photoshop.
| Feature | Description | Pro Tip |
|---|---|---|
| Access Settings | Located in the upper right corner. Adjust canvas size, image size, and use features like Content-Aware Fill. | Customize for essential tools. |
| Hidden Tools | Click on tool icons to reveal additional tools, such as the Patch Tool. | Use shortcuts for efficiency. |
| Blending Modes | Found in the options bar to control layer interactions and create unique effects. | Explore modes for creative outcomes. |
| Quick Access | Options bar changes based on the selected tool, providing context-sensitive options. | Use keyboard shortcuts for faster access. |
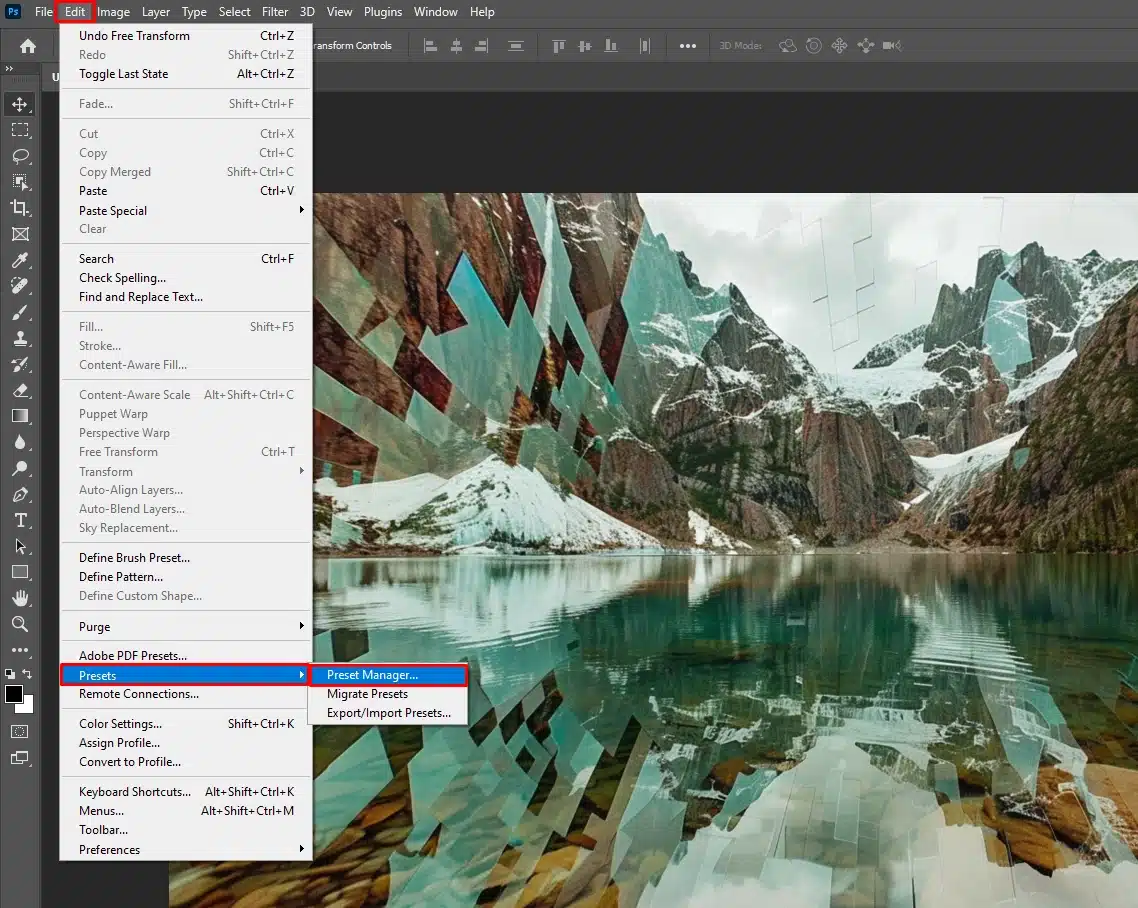
The Preset Manager and the Options Bar are powerful tools in Adobe Photoshop that can significantly streamline your editing process.
The Preset Manager is a window in Project Settings (menu: Edit > Preset > Preset Manager).
Preset Manager allows you to organize and manage your presets, such as brushes, gradients, and styles, while the Options Bar provides quick access to tool-specific settings.
Accessing Settings
To customize it, go to the upper right corner of your screen. You can adjust canvas size and image size easily.
Additionally, you can use the content-aware fill feature for seamless edits.
Customizing this bar allows you to tailor your workspace to better suit your workflow, ensuring that the tools and options you use most frequently are readily available.
This customization can significantly enhance your efficiency and streamline your editing process.
Customizing the options bar allows you to tailor your workspace to include essential tools like blending modes.
These modes enable you to create unique effects by controlling how layers interact, enhancing your creative workflow and artistic outcomes.
Finding Hidden Tools
Click on tool icons to find hidden tools. These options make your work easier. For instance, the patch tool is great for removing unwanted elements from your photos.
Remember, mastering the use of the mouse button and keyboard shortcuts can make commands much faster and your workflow more efficient.
Pro Tip: Use Photoshop shortcuts and Lightroom shortcuts as well to save time. Familiarize yourself with essential tools in Photoshop to enhance your workflow.
Advanced Features in the Menu Bar
The Photoshop menu bar is packed with advanced features that can elevate your editing capabilities.
Beyond the basic functions, it includes powerful tools like the object selection tool, various blending modes, and customization options that allow for precise control over your editing process.
Using Full Screen Mode
Press ‘F’ to go full screen.
Focus on your project without distractions.
Exploring advanced features in the Photoshop menu bar includes mastering the object selection tool.
This tool allows precise selections, making it easier to manipulate specific elements in your images, enhancing your editing capabilities and efficiency.
Pro Tip: Learn Photoshop shortcuts. One keypress saves time!
For instance, using the ‘L’ key activates the lasso tool in Photoshop, making selections easier and faster.
Exploring the advanced features in the Photoshop menu bar can enhance your photography experience with different digital cameras.
These features provide tools for fine-tuning settings, enabling you to optimize your camera’s capabilities and achieve better results in various shooting conditions.
Common Mistakes When Using the Photoshop Menu Bar
When diving into Adobe Photoshop, many users, especially beginners, tend to make some common mistakes that can hinder their workflow and efficiency. Here are a few to watch out for:
Ignoring Keyboard Shortcuts
Many beginners don’t use keyboard shortcuts, relying solely on the Photoshop menu bar. This can significantly slow down the editing process.
Learning shortcuts like Ctrl+Z for undo or Ctrl+T for transforming layers can save a lot of time.
Not Saving Work Regularly
Failing to save work frequently can lead to significant losses if the program crashes.
Use the File menu to save regularly or set up autosave features to avoid losing progress.
Overlooking Non-Destructive Editing
Some users edit images directly without using Smart Objects or adjustment layers. This can permanently alter the original image.
Utilize the Layer menu to create Smart Objects and adjustment layers for reversible edits.
Forgetting to Merge Layers
Having too many layers can make the project confusing and slow down performance.
Periodically merge layers you’re done with using the Layer menu, but keep a copy of the unmerged version in case you need to make changes later.
By avoiding these common mistakes, you can make your Photoshop experience more efficient and enjoyable.
Mastering the use of the menu bar and integrating keyboard shortcuts into your workflow are essential steps to becoming proficient in Photoshop.
Frequently Asked Questions (FAQs)

Where is the Photoshop Menu Bar?
- The Photoshop menu bar is located at the very top of the Photoshop application window. It contains various menus such as File, Edit, Image, Layer, and more, which provide access to all Photoshop functions.
How do I Bring Back the Menu Bar in Photoshop?
- If your menu bar is not visible, you can restore it by pressing the "F" key on your keyboard multiple times to cycle through different display modes until the menu bar reappears.
- Alternatively, you can press "Shift + F" to toggle through the full-screen modes and bring back the menu bar.
What is the Photoshop Menu Bar?
- The Photoshop menu bar is a horizontal bar at the top of the Photoshop window that includes various menus (File, Edit, Layer, etc.). Each menu contains settings and options that control different aspects of the functionality in Photoshop.
How do I Show Menu Items in Photoshop?
- To show or hide individual menu options in Photoshop, go to "Edit" > "Menus" or press "Ctrl + Alt + Shift + M" on Windows or "Cmd + Option + Shift + M" on a Mac. This opens the Menu Customization dialog box, where you can toggle the visibility of menu options.
Conclusion
Mastering the Photoshop menu bar has really improved my photo editing skills.
By understanding each menu and using keyboard shortcuts, I can work faster and more efficiently.
Whether it’s using the advanced features in the menu bar or customizing the options bar, each feature adds to my creative process.
For anyone looking to elevate their skills, I highly recommend checking out these comprehensive courses: the Photoshop Course and the Lightroom course.
They cover everything you need to know to become proficient with these tools.
Additionally, if you’re interested in exploring these tools further, check out Adobe’s official pages for Photoshop and Photoshop Lightroom.
With these resources, you can take your photo editing to the next level.
Happy editing!
Read more about Photoshop:


