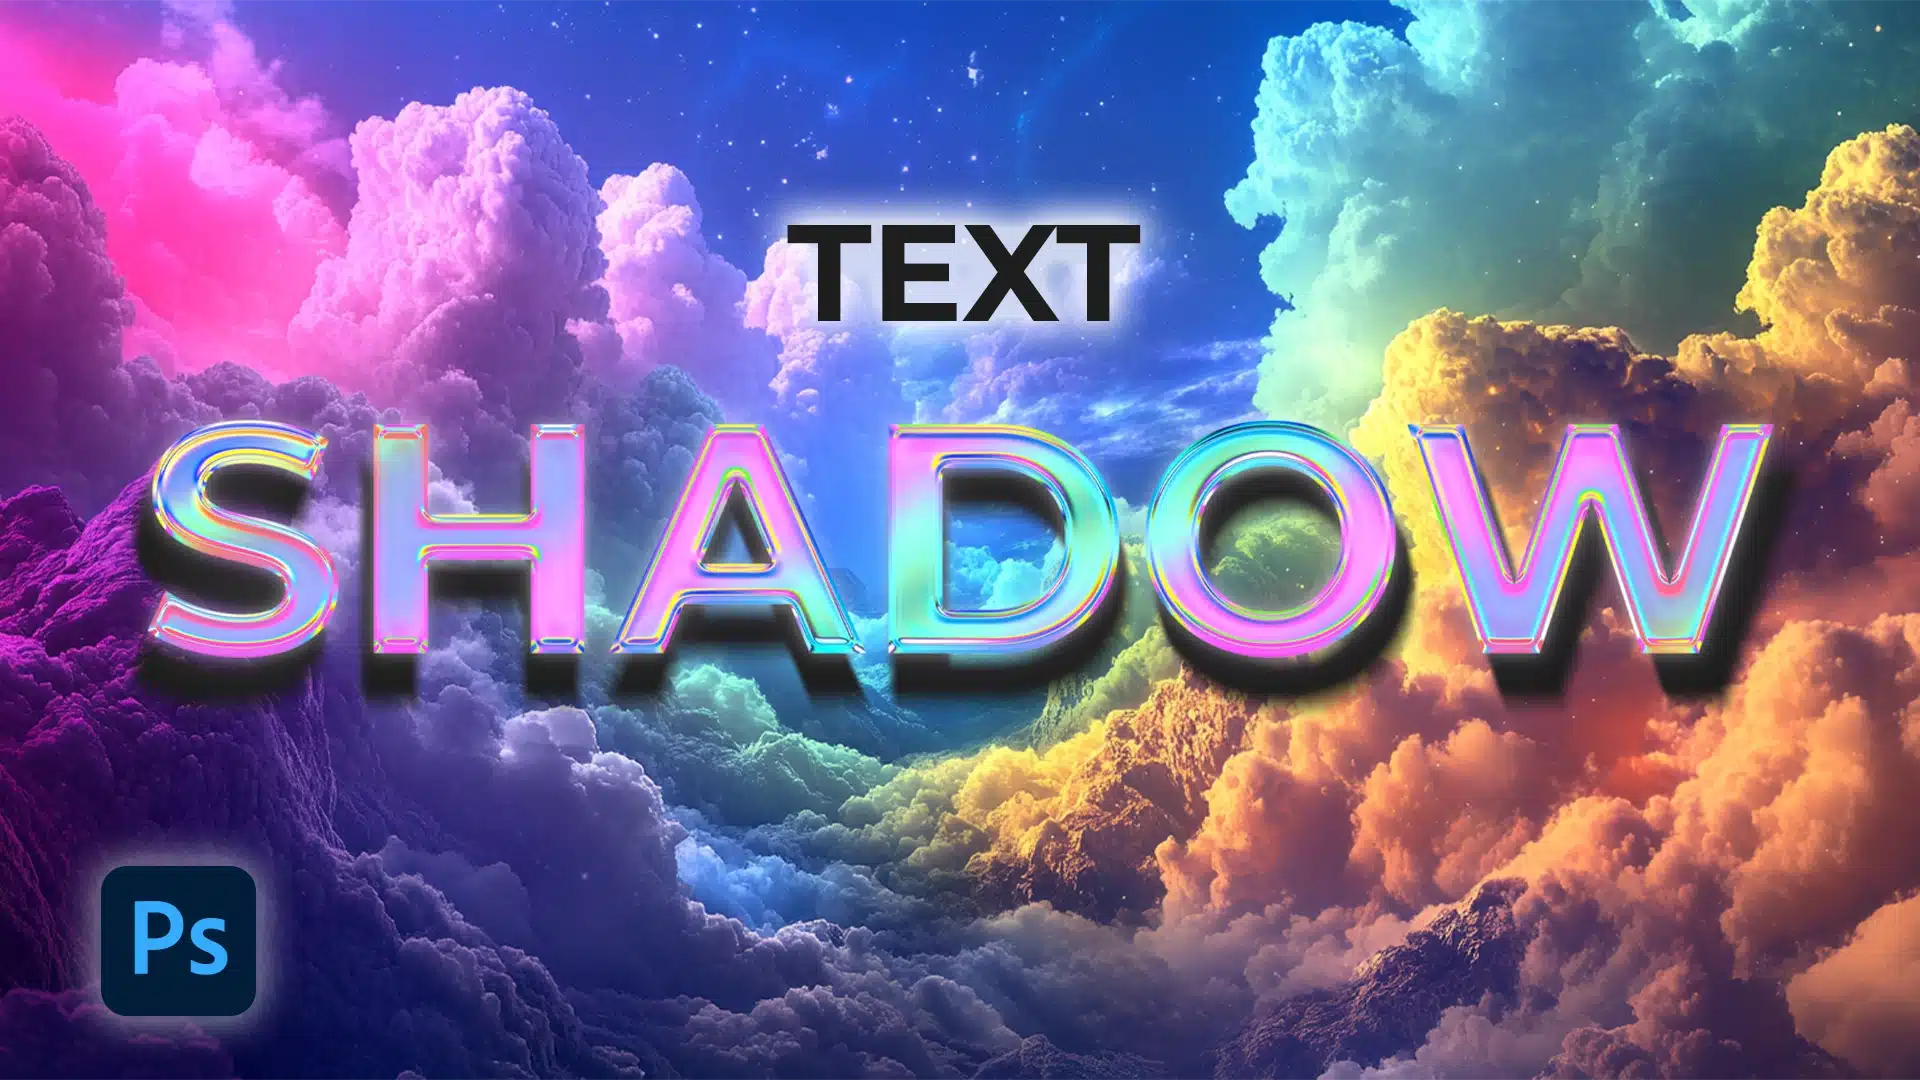
Creating a captivating design often comes down to the details, and mastering the “text shadow Photoshop” technique can make a difference.
Imagine elevating your text so it seems to jump off the screen, grabbing attention and drawing in your audience.
In this article, I’ll you through the process, offering step-by-step instructions and practical tips. By the end, you’ll understand how to create stunning text shadows and use them to enhance your designs effectively.
Let’s dive in!
Table of Contents
How to Add Text Shadow in Photoshop
Adding a text shadow in Photoshop can enhance your text by giving it more depth and visibility.
Start by opening your project to apply this effect.
Opening Your Project and Preparing Your Workspace
Open Photoshop and load the project where you want to add a text shadow. Navigate to “File” in the top menu and click “Open.”
Locate your existing photo or create a new document. Now, you’re ready to add shadows to your text.
Navigating and Utilizing the Layers Panel
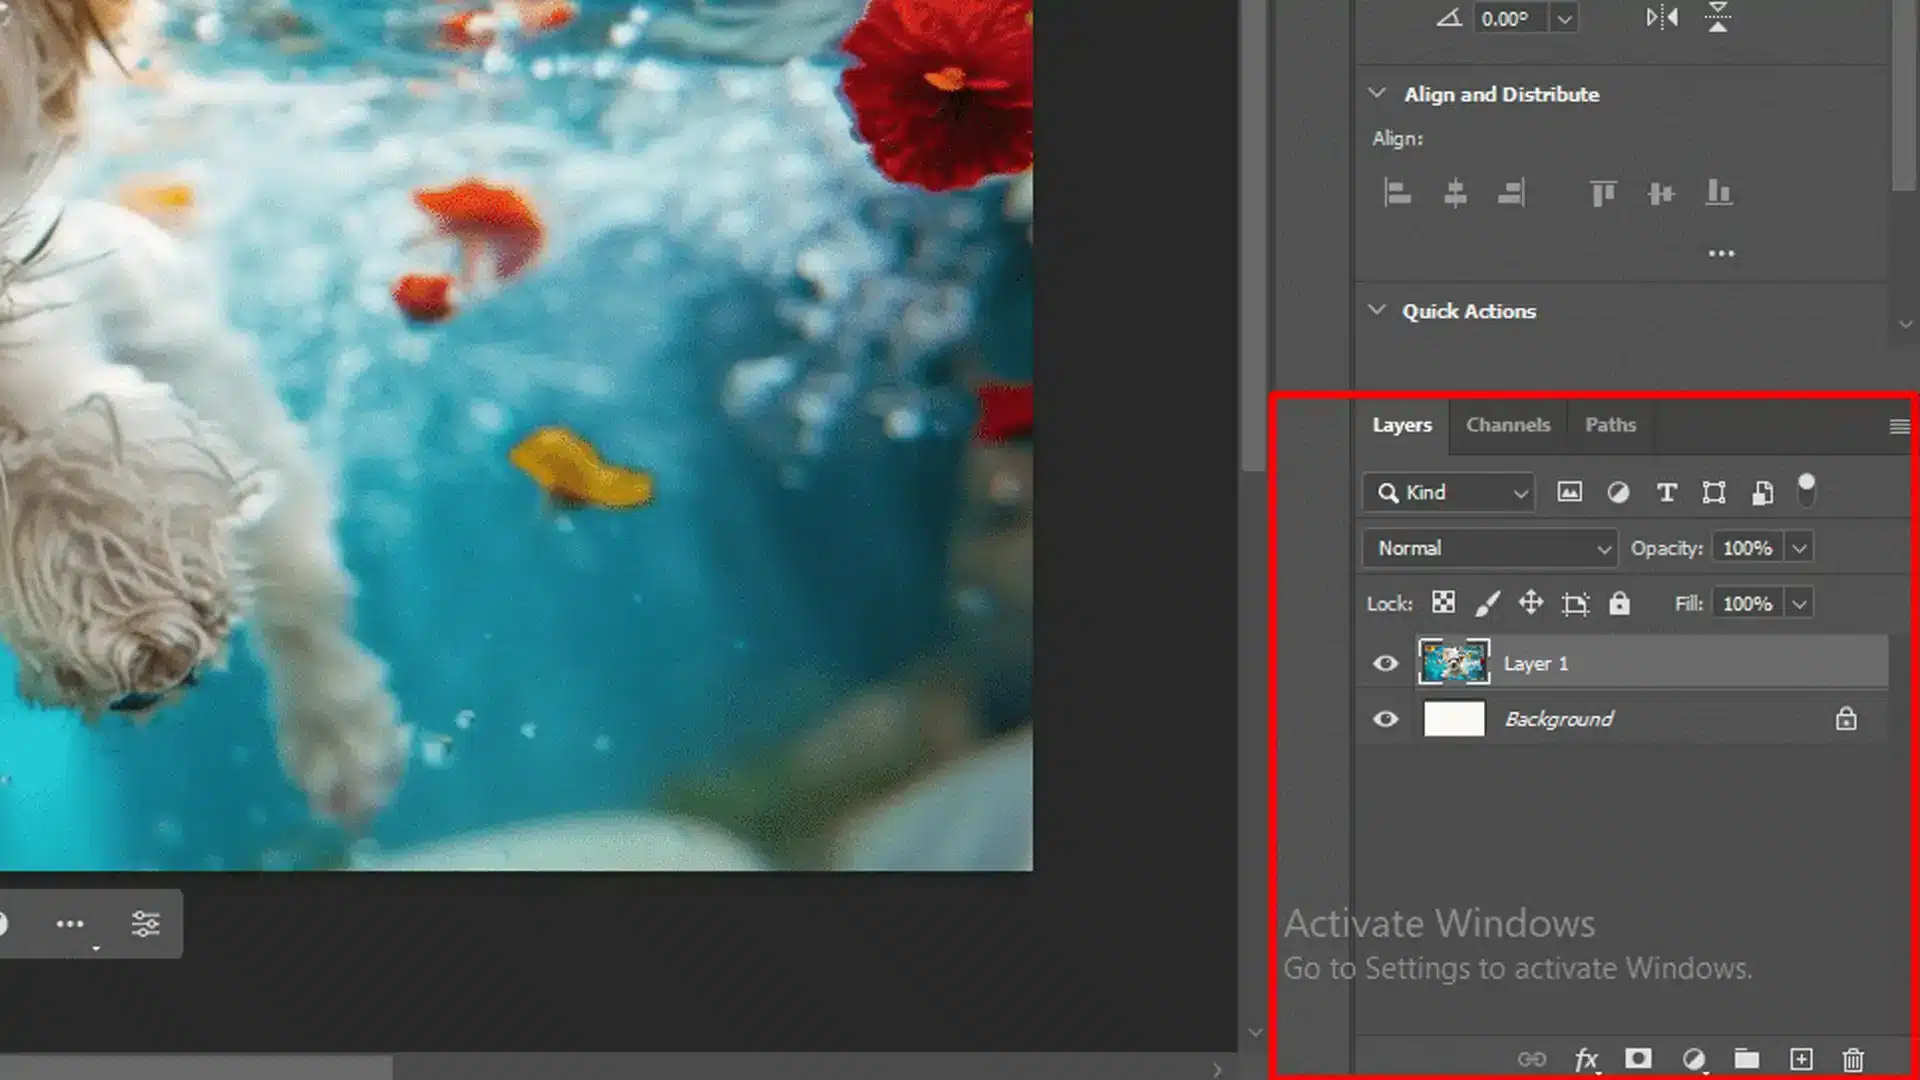
Look at the right side of your screen to find the layers panel. Here, all the layers of your project appear. If you don’t see it, navigate to “Window” in the top menu and select “Layers.”
This will make the Layers panel visible. Layers are important in photo editing and text shadow creation when dealing with adding texture to your projects.
Choosing and Preparing the Text Layer
In the layers panel, identify the type layer where you want to add the text shadow.
If your text has not yet been created, choose the Horizontal Type Tool from the left toolbar to type your desired text into your document window.
Pro Tip: You can streamline your workflow by using Photoshop shortcuts and Lightroom shortcuts to quickly access tools and commands, making the process faster and more efficient. For example, use the ‘Ctrl + T‘ shortcut to transform and resize your text layer easily.
Applying the Drop Shadow Effect
With your type layer selected, look for the “fx icon” at the bottom of the layers panel. Click on it and add a drop shadow effect from the list of effects.
This will open the layer style dialog box where you can customize the drop shadow in Photoshop.
For more advanced techniques you can use the content-aware fill in Photoshop. This powerful feature allows you to fill in areas seamlessly by analyzing the surrounding pixels.
Additionally, if you’re looking to clean up your design, you can learn how to remove an object in Photoshop using various selection tools and techniques.
Fine-Tuning Shadow Settings
Adjusting the drop shadow’s settings helps refine its appearance and blend with your design.
Next, let’s explore how opacity affects the effect.
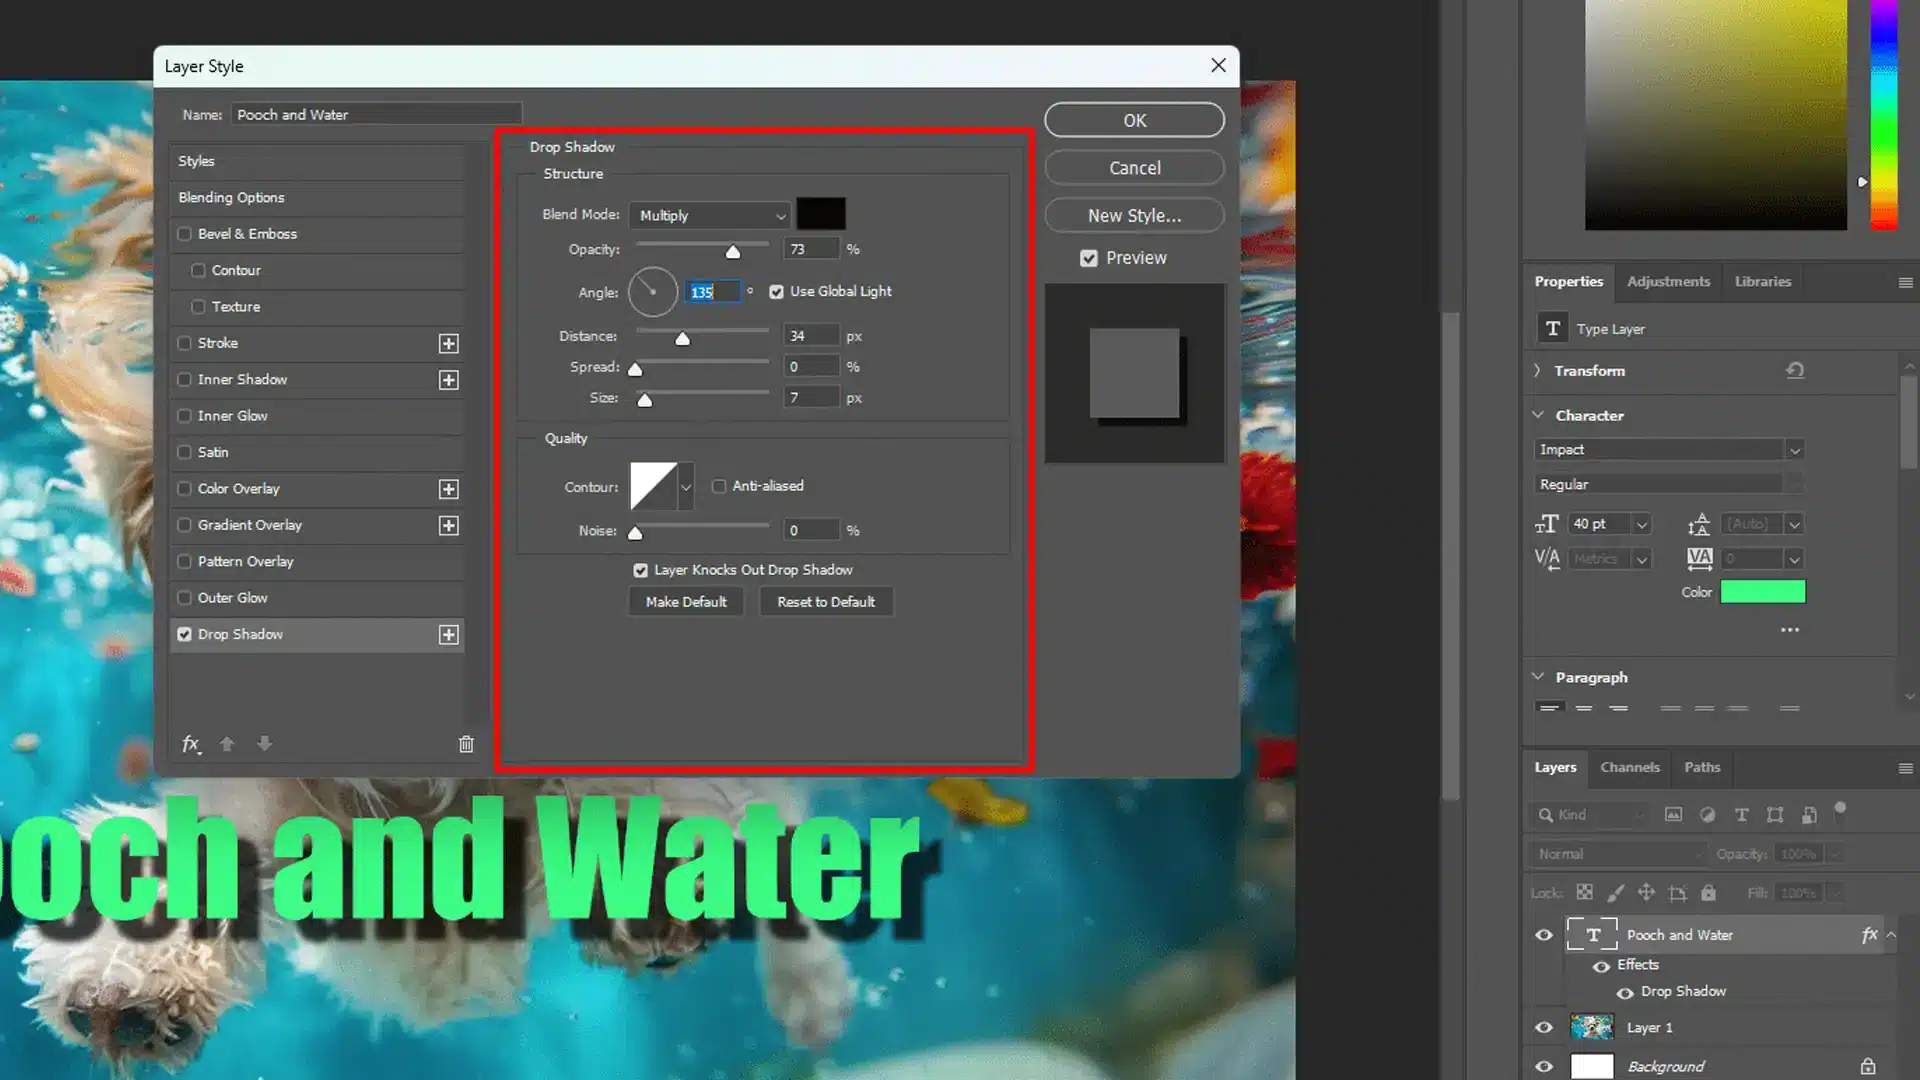
Opacity
Set the opacity slider to control how transparent the drop shadows appear.
Higher opacity makes the shadow more solid, while lower makes it lighter.
Angle
Use the angle slider or the angle spinner to decide the direction of the light source.
This will affect where the shadow falls.
You can also type in an exact degree for precision.
Distance
Adjust the distance slider to determine how far the shadow extends from the text.
This setting can create depth by simulating the effect of real world shadows.
Spread
The spread slider controls how much the shadow spreads out from the text.
It’s useful for making your shadow appear bolder or softer.
Size
Modify the size slider to blur the shadow edges, creating a softer look.
Larger values blur the shadow, while smaller values result in sharp, defined edges.
Perfecting Your Shadow Effect and Enhancing Text Integration
Experiment with different settings to achieve the desired effect. Remember, the goal is to make your text stand out without overshadowing other elements in your project.
Pro Tip: To add a drop shadow that adapts seamlessly when resizing your project, convert your type layer to a smart object before applying the drop shadows.
Additionally, you can warp text to follow curves and shapes, enhancing the visual appeal and integration of the text within your design.
Advanced Techniques for Text Shadow
Exploring advanced techniques for text drop shadows can add extra flair and depth to your designs. One way to achieve a more complex look is by creating multiple drop shadows.
For instance, using dodge and burn feature can enhance certain areas of your text, adding more dimension and emphasis.
Here’s a quick comparison of various text drop shadow techniques in Photoshop, outlining their important features and applications to help you choose the best approach for your design.
| Aspect | Overview |
|---|---|
| Drop Shadow | Simple effect, adjustable distance and size, customizable opacity, angle, and distance. Best for basic shadow effects. Blending modes: Yes (e.g., Multiply). |
| Gradient Shadow | Smooth gradient fade, adjustable gradient settings, and angle. Adds depth and dimension. Blending modes: Yes (e.g., Multiply). |
| Multiple Shadows | Multiple layered shadows, adjustable distance, spread, and size. Creates complex shadow effects. Blending modes: Yes (e.g., Overlay). |
Creating Multiple Shadows
To create multiple shadows, follow these steps:
- Start with the type layer you selected.
- Apply the initial drop shadow.
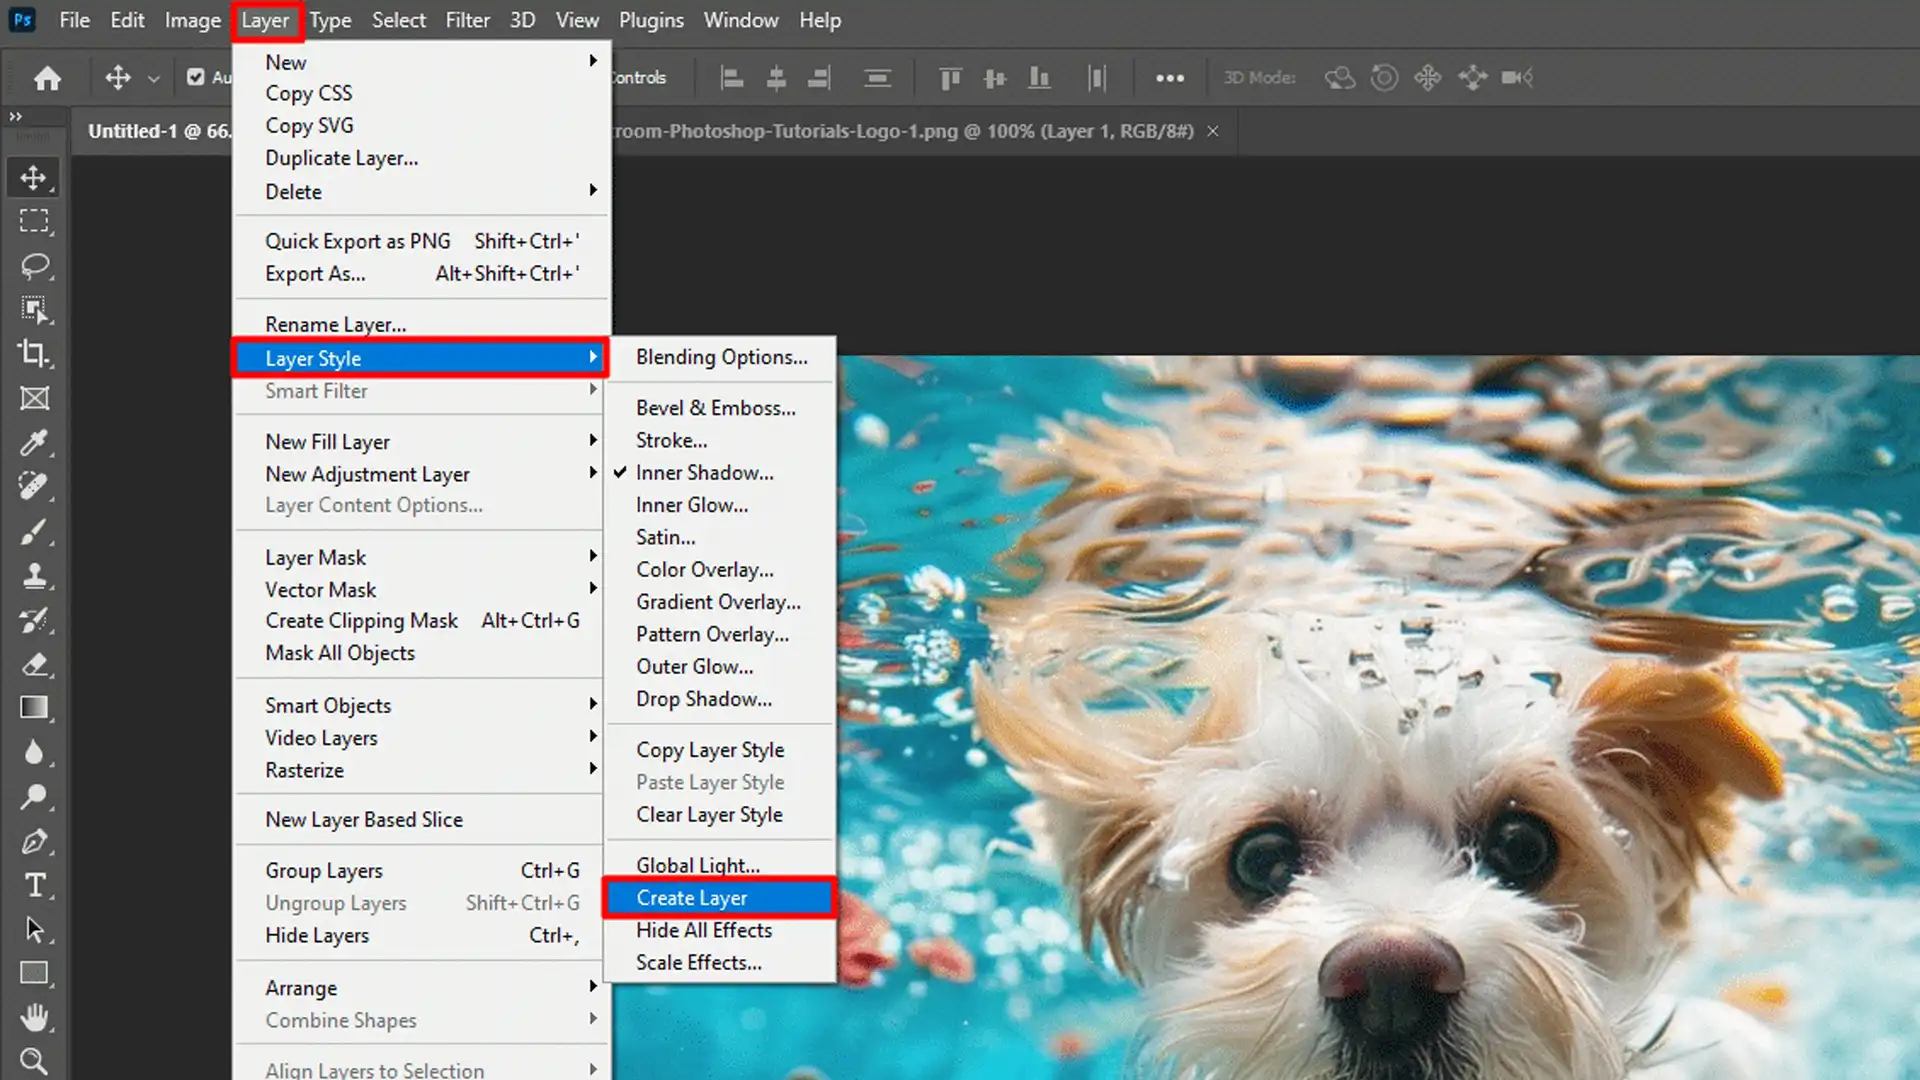
- Create new layer styles by going to the Layer menus and selecting "Layer Style" followed by "Create Layer". This converts your drop shadow into its own layer, allowing you to duplicate and manipulate it further..
- Add a drop shadow in Adobe Photoshop to the text by clicking the "fx icon" at the bottom of the Layers panel and selecting "Drop Shadow". Experiment with different settings for the distance, spread, and size of the drop shadowto create the effect of multiple selected layers of shadow beneath your text..
Pro Tip: For additional inspiration and techniques, check out tips on photography, which often include valuable insights on lighting and shadow effects that can be applied to your Photoshop projects
Using Gradient Shadows
Gradient shadows add depth and dimension. Follow these steps:
- Select the type layer.
- Click the fx icon and choose "Gradient Overlay". This opens the Layer Style dialog box.
- In the gradient settings, choose "Foreground to Transparent" for a simple fade effect.
- Adjust the angle so the gradient fades in the desired direction.
- Control the scale to make the transition smoother or harder, depending on the desired effect.
- Use blending modes like "Multiply" to blend your shadow better with the image layer, adding a realistic lighting feel.
Combining Shadows with Other Effects
Combining drop shadows with other effects can create stunning text visuals.
Here’s how:
- Start so that you add a drop shadow in Photoshop.
- Explore other layer effects like Inner Shadow, accessible via the fx icon. Inner shadows create a recessed look, enhancing depth.
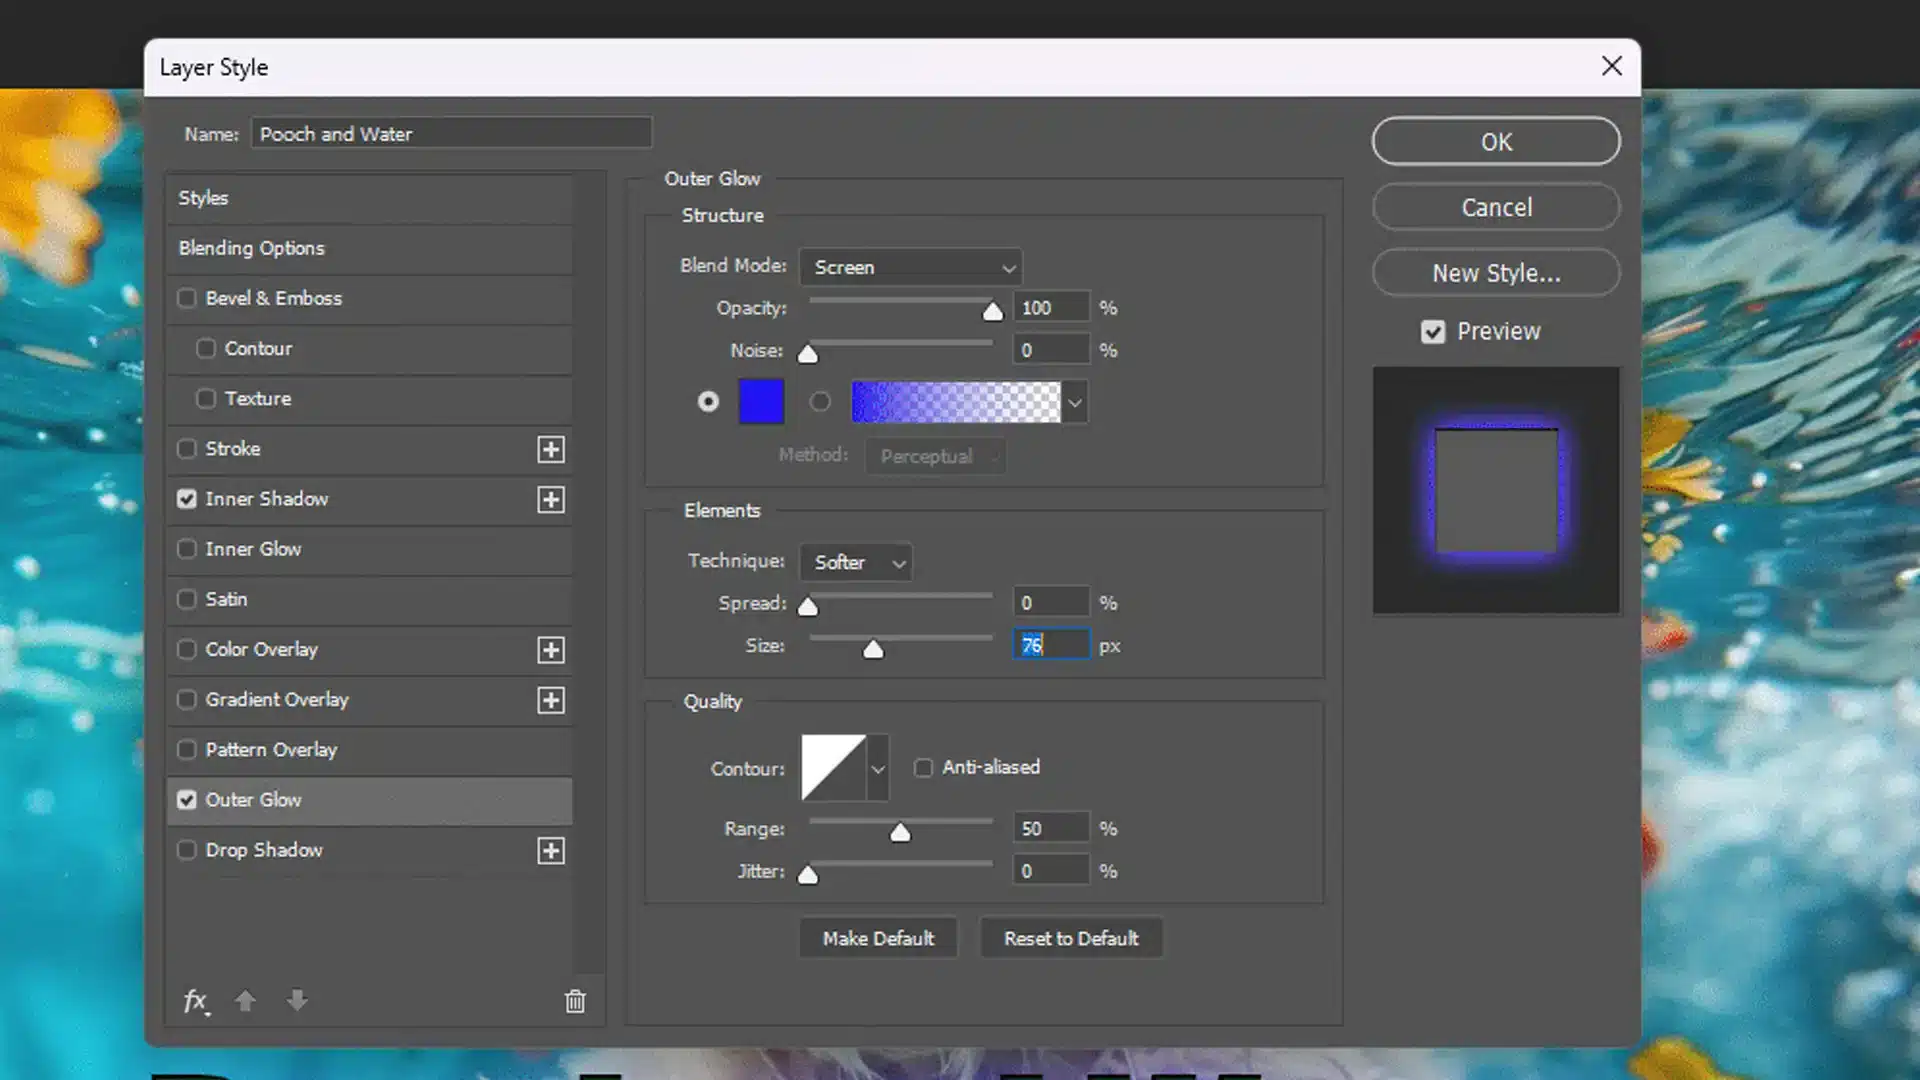
- To add a luminous touch, combine shadows with an outer glow effect. Adjust the noise slider in the photoshop layer style dialog box for texture.
- Alter the blending mode to "Overlay" to integrate dark shadows and glow smoothly with your background layer, providing convincing photo editing.
Integrating shadows with additional effects can result in striking text designs.
Just as in Lightroom, where you can blend various adjustments to achieve a polished photo, you can explore different layer effects in Photoshop to enhance your text further
Pro Tip: Use the gaussian blur filter on a duplicate of your shadow layer. This smooths edges and adds realism.
Practical Applications of Text Shadow
Practical applications of drop shadows can improve your design’s clarity. For instance, enhancing readability ensures your text stands out.
Let’s explore how to add a drop shadow that can help with this.
Enhancing Text Readability Against the Background Layer
Using text drop shadow in Photoshop can make your text clearer. Imagine reading a book where the letters subtly float off the page.
Mastering the brush tool in Photoshop allows you to create intricate designs with precise strokes while experimenting with text shadow Photoshop effects, which adds depth and visual interest to your typography.
For an added effect, consider using transparent text with shadows, allowing the background to show through while still maintaining readability.
Creating Depth
Add a drop shadow in Photoshop to give your text a three-dimensional look.
It works well for headlines and logos, adding a professional touch. You can adjust the distance, spread, and size of the shadow to suit your design.
Too much drop shadow can overwhelm the text. To enhance the depth and visibility of text in your design, adjust the settings of drop shadow to achieve the perfect balance of light, distance, and opacity.
Removing Shadows in Photoshop
While adding shadows can enhance your design, there are times when you might need to remove them.
Removing shadows in Photoshop can be done using tools like the clone stamp tool or the patch tool.
Frequently Asked Questions

How do I add a text-shadow in Photoshop?
- Step 1: Open your Photoshop project and select the Text tool to create or choose your text.
- Step 2: Click on the ''Layer menu'', hover over ''Layer Style,'' and add a ''Drop Shadow'' from the submenu.
- Step 3: A dialog box will appear. Here, you can adjust the shadow settings, such as opacity, angle, distance, and size, to get the desired effect.
- Step 4: Once satisfied with the settings, click ''OK'' to apply the shadow to your text.
How do you add shadow effects to text?
- Step 1: Select the text layer to which you want to add a shadow in your Photoshop workspace.
- Step 2: From the ''ayer''menu, choose ''ayer Style''and ''rop Shadow.''Step 3: In the Drop Shadow settings, modify the options to achieve the shadow style you want.
- Step 4: Adjust the opacity, angle, distance, spread, and size settings to fine-tune the shadow's appearance.
- Step 5: Click 'To apply your changes.
What is text Drop Shadow?
- Description: Text Drop Shadow is a visual effect added to text that creates the illusion of a shadow behind the text. This effect is used to enhance the legibility of text over contrasting backgrounds and to add depth to the text on digital images and designs.
- It is commonly achieved by offsetting a duplicate of the type layer, typically styled in a dark color and positioned slightly below and behind the original text.
How to do shadow work in Photoshop?
- Step 1: Open the image or text you want to work on in Photoshop.
- Step 2: Select the layer you want to add the shadow to.
- Step 3: Go to ''Layer'' select 'Layer Styles'' then add a ''Drop Shadow''
- Step 4: Experiment with different settings in the Drop Shadow options to create the shadow you desire.
- Step 5: Use the various sliders to control the shadow's blur, spread, and distance from the text or image layer.
- Step 6: Press ''OK'' to apply the shadow.
Conclusion
In conclusion, mastering the technique of text shadow Photoshop has significantly enhanced my design projects.
Utilizing shadows effectively can transform simple text into eye-catching graphics that stand out. From personal experience, adding depth and dimension with text shadows not only makes my work more engaging but also more professional.
If you want to refine your skills, I highly recommend checking out my Photoshop course which offers an in-depth look at various tools and techniques, while the Lightroom course will help you perfect your photo editing abilities.
Happy editing!
Read more about Photoshop:


