Are you curious about how to animate in Photoshop and bring your images to life? You’re in the right place! In this article, I’ll guide you through the exciting process of creating animations using Photoshop.
Whether you’re looking to add a bit of motion to a still image or want to create a full-blown animation sequence, Photoshop offers a range of tools to help you achieve stunning results.
By the end of this guide, you’ll have the skills to transform static images into dynamic visuals. Stay with me, and let’s dive into the world of animation in Photoshop!
Table of Contents
Basic Concepts of Photoshop Animation
To animate in Photoshop, you manipulate images to create movement and effects. Understanding how to control each layer property is important for building dynamic and engaging animations.
From adjusting opacity to positioning, mastering these basics sets the foundation for more advanced animation techniques.
Animate in Photoshop: Significant Concepts and Tools
Animate in Photoshop opens a new world for creativity. Using the timeline panel allows you to create yout first frame animations and transform your static images into dynamic ones.
Understanding Frame Animation
Frame animation is a series of animation frames. It shows each step of the action, like a flipbook. The timeline panel helps control these frames, and it’s straightforward to use.
Layer Management
Managing layers is important in developing animations. Use the layers panel to work with different parts of your image. You can turn any layer into a new layer or adjust layer properties like opacity and blending modes.
If you’re new to this, Photoshop’s layering tutorials can guide you through the process, helping you effectively manage and animate your layers
Working with Timeline Panel
The timeline panel offers more than just keyframe animation. It supports a video layer for advanced effects. Each frame in the timeline can hold a background layer or a normal layer for different parts of the animation.
Adding Movement to Frames
Adding motion involves changing content in each animation frame. Use the dropdown menu in the timeline panel to duplicate frames and adjust the content for each frame. This way, moving parts of your image will appear as if they are in motion.
To add more depth to your animations, consider applying textures to certain frames. Learning how to add texture in Photoshop can help you create unique visual effects that make your animations stand out.
Using Layer Masks and Vector Masks
Masks allow specific parts of the layer to show or hide. A layer mask affects the raster content, while a vector mask handles shapes, such as those created with a shape layer.
Adjust the layer mask for smooth transitions in your animation.
Exporting Animations
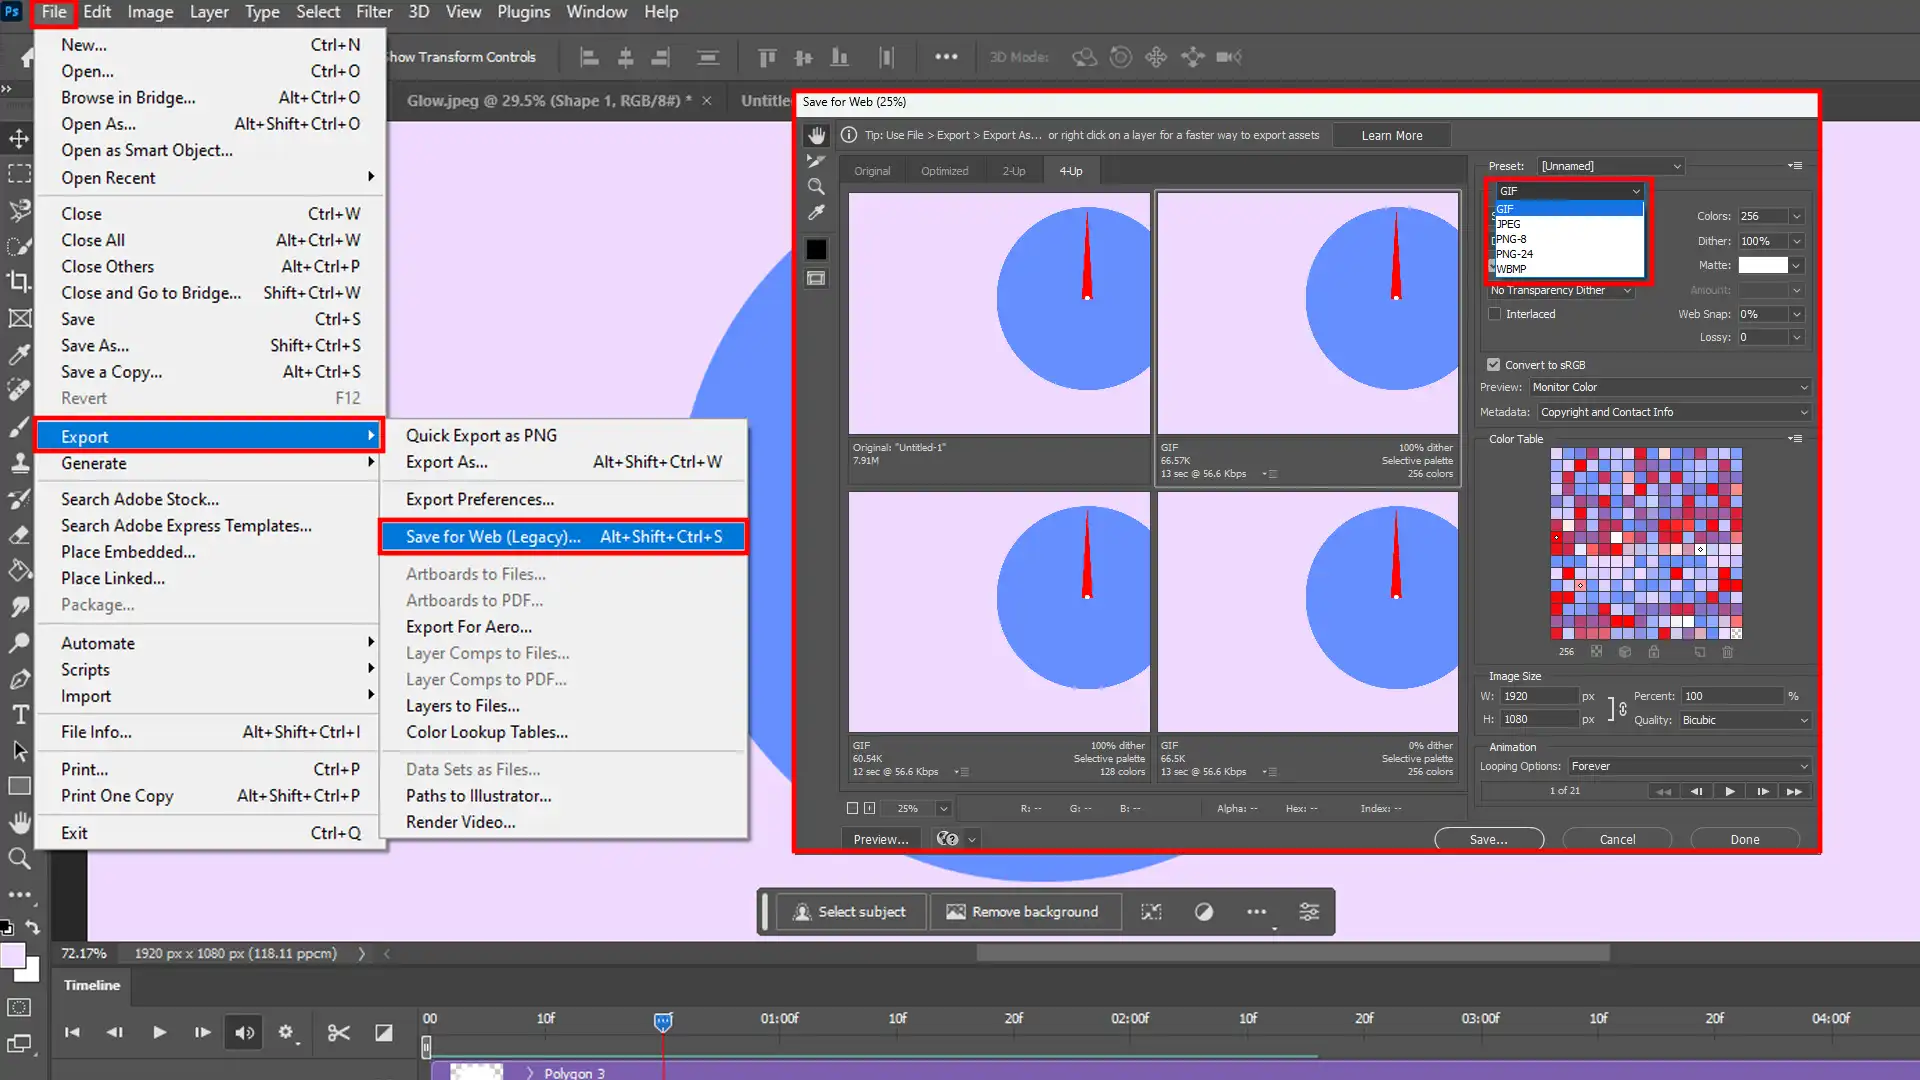
- Once your animation is complete, go to "File" > "Export" > "Save for Web".
- This option exports your work as an animated gif, suitable for sharing on the web.
- Make sure to reduce the file size for smoother performance online.
Pro Tip: Always test your animation by playing it in the timeline panel before exporting. Simple tweaks in the current frame like applying techniques to smooth skin in Photoshop can make a huge difference!
Getting Started to Animate in Photoshop
To animate in Photoshop effectively, it’s important to have a well-organized workspace. Proper setup allows you to manage each layer property with ease, helping you create smooth animations and keep track of all the elements in your project.
Setting Up Your Workspace
First things first, before diving into the creation of an animated GIF, it’s important to set up your workspace for efficiency. Organize the timeline panel and layers panel.
Keep the timeline panel at the bottom of the screen, while the layers panel should be easily accessible. Disable unnecessary panels to keep the workspace uncluttered.
Creating Your First Frame Animation
Let’s kick off by loading the image or creating a new file. Use the “File” menu to load files or create a new document. Now, here comes the fun part.
Click on the timeline panel’s dropdown and select “Create Frame Animation.” This action gives you the foundation to animate your masterpiece.
Steps to Create Animations in Photoshop
- Select the first frame in the timeline panel and work on it. Add any required adjustments through the layers panel, frequently using a new layer for each step to prevent confusion.
- Duplicate the current frame and make slight alterations to create motion. Altering positions, adding elements, and changing layer properties mold your frames into a lively animation.
- Repeat these steps: select the current frame, adjust layers, and create a new frame. Ensure to maintain consistency and check layer properties regularly for smooth transitions between frames.
- Use the preview function in the timeline panel to see your progress. Play around with the frame rate settings to control the speed of the animation.
As you duplicate frames and make slight alterations to create motion, you may find certain elements distracting or unnecessary.
In such cases, knowing how to remove an object in Photoshop can help you clean up your frames for a more focused and appealing animation
Exporting Your Animation
- Finally, when you feel your animation is ready, the export process is simple: Navigate to "File" > "Export" > "Save for Web."
- Optimize your settings to ensure a smooth GIF upload and playback experience.
Pro Tip: Always test your animation in the timeline panel before exporting, mistakes are easier to fix earlier.
For more advanced techniques, consider exploring the content-aware fill in Photoshop to remove unwanted elements from your frames or using the patch tool in Photoshop for seamless edits. These tools can significantly enhance the quality of your animations.
Creating Animated GIF in Photoshop
Making an animated GIF in Photoshop involves combining multiple frames and adjusting each layer property to bring your design to life.
By understanding how layers work together, you can create smooth and eye-catching GIFs ready for sharing.
Understanding GIF Animation Basics
Creating animated GIFs in Photoshop is a simple process that anyone can master. We start by loading an image or creating a new file.
In the layers panel, each layer represents a frame of your animation. To begin, select “Create Frame Animation” from the timeline panel’s dropdown menu.
This will add the first frame of your animation.
For a smooth animated gif, each new layer will represent the next frame in your series. You can use either new layers or a video layer to create multiple frames.
Adjustments on each frame should be minimal to create fluid motion. For mainstream animations, maintain simple and clear movements using shapes or simple transformations.
Exporting Your Animation as a GIF
Once all the frames are set, we need to check the animation:
- Use the preview function to watch it play and confirm the movement is as desired.
- If adjustments are necessary, make them in the respective layers.
- After ensuring the animation runs smoothly, export it by selecting "File" > "Export" > "Save for Web..."
In the export settings, you can optimize the document size and quality. Set the timeline frame rate under this section to ensure your animation plays smoothly online.
Ensure the settings strike a balance between quality and load time. Hit “Save” and choose your destination folder.
Optimizing Animated GIFs for Web Use
Optimizing your animated gifs involves reducing file sizes while keeping a good visual quality. In the export settings, adjusting the layer property such as vector mask position can also affect optimization.
Minimize the number of colors without compromising too much on quality. Simplifying backgrounds and limiting layer properties can drastically reduce file size.
By sticking to these guidelines, your GIFs will load quickly and look great on any device. Always test the exported animated gif in different browsers and devices to ensure compatibility.
Pro Tip: Group layers into folders in the layers panel. This will make managing multiple frames more intuitive and save time in the long run.
Mastering the Timeline Panel
Let’s jump straight into it. Today we’re diving into how to animate in Photoshop using Timeline Panel. No fuss, no fluff, just the steps you’ll need to know.
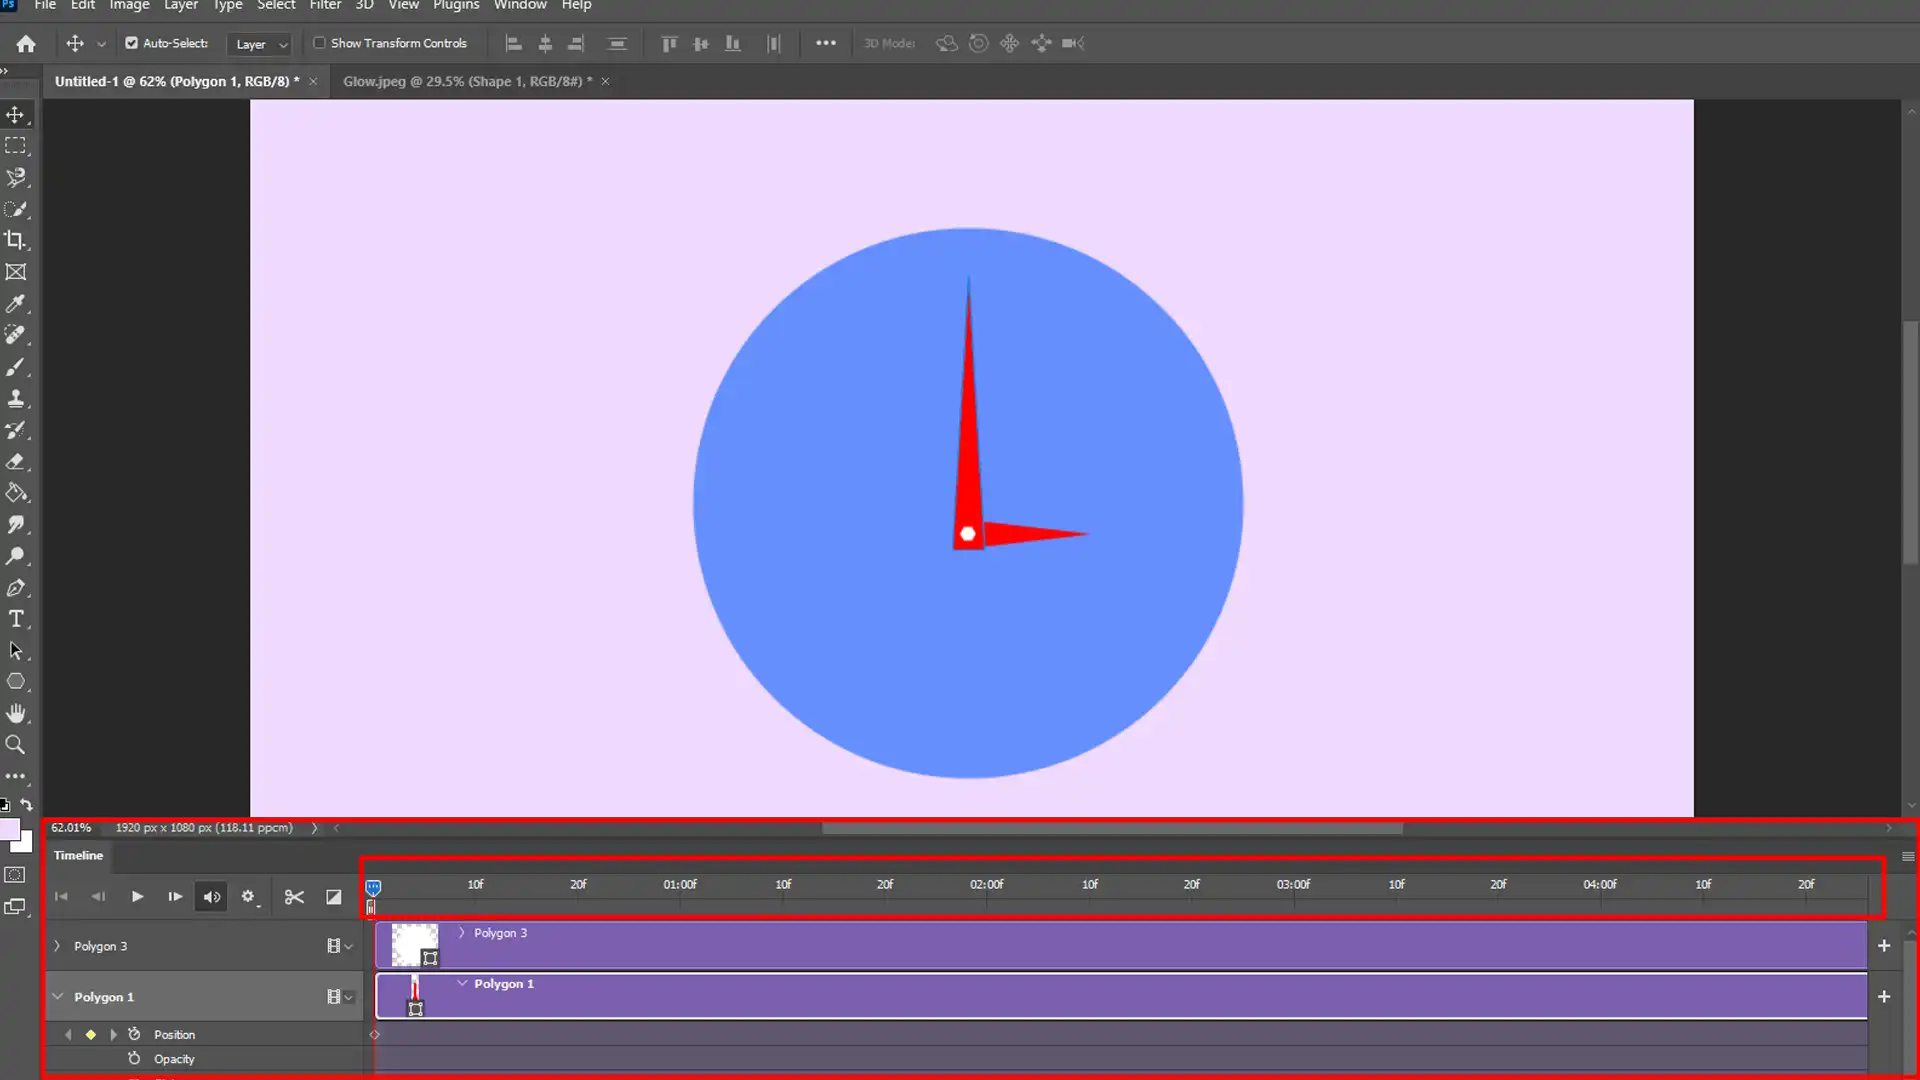
Navigating the Timeline Panel
The Timeline Panel is where the magic happens. To access it, simply go to “Window” and select “Timeline.”
You’ll see an option to create either a video timeline or a frame animation. We’ll focus on the keyframe animation for now. Once selected, you can start adding and adjusting animation frames.
Each new layer will represent a new frame in your animation. You can duplicate layers and make slight changes between them to ensure smooth movement. This process is known as frame by frame animations.
Each next frame builds on the previous one, allowing for any adjustments needed to be seamless.
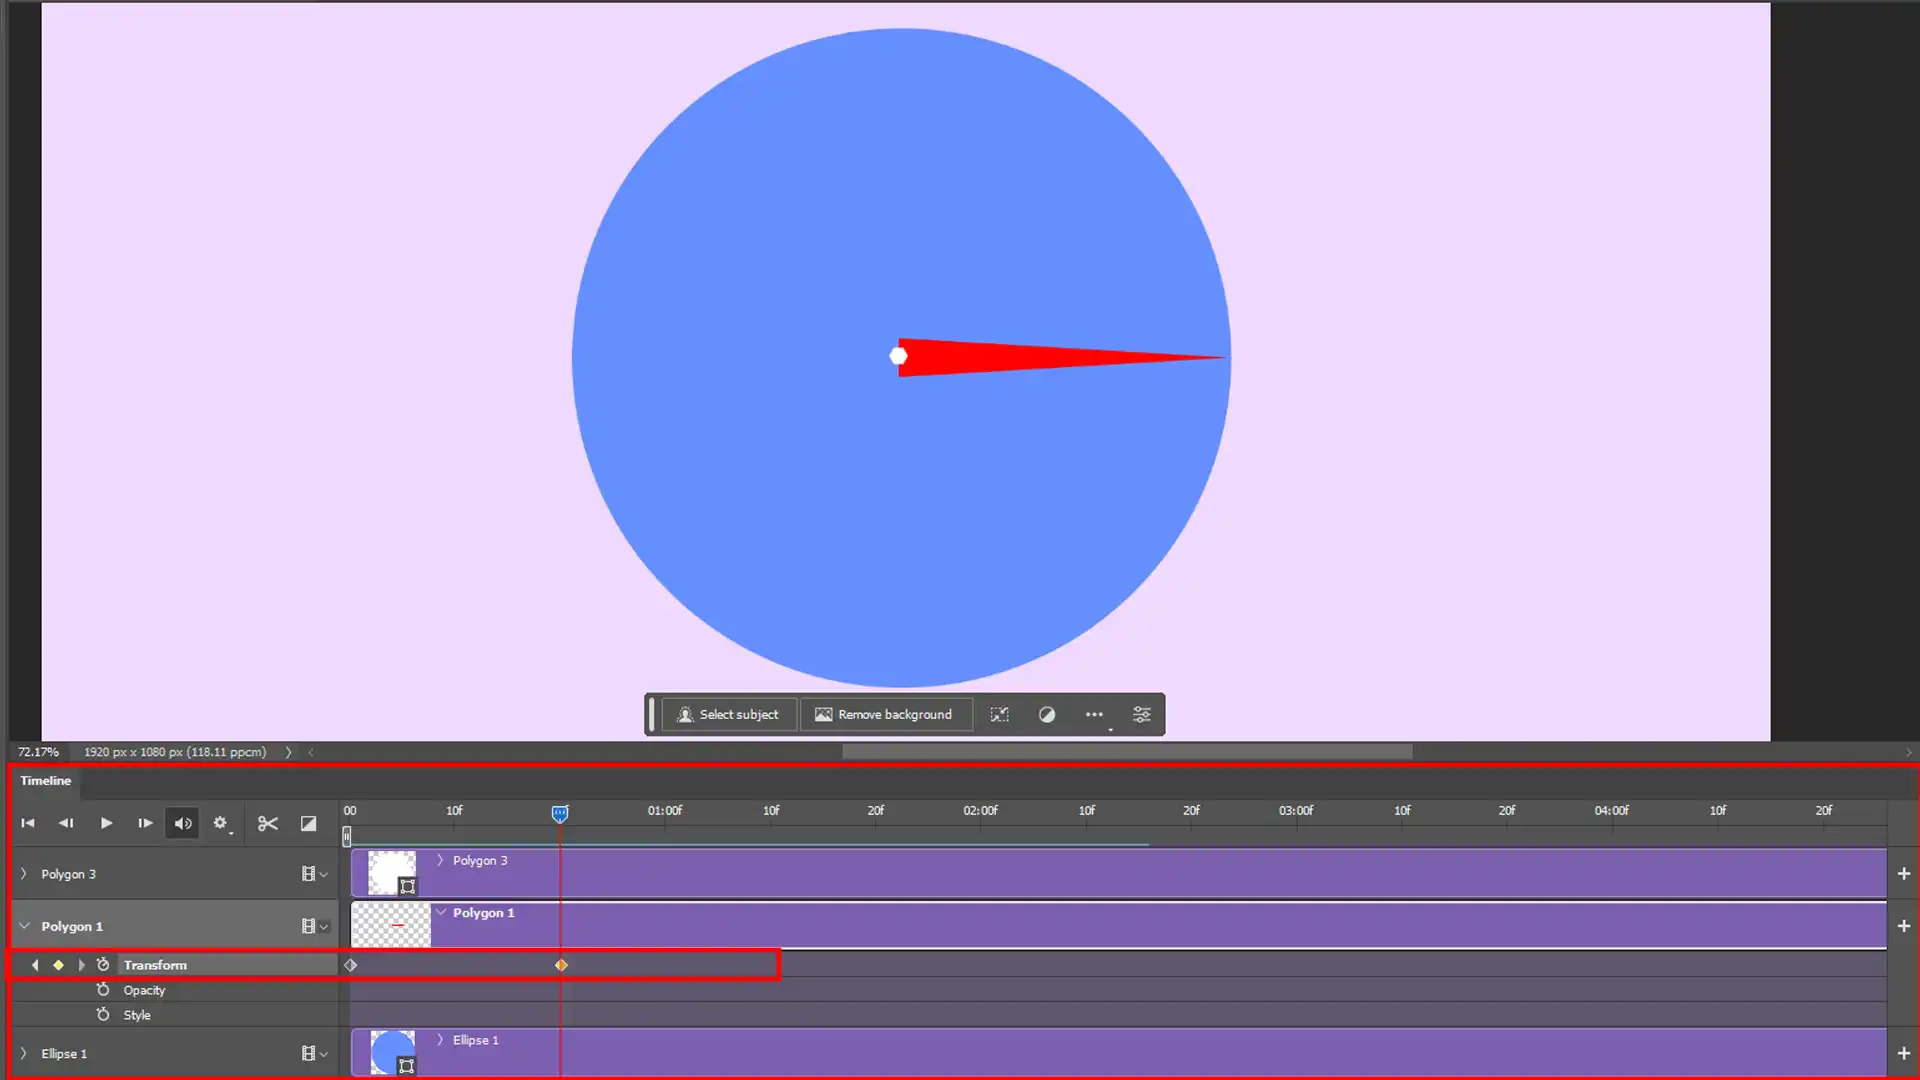
Creating Keyframe Animations
To animate in Photoshop, keyframe animations act as important milestones in your animation timeline. To create them, make sure you’re on the desired current frame, then adjust layer properties such as position, opacity, and style. The idea is to set a point of change that your animation will move towards or away from in the next frame.
Clicked on the new layer? Move or change something just a bit. That’s your new keyframe. Repeat this process to build your animation.
Remember, you want to keep your changes minimal between two frames to maintain smooth transitions.
Advanced Techniques with the Timeline Panel
Once you’ve got a handle on basics, it’s time to dig deeper. For more advanced animations, use video layers. These allow you to import video clips into your project and layer them over your animations.
Mixing these layers with regular layers can result in intricate animations. Try playing with layer masks and vector masks to hide and show parts of different layers.
The last frame should flow seamlessly into the first if you want a looping animation.
One useful trick is to make frames from layers. This automates some of the steps, saving time. You can also use keyframes to tweak individual layer properties.
To ensure your animation runs smoothly online, remember to set the timeline frame rate. A standard rate is 24 frames per second, but adjusting it can impact both the speed and size of your final file.
Pro Tip: Preview your animation regularly. Watch for any jitters or rough spots and tweak individual frames as needed.
Using the Layers Panel Effectively
The Layers Panel is important when you want to animate in Photoshop and master techniques in both Photoshop and Lightroom.
Adding and Managing Layers
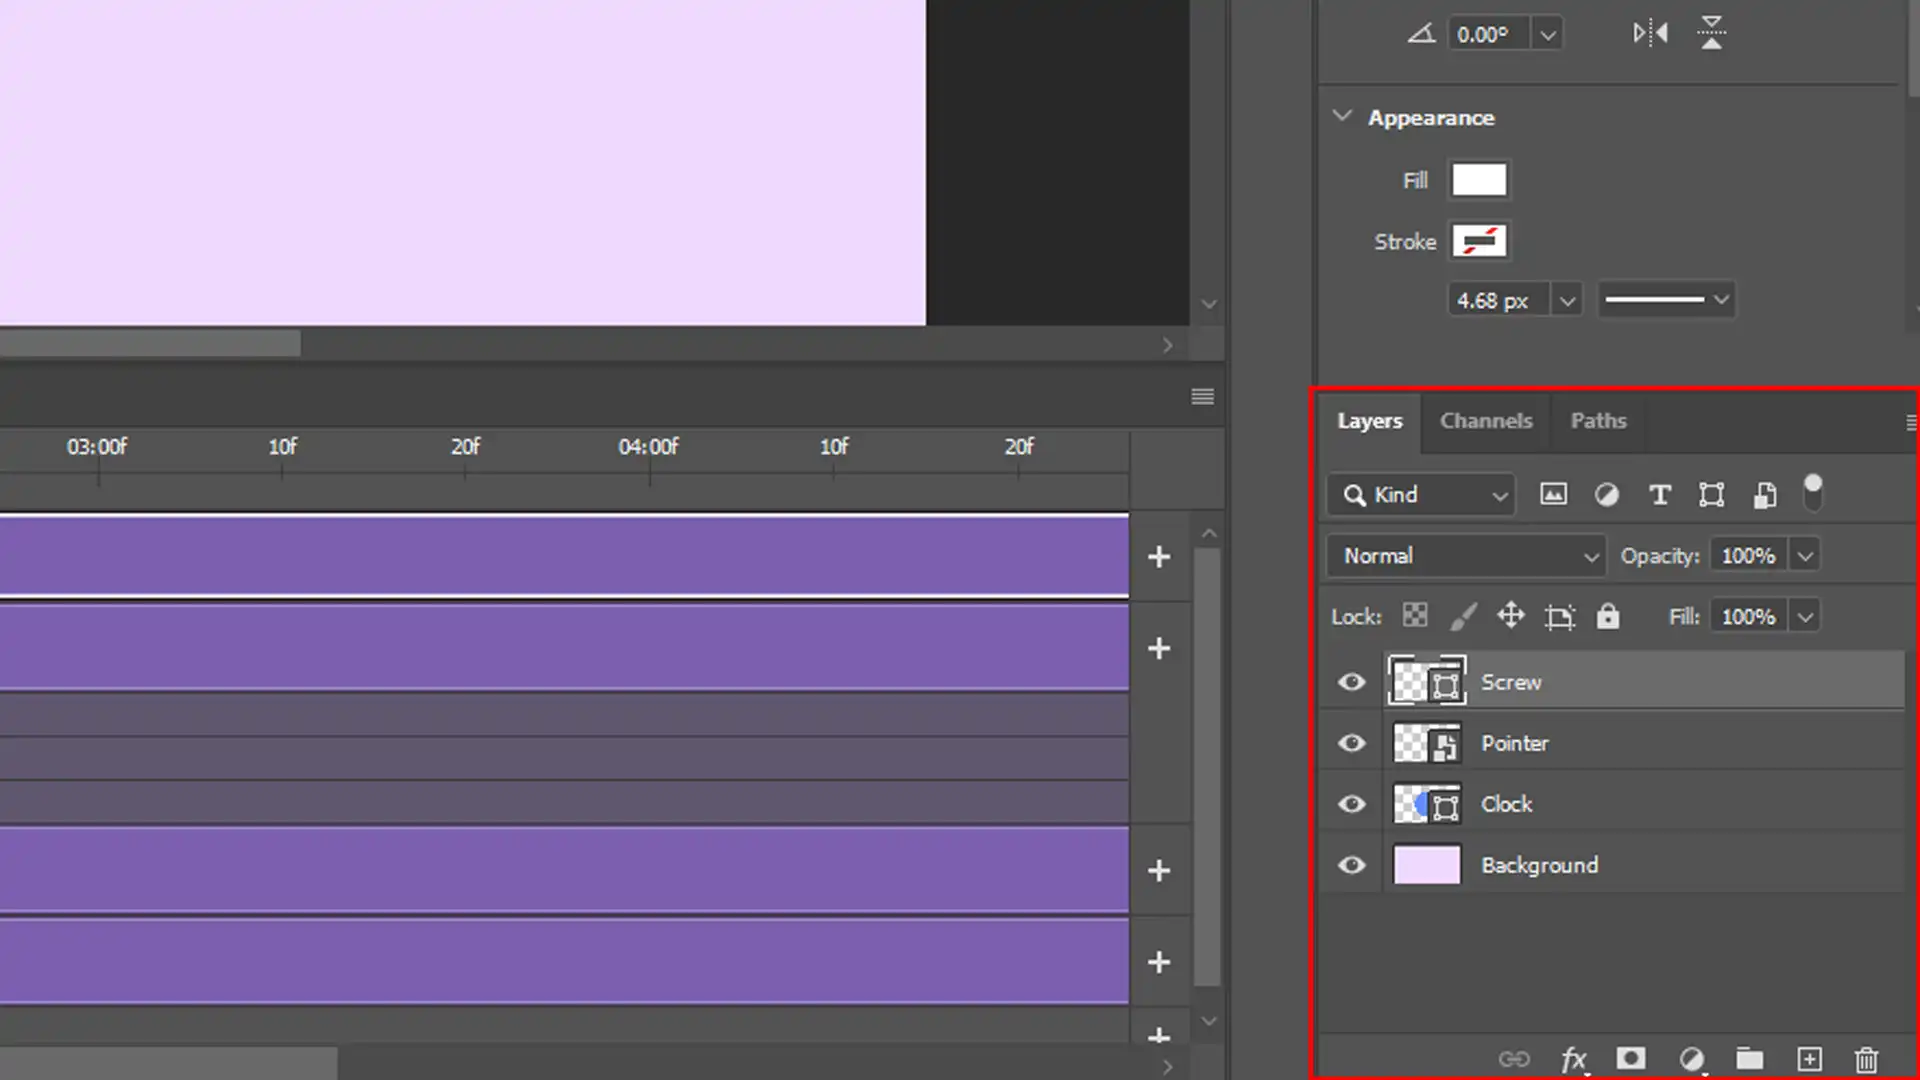
First, click the “New Layer” button at the bottom of the Layers Panel. It’s the one that looks like a sticky note. You know which one.
This creates a fresh canvas for you to work on, without affecting your existing content.
Always name your layers. Trust me on this. You’ll thank yourself later when your project isn’t a maze of ‘Layer 1’, ‘Layer 2’, and so on.
Just double-click the layer’s name and type something descriptive.
Background Layer and Visibility
Now, about that Background Layer. This one is like the foundation of your house. It’s usually locked, but a quick double-click unlocks it. Hold onto it tightly; it keeps things grounded.
The eye icon next to each layer toggles visibility. When juggling multiple layers, turning some off can clear visual noise, helping you focus.
Working with Layer Properties
Adjusting layer properties turns mundane images into captivating visuals. Click on your layer and explore properties like opacity or blend mode.
Even small tweaks make a world of difference.
Utilizing Layer Styles
Layer style adds sophistication to your project. Double-click on your layer, and a new panel pops up.
Here you can add shadows, strokes, and other effects.
Enhance your designs by combining blending modes with shadow techniques in Photoshop. This approach optimizes utilizing layer styles, adding depth and dimension seamlessly.
Developing Animations
If you aim to animate in Photoshop, layers play an important role. Each new layer represents a frame in your animation. By manipulating these, you can make objects move, blink, or transform.
Click on the Timeline Panel and choose ‘Create Frame Animation.’ Add your first single frame by selecting a layer and making it visible.
Then duplicate this layer and make slight alterations for each next frame. The importance to smooth transitions lies in tiny changes between frames.
Working with Video Layers
These layers introduce dynamic elements to your project. Unlike standard layers, they hold real-time moving content.
Simply drag your video file into Photoshop, and voila, you have a new video layer. With a bit of practice, mixing video layers with traditional layers becomes second nature.
Remember, the timeline is important when working with video layer content. Use the set timeline frame rate option to ensure your animations run smoothly.
Higher rates give smoother animations, while lower rates can make actions look more pronounced.
Layer Masks and Vector Masks
Masks are significant tools in your Photoshop toolkit. Layer masks act like magic erasers that non-destructively hide parts of your layer.
Just click the layer mask button right at the bottom of the Layers Panel.
Vector mask is another powerful tool that lets you precisely control which parts of a layer are visible. Think of them as a stencil for your layers.
Pro Tip: Always save your work with layers intact, allowing you to tweak them later. Export a flattened version for final output.
Advanced Photoshop Animation Techniques
By using advanced techniques to animate in Photoshop, you can add depth and complexity to your projects. Combining video layers with new frames for each step helps you create more dynamic and professional animations.
To provide a clear comparison of advanced animation techniques in Photoshop, here’s a summary of important aspects and their overviews
| Aspect | Overview |
|---|---|
| Using Video Layers for Animation | Add real-time moving content to your project by importing videos directly into Photoshop. Manage these video layers with traditional tools, allowing for dynamic backdrops and intricate motion effects. |
| Animating with Smart Objects | Convert artwork into Smart Objects to maintain quality while animating. Adjust a single Smart Object, and it updates across all instances, making complex animations easier to manage and edit. |
| Incorporating Special Effects | Enhance your animations with layer styles like shadows and strokes. Utilize blend modes and shape layers, following composition rules in photography to ensure a balanced and visually appealing animation. |
Using Video Layers for Animation
This technique adds real-time moving content to your project. It’s like adding a mini-movie to your Photoshop file.
First, import your video; it’s simple just drag and drop. Once added, manage it with traditional layer tools. You can edit, layer mask, and blend, giving you flexibility.
So, that video clip you love? It can become a part of your animation. Use the current frame option to work on detailed edits.
By toggling between frames, you can fine-tune every aspect. Always remember a video layer isn’t just for movement. Use it to create dynamic backdrops or interesting motion effects.
Pro tip: Short videos of 10-15 seconds often work best. They keep file sizes manageable and editing smooth.
Animating with Smart Objects
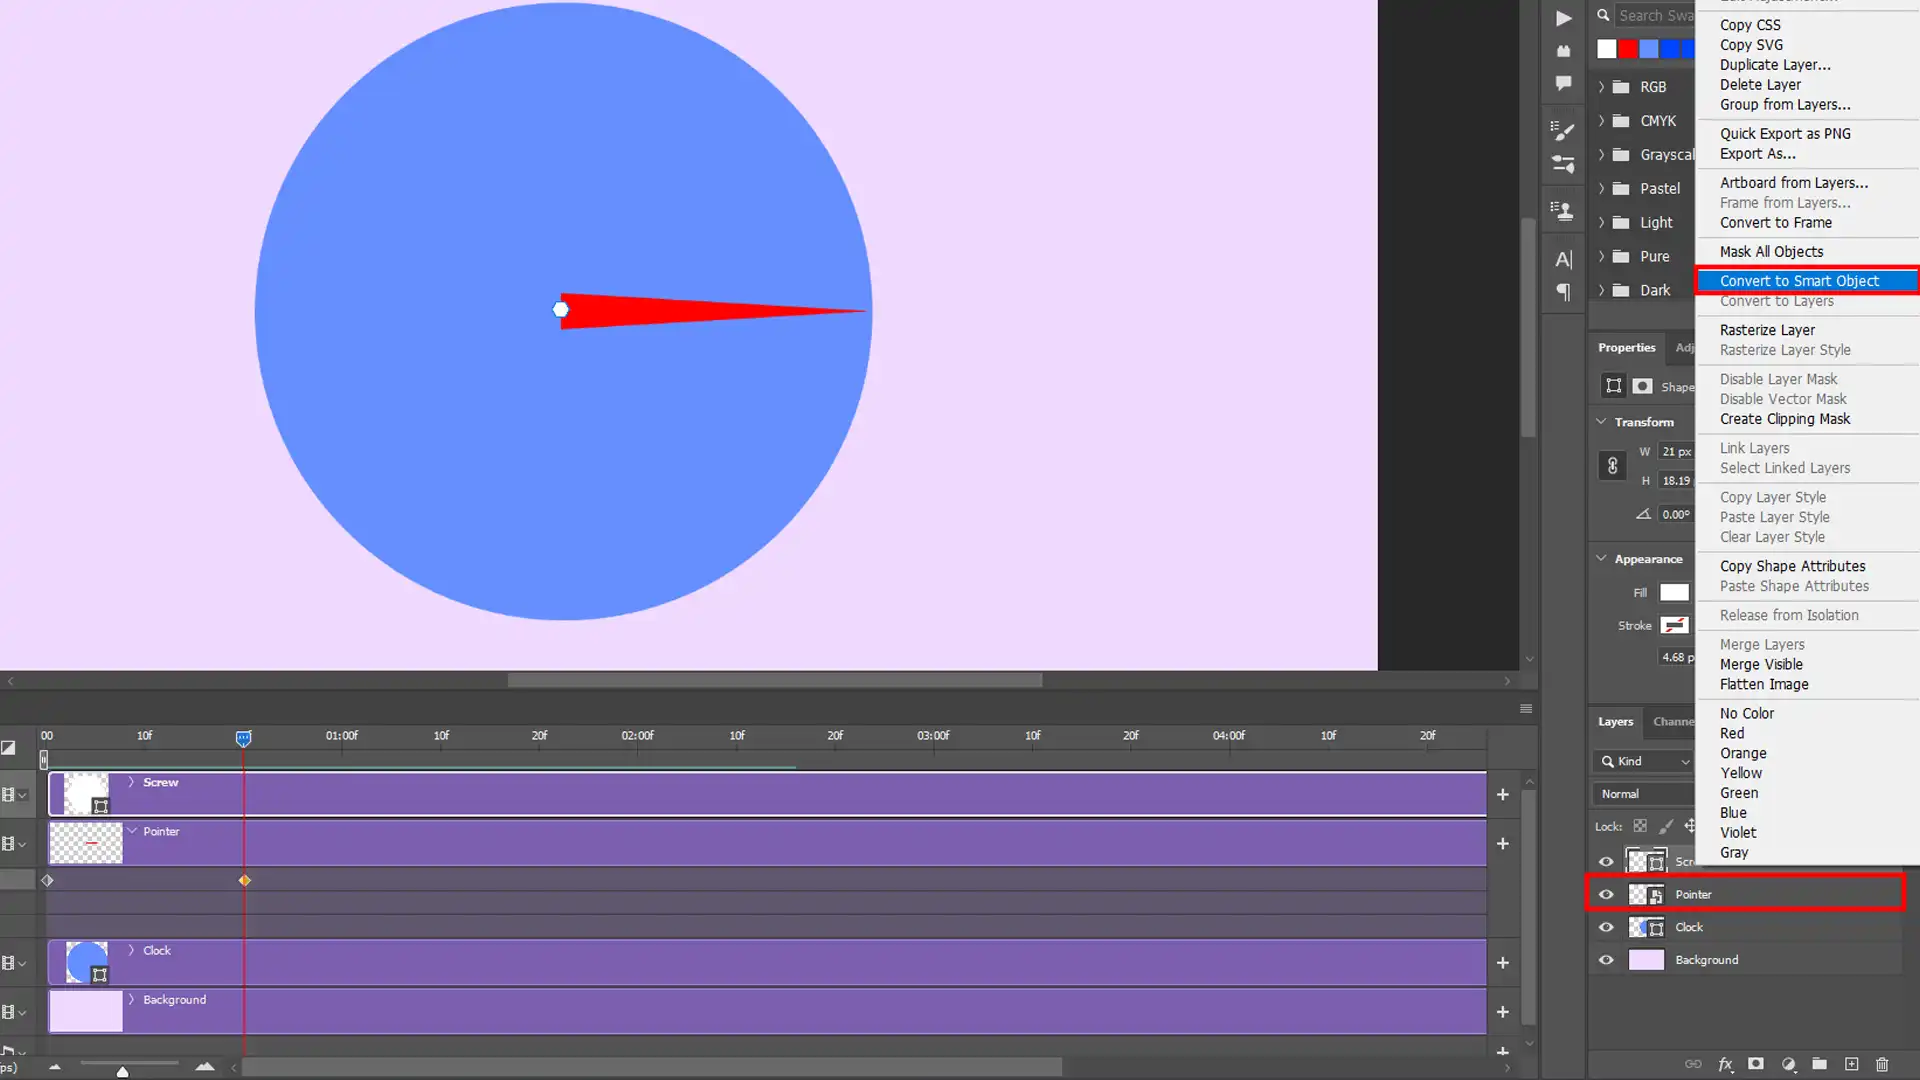
Smart objects make animation easy. Convert your artwork into a Smart Object; this keeps the original quality intact while you animate.
Click Layer > Smart Objects > Convert to Smart Object. You can animate these like any other layer.
Want to change a single detail without starting over? Edit the Smart Object, and all instances update automatically. This saves time and keeps things neat.
Next, move to the timeline at the bottom. Set your keyframes by adjusting Layer properties like position, scale, or opacity.
The beauty of Smart Objects? They let you animate complex designs effortlessly. From transforming text to making illustrations dance, Smart Objects handles it all.
Pro-tip: Break down your elements into smaller Smart Objects. This keeps your workspace organized and makes troubleshooting easier.
Incorporating Special Effects
Special effects bring your animations to life. Use layer styles like shadows and strokes to add depth.
Blend modes mix layers creatively, enhancing visuals. When applying these effects, consider the composition rules in photography to ensure they enhance your animation’s overall balance and focus.
For cool effects, consider Shape Layers. Make them from the toolbar, customize them, and animate their properties. Add motion to strokes, or fill colors for visual interest. It’s an easy way to make your animations pop.
Layer Masks offer another set of possibilities. They let you hide parts of a layer non-destructively, unveiling or concealing elements as needed. This technique is especially useful for animating reveals or transitions.
Lastly, use the “Make Frames from Layers” feature. Found in the timeline panel, it converts each layer into a single frame. Perfect for detailed frame-by-frame animation. Adjust one frame, check your progress, then tweak the second.
Pro-tip: Use the shape tool and frame tool within Photoshop in combination with Layer Masks and gradients. This creates smooth, professional transitions and dynamic frames that look great in any animation.
For those looking to expand their skills further, understanding the Difference Between Photoshop and Lightroom can be beneficial.
While Photoshop excels in detailed editing and animation, Lightroom offers powerful tools for photo management and basic edits.
Tips and Tricks for Better Animations
Enhancing your animations involves mastering various techniques that can improve flow, timing, and visual appeal. With a few simple adjustments, you can make your animations look more polished and professional.
Improving Animation Smoothness
To achieve smooth animations, consider the video layer technique. Drag and drop your video into the timeline, allowing you to manage and edit using traditional layer tools. This approach simplifies intricate details while maintaining control.
Convert your components into Smart Objects. When you adjust a Smart Object, it updates across all instances, ensuring consistency. Breakdown elements into smaller Smart Objects for organizational ease and troubleshooting.
Use short videos, about 10-15 seconds. Smaller sizes lead to smoother editing and manageable file sizes.
Pay attention to the transitions between animation frames. Ensure fluidity from one frame to the next. You avoid hiccups and maintain viewer engagement.
Utilize the second frame feature in the timeline for detailed edits, making it easier to polish the animation flow.
Common Mistakes to Avoid
- Avoid overloading your project with unnecessary elements. It leads to clutter and confusion.
- Steer clear of neglecting the importance of blending modes. Blending modes allow you to get creative with the mixing of layers.
- Don't underestimate the power of layer masks. They enable non-destructive editing, helping you hide or reveal elements without losing any data. Remember, you can use layer masks in combination with gradients for smooth transitions.
- Be cautious with the last frame of your animation. Ensure it aligns seamlessly with the rest, preventing abrupt endings.
- Master setting keyframes for layer properties like position, scale, or opacity. Proper keyframe management results in professional-looking movements.
- Don't forget the animation of shape layers. They offer customizable properties and are useful for dynamic graphic elements.
Pro Tip: Make use of Photoshop shortcuts. They significantly speed up your workflow and help manage complex animations more efficiently.
Additionally, understanding the difference between Photoshop and Lightroom can help you choose the right tool for specific tasks, enhancing your overall productivity.
Frequently Asked Questions

Can you do animation in Photoshop?
Yes, you can design animations in Photoshop. It offers basic tools for frame-by-frame animation, typically for creating GIFs or simple motion graphics.
Does Photoshop have animation tools?
Photoshop includes a timeline panel that allows you to create frame animations or simple video animations. This is suitable for straightforward motion projects.
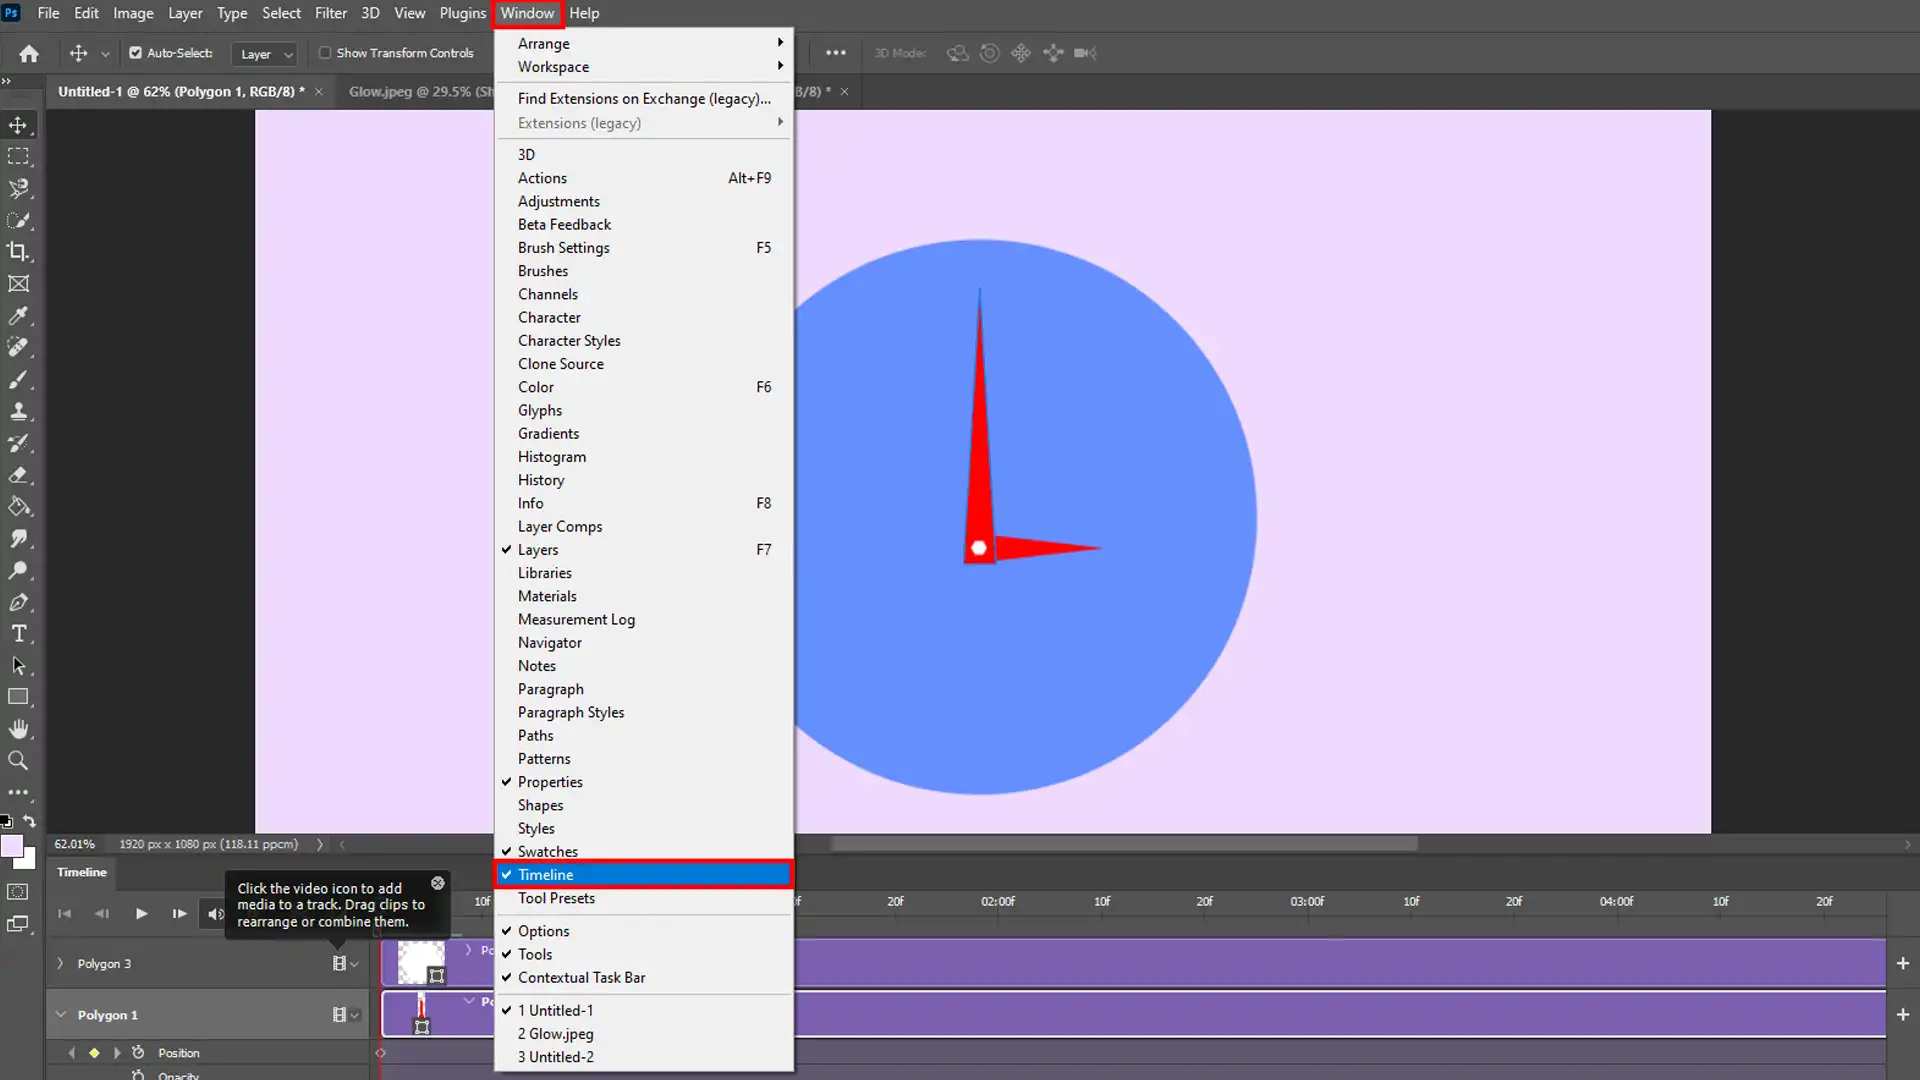
How do I get the animation bar in Photoshop?
- Open Photoshop.
- Go to the 'Window' menu.
- Select 'Timeline.' This will open the animation bar at the bottom of your workspace.
How do I get the animation panel in Photoshop?
- Open Photoshop.
- Click on 'Window' in the top menu.
- Choose 'Timeline' to activate the panel where you can manage frames and design animations.

Conclusion
Learning how to animate in Photoshop has truly revolutionized the way I create visuals. It has added an extra layer of creativity and dynamism to my projects, making them more engaging and captivating.
If you’re eager to enhance your skills further, I highly recommend checking out this comprehensive Photoshop course and this informative Lightroom course.
These resources have been invaluable in my journey and can help you master the tools needed to bring your images to life.
Start animating today and see how it transforms your creative projects!
Read more about Photoshop:


Course

Light Effect Photoshop


Lightroom Course 2025

Adobe Photoshop Course 2025

Photo Editing Course


