8 Bit vs 16 Bit: Comparing Color Depth and Image Quality
8 Bit vs 16 Bit: Comparing Color Depth and Image Quality
Are you curious about the difference between 8 bit vs 16 bit in the world of digital imaging?
If you’re someone who loves diving into the details of photo editing or just wants to understand why image clarity varies, you’re in the right place.
In this article, I’ll unravel the mysteries behind these two color depths, helping you make better choices for your projects.
Imagine the satisfaction of knowing exactly what setting to choose to get the best results for your images. Ready to elevate your understanding and transform your digital creations? Let’s get started!
Table of Contents
Understanding Bit Depth
Bit depth plays a crucial role in defining the quality and range of colors in digital images.
To grasp its significance, let’s delve into what bit depth refers to, focusing on the differences between 8-bit and 16-bit images.
What Bit Depth Refers To: 8-Bit vs. 16-Bit
Bit depth is a significant concept in digital photography. It measures how many different color values each pixel in your image can have.
When you see 8 bit or 16 bit, they refer to the number of bits used for each color channel.
An 8-bit channel image means each of the three channels (red, green, blue) has 256 possible values.
So, an 8-bit image has a total of 16.7 million colors. A 16-bit image takes this further, supporting up to 65,536 shades per channel
To summarize, more bits mean more colors and more detailed images. This extra difference detail is especially important in post-processing, particularly when using the essential tools in Photoshop or the essential tools in Lightroom.
Importance of Bit Depth in Photography
For photographers, bit depth affects the modifying process significantly.
Higher bit depth allows for smoother tonal transitions, which is important when making adjustments in editing software such as Lightroom or Photoshop.
If you’re dealing with raw files, bit depth gives you more room to tweak images without degrading quality.
Shooting in 8 or 16 bit affects the dynamic range and overall clarity of your photos.
Think about 8 bit vs 16 bit like this:
8 bit is good for general use
16 bit gives you superior control and better results in professional editing
You need to balance the difference between the file size and quality needs when choosing between them.
For older digital cameras, sticking to 8 bit might be sufficient. But if you want the best detail and flexibility in your work, 16 bit is far superior.
Remember, one pixel can contain a world of difference depending on bit depth.
Pro Tip: Always shoot in the highest bit depth your camera supports. This ensures you capture all the details you’ll need for the best possible edits later.
Understanding bit depth is important when making detailed edits to your photos.
For instance, higher bit depths allow more flexibility when you need to resize layers, ensuring that the quality and color accuracy of your image are maintained throughout the editing process
8 Bit vs 16 Bit: The Basics
To understand how bit depth affects image quality, it’s important to differentiate between 8-bit and 16-bit formats.
The following section will define these two-bit depths and explain their impact on digital photography.
Defining 8 Bit and 16 Bit
When we talk about 8 bit and 16 bit, we’re referring to the bitdepth of an image.
Simply put, bit depth is the number of bits used to represent the color of a single pixel.
With 8 bits, each color channel, red, green, and blue, get 256 possible values, adding up to 16.7 million colors.
On the other hand, 16 bit images can have up to 65,536 shades per channel, giving a total that’s, well, astronomically higher.
Main Differences Between 8 Bit and 16 Bit
Now, what’s the main difference between 8 bit vs 16 bit? In a nutshell, it comes down to color range and detail. 16 bit images offer more colors and deliver smoother tonal transitions.
That’s critical if you do a lot of post-processing work because you can adjust your images without losing quality.
8 bit images are great for everyday use, but if you want more control and flexibility, especially with raw files or raw image adjustments, go for 16 bit.
The table below highlights the main distinctions between these two formats, focusing on color values, total colors, and their practical applications.
Feature
8 Bit
16 Bit
Color Values
256 per channel
65,536 per channel
Total Colors
16.7 million
Astronomically higher
Color Depth
Limited
Richer and smoother transitions
Use Cases
Everyday use, social media, quick edits
Professional editing, raw file adjustments
Storage & Performance
Less storage and performance needed
More storage and performance needed
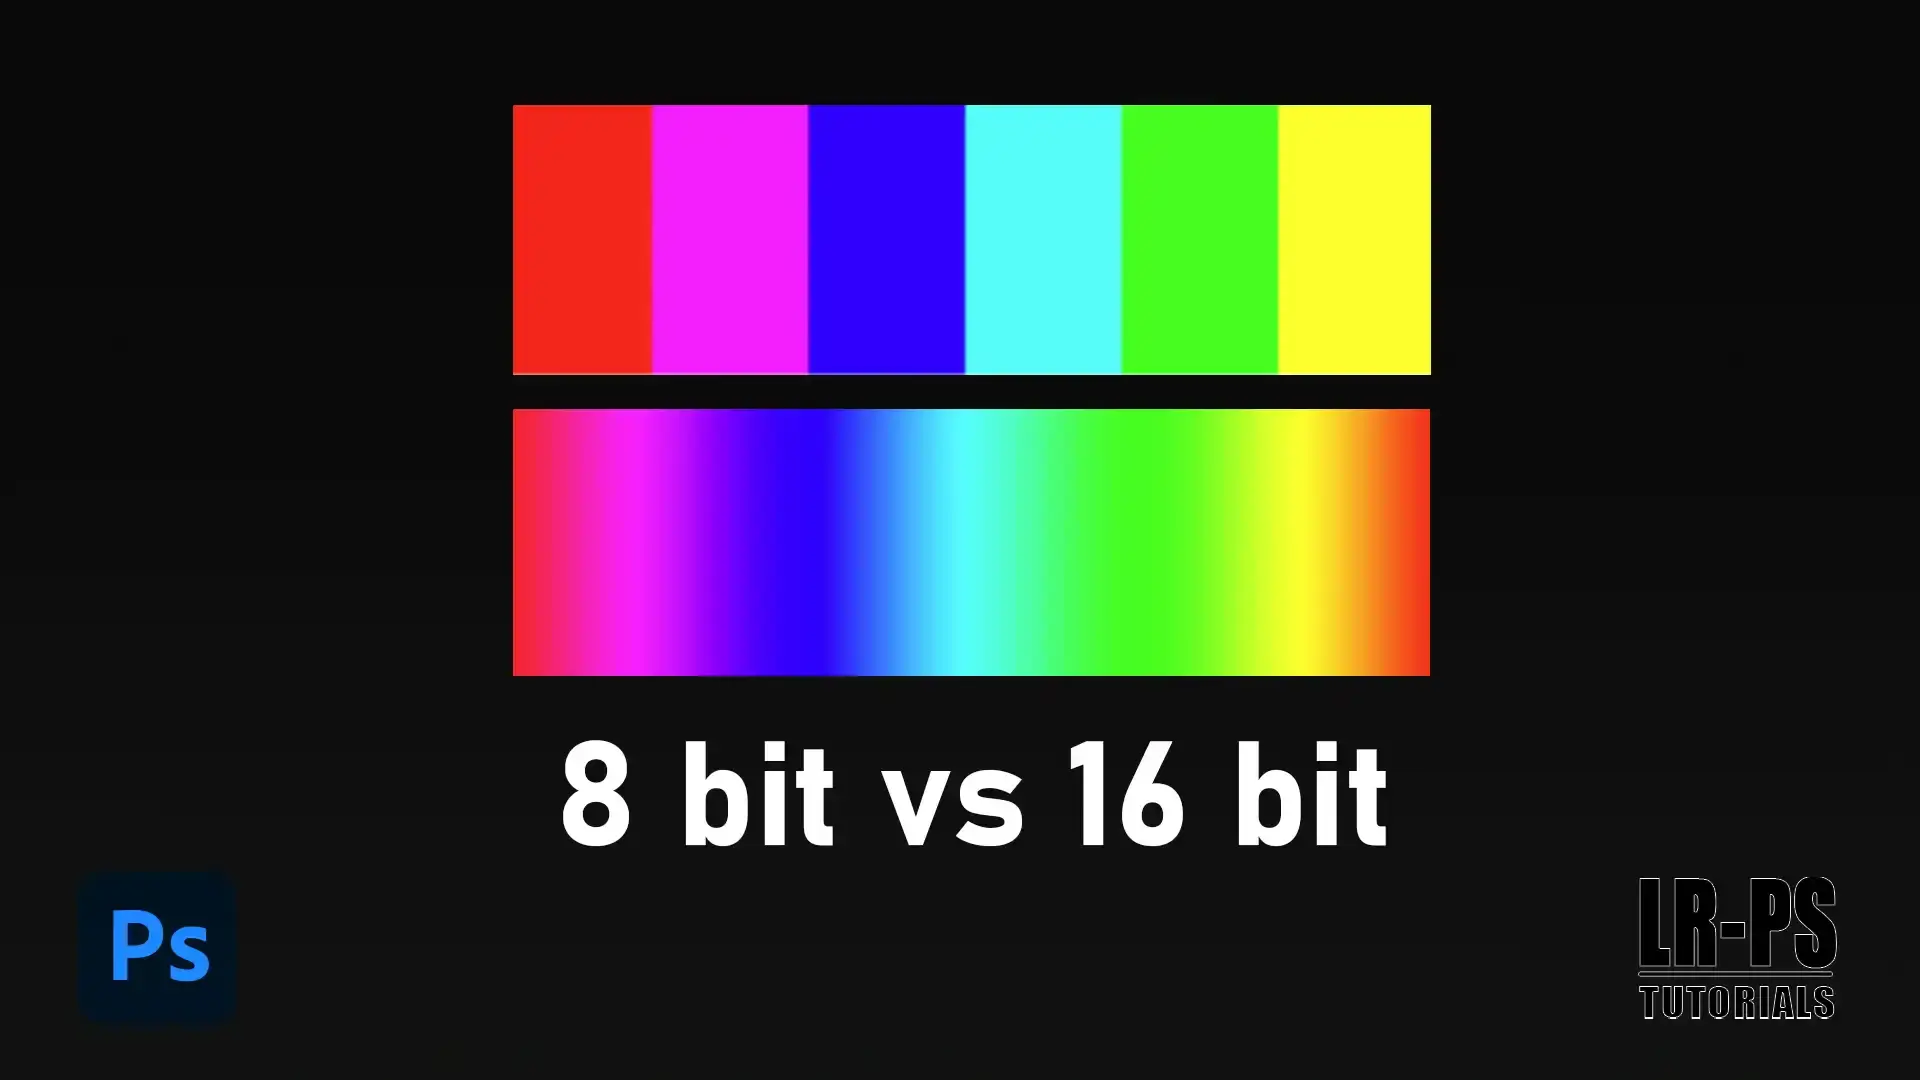
Visual Examples of 8 Bit vs 16 Bit
It’s easier to grasp when you see it, but think about it this way: In an 8 bit image, you’ll notice banding in smooth gradients, like skies or shadows.
Switching to 16 bit, you get smooth transitions without those harsh lines.
Open up your software and compare them side-by-side; it’s like night and day.
Try editing with a wider range of shades and see how much more robust your edits become.
Pro Tip: Always capture in the highest bit depth your camera supports. This gives you more room to play around in post-production, ensuring those tweaks and adjustments you make won’t harm the integrity of your image.
Additionally, knowing how to sharpen an image in Photoshop can make a significant difference in the final output, especially for high-bit-depth images.
Practical Applications
Understanding when to use different bit depths can help you make better choices for your photography needs.
Next, we’ll explore scenarios where 8-bit images are suitable and how they fit into various workflows.
When to Use 8-Bit
For everyday photos, 8-bit is usually enough. Most screens, web images, and standard prints look fine using the 8-bit setting. It’s easier to handle, consumes less storage, and less processing power. Perfect for:
Social media posts
Quick edits
Simple projects
When to Use 16 Bit
For serious editing, switch to 16-bit. It provides more depth and allows smoother transitions in your shades and tones.
Important for detailed adjustments in Photoshop and Lightroom. 16-bit is important for professional photographers who handle large, high-grade raw files. The human eye appreciates the smooth gradients without banding.
Editing Raw Files and Raw Images
When working with raw files, always use 16-bit. It helps to retain all the details that can be lost in an 8-bit setting.
Raw images benefit from 16-bit as it offers a broader color information stored range and finer gradations.
With raw files, you’ll have more flexibility in post-editing, ensuring your final result is top-notch.
When choosing between 8-bit and 16-bit for your images, consider whether you’ll be working with RAW or JPEG format.
For editing flexibility and detail retention, 16-bit is preferred with RAW format files, while 8-bit can be sufficient for final JPEG exports.
Advantages and Disadvantages
Understanding the benefits and limitations of different technologies can help in making informed decisions.
Below, we explore the specific pros and cons of 8-bit systems to give you a clearer picture of their impact and relevance.
Pro Tip: For an easier time when touching up an images clarity, refer to the high pass filter option in Photoshop.
Pros and Cons of 8 Bit
When considering 8 bit vs 16 bit, understanding the benefits and drawbacks of each is significant.
Advantages of 8 Bit
Easy to handle
Consume less storage
Require less performance
Perfect for everyday photos, web images, and standard prints
Disadvantages of 8 Bit
Limited color depth
Can hinder more sophisticated modifying tasks
Reduced overall value of the final image
However, if you primarily share images on social media or engage in quick edits, 8 bit will suffice.
Pros and Cons of 16 Bit
Exploring the pros and cons of 16-bit imaging provides a clear view of its benefits and limitations.
Next, we’ll dive into the advantages of using 16-bit depth in your digital images.
Advantages of 16 Bit
Richer colors and smoother transitions between shades
Ideal for serious modifying tasks
Effective when working with raw files
Retains more details and provides a broader range of colors
Disadvantages of 16 Bit
Demand increased memory and performance
Require better data bus management
Need more significant storage capacity
If you work with intricate adjustments and need the highest value, 16 bit is the way to go.
Workflow Considerations
In your workflow, consider saving images in the highest bit depth available. This approach gives you flexibility for future edits and ensures quality preservation.
All the tools in Lightroom and Photoshop complement these techniques, helping you manage your projects more efficiently.
When working with 8-bit versus 16-bit images, consider how each bit depth affects your editing workflow.
For example, 16-bit images provide more flexibility to refine edges and make detailed adjustments without compromising quality, compared to 8-bit images
Pro Tip: Always start with the highest bit depth you can manage. You can always reduce it later, but adding more might not be feasible.
For more detailed modifying, tools like the patch tool in Photoshop can be incredibly useful for refining your images.
Additionally, using the best Lightroom export settings for Instagram can help maintain the clarity of your photos when sharing them online.
How to Choose the Right Bit Depth
Selecting the appropriate bit depth for your project involves evaluating several important factors.
We’ll look at these considerations to help you make an informed decision.
Factors to Consider
Image Purpose: Think about what you need. Everyday photos? Go with 8 bit. Professional editing? Opt for 16 bit.
File Size: 8 bit requires less storage and performance. On the other hand, 16 bit demands more.
Editing Needs: If you need detailed color correction or adjustments, 16 bit is ideal.
Output Use: Web images work fine at 8 bit. High-quality prints need 16 bit.
Common Mistakes to Avoid
Underestimating Requirements: Don’t assume 8 bit is always enough. Complex editing might require the richer detail of 16 bit.
Overcomplicating Projects: Avoid using 16 bit when unnecessary. It uses more memory and performance.
Neglecting Color Depth: Ignoring the importance of the depth can impact image clarity.
Mismanaging Storage: Forgetting that 16 bit images occupy more address space could cause storage issues.
Expert Tips for Choosing Bit Depth
Start High: Begin with 16 bit for flexibility. You can always reduce later if needed.
Know Your Camera: Many modern cameras can shoot in 16 bit, offering better clarity. Take advantage of this feature.
Test Your Workflow: Experiment with both 8 bit and 16 bit to see which suits your modifying style and project needs.
Consult Tutorials: Use Photoshop and Lightroom tutorials to understand the specifics of 8 bit vs 16 bit images.
Pro Tip: Save images at the highest bit depth during editing to ensure maximum quality and flexibility. Reducing bit depth later is always an option.
When choosing the right bit depth for your images, consider how it affects the overall quality.
For instance, just as using skin smoothing techniques can enhance portraits, selecting the appropriate bit depth can significantly improve the clarity and detail of your digital photos.
Frequently Asked Questions (FAQs)
Is 16-bit better than 8-bit?
Color Depth: 16-bit offers more color depth than 8-bit, meaning it can display more colors and smoother gradients.
Performance: For applications needing detailed graphics or complex calculations, 16-bit might perform better due to its higher capacity for processing data paths.
What is the difference between 8-bit, 16-bit, and 32-bit?
8-bit: Can represent 2^8 (256) different values, suitable for simple graphics and functions.
16-bit: Can represent 2^16 (65,536) different values, better for more detailed graphics and more complex computing tasks.
32-bit: Can represent 2^32 values, which is significantly higher, allowing for complex graphics and high precision in computations.
What is 8-bit vs 16-bit coding?
8-bit coding: Typically used in older or less complex systems. It manages smaller data size and is less capable of handling high-definition content or detailed graphics.
16-bit coding: Provides greater data handling capabilities, better suited for modern applications that require detailed processing and higher definition content.
Is my image 8-bit or 16-bit?
Check Image Properties: Look at the image details in your file explorer or image editing software to see the bit depth.
Visual Quality: 16-bit images usually have smoother gradients and richer details compared to the often banding-prone 8-bit images.
In conclusion, understanding the difference between 8 bit vs 16 bit has significantly improved my workflow and the clarity of my images.
When I first started, I often used 8-bit files due to their smaller size and ease of handling.
However, as I progressed and my projects demanded higher precision and flexibility, switching to 16-bit became important.
The richer color depth and smoother gradients have been game-changers for my editing process. If you’re serious about leveling up your photo editing skills, I highly recommend diving deeper into these concepts.
$2,061.00Original price was: $2,061.00.$1,061.00Current price is: $1,061.00. 27584
Download Your Free Guide Now!
Discover the secrets of photography with our printable guide! Master essential techniques like aperture, shutter speed, and ISO to create stunning images. Get your free printable PDF now and start turning your snapshots into masterpieces!