Lightroom Export Settings for Instagram: Optimizing Images for Social Media
Lightroom Export Settings for Instagram: Optimizing Images for Social Media
When it comes to mastering Lightroom export settings for instagram, understanding the right choices can make a significant difference in the quality of your final images.
Are you frustrated with how your photos appear after exporting them? You’re not alone. Many photographers struggle with this step, but it doesn’t have to be complicated.
In this article, I will guide you through the essential settings that will elevate your exported photos to a professional level.
Whether you’re preparing images for web use, print, or social media, I’ll cover everything you need to know. Let’s dive in and simplify the process so you can focus on what you love, capturing stunning photos.
Table of Contents
Understanding Lightroom Export Settings
Lightroom export settings can greatly impact how your final images turn out. Let’s explore why paying attention to these settings is important for achieving the results you want.
Why Lightroom Export Settings for Instagram or Other Purpose Matters
Lightroom Export settings decide how your final images look. They impact image quality, file size, and display options.
Choosing the right settings ensures you to export high resolution images and helps manage storage space efficiently. We often overlook these settings, but they are important for optimal results.
Common Export Mistakes to Avoid
Avoid using the best Lightroom export settings without adjustments. Generic settings may not suit all images.
Ensure you select the correct image format; NEF or JPEG Format can make a significant difference in quality and file size. Never ignore the color space setting, as this affects how colors appear across different devices.
Be cautious with JPEG clarity; too high or low affects file size and quality, so find a balance. Pay attention to size settings; using “long edge” helps maintain proportions and simplifies resizing.
Remember to make use of export presets. They save time and ensure consistency in your exported images.
Pro Tip: Utilize the export dialog box in Lightroom. Adjust the file settings, and export presets for each project. This ensures your exported image meets the desired specifications without compromise.
Step-by-Step Guide to Exporting Photos from Lightroom
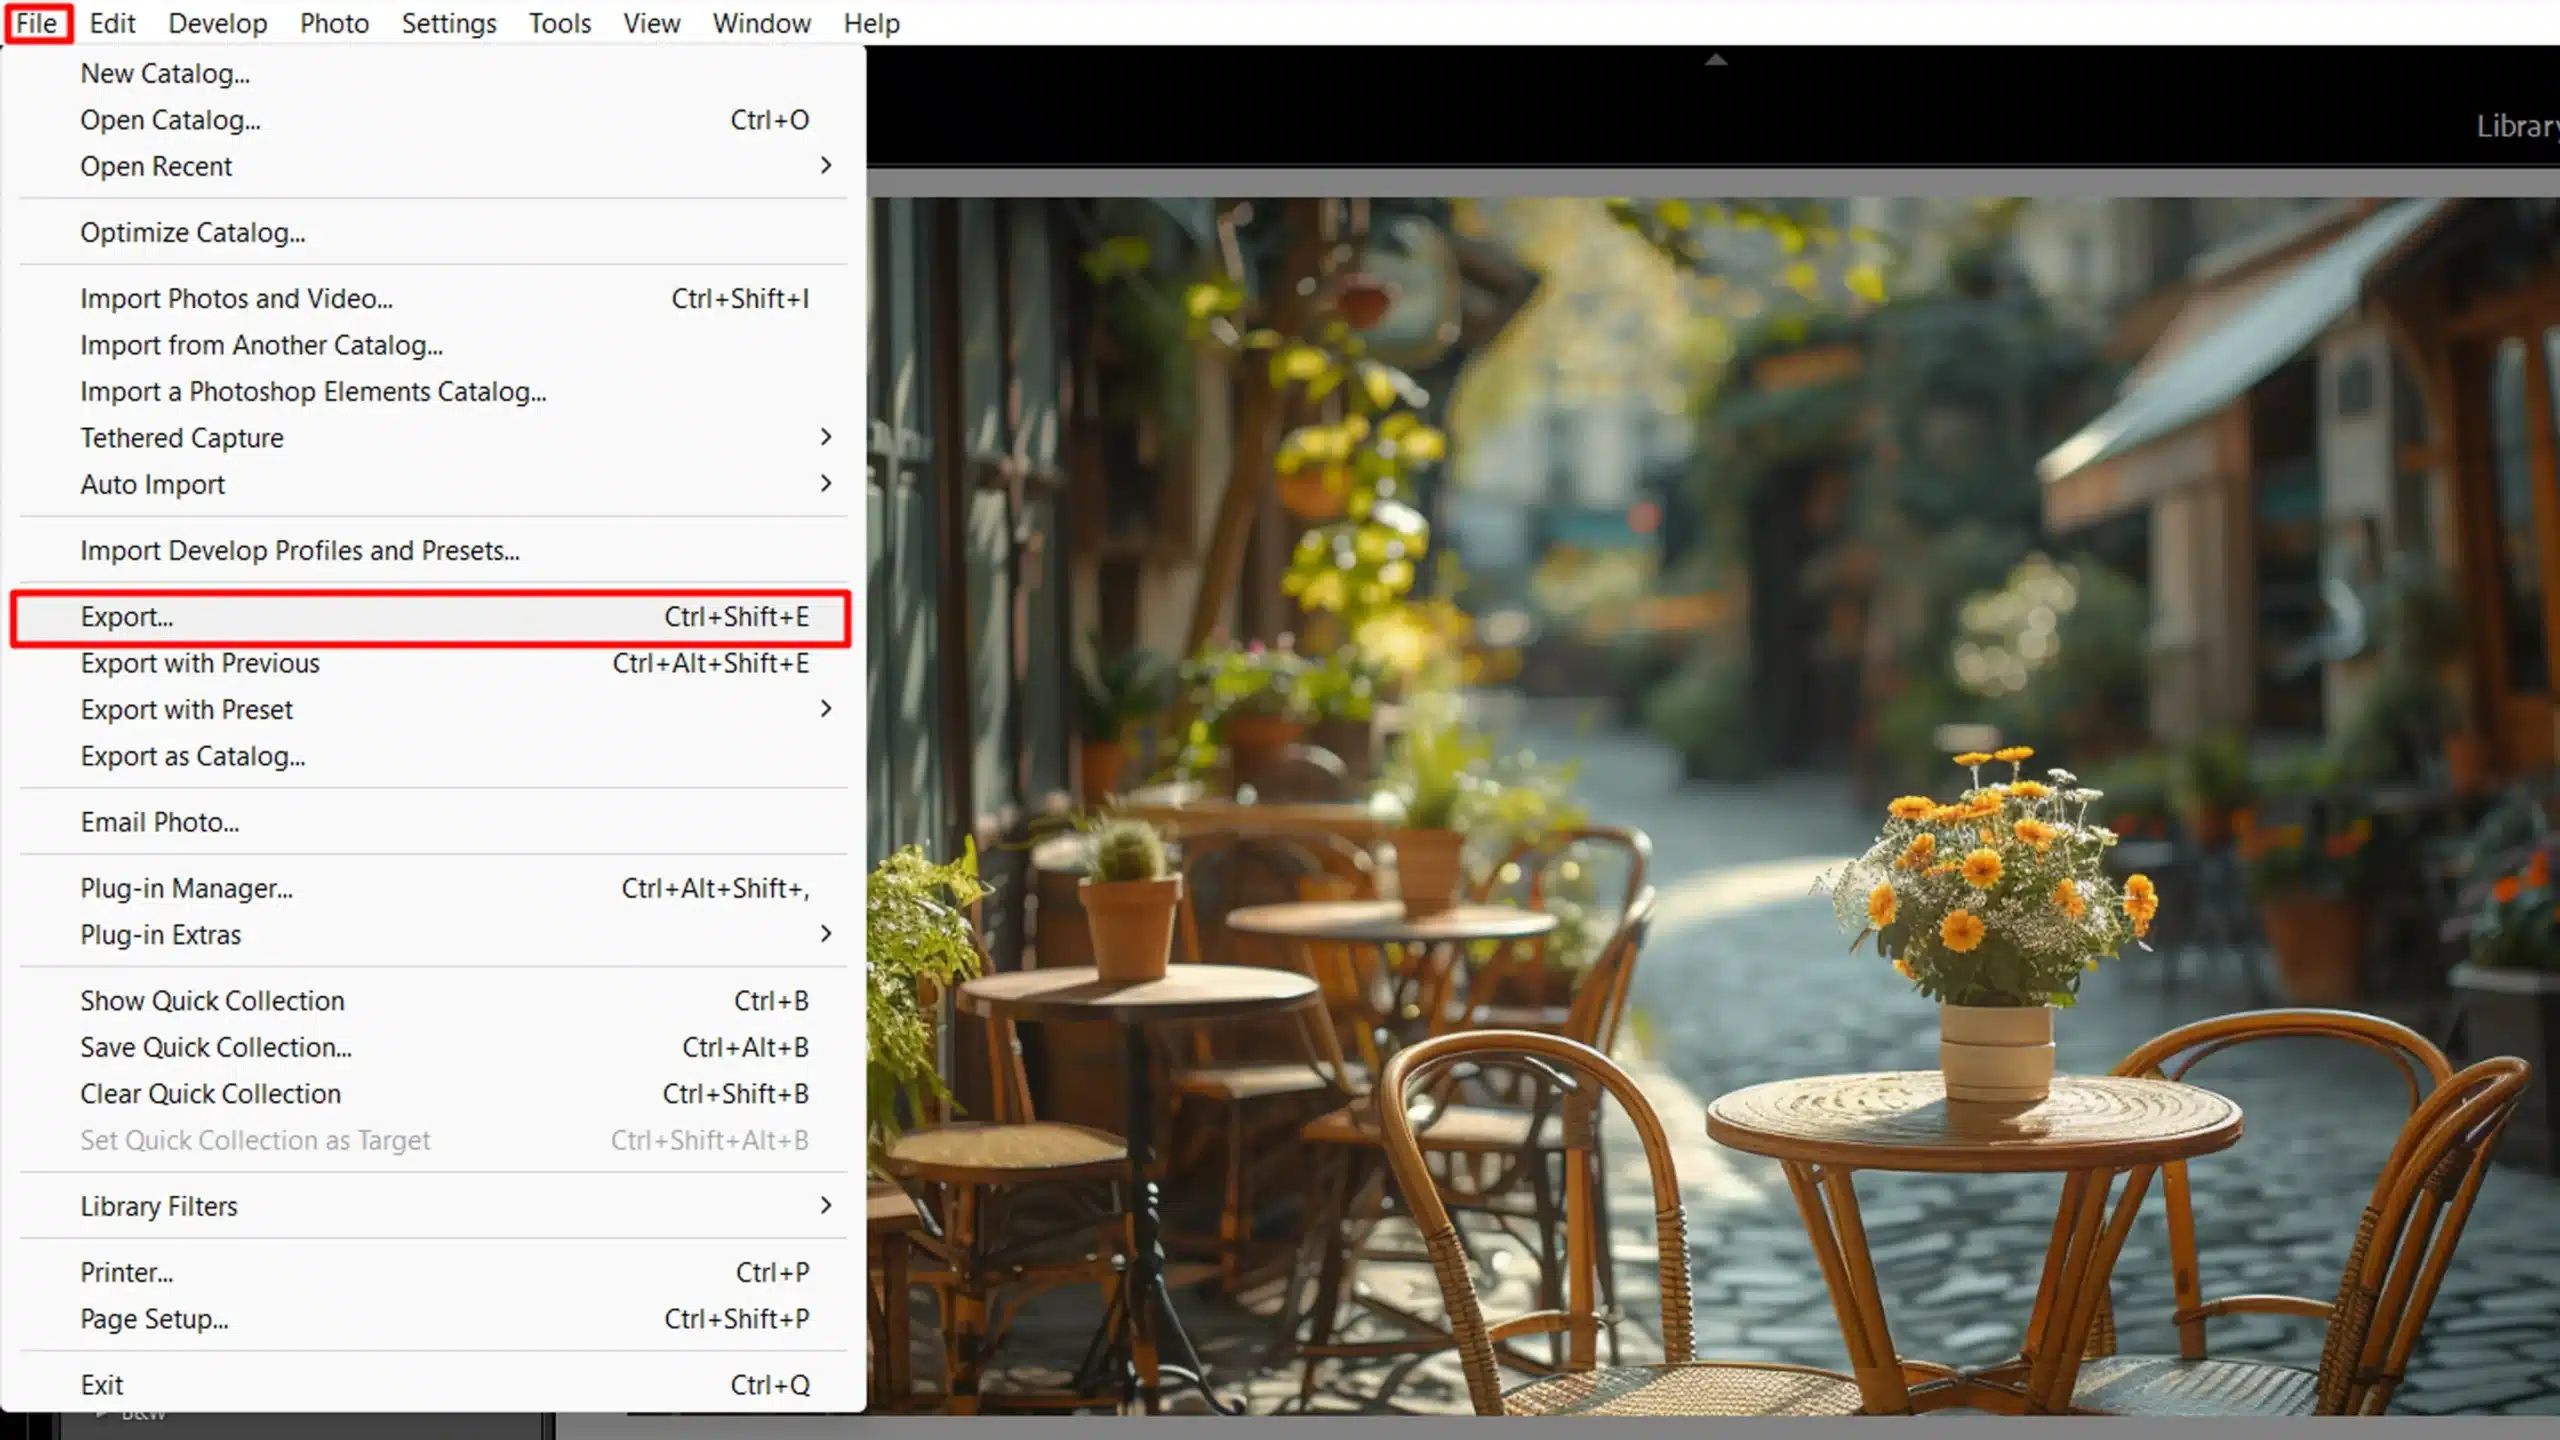
Exporting photos from Lightroom can be straightforward when you know the steps. Let’s start by opening the export dialog box to begin the process.
To make the exporting process in Lightroom more efficient and ensure consistent results, here’s a quick overview of the important steps involved.
Aspect
Overview
Opening the Export Dialog Box
The first step in exporting photos from Lightroom, where you set the necessary parameters like format, size, and other details.
Choosing the Right File Settings
File settings, including format and color space, play a significant role in determining the quality and size of your exported images.
Adjusting Image Quality
Adjust the quality settings to maintain image detail without creating excessively large files, ensuring uniformity across multiple images.
Setting Up Export Presets
Save time and maintain consistency by creating and using export presets for different purposes like web, print, or social media.
Opening the Export Dialog Box
When you’re ready to export photos from Lightroom, the first step is opening the export dialog box.
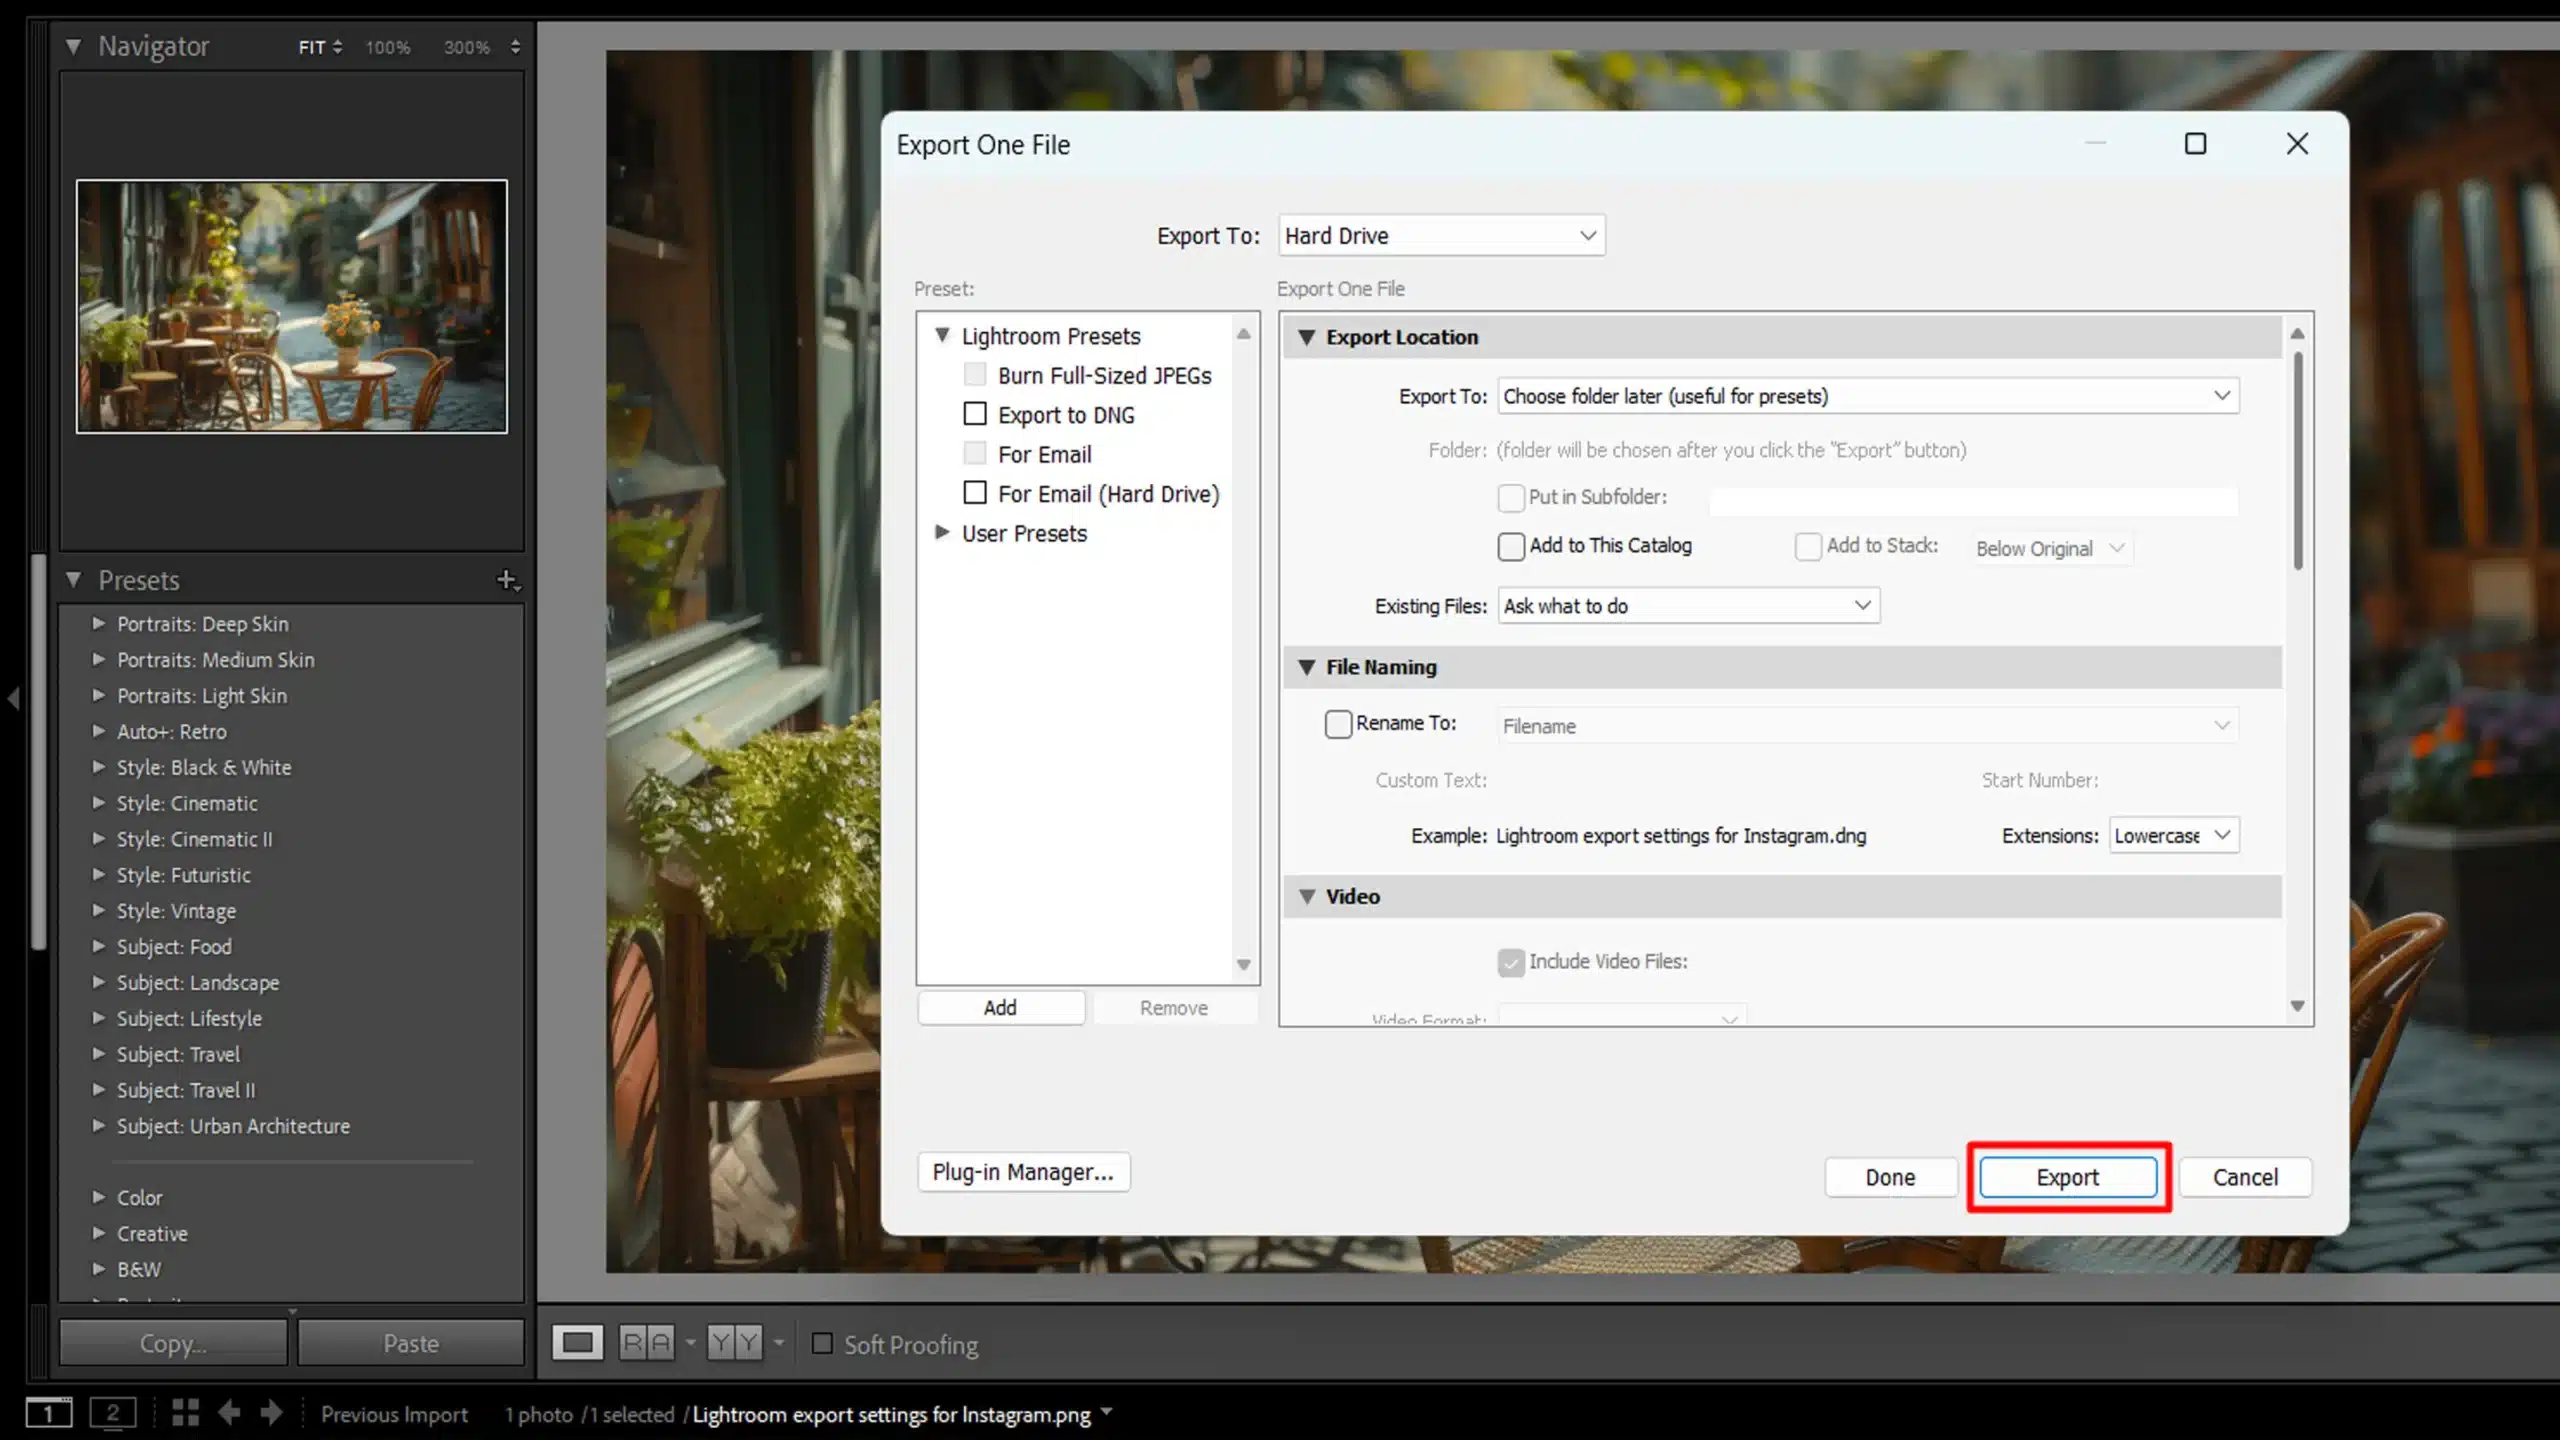
This is where the magic happens. Just press Ctrl+Shift+E (Cmd+Shift+E on Mac), and voila, the export dialog box pops up. This box is your gateway to set all the necessary parameters for exporting images.
From here, you decide on the format, size, and other critical details. Make sure you know this window well; it’s your friend.
Choosing the Right File Settings
File settings affect the outcome of your export. Overlooking them can lead to low-quality images.
You’ll see options like image format (JPEG, PNG, etc.), which play a significant role in how your final display images look and their file size. For most uses, JPEG at 80-100% quality does the job.
However, depending on your needs, you might choose between RAW or JPEG format to balance quality and file size. Choosing the correct color space (usually sRGB for web use) ensures your colors stay consistent across different devices and web browsers.
Don’t forget the file naming section here, so your exported photos have meaningful file naming.
Adjusting Image Quality
Next, you focus on adjusting image quality, an essential part of exporting images. In the export dialog, find the slider for JPEG quality.
Set it high enough to maintain image detail but not too high to avoid large files. The balance is significant. In the image size section, use options like “long edge” to maintain proportions while resizing.
This is especially useful when dealing with multiple images, ensuring they look uniform. Remember, high-quality pictures don’t always mean large file sizes.
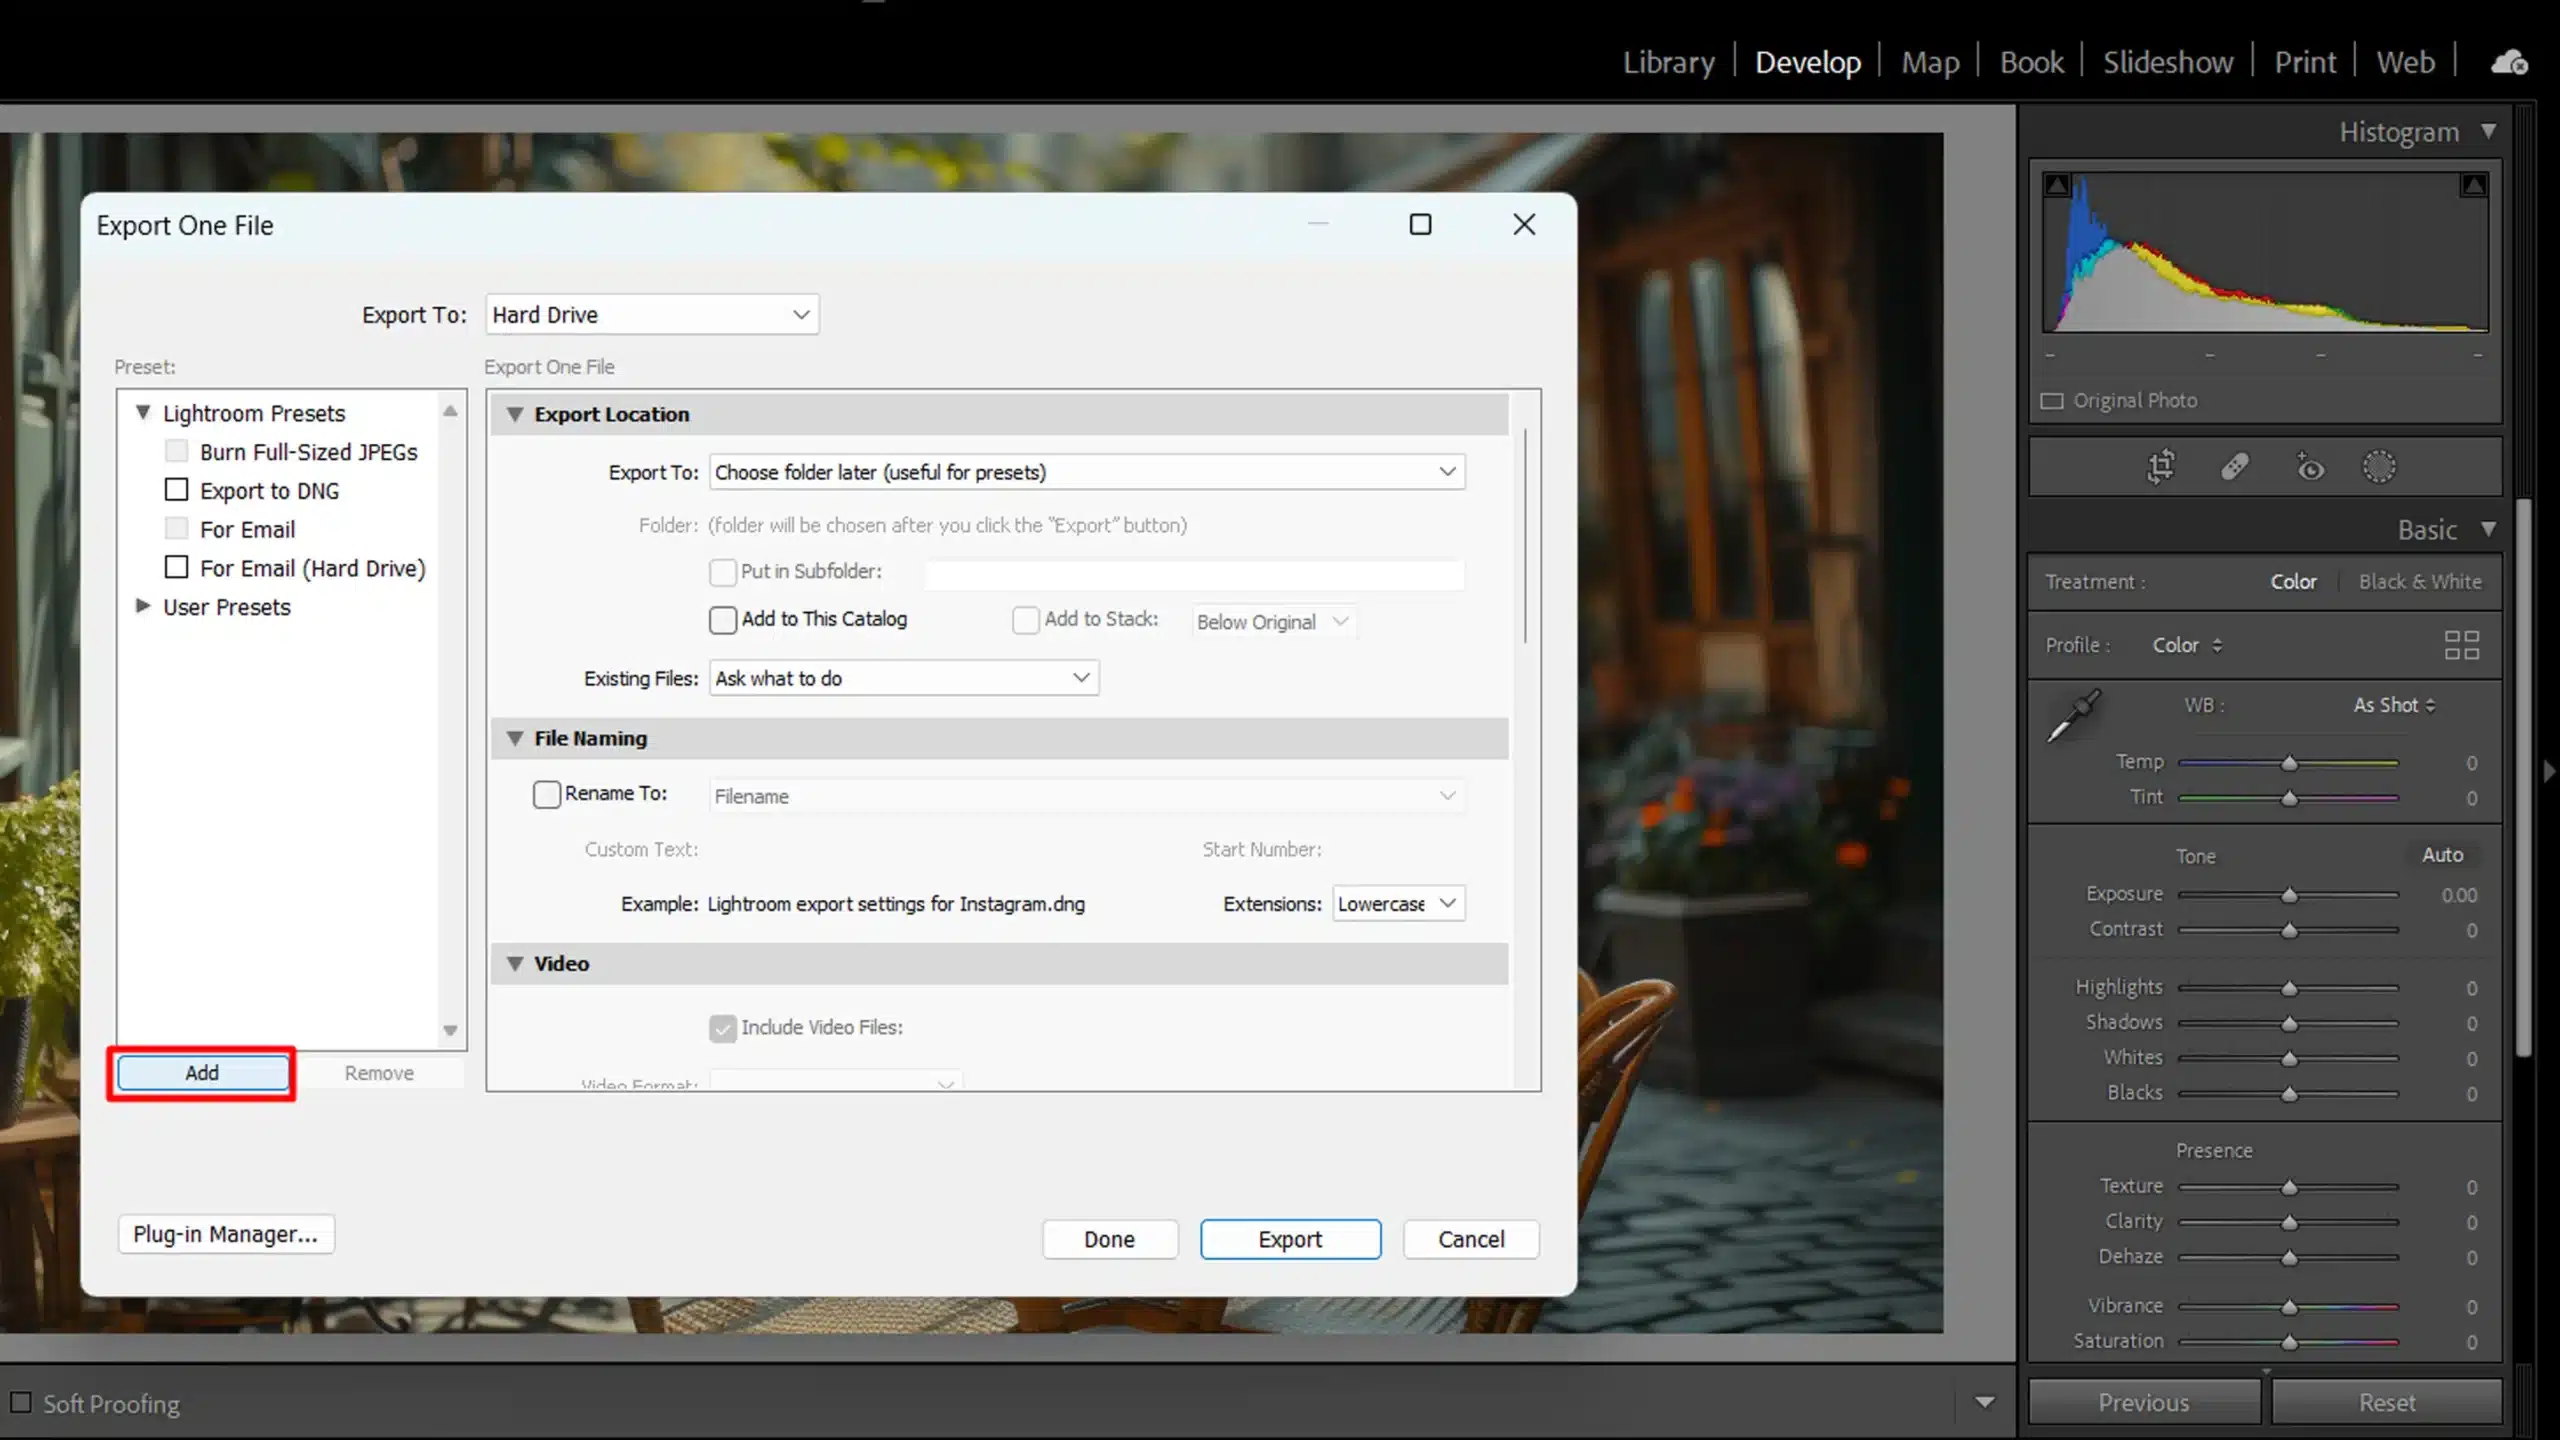
Setting Up Lightroom Export Presets for Instagram and Other Purposes
Now, let’s simplify things with export presets. Instead of setting everything from scratch every time, save your configurations as export presets.
You create these by clicking the “Add” button in the presets panel within the export dialog. Name your preset based on its purpose, like “Web,” “Print,” or “Social Media.”
Once saved, you apply the same settings with just one click. This consistency saves you time and ensures your photos always meet your standard requirements.
Pro Tip: Always double-check your export settings before hitting the final export button. It avoids nasty surprises later!
Optimizing Image Quality for Different Platforms
Exporting photos from Lightroom is important for achieving the best results on various platforms. Let’s dive into the best Lightroom export settingsfor instagram you need.
Lightroom Export Settings for Instagram and Web
For web usage, ensuring quick load times while maintaining picture clarity is essential:
Use JPEG format with a quality setting between 70-80%. This balance keeps the file size manageable without compromising too much on quality.
Set the color space to sRGB, the standard for web displays.
Adjust the image size to 72 PPI (pixels per inch). This resolution is perfect for web usage, ensuring speedy loading times and good visual detail.
Export Settings for Print
Printing demands higher quality:
Choose JPEG or TIFF formats.
For color space, Adobe RGB is a solid choice for print.
Set your resolution to 300 PPI. This higher resolution ensures sharp and easy way to export high resolution images on paper.
When resizing, consider using the “long edge” option for consistent proportions.
Always preview your images before printing.
Lightroom Export Settings for Instagram and Other Social Media
Social media platforms often compress images. Therefore, choosing the right Lightroom export settings for Instagram or other purposes is essential:
Use JPEG format at around 80% quality.
sRGB color space works well for online platforms.
Resize your images to a width of 1080 pixels for Instagram or 2048 pixels for Facebook.
Ensure your images load fast and look crisp.
Pro Tip: When setting up Lightroom export settings for Instagram, save your configuration as an export preset. This saves time and ensures consistency every time you export high-quality pictures.
Additionally, familiarize yourself with Lightroom shortcuts to streamline your workflow even further. To optimize web image quality, adjust your export settings to balance file size and clarity, ensuring your images load quickly while still looking sharp across all devices.
In the world of photo editing, knowing advanced Lightroom export techniques can significantly improve your workflow. In this article, we’ll explore three important areas: batch exporting photos, exporting with watermarks, and exporting with metadata.
Batch Exporting Photos
Batch exporting saves a lot of time. Instead of exporting each photo one by one, you can export multiple images simultaneously. Here’s how:
First, select the photos you want to export.
Next, press Ctrl+Shift+E (Cmd+Shift+E on Mac) to open the export dialog.
Adjust your Lightroom export settings according to your choices.
Click “Export” and let Lightroom do the heavy lifting.
Batch exporting comes in handy when working with a series of photos from an event or a photoshoot.
It lets you maintain consistency in your edits and ensures that all images share the same export settings. This method not only saves time but also guarantees uniformity.
Exporting with Watermarks
If you’re showcasing your work online, using watermarks protects your images. Adding them while exporting is straightforward:
Open the export dialog as usual.
Scroll down to the “Watermarking” section.
Check the “Watermark” box and select your predefined watermark or create a new one.
Adjust its position and size, then click “Export.”
A watermark serves as a signature on your work. It ensures that anyone who sees your photos knows where they came from, providing protection and helping build your brand.
Exporting with Metadata
Metadata offers valuable information about your photos, such as camera settings and location. To include this data during export, follow these steps:
Head to the export dialog.
Under “Metadata,” choose “All Metadata” to include everything.
You can also select specific chunks of metadata to export.
Once configured, click “Export.”
Metadata gives viewers more context about your photos. It can be especially useful for educational and professional purposes.
Pro Tip: Use presets for each type of export. Whether you’re exporting a batch, adding watermarks, or including metadata, saving your settings as presets simplifies future exports.
This ensures that you always use the proper export settings, leading to high quality pictures every time.
With these techniques, you can master your Lightroom export game and make your workflow efficient and effective. The right settings help produce the best results, every single time.
When refining your images before exporting, consider using tools like the Photoshop Shape Tool to add precise geometric elements or masks. This can enhance your final output, especially when combined with advanced Lightroom export techniques.
Troubleshooting Common Export Issues
We’ve tackled export settings and their importance. But sometimes, issues arise in the export process. Let’s get started into common export problems and how to solve them.
Export Errors and How to Fix Them
Occasionally, Lightroom export fails, and a baffling error message appears. Don’t fret.
First, check if you’re running out of memory space; large exports need ample room. If that’s not the problem, try exporting a smaller batch of images. A full Lightroom restart can also resolve glitches. Sometimes, the solution is simpler than you think.
If this doesn’t solve it, updating Lightroom to the latest version often fixes bugs. Remember, keeping software current helps avoid many minor issues that cause headaches.
Lastly, verify that your image format settings are correct, wrong formats lead to export failures. For instance, choosing between NEF or JPEG format can make a significant difference.
Ensuring Consistent Image Quality
Inconsistent image quality is another common hiccup. Export high resolution images at lower settings end up lackluster.
Always double-check your settings before hitting the export button. Using export presets can help maintain consistency across multiple projects.
Set your JPEG quality slider thoughtfully. Too high, the file size balloons; too low, the quality suffers. Keep it around 80-90% for good balance.
Leverage the best Lightroom export settings for instagram for consistent, high-quality output. Mastering image quality involves leveraging the best Lightroom export settings for consistent, high-quality output.
Dealing with Color Space Issues
Color space inconsistencies vex many users. Your photo looks vibrant in Lightroom but dull elsewhere. The answer lies in color profile settings.
Ensure the sRGB color profile when exporting for web use. Adobe RGB suits print better but may look off on screens.
If colors seem odd, revisit the export settings. A mismatch between Lightroom’s working space and the export settings leads to inaccuracies. Adjust and save these settings as a preset to avoid future mishaps.
Pro Tip: Always back up your original photos before extensive editing or exporting. Protecting your work ensures you’ll always have the original to fall back on if things go sideways.
Frequently Asked Questions
What are the best export settings for Lightroom?
File Format: Use JPEG for a good balance of quality and file size or TIFF for high-quality prints.
Color Space: Choose sRGB for general use or Adobe RGB for printing.
Resolution: Set to 300 ppi for prints or 72 ppi for online use.
Compression: Adjust according to your quality requirements for the best quality.
Where are Lightroom export settings stored?
Lightroom export settings are stored within the Lightroom application under the ‘Presets’ panel. You can access and manage them by navigating to the ‘Presets’ section and selecting ‘Export Presets’.
How do I change export settings in the Lightroom app?
Open Lightroom and go to the 'Export' dialog from the 'File' menu.
Choose an existing preset or modify the settings as needed.
Adjust settings like file format, quality, and destination folder.
Save your new settings as a preset for future use by clicking 'Add' at the bottom of the export screen.
What does export with the previous mean in Lightroom?
This option allows you to export your photos using the last used export settings. It’s a quick way to apply the same settings without manually adjusting them each time.
Mastering Lightroom export settings for instagram has truly changed how I handle my photos. By simply tweaking a few settings, I’ve been able to consistently create high-quality images that are perfect for both web and print. It took some trial and error, but once I understood the key parameters, it became a straightforward process. The difference in the final results is clear, and it’s made my work much more professional.
If you’re looking to improve your photo editing skills, I strongly suggest checking out this Lightroom course. It’s packed with insights that helped me a lot. Also, don’t miss the Photoshop Course if you want to dive deeper into editing.
For those who are just getting started, Adobe offers excellent tools. You can explore them here: Photoshop and Photoshop Lightroom. These resources have been essential in my journey, and I’m sure they’ll help you too.
If this article has helped you, then Like and Share it with your friends
$2,061.00Original price was: $2,061.00.$1,061.00Current price is: $1,061.00. 27597
Download Your Free Guide Now!
Discover the secrets of photography with our printable guide! Master essential techniques like aperture, shutter speed, and ISO to create stunning images. Get your free printable PDF now and start turning your snapshots into masterpieces!