Have you ever struggled with how to select hair Photoshop? You’re not alone.
This seemingly simple task can often feel overwhelming, especially when dealing with intricate details and fine strands.
But don’t worry, I’ve got you covered.
In this article, I will share some practical tips and techniques to master the art of selecting hair in Photoshop.
Whether you’re a beginner or looking to refine your skills, you’ll find valuable insights that make this process a breeze.
Table of Contents
Getting Started with Select Hair Photoshop: Using the Lasso Tool
This tool is a handy feature. It helps to create a precise selection around objects. This tool is especially useful in photo editing.
Basic Lasso Tool Techniques
Start by opening an image in Photoshop. Ensure you have the correct layer selected. Follow these steps:
- Select the lasso from the toolbar.
- Click and drag to draw a freeform selection around your object.
- Close the selection by releasing the mouse button at the starting point.
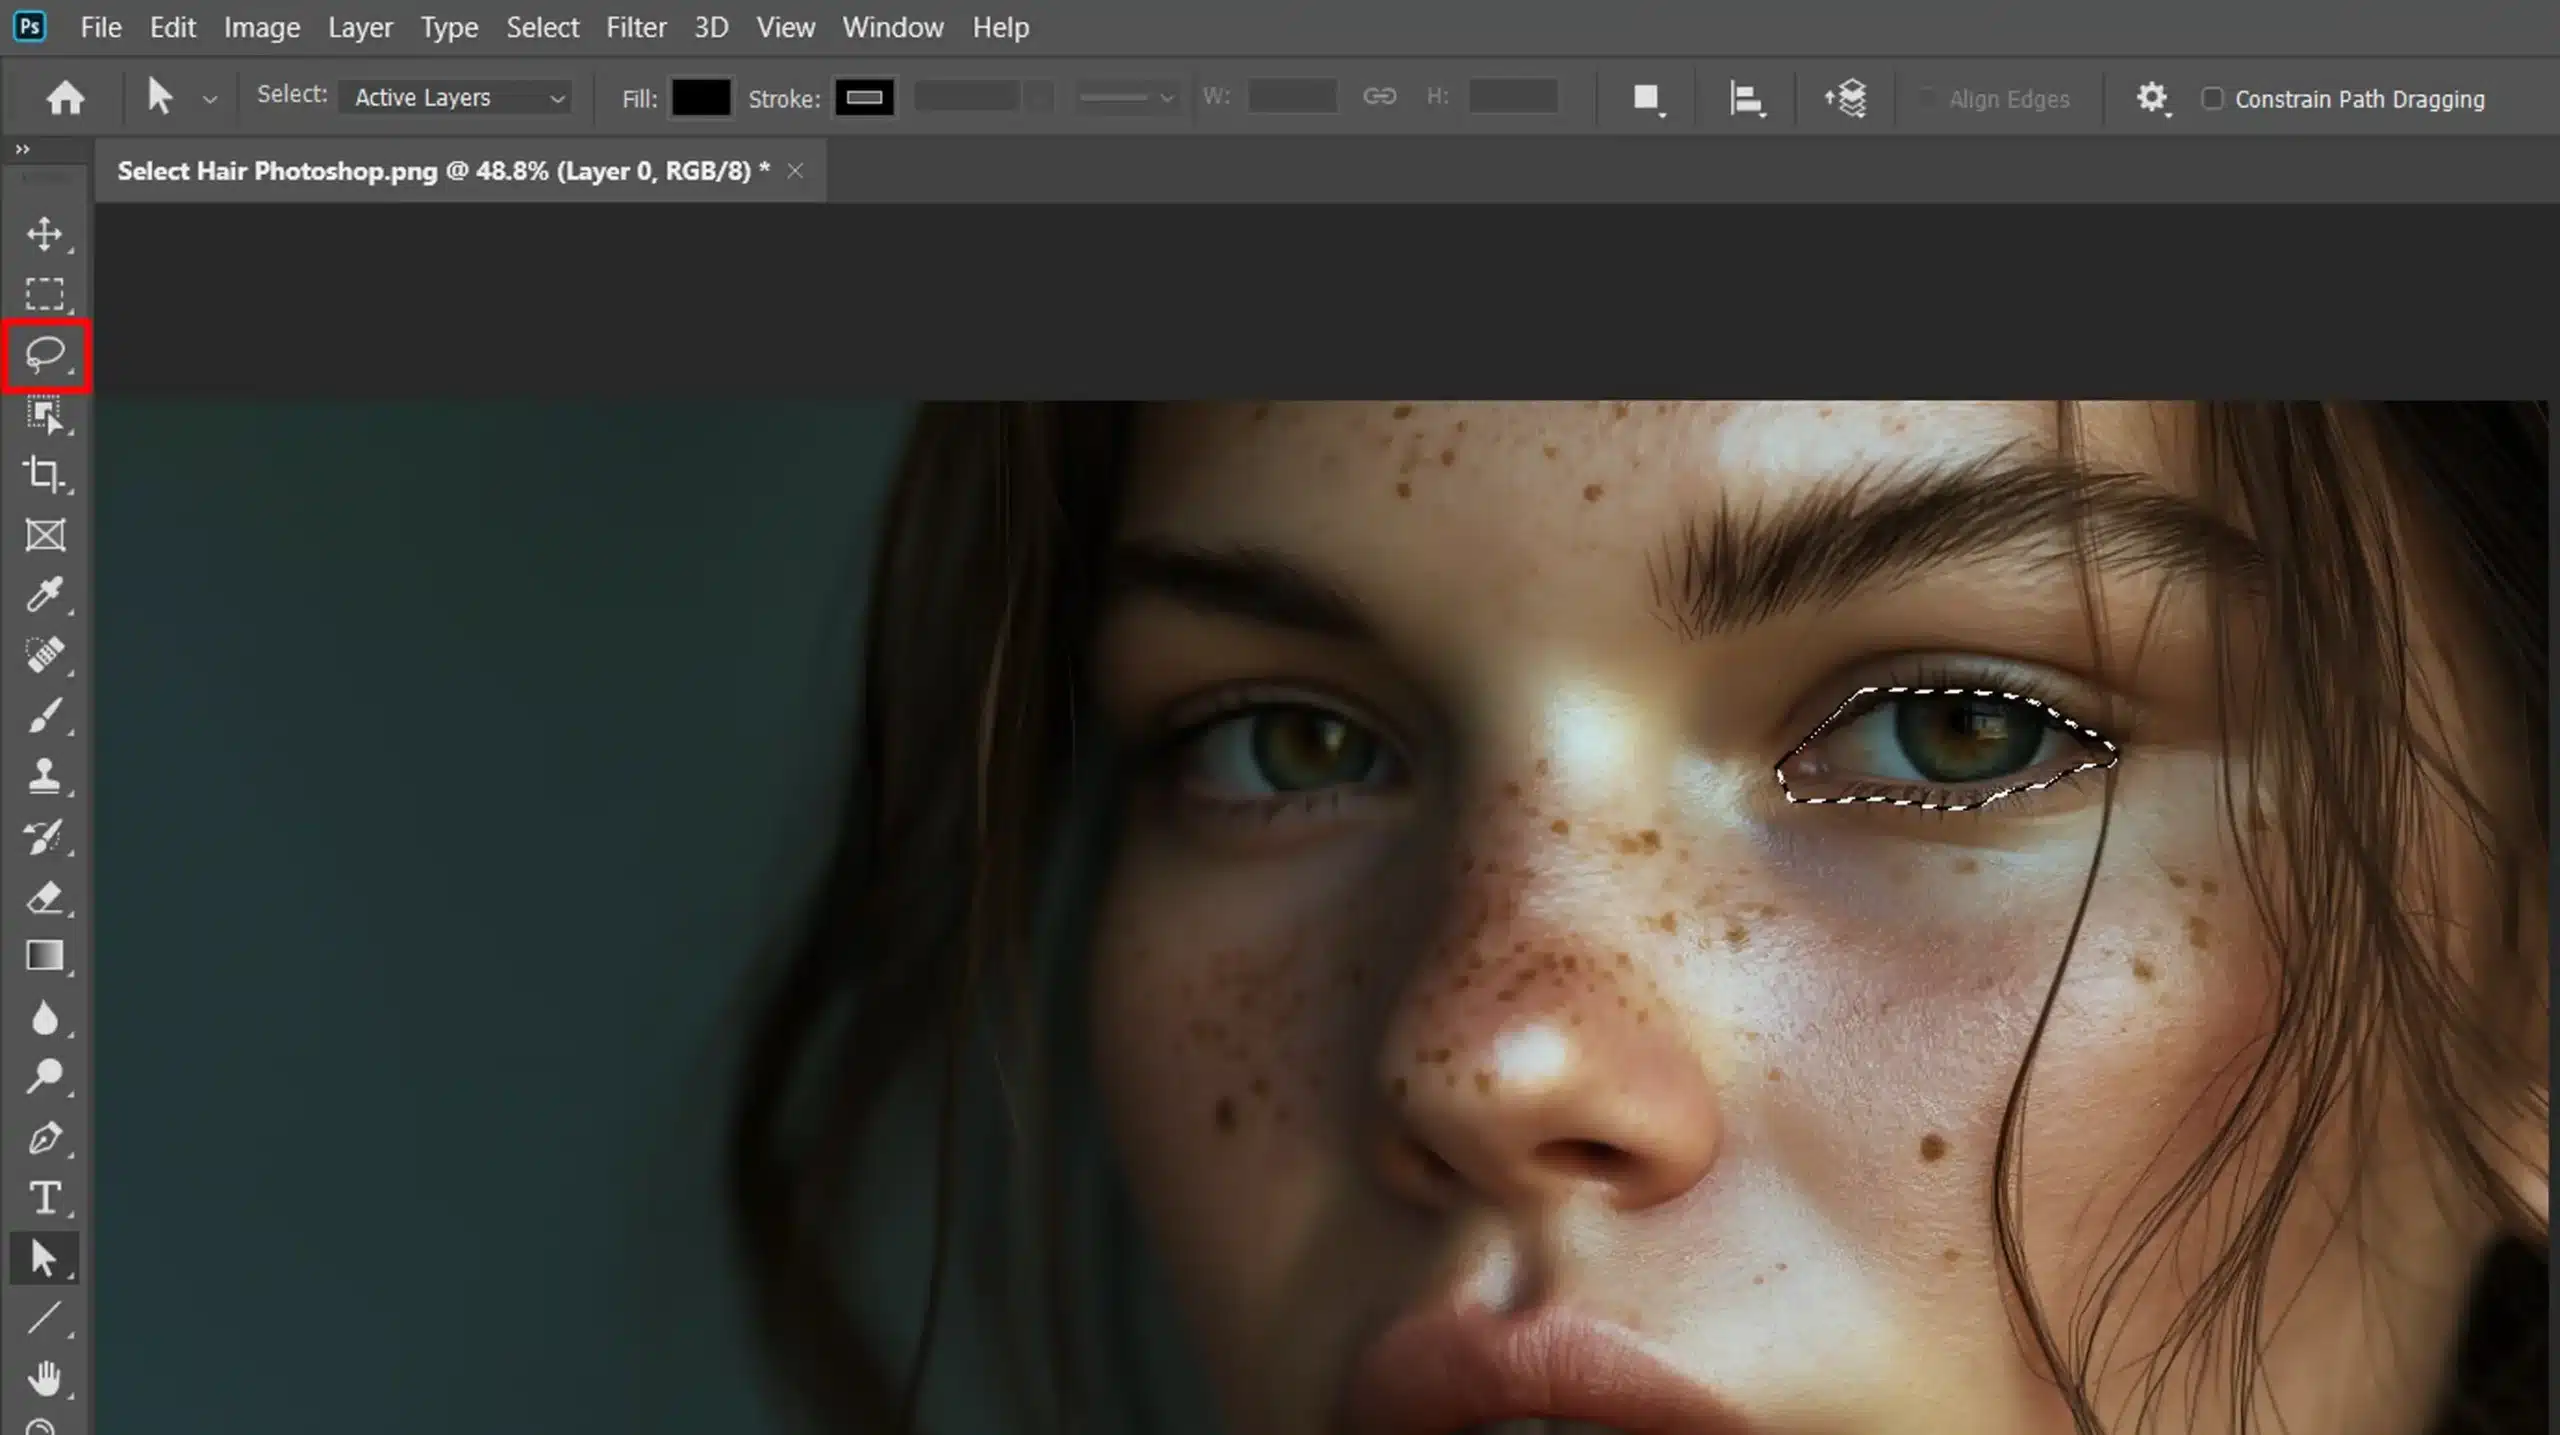
Let’s say you want to learn how to select hair Photoshop. Use this tool, including the polygonal lasso tool, for an initial selection.
For cleaner edges, apply a layer mask and refine edge command.
Advanced Lasso Tool Tips
Refining a selection is important. Once your selection is made:
- Go to Select > Refine Edge.
- In the refine edge dialog box, adjust the settings. This helps in cleaning up the selection.
- Use a brush if needed to further refine edges.
If working with complex objects like hair, use the object selection tool as one of the selection tools for an initial selection.
Then refine it with the refine radius tool and enable the smart radius option.
This enhances the rough selection outline around fine details when selecting hair in Photoshop by adjusting the radius value accordingly, ensuring the selected hair in Photoshop looks natural and precise.
Also, consider the shift edge command to tweak the selection boundary. This helps secure the perfect cut-out from the original background.
Using the Polygonal Lasso Tool
After refining, apply the rough selection outline to a new layer. This makes editing non-destructive.
Always preview the results in the reveal layer view mode to check for accuracy.
The polygonal lasso tool is great for making straight-edged selections. For advanced precision, combine the polygonal lasso tool with the regular lasso tool to handle both straight and curved edges in your selections, especially when working on complex shapes
Pro Tip: For tricky selections, use both the lasso tool and the object selection tool. Combining their strengths ensures a precise cut-out every time.
Remember, mastering the lasso tool, including the polygonal lasso tool, takes practice, and combining it with the object selection tool can provide even better results. Keep experimenting with its features and options.
If you’re looking to enhance your skills further, consider learning about other essential tools in Photoshop or exploring different types of photography to understand how selections can be applied in various contexts.
Select Hair Photoshop: Refine Edge Dialog Box
The Refine Edge Dialog Box is a handy tool for perfecting your hair selection in Photoshop. It makes adjusting the edges of a selection easier, especially with complex objects like hair.
Before choosing between the Refine Edge Dialog Box and the Select and Mask Workspace, it’s essential to understand their key differences and features.
The table below highlights these aspects to help you select the best tool for refining your selections in Photoshop.
| Feature | Refine Edge Dialog Box | Select and Mask Workspace |
|---|---|---|
| Accessibility | Older Photoshop versions | Available in recent versions |
| Edge Detection | Manual refinement needed | Enhanced with Smart Radius |
| Tools | Refine Radius Tool | Refine Edge Brush Tool, Global Refinements |
| Preview Options | Limited previews | Multiple preview modes |
Accessing the Refine Edge Dialog Box
To access it:
- Right-click the background layer and select Duplicate Layer
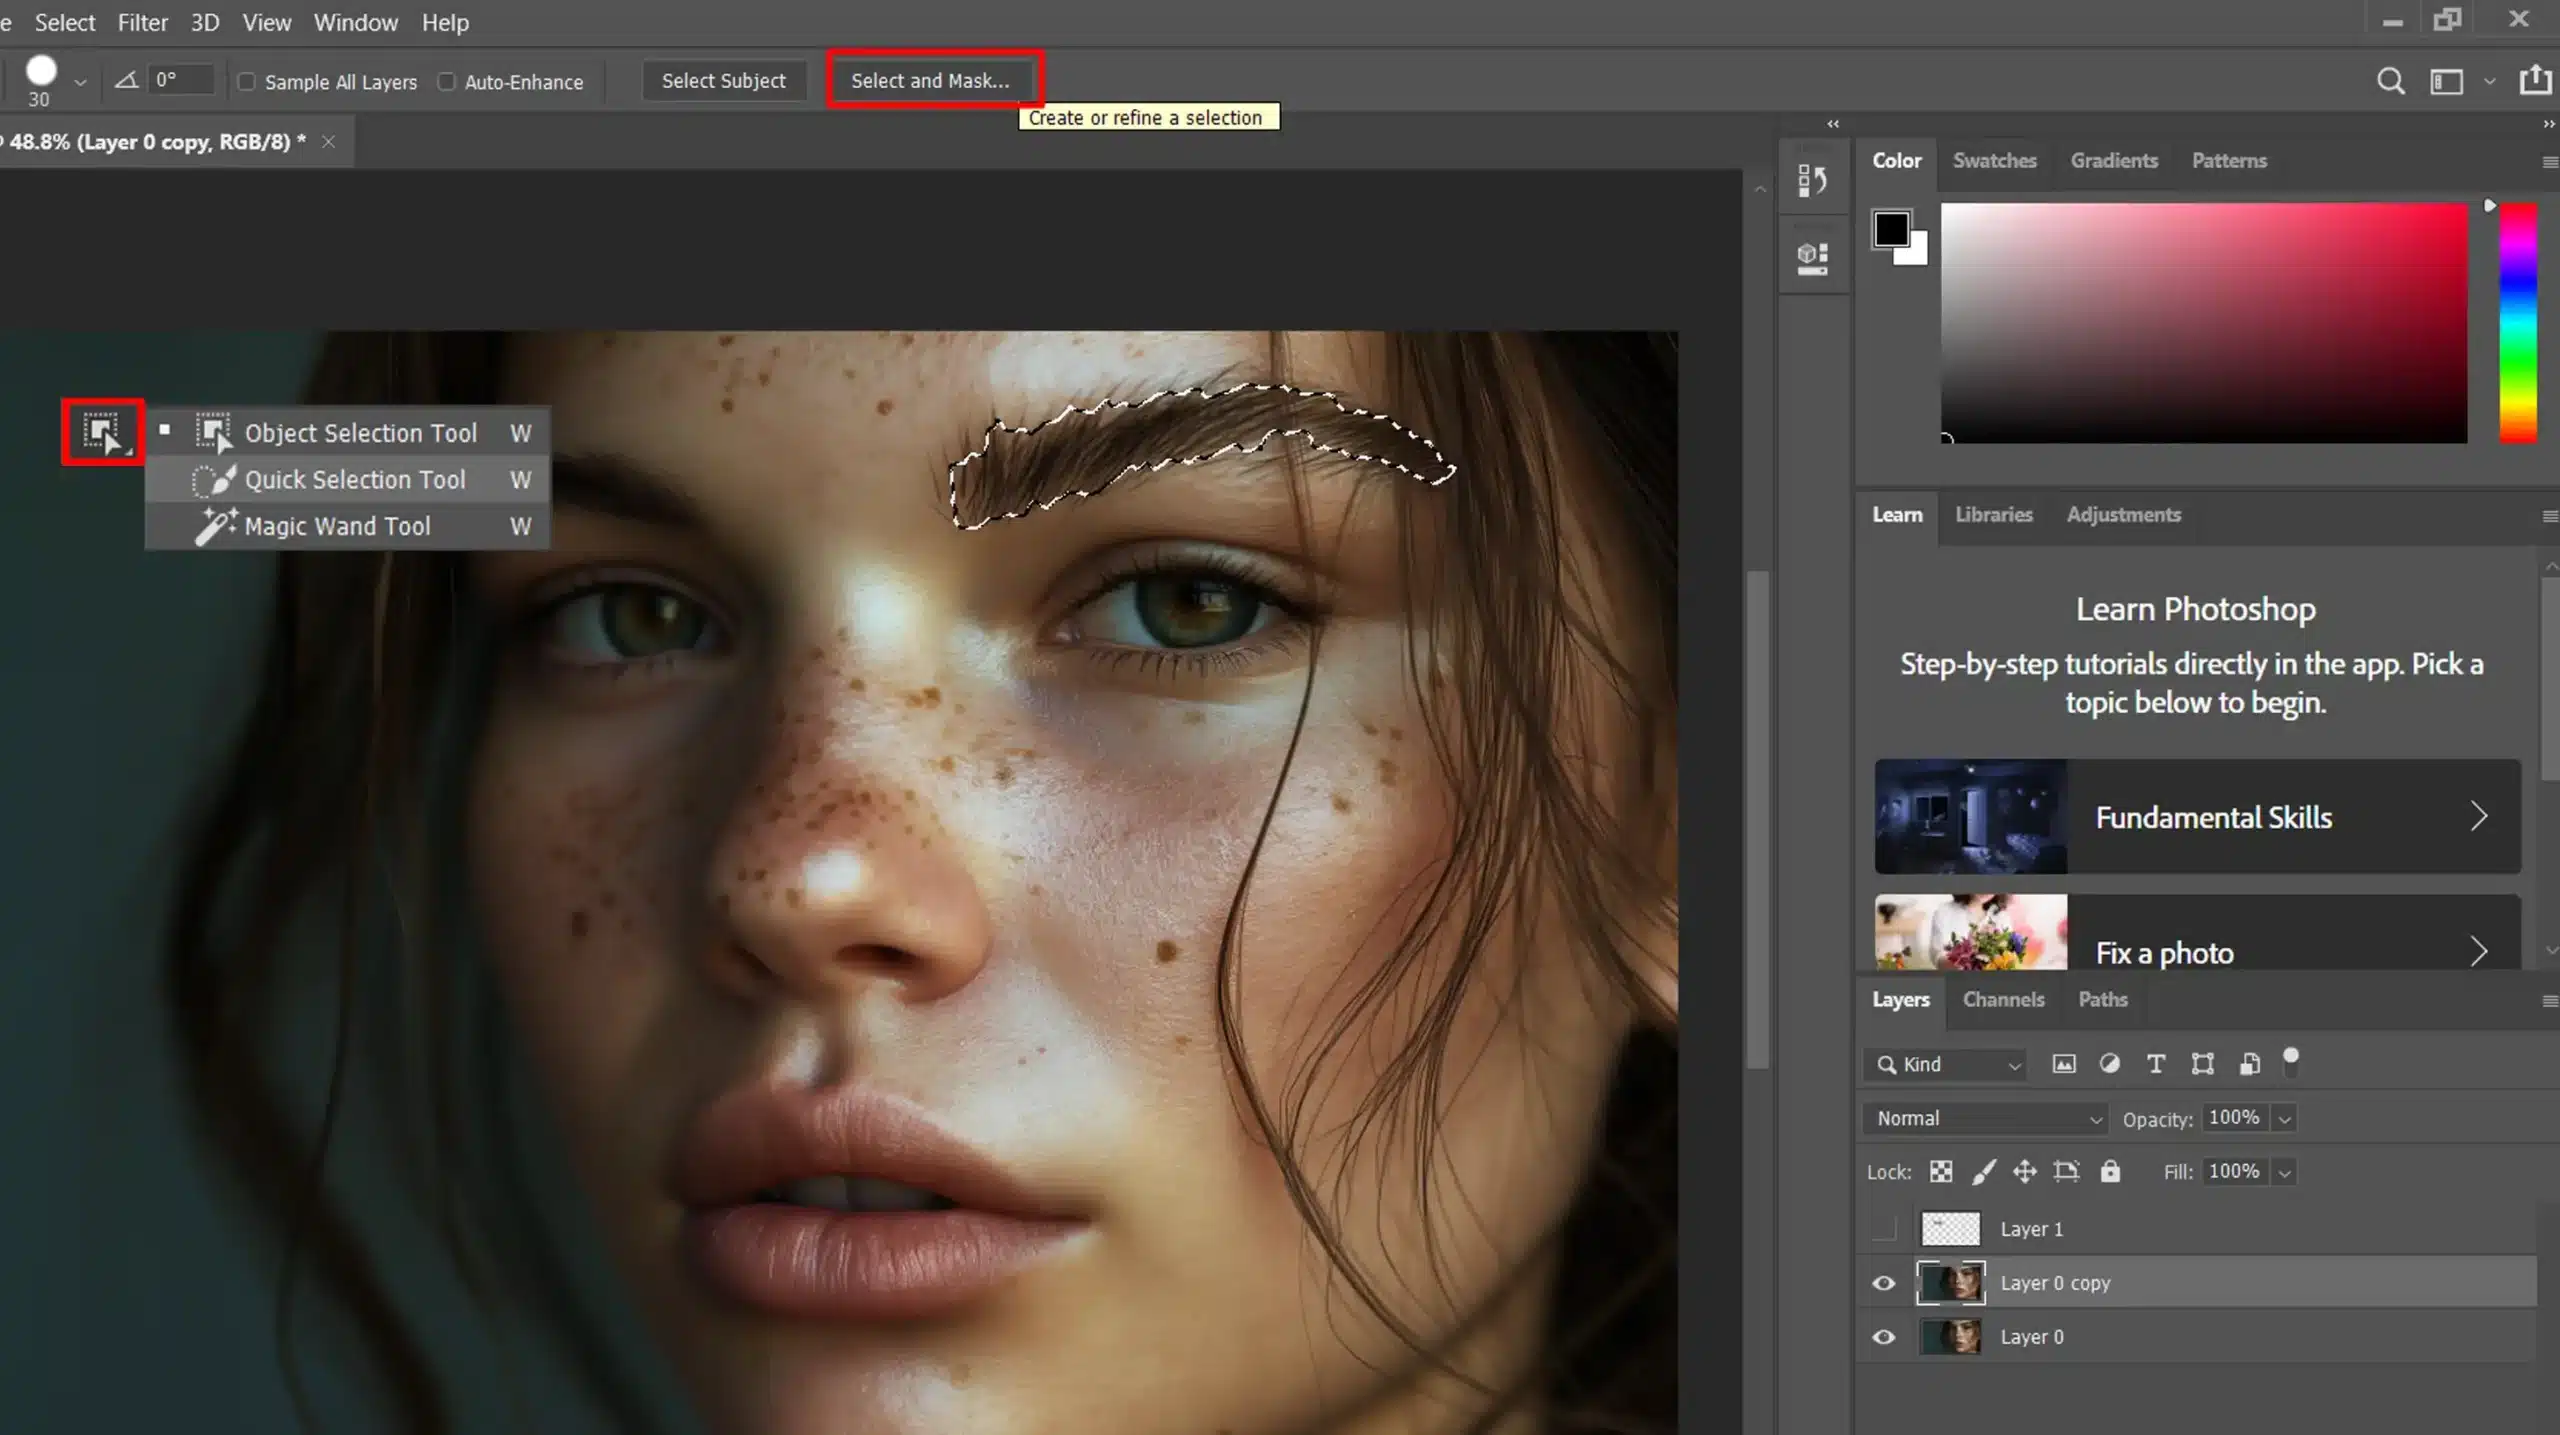
- Select your initial selection using any of the selection tools, such as the Quick Selection Tool in Photoshop.
- Click Select and Mask at the top of the window
- Hit the Refine Edge Button located in the options bar.
This opens up the dialog box where you can fine-tune your selection.
Adjusting Edge Detection
Within the box, the Refine Radius Tool with the smart radius option lets you modify the detection, especially when selecting hair in Photoshop.
Use it to automatically adjust the radius around tricky areas like hair.
The Adjust Edge Options, such as Shift Edge and smoothing, help refine the boundary further
Refining the Selection
After adjusting:
- Apply the results to a new layer with a Layer Mask. This step ensures no permanent changes are made to the original image.
- You can also use the brush if you need to erase refinements or perfect your final selection using the erase refinements tool.
Remember, the secret to mastering the Refine Edge Dialog Box lies in practice and tweaking those settings until your selection feels right.
Pro Tip: Use the Layer’s Preview Thumbnail in the Layers Panel to view your changes closely. This helps in making more precise adjustments.
Ready to dive in? Give it a shot, and don’t be afraid to experiment.
Using Layer Mask
The power of Photoshop’s layer masks is no secret. Let’s dive right in.
Creating a Layer Mask
Your journey begins with an initial hair selection in Photoshop. No worries, you’ve got this.
Select hair Photshop starts with selecting any object using a selection tool, then head to the layers management panel. Click on the ‘Add Layer Mask‘ icon.
When creating a layer mask, you can also use it to experiment with different effects, such as how to change hair color without affecting the rest of the image.
You’ve masked out the rest of the image. This means you can edit parts without touching the rest. Awesome, right?
Steps to Create a Layer Mask
To create a layer mask in Photoshop, follow these simple steps:
- Select an object using a selection tool.
- Go to the layers management panel.
- Click on the 'Add Layer Mask' icon.
Editing the Layer Mask
Now, we’re moving on to editing. With the correct layer mask thumbnail selected, grab your trusty brush tool.
Paint with white to reveal and black to conceal. If it’s not perfect, it’s fine. Just hit ‘X‘ to switch colors. Easy peasy!
Tips for Editing
Here are some tips for editing layer masks effectively:
- Paint with white to reveal.
- Paint with black to conceal.
- Press 'X' to switch colors.
- Zoom in and use smaller brush sizes for detailed work.
Fine-Tuning the Mask
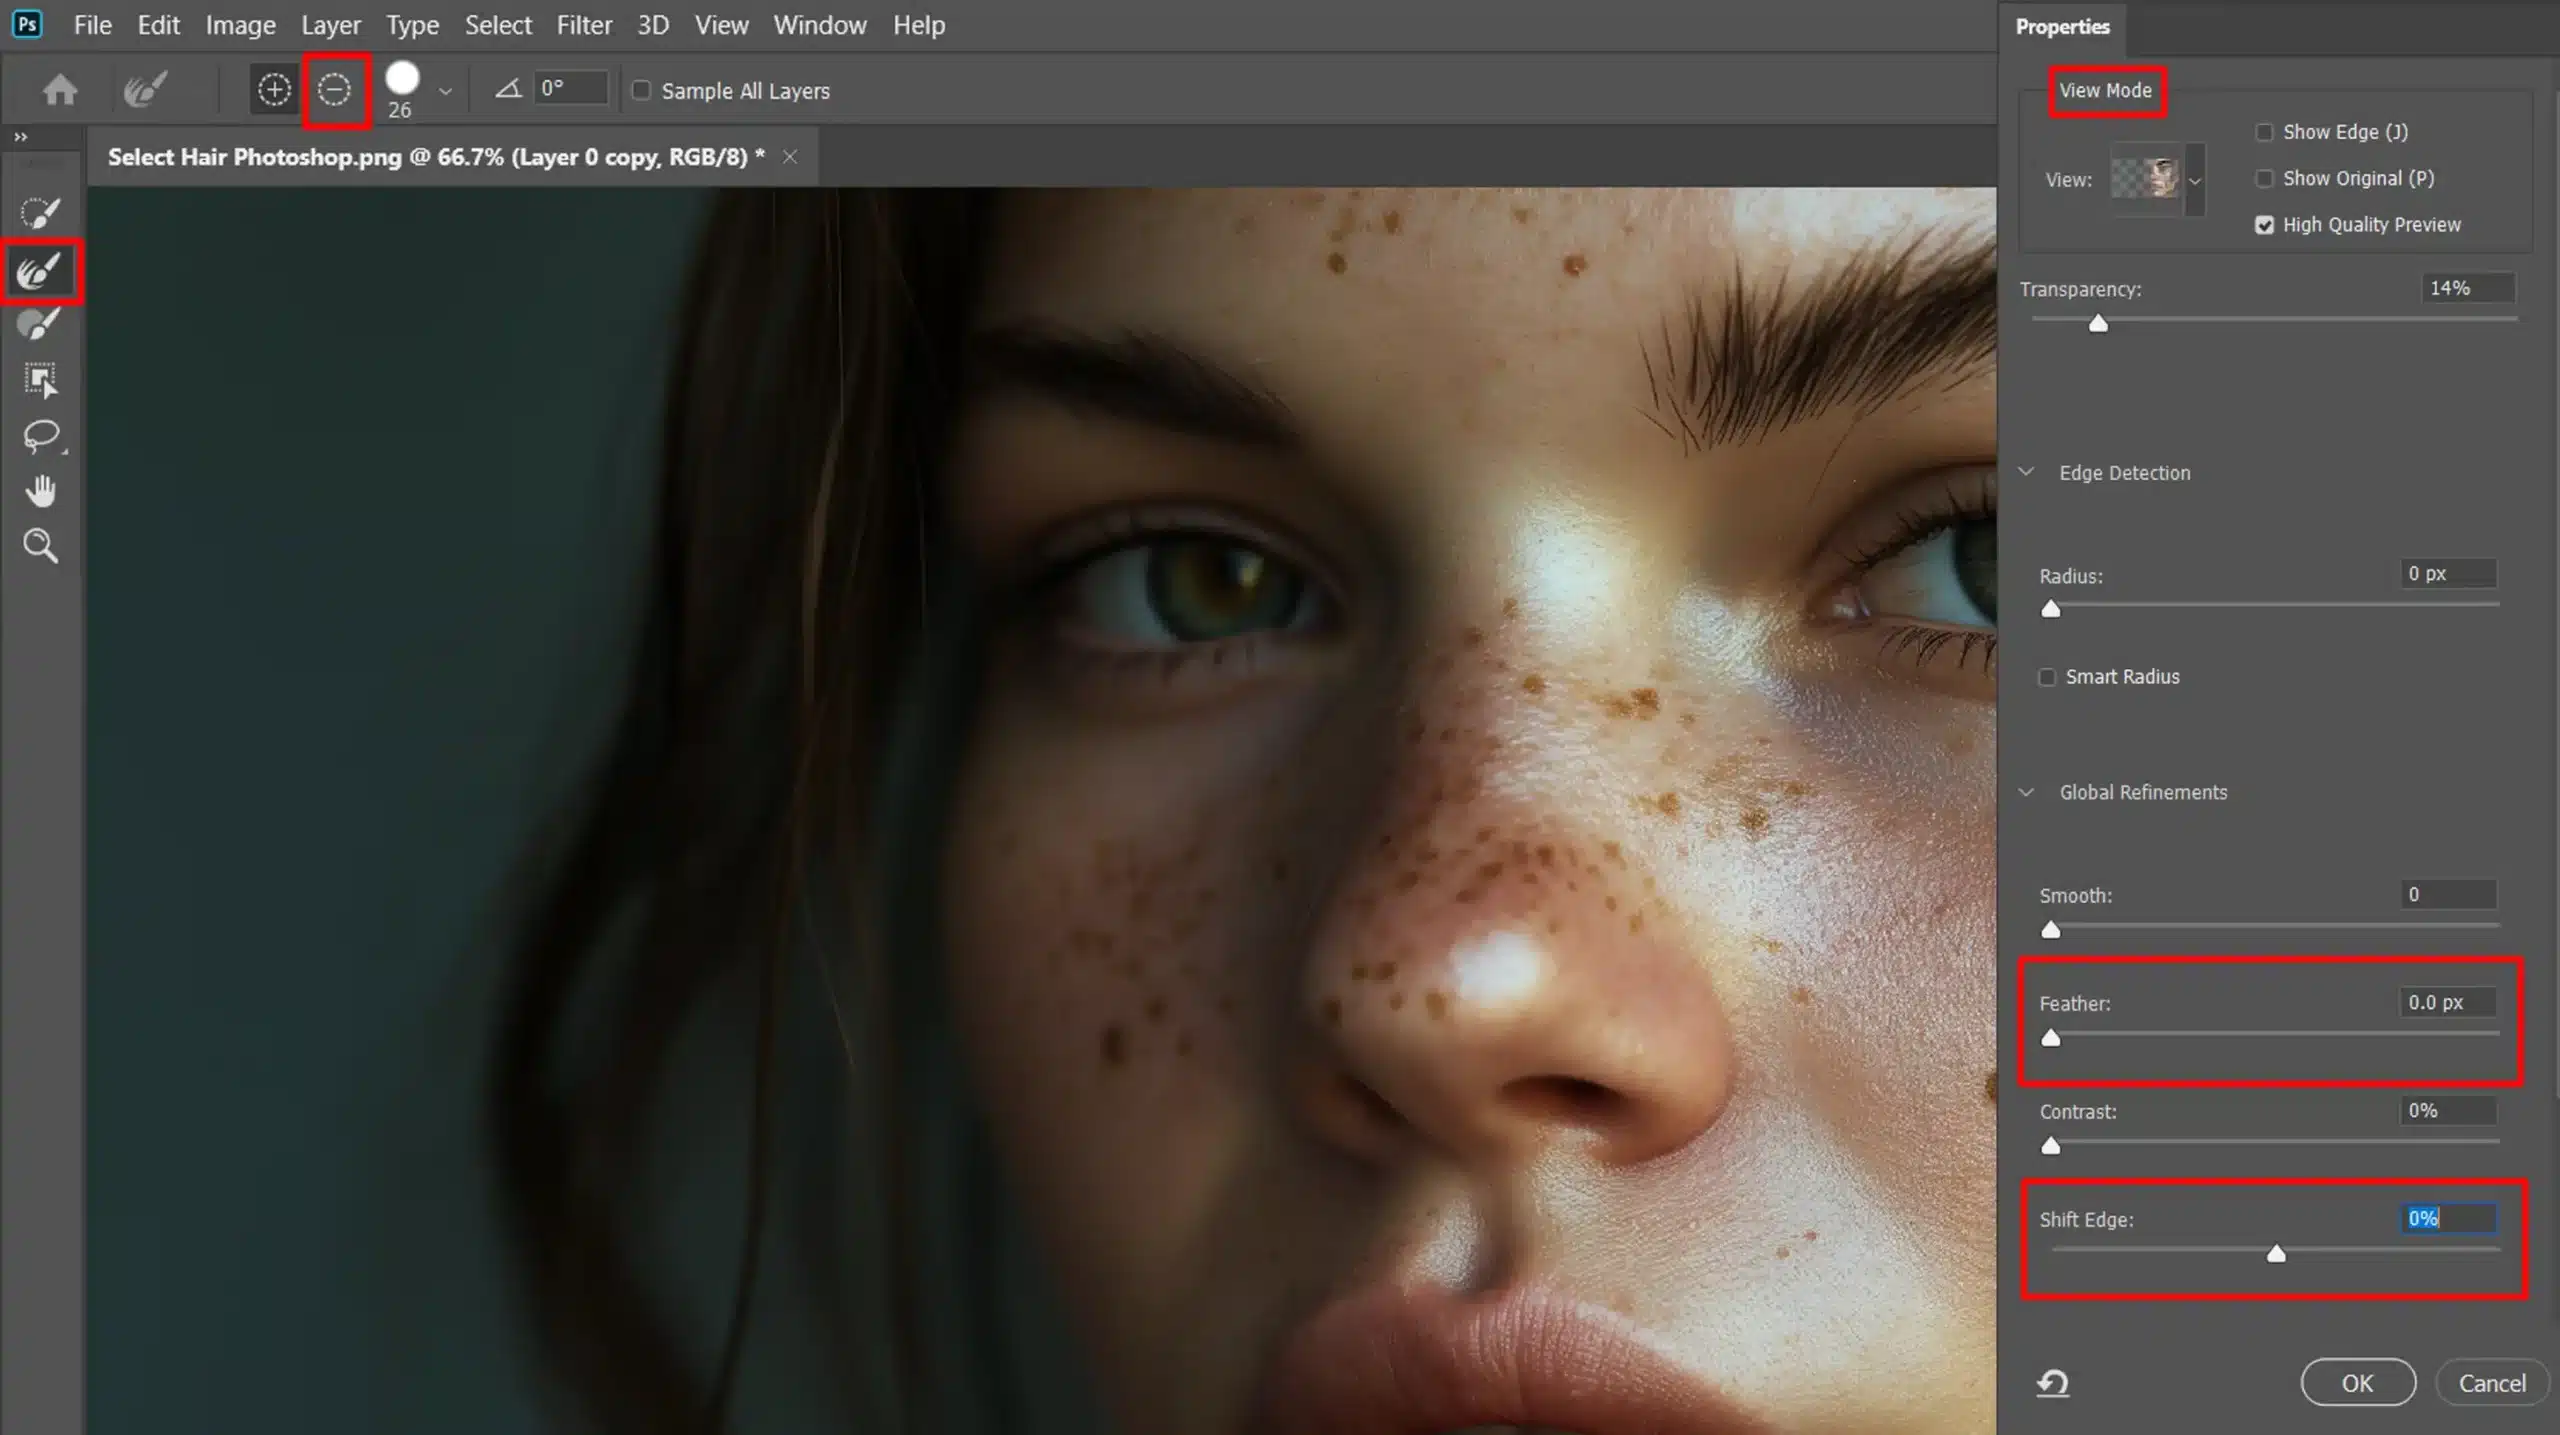
We’re onto fine-tuning. Here’s where the refine edge dialog box comes in handy.
Go to the refine edge button and click it. Adjust the settings such as shift edge and feather to fine-tune boundaries.
Don’t forget about the refine radius tool with the smart radius. It’s golden for tricky edges, especially when you need select hair Photoshop.
Be sure to use it to adjust the radius for better accuracy and to avoid unwanted radius areas.
Make sure to check the reveal layer view occasionally to see your progress in real time.
Finally, use the erase refinements tool if you need to correct any mishaps.
Steps to Fine-Tune the Mask
To fine-tune your mask in Photoshop, follow these steps:
- Click the refine edge button.
- Adjust settings like shift edge and feather.
- Use the refine radius tool for tricky edges.
- Check the reveal layer view mode to see progress.
- Use the erase refinements tool for corrections.
And there you have it. A seamless layer mask creation!
Pro Tip: Never hesitate to use the layers panel preview thumbnail to ensure your refinements are on point.
Practice refining edge settings and remember, perfection takes patience.
For more advanced techniques, consider learning about other essential tools in Photoshop, such as the content-aware fill and the patch tool.
These tools can further enhance your editing workflow and help you achieve professional results.
Working with the Layers Panel
When working on any image in Photoshop or Lightroom, the Layers Panel becomes your best friend. It serves as the workspace where you stack and manage various elements of your composition.
Think of layers as transparent sheets stacked one atop another. Each sheet can hold different parts of your design or edits without affecting other layers.
To start, ensure your selection tool is active. This action helps you manage and move elements efficiently. You can also use the pen tool to make precise paths for your shapes.
Organizing Layers
Maintaining an organized Layers Panel is significant for efficient editing:
- Name your layers descriptively to avoid confusion later. For example, if you select hair Photoshop, name the layer "Hair Selection."
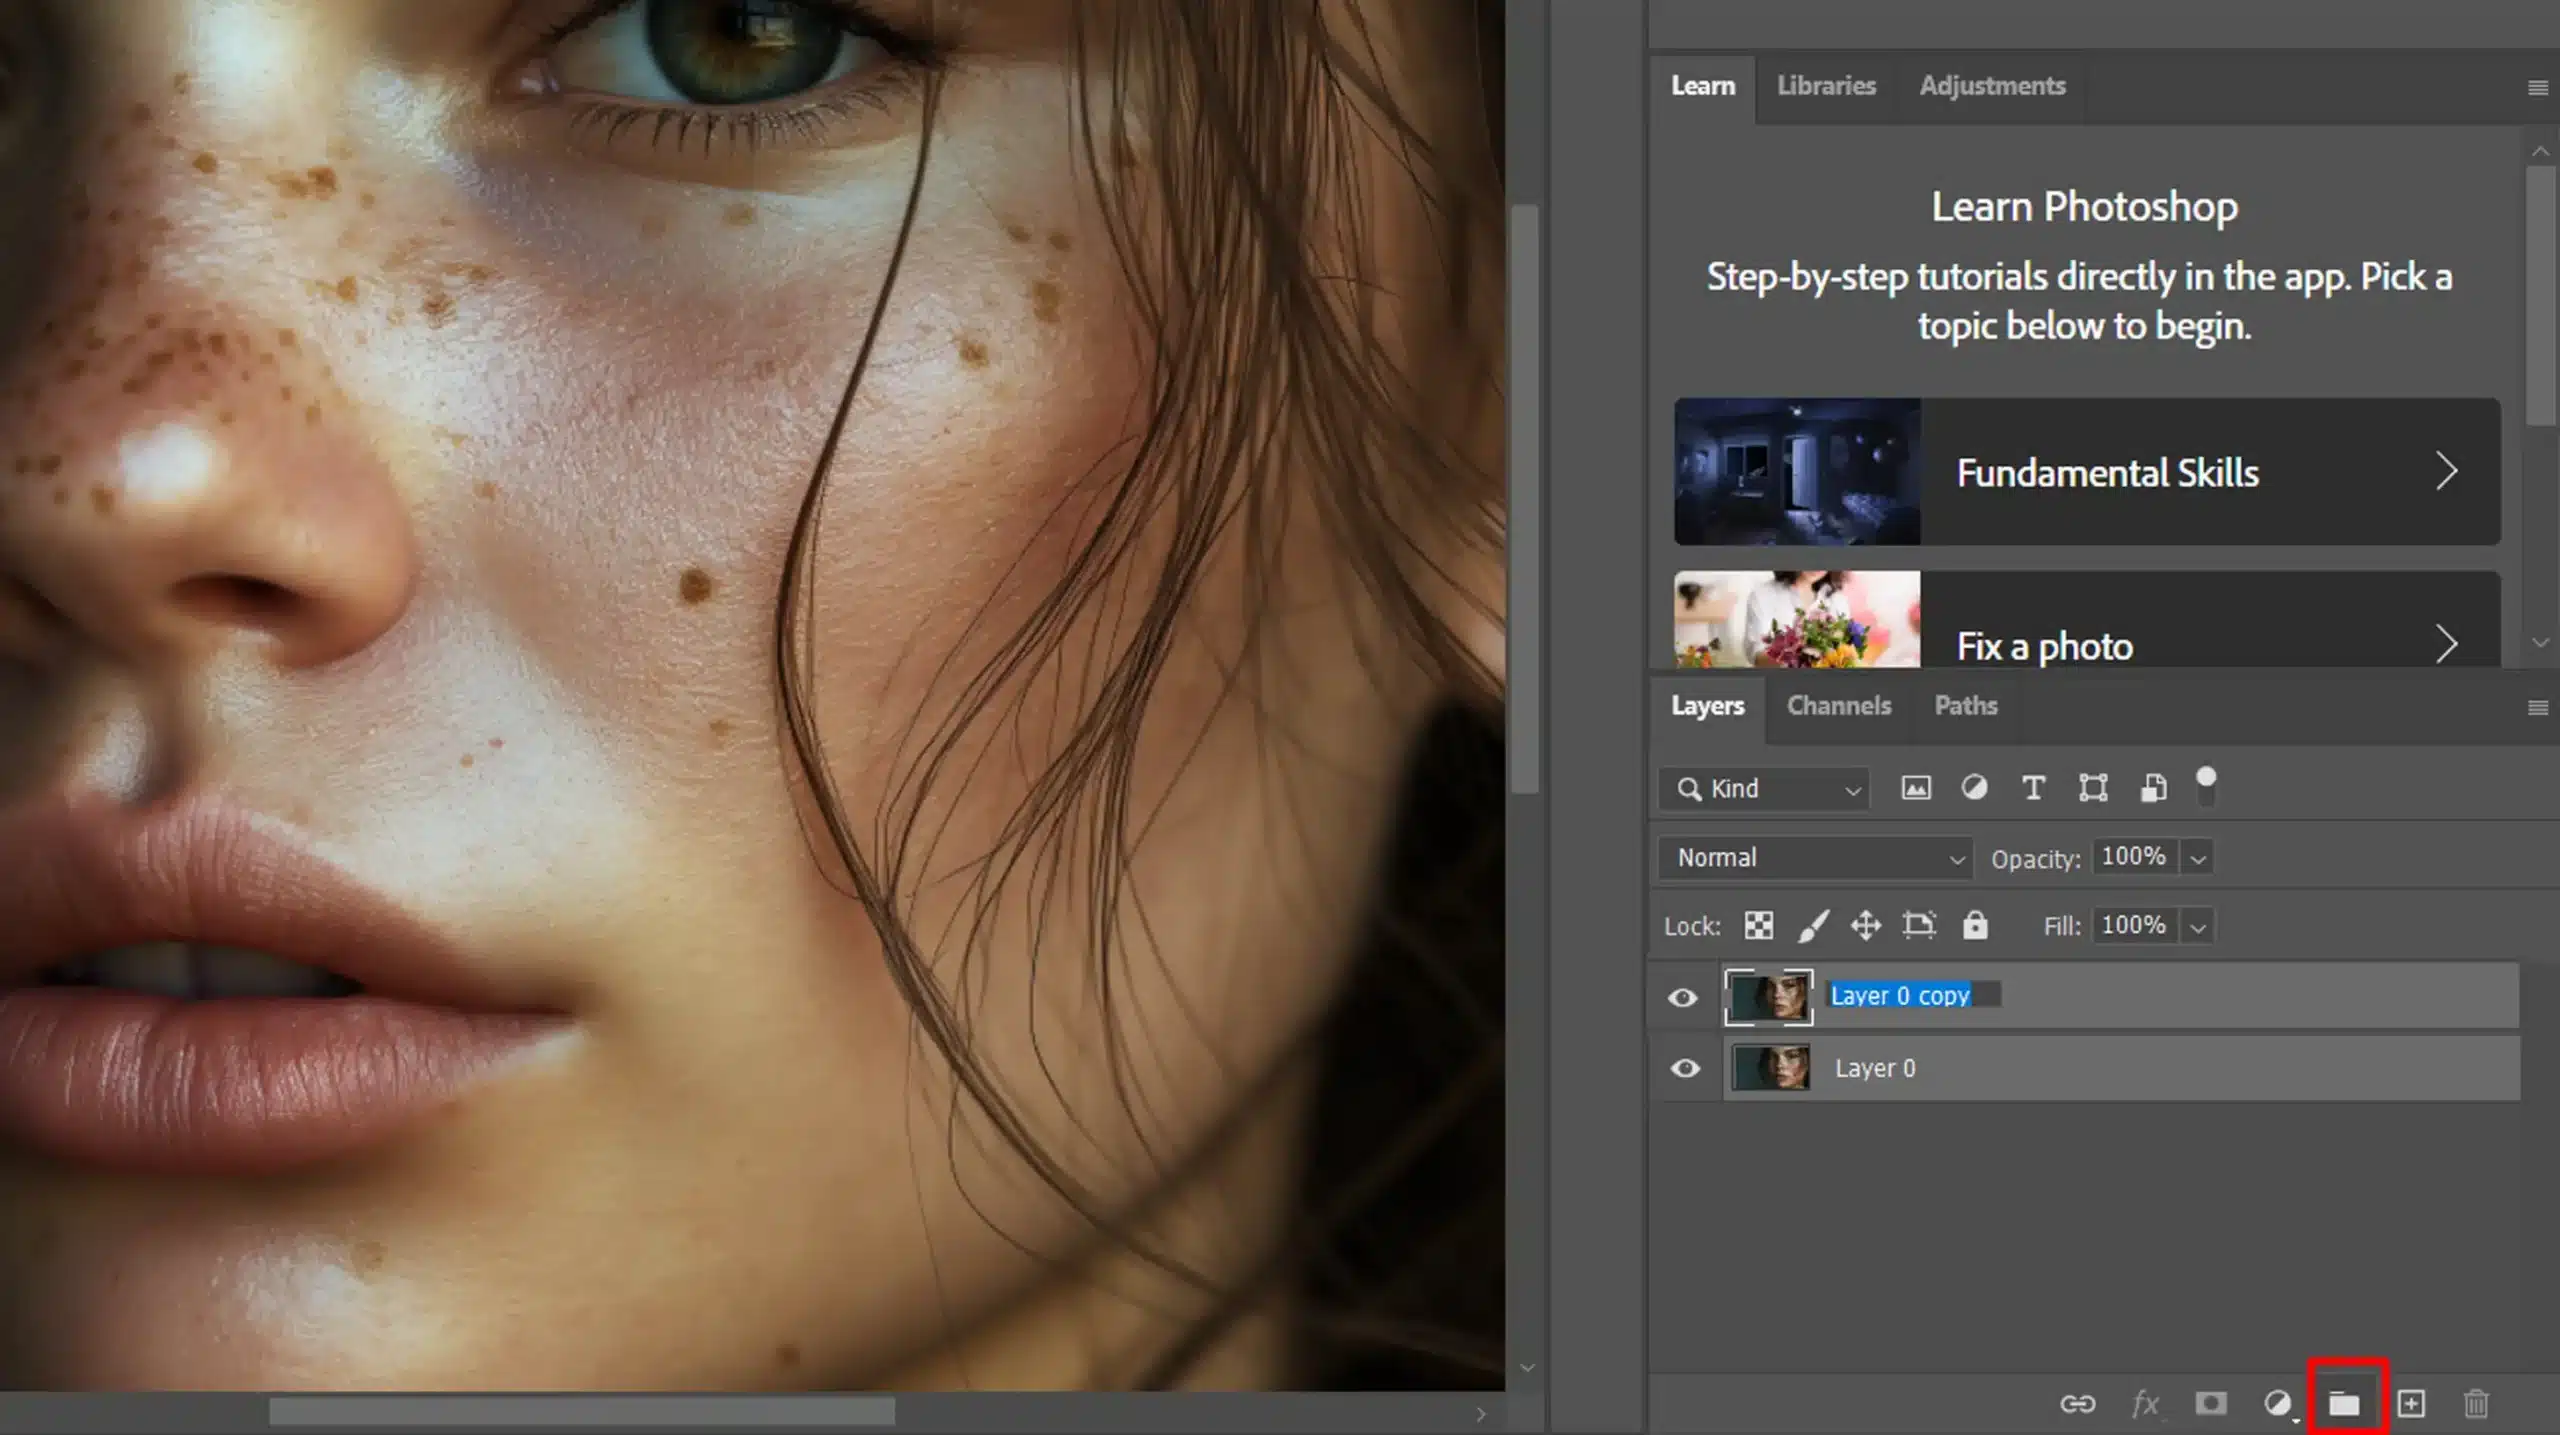
- Group related layers together by using folders. This practice keeps your workspace tidy and tracks your changes better.
- Use color-coding to distinguish between different types of layers quickly. It may seem trivial, but it can save you a lot of time.
Blending and Opacity
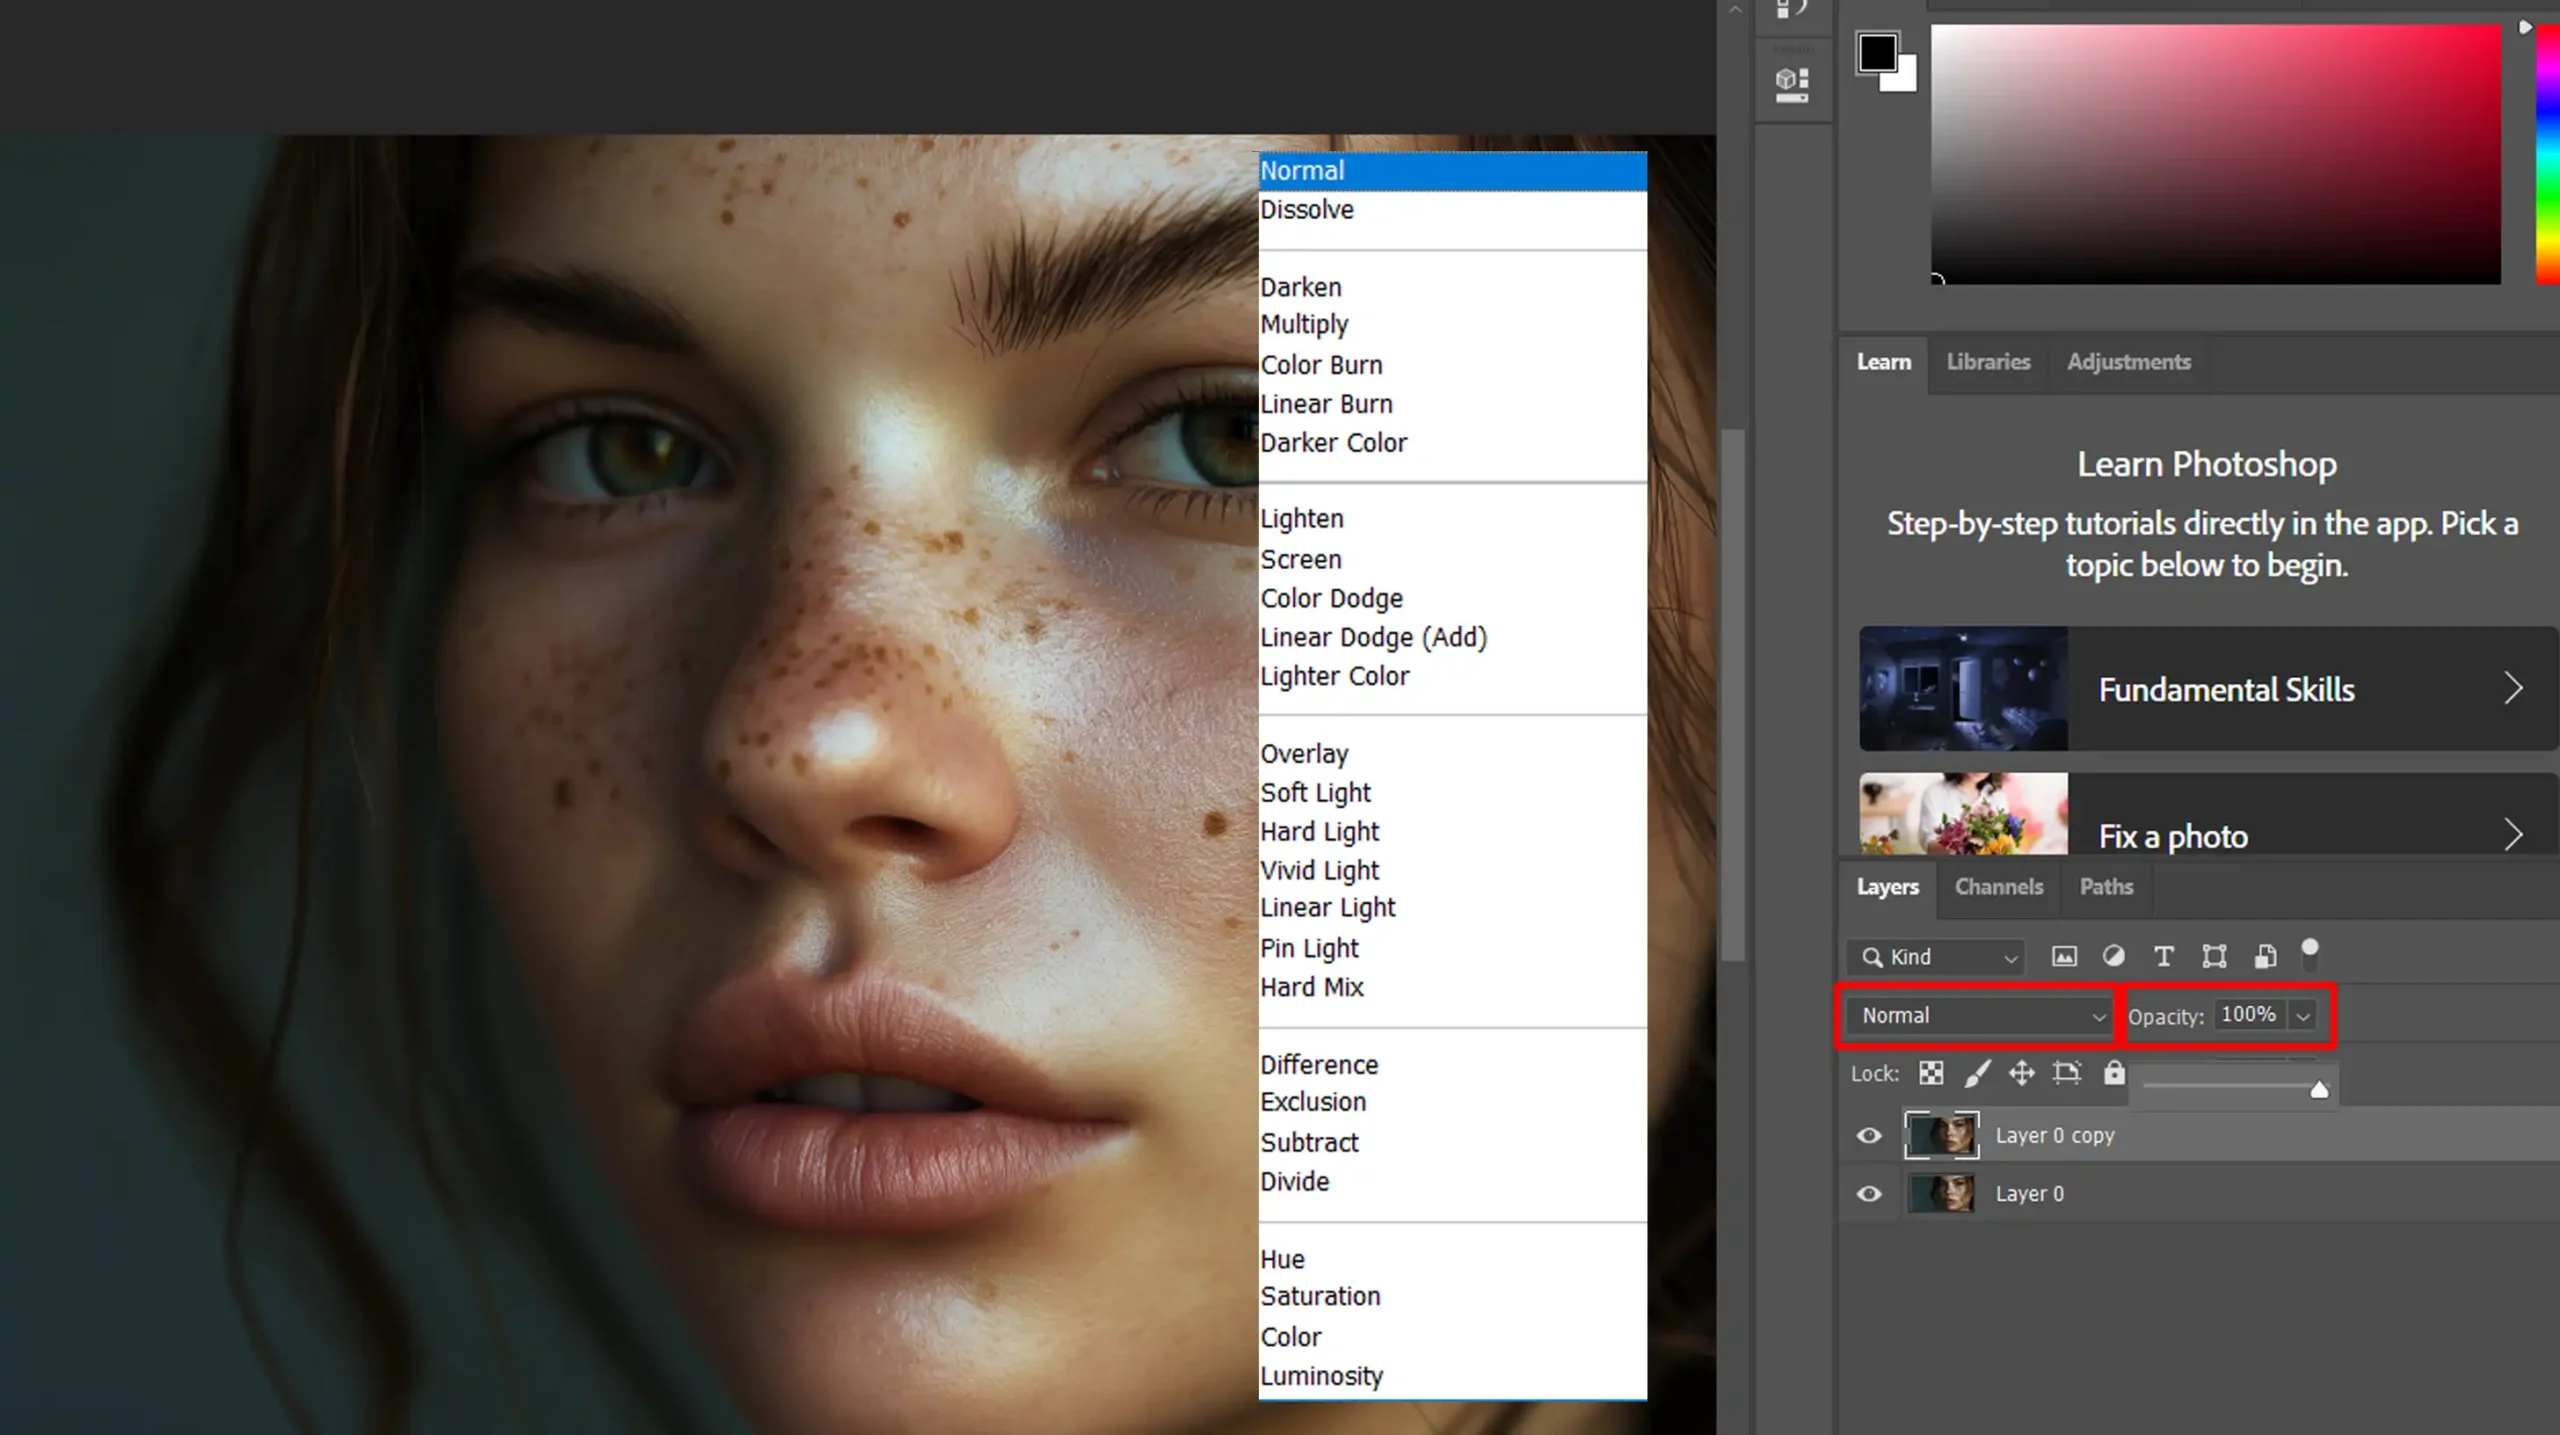
Blending modes offer various ways to blend one layer with the layers beneath it.
You can achieve many effects by experimenting with blending modes.
Just click on the dropdown menu in the Layers Panel and select different modes to preview the effects.
Another handy feature is opacity control. Sometimes, you want a layer to be partially transparent.
Adjusting the opacity slider lets you fine-tune how much of the layer below shows through.
Fine-Tuning Selections Like a Pro
When you need to make complex selections, the refine edge command is your go-to tool.
Access it from the menu after making a selection. It offers several adjust edge options to perfect your selection edges.
If you’re dealing with minute details like selecting hair in Photoshop, use the refine radius tool with the smart radius and zoom in to ensure accuracy.
This helps automatically adjust for better precision and avoid unwanted radius areas. Once satisfied, inspect your work using the layer mask thumbnail preview.
You might find the erase refinements tool helpful in correcting over-refined areas.
Keep practicing the refine edge process to become adept. The more you use it, the more intuitive it becomes.
Pro Tip: Create separate layers for each significant change or addition. It saves time and makes it easier to undo specific steps without affecting the overall project.
Final Touches and Tips for Select Hair Photoshop
After mastering the basics of layers, it’s time to delve into some final touches. This will make your work stand out in Photoshop and Lightroom.
Smoothing the Edges
Smoothing edges is significant for a polished look. One way to achieve this is by using the Refine Edge command.
This command helps fine-tune your selections, especially for tricky areas like hair selection in Photoshop.
Open the Refine Edge dialog box, enable the smart radius, and manually adjust the radius value to see which settings work best for your project.
This can help with small, intricate details, providing a more refined selection.
Adding Realism
To add realism to your photos, consider blending modes and opacity adjustments.
These settings allow you to layer images and create a more cohesive look.
Additionally, tools like the pen tool and various selection tools help refine your elements.
The Select Hair Photoshop feature is also beneficial for creating realistic hair selections in Photoshop.
Applying a portrait filter can further enhance the overall effect, making skin tones smoother and adding depth to the image.
Common Mistakes in Select Hair Photoshop
Many beginners make simple yet avoidable mistakes while using Photoshop and Lightroom. Let’s look at a few so you can avoid them and improve your workflow.
Wrong Use of Layers
People often do not use layers correctly. This results in clutter and confusion.
Always name your layers and group them properly. Utilizing essential tools in Photoshop like the layer mask and essential tools in Lightroom can significantly streamline your editing process.
Inadequate Selection
The selection tools are significant, but many users don’t use them well. Ensure your selection tool active is proper for the task to avoid imprecise selections. The quick selection tool in Photoshop is particularly useful for making fast and accurate selections.
Ignoring Refine Edge Command
The refine edge command helps to smooth out edges, but it’s often overlooked. Don’t neglect it, especially when working on complex selections.
Overlooking Refine Radius Tool
Tweaking the refine radius tool with the smart radius and adjusting the radius value carefully can minimize rough edges, leading to more polished results.
Neglecting to Select Hair Photoshop
When selecting hair, use the select Hair Photoshop feature. It results in a more natural look.
Pro Tip: Always use the mask thumbnail preview to inspect your work. It will save you time and ensure accuracy.
Frequently Asked Questions

How to Select Hair in Photoshop?
- Open your image in Photoshop.
- Choose the Quick Selection Tool from the toolbar.
- Click and drag over the hair to make a selection. For finer control, adjust the brush size as needed.
- If needed, refine the selection by using the 'Select and Mask' option.
How do You Mask, Refine, and Select Hair in Photoshop?
- After making a preliminary selection of the hair, click on ‘Select and Mask’ in the options bar.
- Switch to the Refine Edge Brush Tool within the Select and Mask workspace.
- Brush over the hair edges to capture fine hair details.
- Adjust the Edge Detection settings to improve the selection.
- Preview the selection and apply it by pressing OK.
Can I Edit My Hair Selection in Photoshop?
- Select the hair using the Quick Selection Tool or any other preferred selection tool.
- Once selected, go to ‘Image’ and then ‘Adjustments’ to modify color, brightness, contrast, etc.
- Use the Clone Stamp Tool or Healing Brush to fix any stray hairs or imperfections.
How do I Remove Unwanted Hair in Photoshop?
- Zoom into the area with unwanted hair for better visibility and precision.
- Select the Clone Stamp Tool or Healing Brush from the toolbar.
- Alt-click (Option-click on Mac) on a clean area of skin near the unwanted hair to sample it.
- Gently paint over the unwanted hair to replace it with the sampled skin texture.
- Repeat the process as needed until all unwanted hair is removed.
Conclusion
In conclusion, mastering the “select hair Photoshop” technique has made a huge difference in my editing process.
Before, I struggled with complex original background and intricate hairstyles, but now I can easily create more polished and professional images. This skill has really helped me save time and improve the quality of my work.
If you want to boost your photo editing skills, I highly recommend checking out my courses. The Photoshop Course covers everything from the basics to advanced techniques. You’ll learn all the tricks I use to achieve great results.
Also, the Lightroom Course is perfect for those who want to get the most out of their photos. Both courses are designed to give you the tools you need to succeed.
Give them a try, and you’ll see the difference in your own work!
Read more about Photoshop:


