Photoshop Project for Beginners: A Quick Start Guide
Photoshop Project for Beginners: A Quick Start Guide
Are you ready to dive into your first Photoshop project for beginners? If you’re just starting your creative journey, this guide will ignite your imagination and simplify the process.
Whether you’re aiming to enhance photos or design eye-catching graphics, Photoshop offers endless possibilities. I’ll walk you through the significant steps, ensuring you feel confident and inspired to explore more.
Discover how to transform your ideas into stunning visuals with ease. This project isn’t just about learning; it’s about unleashing your creativity and seeing immediate results.
Don’t miss out on unlocking the potential of your artistic skills. Let’s embark on this exciting adventure together!
Table of Contents
Why Choose Photoshop?
Photoshop offers endless possibilities. Whether you’re reviving old photographs or diving into digital artistry, this tool becomes your creative playground.
A Photoshop project for beginners is the perfect way to start exploring.
With tools like layer masks and selection tools, transforming images seems effortless. Using Adobe Photoshop, you can breathe new life into photos, making them vibrant and engaging.
Imagine the world of image manipulation; with a few clicks, you’d see ordinary photos become extraordinary. All you need is to understand how to use the software, and you are ready to begin.
Getting Started with Adobe Photoshop
Getting started with Adobe Photoshop is an exciting journey.
A Photoshop project for beginners is the perfect way to familiarize yourself with the basic tools and techniques.
In this section, we’ll explore the fundamental tools that will help you build a strong foundation for any project.
Fundamental Tools and Techniques
Photoshop might be complex at first glance, but starting with the basics helps. Begin with learning significant tools like the clone stamp tool and adjustment layers.
This foundation allows for creating stunning images and achieving effects like color splash.
Adding excitement to images is easy with multiple exposures and glitch effects. These tricks turn standard pictures into fascinating artwork.
Visual Storytelling
Understanding photos involves more than just taking them. It’s about adding elements that tell a story. Visual storytelling sends messages through images; it’s an art you perfect in Photoshop.
You can even blend modern photographs with film photography elements to design something unique. Old photographs also get a fresh look, taking you back in time yet keeping things relevant.
Enhancing Skills
Learning the specifics, like using blending modes for soft light effects or removing unwanted objects, enhances your skills.
Don’t let the learning curve discourage you. Making repeated small adjustments on how to blend modes can change the look of images dramatically.
Mastering this ensures everything fits perfectly. Plus, the ability to add blurred backgrounds simulates professional photography.
Beginner Projects
For beginners, a Photoshop project focusing on basics improves confidence. Creating multiple images into one cohesive piece teaches patience and creativity.
Layer styles give text and image depth while using two pictures as starting points keeps projects simple yet effective.
Never underestimate the power of simple practices, as they pave the way for more complex tasks.
Unlocking Photoshop’s Potential
Photoshop’s potential unlocks when understanding its fundamentals. Experimentation leads to discovery.
Multiple ways exist to manipulate photos, like the multiple exposure effect or adjusting elements for better visual impact.
Let’s turn stumbling blocks into stepping stones toward mastery.
Pro Tip: For those interested in expanding their skills further, learn Photoshop to speed up your workflow and enhance productivity.
Basic Techniques for a Photoshop Project for Beginners
Mastering basic skills in Photoshop makes the editing process smoother and more enjoyable. Sometimes, I procrastinate when I have to start from scratch. But once you dive in, magic happens.
Setting Up Your Workspace
Setting up your workspace is the first step. Think of it like arranging your desk before starting homework. Tools like layers and adjustment panels are important. I set them up exactly where I need them. Otherwise, hunting for them turns into a treasure hunt. Use the workspace tab to customize layouts that will work best for you. You’ll thank yourself later.
Using the Photoshop Toolbar
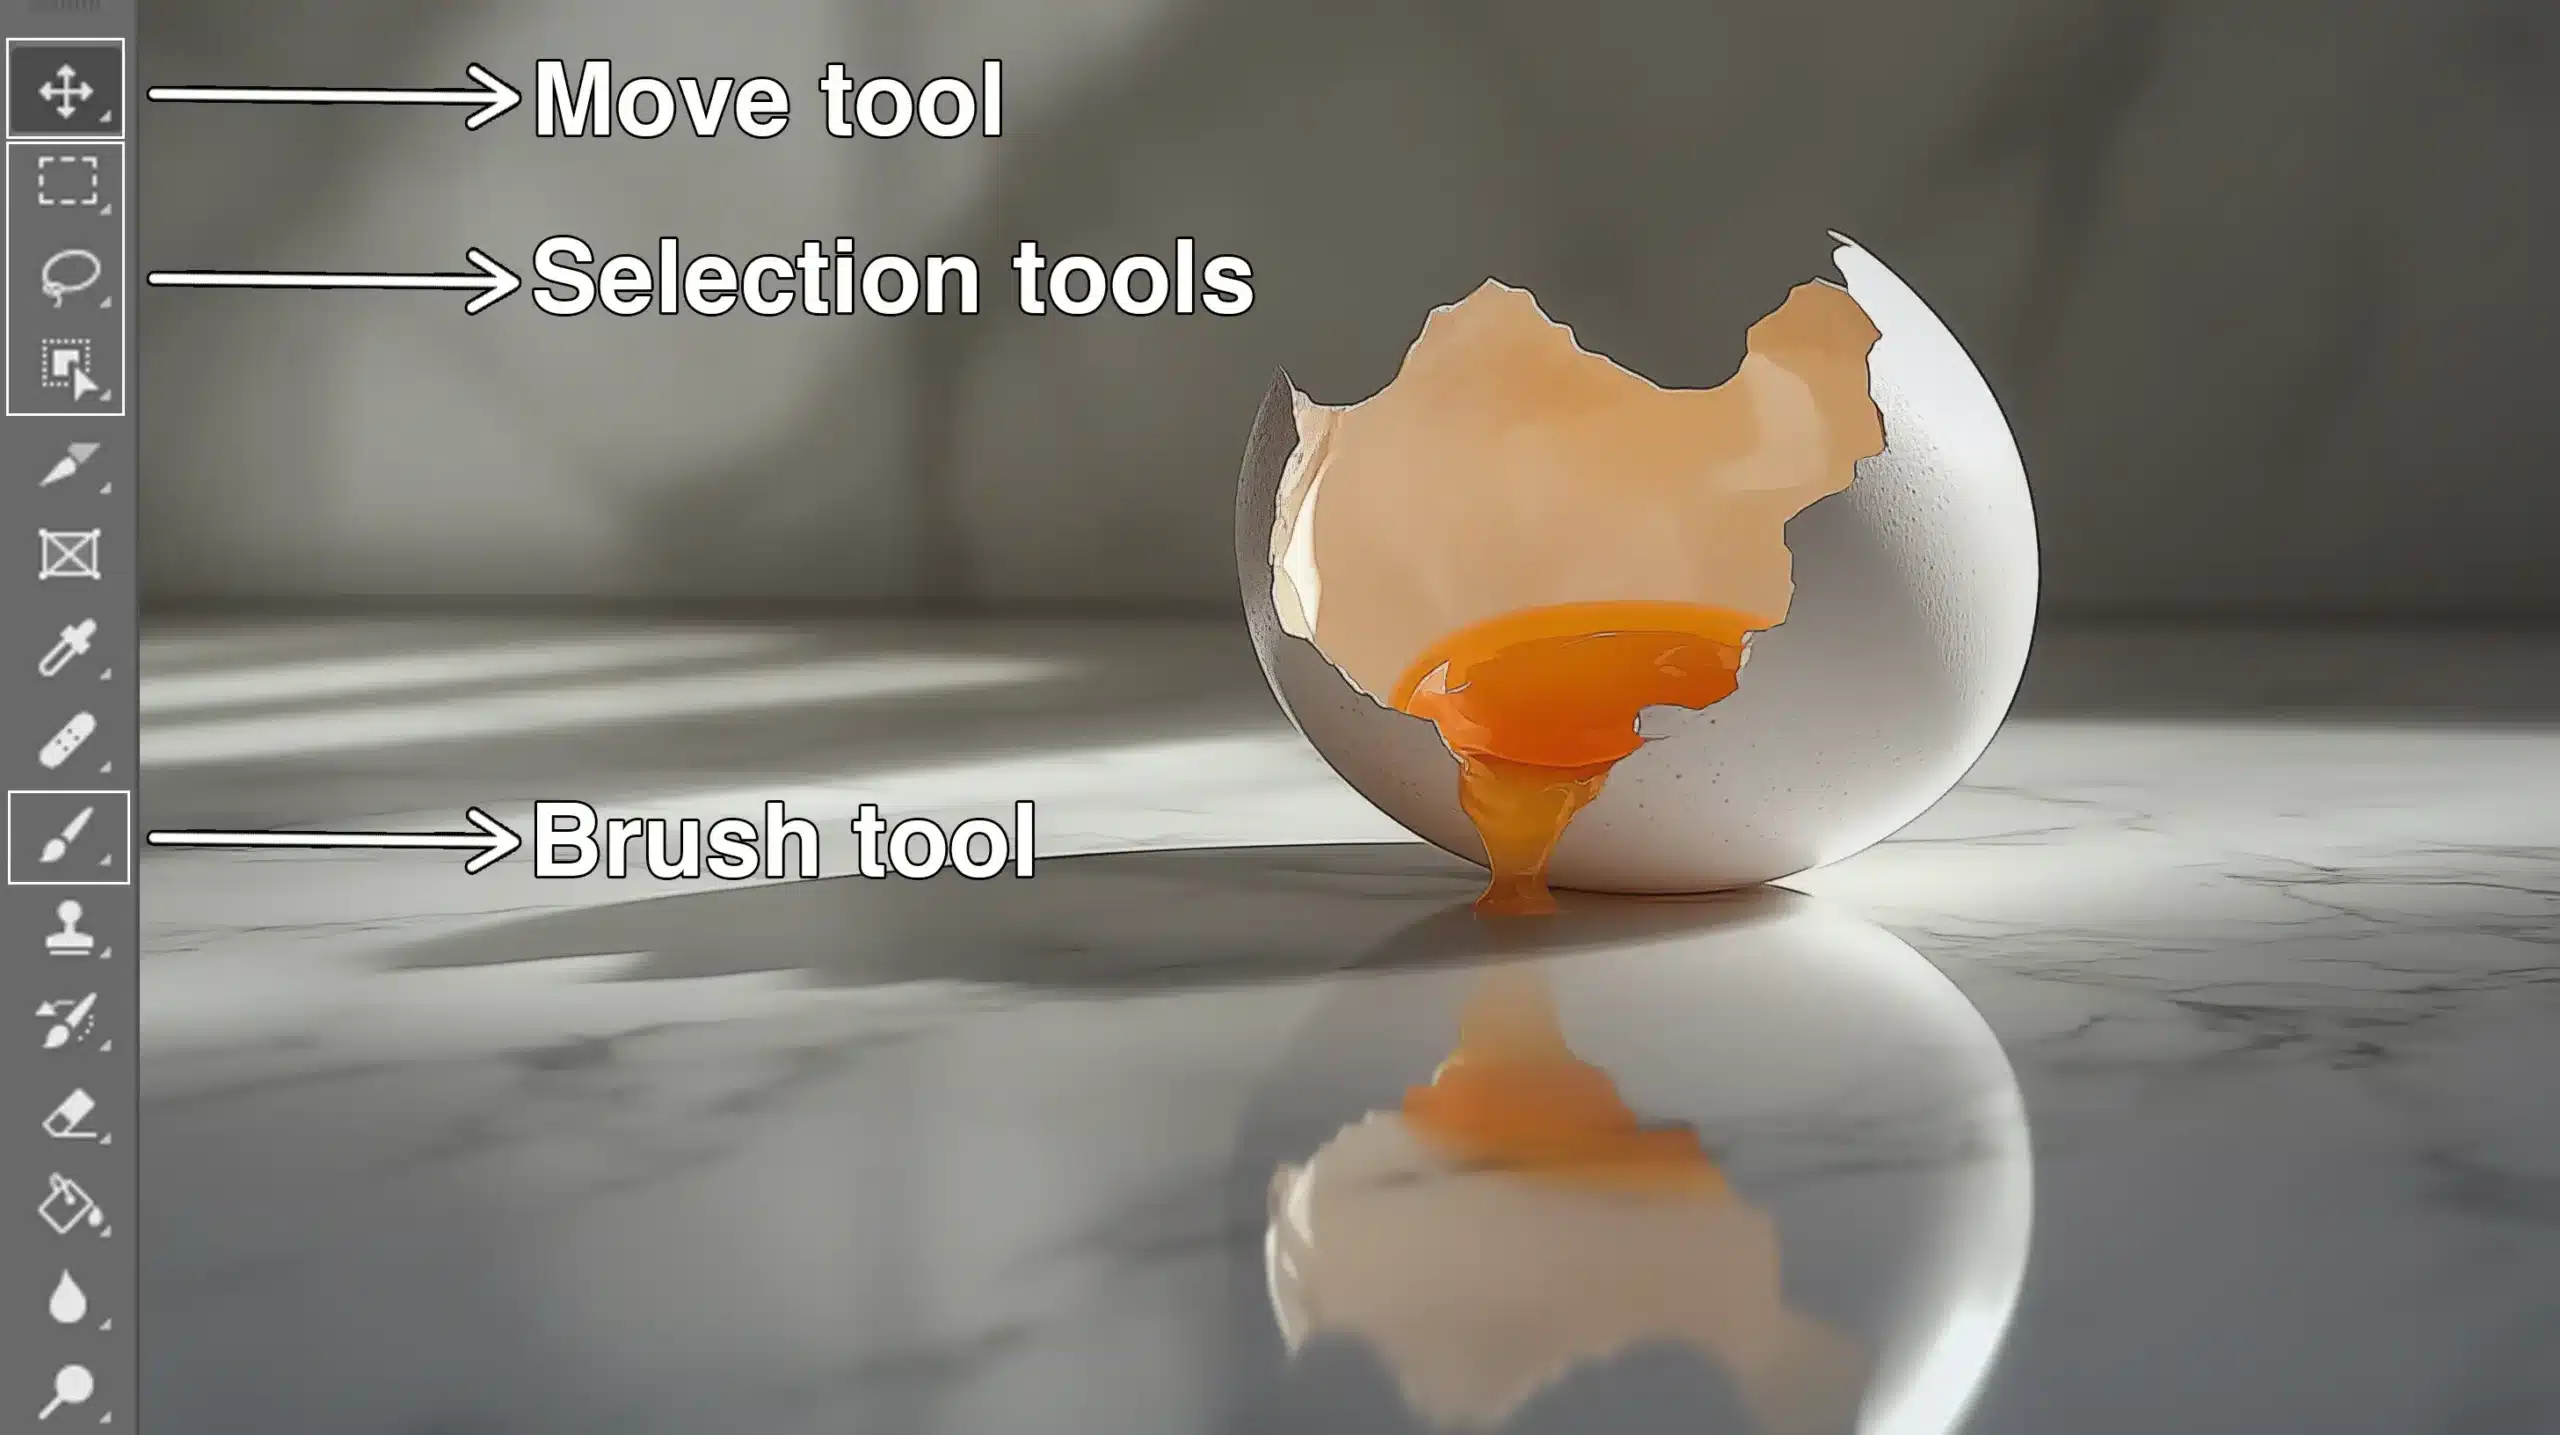
This toolbar is akin to a painter’s palette. First-time users might feel overwhelmed. Don’t worry; we all do. Start by familiarizing yourself with the essentials like the Move Tool, Selection Tools, and the Brush Tool. Get comfortable with the zoom function.
Basic Tools and Settings
Familiarize yourself with these basic tools to lay the foundation for your Photoshop projects. Here’s a quick guide to using them effectively.
Layer Masks: They are about as cool as secret compartments. They show or hide parts of a layer. Practice with small projects to get the hang of it. A simple project for beginners might involve combining two images using layer masks to design unique compositions.
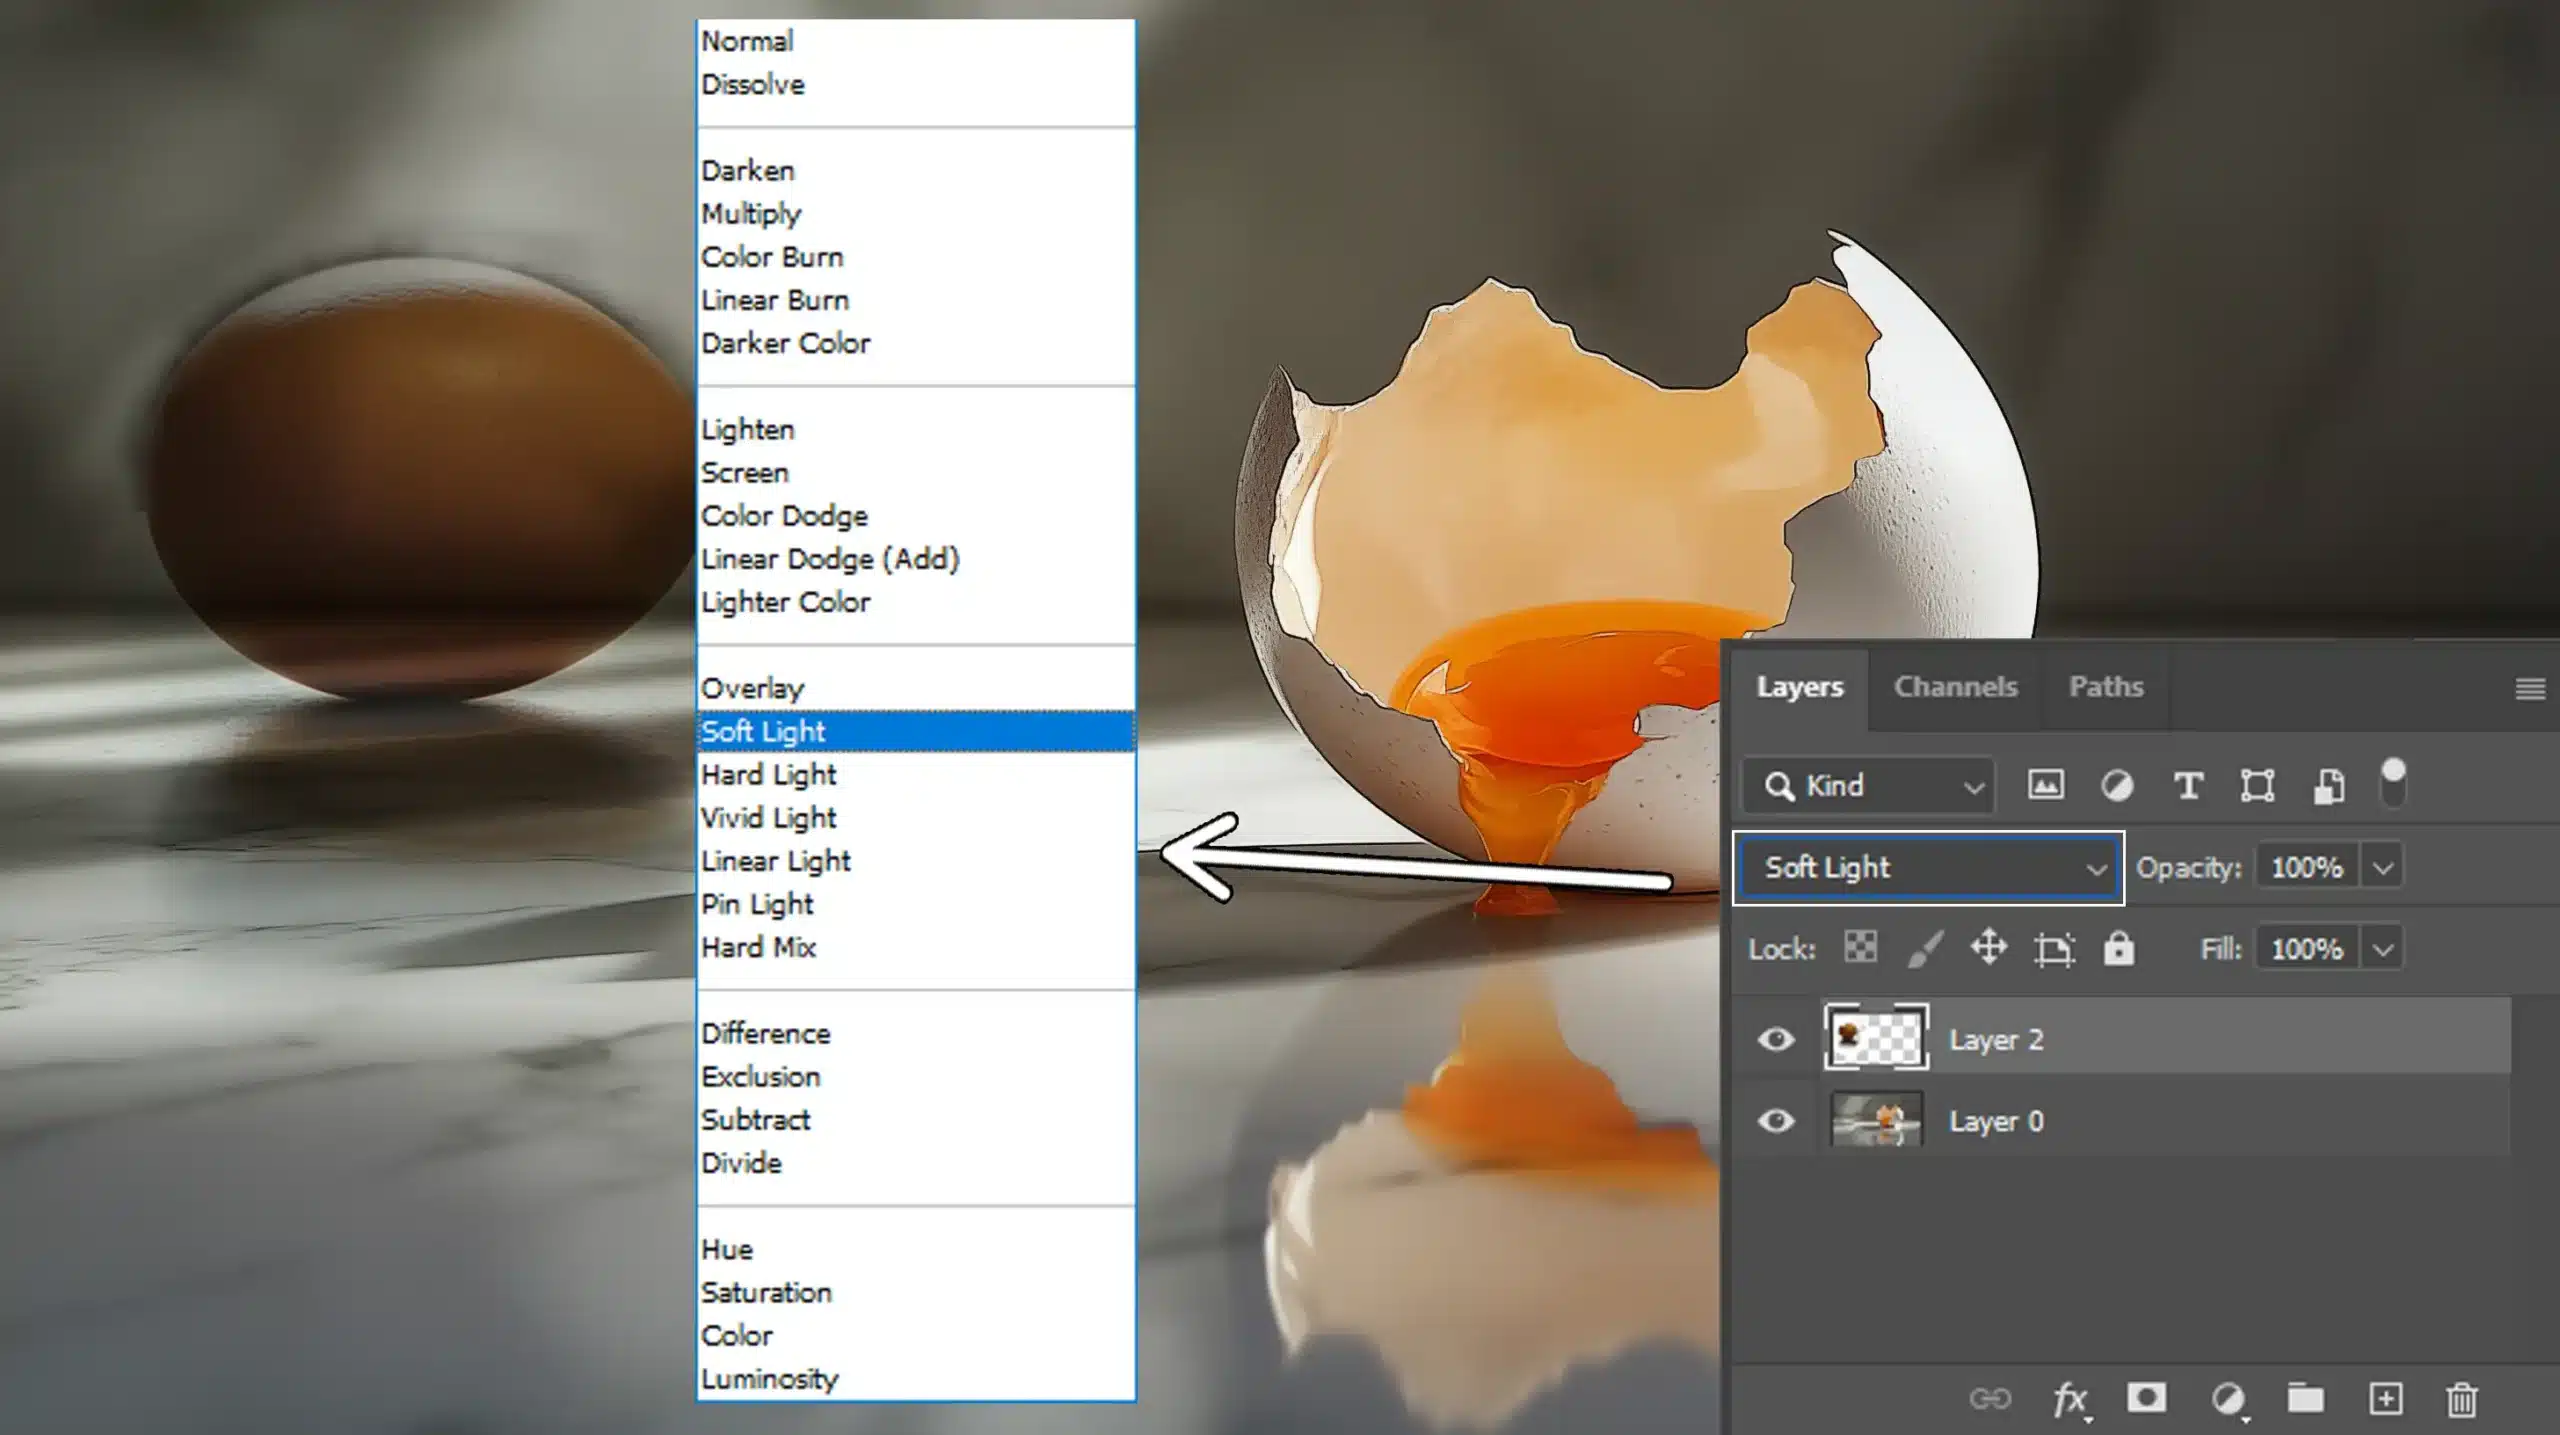
Blend Modes: When it comes to photo manipulation, blend modes change how layers interact. Start with soft light to add subtle changes or create dreamy effects. Blending modes offer endless possibilities but can also lead to delightful surprises or major headaches if not understood properly.
Film Photography Edits: Incorporating modern elements into film photography edits can refresh old memories. Methods like the multiple exposure effect allow for creative storytelling. An example would be layering a cityscape over a portrait for depth. Layer masks ensure smooth transitions between images.
Glitch Effect: Want to explore something fun? Try the glitch effect. It's like creating deliberate errors that somehow look super artistic. Just play around with the settings. You might find you like the imperfections.
In Lightroom, you focus more on image editing rather than creating entirely new images. Together, Photoshop and Lightroom expand artistic boundaries.
Pro Tip: Don’t neglect the blurred background. It draws attention to the subject, adding depth without distraction.
Fun Photoshop Projects for Beginners
Photo manipulation is a fun way to explore new skills, and a Photoshop project for beginners is a great way to start. By combining and adjusting images, you can develop unique visuals and improve your skills.
It’s an engaging way to experiment with different effects and enhance your editing abilities.
Photo Manipulation
Photo manipulation is a great way to get creative and improve your skills. A Photoshop project for beginners is the perfect starting point.
It helps you experiment with combining different images and applying effects, making it an exciting way to learn and grow your editing abilities.
Double Exposure Effect and Color Splash Effect
This effect merges two images into one, like blending a calm forest with a city skyline.
Start by opening your two chosenimages in Photoshop. Place them in separate layers.
Play with the blending mode to see different outcomes, and don’t hesitate to try all the options until you find the look you love. This technique is a great way to explore different types of photography styles.
Feeling adventurous? Incorporate the color splash effect! Focus on one color and make it pop while the rest turns black and white. It guides the eye and adds drama.
Use the brush tool to desaturate your image and then bring back the desired color. Simple steps lead to striking modern photographs.
Soft Light and Layering
Remember the power of soft light in creating ambiance. Adjusting your images with this blend mode can transform flat images into pieces with mood and character. Sometimes, a subtle touch makes all the difference.
Let’s not forget to work with multiple images. Layering is where the real magic begins. It isn’t just stacking one thing on top of another.
Each layer brings its own vibe, and when combined thoughtfully, they tell stories. Explore, but keep it balanced. Clutter isn’t captivating.
Creative Effects and Techniques for a Photoshop Project for Beginners
Creative effects and techniques allow you to take your Photoshop skills to the next level. One popular technique is the double exposure effect, which combines two images into one for a stunning visual.
This is a great Photoshop project for beginners, offering a fun way to experiment with blending and creativity.
Double Exposure Effect
Have you ever wondered how artists combine two pictures into one? That’s the magic of the double exposure effect. It gives your images a dreamy feel by blending them together, much like the captivating results you can achieve with Photoshop.
Steps to Create Double Exposure
To create a double exposure effect, follow these steps to blend two images together seamlessly.
Choose two strong images (e.g., a tree and an urban landscape).
Pro Tip: To make your work stand out, focus on selecting bold contrasts and vibrant elements in your pictures.
Advanced Projects in Photoshop: A Photoshop Project for Beginners
If you’re looking to move beyond the basics, creating a color splash effect is a great way to build on your skills.
While it’s a fun challenge for a Photoshop project for beginners, it also serves as a stepping stone for more advanced techniques.
This effect brings focus to one color while desaturating the rest, creating a striking visual impact.
Color Splash Effect
To create a color splash effect, you’ll focus on highlighting one color while turning the rest of the image black and white.
This is a fun and creative Photoshop project for beginners that allows you to experiment with color and make certain elements pop. Follow the steps below to add this effect to your images.
Steps to Create the Effect
To apply the color splash effect, follow these steps to highlight specific areas of your image. This process will help you add dramatic color contrasts while keeping the rest of the image in black and white.
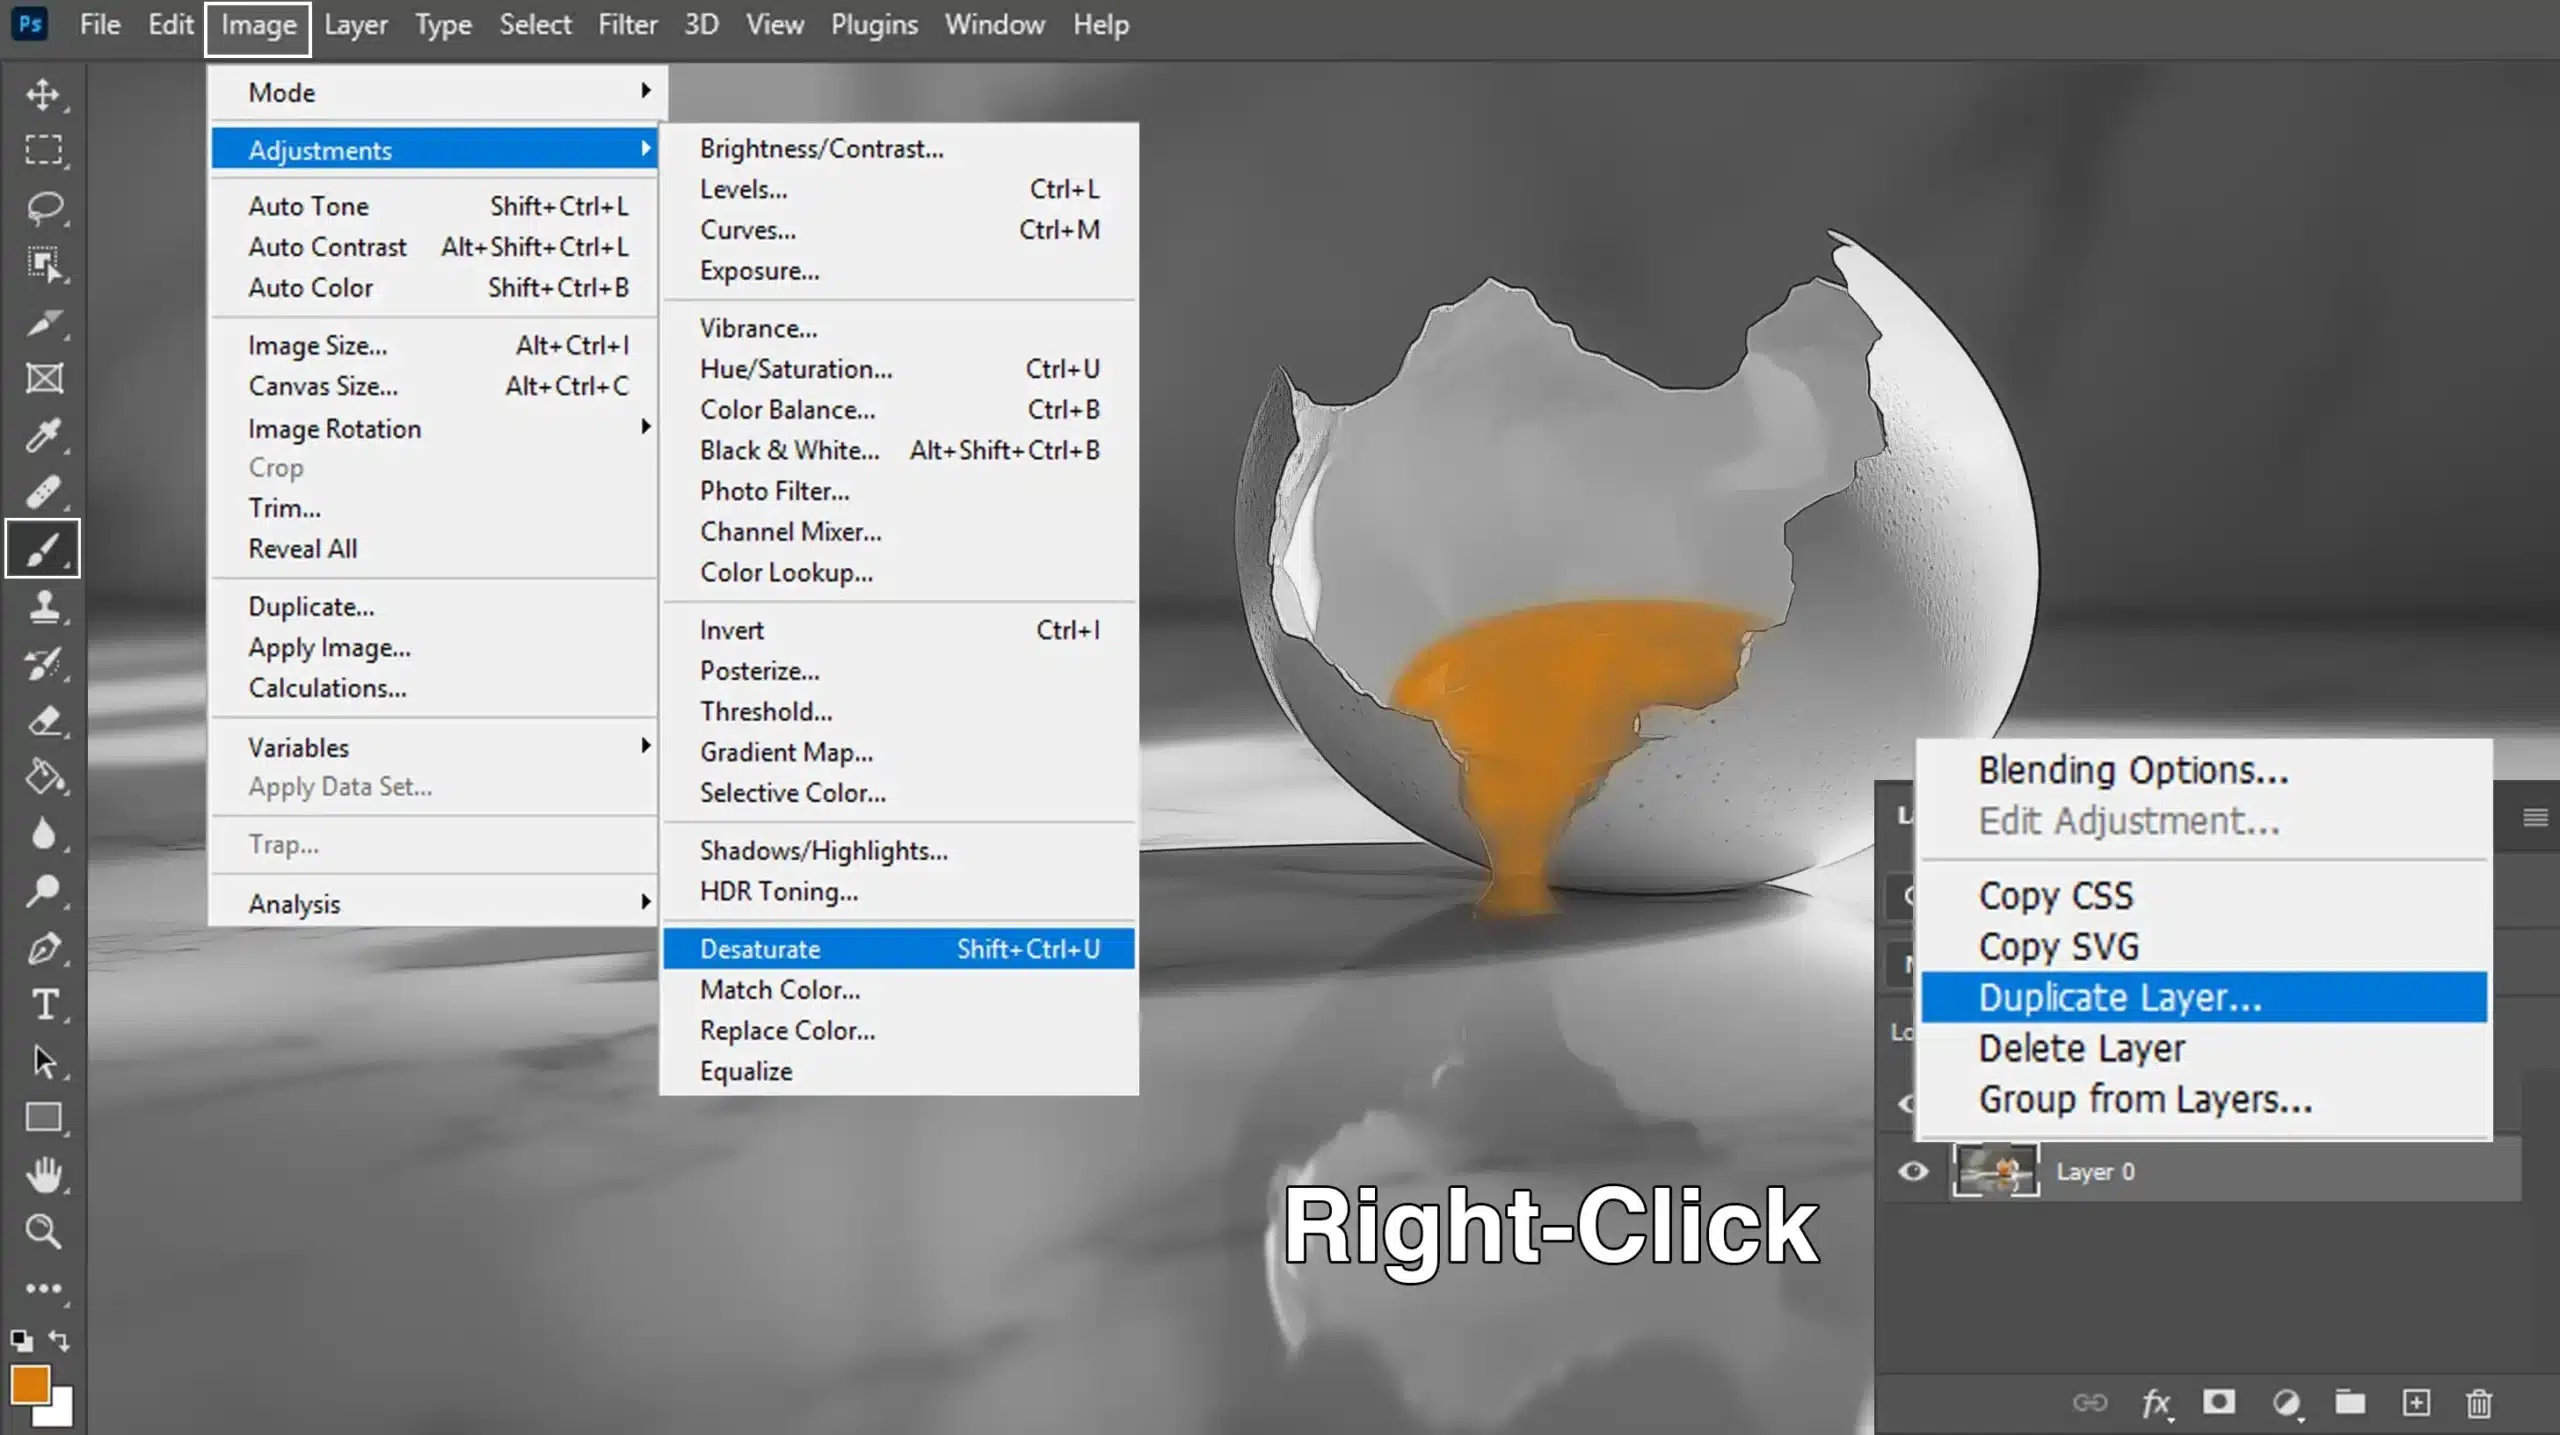
Open the image in Photoshop.
Duplicate the layer for safety.
Desaturate the whole image.
Use the brush tool to paint back the areas where you want color, or use a mask for precise edits.
Adjust the brightness and contrast to make the colored part pop even more. Experiment with different elements and play with other hues as well. For added precision, consider using the quick selection tool in Photoshop to select areas more efficiently.
Retro 3D Effect
The retro 3D effect adds depth and a dynamic, nostalgic vibe to your images. This technique is a fun Photoshop project for beginners that will introduce you to layering and blending options while achieving a cool, retro look.
Steps to Achieve the Effect
Follow these steps to get the iconic 3D look:
Open the image in Photoshop.
Duplicate the background and name it '3D'.
Go to blending options and uncheck 'Blue' or 'Green'.
Slightly move the image layer to the side.
Align multiple images using this technique for a fun collage. It’s fun how something so simple brings such a cool vibe. Keep playing because that’s what creativity is all about.
Pro Tip: Don’t forget to save your work in layers. Having multiple layers lets you edit parts without starting over. Saving time is like finding gold.
Tips and Tricks for Efficient Workflow
Mastering Photoshop and Lightroom isn’t about age or special skills. It’s about learning a few simple tricks. Let’s explore some effective hacks to make your editing process faster and more efficient.
The table below highlights the main strategies to improve your efficiency and enhance your editing process in both Photoshop and Lightroom.
Aspect
Overview
Time-Saving Shortcuts
Using keyboard shortcuts can significantly speed up your workflow, saving time navigating through menus.
Presets in Lightroom
Save your favorite looks as presets for one-click transformation, speeding up the editing process.
Batch Editing
Edit multiple photos at once by applying similar adjustments, streamlining your workflow.
Layers in Photoshop
Layers keep your edits non-destructive and organized, making it easier to adjust individual parts of an image.
Actions in Photoshop
Record repetitive tasks as actions, which you can then replay to speed up your process.
The Crop Tool
Use the crop tool to focus attention on the most important parts of the image, ensuring a clean composition.
Adjustment Tips
Start simple with adjustments and use sliders to see how different settings impact your images.
Save Regularly
Save your work regularly and use version saves to keep track of different stages of your project.
Time-Saving Shortcuts
First up, keyboard shortcuts. They’re the tiny saviors in our tech toolkit. Knowing which keys do what saves you time. Let’s face it: who wants to navigate a thousand menus?
Get your fingers dancing on Ctrl+Z for undo or Ctrl+C and Ctrl+V for copy and paste. Every second counts, so don’t waste them!
Presets in Lightroom
Ever found the perfect look for a photo? Save it as a preset! One-click wonders can transform an image with minimal effort. Find yourself coming back to certain styles.
That’s your preset waiting to happen. This is one of the essential tools in Lightroom that can significantly speed up your workflow.
Why edit one photo at a time if you can tackle a bunch with similar adjustments? Start with the basics like exposure and contrast in one image and then apply the settings to the rest. It’s like having a magic wand!
Layers in Photoshop
Layers keep your work organized and reversible. Non-destructive editing is important – think of layers as a way to stack content separately, which protects the original image. This is important when using advanced features like content-aware fill in Photoshop.
Actions in Photoshop
Record those repetitive tasks as actions, and then play them back with a click. You’ll feel like a wizard casting spells on your images!
The Crop Tool
Don’t shy away from the crop tool. Simple yet effective, cropping focuses the view on what matters most in a photo.
Adjustment Tips
If you’re struggling with adjustments, start simple. Use sliders and see their impact. Don’t rush; learn what changes they bring to the image.
Save Regularly
Remember to save your work regularly. Using version saves allows you to keep different stages, which is useful for recovering from any mistakes.
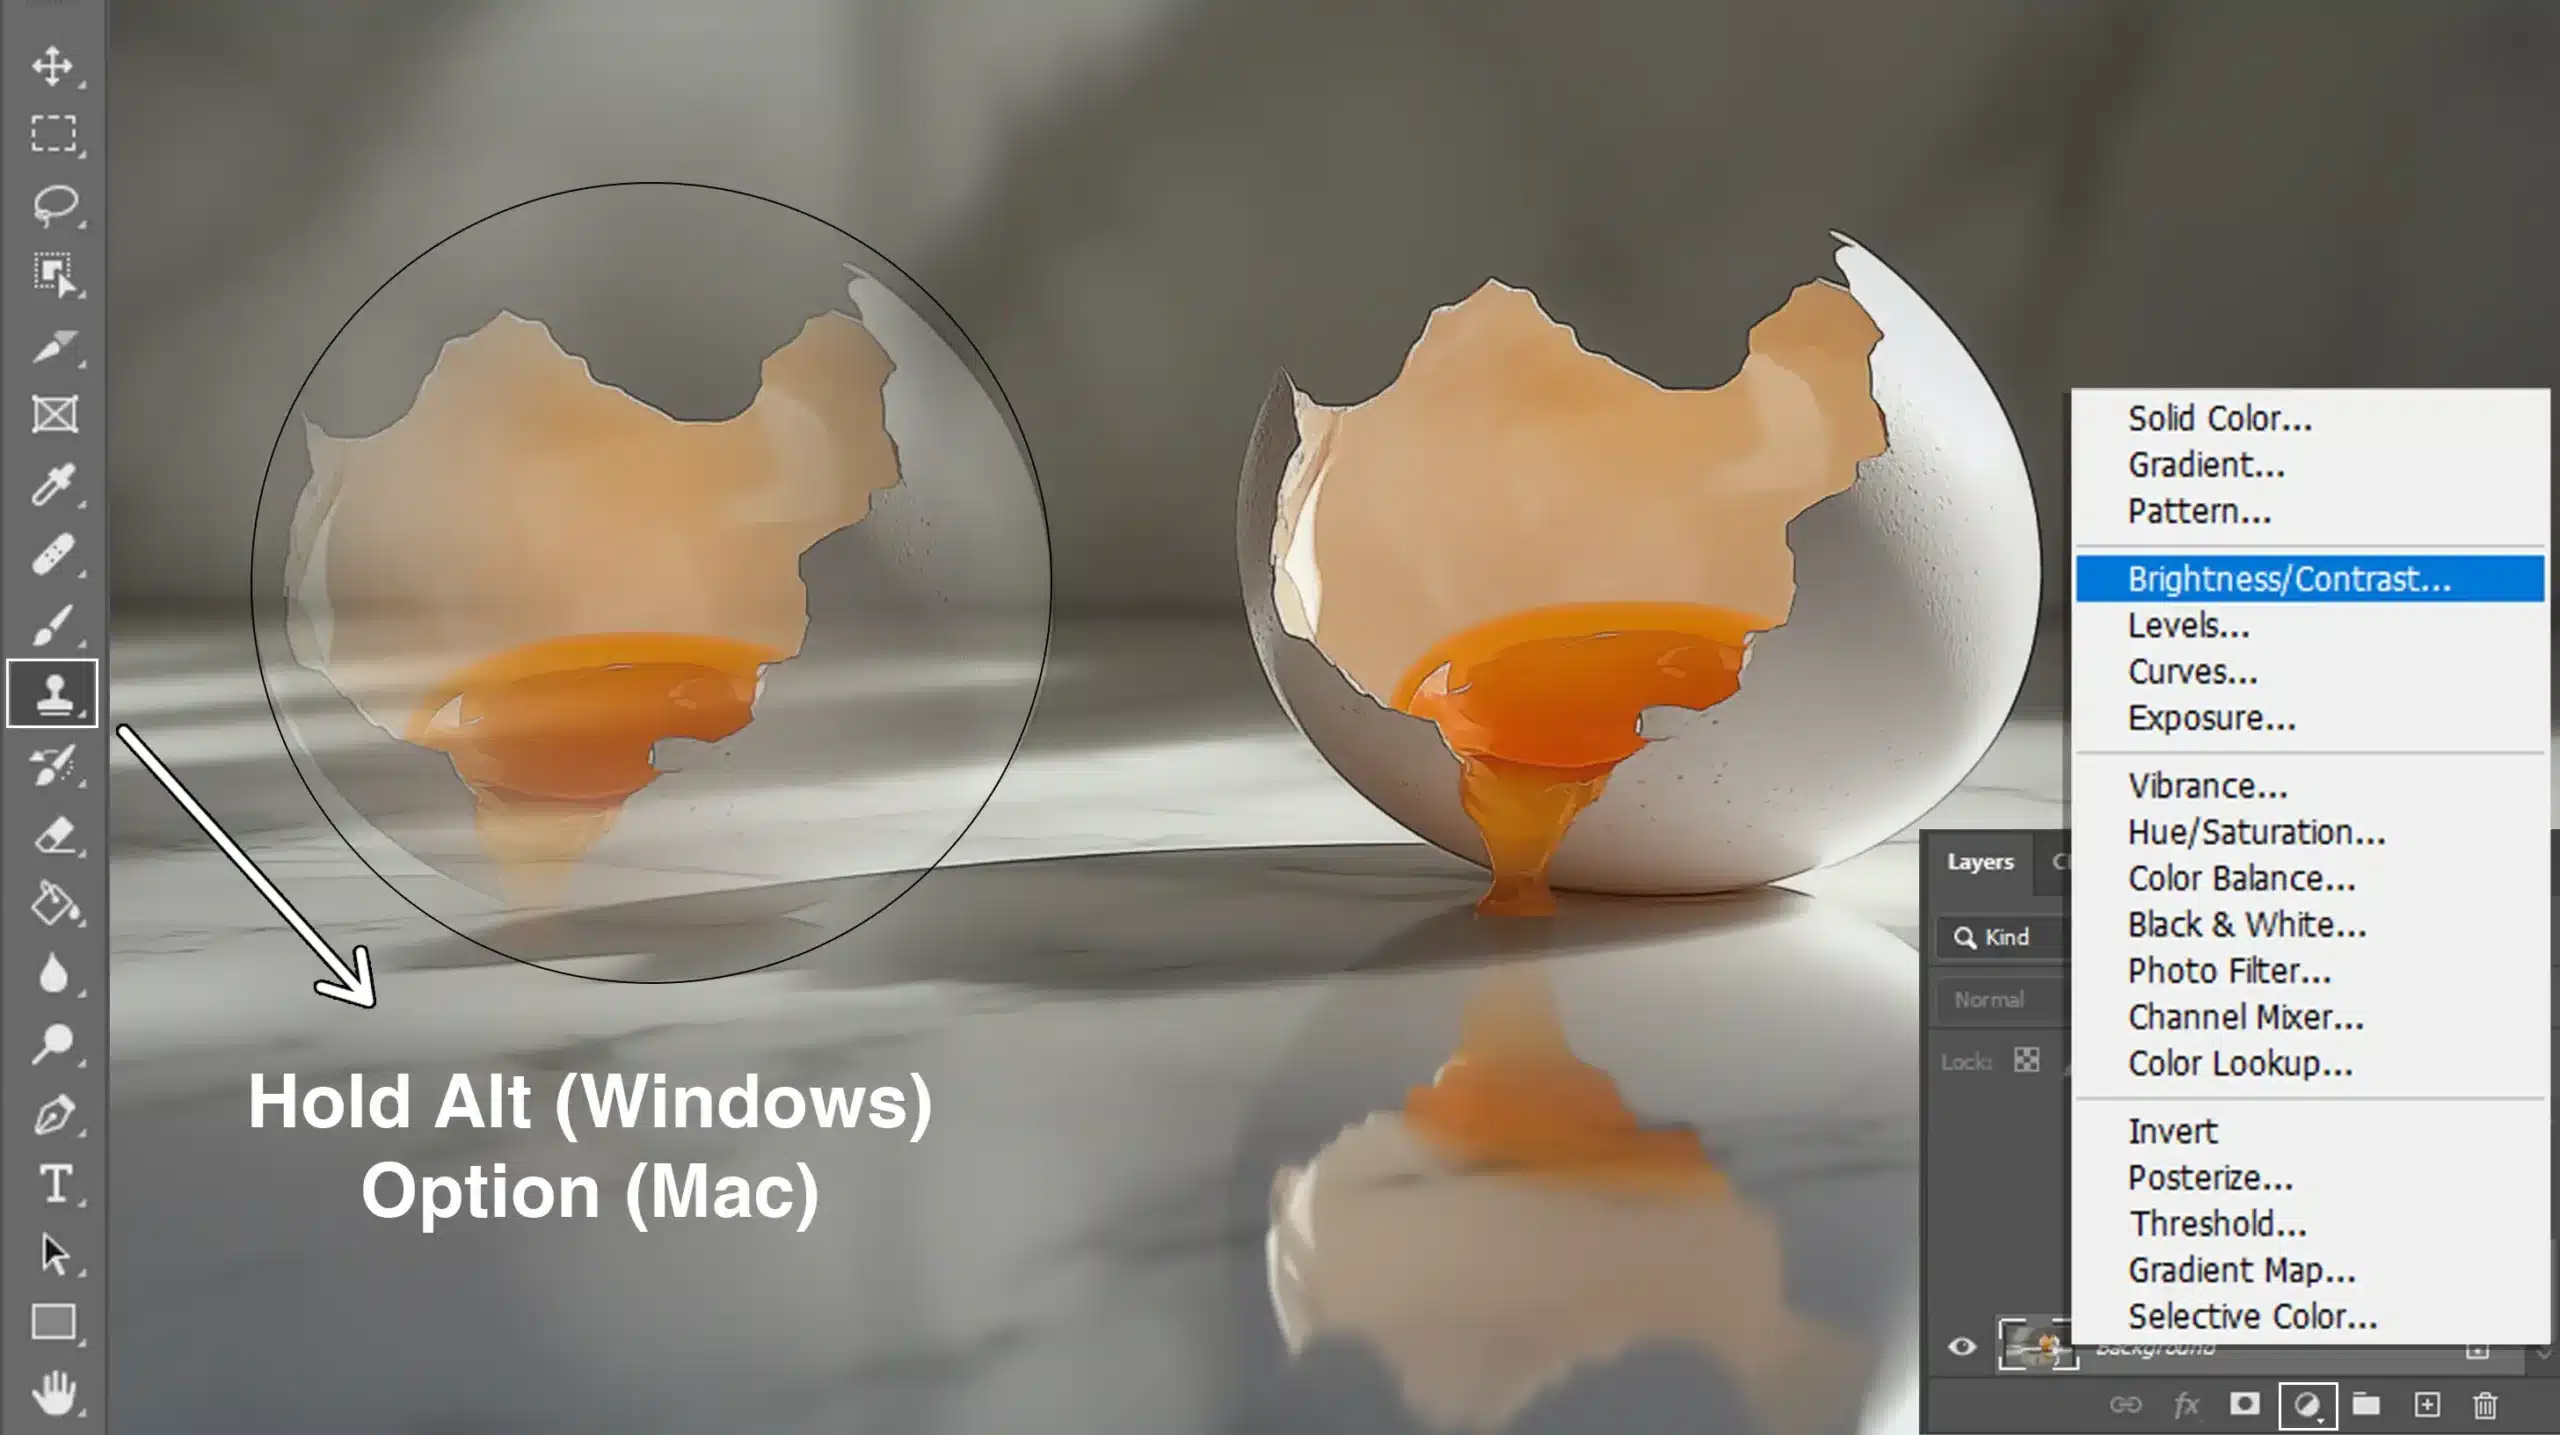
Pro Tip: To make fast edits without flipping through layers, use the Alt (Option on Mac) key to sample colors directly from your image, speeding up selection tasks.
Common Mistakes to Avoid
Let’s talk about common mistakes in Photoshop and Lightroom, especially when working on a Photoshop project for beginners. You might be excited and ready to go, but sometimes errors can slip in.
By identifying and avoiding these mistakes, you’ll be able to work more efficiently and confidently.
Planning and Workflow
Starting a Photoshop project for beginners without a plan can make editing harder. Treat each image like a story; skipping steps can disrupt the flow. Plan ahead for a smoother process.
Efficiency Techniques for a Photoshop Project for Beginners
To improve your workflow and avoid common mistakes, follow these efficiency techniques for a smoother editing process.
Neglecting shortcuts can be a mistake. Those keys on the keyboard aren't just for decoration. Using Photoshop Shortcuts and Lightroom shortcuts will speed up your process.
Over-editing images involves packing too many adjustments. Stop before you transform someone’s portrait into abstract art.
Layer Management
Skipping layers can be a mistake. Layers give you control, allowing you to edit parts of the image without affecting the entire project.
File Safety
Working on the original file is risky. Back up! If your work falls apart, you’ll need that untouched original.
Composition and Consistency
To maintain a cohesive and focused design, consider these composition and consistency tips.
Skipping ‘crop and compose’? Remember, distractions draw eyes away from the important stuff. Crop wisely to guide attention.
Forgetting consistency across images hurts. When editing a batch, make sure they all tell the same visual story.
Advanced Tips
Here are some advanced tips to help streamline your workflow and improve your editing efficiency.
Now a trick not everyone knows. Don't abandon the history panel. It's your friend for undoing missteps without losing your head.
If you're struggling with color, press ‘Alt’ (or ‘Option’ on a Mac) to quickly sample colors and streamline your process.
Open Photoshop: Launch the Photoshop application on your computer.
Create a New Document: Go to File > New or press Ctrl+N (Cmd+N on Mac) to open a new document. Choose the desired settings for your project.
Select Tools: Use the toolbar to select tools for adding and editing elements in your project.
Save Your Project: Regularly save your work by going to File > Save and choosing the format and location to save the file.
How do I start Photoshop for beginners?
Learn the Basics: Familiarize yourself with the basic functions and tools in Photoshop. Online tutorials, video guides, and help articles can be very useful.
Practice Simple Projects: Start with simple projects like photo retouching or creating basic graphics to build your skills.
Use Templates: Utilize built-in templates in Photoshop to understand layout and design basics.
Explore Photoshop Features: Gradually explore more features like layers, masks, and filters as you become more comfortable.
What Types of Projects are Best for Photoshop?
Photo Editing: Enhance and manipulate photographs.
Graphic Design: Create logos, posters, and flyers.
Web Design: Design web layouts and graphics for online use.
Art and Illustration: Paint digitally and design digital illustrations.
Is Photoshop Good for Beginners?
User-Friendly Interface: Although it has advanced features, Photoshop’s basic functions are straightforward for beginners.
Abundant Resources: There are numerous tutorials and resources available online that help beginners learn how to use the software effectively.
Community Support: A large community of users can provide support and inspiration.
Gradual Learning: You can start with simple tasks and gradually move to more complex projects as your skills improve.
Embarking on a “Photoshop project for beginners” was a transformative experience for me.
Projects specifically designed for beginners provided the perfect opportunity to apply what I learned in real time, allowing me to see tangible improvements in my skills.
The experience was rewarding and built my confidence. If you’re just starting out, I highly recommend the Photoshop Course and the Lightroom course. These courses helped me grasp the basics and understand more advanced techniques at my own pace.
For anyone looking to develop their skills further, these resources are a fantastic starting point. They provided structured guidance that made a real difference in my learning journey.
$2,061.00Original price was: $2,061.00.$1,061.00Current price is: $1,061.00. 27583
Download Your Free Guide Now!
Discover the secrets of photography with our printable guide! Master essential techniques like aperture, shutter speed, and ISO to create stunning images. Get your free printable PDF now and start turning your snapshots into masterpieces!