Today, we’re diving into the fascinating world of Photoshop distort techniques.
Ever wondered how to bend reality with just a few clicks?
I’m here to guide you through the process.
In this article, you’ll learn step-by-step how to manipulate images using Photoshop’s powerful tools like the warp tool or puppet Warp
Whether you’re a beginner or looking to refine your skills, these tips will help you transform your photos in creative and precise ways. Ready to start bending reality? Let’s get to it!
Table of Contents
How to Distort Images in Photoshop
Distorting images in Photoshop opens up a world of creative possibilities, allowing you to reshape and transform elements with precision.
Whether you’re correcting perspectives, creating artistic effects, or manipulating objects seamlessly within compositions, mastering the tools and techniques of image distortion can enhance your digital editing prowess.
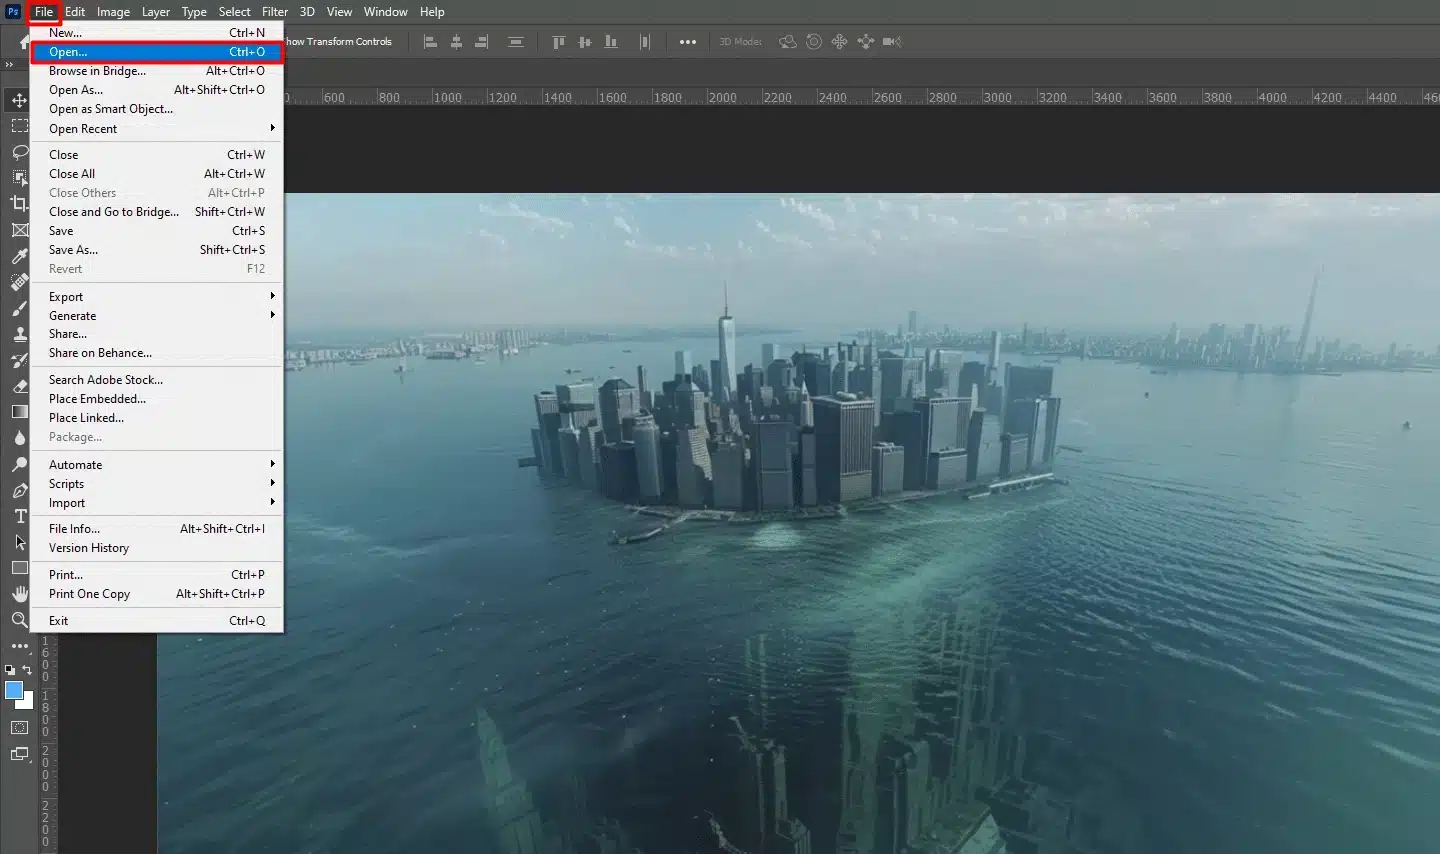
Step 1: Open Your Image

First, open Photoshop. Click on File in the menu bar, then Open and select your image.
Step 2: Duplicate the Layer in Layers Panel
Work safely. Press Ctrl+J (Windows) or Cmd+J (Mac) to duplicate your layer.
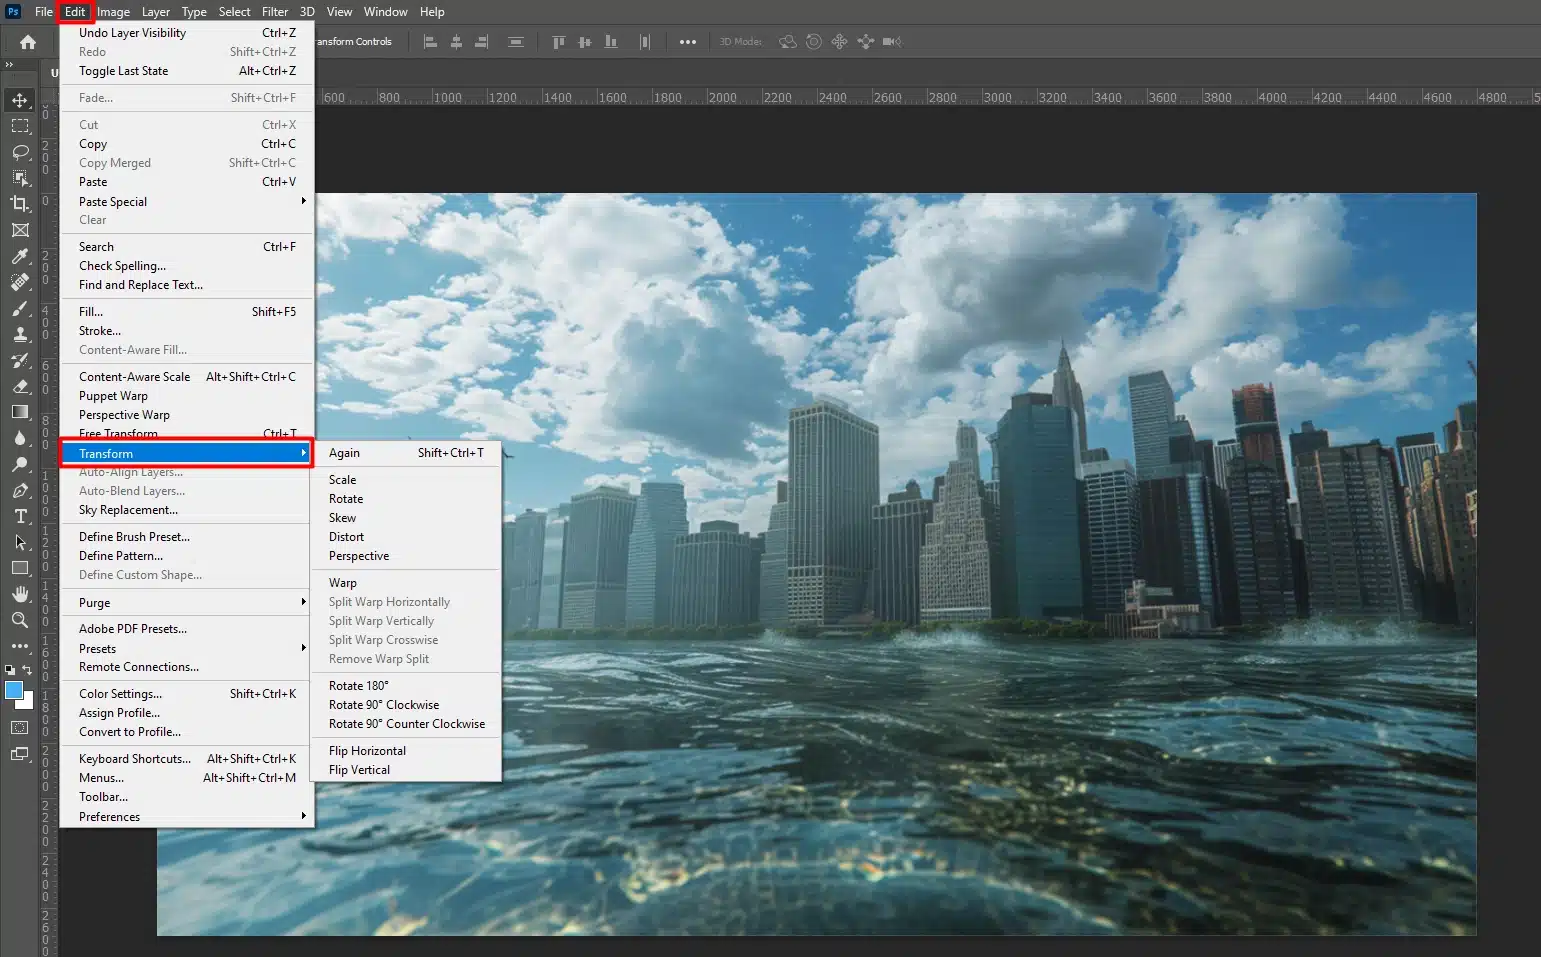
Step 3: Access the Warp Tool
Go to Edit, choose Transform, then Warp. A grid overlay appears on your image.
Step 4: Manipulate the Grid Control Points
Click and drag one of the following, control points or anchor points along the mesh to shape your image. Use the control point handles for more points and finer adjustments.
Step 5: Use the Puppet Warp Tool
For more detailed editing, select Puppet Warp from the menus bar. Place pins on the image to control specific areas.
Step 6: Experiment with Warp Styles
Click the warp pop-up menu in the options bar. Try different warp styles to see what fits best.
Step 7: Adjust Brush Size
For precision, adjust the brush size in the options bar.
Step 8: Show and Edit the Mesh
Go to the options bar and click on show mesh. Adjusting the individual mesh points gives you precise control.
Step 9: Freeze and Thaw Areas
Use the freeze mask tool to protect parts of your image. Use the thaw mask tool to make changes again.
Using the Warp Tool For Photoshop Distort
The Warp Tool in Photoshop is a versatile feature that enables users to manipulate and mold images with flexibility and precision.
From subtly adjusting facial expressions to reshaping landscapes, this tool offers creative control over the curvature, perspective, and positioning of elements within an image.
Engaging with the Warp Tool

Open your photo in Photoshop. Duplicate your layer by pressing Ctrl+J (Windows) or Cmd+J (Mac) to keep the original safe.
Now, head to the Edit menu, select Transform, then Warp. You’re in!
Photoshop Distort: Basic Warp Style Adjustments
You’ll see a grid over your image. Click and drag the control points to reshape your photo. If it looks wonky, press the Esc key to undo.
Advanced Warp Techniques
Ready for more? Use the Puppet Warp tool for detailed adjustments:
- Place pins in specific areas of the image.
- Move each pin independently for precision.
- Add multiple points for intricate tweaks.
- Check out different warp styles from the warp pop-up menu in the options bar.
For a different look, try Perspective Warp to adjust angles naturally. Keep an eye on the edges and details for a balanced look.
Additional Tips for Photoshop Distort
Consider using the content-aware fill in Photoshop distort to seamlessly blend areas after warping. Also, explore the Photoshop vs. GIMP debate to see which software suits your needs best.
Using the Liquify Tool for Photoshop Distort
On the other hand the Liquify Tool in Photoshop is a powerful asset for digital artists and photo editors, offering unparalleled control over image manipulation.
This tool allows users to reshape, warp, and refine elements within images with precision.
Accessing the Liquify Tool

The Liquify Tool in Photoshop is a must-know for any user. Start by opening your photo in Photoshop. Duplicate your layer by pressing Ctrl+J (Windows) or Cmd+J (Mac).
This keeps your original safe.
Next, go to the menu bar, click on Filter, and then choose Liquify. A new window opens where the magic happens.
Basic Liquify Adjustments
Inside the tool, you can play with various tools on the right side:
- Forward Warp Tool: Lets you drag parts of the image wherever you want. Just click on the area and drag it to your desired position.
- Reconstruct Tool: Handy if you need to revert some of your changes. It’s like having an instant "undo" switch.
Don’t forget to have the show mesh option checked; it helps in keeping track of your adjustments.
Advanced Liquify Techniques
Want to get into advanced stuff?
Try using the puppet warp:
- Head back to your layer panel and select the new layer with your duplicated image.
- Go to Edit > Puppet Warp.
- Add pins to specific points and adjust them. For example, move a person’s arm or tilt their neck. Click to add pins, drag to manipulate.
It’s incredible how much control you have!
Pro Tip: For the best results, use fewer points for major adjustments and more pins for detailed changes.
This combination of the Liquify filter and Puppet Warp will help you elevate your photography by keeping your distortions looking natural. If all goes wrong, just hit the cancel button or press Esc to start over.
Photoshop Distort: Using the Transform Tool
Significant for digital editing, transform tool empowers users to resize, rotate, distort, and manipulate elements within images.
Whether adjusting object scales, correcting perspectives, or creatively distorting shapes, it offers precise control over layer and selection transformations.
Accessing the Transform Tool

First, open your photo in Photoshop. Select the layer you want to change. Go to the Edit menu at the top, and click on Transform. You’ll see different options pop up.
Use this shortcuts for better workflow:
- Ctrl+T for Windows or Cmd+T for Mac. This is one of the significant Photoshop shortcuts to speed up your workflow.
- If you mess up, just click Esc to start over.
Basic Transform Adjustments
Here’s a quick comparison of different transform options in Photoshop to help you choose the best one for your needs.
Understanding these tools will allow you to resize images in Photoshop, Photoshop rotate canvas, skew, distort, and adjust the perspective of your images efficiently.
Each tool offers unique functionalities, so let’s dive into their features and shortcuts:
| Feature | Description | Shortcut |
|---|---|---|
| Free Transform | Resizes, rotates, and skews the image | Ctrl+T / Cmd+T |
| Warp | Provides a grid to manipulate the shape of the image | Edit > Transform > Warp |
| Skew | Slants or angles the sides of the image | Right-click > Skew |
| Distort | Pulls and manipulates individual corners | Right-click > Distort |
| Perspective | Adjusts angles naturally for correcting perspective | Right-click > Perspective |
When you open the Transform Tool, control points appear around your photo. Click and drag these to resize and reshape your image.
Basic Transform Tool features:
- To keep proportions, hold down Shift while you drag.
- To rotate, move your cursor outside the corner handle until it turns into a curved arrow. Then, drag in the direction you want to rotate.
- You can also right-click for more options like scaling, skewing, and distorting.
- If you want to bend or stretch parts of your photo, choose Warp from the menu. A grid overlay appears; click and drag points to change the image. Try moving those grid lines, but don't go too wild!
Advanced Transform Techniques
Let’s talk about the Puppet Warp tool. Make sure your layer is selected. Go to Edit, then Puppet Warp.
Using selective focus in Photoshop is pivotal in exploring advanced transform techniques. This technique allows you to precisely adjust focal points, enhancing depth and composition.
- A mesh overlay appears. Start placing pins at important points on your photo. This lets you change specific areas without affecting the whole image.
- Check out the warp pop-up menu in the options bar for different styles like perspective and distortion tools.
- Remember the anchor points; you can select multiple points for more detailed adjustments. This gives you better control for precise edits.
One quick note: Keep an eye on your outer edges. Distorting too much can make your image look unnatural. Always check your final product for any warped lines or shapes.
Pro Tip: Use the Reference Point Location feature in the options bar to control the center of transformations. It gives you better control over how you photoshop distort images.
For more advanced photo editing techniques, consider learning about the difference between Photoshop and Lightroom, as each software has unique features that can enhance your editing skills.
Photoshop Image Distortion: Practical Applications
From refining compositions to enhancing perspectives and manipulating elements creatively, practical applications empower users to achieve professional-grade results in their visual projects.
You can bend reality to fit your ideas. Whether for fun or work, Photoshop’s warp image is your buddy.
Creative Uses of Distortion
Leveraging the Warp Tool in Photoshop opens up a realm of artistic possibilities. This tool allows artists and designers to bend, twist, and reshape elements within images, enabling unique and imaginative compositions.
Manipulate and Reshape with Warp Tool
Steps to use warp tool:
- First, open your photo in Photoshop. Press Ctrl+J (Windows) or Cmd+J (Mac) to duplicate the layer. Easy, right?
- With the duplicated layer selected, go to Edit and choose Warp. Now you have mesh control over your image. Use the control points to photoshop distort and reshape your photo. Try different warp style in the pop-up menu. You'll find one that works!
Using Puppet Warp Tool
Want more fun? Use the puppet warp tool. Place pins at significant points to move parts of the image. Want that mountain to look like a roller coaster?
Drop down a pin or two and shift its position. You create so much with this!
Pro Tip: Watch the outer edge of your image. Too much distortion can make it look fake. Also, explore the Photoshop vs GIMP debate to see which software suits your needs best.
Fixing Perspective Issues
Let’s tackle those pesky perspective issues. Sometimes, angles just don’t work. But Photoshop has tools to fix this.
Steps to Fix Perspective:
- Open your photo in Photoshop and select the new layer you want to edit. Go to Edit > Transform > Perspective. This tool lets you tweak awkward angles.
- If you need more control, duplicate the layer again and use the distort option in the options bar. Drag the corner handles to fix the perspective issues precisely. Anchor points help with delicate adjustments.
Aligning Vertical Structures
Trying to align vertical structures like buildings? Use the vertical distortion feature under the transform menu. Align using grid lines for precision.
Click and drag until your objects stands tall!
Using Free Transform
Feeling brave? Try the free transform option. Hold down Shift as you distort to keep the shape intact.
Pro Tip: Save your project often. Losing your work halfway through is the worst!
Now, with these tips, you’re ready to master Photoshop. Distorting images and fixing perspective issues can be fun and useful. Happy editing!.
Tips and Tricks for Mastering Photoshop Distort Techniques
Before we get into the details of Adobe Max Photoshop and Lightroom, let’s focus on some important tips that will boost your skills. Whether you’re new or just brushing up, this guide is here to help.
To enhance your editing skills further and achieve professional-looking results, consider incorporating advanced techniques such as those used in Lightroom.
Explore significant tips for Lightroom editing to enhance your skills with these tips and tricks. These insights will streamline your editing workflow and improve your final results.
This resource will provide you with valuable information to complement your Photoshop distortion techniques and elevate your overall photo editing proficiency.
Common Mistakes to Avoid
When using trying to create a project to perfection in Photoshop, everyone makes mistakes. Here are a few to watch out for:
- Over-Warping: Don't go overboard with the distort tool. It’s easy to create unnatural shapes. Keep changes subtle.
- Ignoring Edges: Pay attention to the edge of your image. Distorting too much can make outlines look fake.
- Skipping Layers: Always duplicate layers. Press Ctrl+J (Windows) or Cmd+J (Mac) to create a new layer before starting. It’s your safety net.
- Misplacing Control Points: Misplaced control points can cause problems. Place them thoughtfully.
These are common missteps, but with practice, you can Photoshop your way to the perfect project!
Expert Tips for Better Results
Ready to move from good to great? Here are some expert tips:
- Use the Mesh: Show the mesh when using the warp tool. It helps you keep track of adjustments.
- Master the Puppet Warp: This feature is a game-changer. Create pins to specific areas to control adjustments. You can move entire sections without affecting others.
- Experiment with Styles: Open the warp pop-up menus and try different warp styles. New styles can give a fresh perspective to your edits.
- Adjust Anchor Points: Use anchor points in the options bar for fine-tuning. This gives you precise control over distortions.
- Save Your Work: Constantly save your progress. Hit Ctrl+S frequently.
If you love to experiment, Adobe Max promises new features in image distortion tools, allowing you to easily fix and correct distorted photos. Keep an eye out for updates!
Pro Tip: Use Multiple Tools: Combine tools like the lasso tools and warping options for more creative freedom on the objects. For example, outline the objects with the lasso tool before warping the text or image to get a perfect result.
Now you’re all set to distort, warp, and tweak your images like a pro!
Enhance your images with lens correction in Lightroom, an important skill discussed in our expert tips. Correct lens distortions and improve precision effortlessly for a sharper final result.
For more expert tips on enhancing your edit portraits in Lightroom skills, mastering the art of editing is important. Learn how to edit portraits in Lightroom with precision to elevate the natural beauty and emotion in each shot, blending technique with creativity for stunning results.
Frequently Asked Questions

How do you distort in Photoshop?
- Select the layer you want to distort.
- Go to Edit > Transform > Distort.
- Click and drag the corner handles of the bounding box to distort the image.
- Press Enter to apply the distortion.
What is the difference between skew and distort in Photoshop?
- Skew: Alters the image by slanting or angling the sides, essentially creating a shearing effect.
- Distort: Allows for more freedom by letting you pull and manipulate individual corners which changes the perspective more dramatically.
What is the shortcut for distort in Photoshop?
- Press Ctrl (Cmd on Mac) + T to open the Free Transform tool.
- Right-click within the transform box and choose 'Distort' from the context menu.
- Adjust as needed, then press Enter to confirm.
How do you warp deform in Photoshop?
- Select the layer you want to warp.
- Go to Edit > Transform > Warp.
- Drag the points, lines, or area within the warp grid to manipulate the shape of the image.
- Hit Enter to apply the warp.
Conclusion
Getting the hang of Photoshop distort tools really opened up new possibilities for me in editing.
Playing with Warp and Puppet Warp lets you tweak your photos in some cool ways, making anything you imagine pretty much possible.
If you’re keen to get even better at this, I’d definitely suggest looking into further learning. I learned a lot from the Photoshop Course and Lightroom Course.
They break things down so it’s easy to catch on.
And if you don’t have the software yet, you can grab Photoshop and Lightroom.
Both programs have been game changers for me. Whether it’s a simple touch-up or a major transformation, these tools make your creative process so much smoother.
Read more about Photoshop:


