Today, I’ll guide you through the essential Lightroom settings for night photography to transform your dark and grainy images into stunning works of art.
Are you struggling to capture the magic of nighttime scenes? You’re not alone.
Imagine being able to bring out the vibrant colors and intricate details that often get lost in the shadows.
Intrigued?
Keep reading, and I’ll show you how to make your night images stand out.
Table of Contents
Lightroom Settings for Night Photography
Using Lightroom settings for night photography presents both unique challenges and exciting opportunities.
Whether capturing the quiet elegance of a deserted street or the dazzling dance of city lights, Lightroom offers the tools needed. This article breaks down the essential settings for enhancing night images using Lightroom.
Why Nocturnal Photography is Unique
Nocturnal photography offers a different perspective. During the day, natural light dominates, guiding exposure and color. At night, artificial light and darkness create a dynamic canvas.
You get to play with contrasts between light and dark areas.
Challenges with Lightroom Settings for Night Photography
Light trespass often impacts night sky and urban photos. Shutter speed adjustments are critical to avoid blurry shots. Balancing exposure and avoiding noise becomes trickier without daylight.
When editing night photography, certain Lightroom settings become essential for refining your images and balancing the challenges of low light.
The table below highlights key aspects of night photography editing, along with an overview of how to adjust each setting for optimal results
| Aspect | Overview |
|---|---|
| White Balance | Adjust to compensate for artificial light sources in night photography to maintain accurate colors and avoid color casts. |
| ISO Settings | Higher ISO settings are needed for night photography to capture more light, but they also increase noise, requiring careful balance. |
| Shutter Speed | Longer shutter speeds help capture more light in dark scenes but require a tripod to avoid blurring the image. |
| Aperture | A wider aperture like f/2.8 or lower allows more light into the lens, essential for night photography, but can reduce depth of field. |
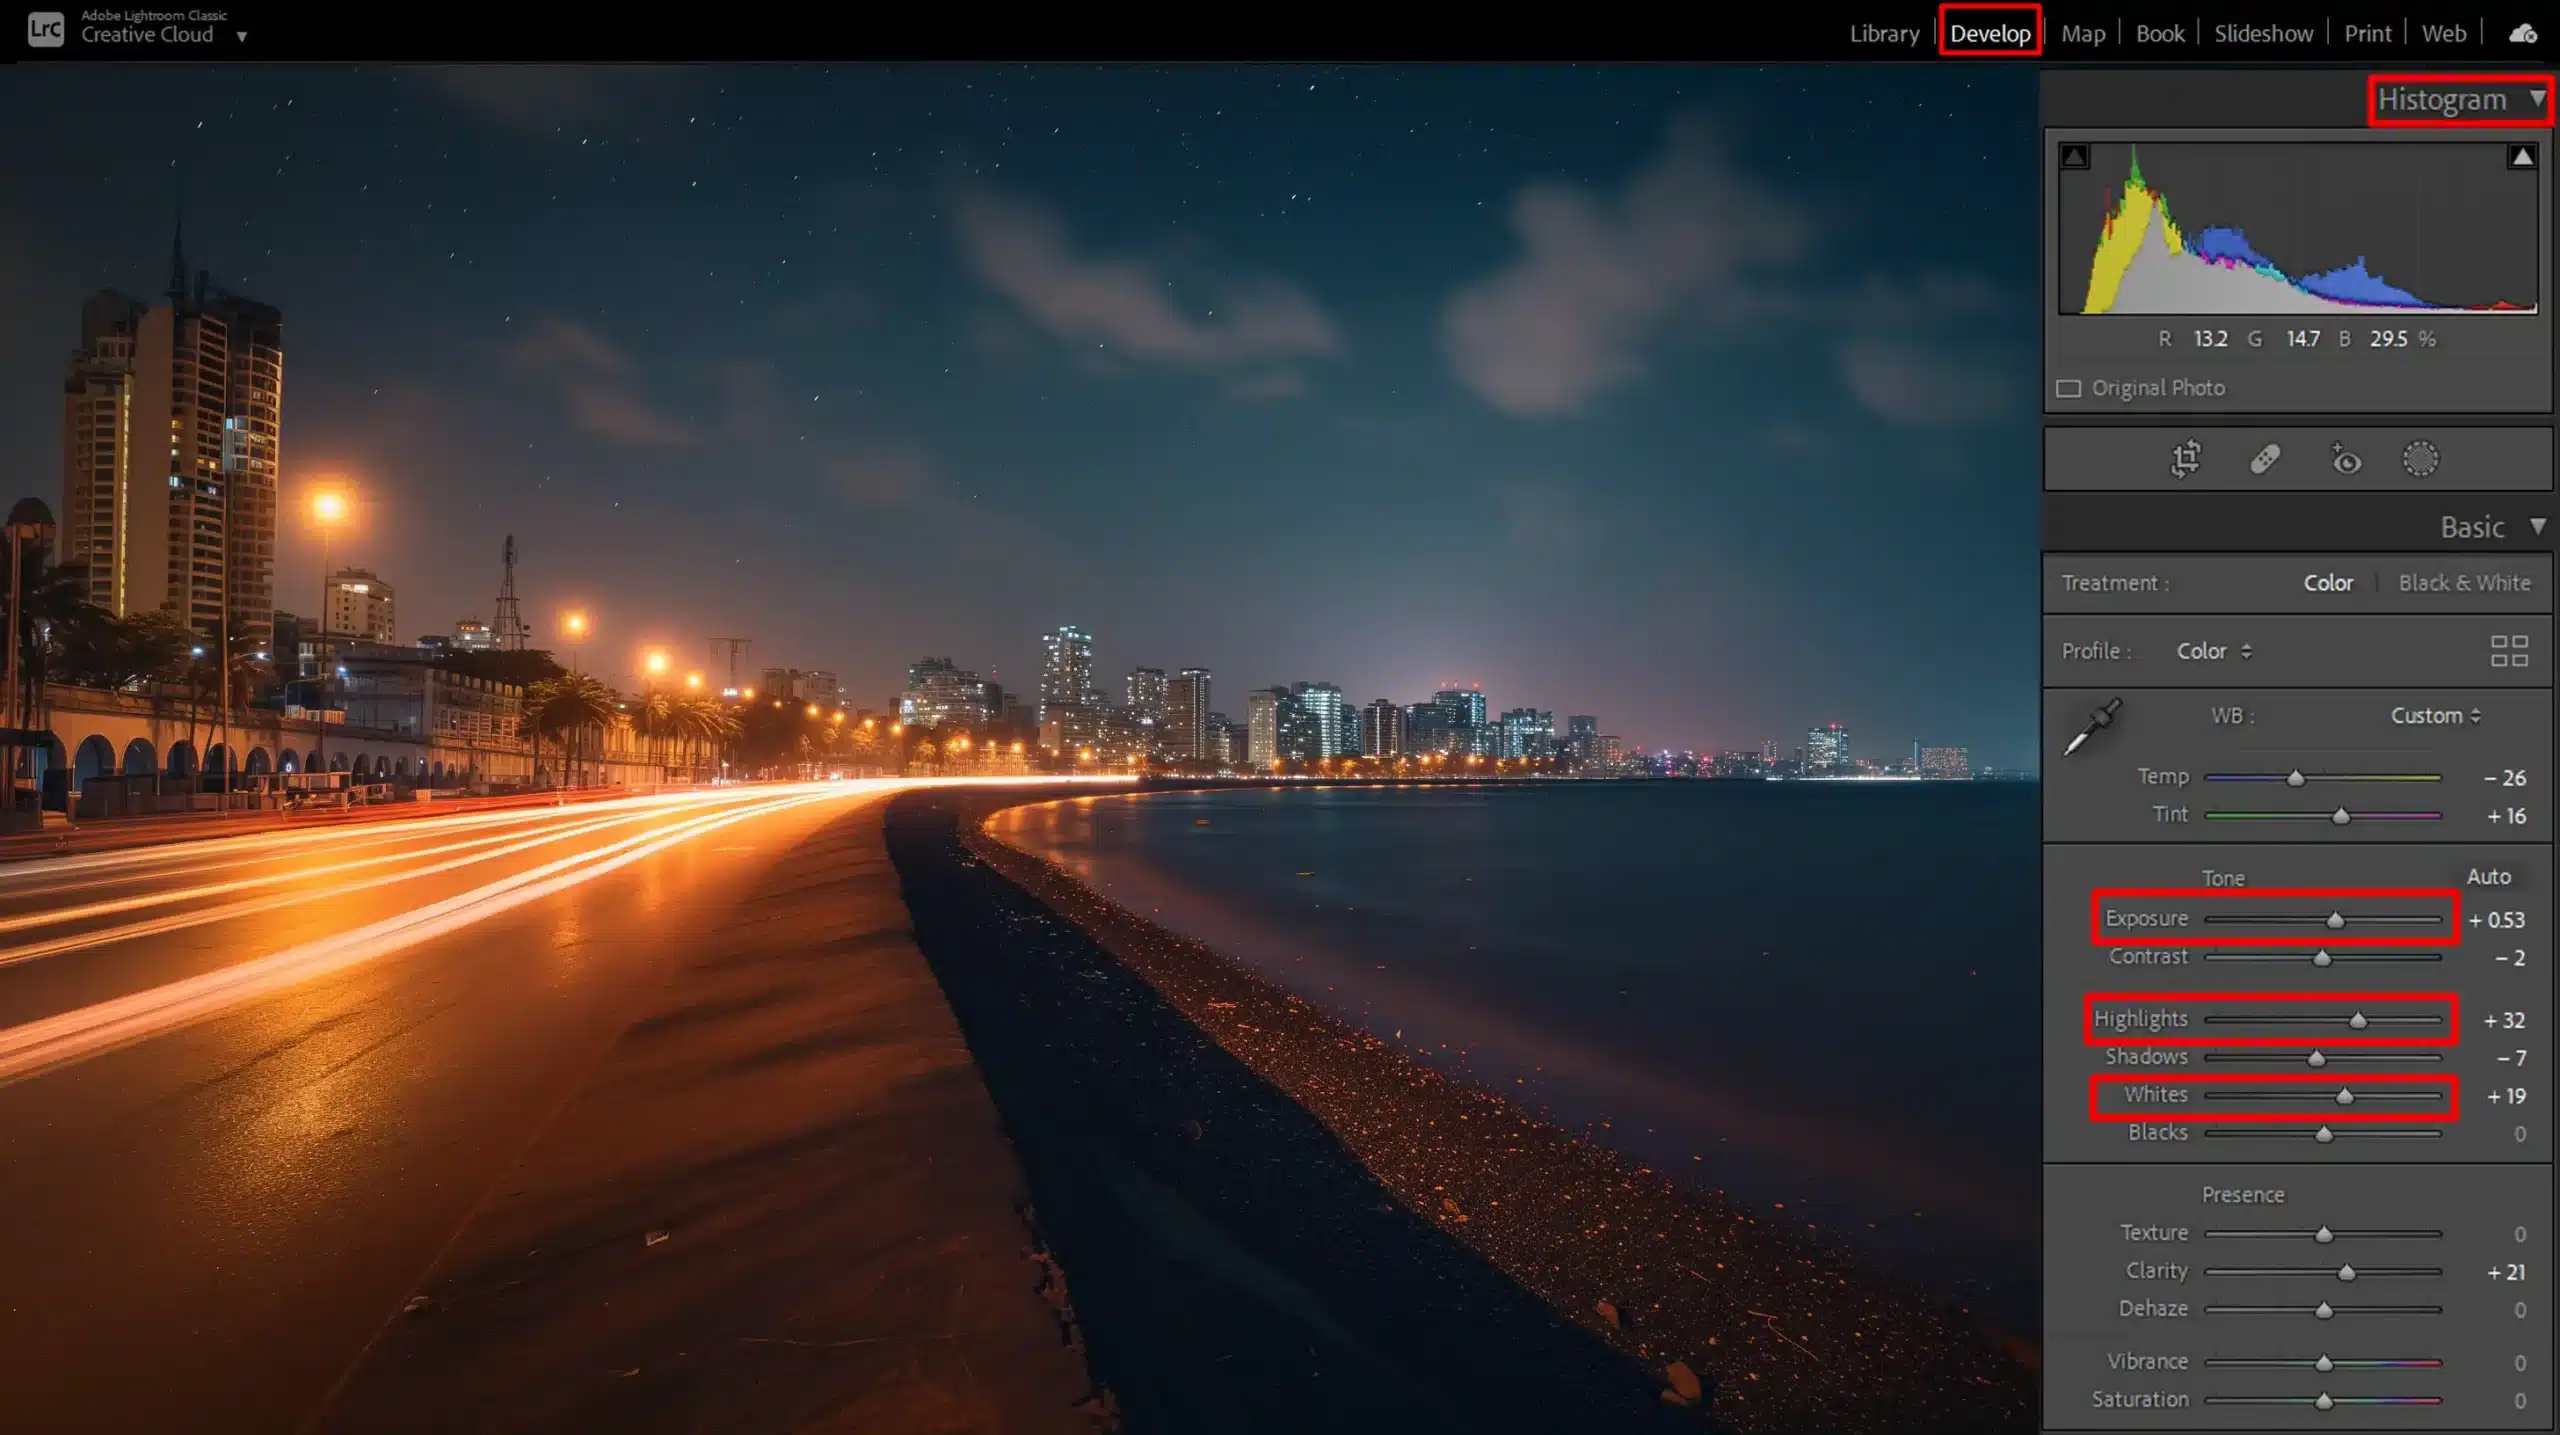
| Exposure and Highlights Slider | Balance the exposure and use the highlights slider to avoid blown-out bright spots from artificial lights. |
| Noise Reduction | Use noise reduction techniques in Lightroom to minimize graininess from high ISO settings. |
| Clarity and Contrast Slider | Enhance mid-tone details and contrast to make the night scene sharper and more defined without flattening the image. |
Significant Lightroom Settings for Night Photography
When editing night images, several settings become particularly important:
- White balance: Adjust to address the color inconsistencies from artificial lights in nocturnal settings.
- Exposure slider: Tweak to get balanced light and dark areas in photos.
- Highlights slider: Use to tone down bright spots from streetlights or other sources of artificial light.
- Shadows slider: Bring out details hidden in the darker parts of the image.
- Clarity slider: Enhance contrast and mid-tone details for sharper night images.
For night sky shots, the emphasis might be on reducing noise and brightening stars.
Editing Techniques for Night Photos
- Contrast slider: Adjust to balance between dark and light areas ensuring the photo does not appear flat.
- Saturation slider: Enhance specific colors without overdoing it.
- Local adjustments: Make precise changes to specific areas of the image.
In night street photography, consider enhancing the streetlights and storefronts while reducing noise in darker areas.
Special Tips for Lightroom Settings for Night Photography Edits
Maximize the use of the masking slider to isolate and adjust areas individually. Manual mode enables fine-tuning of settings like shutter speed and aperture. Adjusting the tone curve helps in defining the mood and contrast.
Mastering these Lightroom settings helps you enhance your night images effectively. Experimentation with different settings leads to the best results.
Pro tip: Always take RAW photos to maximize editing flexibility.
ISO Settings
ISO settings play a huge role in nocturnal photography. The rule of thumb: the darker it is, the higher the ISO should be. For night images, a starting point around ISO 1600 usually works, but might also introduce some noise.
Higher ISO settings allow you to capture images in low light but they can add graininess.
A lower ISO minimizes noise but requires longer exposure times. Use ISO settings carefully to find a balance between brightness and noise levels. Always test and review your shots after adjustments.
Pro Tip: Check out this guide on iso sensitivity for a better understanding.
Shutter Speed
Shutter speed determines how long your camera’s sensor is exposed to light. For nocturnal photography, especially if you’re into night sky shots or urban night photography, go for longer shutter speeds. Longer exposure means more light captured.
This technique is particularly effective for urban night scenes, where it can bring out vibrant city lights and create striking, dynamic compositions.
Experiment with shutter speeds ranging from 10 to 30 seconds, using a tripod to prevent blur. This is especially true for nighttime street photography, where the dark and light areas create captivating contrasts. It may take a few attempts to get your desired effect, but it’s worth it.
Aperture
Aperture controls the amount of light entering through the lens. For night edit photos, use a wider aperture like f/2.8 or lower. This lets in more light and helps keep your ISO low.
Remember, a wide aperture creates a shallow depth of field, affecting the overall sharpness. Additionally, applying lens correction in Lightroom can help minimize any distortion or vignetting caused by using wide apertures, ensuring your night photos maintain their clarity and detail.
Narrowing the aperture to f/8 or higher reduces light intake, requiring adjustments in shutter speed and ISO. A wide aperture is your friend when capturing city lights or night street photography, emphasizing bright elements in the frame.
White Balance
Adjusting the white balance helps manage color temperatures in night images. Set it manually to ensure accurate colors. Streetlights often emit a yellowish hue, which might need balancing to prevent weird color casts.
Try different white balance settings, like tungsten or custom, to match the lighting in your scene. Your goal is to achieve the desired mood without overexposing light sources.
Extra Tips for Better Night Photos
- Manual Mode: Opt for manual operation to have full control over exposure settings.
- Tripod: Always use a tripod to avoid camera shake during long exposures.
- Remote Release: Use a remote release or timer to minimize camera movement.
- Light Pollution: Avoid areas with excessive light trespass for clearer night skies.
- Editing Techniques: Post-processing can enhance night images, utilize tools like the shadows slider and highlights slider.
Pro Tip: For editing night photos, especially those taken using long exposure photography at night, focus on the highlights slider and shadows slider to balance dark and light areas.
This adjustment maintains detail without introducing too much noise. Explore Lightroom settings for nocturnal photography to refine your images further.
Additionally, consider using Adobe Photoshop for advanced edits like removing unwanted objects or enhancing specific areas with the dodge and burn tools.
Lightroom Settings for Night Photography: A Step-by-Step Editing Guide
Let’s start by importing your night images into Lightroom. Open Lightroom and select the “Import” button. Locate your photo folder, select your images, and hit “Import.” This simple step prepares your images for editing.
Once imported, organize your photos using collections. This process keeps your workspace tidy and efficient. Group similar photos together. This helps when you edit night images in batches.
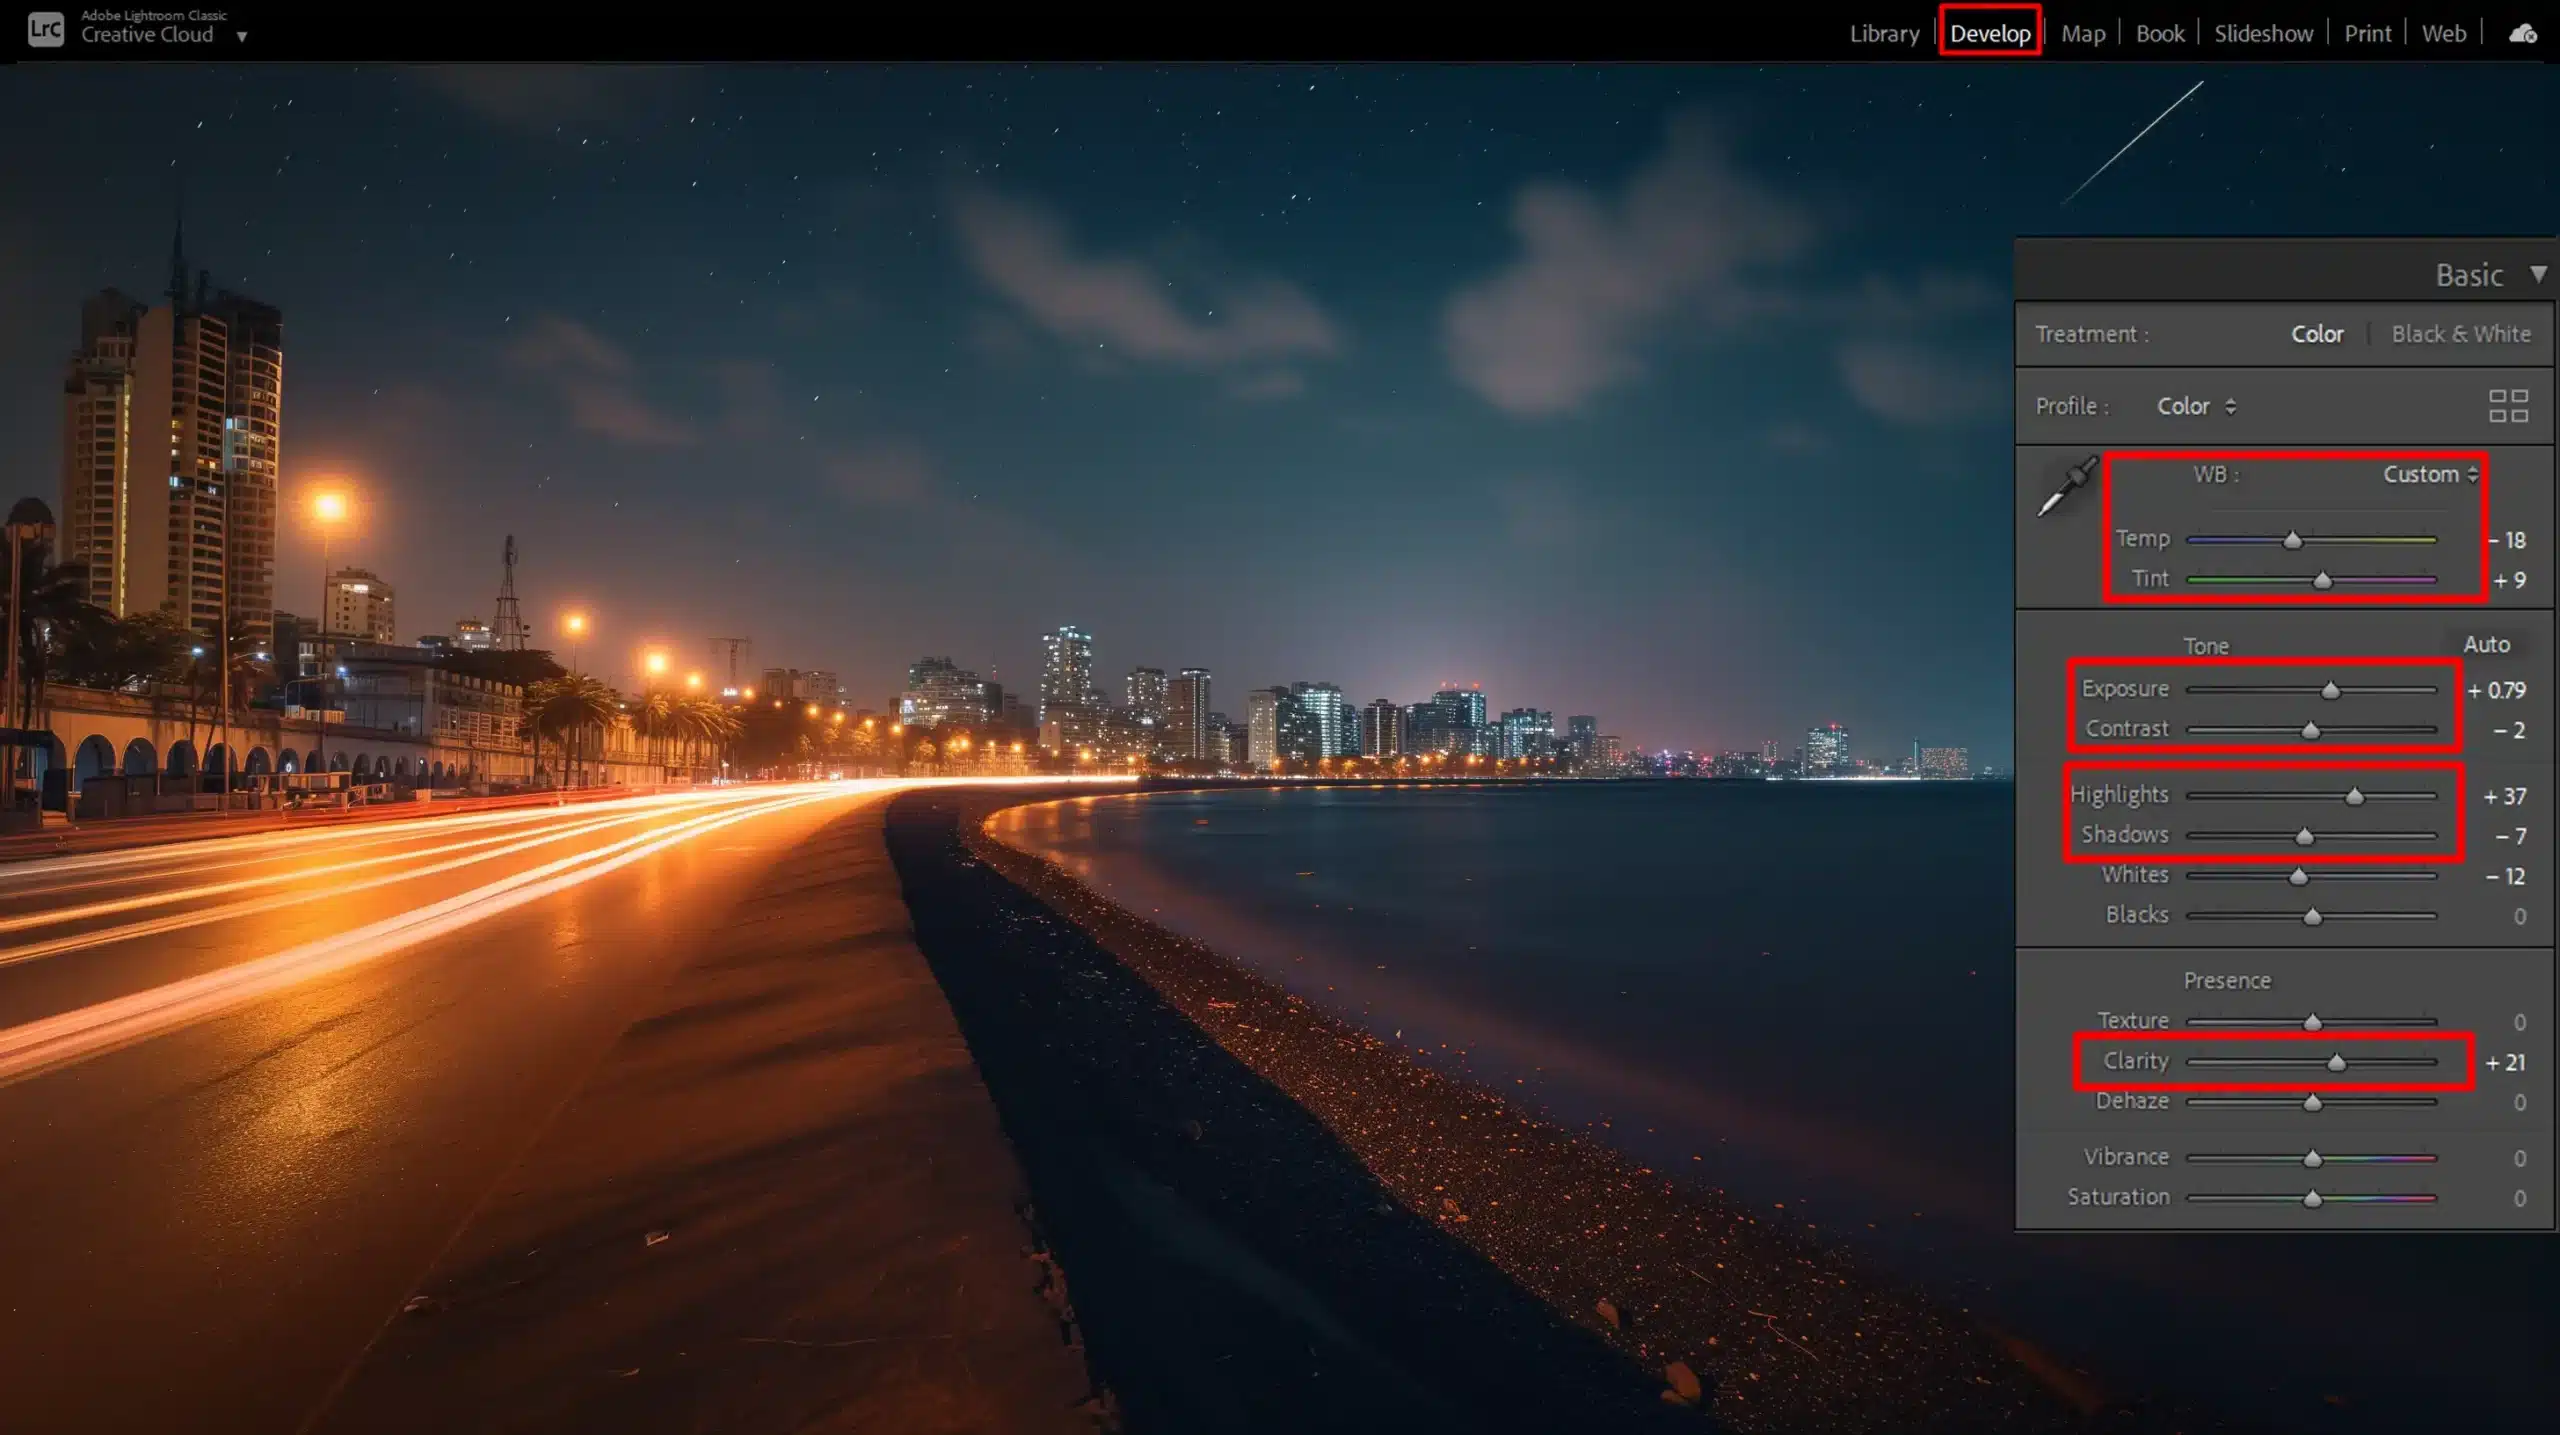
Basic Adjustments
First, adjust the exposure control. Night images usually need increased exposure to reveal details. Move the exposure slider until your photo is adequately lit.
Next, adjust contrast. Use the contrast slider to enhance the difference between shadows and highlights. Be careful not to overdo it.
The next step is sharpening your photos. Increase the clarity slider to enhance fine details. This makes the image crisper but be cautious; too much can result in noise.
Finally, use the saturation slider. This enhances colors in your night street photography. A little saturation makes colors pop without looking unnatural.
White Balance
Setting the correct white balance is crucial for night images. It’s a quick adjustment that drastically improves night street photography edits.
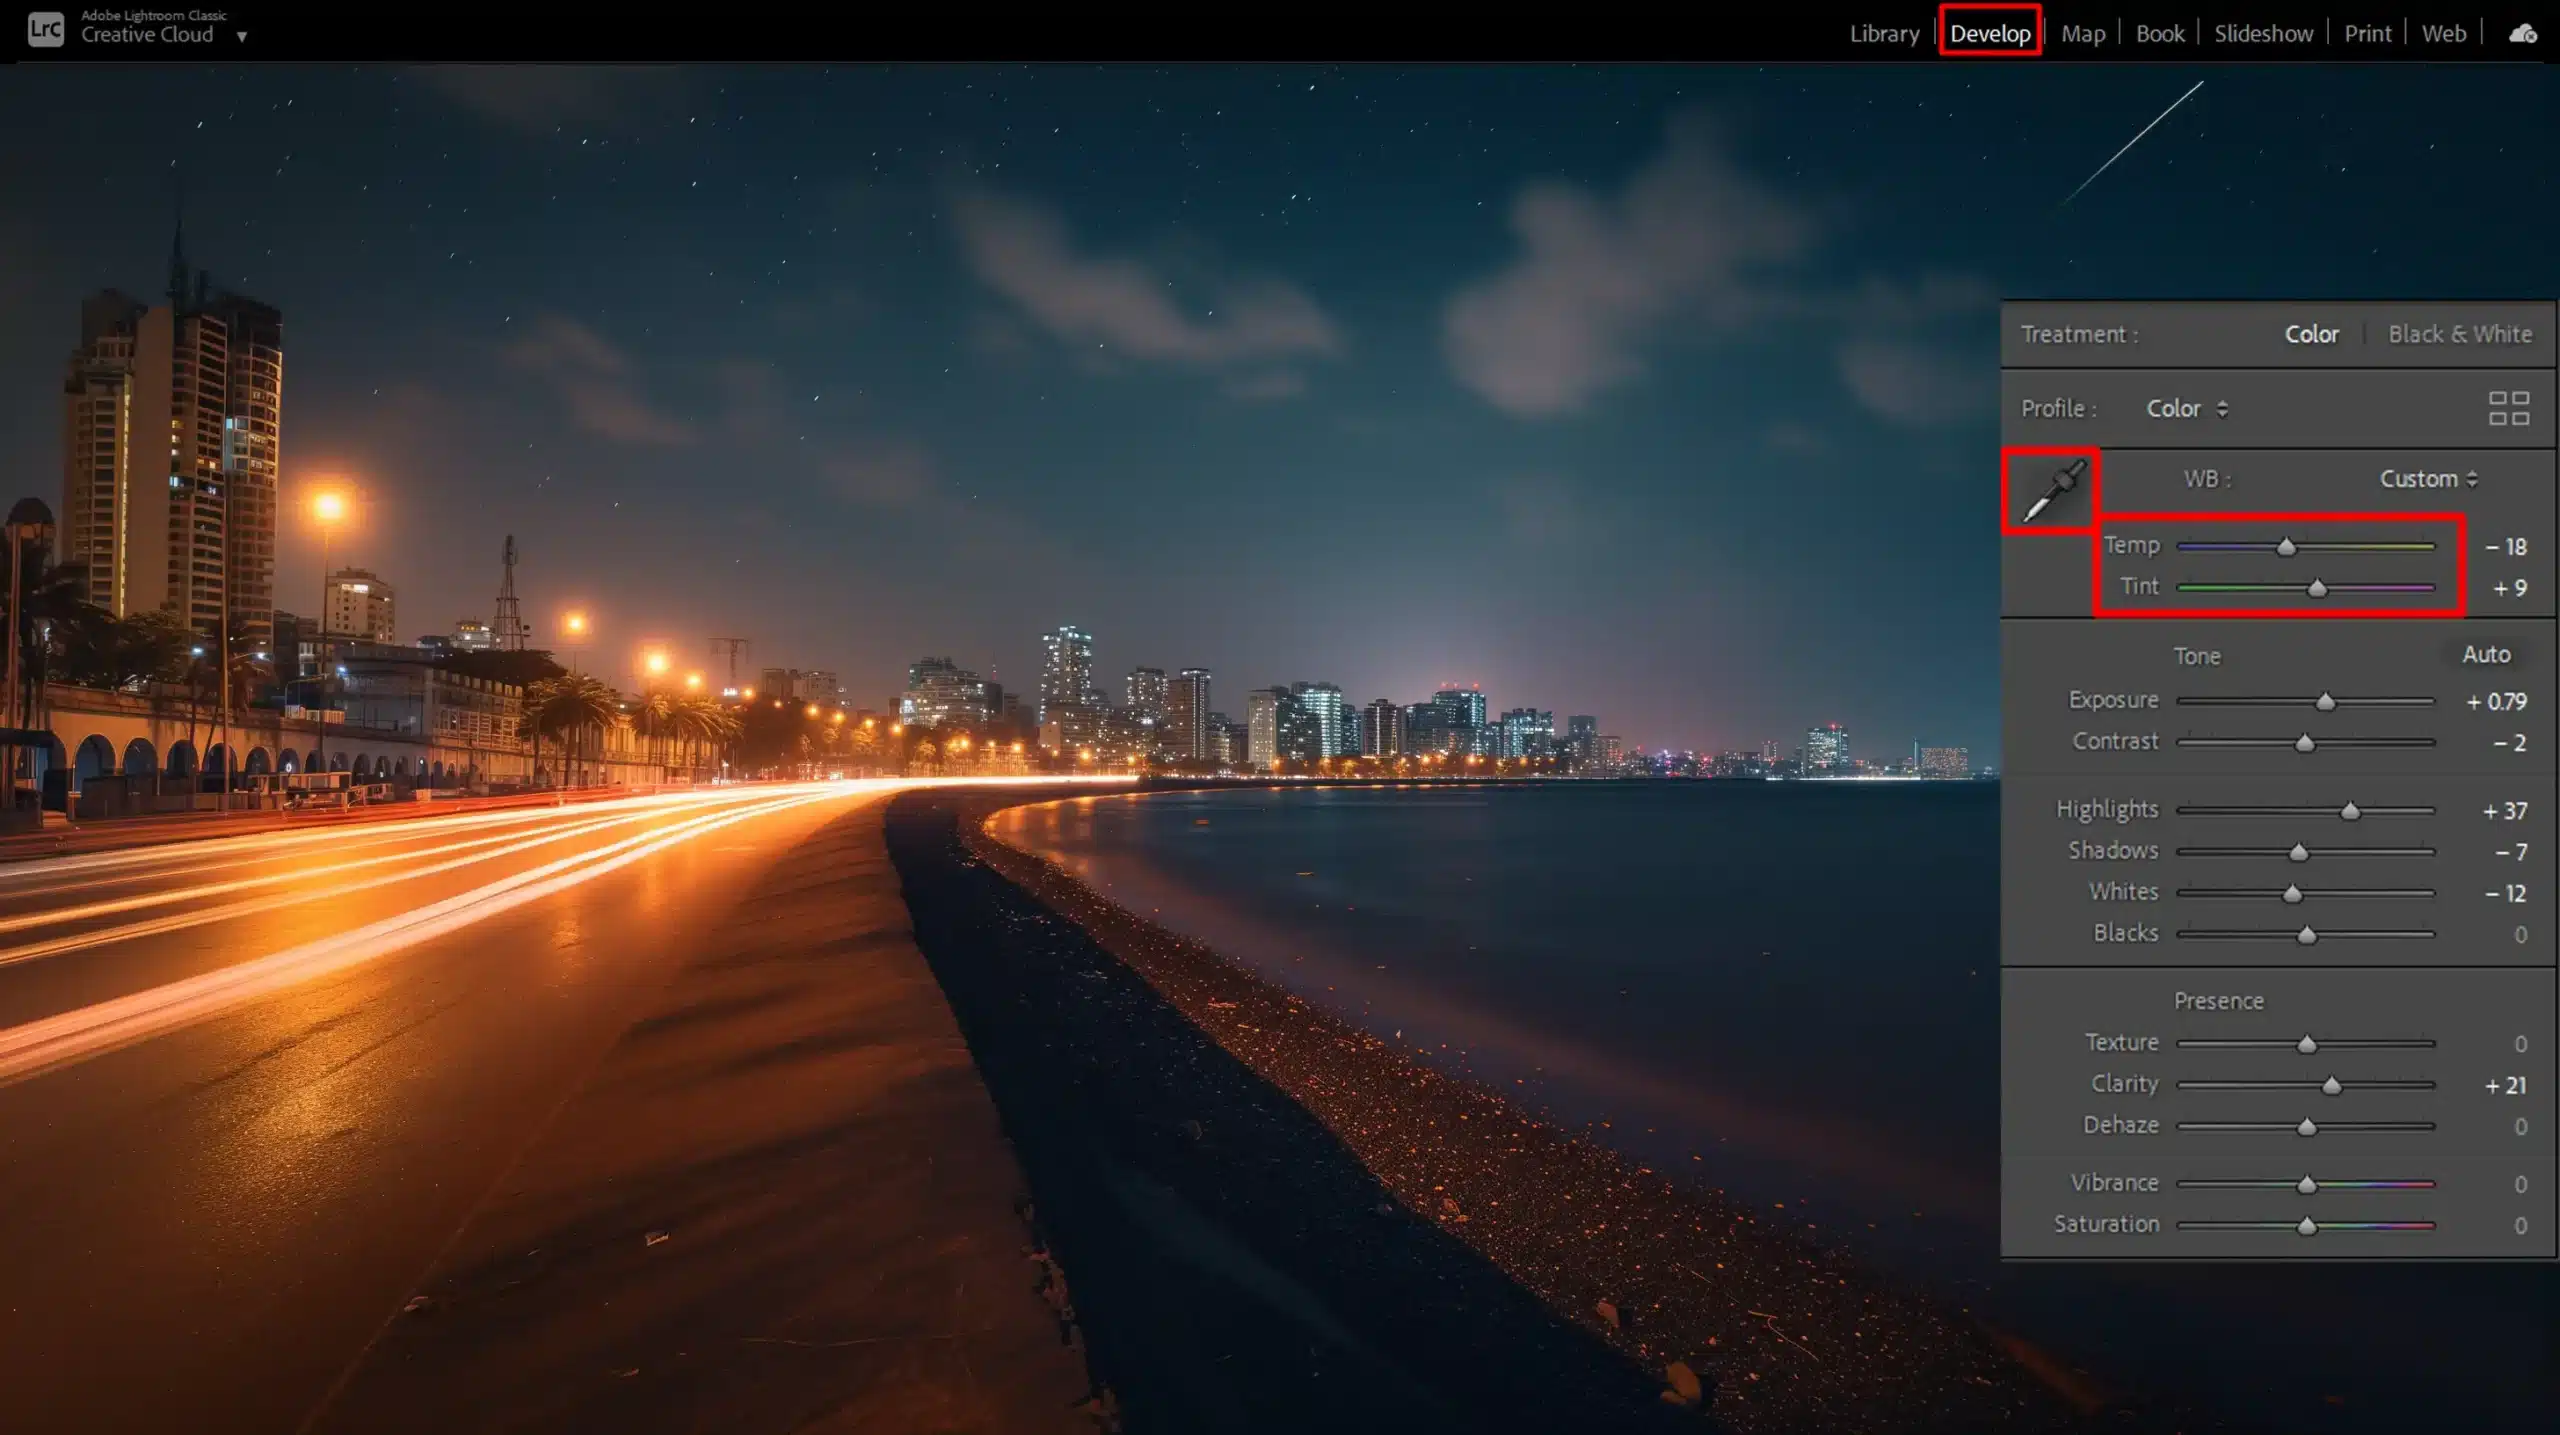
Start by using the white balance tool in Lightroom. Click on a neutral part of the image, such as a gray sidewalk or building. The tool adjusts the overall color tone accordingly.
If needed, use the temperature slider. Dragging the slider to the left makes the image cooler, while dragging to the right warms it up. Experiment until the colors look natural.
Local adjustments also play a vital role. Use the masking slider to apply white balance corrections to specific areas. This technique is helpful for mixed lighting situations.
Advanced Editing Techniques
Once your basic adjustments are set, move to more detailed editing approaches. Use the tone curve feature to fine-tune the brightness levels. Creating an S-curve boosts both the contrast and depth.
Experiment with the texture slider. This helps bring out surface details in your night photos without affecting overall sharpness too much.
For area-specific edits, take advantage of Lightroom’s tools for selective adjustments. The radial filter and graduated filter tools fine-tune specific parts of your photo without altering the entire image.
Lastly, don’t forget to tweak the shadows and highlights sliders. These adjustments offer better control over how light and dark parts of your image appear.
Pro tip: Spend extra time on noise reduction when you edit night photos. Night photo editing often brings out more noise, so refining this aspect greatly enhances the final output.
By following these Lightroom settings, you’ll master the art of editing night photos. Your night street photography will shine through with clarity and vibrant colors.
Advanced Lightroom Settings for Night Photography to Enhance Image Quality
We all know that noise can ruin a good night photo. Start by moving the “Luminance” slider under the Noise Reduction panel in Lightroom. This helps in smoothing out graininess without losing too much detail.
Next, adjust the “Color” slider to tackle any color noise. Remember, it’s a balance game. Too much noise reduction can lead to a plasticky look. Aim for clarity and realism.
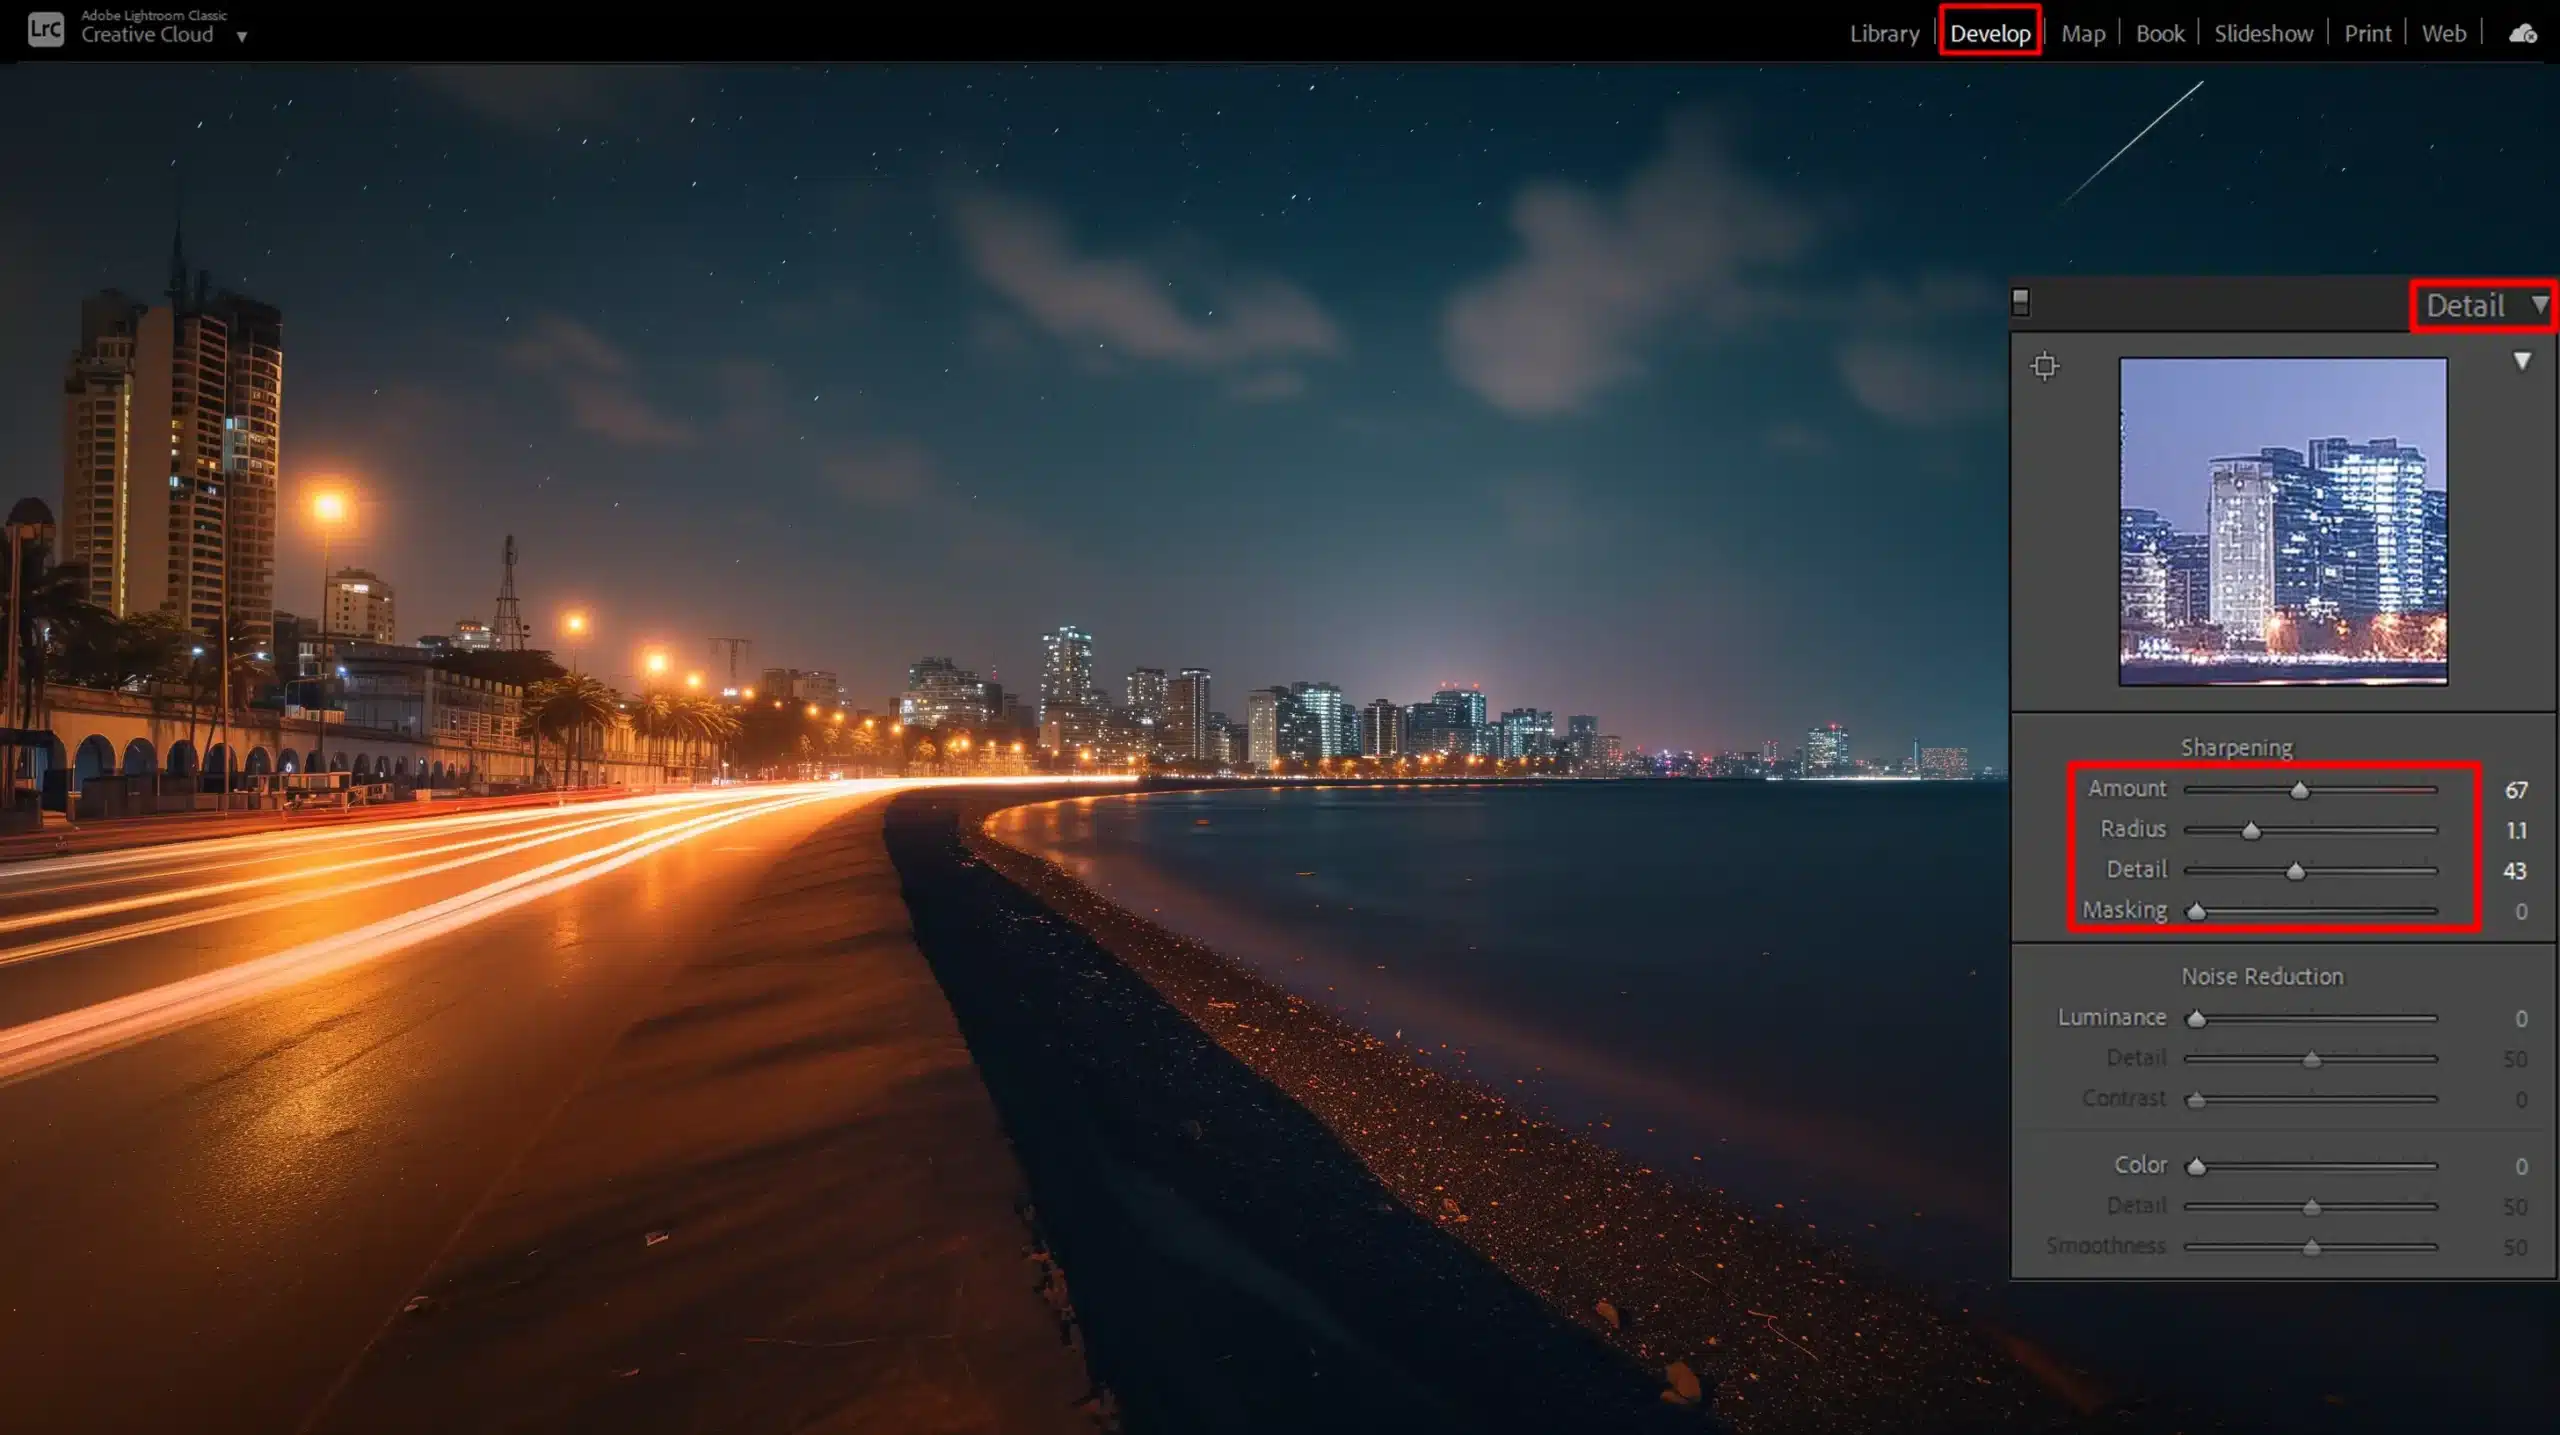
Sharpening
Sharpening brings back the texture and detail in your night images. In Lightroom, find the “Detail” panel. Follow these steps:
- Move the “Amount” slider first, but don’t overdo it. You want crisp details, not halos.
- Use the “Radius” slider to control the width of the edges being sharpened. A lower value means more subtle sharpening.
- Finally, the “Detail” slider helps to fine-tune the effect. Your goal is to enhance, not exaggerate.
Color Correction
Getting the colors right in night images is pivotal. Use the white balance tool to set the correct color temperature. If the light sources differ, local adjustments may be necessary.
Using Lightroom’s radial filters, you can apply different white balance settings to specific areas. Also, pay attention to saturation and vibrance. Vibrance boosts muted colors while leaving already vivid ones alone. This way, your photos will look more natural.
Use the vibrance slider in Lightroom to enhance the intensity of the colors in your photo without oversaturating the already vivid hues.
Pro Tip: Experiment with the tone curve to adjust brightness levels in your photo subtly. Additionally, consider using the content-aware fill in Photoshop to remove any unwanted elements that might distract from the main subject.
Using Lightroom Settings for Night Photography in Street Scenes
Street lights play a huge role in night street photography. You can start by adjusting the exposure to make the lights more pronounced.
Increase the brightness without losing detail. Then, move to white balance; set it to the right temperature for authentic colors. Use the radial filter to emphasize certain light sources, creating a focal point.
Managing Shadows and Highlights
In night street photography, shadows and highlights need careful balancing. Highlight control ensures the bright areas don’t wash out.
Use Lightroom’s “Highlights” slider to tone down overly bright spots. The “Shadows” slider helps to bring out hidden details in dark areas. Adjust these slowly; small changes make significant impacts.
Adding Drama with Contrast
Contrast adds drama to your night street photos. Increase the contrast slider to deepen darks and brighten whites. Too much can ruin the mood, so be cautious.
For more refined control, use the “Blacks” and “Whites” sliders. This targeted approach retains details. Also, consider using the split toning tool to add a color gradient that enhances the night mood.
Pro Tip: If you’re familiar with astrophotography, you can apply similar techniques when using Lightroom settings for night photography in street scenes. Use the tone curve with an “S” shape to subtly increase brightness and contrast without overdoing it.
Exporting and Sharing Your Photos with Lightroom Settings for Night Photography
Navigating the world of exporting and sharing night images can be a challenge, but with a few tips and tricks, you can ensure your work shines in any medium.
Choosing the Right Export Settings
When exporting your photos, selecting the correct settings is crucial. This starts by setting the resolution properly. For digital displays, 72 PPI works well, while for printing, 300 PPI offers higher quality. Metadata can enhance credibility.
Always include basic data such as camera settings. Export formats matter too. JPEGs are great for online sharing because of their size but for prints or further edits, TIFF files are a better choice.
If you’re using Lightroom, make sure to explore the best Lightroom export settings for Instagram to optimize your images for social media.
Best Practices for Social Media
Sharing photos on social media platforms requires different settings:
- Resize images to fit the platform's ideal dimensions - for Instagram, 1080x1080 pixels is often a good standard.
- Avoid over-sharpening; it can lead to loss of quality.
- Adding a watermark protects your work but keep it subtle.
- Write engaging captions that tell a story or provide context about the shot.
- Use relevant hashtags to increase visibility and engagement.
- Consistent posting maintains audience interest and increases your reach.
Printing Your Photos with Lightroom Settings for Night Photography
Printing your photos is a rewarding experience. Choose high-quality paper with a finish that complements your photo style. Glossy paper can enrich colors, while matte reduces glare. Calibrate your monitor for true color representation.
When using a printing service, specify ICC profiles for color accuracy. Select your print size wisely. Larger prints attract attention, but smaller ones can suit more intimate spaces. Finally, framing enhances the display, protecting the photo from physical damage.
Pro Tip: Always check your photos on different devices before sharing or printing. This ensures the image looks great everywhere.
Common Mistakes with Lightroom Settings for Night Photography and How to Avoid Them
Many people face overexposure issues while editing photos. This happens when too much light enters the sensor, making the image look too bright. To avoid this:
- Keep an eye on your histogram.
- Adjust the exposure levels until you see a balanced curve.
- Ensure the highlights are not clipped.
- Try using the exposure adjustment in Lightroom to balance the light in your photos.
If it’s your first time, don’t worry. Just practice, and you’ll get better with each edit.
Underexposure
Underexposure is the opposite problem where your photo looks too dark due to insufficient light. To fix it:
- Turn to the histogram and look for a curve that's skewed to the left.
- Use the exposure control to bring in more light.
- Often, increasing the shadows can add detail to the darker areas.
It takes some trial and error, but with time, you’ll intuitively know how much to tweak.
Ignoring White Balance
Sometimes, our photos end up with a weird color cast due to improper white balance, especially with indoor lighting. Fixing it is simple:
- In Lightroom, use the white balance tool and click on an area of the photo that should be white. The software will adjust the colors automatically.
- If that doesn’t work, use the temperature slider to manually correct it. Warm it up or cool it down until the colors look natural.
Bad white balance can ruin even the best shots, so always check your photos before finalizing them.
Pro Tip: When using bulb mode photography, it’s easy to encounter overexposure, especially during long exposures.
Keep an eye on your histogram and adjust exposure levels in Lightroom to ensure the highlights are not clipped. This technique allows you to maintain control over your light balance in night photos and avoid overly bright images.
Always shoot in RAW format. RAW files retain all the detail from your camera’s sensor, making it easier to correct mistakes like exposure and white balance during editing.
This gives you more flexibility and helps produce higher-quality images compared to the RAW or JPEG format.
For those who frequently edit in Lightroom, learning some important Lightroom shortcuts can significantly speed up your workflow and make the editing process more efficient.
- Turn to the histogram and look for a curve that's skewed to the left.
- Use the exposure control to bring in more light.
- Often, increasing the shadows can add detail to the darker areas.
It takes some trial and error, but with time, you’ll intuitively know how much to tweak.
Frequently Asked Questions

What are the best settings for night photography in Lightroom?
- Exposure: Adjust the exposure to ensure the photo isn't too dark. You might need to increase it slightly.
- Contrast: Increase the contrast to make the lights and darks in your photo pop.
- Shadows and Blacks: Lift the shadows to reveal details hidden in darker areas without making the photo look washed out.
- Clarity and Dehaze: Add a bit of clarity for more texture and dehaze to reduce fog or glare.
- White Balance: Tweak the white balance to correct color tones, aiming for natural skin tones or a true-to-scene hue.
What settings to use for nocturnal photography?
- ISO: Use a higher ISO to capture more light, but be cautious of increasing noise.
- Aperture: Open your aperture to let in more light (use a lower f-number).
- Shutter Speed: Use a slower shutter speed to allow more light to hit the sensor. Consider using a tripod to prevent shaking.
How do you edit night photos in Lightroom?
- Noise Reduction: Apply noise reduction to minimize graininess caused by high ISO settings.
- Sharpening: Sharpen the details gently to keep the photo crisp without exaggerating the noise.
- Color Enhancements: Adjust the vibrancy and saturation to enhance the colors without making them look artificial.
How to make night photos look better?
- Crop and Composition: Crop the photo to enhance the composition or to focus more on the subject.
- Effects: Add subtle effects like a vignette to focus attention or a slight grain to give a filmic texture.
- Detail Enhancer: Use local adjustment tools like the adjustment brush to brighten or darken specific areas and bring out details.

Conclusion
In wrapping up, exploring Lightroom settings for night photography has dramatically improved my night shots, showing just how powerful a tool Lightroom can be.
Adjusting sliders like white balance and exposure not only sharpens details but also enriches colors, making each photo pop. If you’re keen to refine your own night photography skills, I can’t stress enough how valuable these adjustments are.
For those eager to dig deeper and expand their editing skills further, consider exploring my Photoshop Course and Lightroom Course. Each course is packed with insights and step-by-step guides that cater to both beginners and seasoned photographers.
Additionally, exploring Adobe’s Photoshop and Lightroom can offer further enhancements to your workflow. Dive in and see how these tools can elevate your night photography to dazzling new levels
Read more about Photoshop & Lightroom:


Course

Light Effect Photoshop


Lightroom Course 2025

Adobe Photoshop Course 2025

Photo Editing Course


