Using “light rays Photoshop” techniques can transform an ordinary image into something truly magical.
In this article, I’m excited to walk you through a step-by-step process that will captivate your audience and make your images stand out.
Imagine the awe your viewers will feel when they see the beautiful and realistic light rays enhancing the atmosphere of your photos.
Ready to take your photo editing skills to the next level?
Keep reading to discover how easy it is to add this enchanting effect to your images!
Table of Contents
Setting Up Your Photoshop Workspace
Setting up your workspace in Adobe Photoshop is important for efficient workflow.
Ensure that your main tools and panels are accessible.
Preparing Your Image
Before diving into effects, you must prepare your image. Open Adobe Photoshop, load your specific image, and make sure it is set as the background layer. This is fundamental.
Open Your Image: Select "File" and then "Open" from the top menu. Choose the specific image you want to edit.
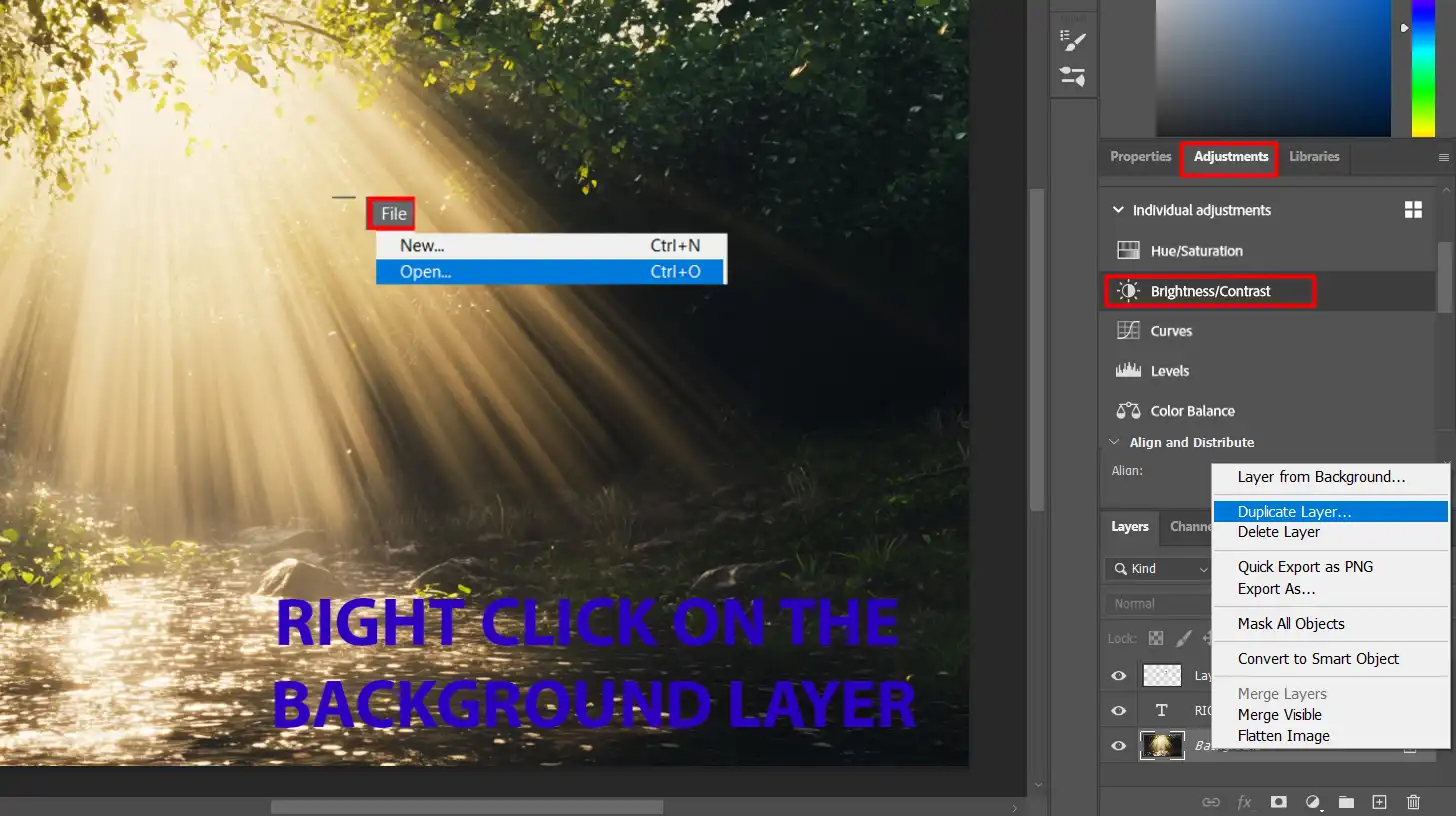
Duplicate Layer: Right-click on the background layer in the layers panel. Select "Duplicate Layer". This way, your original photo stays intact.
Adjustment: Crop, adjust brightness, and contrast if needed. This sets the stage for adding realistic light rays.
Essential Tools and Panels
Understanding essential tools and panels can drastically improve your editing speed. Familiarize yourself with these important elements:
Layers Panel: It manages all the layers in your workspace. Each edit gets its own layer, simplifying modifications.
Brush Tool: Find this on the left toolbar. It's versatile, important for creating light rays or other enhancements.
Filter Menu: You’ll apply many effects through this menu, including the radial blur, an important step in creating realistic effects.
Layer Mask: Adding a layer mask allows selective editing without permanently altering the new layer.
Now that the essential tools are set, let’s add those beautiful light rays.
Pro Tip: Turn your image into a smart object before making major edits. It keeps your edits reversible.
Additionally, familiarize yourself with the essential tools in Lightroom and Photoshop, as they are important for enhancing your workflow efficiency.
These tools provide powerful options for detailed adjustments and can significantly improve your editing process when used alongside Photoshop’s features
Create Realistic Light Rays
To create realistic light rays in Photoshop, we follow several steps that ensure an authentic and captivating light effect.
Whether you aim for sun rays in a landscape shot or dramatic lighting in a portrait, mastering this technique will enhance your images significantly.
Using Levels Adjustment
First, we adjust the levels. Click “Image” > “Adjustments” > “Levels” to open the levels dialog box.
Drag the sliders to improve contrast in the dialog box. This step helps define where the light rays will appear.
Steps to Use Level Adjustment:
Open your image.
Select "Levels" from the Image menu.
Adjust the levels sliders.
By enhancing the contrast, we’ll better see the areas where light interacts. Ensuring accurate initial adjustments is significant for creating a realistic effect.
Applying Gaussian Blur
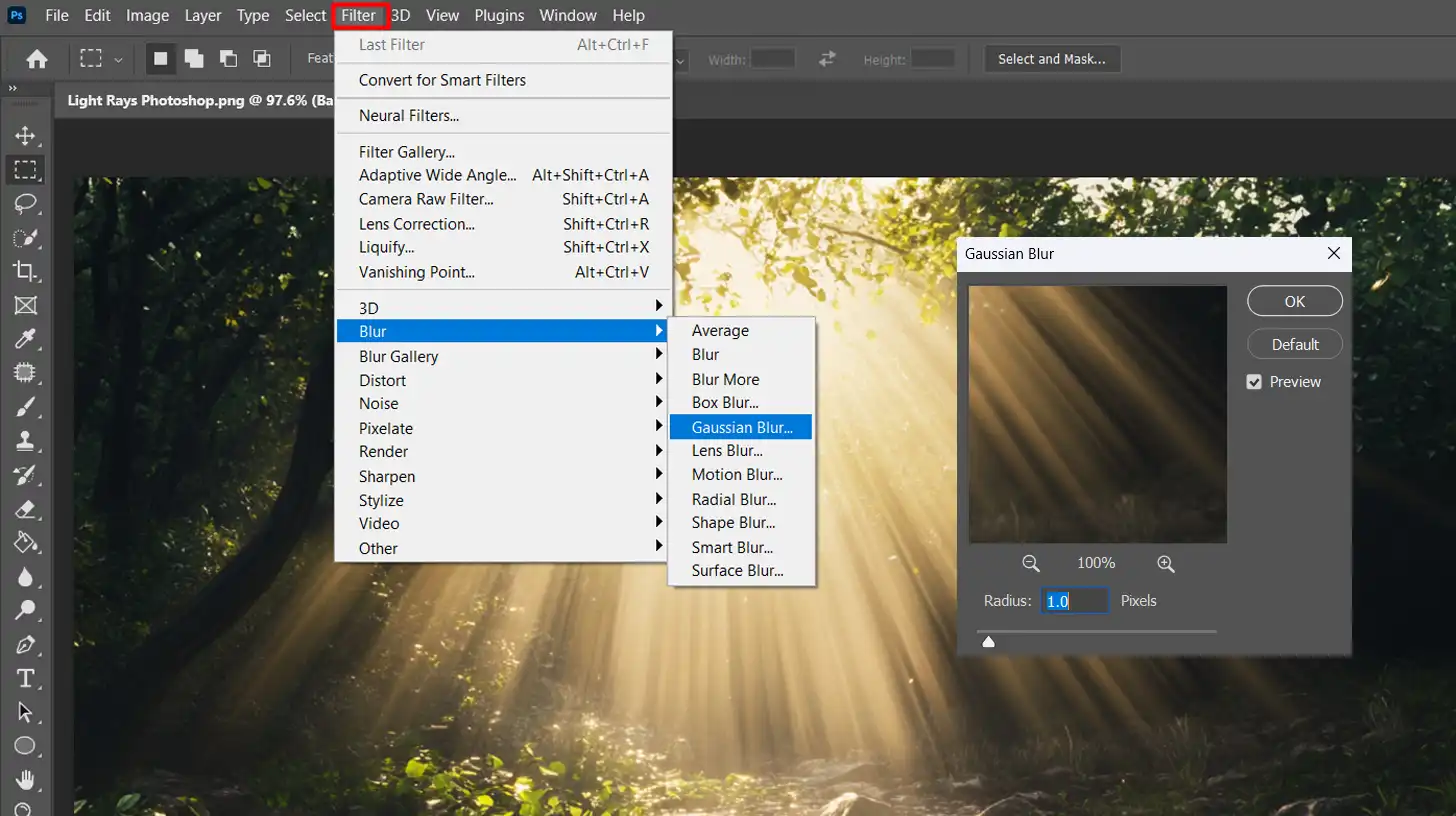
Next, apply a Gaussian Blur to soften the light source. Go to “Filter” > “Blur” > “Gaussian Blur“. Adjust the radius for the desired blur effect.
Steps for Applying Gaussian Blur:
Select your light ray layer.
Navigate to the filter menu.
Choose "Gaussian Blur" and set the radius.
Blurring the layer gently simulates how light spreads naturally. This method provides a soft light, enhancing the overall appearance.
Blending Modes for Light Rays
Lastly, use blend modes to integrate the light rays into the image. Duplicate the light ray layer and set its blend mode to “Screen” or “Overlay“.
Adjust the layer opacity for subtle effects.
Steps for Using Blending Modes:
Duplicate the light ray layer.
Set the blend mode to "Screen".
Adjust the layer opacity.
Experiment with blend modes like “Soft Light” or “Multiply” for different visual impacts. Proper use of blend modes bridges your light rays and the original image seamlessly.
Pro Tip: Use the radial blur method to focus on a specific point. This method enhances the realism of the light rays.
Adjust the blur center to fine-tune light beams for optimal results.
Advanced Techniques for Light Beams
Continuing with our exploration of advanced techniques for creating light beams, the true magic unfolds.
In the following sections, we will discuss several refined methods to enhance your light rays in Photoshop.
To better understand the progression from basic to advanced light ray techniques in Photoshop, refer to the comparison table below.
It outlines the steps, tools, and effects you can expect at each skill level, providing a clear distinction between beginner and more complex methods.
Feature
Basic
Advanced
Steps
Open, select, filter
Open, create, adjust, blend
Tools Used
Lasso Tool, Lighting Effects
Brush Tool, Radial Blur, Layer Blending
Resulting Effect
Basic light enhancements
Dynamic and tailored light designs
Skill Level Required
Beginner
Intermediate to Advanced
Creating Custom Light Ray Brushes
To create realistic light rays, start with custom brushes. This trick allows you to have full control over how your light beams look.
Steps to Create Custom Light Ray Brushes:
Create a New Brush: Use the brush tool and set your preferred shape and size. Play around until it feels right.
Adjust Brush Dynamics: Open the brush settings panel and tweak the dynamics. Try scattering and size jitter for natural effects.
Save Your Brush: Once satisfied, save your creation. Click on the brush preset options and choose "New Brush Preset". Now, it's ready for action.
Using custom brushes gives you a unique touch, making your light rays more convincing.
While creating custom light ray brushes, you can use the spot healing brush to clean up any unwanted marks or blemishes on your canvas before applying the light effects, ensuring a pristine background for your design.
Also, when creating custom light ray brushes, consider the principles of photography lighting to simulate realistic light effects that mimic natural sunlight and shadows in your digital compositions.
Using the Radial Blur Tool
The radial blur tool is an underappreciated gem. The blur method option can add depth and direction to your light rays in Photoshop.
Steps to Use the Radial Blur Tool:
Duplicate Your Layer: Always work non-destructively. Duplicate your current layer with light rays.
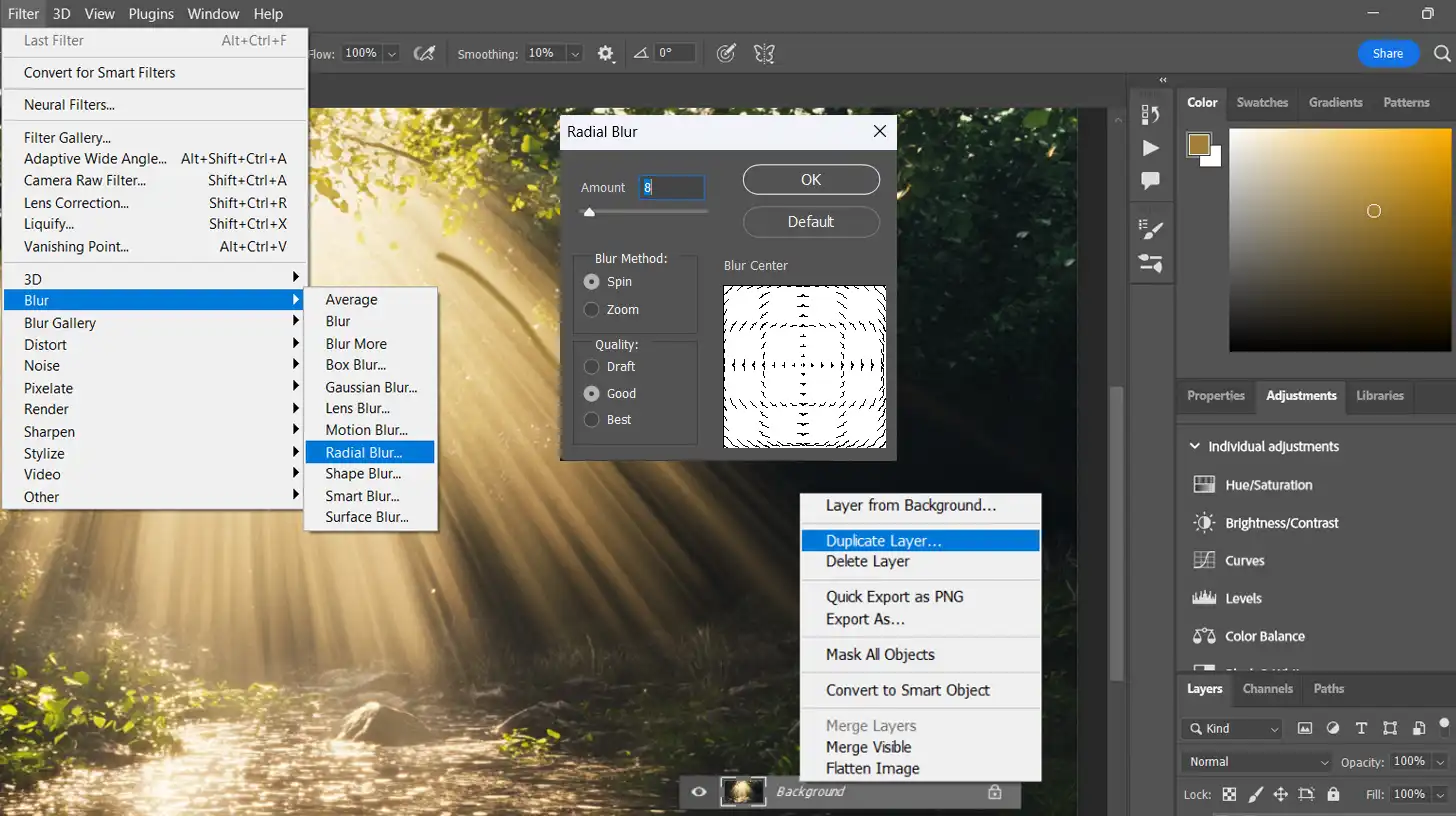
Apply Radial Blur: Head to "Filter" > "Blur" > "Radial Blur". A dialog box appears. Choose "Zoom" and adjust the amount. This is called a zoom blur method.
Set the Blur Center: Move the blur center to match your light source, such as the setting sun. This ensures the blur effect and outer glow radiate correctly, enhancing the overall visual impact.
Blend Modes: For a more seamless effect, change the blend mode of your light ray layer to "Screen".
This technique adds realism by aligning the light rays with your light source.
Consider applying motion blur effects to simulate speed or movement in your images.
This technique can add dynamism and a sense of action, especially when creatively combined with radial blur adjustments in Photoshop.
When using the Radial Blur Tool, integrating Photoshop levels tips can enhance the contrast and intensity of the effect, making the blurred features stand out more dramatically in your compositions.
Enhancing Light Rays with Color
Color brings light beams to life. Enhancing your light rays with color can make a huge difference.
Steps to Enhance Light Rays with Color:
Add a New Layer: Create a layer directly above your light rays.
Choose Foreground Color: For a foreground color, pick a warm hue for sun rays or cooler tones for moody effects.
Paint Over Light Rays: Use a soft brush to paint gently over your light beams.
Adjust Opacity: Reduce the layer opacity to blend the colors seamlessly.
By incorporating color, the light beams become vibrant and engaging.
Pro Tip: Incorporate gradient techniques by using a subtle gradient overlay on your light rays layer.
This strategy adds an extra dimension, enhancing the realism of the light beams and making them appear even more natural.
When enhancing light rays with color, consider using Lightroom to subtly adjust the hues and saturation, ensuring the colors blend seamlessly with the rest of your image for a more natural effect.
With these techniques, your light rays in Photoshop will elevate from good to outstanding.
Practical Applications of Light Rays
Adding light rays to your images can make them look better and more professional.
This technique is not just for pros; it’s accessible and very effective in several scenarios. Let’s explore some practical applications of light rays in Photoshop.
Adding Light Rays to Portraits
Enhancing a portrait when you want to create realistic light rays gives it a fresh and magical touch.
Imagine capturing a moment where the sun rays gently kiss the subject’s face, outlining their features with a soft, glowing hue. It adds depth and sets the mood.
Steps to Add Light Rays in Photoshop:
Open your portrait in Adobe Photoshop.
Create a layer and set your brush to white.
Paint rays come from your light source, like the sun or a lamp.
Apply Gaussian Blur to soften the lines and create realistic light rays.
Set the blend mode to "Screen" to integrate the rays seamlessly.
This simple yet effective method can bring your portraits to life. Remember, less is often more. Subtle light rays can make a big difference.
Creating Dramatic Landscape Effects
Landscapes become mesmerizing when enhanced with light rays.
Think about an early morning scene where the sun rays pierce through the trees, creating a fairytale-like setting. This effect can be achieved easily in Adobe Photoshop.
Steps for Dramatic Landscape Effects:
Open your landscape photo.
Duplicate the background layer.
Use the brush tool to draw light rays extending from the sun.
Apply Radial Blur to the rays for a natural spread.
Adjust opacity to match the brightness of the scene.
By adding light rays, your landscapes will captivate viewers more and evoke stronger emotions.
When creating dramatic landscape effects, blurring the background in Lightroom can help emphasize the foreground elements, adding depth and focusing the viewer’s attention on important aspects of the scene.
Using Light Rays in Graphic Design
In graphic design, to create realistic light rays can direct focus and create stunning visuals.
Whether you design posters, digital art, or social media graphics, integrating light rays can enhance your work.
How to Incorporate Light Rays Effectively:
Start with a new project in Adobe Photoshop.
Create a new layer where you want the light rays to appear.
Draw the rays using the pen tool or brush tool.
Add a Gaussian Blur effect to soften the look.
Modify the blend mode to “Overlay” or “Screen”.
Light rays can highlight important elements and guide your audience’s eyes toward the focal point.
Pro Tip: Use light rays sparingly; overdoing it can clutter your image.
Always aim for balance, ensuring the light rays complement your composition, not overpower it.
For example, when you photograph sunsets, subtle light enhancements can capture the beauty without seeming unnatural.
When using light rays to enhance your images, consider blurring the background in Photoshop to subtly shift focus towards the illuminated areas, making the effect more pronounced and visually striking
By learning to create realistic light rays in Photoshop, your images will look impressive and professional. Dive in, practice, and see how light rays can transform your work!
Frequently Asked Questions
What are the steps to make rays of light in Photoshop?
Open your image in Photoshop.
Select the area where you want the light rays to come from using the 'Lasso Tool'.
Go to 'Filter', then 'Render' and choose 'Lighting Effects'.
Adjust the light type to 'Spotlight' and modify the intensity and focus as needed.
Use the 'Move Tool' to position the light effect in the desired direction.
How do I add light rays to a photo?
Start by opening your image in Photoshop.
Create a new layer and fill it with black color.
Go to 'Filter', select 'Render', and then 'Lens Flare'.
Place the flare at the source point where you want the rays to originate.
Change the blend mode of the layer to 'Screen' to let the rays blend with the photo.
What steps are involved in adding light effects in Adobe Photoshop?
Load your image into Photoshop.
Use 'Layer' > 'New Adjustment Layer' > 'Levels' to adjust the brightness and contrast.
Add a new layer for light effects and use brushes with soft round tips or flares.
Apply 'Gaussian Blur' to soften the light spots.
Adjust the opacity to get the desired intensity of the light effects.
How do you make fake sun rays in Photoshop?
Open the image in Photoshop where you want to add sun rays.
Create a new layer and draw lines radiating outward from where the sun would be.
Fill these lines with a white or light yellow color.
Apply a 'Radial Blur' from the 'Filter' menu. Set it to 'Zoom' and adjust the amount to create a sun ray effect.
Set the layer blend mode to 'Soft Light' or 'Overlay' to integrate the rays with the background.
In conclusion, mastering “light rays Photoshop” has truly transformed my editing process. Adding light rays not only enhances the visual appeal of my photos but also brings a magical touch that captivates viewers.
This technique has become a significant part of my workflow, allowing me to create stunning, dynamic images effortlessly.
If you’re looking to elevate your editing skills, I highly recommend checking out these courses: Photoshop course and Lightroom course.
They’ve been instrumental in refining my abilities and can help you achieve similar results.
Happy editing!
If this article has helped you, then Like and Share it with your friends
$2,061.00Original price was: $2,061.00.$1,061.00Current price is: $1,061.00. 27584
Download Your Free Guide Now!
Discover the secrets of photography with our printable guide! Master essential techniques like aperture, shutter speed, and ISO to create stunning images. Get your free printable PDF now and start turning your snapshots into masterpieces!