Creating gold text in Photoshop is an eye-catching way to enhance your design projects.
Whether you’re working on a logo, invitation, or social media graphics, mastering this technique can make your text pop with a luxurious flair.
In this guide, I’ll walk you through the steps to achieve stunning gold text in Photoshop.
By the end, you’ll be able to add that touch of elegance and sophistication to your work.
Ready to turn your designs into pure gold?
Let’s dive in!
Table of Contents
Setting Up Your Photoshop Document
First, launch Adobe Photoshop. Click on “File” and select “New” to start a new Photoshop document.
Choose your dimensions based on your project needs. If you’re unsure about the size, you can always crop in Photoshop later.
Choosing the Right Font for the Gold Text
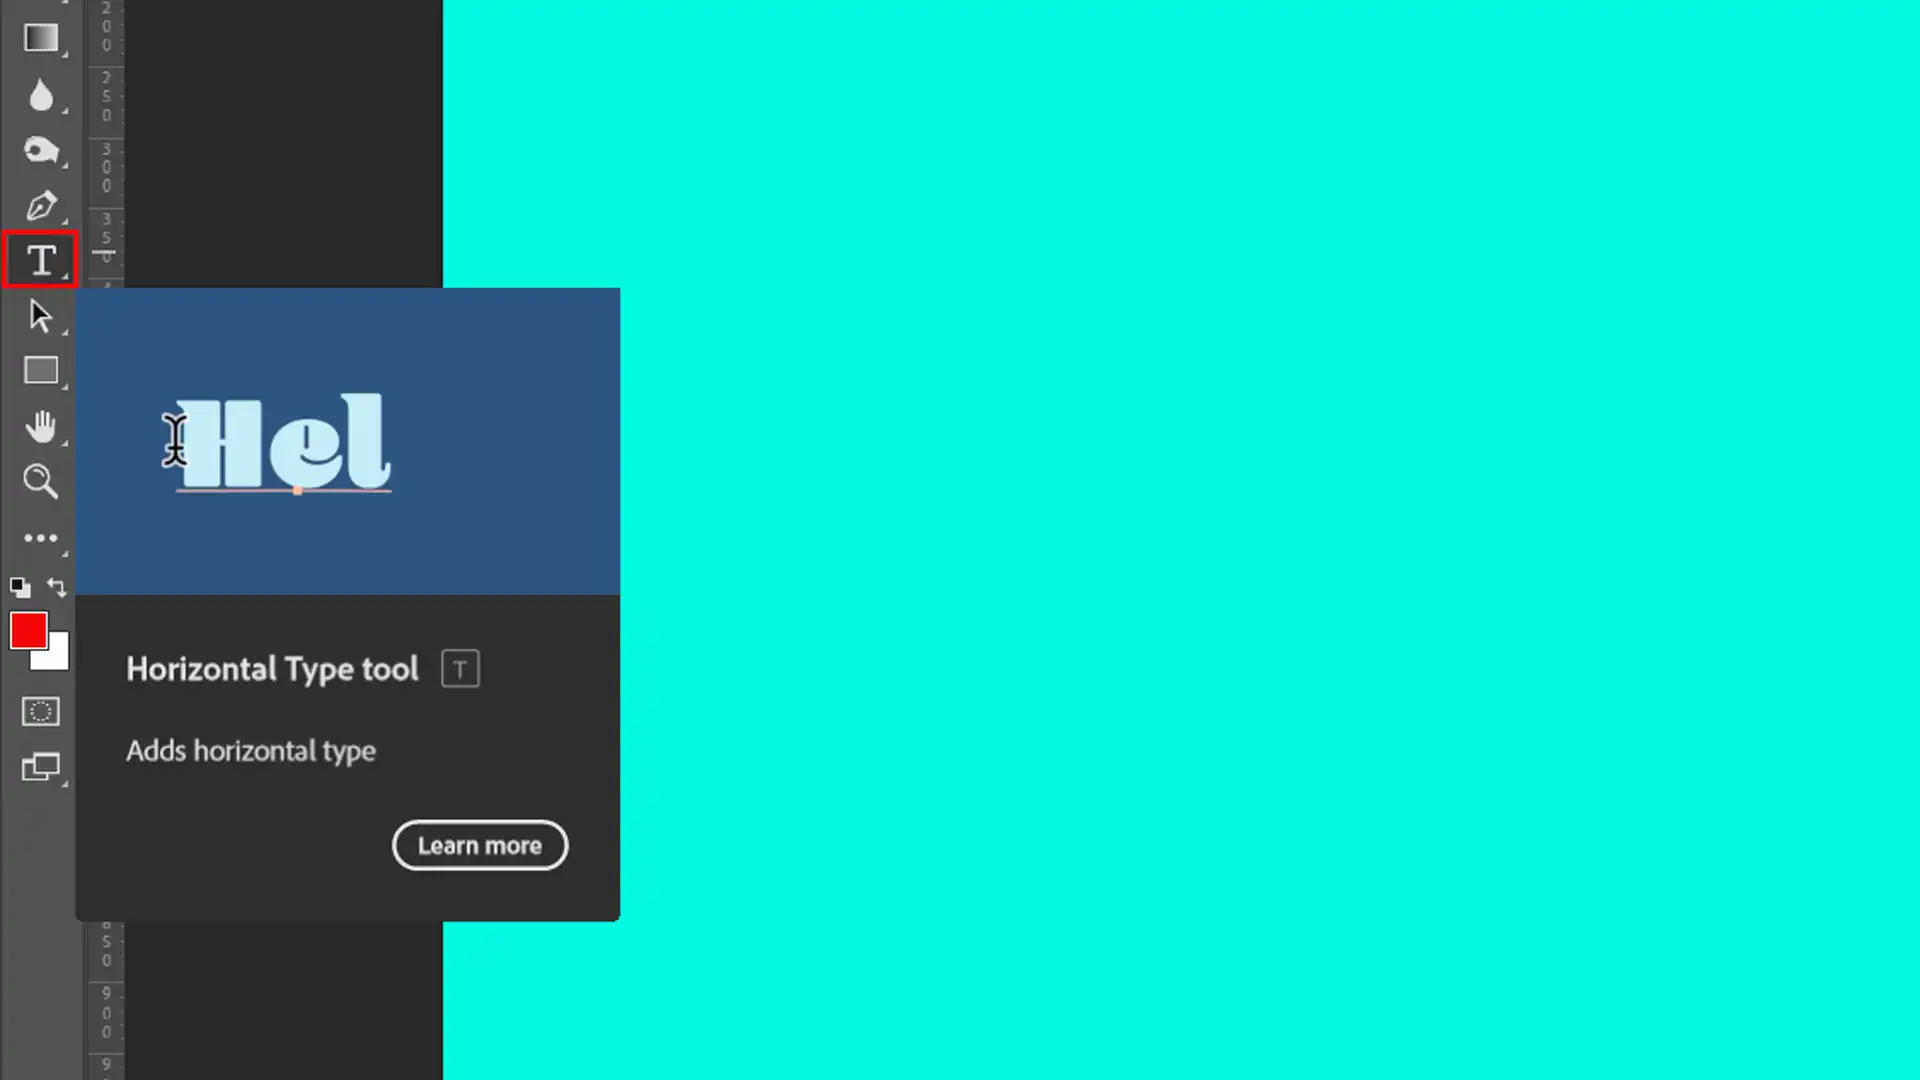
Next, consider your font. Open the “Type Tool” from the toolbar, click on your canvas, and type your text.
For gold text, choose a bold, serif font to make it pop. If you need to adjust the font size or spacing, remember that Photoshop shortcuts can save you time.
Choosing the right font is crucial, but don’t overlook how warp text can enhance your design. By applying warp text techniques, you can perfectly adjust your font to fit your gold text’s style.
Adding and Positioning Your Text
Once you’ve chosen your font, add your text by clicking on the canvas. Use the “Move Tool” to position it where you like. Make sure it stands out.
Layer Effects: Making Your Text Shine
Layer Styles: Go to the "Layers Panel" and right-click on your text layer. Select "Blending Options" Use these styles to enhance your text. Apply "Outer Glow","Bevel and Emboss" and "Gradient Overlay"
Outer Glow: This adds a light halo around your text. Set the color to white or a light hue. Increase the "Spread" and "Size" until you're happy with the look.
Gradient Overlay: Create a gold effects using the "Gradient Overlay Layer Effect" Set your gradient colors from dark yellow to light yellow.
Bevel and Emboss: This adds depth to your text. Play around with different settings. Try adjusting the "Gloss Contour" for a more refined look.
After applying the separate layer effects, tweak the settings to your taste. You can always go back and edit each layer style.
Now you have your gold text in Adobe Photoshop!
Pro Tip:Use “Smart Objects” to keep your text editable. Just right-click on your text layer and select “Convert to Smart Object” This allows you to go back and make changes anytime.
Applying Gold Text Effect
Learning to create gold text effect in Photoshop can be an engaging and rewarding process. In this guide, we will cover the essential steps to easily transform plain text into stunning gold letters.
Follow along and learn how to achieve this professional look.
Using Layer Styles
Open your new Photoshop document.
Select the Type Tool.
Type out your desired text and position it appropriately on a new layer.
Now, let's head to the Layers Panel to access the layer styles options.
You can customize the appearance of your design elements by using the layer style feature in Photoshop.
By applying various layer style, such as drop shadows or glows, you can add depth and texture to your work.
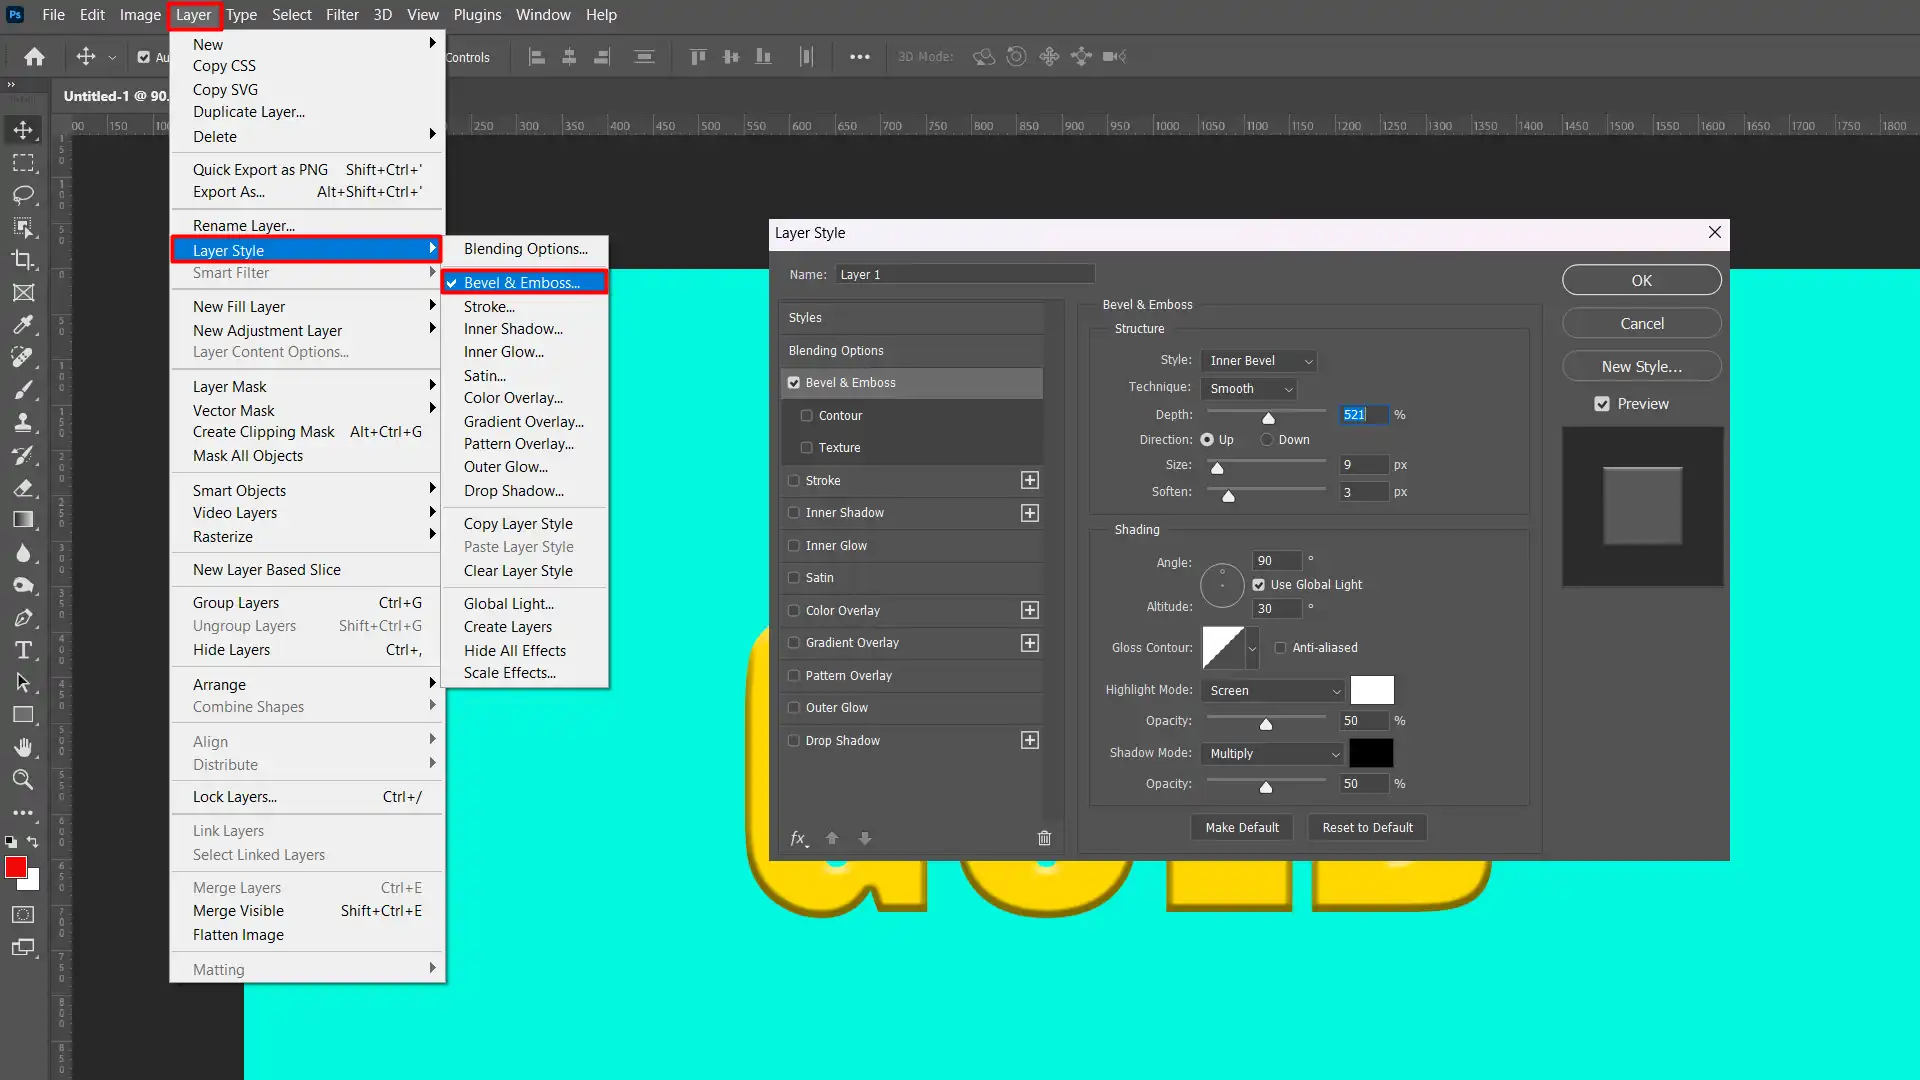
Bevel and Emboss
Click on the Bevel and Emboss option in the Layers Panel.
Set the technique to Smooth and depth around 100% for bold edges.
Adjust the direction to Up and size to suit your preference.
For best results, play with the settings until you get a realistic 3D effect.
Contour
Within the Bevel and Emboss settings, enable the Contour option.
Select a sharp curve to enhance the highlights and shadows.
Adjust the range as needed for a polished appearance.
Texture
Enable the Texture option under Bevel and Emboss.
Choose a texture that closely resembles metal.
Set the scale and depth to integrate the texture seamlessly with the text.
Gradient Overlay
Select the Gradient Overlay layer effect.
Choose a gradient that includes various gold colors from yellow to light brown.
Set the blend mode to Normal and adjust opacity for the desired intensity.
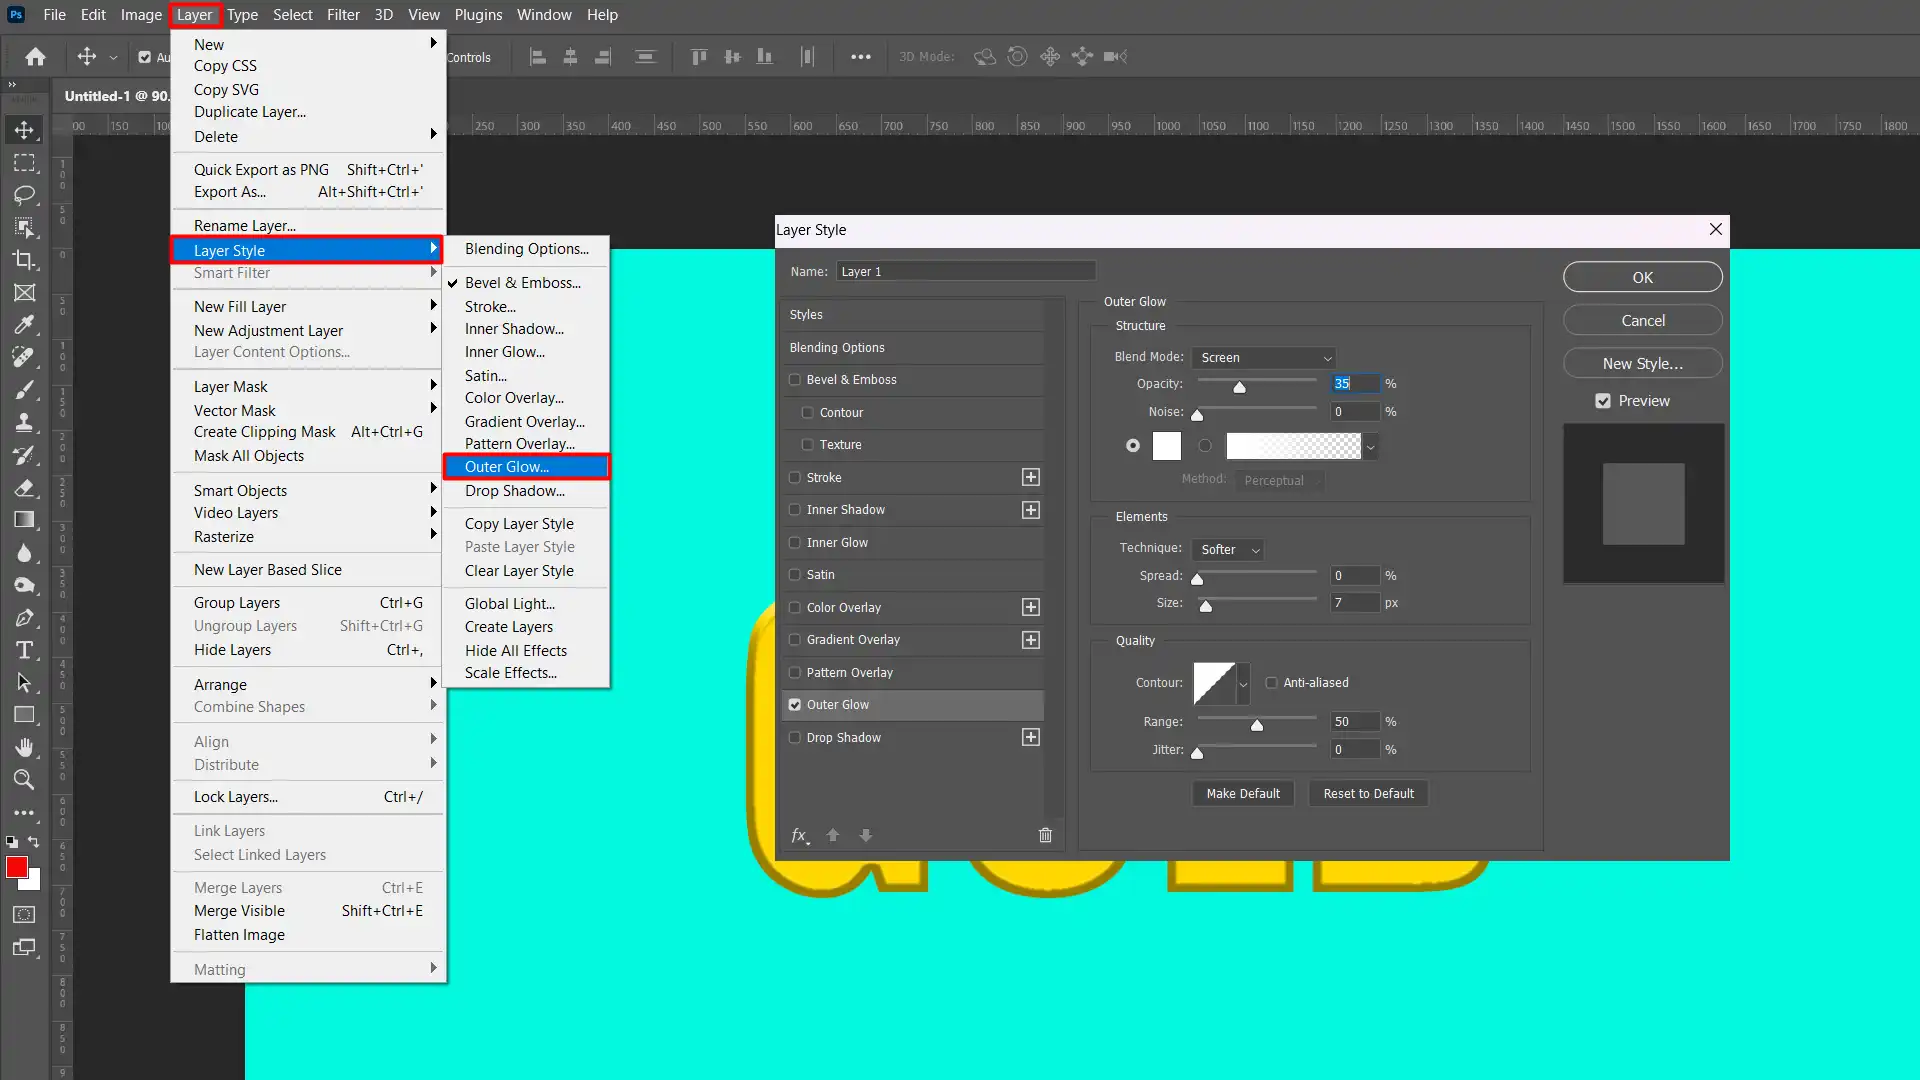
Outer Glow
To make the text pop, apply the Outer Glow layer effect from the Layer Style menu.
Set the color to a bright yellow or light orange.
Adjust size, spread, and opacity until the glow compliments the text without overpowering it.
To make your text or object stand out, apply the Outer Glow layer effect for a subtle halo that enhances its visibility and adds a touch of depth.
After completing these steps, you should see your text transformed into realistic and vibrant gold text. Experiment with different settings to perfect the effect.
Pro tip: Always convert your text layer into a Smart Object before applying layer style. This keeps your effects editable.
For more advanced techniques, consider exploring the content-aware fill in Photoshop or learning how to add texture in photoshop to further enhance your designs.
Enhancing the Gold Text Effect
In this section, we’ll explore advanced techniques to refine your gold text.
This includes adjusting colors and highlights, adding shadows for depth, and fine-tuning textures to achieve a polished, professional look.
These enhancements will help your text stand out and look more realistic.
Adjusting Colors and Highlights on the Gold Text
Achieving a realistic look for gold letters lies in meticulous adjustments to colors and highlights.
Utilize the gradient overlay layer effect, selecting a gradient that includes various shades of gold.
Open the Layers Panel and fine-tune the highlight mode to ensure light reflections appear natural.
This subtly brings the text to life without overwhelming it.
Adding Shadows for Depth on the Gold Text
Depth is crucial for making gold text stand out. Employing the emboss layer effect, combined with careful adjustment to shadow opacity, provides a 3D perspective.
Start with the Bevel and Emboss option within your layer styles.
Set the technique to Smooth and depth to around 100%.
Adjust the direction to Up for highlights and Down for shadows.
Be mindful not to overdo the shadows, as it can detract from the glow.
Fine-Tuning the Gold Texture
Texture adds a realistic touch to your gold text. Within the layer style, select the Texture option under Bevel and Emboss. Choose a texture that mimics the look of metal.
Adjust the scale and depth settings until the texture seamlessly blends with your text. Additionally, applying a contour can further enhance the metallic effect.
Select a sharp curve in the gloss contour to accentuate light reflections and shadows, making the text appear more polished.
Pro Tip: Before applying any effects, always convert your text layer into a smart object. This ensures all layer effects remain editable and non-destructive, allowing for greater flexibility and creativity.
With these steps, you’ll master creating stunning gold text in Photoshop, making your designs shine.
For more advanced techniques, consider exploring how to add texture in Photoshop or utilize the dodge and burn tools to refine your effects further.
Saving and Exporting Your Gold Text
Creating stunning gold text in Photoshop is one thing, but knowing how to save and export your work is equally important.
When exporting your gold text, ensure that any transparent text elements are correctly handled. Properly managing transparency will maintain your design’s quality
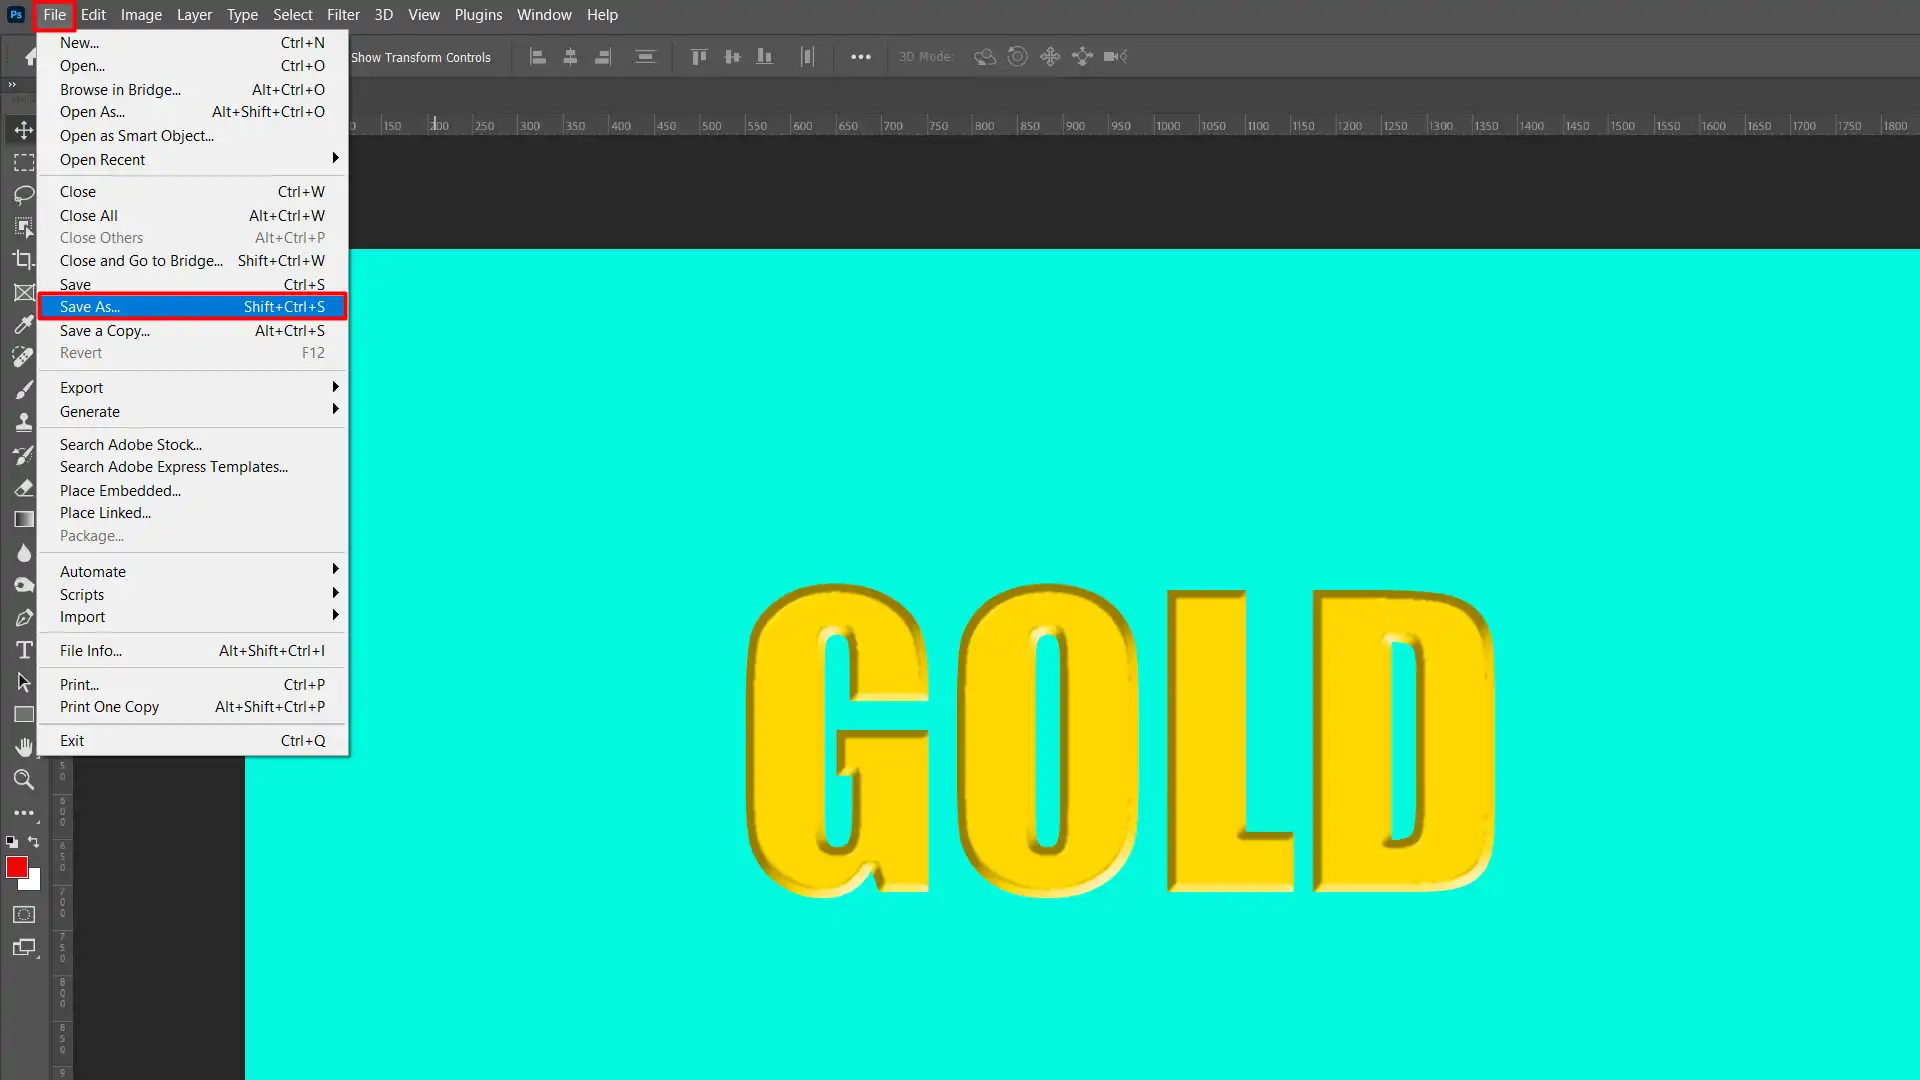
Saving Your Photoshop File
First, always save your work in the .PSD format. This keeps all the layers and allows for future edits. To do this, simply go to File > Save As, choose the .PSD option, and hit save.
Remember, saving in .PSD ensures that all the layer effects you’ve applied remain editable.
Exporting for Web and Print
Now, let’s dive into exporting. For web use, you want a lightweight file that loads quickly.
Go to File > Export > Save for Web (Legacy). Pick JPEG or PNG depending on whether you need transparency.
Adjust the quality slider to balance between file size and image quality.
For print, the focus shifts to maintaining high resolution. Use File > Save As and select high-resolution formats like TIFF or PDF. Ensure your document is in 300 DPI for crisp prints.
Aspect
For Web
For Print
File Format
JPEG, PNG
TIFF, PDF
Resolution
72 DPI
300 DPI
File Size
Smaller (optimized for fast loading)
Larger (high-quality images)
Transparency
PNG for transparency
Supported in TIFF and PDF
Color Mode
RGB
CMYK
Pro Tip: Always keep a master .PSD file for any future tweaks. Converting it to a Smart Object before applying layer effects provides flexibility down the line.
Additionally, using essential tools in Photoshop like the quick selection tool can help refine your gold text, making it even more striking.
Advanced Techniques for Creating Gold Text in Photoshop
Creating stunning gold text in Adobe Photoshop is easier than it looks. I’ll take you through key steps to make your text shine like real gold.
Step 1: Setting Up Your Background Layer
First, start by opening a new document in Photoshop. Make sure you add a background layer. You can choose a color that makes your gold text pop. White or black are good options.
Step 2: Creating the Text Layer
Use the type tool to create your text layer. Choose a bold font to make your text stand out. I’ll use “Gold” as our example text.
Step 3: Applying Gradient Overlay Layer Effect
Select the text layer in the layers panel.
Go to Layer > Layer Style > Gradient Overlay.
Choose a gradient that has shades of yellow, gold, and brown.
Applying this gradient overlay layer effect gives your text a foundation of gold hues.
Step 4: Adding Inner Glow and Outer Glow
Go back to Layer > Layer Style and select Inner Glow.
Use the color picker to choose a light yellow shade.
Repeat with Outer Glow, using the color picker to select a bright white or yellow.
The inner and outer glow effects make the text shine. It’s like adding a halo around your gold text.
Step 5: Applying Bevel and Emboss Layer Effect
Within the same Layer Style menu, select Bevel & Emboss.
Adjust the depth and size to give your text a 3D gold appearance.
Use the gradient overlay layer effect within Bevel & Emboss for extra shine.
This adds texture and dimension to your text, making it look embossed and luxurious. Don’t forget to adjust the blend mode to make the effects more natural.
Step 6: Final Touches for Polished Gold Text
Create a new layer on top of your text and use the brush tool to add subtle highlights and shadows. This final step ensures that your gold text looks polished and realistic.
Pro Tip: Before you start, convert your text layer to a Smart Object. This allows you to apply and edit layer style non-destructively.
For the final touches for polished gold text, applying gradient techniques can elevate the effect. These techniques help blend colors seamlessly, giving your gold text a refined look.
Common Mistakes and How to Avoid Them
Even with the best techniques, mistakes can happen when creating gold text in Photoshop.
This section highlights frequent errors, such as incorrect gradient settings or misaligned text, and provides tips on how to avoid them.
By understanding these common pitfalls, you’ll ensure your gold text looks polished and professional every time.
Choosing the Wrong Font for the Gold Text
Bold fonts work better with a gold text effect in Photoshop.
Using thin fonts makes the gold effects less visible and ineffective.
Ignoring the Layers Panel
Understanding the layers panel allows you to manage layer effects efficiently. Create a new layer for each element so you can edit easily.
Neglecting the Emboss Layer Effect
Applying the emboss layer effect gives the text a 3D look, which enhances realism and can add a sophisticated, raised look to your design elements.
Whether you’re working with text or images, the Emboss layer effect helps create a realistic, three-dimensional feel that adds depth and dimension to your artwork.
Skipping the Outer Glow Layer Style
The outer glow layer effect adds a shimmering edge to your text, making it more vivid.
Using Uncomplimentary Colors
Utilize the colorpicker to choose shades of yellow, gold, and brown for a perfect blend.
Overlooking Highlights and Shadows on the Gold Text
Use the brush tool on a new layer to add these details for dimension.
Additionally, consider using the dodge and burn tools in Photoshop to fine-tune highlights and shadows.
To enhance your effect in Photoshop, create a new layer and apply an effect using the brush tool for precise and creative adjustments.
Only use the brush tool for precise painting and retouching.
Not Converting the Text Layer to a Smart Object
This helps in non-destructive editing, allowing for future tweaks without compromising quality.
Failing to Save a Project with All Layers Intact
Always save your document in the PSD format with layers for easy adjustments.
For added convenience, learn Photoshop shortcuts to speed up your workflow.
Pro Tip: Apply outer glow layer style subtly. Increase its size gradually for best results.
Frequently Asked Questions
How to Make a Text Gold in Photoshop?
Here’s quick Step-by-step guide:
Open your Photoshop project and select the Text Tool.
Type your text and choose the font and size you prefer.
With the text layer selected, go to the 'Layer' menu, choose 'Layer Style,' then 'Gradient Overlay.'
In the Gradient Overlay settings, click on the gradient to edit it. Select a gold gradient or create one using shades of yellow and brown.
Adjust the angle and scale to get the golden effect you desire.
Click 'OK' to apply the gradient overlay to your text.
How to Get Golden Color for a Font in Photoshop?
To get golden color you have to:
Follow the initial steps above to create your text and access the 'Gradient Overlay' window.
For a golden color, focus on adjusting the gradient to include more yellow and less brown.
Experiment with adding a bit of orange or light brown to enhance the golden shine.
Apply the changes to see your font in a rich golden color.
How to Make Metallic Text in Photoshop?
To create metallic text you have to:
Create your text and open the 'Layer Style' dialog as mentioned above.
Along with 'Gradient Overlay', consider adding a 'Bevel and Emboss' effect.
Adjust the depth and size under the 'Bevel and Emboss' settings to give your text a metallic look.
Combine with a slight grey gradient to mimic metal more realistically.
How to Write in Gold Font?
This process is similar to creating gold text. Start by selecting your text and adding a gradient overlay.
Choose a golden gradient, or customize your own with colors like gold, yellow, and soft browns.
Adjust the gradient to flow vertically or horizontally depending on the effect you want.
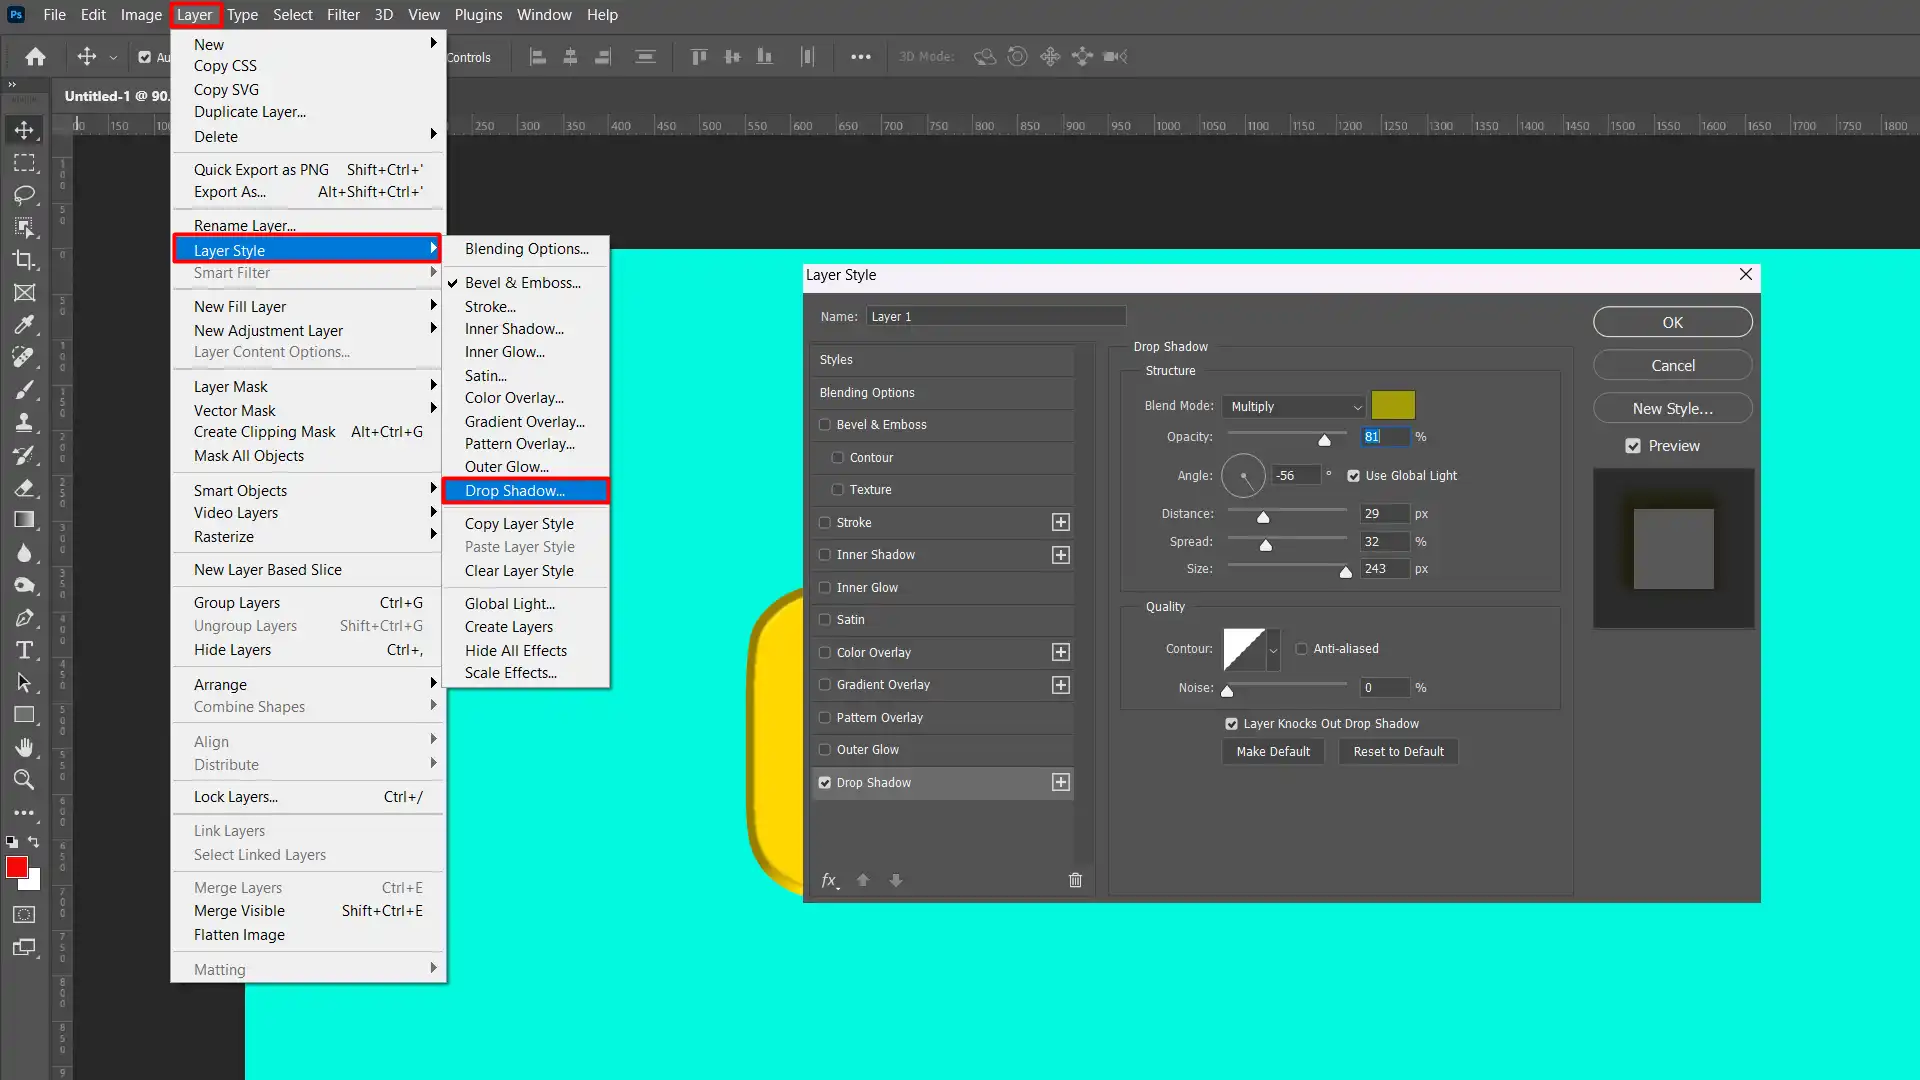
Enhance the look by adding effects like 'Drop Shadow' or 'Outer Glow' for more depth.
Creating gold text in Photoshop is a great way to add a touch of elegance to your designs. By following the steps I shared, you can easily make your text stand out with a beautiful gold effect.
Remember, getting the gold just right involves adjusting colors, highlights, and using layer styles effectively.
From my experience, taking the time to tweak these settings can make a big difference. I’ve found that using the right gradients and layer effects can really make your gold text shine.
If you want to learn more about Photoshop and how to use it to create stunning designs, check out my Photoshop Course and my Lightroom Course.
$2,061.00Original price was: $2,061.00.$1,061.00Current price is: $1,061.00. 27584
Download Your Free Guide Now!
Discover the secrets of photography with our printable guide! Master essential techniques like aperture, shutter speed, and ISO to create stunning images. Get your free printable PDF now and start turning your snapshots into masterpieces!