Generative Expand Photoshop: Boosting Images with AI
Generative Expand Photoshop: Boosting Images with AI
If you’ve ever found yourself wishing for more space in your photos, then generative expand Photoshop might be the tool you’ve been waiting for.
Imagine effortlessly extending the edges of your images without distorting the content.
In this article, I’ll guide you through how this powerful feature works and how it can transform your photo editing experience.
Whether you’re a seasoned photographer or just getting started, you’ll discover tips and tricks that can elevate your creativity and efficiency.
Ready to see how you can make your photos bigger and better?
Let’s dive in!
Table of Contents
How to Use Generative Expand in Photoshop
First, update your Adobe Photoshop to the latest version. Look for the generative expand tool in the toolbar.
Select generative expand.
This tool allows you to extend images. Imagine the possibilities!
Next, use the crop tool to adjust the canvas size. Expand the crop border to create empty space around your original image.
After that, use text prompts to add new elements. Click the generate button and wait for Adobe Photoshop Beta to work its magic.
Now, check the layers panel. Make sure the generative layer is properly set. You can adjust it further if needed.
The ability to rotate canvas in Photoshop complements the generative expand feature by providing more control over your composition.
Adjust angles and extend your canvas effortlessly using both tools for enhanced flexibility.
Using the Crop Tool
The crop tool is essential.
First, open your original image. Select the crop tool from the toolbar. Drag to adjust the aspect ratio and the canvas size.
Leave enough space for new elements.
Apply the crop adjustment. Ensure there is enough empty space for the new generated content.
Applying Generative Fill
Next, open the properties panel. Click generative fill. Input descriptive text prompts in the prompt box.
For example, write “add a tree” or “extend the sky”. Hit the click generative fill button. Wait for the system to generate the new content.
Review the generative fill results. If needed, tweak your text prompts.
Repeat the process for better outcomes.
Working with Generative Expand Layer
This layer is crucial. In the layers panel, find the generated content layer. Mark it as a generative expand layer.
Fine-tune the final touches.
Use the contextual task bar for additional settings.
Explore options for adjustments.
End by clicking click generate to apply the changes permanently.
Save your project. Enjoy your new creatively expanded image!
Pro Tip: Use specific and clear text prompts. The more descriptive, the better the outcome.
Advanced Techniques with Generative Ai Expand
First, open Adobe Photoshop and make sure it’s updated. Locate and select the generative expand tool from the toolbar.
Use the crop tool to adjust your canvas dimension for new creative space. Once you create the extended canvas around your original image, input a text prompt in the prompt box and click generate.
This integrates smoothly with other tools like the crop tool and allows for seamless artwork augmentation.
If you want to add elements effortlessly:
Click the generative fill option in the properties panel.
Type specific text prompts which detail your desired additions.
In the layers panel, ensure that you mark the new content as a generative layer.
The concise integration of these tools makes the creative process easier and more intuitive.
The key to mastering this?
Practice.
Experiment with various text prompts and observe the results. You’ll soon master combining different tools for incredible outcomes.
Adobe AI is revolutionizing creative tools, and with Generative AI Expand, the possibilities are even more exciting.
This technology allows for seamless image enhancements and expansions, offering unprecedented flexibility in photo editing
Creative Uses of Generative Expand
Now, think beyond the basics. What happens when you need to fill an empty sky in your image?
Open your new image and create space with the crop tool. Then, prepare your text prompts and use the generative expand tool.
This tool instantly adds elements like clouds, birds, or even a sunset. Just describe what you want in the prompt box and click generate.
You can also use the contextual task bar to tweak elements further. This options bar provides real-time adjustments making your work highly customizable.
In fact, the photoshop beta version offers some exciting features exclusive to generating imaginative content via the generative expand tool.
Explore these updates regularly to stay ahead.
Another clever way is using text prompts to change themes. From “sunny beach” to “dark forest”, adjustments are a breeze.
The functionality opens a plethora of possibilities for new background and foreground dynamics.
For example, altering the aspect ratio and then expanding creatively takes your projects to the next level.
Pro Tip: Always save your project frequently.
The creative cloud desktop app keeps backups handy, and the generate button ensures that every element is perfect before finalizing.
Mastering the Generative Expand Tool and Generative Layer
The Generative Expand Tool in Photoshop, paired with the Generative Layer, represents a leap forward in photo editing capabilities.
With the Generative Expand Tool, you can effortlessly extend the edges of your images, adding new content that blends seamlessly with the existing elements.
The Generative Expand Tool enables creative enhancements by expanding the image canvas while maintaining high-quality results.
The Generative Layer that this tool creates allows for dynamic adjustments and refinements, ensuring that the new element integrate smoothly into your expanded canvas.
By utilizing the Generative Expand Tool and making use of the Generative Layer, you can enhance your photos with new features, like extended skies or additional objects, without disrupting the original composition.
This approach not only broadens your creative possibilities but also streamlines your workflow, allowing you to focus on refining your visual storytelling.
Contextual Taskbar
Photoshop’s new Contextual Taskbars streamline your workflow by providing tailored tool options and shortcuts based on your current task.
This feature enhances efficiency by adapting to the specific editing phase you’re in, making it easier to access relevant functions and settings quickly.
Generative Fill or Content Aware Fill
I know you’ve heard about Generative Fill and ContentAware Fill, but what do they really do?
Let me break it down.
Generative Fill: What is it?
Generative Fill in Adobe Photoshop is like having a magical brush.
You input a simple text prompt, it generates exactly what you need! Click the Generative Fill tool in the toolbar to begin.
Content Aware Fill: How’s it different?
Content Aware Fill isn’t new. It’s useful for removing unwanted elements or filling in gaps seamlessly.
With both techniques, your creative options expand greatly.
Using Generative Expand
Generative Expand takes this a step further. Let’s say you need more room in your image.
Use the crop tool, stretch the canvas, and hit the generative expand button.
The generative expand tool will then work its magic by extending the canvas creatively.
Here is a step-by-step guide:
First, open Adobe Photoshop and select the desired image.
Then choose the crop tool to adjust your canvas dimension.
Now use the generative fill tool from your toolbar, enter the text prompt, and then click generate.
In the properties panel, confirm the adjustment before finalizing.
Managing Layers and Adjustments
Layer management is key. Within your layers panel, mark any new additions as a Generative Layer for easy identification.
Adjusting and blending makes a difference. Here’s where the contextual task bar comes in, helping you tweak everything in real time.
Photoshop Beta Features
The Photoshop Beta version includes exclusive features. You can change entire themes with a text prompt or adjust specific elements to get the precise look you want.
Pro Tip: Use Generative Fill and Generative Expand Tool together. They make extending the canvas while maintaining consistency simple!
By combining these tools, you leverage the Generative Expand Tool to create additional space and the Generative Fill to seamlessly populate that space with new content, ensuring a cohesive and professional look.
Common Issues and Troubleshooting
Artifacts in your images can be pretty frustrating. They usually show up when you use tools like the generative fill and the generative expand, and can sometimes ruin an otherwise perfect edit.
To address this, follow these steps:
Make sure the selection area is precise. Use tools like the crop tool for better control.
Try fine-tuning your work by zooming in and using the generative expand tool at smaller increments.
If artifacts persist, consider editing the affected area manually.
By tackling artifacts directly, you’ll refine your current image and achieve a cleaner finish.
It’s also beneficial to understand that practice and patience improve results.
Improving Fill Accuracy
To enhance the fill accuracy in Adobe Photoshop, especially when using generative fill, consider these tips:
Refine your selection as much as possible. This helps the tool understand what needs filling.
Adjust settings in the properties panel. Fine-tuning here can lead to better results.
Utilize the contextual task bar for real-time feedback and adjustments.
Sometimes, tweaking small areas can make a big difference. Consistency and attention to detail go a long way in ensuring high accuracy.
Closing gaps and improving the output makes your final image stand out.
Pro Tip: Combining tools often yields the best results.
Utilize the generative fill alongside the generative expand tool to seamlessly extend your canvas while maintaining consistency.
When satisfied, hit the generate button to finalize. This workflow ensures precision and creativity, giving your edits a professional touch.
Understanding and mastering these features will help you tackle common issues and significantly improve your photo editing skills.
Remember, every expert was once a beginner, so keep experimenting and learning!
Case Studies and Examples
Generative expand finds its applications in various real-world scenarios:
Photography: Imagine you are a photographer who wants to add more sky to an otherwise perfect photo. The generative expand tool in Adobe Photoshop helps extend the canvas seamlessly without compromising on quality.
You simply use the crop tool to select the area you want to expand, and then click “generate” to see the magic unfold.
This technique is particularly useful for landscape photography, where adding more scenery can enhance the visual appeal of the image.
Understanding bulb mode can greatly enhance your case studies in photography by allowing long-exposure shots.
This technique provides you with the flexibility to capture stunning, detailed images that can showcase your subject in unique ways.
Graphic Design: Graphic designers often need to create larger canvases for marketing materials.
Instead of redoing the entire design, they can use generative expand to seamlessly add space.
This saves time and effort, allowing them to focus on other essential tools in Photoshop to refine their work.
Fashion Industry: In the fashion industry, generative expand comes into play when creating lookbooks. Designers often need to extend a background to fit various layouts.
The generative expand tool ensures a smooth transition and maintains aesthetic appeal.
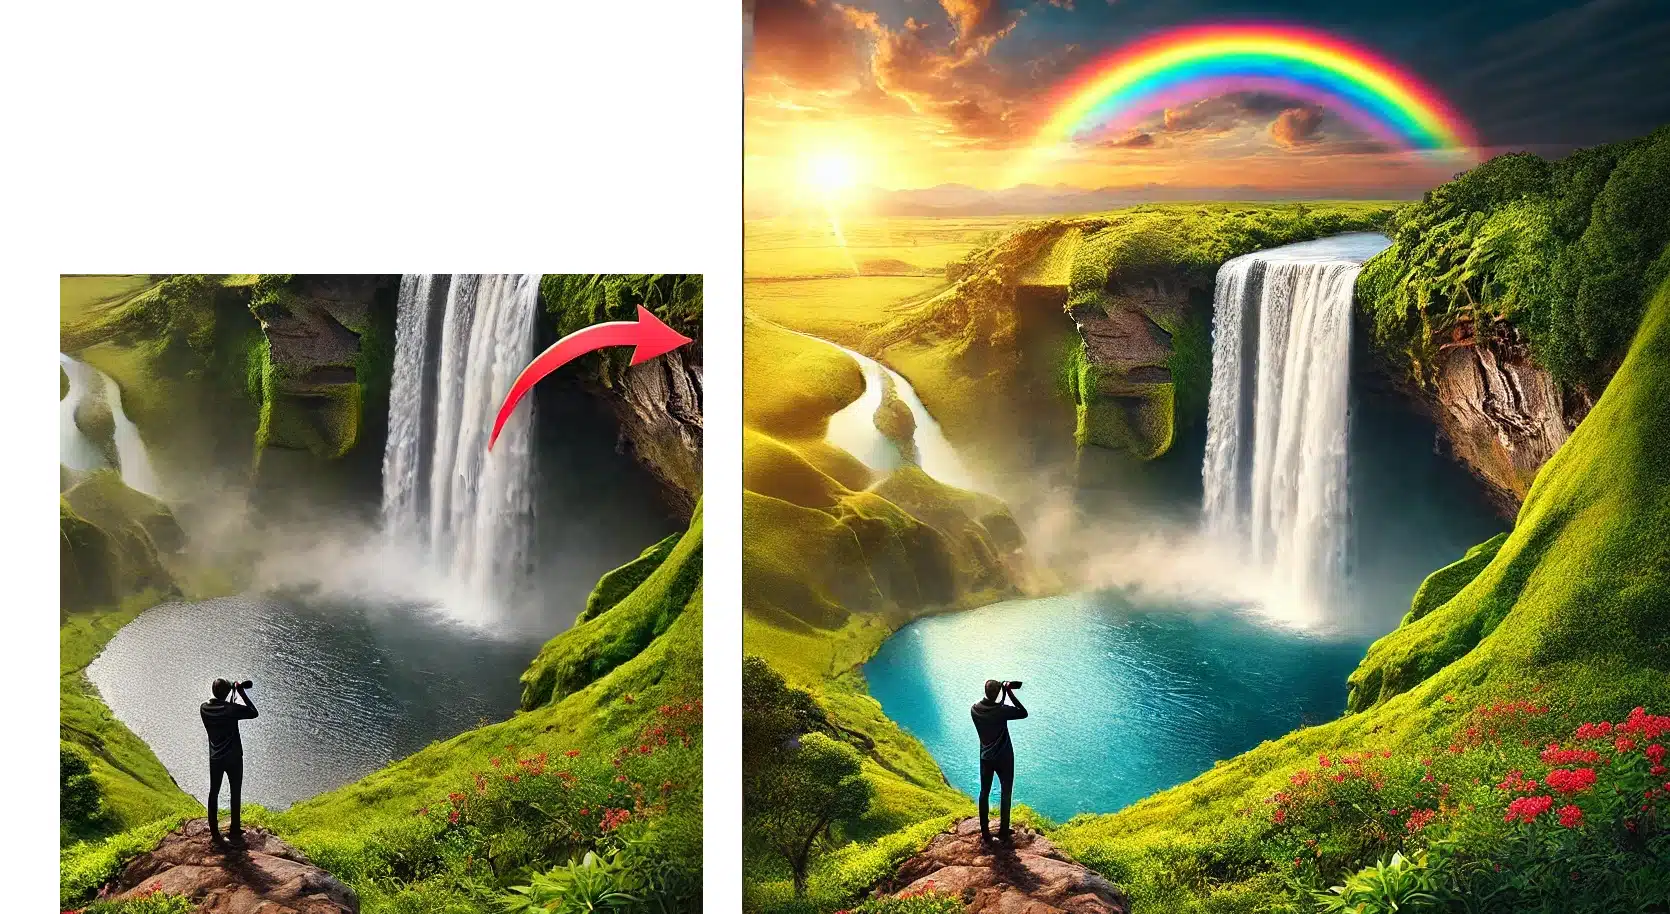
Before and After Examples
To understand the effectiveness of the generative expand tool, let’s look at some before and after examples:
Family Photo: Imagine you have a family photo where one member is almost cut off. Using generative expand, you can extend the canvas to include everyone. The final image looks natural, as if it was always meant to be that way.
Landscape Photograph: Consider an old landscape photograph that you want to turn into a widescreen wallpaper.
By using generative expand, you can add more scenery, making the picture look balanced and complete.
These examples show how generative expand can transform ordinary images into extraordinary works of art.
The tool has been a game-changer for many users, from photographers and artists to casual Photoshop enthusiasts.
Pro Tip: When using the generative expand tool, zoom in to fine-tune your selection and adjust the settings in the properties panel for optimal results.
Maximizing the Potential of Generative Expand Photoshop
When it comes to extending and enhancing your images, different methods offer various advantages.
The Generative Expand Tool in Photoshop represents a modern, efficient approach, leveraging advanced technology to simplify and automate the editing process.
Feature
Generative Expand Tool
Traditional Editing
Image Extension
Effortlessly extends image edges
Manual cropping and stretching
Content Integration
Seamlessly blends new content with existing
Often requires manual blending and adjustments
Efficiency
Fast and automated
Time-consuming and labor-intensive
Customization
Adjustable via text prompts
Limited to manual adjustments
Using the generative expand feature in Adobe Photoshop efficiently can make a significant impact on your projects.
Understanding Generative Layers
Firstly, understand the concept of a generative layer. It creates new parts of an image based on existing content.
This makes it invaluable for extending areas like skies, water, or any repeating pattern.
Proper Selection
Make sure to properly select the area to expand. Use tools like the lasso toolor quick selection tool for more accuracy.
Experimentation
Don’t be afraid to experiment. Many users find success by trying different settings in the properties panel.
Play around, and see what works best for your specific need.
Fine-Tuning
Always zoom in for fine-tuning. Small adjustments can significantly enhance the final output, especially on a small scale.
Lighting and Shadows
Check the lighting and shadows. They should match across the original and extended parts to keep the image realistic.
For more advanced shadow adjustments, you can use the dodge and burn tools in Photoshop.
Avoiding Common Mistakes
Even seasoned professionals can make mistakes with the generative expand tool.
However, awareness is half the battle.
Over-Expanding
Avoid over-expanding. Generating too much can make the image look artificial.
Less is often more.
Resolution
Don’t ignore the resolution. Make sure your extended canvas maintains the resolution quality.
Mismatched resolutions can ruin the final output.
Repeating Patterns
Watch out for repeating patterns. If the generated part shows obvious repeats, it can be a dead giveaway that the image was edited.
Break up patterns by manually editing if necessary.
Color Consistency
Don’t forget to double-check the colors. Sometimes, the generated sections can have color discrepancies.
Adjust hues and saturation levels for consistency.
Saving Work
Save your work frequently. This allows you to go back if something goes wrong.
Practice this habit whenever you work on major edits.
Frequently Asked Questions
How do you expand an image in generative AI?
Choose the AI model: Select a generative AI model that supports image expansion, such as DALL-E or Midjourney.
Input your image: Upload the image you want to expand.
Set your parameters: Specify how much and in which direction you want to expand the image.
Generate: Let the AI process your request and generate the expanded image.
How to generate an extended image in Photoshop?
Open your image: Start by opening the image you wish to extend in Photoshop.
Select the area: Use the marquee tool to select the area of the image you want to extend.
Content-Aware Scale: Go to Edit > Content-Aware Scale and adjust the handles to stretch the image as needed.
Refine and save: Make any necessary adjustments to blend and refine the extended areas. Save your work.
Why doesn't my Photoshop have generative fill?
Check version: Ensure your Photoshop version supports generative fill. This feature is available in newer versions.
Update Photoshop: If your version is outdated, consider updating to the latest version to access new features like generative fill.
Plugin check: Some features might require additional plugins. Check if you need to install any specific plugin.
How to use expand tool in Photoshop?
Select the tool: Choose the Selection Tool from the toolbar.
Modify selection: Go to Select > Modify > Expand. Enter the number of pixels by which you want to expand the selection.
Apply changes: Once the selection is expanded, you can fill or modify it as needed.
In conclusion, mastering the Generative Expand Photoshop tool has made a big difference in how I handle image editing.
It’s incredibly useful for extending the edges of your photos while keeping everything looking natural. Whether you’re adding extra space to fit new elements or just want to adjust the canvas size, this tool makes the process smooth and easy.
From my personal experience, combining the Generative Expand Photoshop tool with the Generative Fill can transform your projects, saving time and enhancing your creativity.
$2,061.00Original price was: $2,061.00.$1,061.00Current price is: $1,061.00. 27584
Download Your Free Guide Now!
Discover the secrets of photography with our printable guide! Master essential techniques like aperture, shutter speed, and ISO to create stunning images. Get your free printable PDF now and start turning your snapshots into masterpieces!