Flame Text Effects: Creating Fiery Typography in Photoshop
Flame Text Effects: Creating Fiery Typography in Photoshop
Creating captivating designs can often hinge on mastering specific effects, and one such striking effect is flame text.
Imagine transforming ordinary text into fiery, eye-catching artwork that demands attention.
Whether you’re designing for a dynamic poster, an edgy album cover, or a compelling social media post, flame text can add that perfect touch of drama and intensity.
In this article, I’ll guide you through the step-by-step process to achieve this stunning effect using Photoshop.
Trust me, by the end of this, you’ll have the skills to set your text ablaze with creativity.
Let’s dive in and light up your design game!
Table of Contents
Setting Up Your Workspace
Understanding how to set up your workspace in Photoshop is essential before diving into creative projects.
Whether you’re learning Photoshop for the first time or looking to streamline your workflow, having an organized workspace is key.
Opening Photoshop
To begin, let’s open Photoshop:
Locate the Photoshop icon on your computer and double-click it.
The program opens and loads the default workspace.
Familiarize yourself with the interface for efficiency.
Knowing where essential tools like the Layers Panel and the Content-Aware Fill tool are located can save you a lot of time.
Creating a New Documents
Next, you need to create a new documents:
Go to the menu and click "File" then select "New".
In the dialog box that pops up, you'll see options to set the width, height, resolution, and other details for your new document.
Make sure to choose dimensions that fit your project’s requirements.
If you’re working on a image editing project, consider the final output format, whether it’s JPEG or RAW.
Layers Panel Overview
Understanding the layers panel is crucial for any Photoshop task:
The layers panel shows the different layers in your image, which can include text layers, image layers, and more.
Click the "layer" icon at the bottom of the panel to create a new layer as needed.
This allows you to work non-destructively, meaning changes can easily be modified without altering the original content.
For instance, if you’re using the Dodge and Burn tools, doing so on separate layers can help you make adjustments without affecting the base image.
One important tip is to use named layers for better organization. For instance, instead of leaving a layer named “Layer 1” rename it to “Background” or “Text Layer” This will make your workflow smoother and easier to manage.
Pro tip: Always save your work frequently to avoid losing progress.
Utilize Lightroom for organizing your photos before bringing them into Photoshop for detailed edits.
Creating the Flame Text Effect
Creating flame text in Photoshop seems complex, but we break it down easily.
Let’s go through steps together.
Typing Your Flame Text
First, open Photoshop and make a new document.
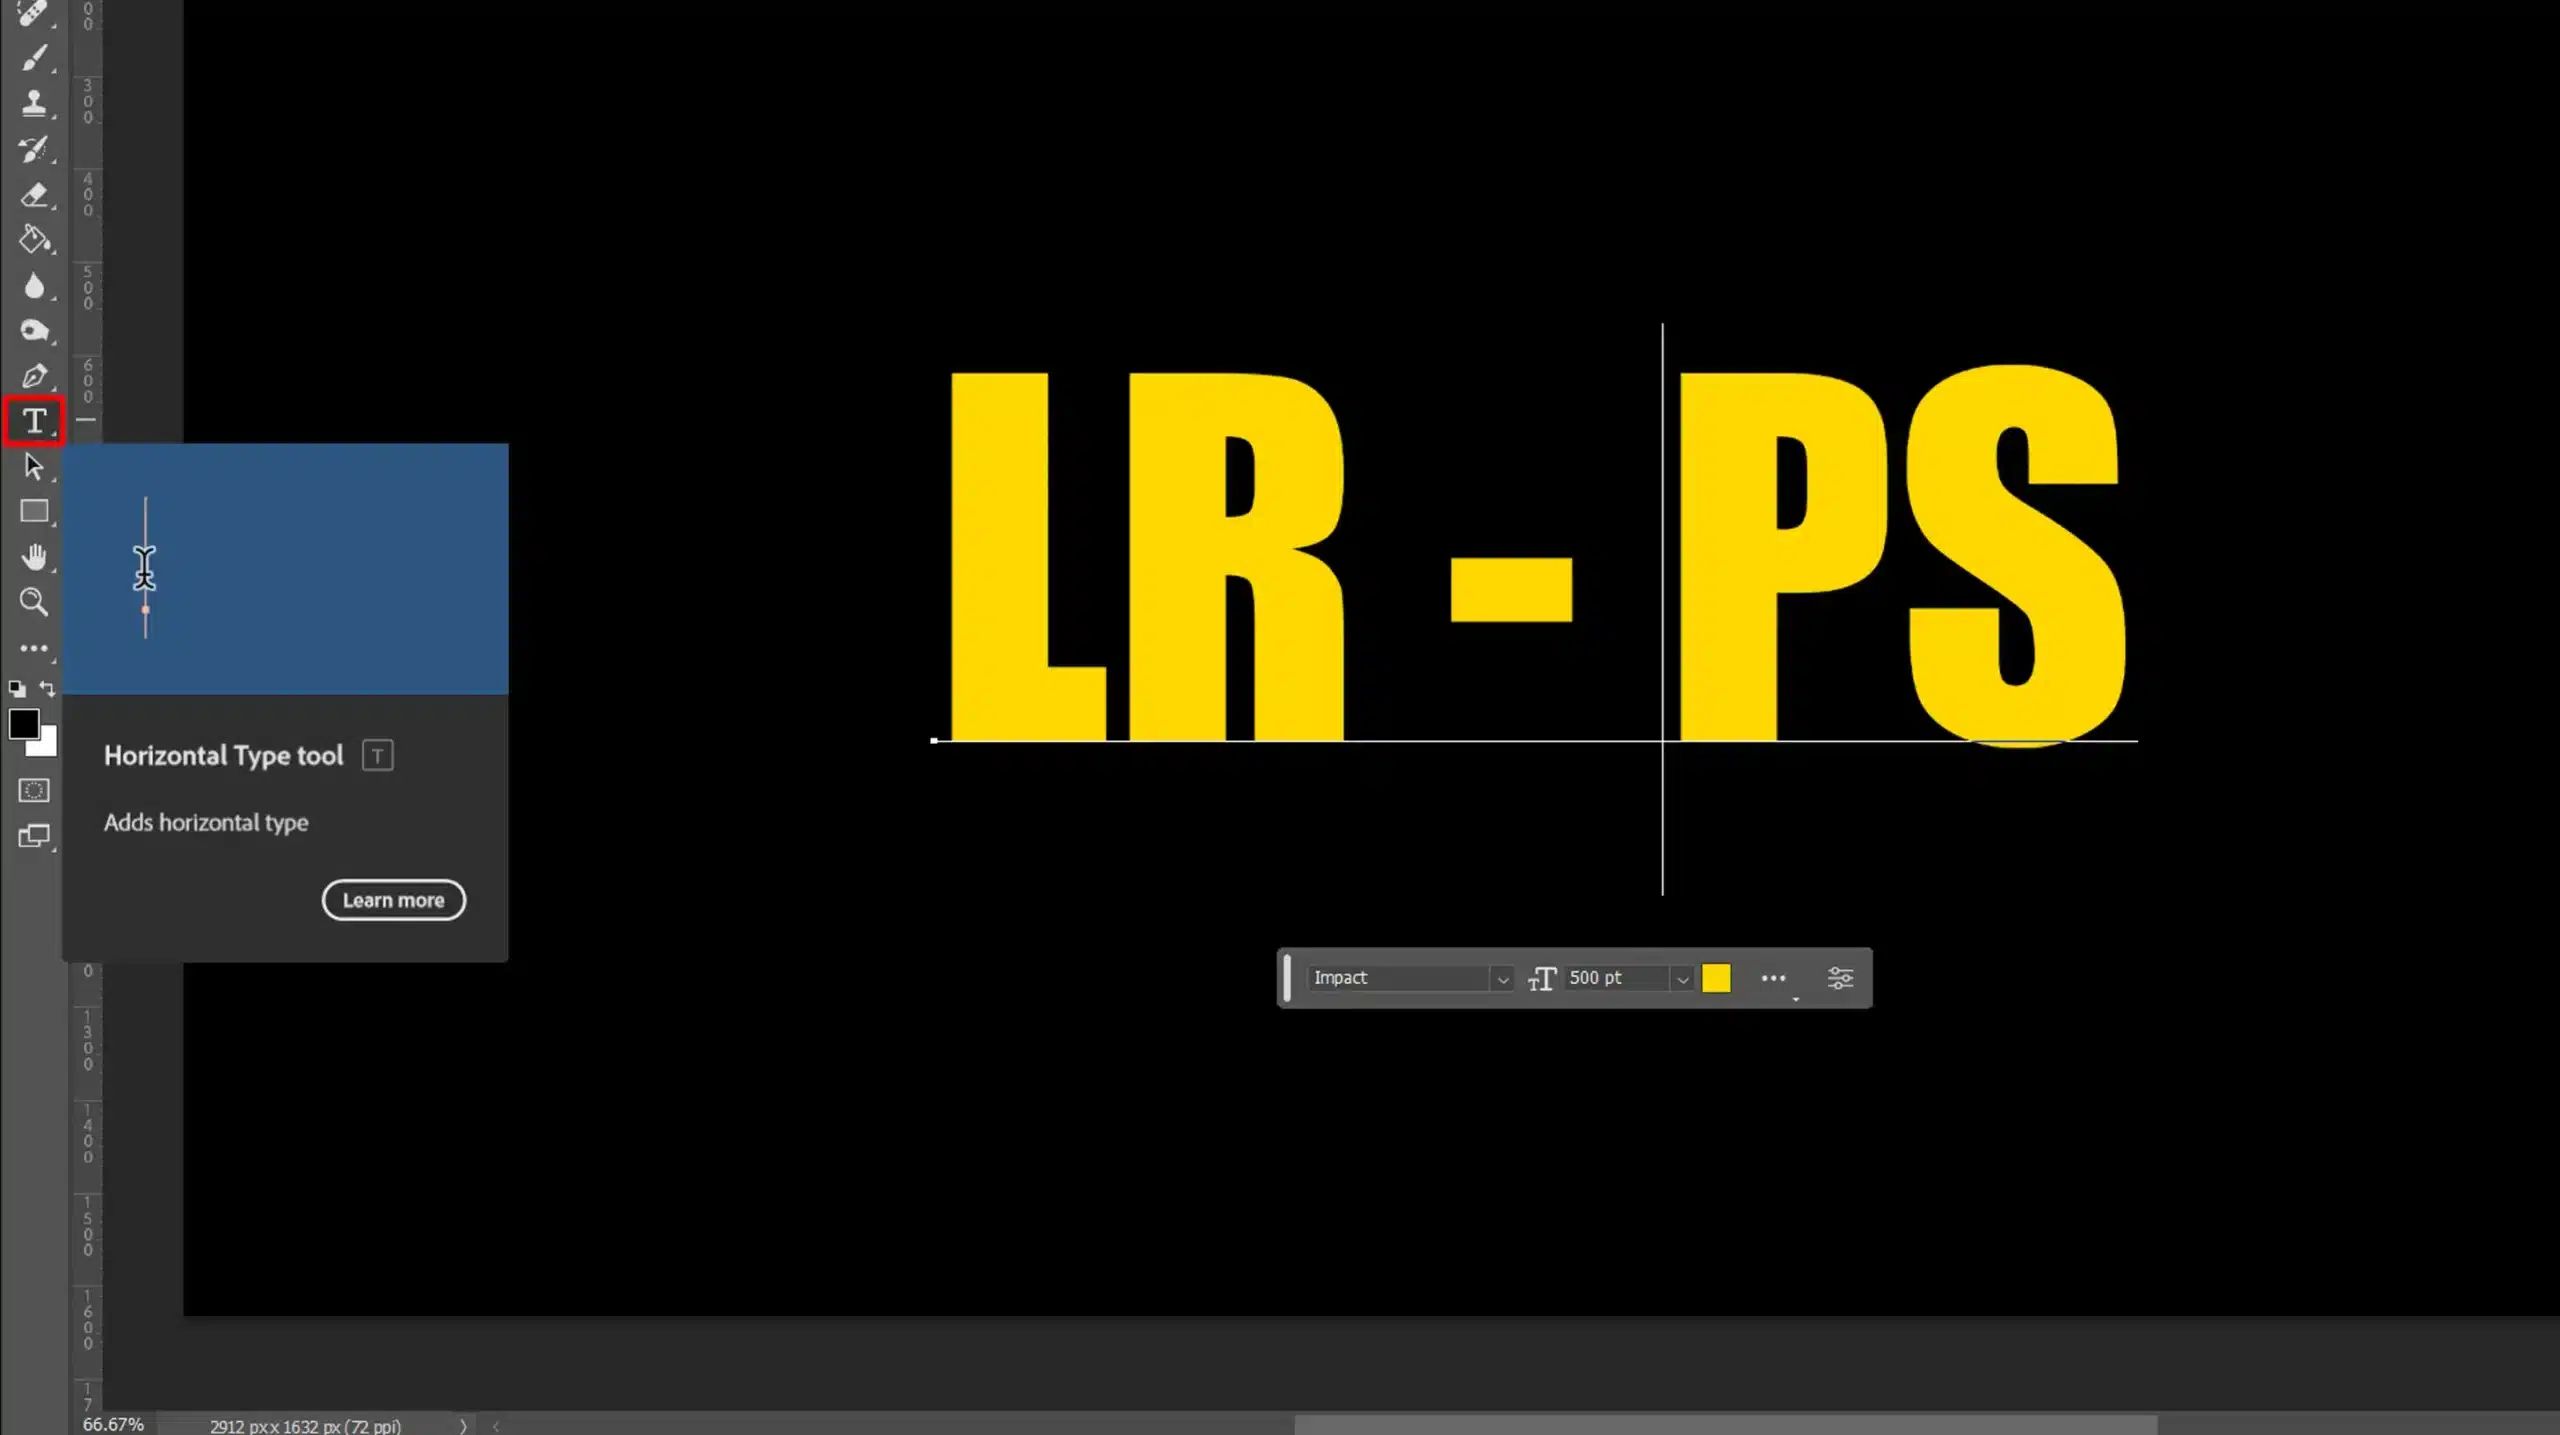
Type your desired text in the default font. Bold fonts work best for this text effect.
Next, turn your text into a text layer by clicking the checkmark in the options bar.
Place your text in the center of the document using free transform.
Pro Tip: Learn how to utilize the text box in Photoshop for an even better workflow.
Applying Layer Styles
We will use layer styles to achieve the fiery look.
Open the layers panel to select your text layers.
Outer Glow to the Flame Text
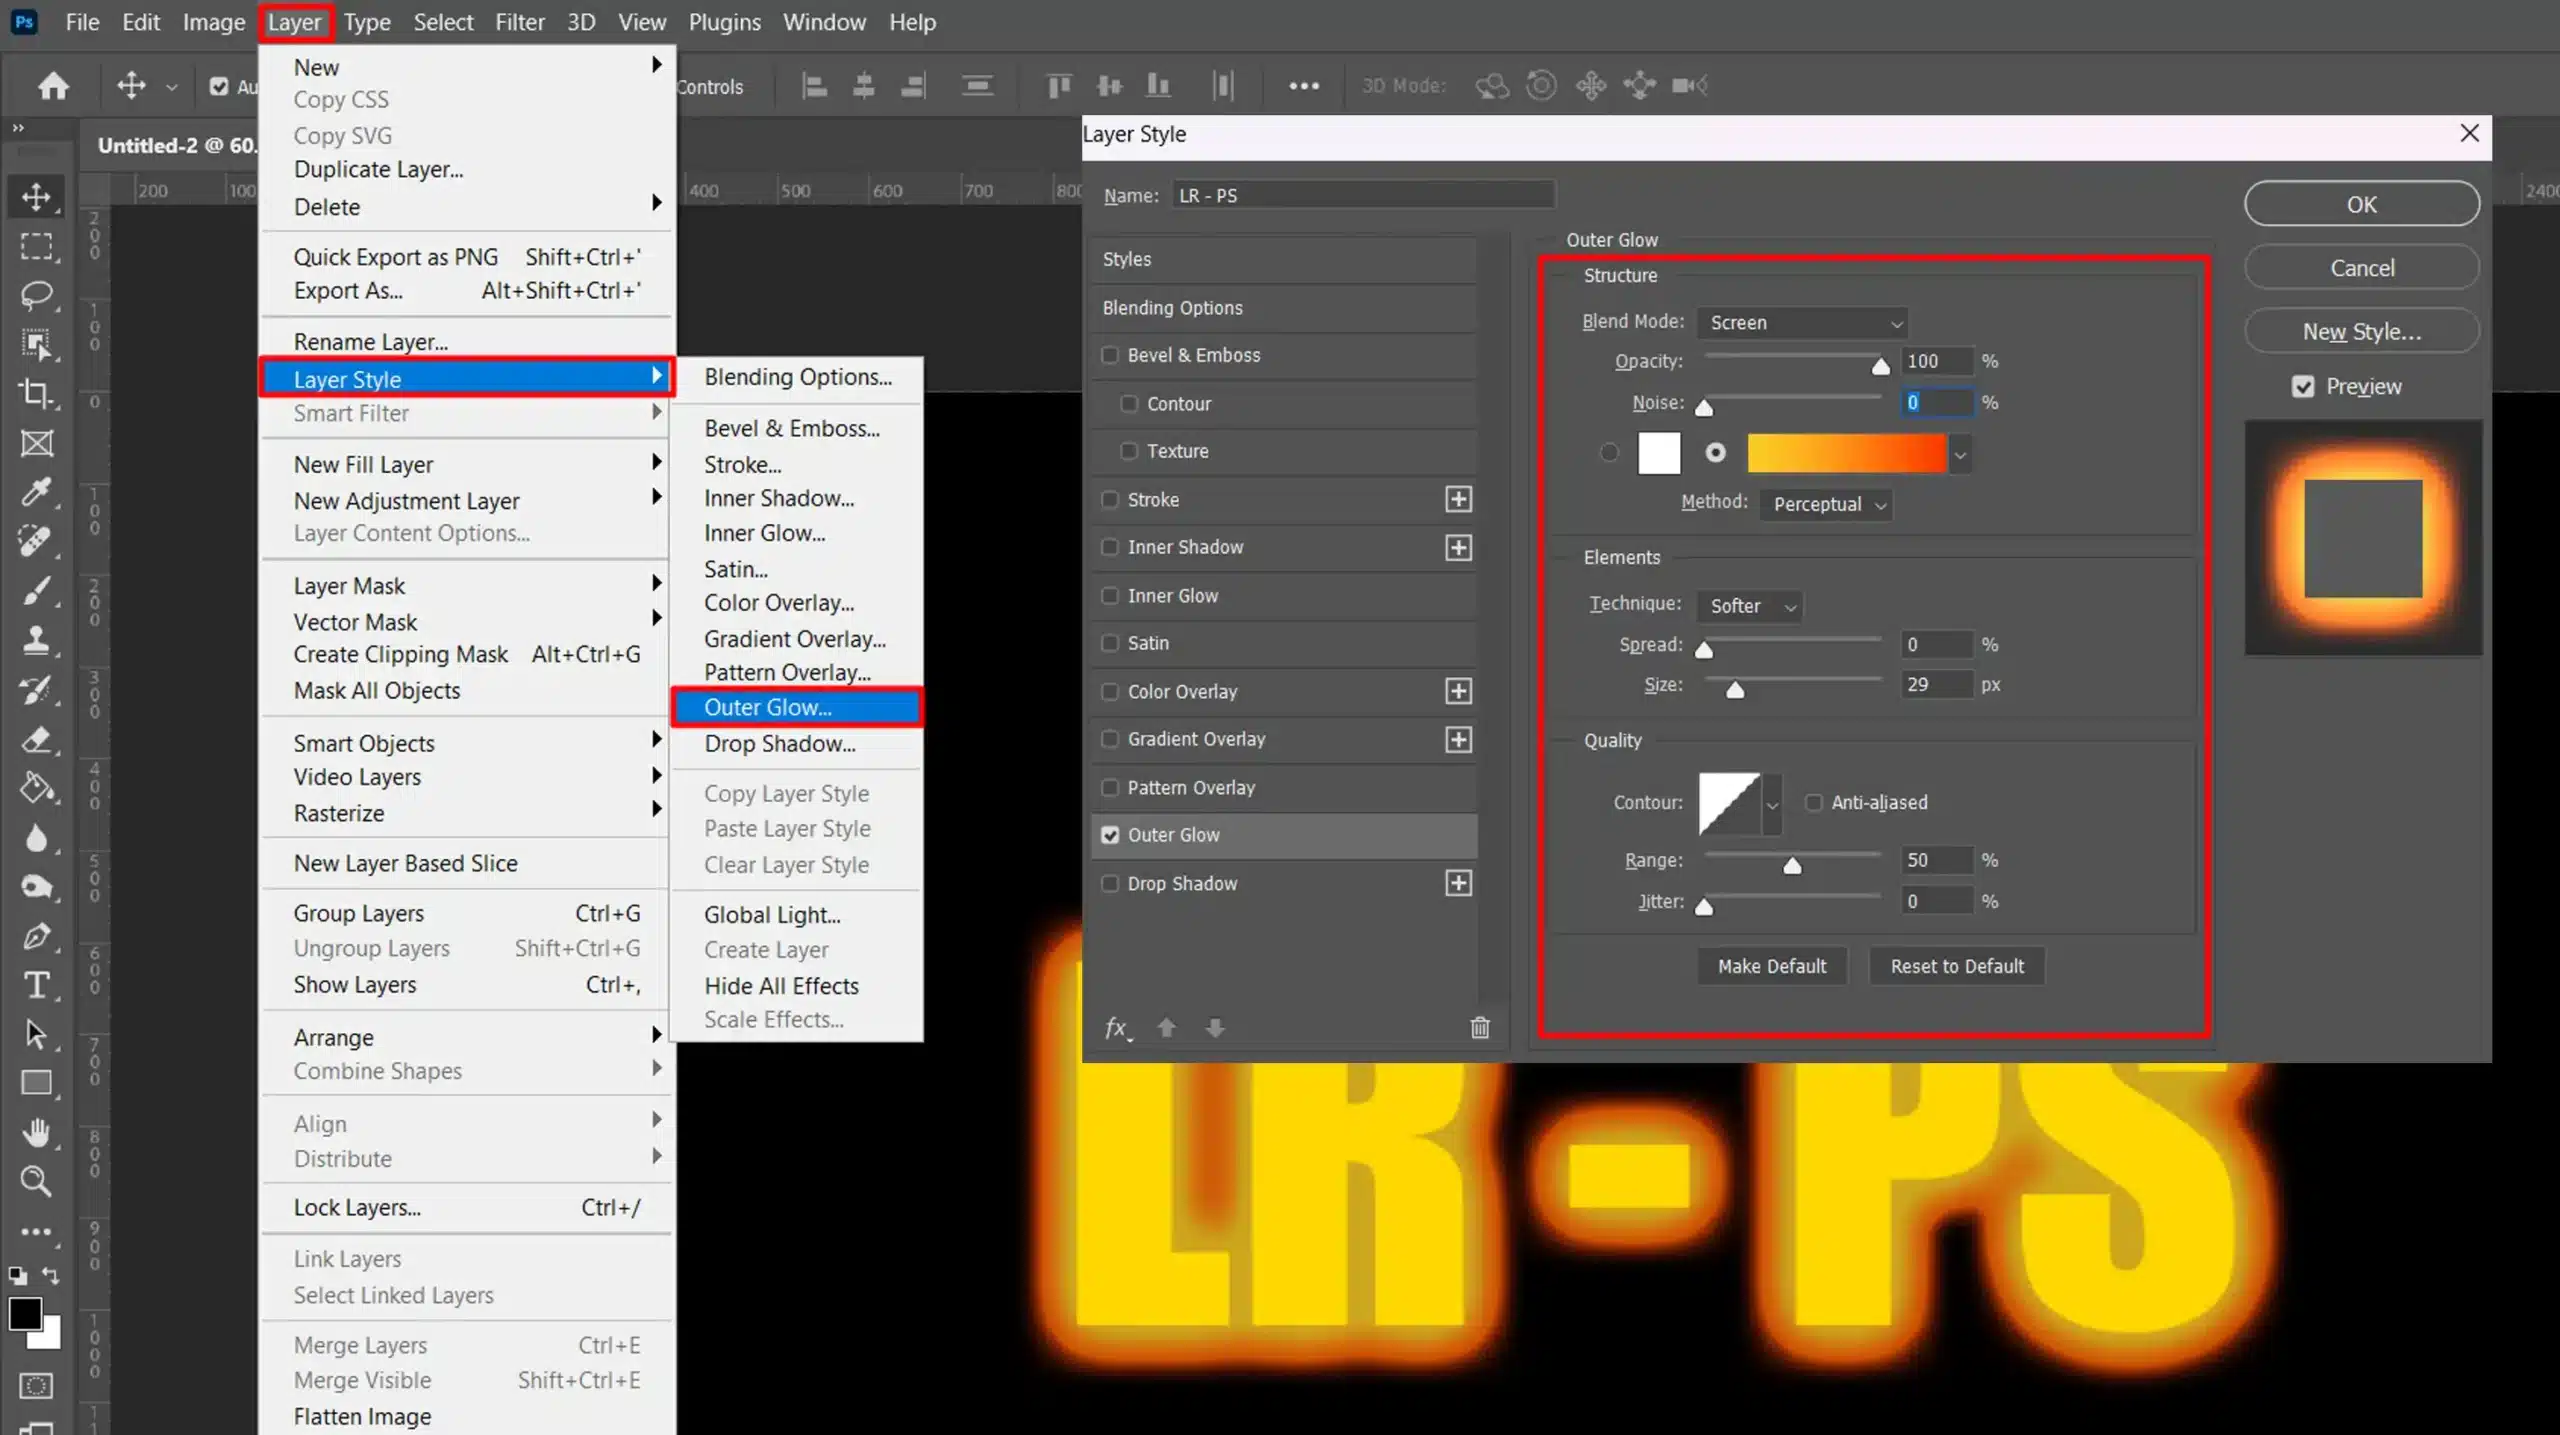
First, add an outer glow. This makes flames appear around your text.
In the layers panel, double-click the text layer. This opens the layer styles window.
Choose "Outer Glow" from the options. Adjust settings like size and opacity to your liking. A soft yellow or orange works well for the glow color.
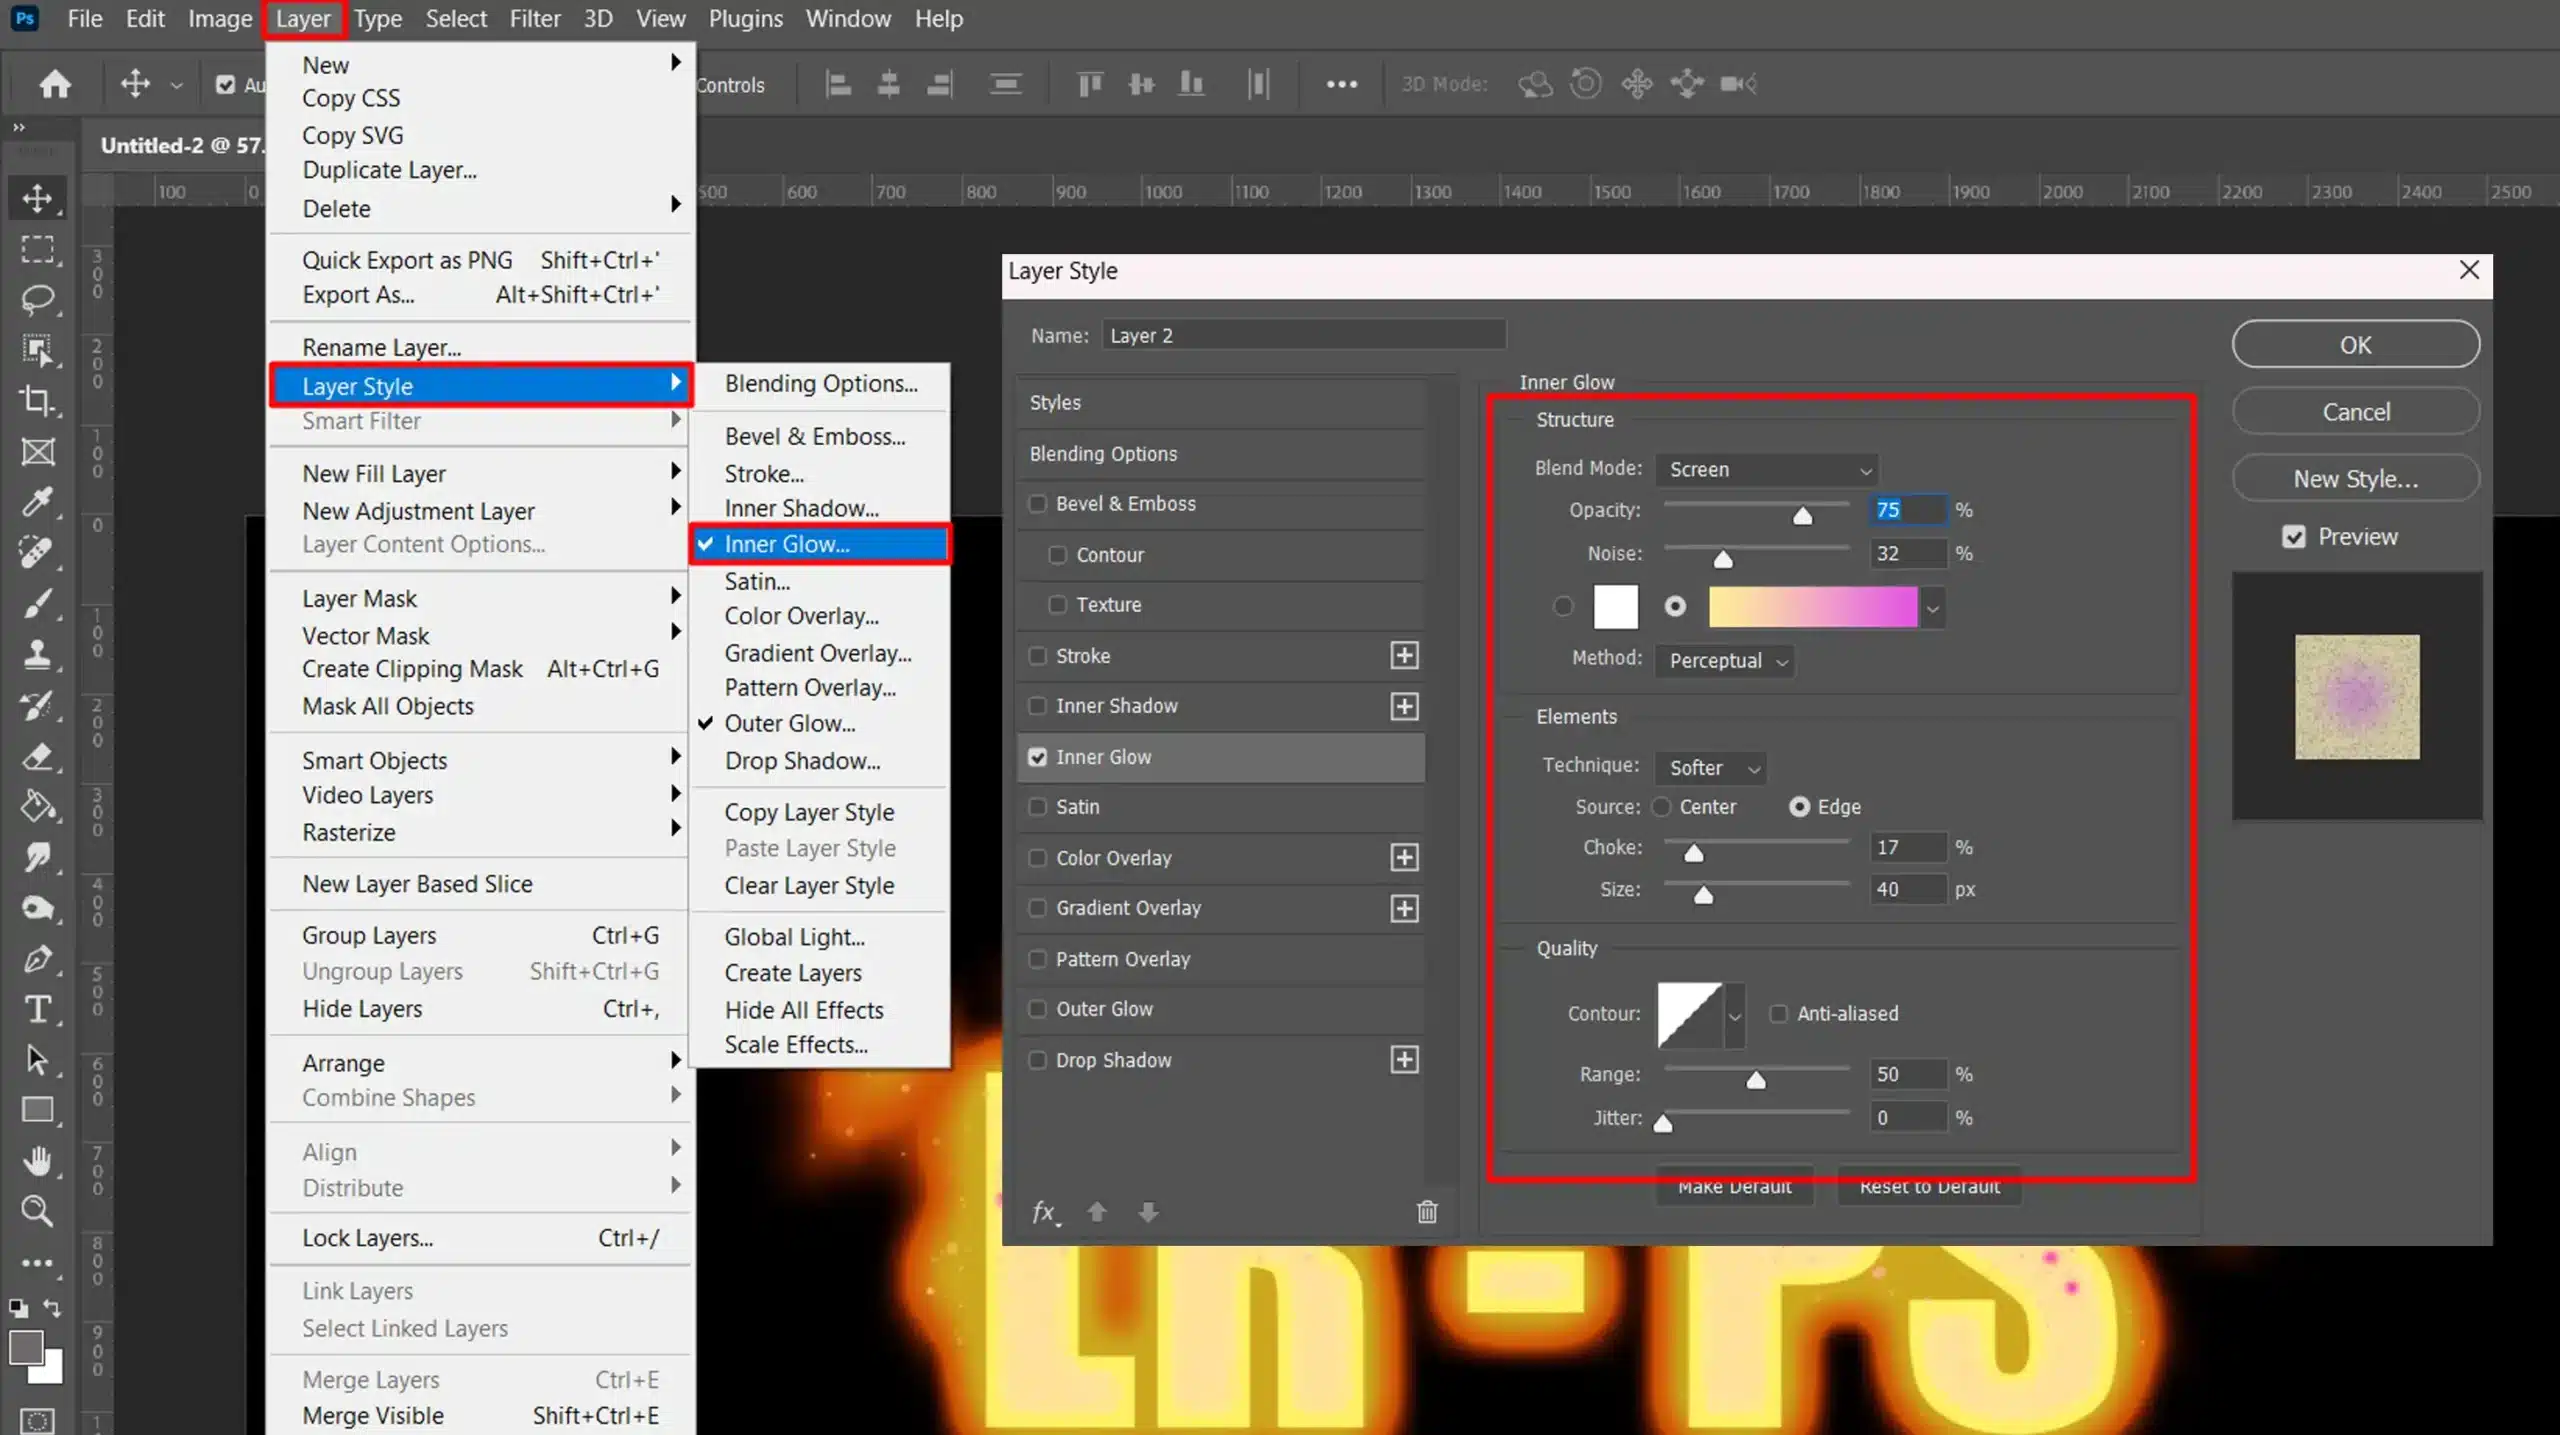
Inner Glow to the Flame Text
Add an inner glow next.
Stay in the layer styles window and choose "Inner Glow".
Set the color to a brighter yellow or white. Adjust the size to fill the text interior with light.
Gradient Overlay
Finally, use Gradient Overlay.
Back in the layer style window, click "Gradient Overlay".
Choose a gradient that goes from yellow to red. This adds depth to the flame text. Adjust opacity if needed.
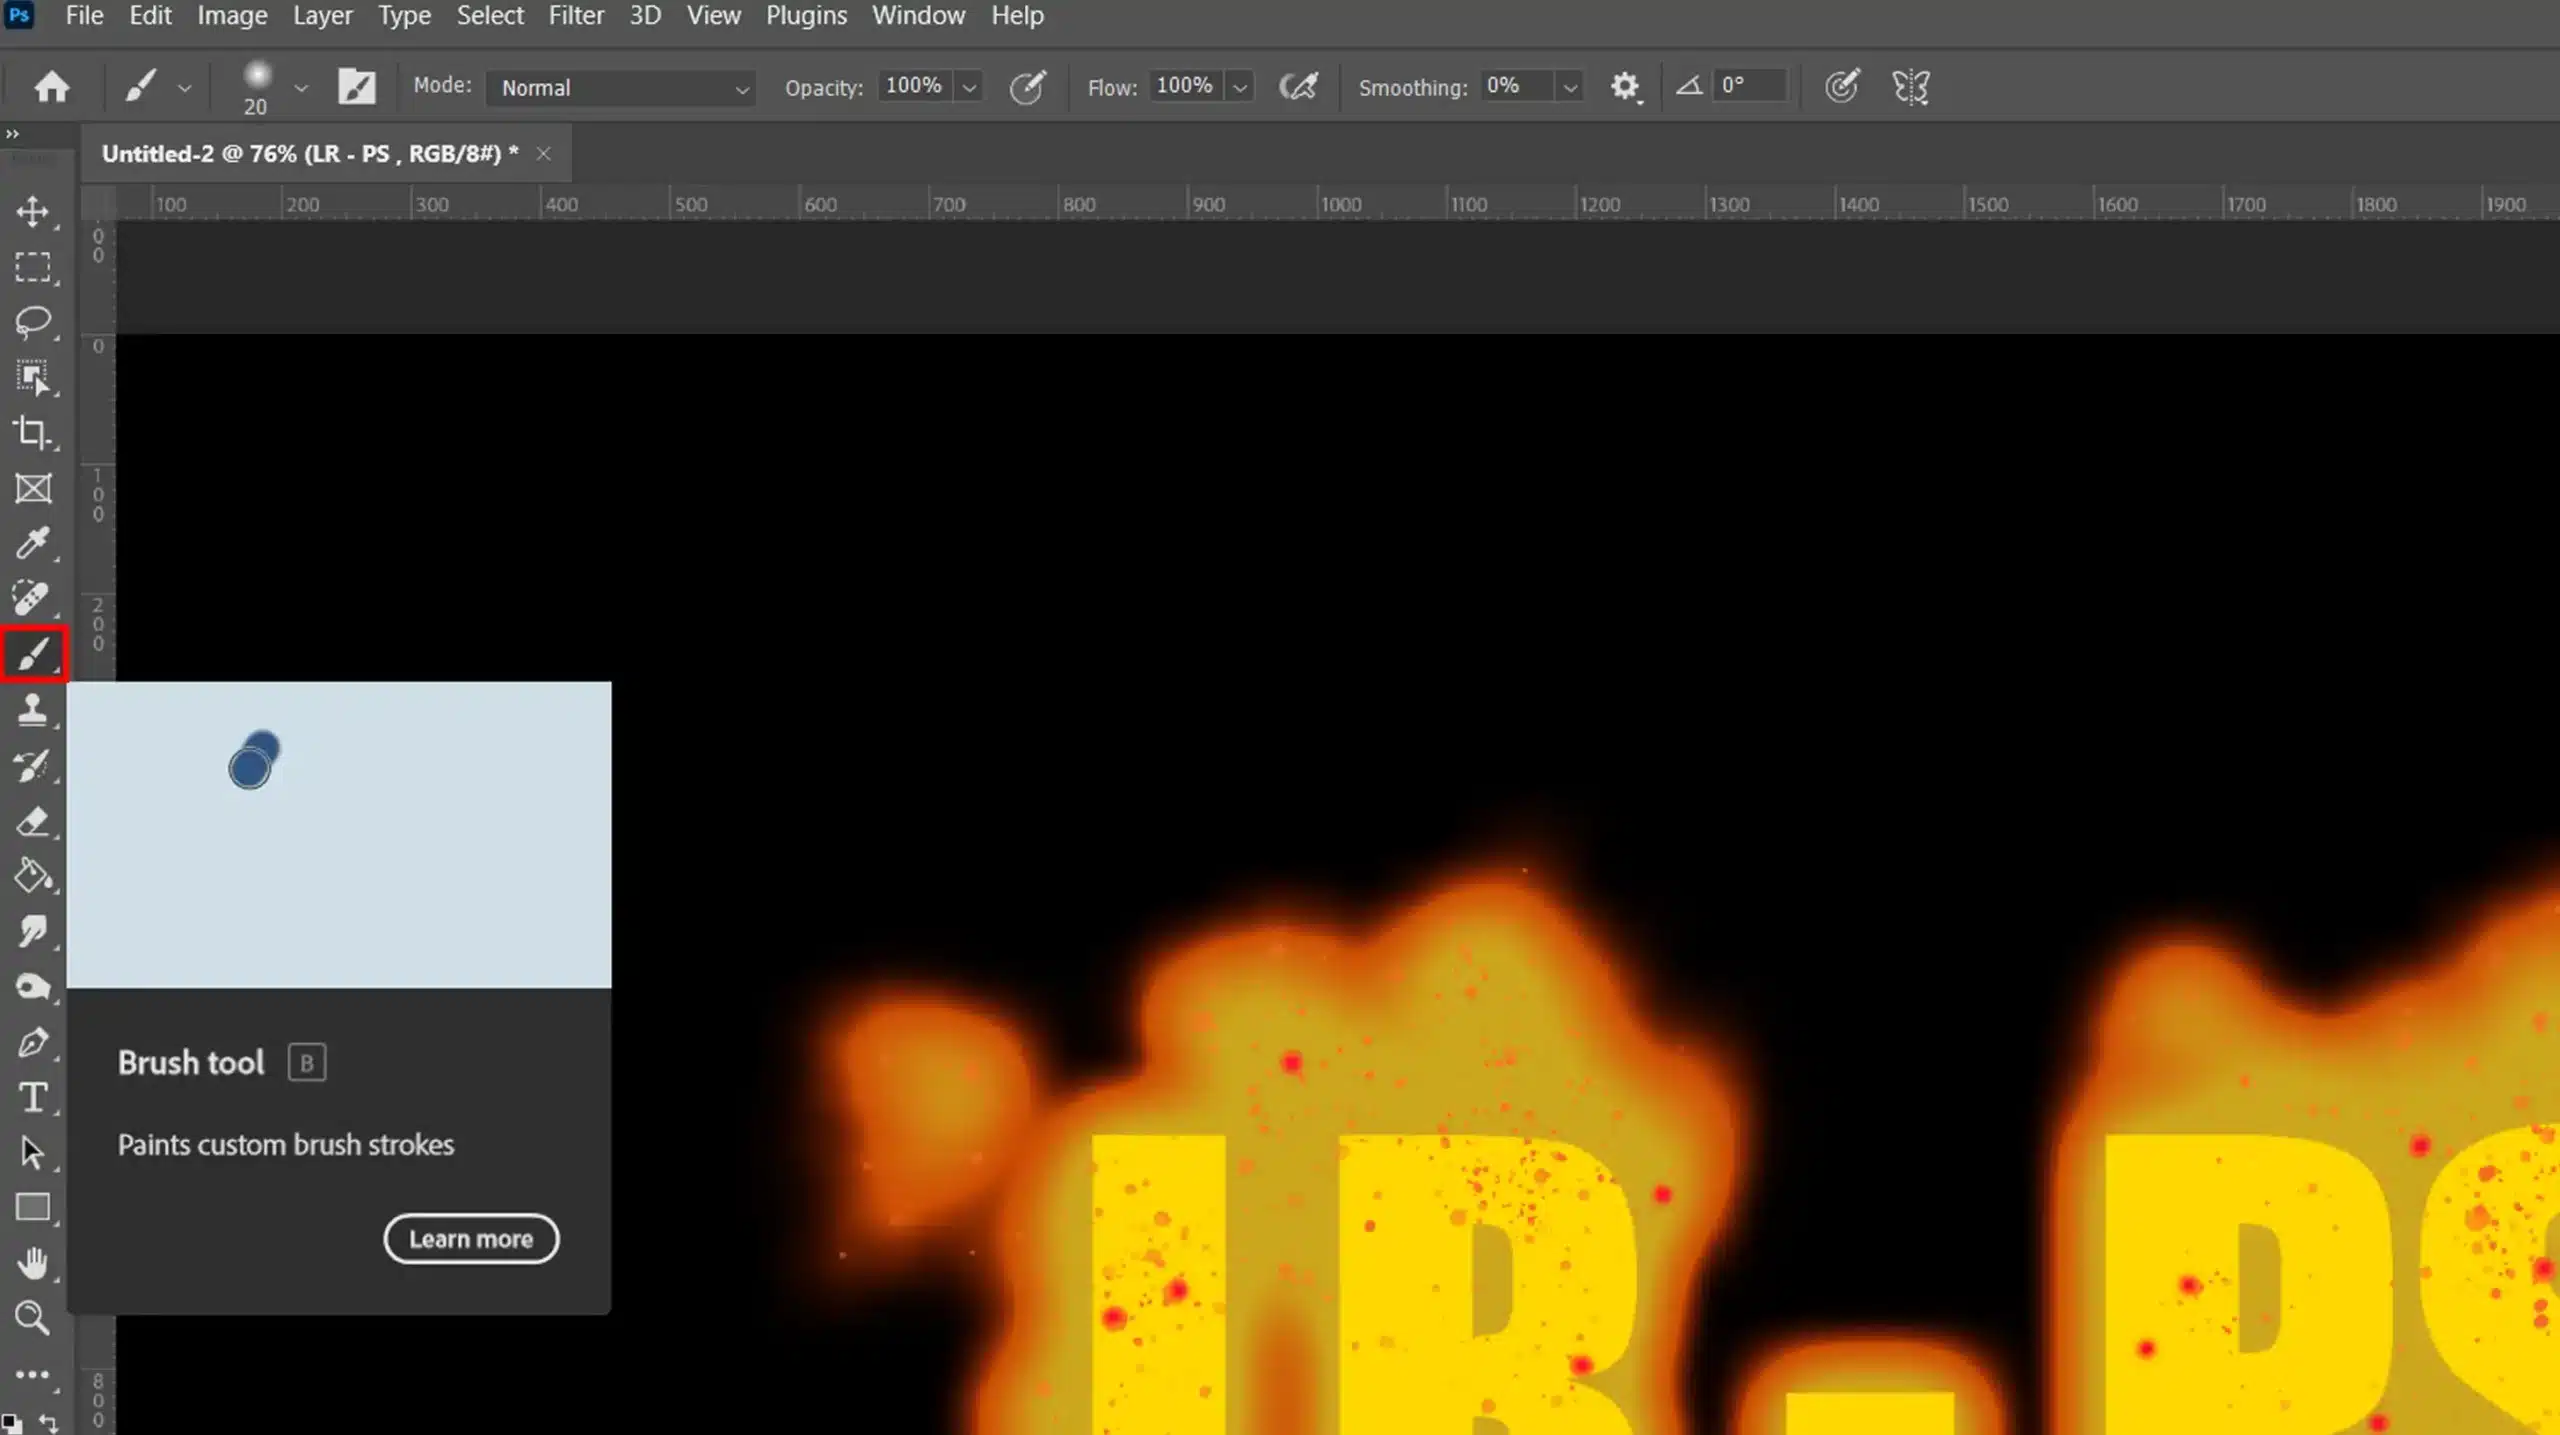
In the brush settings, choose a soft round brush. Set the foreground color to a bright orange or red.
Create a new layer above your text layer. Start brushing around letters to simulate flame flickers.
Use different brush sizes for a natural look.
Adding Flame Details with Brush Tool
To enhance the fire text effect, draw small flame shapes around the text.
Try setting the brush tool to low opacity for a gradual build-up. Work on a new layer to keep control over your additions.
For final touches, rasterize the text layer and merge all flame layers.
Use the smudge tool to refine edges of the flames. Blend the flames seamlessly into the text.
Pro Tip: Experiment with different style of text and colors. Save layer style for future projects.
To enhance the flame text, experimenting with blending modes can elevate the effect significantly. These modes adjust how colors and textures interact, making your flame text more dynamic.
Enhancing the Flame Text in Photoshop
Creating flame text in Photoshop offers a unique way to add excitement to your designs.
Adjusting Colors
Changing colors brings your flame text to life.
Follow these steps:
Begin with your text layer selected in the layers panel.
Go to “Layer Style” and add an outer glow. Choose a bright yellow as your foreground color.
Adjust the shine size and spread to mimic realistic flames.
Apply a gradient overlay. Select colors transitioning from yellow at the bottom to red at the top.
Fine-tune the gradient’s angle and opacity until it looks just right.
Adding Smoke Effects to the Flame Text
Adding smoke gives more realism.
Follow these steps:
Create a new layer above the flame text.
Set the foreground color to gray for smoke.
Use the brush tool with different opacities to create smoke wisps. Brush softly around the flame edges.
Apply a Gaussian blur to the smoke layer. This step softens the smoke and integrates it better with the flame.
Experiment with different blur settings until you’re satisfied. Alternatively, use a smoke brush for a more detailed effect.
Final Touches
These final steps complete the text effect:
Merge all flame-related layers into one.
Use the smudge tool to blend the flame edges further. This blending smoothens the flame transitions.
For a dramatic background, create a black background layer under the flame text layers. This contrast makes the flame colors pop.
Adjust the layer effects like inner glow and dropshadow to add depth and dimension to your flame text.
Save your work and enjoy your fiery creation.
Pro tip: Save your layer style and settings for future projects. This approach saves time and ensures consistency in your designs.
To enhance the flame text, try using transparent text to create more depth and visual interest.
This technique allows the flame effect to blend seamlessly with your design, making it even more striking.
Saving and Exporting Your Flame Text
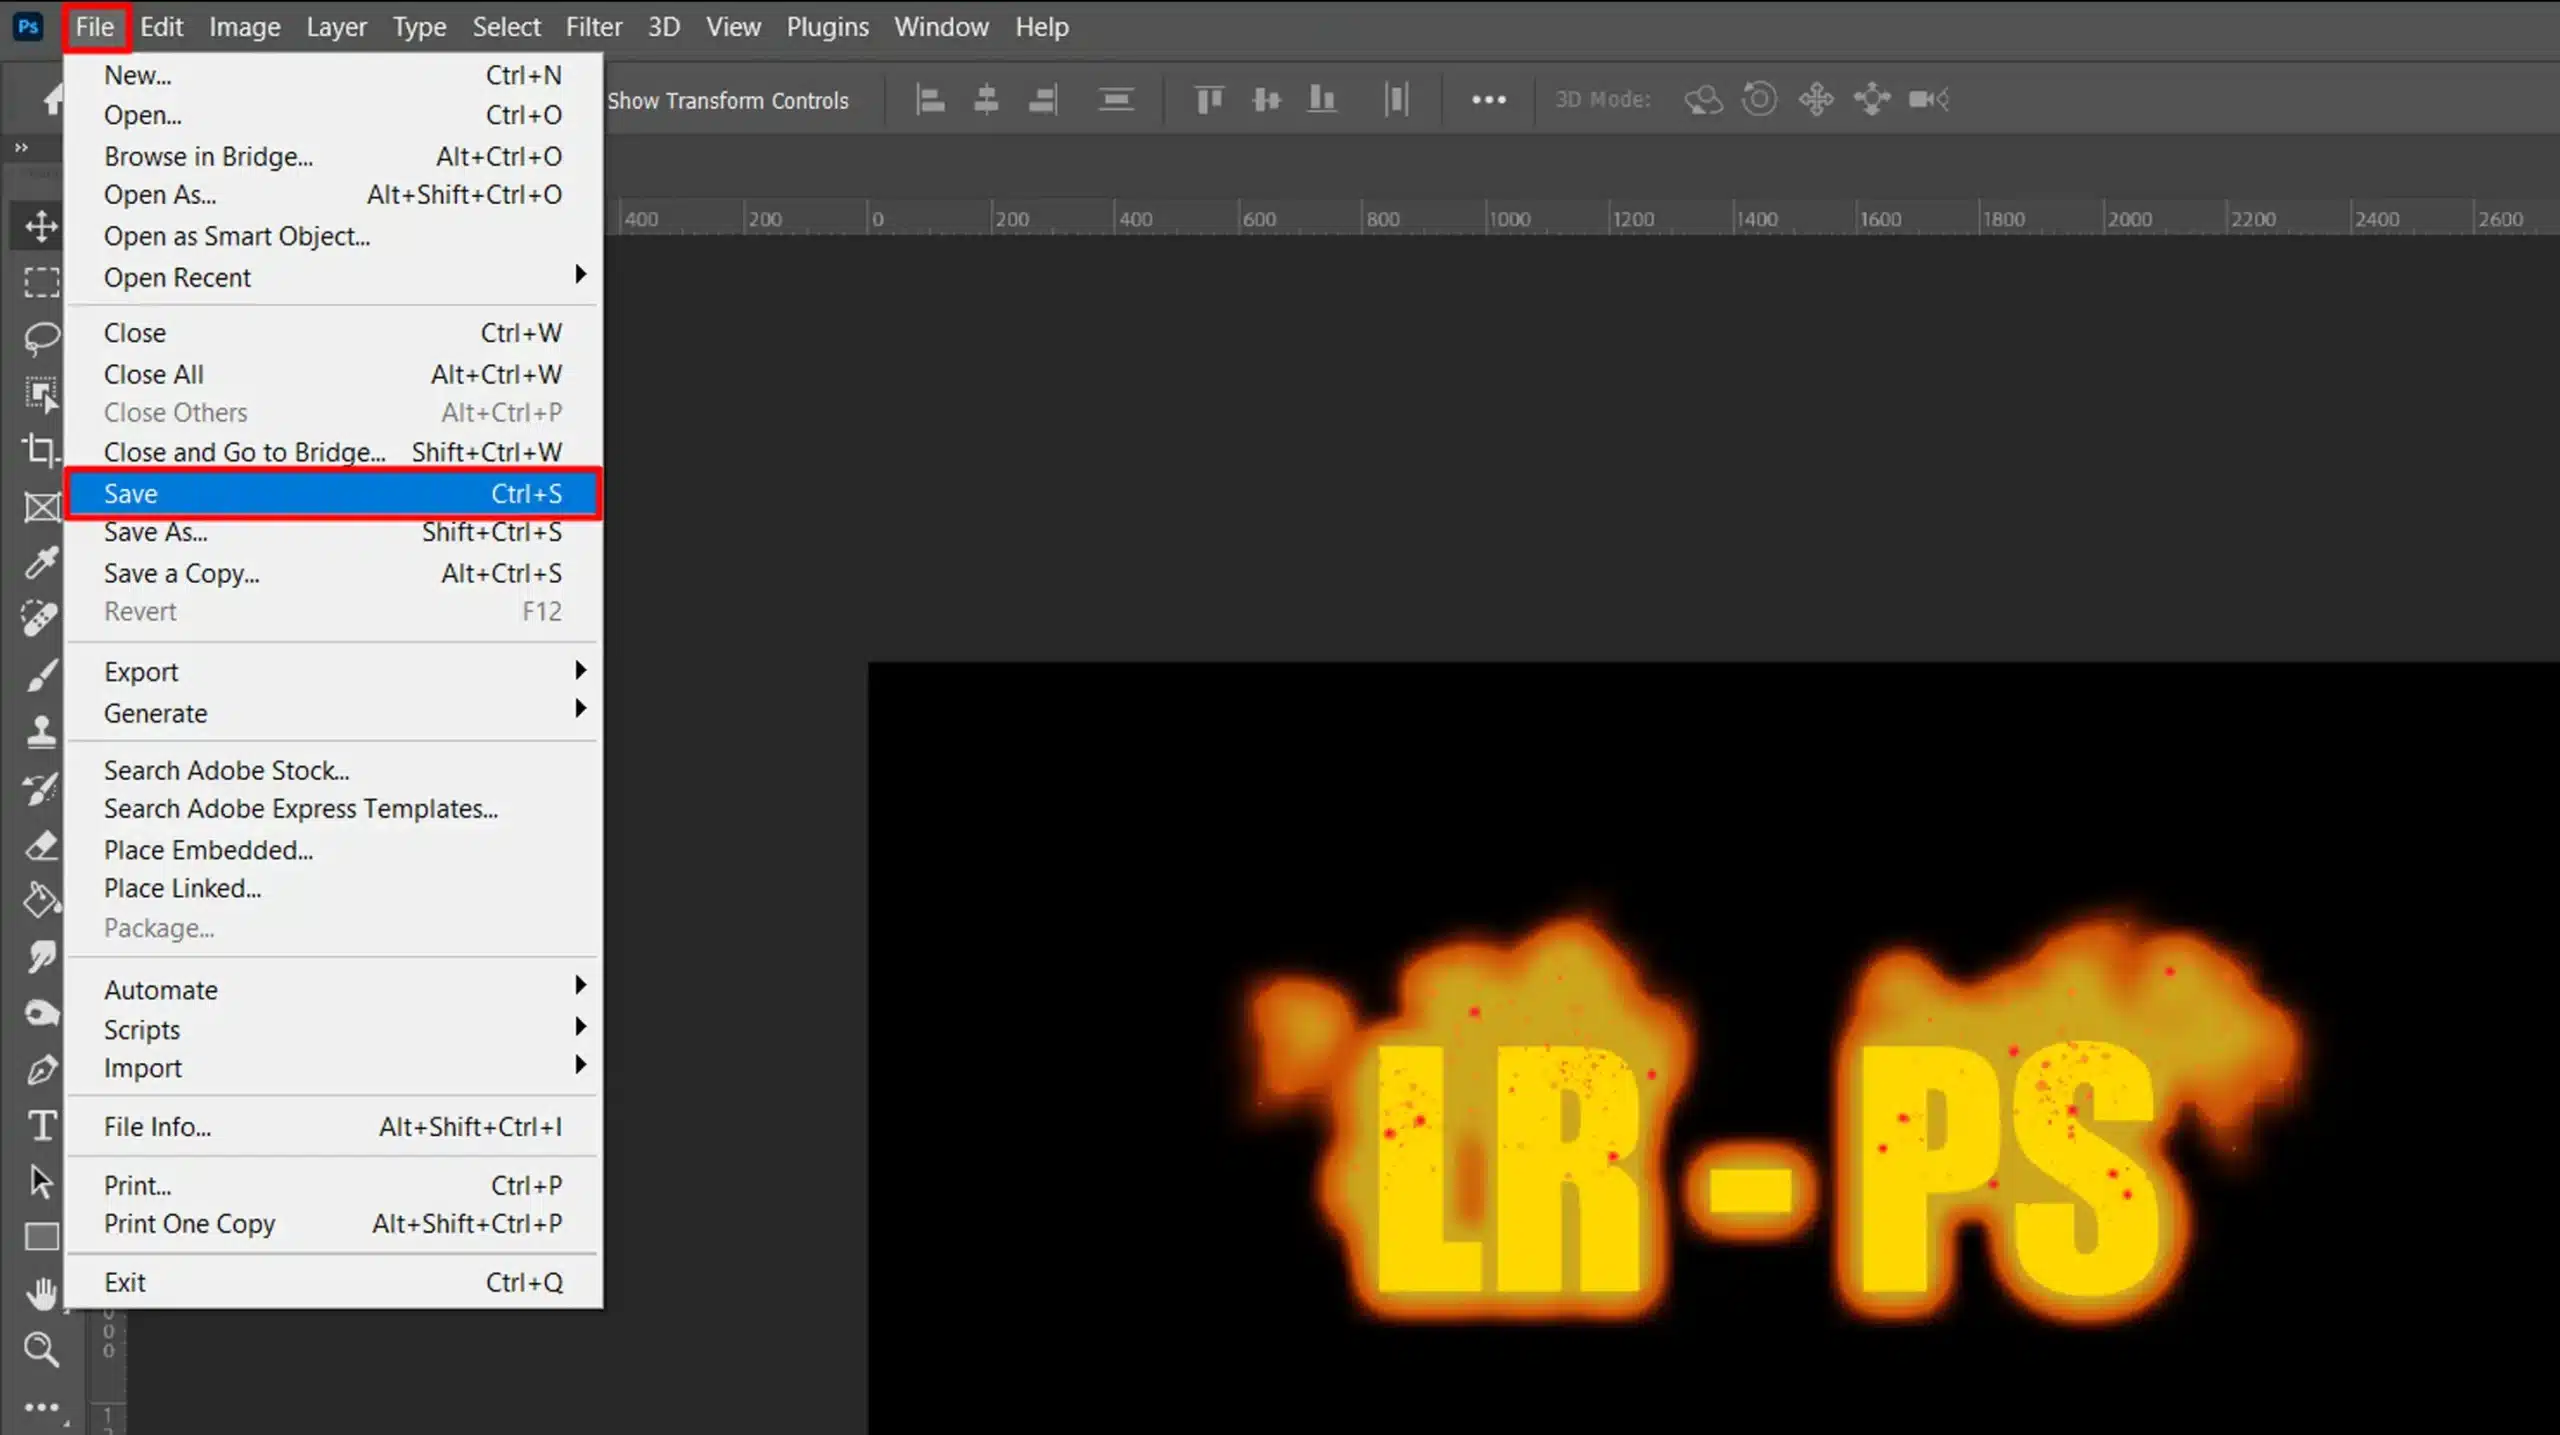
When working on a detailed design, saving your project ensures you don’t lose any adjustments.
It’s simple: go to the top menu and click File > Save. Make sure your file format is set to .PSD to maintain all layers and layer effects.
This format preserves all the intricate details, like that outer glow or unique text effect, ready for further editing.
A neat trick to speed things up: use shortcuts like Command+S (Mac) or Ctrl+S (Windows).
For those who prefer Lightroom, knowing essential tools in Lightroom can also streamline your workflow.
Exporting the Flame Text for Web
After crafting that perfect design, the next step is to export it.
Follow these steps:
Go to File > Export > Save for Web(Legacy).
Ensure your settings are optimal for the web. JPEG works great for photos, while PNG is perfect for logos with transparent backgrounds.
Adjust the image size and quality to your preference. Lower quality might reduce file size but could affect overall appearance.
Preview your output by clicking the preview button; ensure it looks sharp on the screen.
Printing Your Flame Text
Aim for the highest quality print by first setting the correct dimensions and resolution to 300 PPI (Pixels Per Inch) is the standard.
Follow these steps:
Go to File > Print.
In the print settings, you can position your image, adjust color settings, and ensure the design fits onto your paper size correctly.
Remember to check the printer settings to match paper type and print quality. A good paper choice enhances vibrant colors and textures of your design.
Pro TIp: Protect your projects by regularly saving them on an external drive or cloud storage.
It ensures you always have a backup in case of technical issues.
Advanced Techniques in Creating Flame Text in Photoshop
Explore the key techniques for creating flame text effects in Photoshop. This table outlines each method, detailing their descriptions, best uses, pros, and cons.
Whether you’re enhancing color with gradients, adding glowing effects, or experimenting with text distortion, this comparison will help you choose the right technique for your design needs.
Technique
Description
Best For
Pros
Cons
Gradient Overlay
Adds depth with fiery gradient colors.
Vibrant flame effects
Enhances color intensity; customizable
May require fine-tuning for best results
Outer Glow
Creates a glowing effect around text.
Intense shine and emphasis
Adds dynamic shine; enhances readability
Can look unrealistic if overused
Free Transform & Warp
Distorts text to flow like flames.
Dynamic text shapes
Adds a natural, flowing look
Can be tricky to get a balanced distortion
Brush Strokes
Adds smaller flame accents around the text.
Detailed flame effects
Provides a realistic flame appearance
Requires careful blending and opacity adjustment
Ready to learn how to set your text ablaze?
Step 1: Setting Up Your Document
First, create a new Photoshop document. Use RGB color mode for more vibrant colors.
Set the width and height according to your needs. Remember, keeping a high resolution will help in getting crisp edges.
Step 2: Choosing the Right Font
Select a bold and chunky font. The “flame” effect works best with solid, thick letters. Open the ‘Text Tool’, click anywhere on the canvas, and type your desired word.
Step 3: Applying the Fire Effect
Next, convert your text layer to a rasterized layer by right-clicking it in the layers panel and selecting ‘Rasterize Type’. This is crucial for manipulating the text further.
Step 4: Adding Ignite Colors
Double-click on the layer to bring up the Layer Style window. Check the ‘Gradient Overlay’ option, and select a gradient that features deep reds, oranges, and yellows to mimic flames.
Adjust the angle to 90 degrees, and tweak the scale until you’re satisfied with the look.
When adding ignite colors with your design, understanding gradient techniques is crucial.
By applying these techniques, you can enhance how you distort text and other elements, creating vibrant and dynamic effects.
Step 5: Glow for Intensity
Still in the Layer Style window?
Now, add an ‘Inner Glow’ and ‘Outer Glow’ to your text. Set the blend mode to ‘Screen’ and pick a fiery orange color. Increase the Spread and Size sliders to give that intense shine around the text.
Step 6: Distorting the Text
Time to heat things up!
Use the ‘Free Transform’ tool (Ctrl+T or Command+T) on your rasterized text layer. Right-click and select ‘Warp’.
Use this to gently tease and distort your text to flow like flames. Play around here, the goal is a random yet dynamic shape.
To master distorting the text, learn how to warp text effectively.
This technique, detailed in our warp text guide, enhances how you distort text for dynamic designs.
Step 7: Enhancing with Brush Strokes
Grab a soft round brush and set your foreground color to a fiery orange.
Create a new layer above your text layer.
Create some accents around your text, mimicking smaller flames. Keep these brush strokes subtle.
Step 8: Finishing Touches
To bring everything together, adjust the opacity of your brush layer. Reduce it for a more natural look. Finally, merge your layers by selecting them, right-clicking, and choosing ‘Merge Layers’.
Pro Tip: Experiment with different background colors to make your flame text stand out. Sometimes a dark background can make the flames really pop.
Tips and Tricks for Better Flame Text
For more impactful flame text in Photoshop, adjust the distance between the fire effect and the text to enhance visibility.
Start with the default settings and tweak as needed. Note the position of the flame to ensure it aligns perfectly with your text.
Experiment with different settings to find the optimal look and make your fire effect truly stand out.
Advanced Techniques for a Fiary Text
Once you master the basics, step up your game.
Explore advanced techniques such as:
Transform: Use the Free Transform tool to warp and distort your text. This adds a dynamic look to your flame text effects.
Layer Masks: Apply layer masks to hide specific parts of your layer. This allows for controlled, non-destructive edits.
Brush Strokes: Create subtle brush strokes on a new layer. This simulates movement and adds realism to your fire text effect.
For advanced techniques for a fiery text, adding a metallic effect can make your design shine. This effect enhances the flame’s impact, giving it a more striking appearance.
Learn different text effects so that you know which best suit your needs.
Resources and Inspirations for a Flame Text Effect
Looking for inspiration?
Here are some resources:
Online Tutorials: Platforms like YouTube offer numerous Photoshop tutorials.
Stock Image: Explore stock image websites for background textures. This enhances the overall look of your design.
Photoshop Forums: Join forums and communities. Engage with other designers to get fresh ideas.
Pro Tip: Always keep your Layers Panel organized. Group related layers and name them properly to avoid confusion with your image.
Keeping your layers tidy ensures you can easily manage and adjust each image component.
This practice helps maintain clarity and precision in your image editing process..
This approach ensures a streamlined workflow and keeps you focused on creativity rather than chaotic adjustments in your Photoshop documents or image.
Added these keywords: “Blend Modes, Layer Masks”.
Common Mistakes to Avoid While Making the Flame Text Effect
Designing a flame text effects can be tricky, and avoiding common mistakes can make a big difference. From overusing effects to not adjusting layer settings properly, this section highlights key pitfalls and how to steer clear of them for a flawless fiery text design.
Overusing Layers
Beginners often overuse the layer feature. It’s tempting to create a new layer for every small change. However, this can make the Layers Panel quite cluttered.
Use groups and smart layers to keep things neat.
Ignoring Layer Masks
One mistake is not using masks properly which offers controlled, non-destructive edits.
Masks help you adjust specific parts of your image without altering the entire document. Practice using layer masks to improve precision.
Incorrect Fonts Selection
Choosing the wrong style of text can ruin your design. Make sure to select a font that aligns with the mood and theme of your project.
For example, a bold font works well for a headline, while a delicate style of text suits invitations.
Ignoring Blend Modes
Neglecting blend modes can limit creativity. They allow you to experiment with how layers interact with each other.
Don’t stick to the default settings, explore different blend modes to make your work more dynamic.
Not Rasterizing Text Layers
To apply certain effects like the fire text effect, you need to rasterize your text layer.
Neglecting this step can lead to unexpected results.
Always rasterize when required.
Poor Use of the Background
Your background sets the scene for your whole image. A busy or inappropriate background can distract from your main subject.
Choose or create your background carefully to enhance the overall design.
Rendering Example Issues
Finally, always remember to check the rendering settings for the final output. Low resolution can make even the best designs look poor.
Pro Tip: Use the Free Transform tool in Photoshop to distort text dynamically. This helps in adding unique effects and gives your designs a professional touch!
For more advancedtechniques, consider learning how to use the content-aware fill in Photoshop or exploring different types of filters in Photoshop to elevate your editing skills.
Adjust the distance settings in these tools to refine your results and achieve more precise edits.
Frequently Asked Questions
How to do flame text in Photoshop?
Easy steps to do flame text:
Open your project: Open your project in Photoshop and select the Text Tool to type your desired text.
Layer Styling: Go to the 'Layer' menu, hover over 'Layer Style', and select 'Blending Options'.
Add Shine: Choose 'Outer Glow' and adjust the settings to give a fiery glow effect.
Detailed Flames: For more detailed flames, use the 'Rendering' function under the 'Filter' menu and select 'Flame...'. Adjust the settings to fit your text.
How do I add fire to text?
Adding a fire to text in few steps:
Begin with Text: Start with typing your text using the Text Tool.
Render Flames: Access the 'Filter' menu, choose 'Render', and then select 'Flame...'.
Flame Settings: Experiment with different flame types and settings to match your vision.
Placement: Apply the flame effect and fine-tune it using 'Free Transform' to get the perfect placement and size.
How do you flare text in Photoshop?
To flare a text in Photoshop follow these steps:
Initial Steps: Type your text and ensure it's on a separate layer.
Layer Styling: Use the 'Layer' menu to select 'Layer Style', then 'Outer Glow' for a basic flare effect.
Adjust the Shine: Adjust the glow color to a bright, fiery hue and modify the spread and size for intensity.
Additional Effects: Add additional effects like 'Lens Flare' from the 'Filter' menu if desired.
What is flame in Photoshop?
Flame in Photoshop is:
Explanation: In Photoshop, 'Flame' is a render effect used to create realistic-looking fire and flame graphics.
Application: It can be applied to text or any other paths within your project.
Customization: The flame effect is customizable with various options like flame style, width, and complexity.
Creating flame text effects in Photoshop is a fun way to make your designs stand out. I’ve found that experimenting with different settings and keeping my Layers Panel organized helps achieve the best results.
Remember, starting with the default settings and adjusting the distance and position of the flame can make a big difference.
If you want to dive deeper into Photoshop or Lightroom, check out my Photoshop Course and Lightroom Course. These courses will help you master more techniques and enhance your skills.
For the best tools, you can also explore Adobe’s Photoshop and Photoshop Lightroom to take your projects to the next level.
Happy editing!
If this article has helped you, then Like and Share it with your friends
$2,061.00Original price was: $2,061.00.$1,061.00Current price is: $1,061.00. 27582
Download Your Free Guide Now!
Discover the secrets of photography with our printable guide! Master essential techniques like aperture, shutter speed, and ISO to create stunning images. Get your free printable PDF now and start turning your snapshots into masterpieces!