
Color correction in Photoshop is a game-changer for making your photos pop with vibrancy and accuracy.
Have you ever looked at your images and felt they just didn’t capture the moment as perfectly as you’d hoped? I know the feeling.
Imagine transforming those dull or overly bright shots into something truly breathtaking. That’s where effective color correction comes in, and I’ll guide you through the process step by step.
By the end of this, you’ll be able to enhance your photos‘ colors like a pro, ensuring they reflect the true essence and emotion of the moment.
Let’s dive into the magic of color correction and unlock the full potential of your images.
Table of Contents
Understanding Color Correction Photoshop
Color correction is essential for improving photo quality. It ensures that colors appear as they should, which might differ from the original image due to lighting or camera settings.
Photoshop tools, such as the replace color tool, provide precise color adjustments, enhancing visual appeal and communication by offering realistic colors. Adjustments can also highlight certain parts of the image for emphasis.
Basic Tools for Color Correction
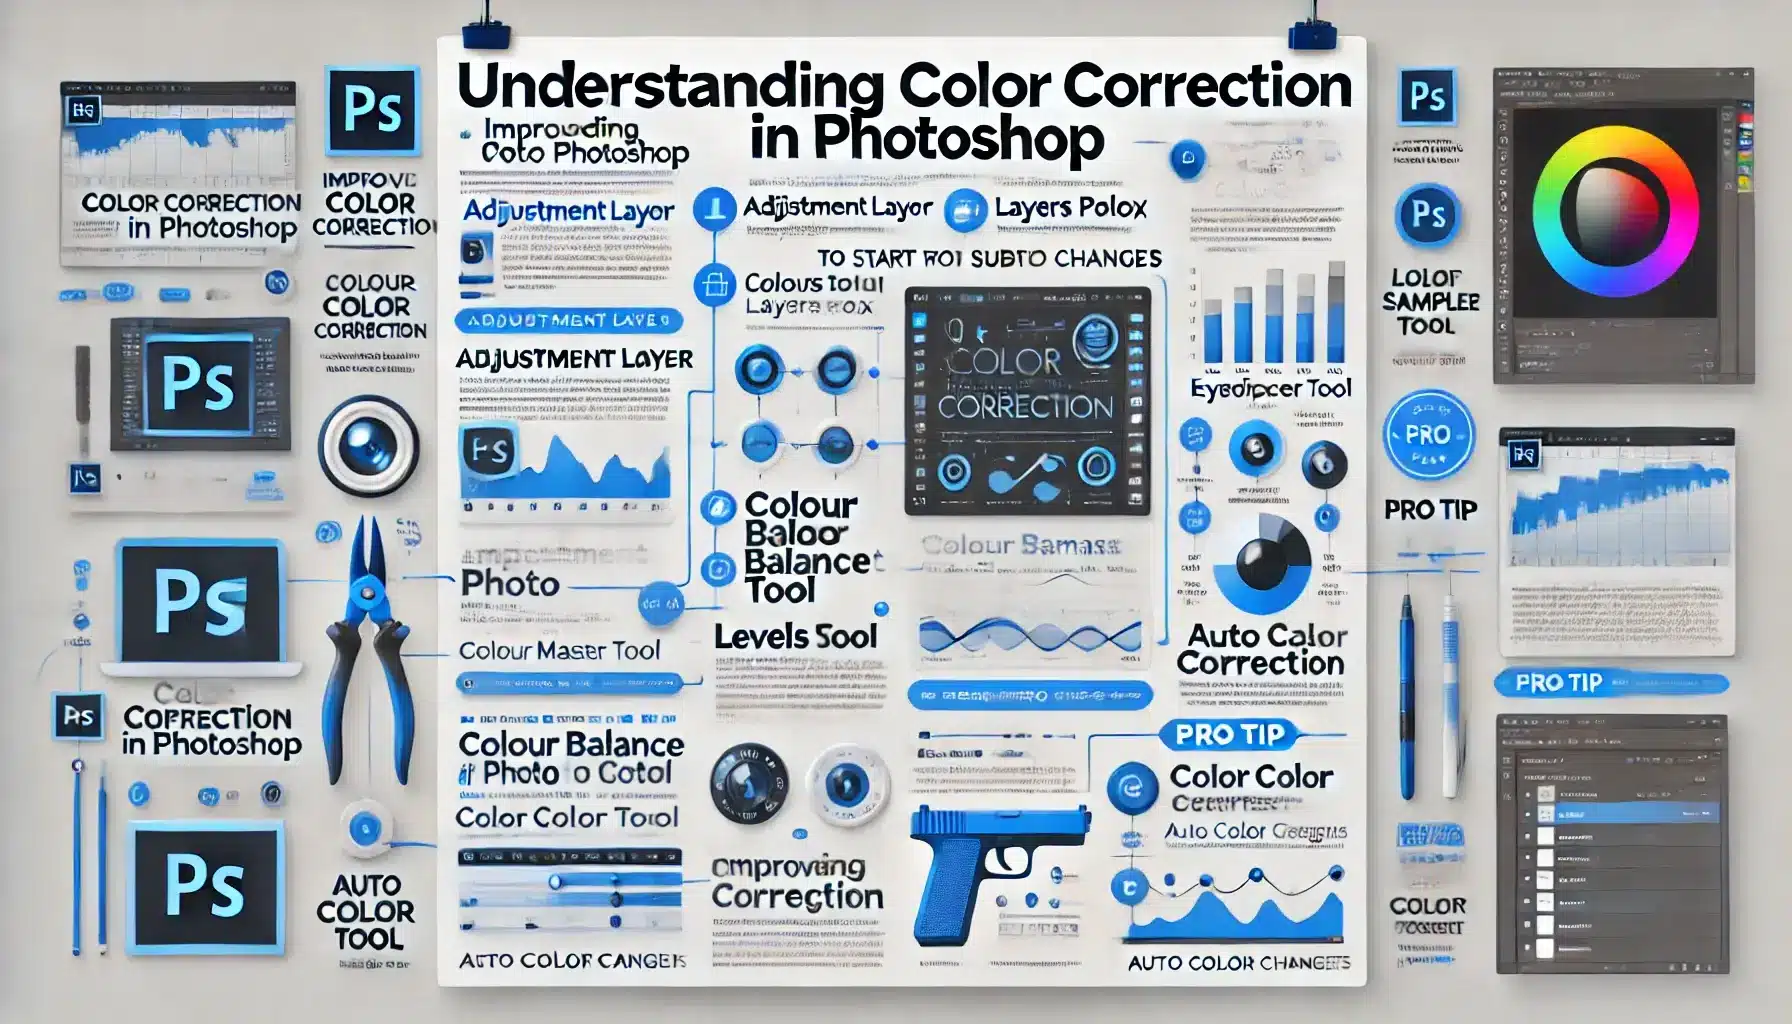
- Adjustment Layer: Key in color correction.
- Layers Panel: Contains essential tools like the levels adjustment layer and the hue saturation tool.
- Colour Balance Tool: Adjusts shadows, midtones, and highlights.
- Eyedropper Tool: Selects colors accurately from the image.
- Levels Dialog Box: Manages the tonal range effectively.
- Layer Mask Icon: For selective adjustments.
- Color Sampler Tool: Views precise colors at specific points.
- Auto Colour Correction: Offers quick fixes for images with a strong color cast.
- Curves Tool: Provides greater control over color channels for precise adjustments.
When facing issues with extreme highlights or shadows, consider using the selective color tool. Always remember to practice on a duplicate layer to preserve your original image.
Pro Tip: When adjusting colors, begin with subtle changes. This approach helps fine-tune the output without drastic errors. Don’t forget to save your work frequently!
For those looking to enhance their workflow, learning Photoshop shortcuts can significantly speed up the editing process.
How to Use an Adjustment Layer
So, you’ve jumped into the world of digital creativity and Adobe Photoshop. Brilliant!
Common Mistakes to Avoid
- Overusing the Adjustment Layer: Too many adjustment layers might lead to chaos instead of harmony. Keep it simple when refining.
- Ignoring the Color Balance: This could ruin the intended mood. Adjust it subtly, making sure it doesn’t overpower the photo.
- Not Leveraging the Levels Adjustment Layer: Underutilizing this tool can miss out on perfecting the tonal range in your photos.
- Forgetting to Work on a Duplicate Layer: Always edit on a duplicate layer so you keep your original image intact.
- Choosing Wrong Part of the Image: Apply adjustments only where needed, not the entire image.
Steps to Create and Use an Adjustment Layer
Start with creating an adjustment layer. Go to the layer panel and click the adjustment layer icon. This doesn’t alter the background layer making it a safe platform for experimenting.
Balance color correction effortlessly with the color picker or the color lookup tool. Double click on these tools; they are user-friendly.
Be mindful of extreme highlights when color correcting. Use selective color to adjust blue color or any other that stands out.
When using camera raw, remember to make linear adjustments. Navigate through the image menu and double click each time for detailed edit insight.
Let’s not forget about the brush tool, perfect for refining adjustments on a gray point or pure black without altering the entire setup.
Incorporating these steps ensures you ace picture editing by leveraging photo correction aces like the brilliant color channel.
Pro Tip: The levels dialog box helps in managing the tonal range. Take a moment to explore it fully before making final touches.
Additionally, understanding how to use essential tools in Photoshop, such as the patch tool, can significantly improve your photo editing results.
Step-by-Step Guide to Color Correction in Photoshop
Let’s dive into color correction. Sounds fancy, but it’s just about making photos look their best.
Preparing Your Image for Editing
- Open your image in Photoshop. Easy, right?
- Duplicate your layer. This step is critical. It ensures you can revert back to the original if something goes awry. I've learned this the hard way.
- Set up the workspace to focus. Clear distractions. Turn off notifications. Ready?
Grab the color sampler tool. Identify areas needing correction. This simple tool shows colors we need to address. Look for shadows, mid-tones, and highlights.
Got it? Good. Now, you’re ready to make some magic.
Pro Tip: Learn how to remove shadows in Photoshop in case you run into any problems.
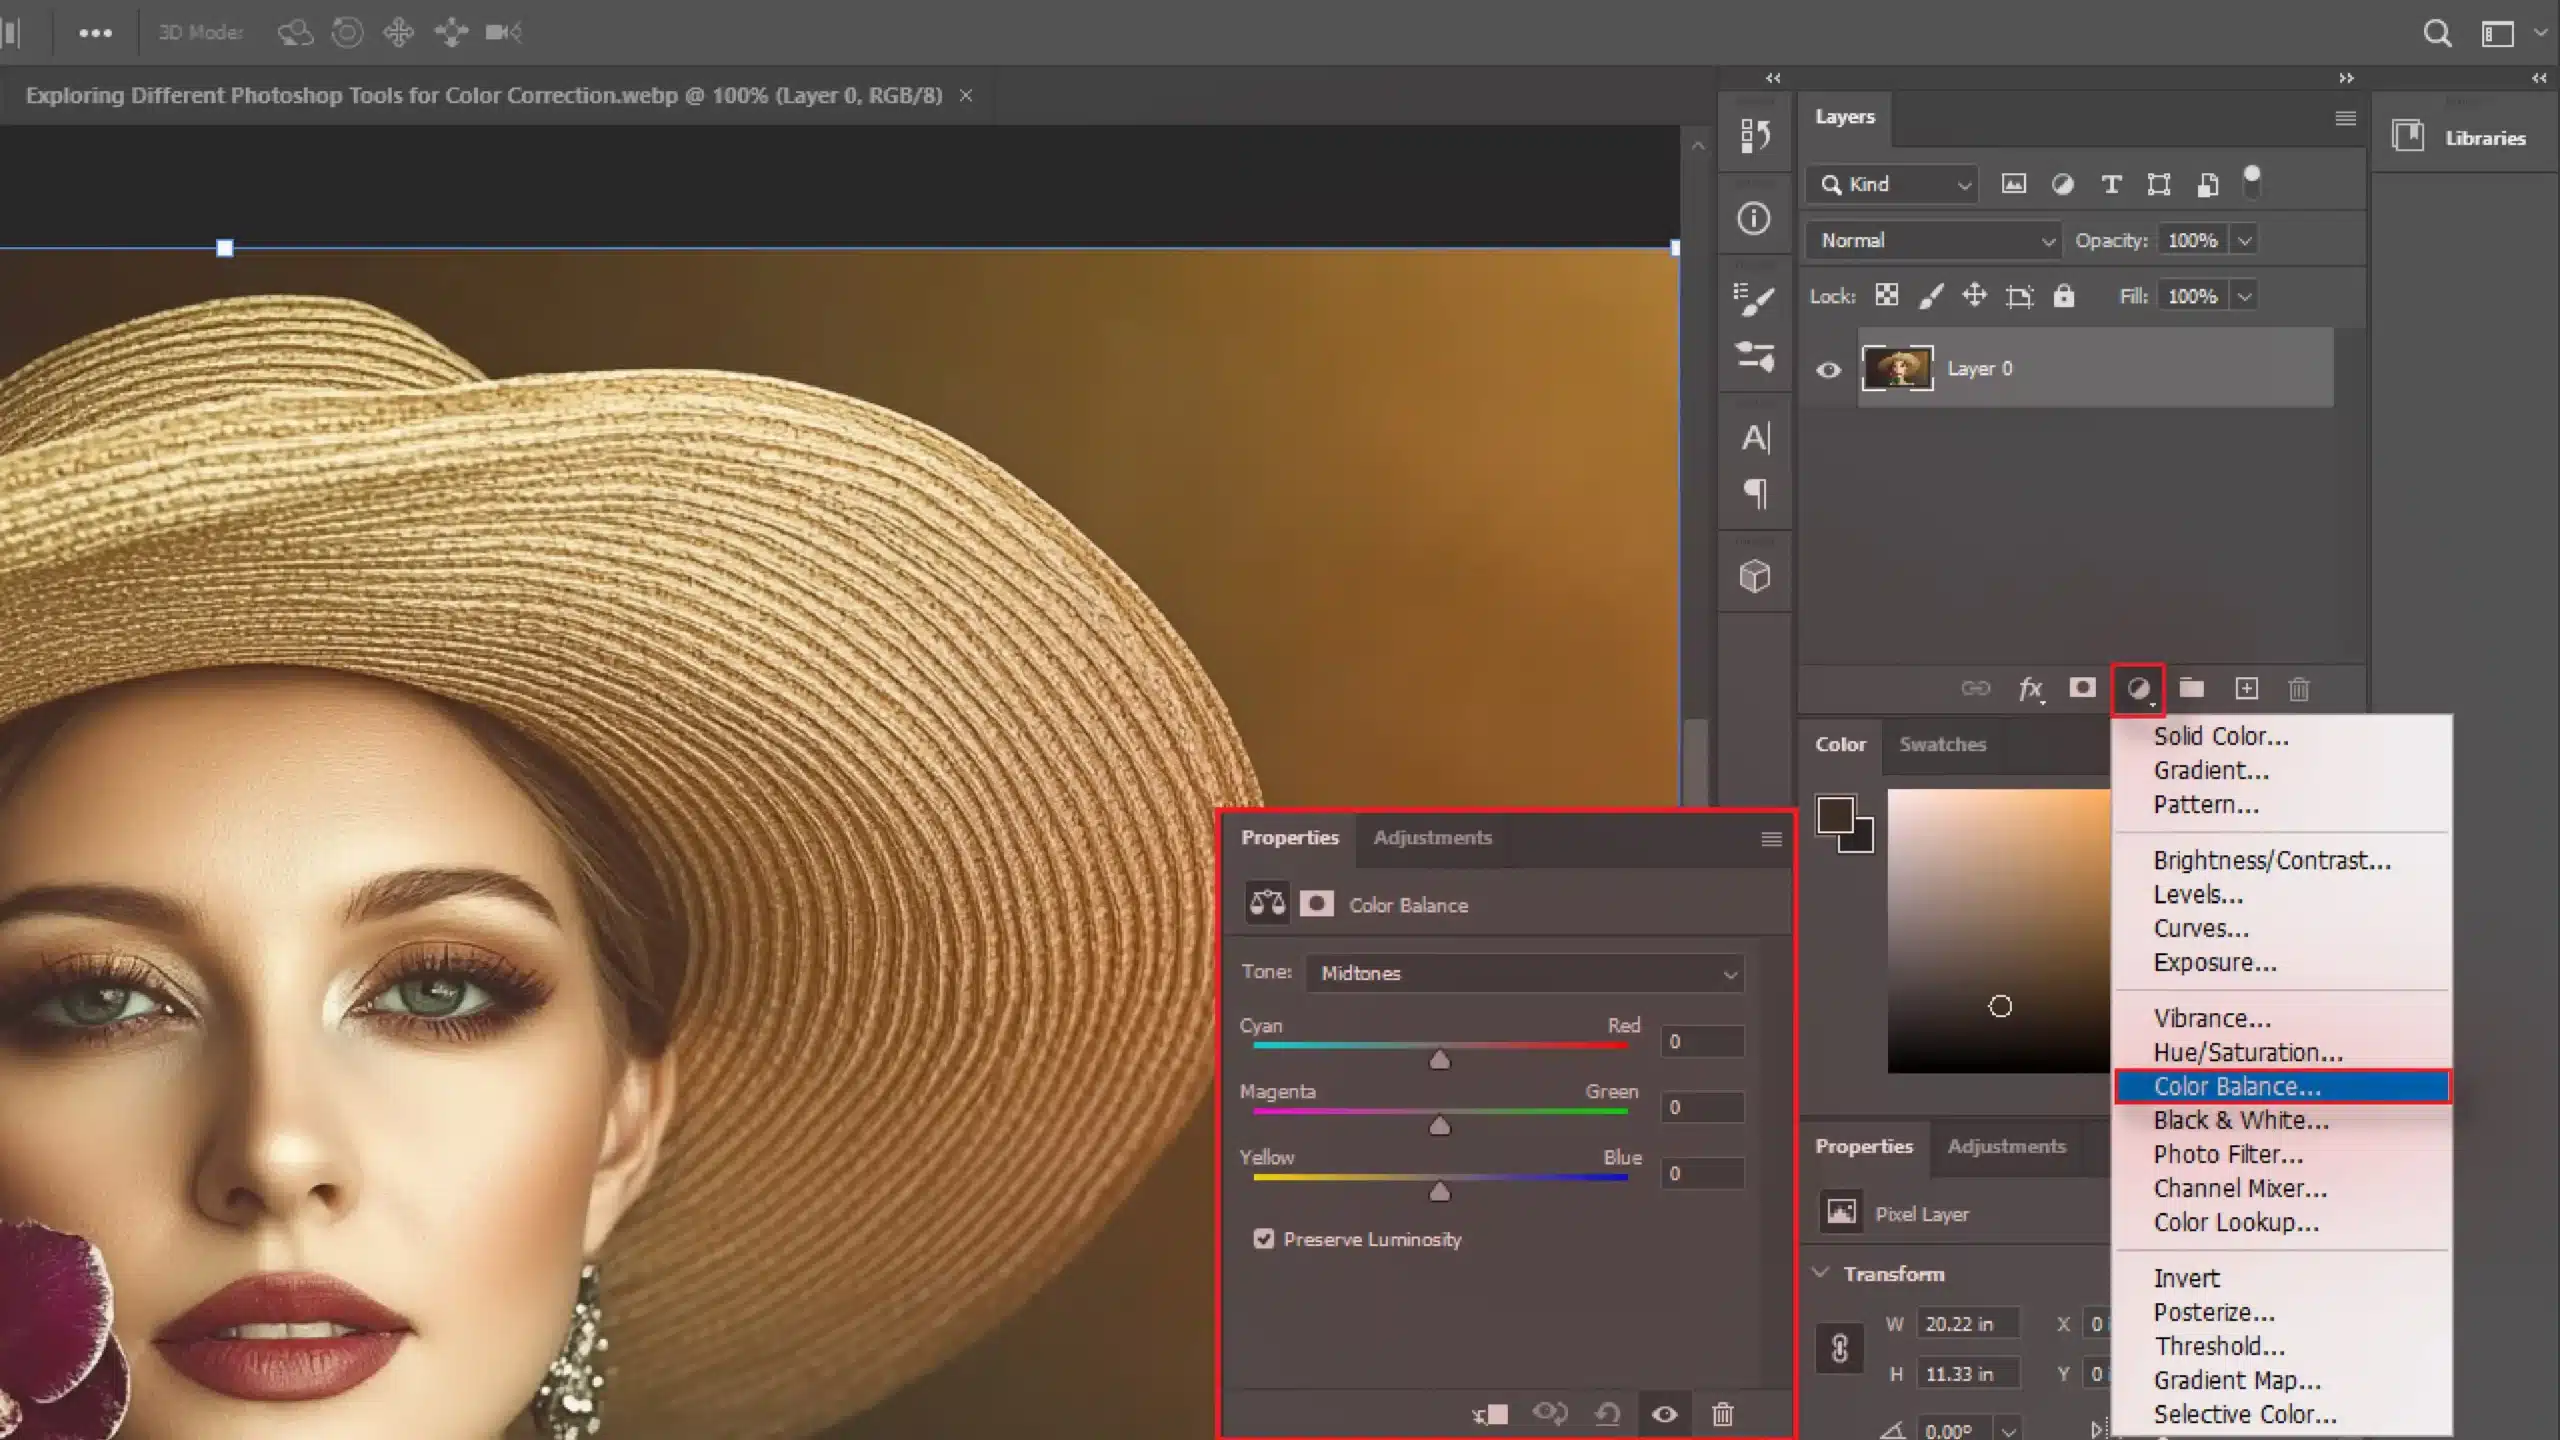
Using the Color Balance Tool
- Start with the adjustment layer. This layer allows changes without harming the original picture.
- The color balance tool is our friend here. It fixes color casts or extra hues. It’s simple. Start with mid-tones, then adjust shadows and highlights as needed.
Sometimes, colors might go wild. When this happens, breathe.
Make subtle changes until it feels right. Check the levels dialog box.
This helps maintain those tones. It ensures shadows, mid-tones, and highlights are correctly balanced.
But beware of the extreme highlight, especially when adjusting photos with intense whites. Calmly address them with caution.
Use the brush tool for detailed work. Paint over precise areas with care. Doing this maintains the intended look without going overboard.
As you continue, remember to fine-tune the adjustments. Little tweaks often lead to the biggest improvements in color correction.
Trust me, I’ve seen the results time and again.
Pro Tip: Balance the colors late at night. Your eyes are tired then, and you’ll notice exaggerated or off tones more easily. Remember the life lesson from this journey and enjoy creating stunning visuals!
This straightforward approach to color correction in Photoshop makes it easy to enhance your images and helps you grow as an editor.
Exploring Different Photoshop Tools for Color Correction
Photoshop offers a broad range of tools for color correction.
Here, we aim to demystify some key methods. With a bit of practice, you can turn dull photos into vibrant masterpieces.
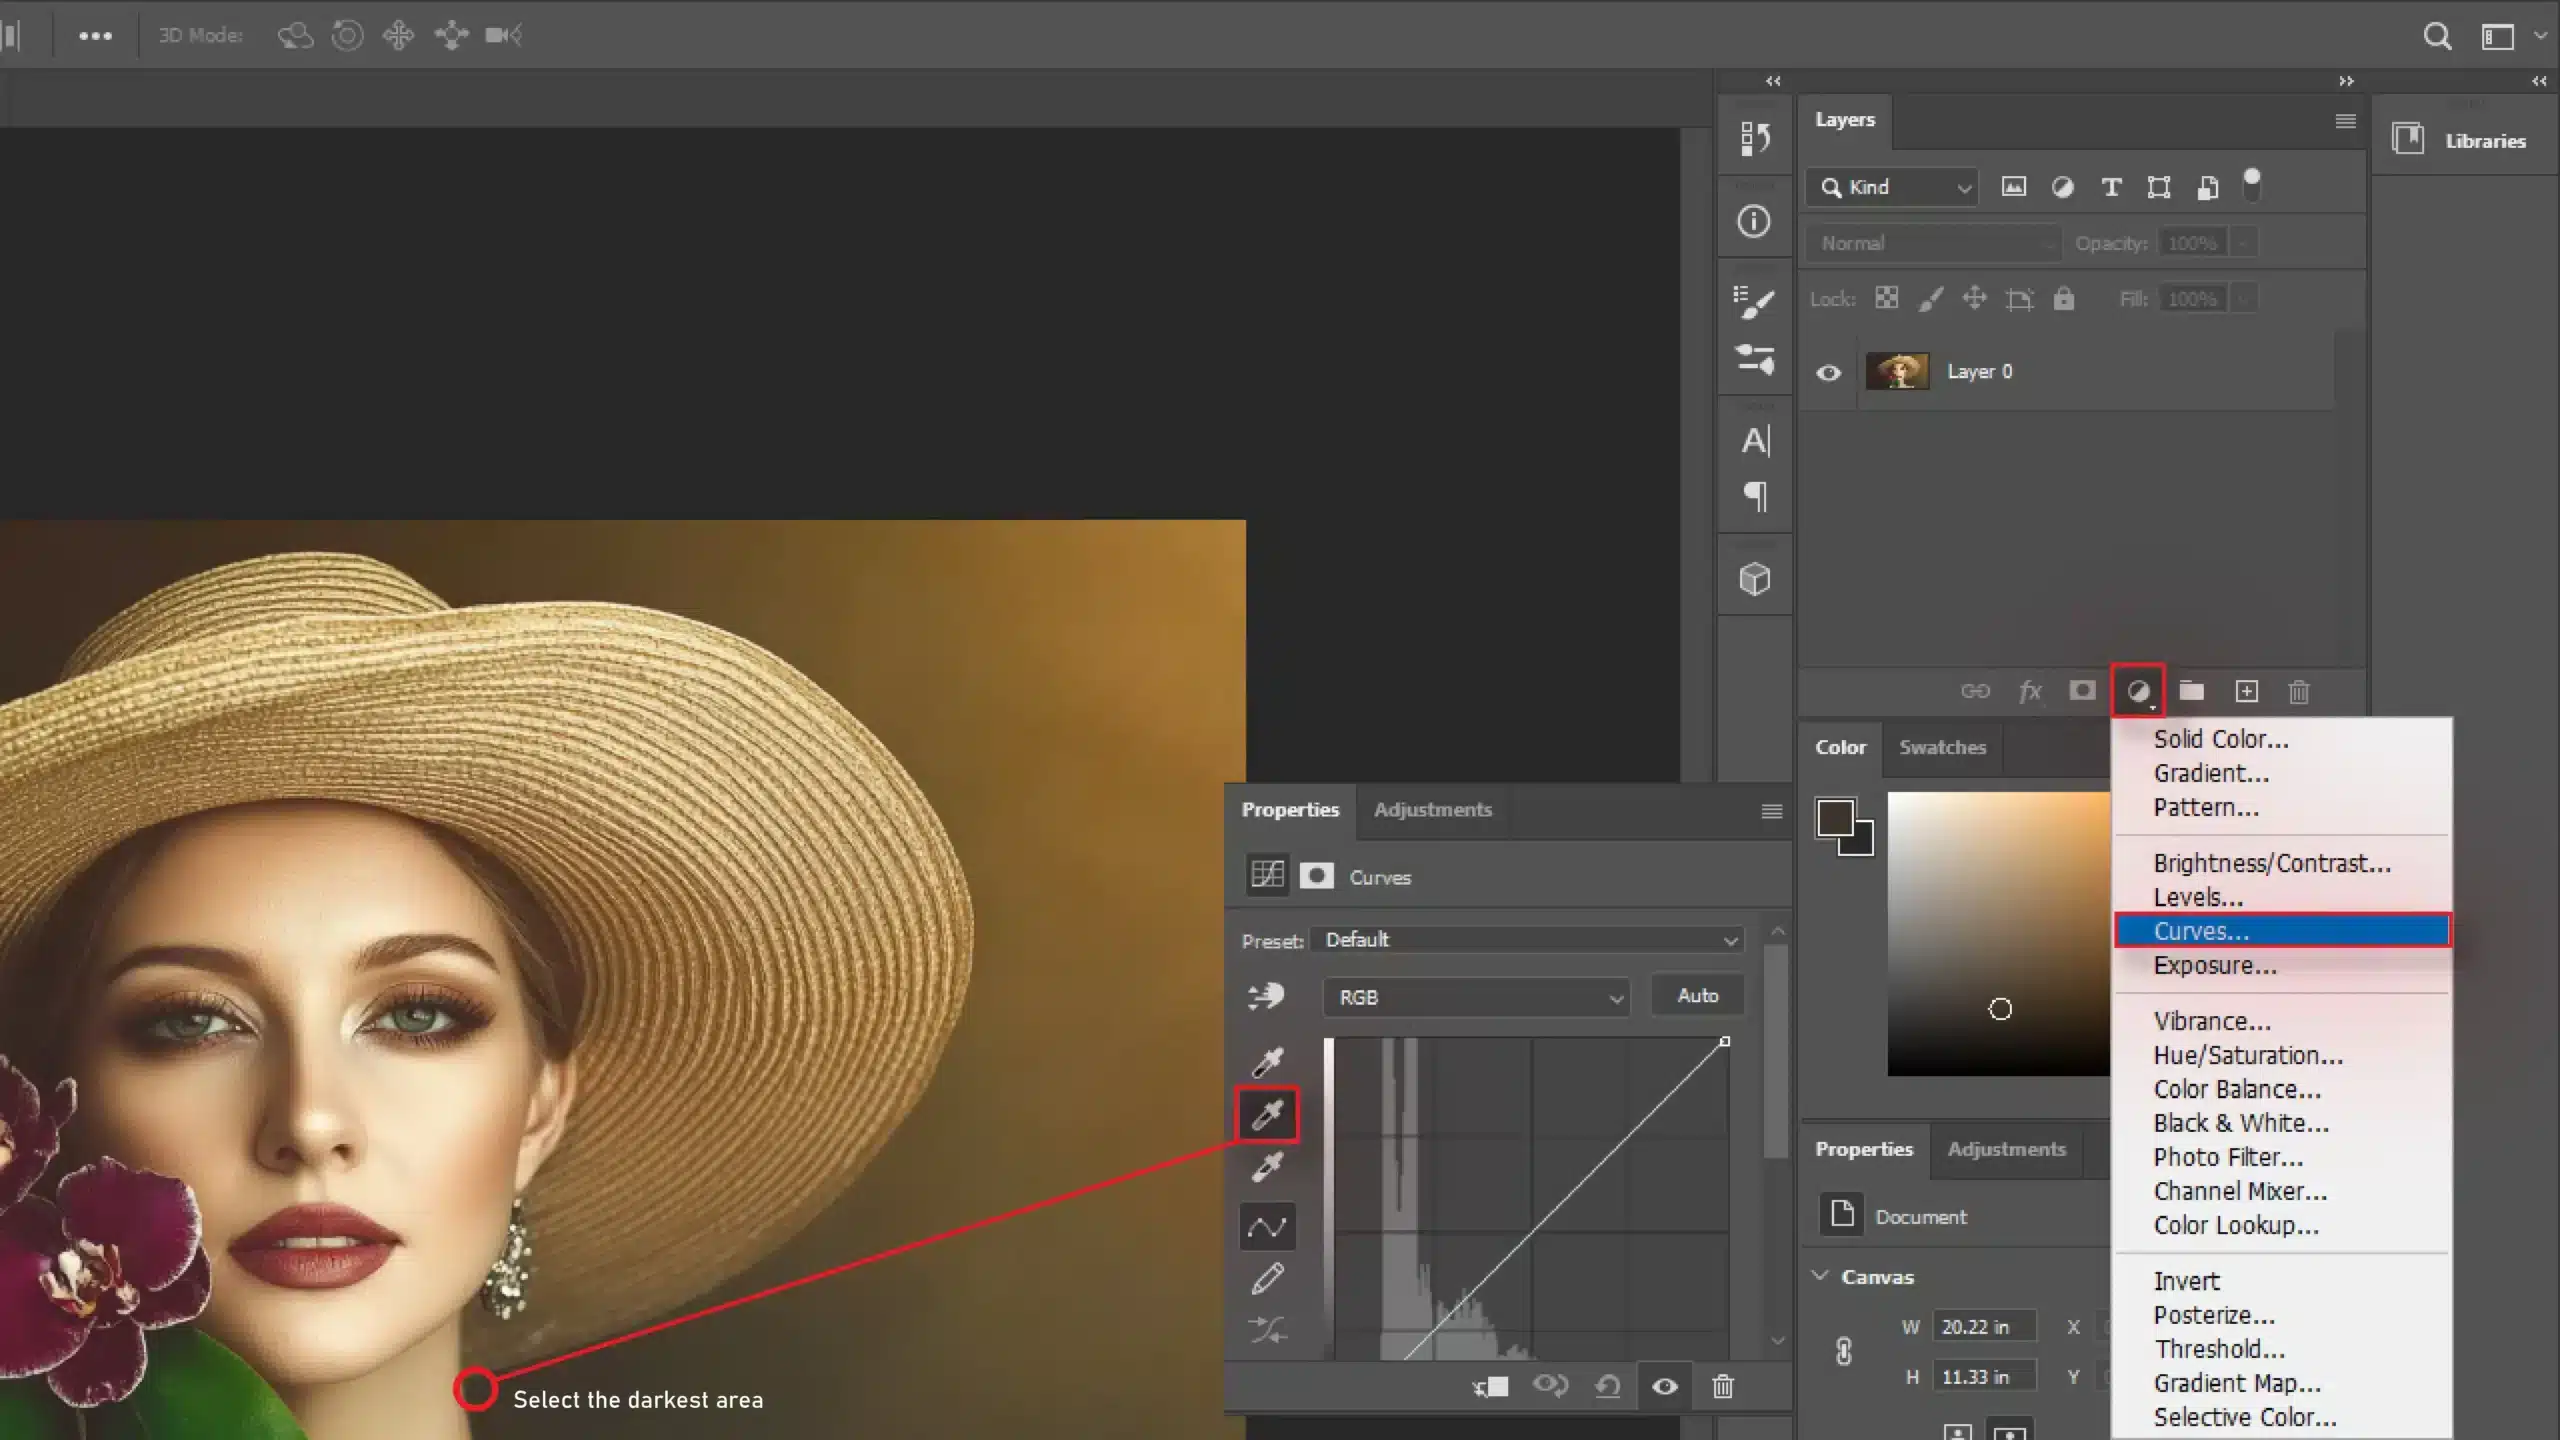
Understanding Levels and Curves
Now, let’s check out the difference between levels and curves.
| Concept | Description | |
|---|---|---|
| Levels | Adjusts tonal range by tweaking sliders. Lighten shadows and reveal details. Simple adjustments, impressive results. | |
| Curves |
|
Working with the Selective Color Tool
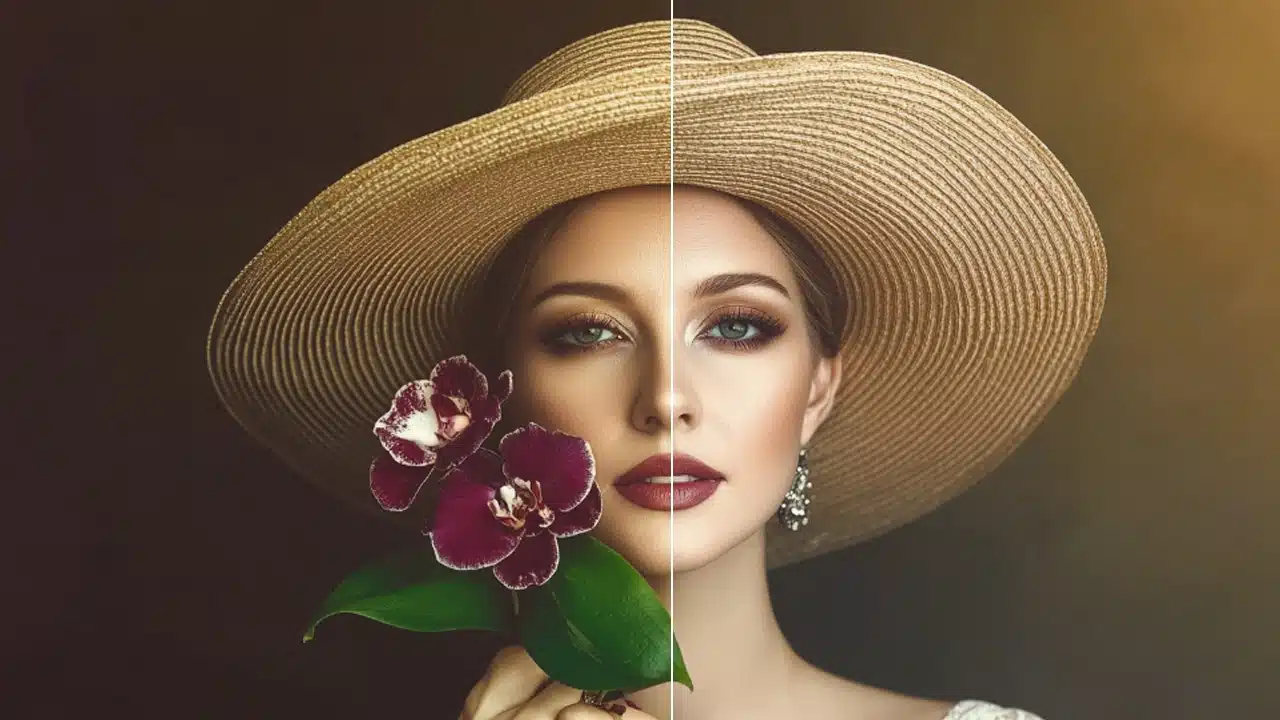
Learning how to use the selective color tool is a game-changer.
Want to alter specific hues? This tool lets you do just that.
Target yellows or reds. Remove unwanted color casts. Experimentation is encouraged!
Don’t complicate it. Begin with neutrals.
Progress to color casts to rectify unwanted tones. Find what’s wrong and fix it.
The outcome? Perfectly balanced colors.
Integrating an Adjustment Layer
Adjustment layers are non-destructive. That’s what makes them fantastic.
You adjust your image without changing the original.
Pro Tip: Learn how to change the color of a layer in Photoshop for an expanded skillset.
Layer Management
- Layer stack order matters. Place color balance on top. It affects every layer beneath.
- Understanding this hierarchy helps fine-tune pictures efficiently.
- It's flexible. Play with layer opacities. Add masks for targeted edits.
So, give these tools a try. Make mistakes. Learn from them.
And yes, you now have the freedom to unleash your creativity!
Pro Tip: If you make a mistake, it’s okay. Simply press ‘Ctrl+Z‘ to undo.
Additionally, understanding the difference between Photoshop and Lightroom can help you choose the right tool for your editing needs.
Tips and Tricks for Effective Color Balance
Color balance might seem intimidating at first, but it’s simpler than it appears. We all have that one photo that just doesn’t look right.
Usually, it’s the color balance that needs tweaking. You don’t need to be a pro; with a few simple tips, you’ll be amazed at how much better your photos can look.
Balancing Warm and Cool Tones
Warm tones give that cozy, golden-hour feel. Cool tones, like a crisp morning, offer freshness.
When working on color correction in Photoshop, adjust these with the slider. Move left to embrace warmth or right for a cooler touch.
Feel free to experiment.
Steps to Adjust Warm and Cool Tones:
- Open your photo editing software.
- Locate the color balance or temperature slider.
- Move the slider left for warmth or right for coolness.
- Experiment until the photo feels balanced.
Pro Tip: Check out this guide on color temperature in photography for a better understanding.
Creating Consistency Across Images
Ever noticed how a mismatched thread ruins a beautiful quilt? Photos need consistency too, especially when creating an album or a slideshow.
Keep the tone, brightness, and saturation level across different pictures similar. This continuity feels soothing to the eyes.
How to Maintain Consistency:
- Use tools like Lightroom to sync settings from one picture to others.
- Apply consistent edits to multiple images.
- Remember, even pros run into this!
Using Presets for Quick Adjustments
Presets are like magic buttons in photos.
Lightroom offers countless presets. They efficiently adjust colors, brightness, and shadows with one click, saving loads of time.
For those who want to delve deeper, learning Lightroom shortcuts and the essential tools in Lightroom can further streamline your editing process.
Using Presets Effectively:
- Choose a preset that matches your desired style (vintage, dramatic, etc.).
- Customize presets occasionally to tailor them for each photo.
- Watch out for overuse to maintain originality.
Pro Tip: Remember, understanding your own style first makes all the adjustments smoother.
Advanced Photo Editing Techniques
Now, let’s dive into the fascinating world of advanced photo editing.
Why? Because who doesn’t want their pictures to pop like they belong in a museum?
We’re going to navigate through a few Photoshop techniques that will make your photos shine.
Layer Masking for Precise Edits
Think of it as putting on a magical cloak over your picture. It allows you to hide parts of a photo without permanently erasing them.
Imagine being able to change your mind later!
How to Use Layer Masking
To use this, simply add a mask layer and paint over the areas you want to hide with a brush tool. It’s like painting with invisible ink.
The best part? You can always improve your edits as much as you need!
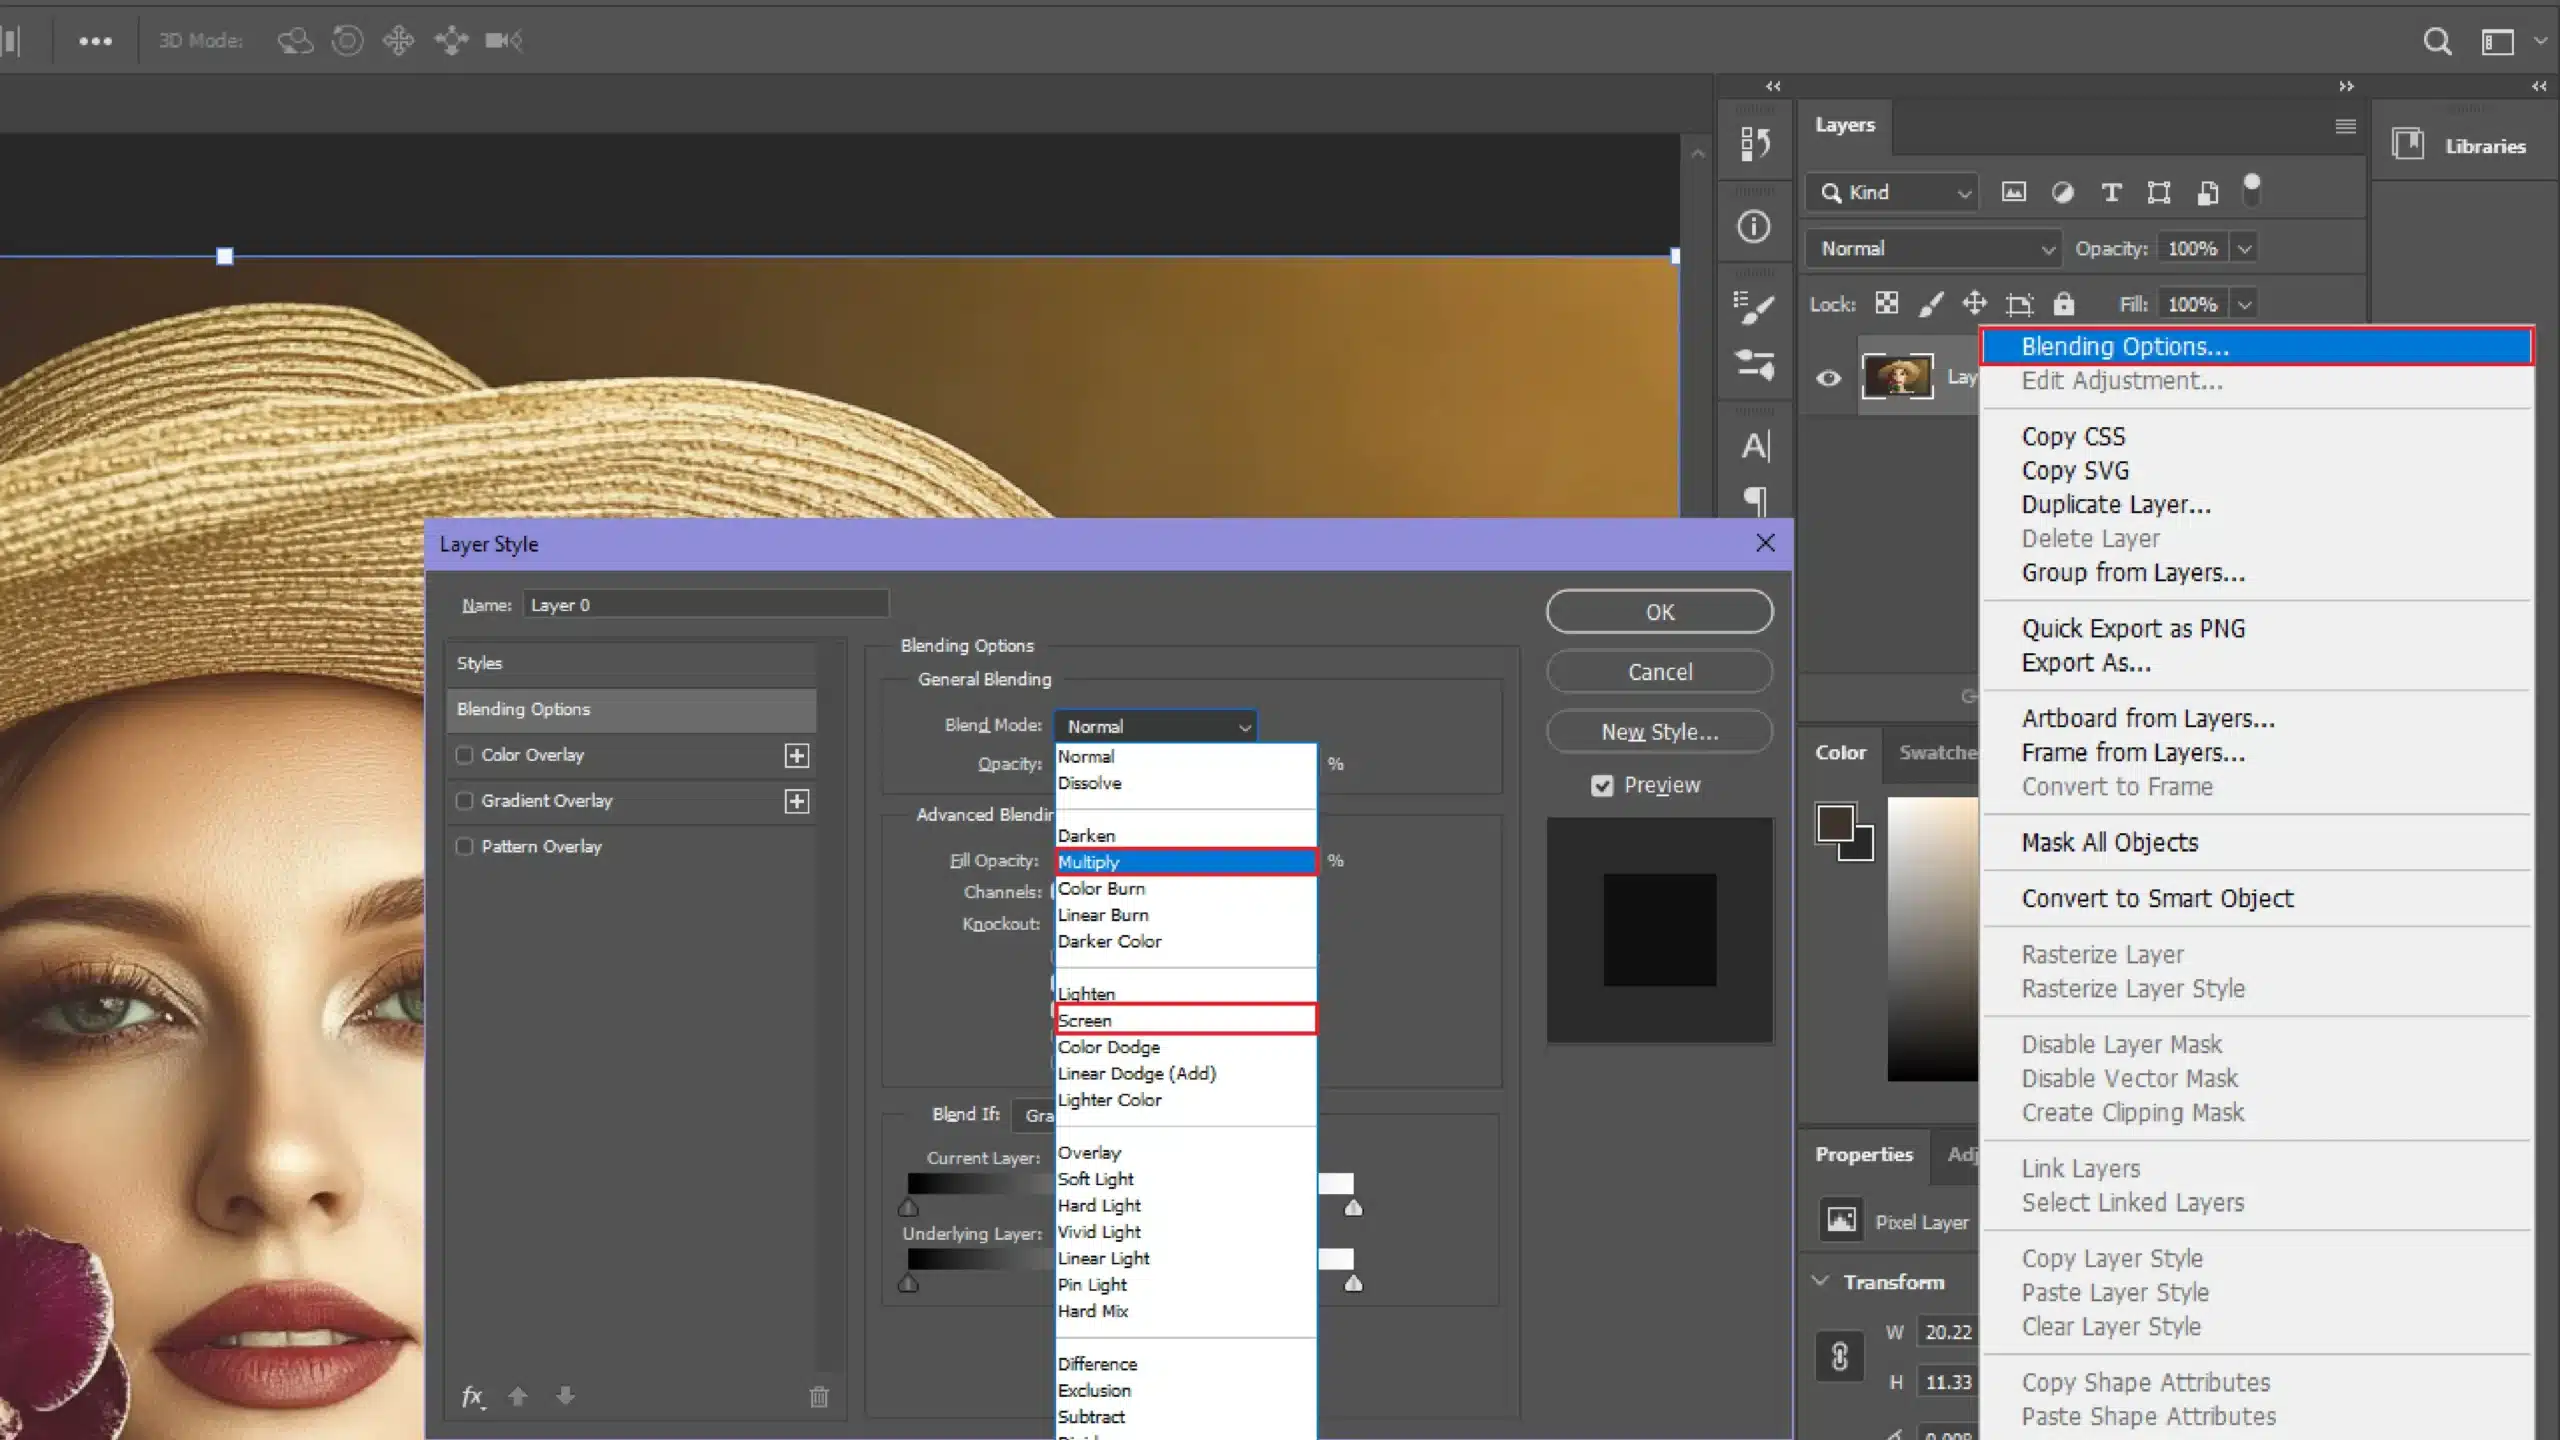
Blending Modes for Creative Effects
Blending modes sound fancy, but they’re just a way to make photos sit better together in an image.
They create magic by changing how layers interact with each other.
Experimenting with Blending Modes
- "Multiply" for darkening
- "Screen" for brightening
No need to worry about the terminology; it’s more about trial and error until you hit that sweet spot!
Non-Destructive Editing Techniques
Here’s a nugget that’s music to any lazy soul’s ears: non-destructive editing.
Why make irreversible edits when you can go back to your original anytime? This technique preserves your original picture while letting you experiment freely.
Methods to Implement
- Using an adjustment layer
- Utilizing smart objects
Any tweaks you make are atop your image, rather than etched forever, which is great if you want to try out different color correction hues or adjustments.
Photoshop Shortcuts for Efficiency
Speed up your workflow by mastering some essential keyboard shortcuts.
Whether you’re using the lasso tool in Photoshop or the lasso tool in Lightroom, knowing the right keystrokes can save you time and effort.
You see, editing photos isn’t about getting everything spot-on the first time. It’s a journey, and like any good trip, it should be enjoyable.
Use these techniques to experiment liberally and, most importantly, have fun!
Pro Tip: Practice whenever you can on both Photoshop and Lightroom. Editing gets easier the more you play around with it. Before you know it, you’ll be creating masterpieces like never before!
Frequently Asked Questions (FAQs)

How to do a color correction in Photoshop?
- Open your image in Photoshop.
- Navigate to the Image menu, select Adjustments, and then choose Color Balance.
- Adjust the color levels to correct the color. You can modify the shadows, midtones, and highlights separately.
- Use the Preview checkbox to compare the before and after of your adjustments.
- Click OK to apply your changes.
Does Photoshop have auto color correction?
- Yes, Photoshop offers an auto colour correction feature.
- To use it, open your image, go to Image in the menu, select Auto Tone or Auto Color for automatic adjustments.
- Auto Tone adjusts the contrast, while Auto Color adjusts both contrast and color.
How do I fix discoloration in Photoshop?
- Open the image with discoloration.
- Use the Spot Healing Brush tool for small areas or Patch Tool for larger areas to fix discoloration.
- For overall discoloration, adjust the hue and saturation by going to Image, selecting Adjustments, and then Hue/Saturation.
- Slide the hue bar until the discoloration is corrected.
How do I make colors look better in Photoshop?
- Enhance colors by adjusting the brightness and contrast. Go to Image, select Adjustments, and then Brightness/Contrast.
- Improve color vibrancy by selecting Vibrance from the Adjustments menu.
- Experiment with Color Balance and Selective Color for editing specific color ranges in your image.

Conclusion
Color correction in Photoshop has truly transformed my approach to photography.
By mastering various techniques, I can elevate my images from ordinary to extraordinary, allowing each photo to convey its unique story with vibrancy and accuracy. Whether adjusting hues to set the mood or balancing tones to highlight details, color correction has become essential in creating compelling visuals.
For anyone looking to deepen their skills, I highly recommend exploring the Photoshop course, along with a fantastic Lightroom course for those who prefer that platform. Both courses offer invaluable insights and practical techniques that can refine your photographic work.
Embracing color correction has significantly enhanced my artistic expression and boosted my confidence in producing professional-quality images.
Read more about Photoshop:


