Are you curious about adjusting the color of a layer in Photoshop?
Learning how to modify layer colors can truly transform your designs and take your creative skills to the next level.
Whether you’re aiming to highlight a key element in a graphic or just add some flair to your artwork, mastering this simple technique will make all the difference.
Today, let’s dive into exactly how you can easily change colors of any layer in Photoshop, ensuring that your projects always stand out with just the right touches of vibrancy and style.
Table of Contents
Changing the Color of a Layer in Photoshop: A Step-by-Step Guide
Photoshop offers various powerful tools to modify and enhance images, including the ability to change the colors of specific layers.
This guide walks you through effective methods using layering techniques, blend modes, and more.
Whether you’re looking to tweak a small element or overhaul an entire layer, these steps will help you achieve your desired results.
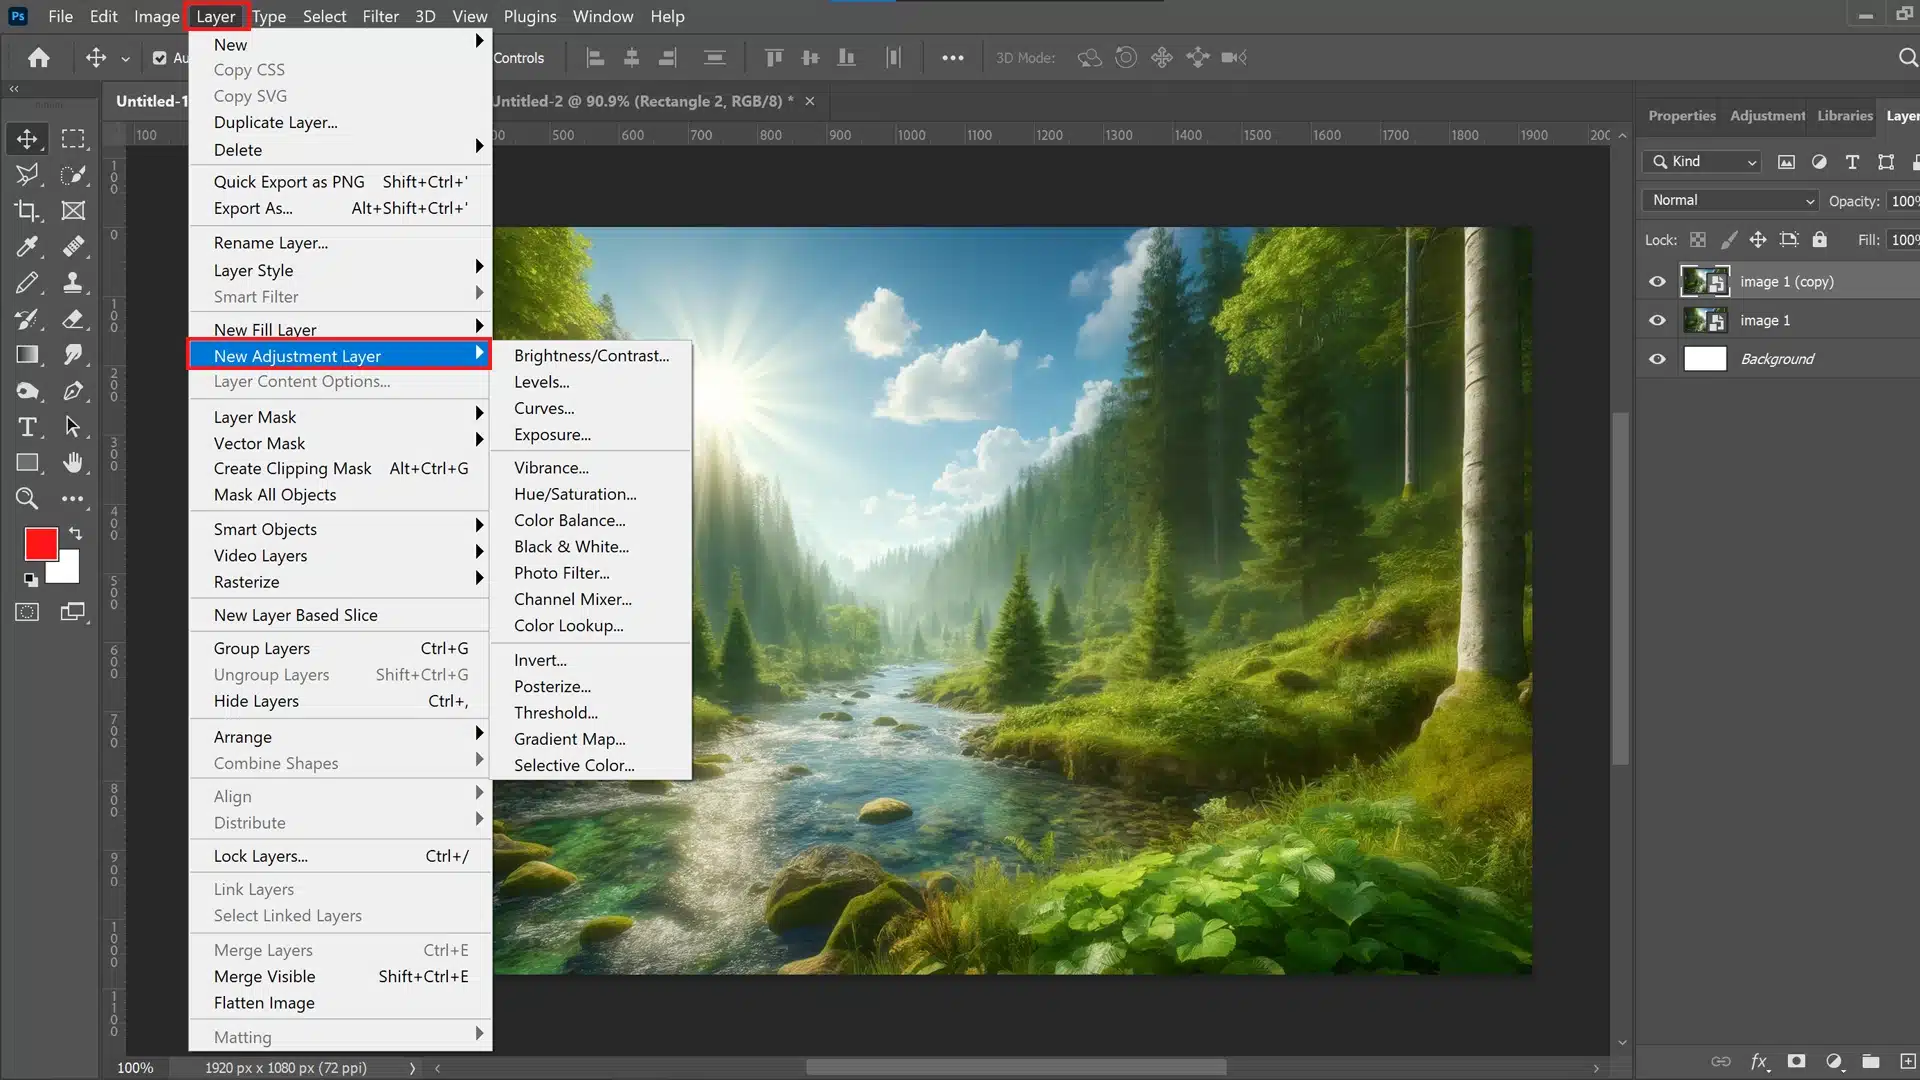
1. Accessing the Adjustment Layer Feature
To begin changing the hue of a layer in Photoshop, access the adjustment layer feature.
It’s a non-destructive way of editing, which allows you to create changes without permanently altering the original image.
- Open your project and select Change colors.
- Navigate to the Layer menu at the top, select New Adjustment Layer, and choose an option from the list that fits your needs.
- Use this method for multiple edits, as each adjustment layer affects all layers beneath it unless clipped.
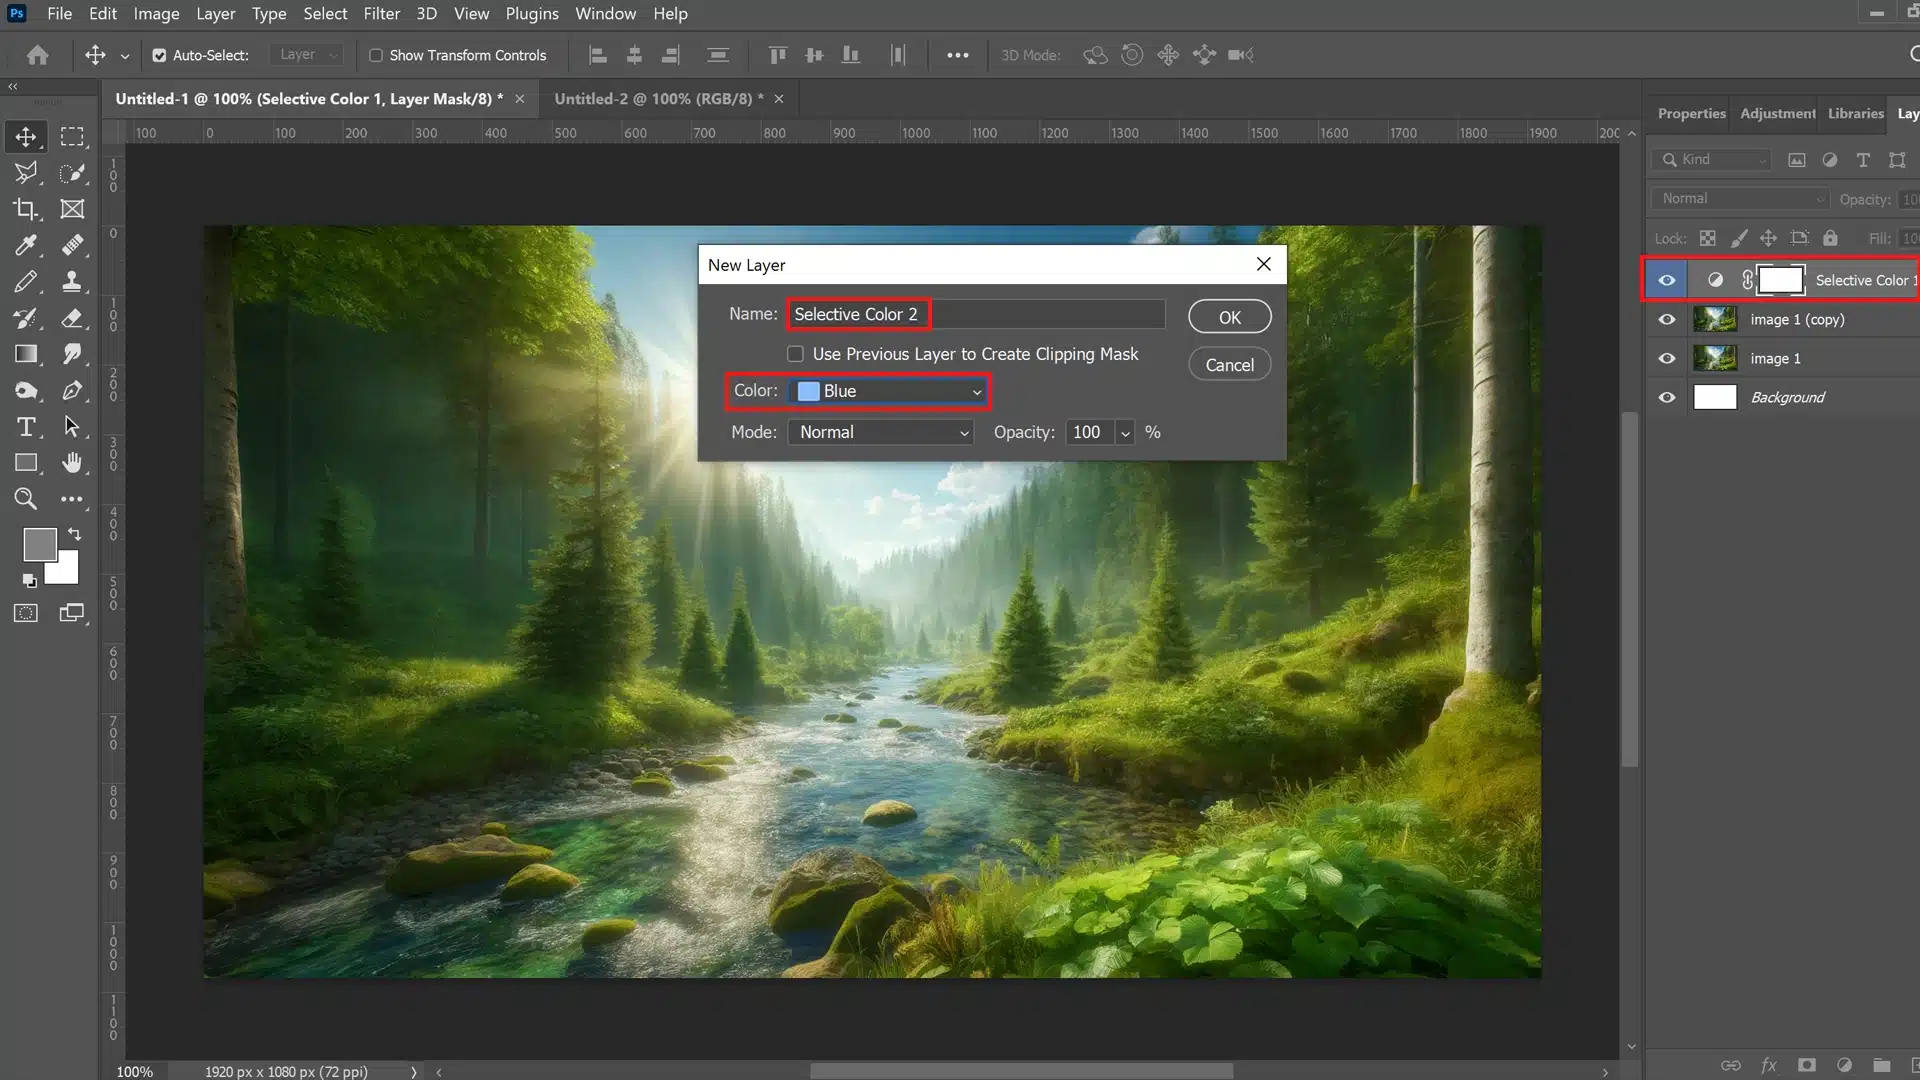
2. Selecting the Correct Adjustment for a Change Colors Option
- If specific color tweaks are needed, utilize "Hue/Saturation."
- To alter specific colors, selectively use "Selective Color."
- For overall tonal adjustments, "Color Balance" can be very useful.
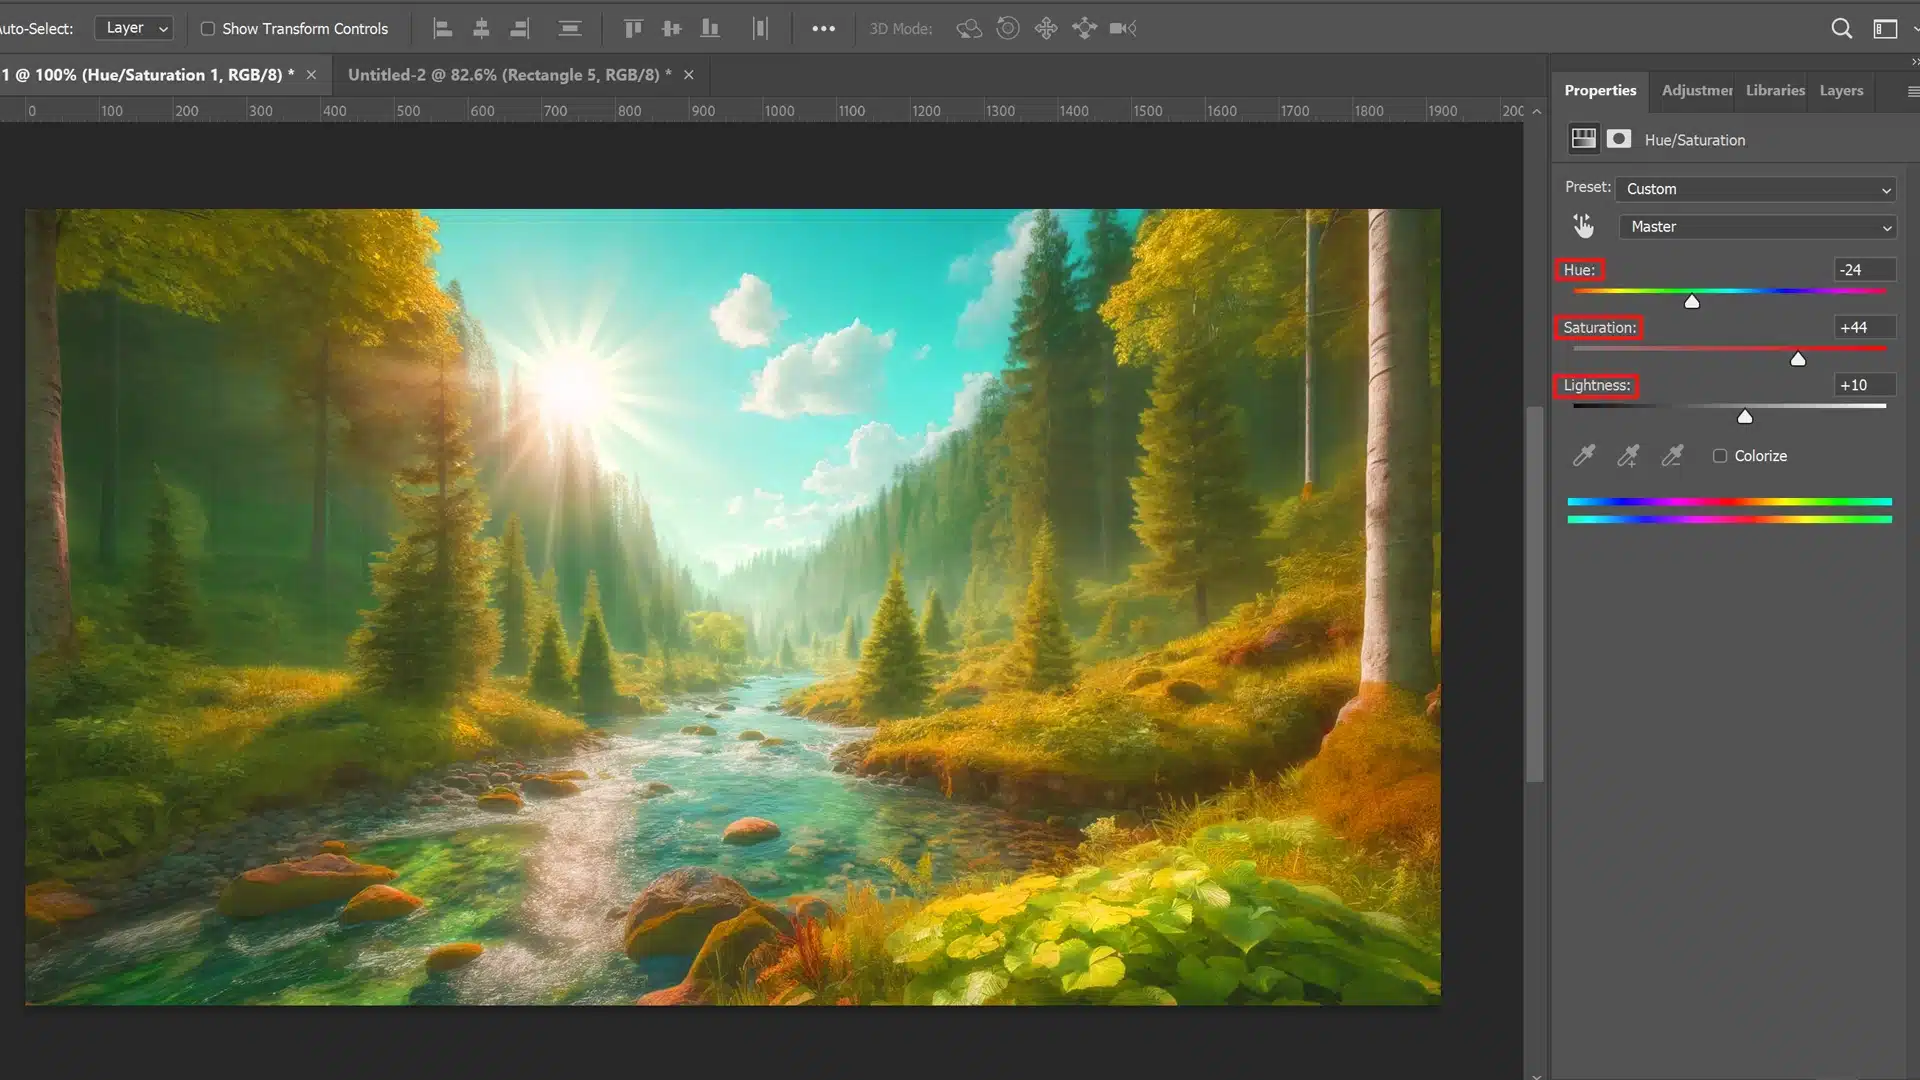
3.Adjusting Hue/Saturation and Color Balance Settings
Within these settings:
- The Hue slider adjusts primary colors weaving through 360 degrees of the color wheel.
- Saturation sliders amplify or mute the vibrancy of existing hues.
- The lightness slider adjusts brightness without altering hue.
- Use three ranges (Shadows, Midtones, Highlights) in Color Balance for targeted corrections without affecting other elements inappropriately
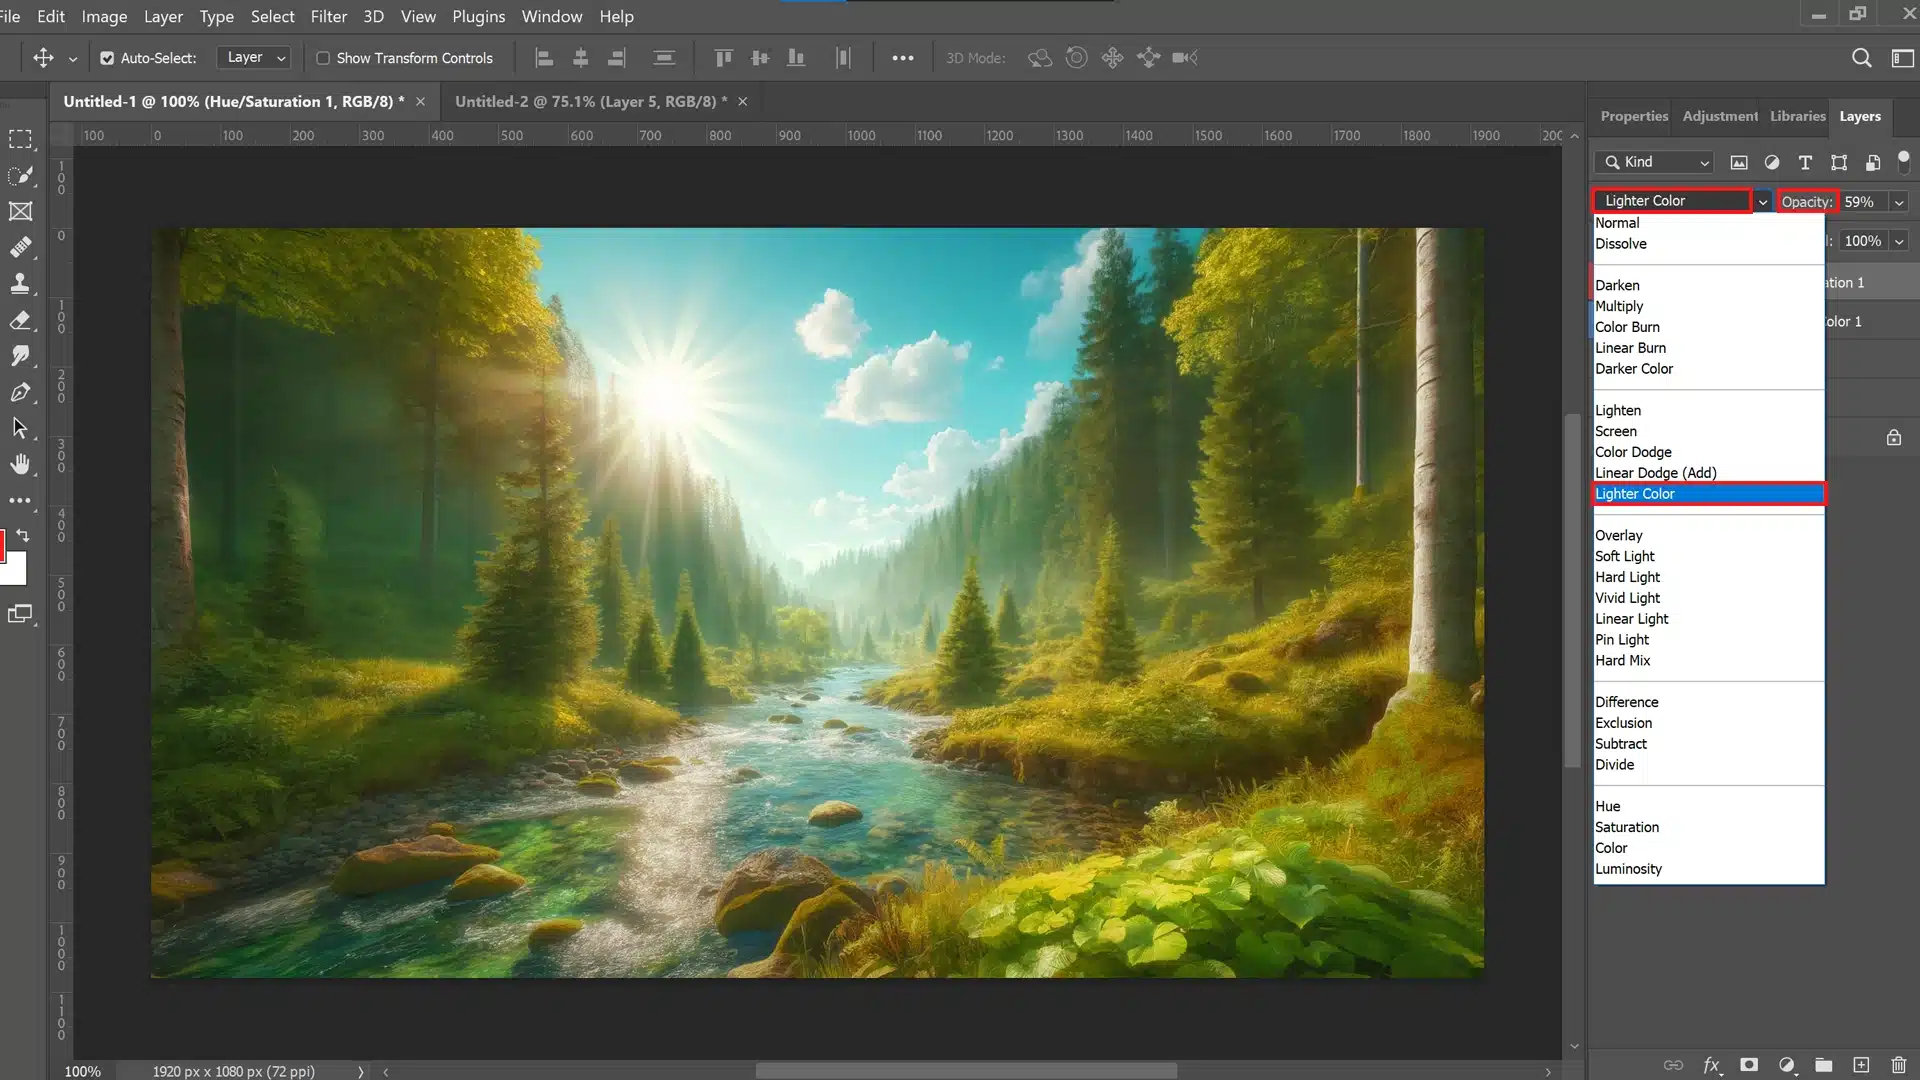
4.Applying Changes and Previewing the Outcome
As adjustments are made:
- Toggle the eye icon next to each adjustment layer on/off to see before/after effects
- Employ blend mode options such as Soft Light or Hard Light to fine-tune how new colors interact with underlying pixels
- Continuously adjust the opacity of each adjustment layer until satisfaction
This step ensures multiple options are considered before finalizing edits, ensuring best possible output consistent with individual creative visions
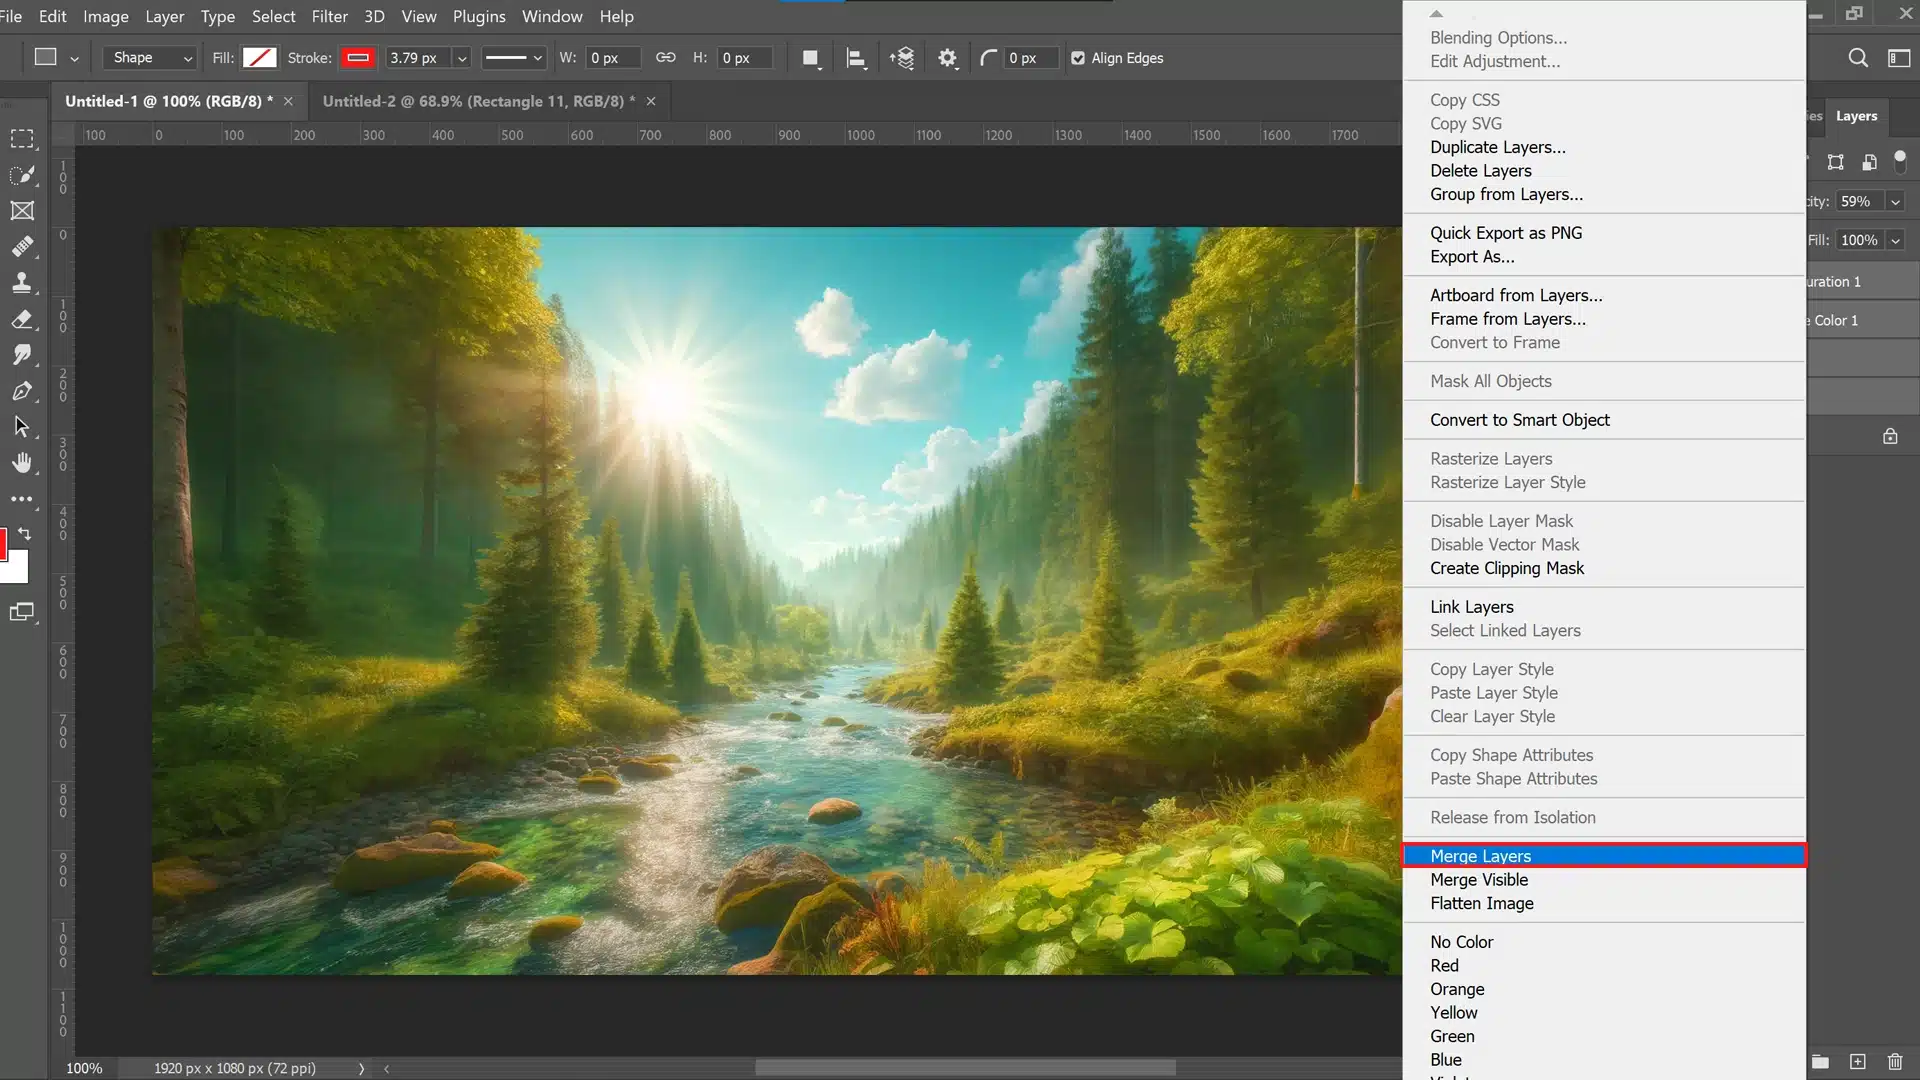
5. Finalizing and Saving the Adjusted Layer
Once satisfied with a new look:
- Right-click on layers, choosing Merge Down from the context menu if a permanent application desired
- Alternatively, keep layers unmerged, preserving the ability for further revisions at a later stage, enabling a flexible workflow suitable for evolving design necessities
Always save your work in a format that preserves editing capabilities, ideally PSD. Additionally, export versions that are compatible across different platforms and devices if necessary.
Whether you’re performing minor touch-ups or extensive transformations, following these guidelines ensures you maintain high-level control over your artistic direction throughout the editing process, leading to the best possible outcomes.
For different needs, consider saving your images in NEF or JPG and RAW or JPEG formats
Utilizing a Layer Mask for Targeted Layer Color Adjustments
Creating and Managing Layer Masks
Creating a layer mask is essential when you need to apply effects or adjustments to a particular part of your image.
| Component | Description |
|---|---|
| Creation of Layer Mask | Locate and use the ‘Add a mask‘ option at the bottom of the layers panel to add a mask to the desired layer. |
| Application of Masking | Paint black on the mask in areas where no changes are desired, and white where changes are needed. |
| Opacity Adjustment | Modify the opacity of the mask to manage how visible the changes are. |
| Mask Refinement | Employ brushes or gradient tools on the mask to enhance dynamic and smooth transitions between treated and untreated areas. |
Isolating the Layer for Specific Color Changes
When isolating a layer for specific color changes, first duplicate the layer you want to adjust.
Use tools like the hue/saturation adjustment layer to select the color of an object in the layer from your adjustment options. This allows you to target specific hues or create broad color adjustments.
This approach ensures that original layers remain untouched, offering flexibility if revisions are needed. For precise adjustments, consider using the shape tool.
Techniques for Blending and Refining Edges
Effective blending and edge refining requires familiarity with various blend modes within Photoshop, unrelated to a color of an object.
The use of an appropriate blend mode helps integrate layers seamlessly by controlling how they combine with underlying pixels.
To refine edges after using blend modes, access ‘Refine Edge’ from the selection tools options or add an additional feathering effect via properties accessible through each layer’s right-click options menu.
This will soften hard edges making merges less noticeable and more natural-looking within your project composition.
Additionally, mastering techniques in master photoshop feather edges can significantly enhance your ability to create subtle transitions between different elements in composite photography tasks.
Advanced Color Editing Techniques
In advanced Photoshop work, color editing is where the magic happens.
Sophisticated techniques allow you to bring your creative vision to life by adjusting hues and saturation, manipulating layers, and applying specific color treatments to enhance or completely transform your images.
Working with Gradient Maps for Color Adjustments
Gradient maps are powerful tools in Photoshop for creating striking color effects by mapping the grayscale tones of an image to a specified gradient.
They can also be used as an adjustment layer, allowing you to non-destructively edit image colors while preserving the underlying pixels.
Start by adding a new gradient map from the Layers panel. You can choose from preset gradients or create your own custom gradient using the color picker.
For more precise adjustments, tweak the position of the gradient stops on the gradient editor bar. If desired, change the blend mode of the gradient map layer to customize how it interacts with the layers below it.
Here’s a quick step-by-step approach:
- Open your image in Photoshop.
- Go to Layer > New Adjustment Layer > Gradient Map.
- Select or design your gradient.
- Adjust blend modes and opacity for diverse effects.
Applying Selective Color Corrections and Saturation Sliders
Selective color correction is essential when you need to fix or enhance specific colors within an image without affecting others.
This technique typically involves using masks along with layers such as hue/saturation or selective color.
To begin, add a hue saturation adjustment layer and selectively target colors via the properties panel.
Add a layer mask, then paint over areas you don’t want to be affected with black on the mask; this keeps changes confined only where needed.
Efficient steps include:
- Creating a new hue/saturation adjustment layer.
- Using the hand tool from the options bar, click on areas needing adjustments.
- Isolate those regions with a layer mask and brush tool.
Exploring Color Lookup Tables (LUTs) for Creative Effects
Color Lookup Tables (LUTs) are presets that quickly apply various film styles, moods, or cinematic effects across entire images. They are ideal for fashion shoots or adding dramatic effects to projects.
To apply LUTs:
- Navigate through Layer > New Adjustment Layer > Color Lookup.
- In the Properties Panel, choose among 3DLut File options preloaded in Photoshop or import customized ones crafted externally.
- Experiment with reducing opacity if the LUT effect feels too strong.
Tips for Achieving Realistic Color and Adjustment Layers
Achieving realistic color adjustments in Photoshop requires a solid understanding of color theory, tools, and techniques.
This section delves into practical tips that will help you master color adjustments seamlessly.
How to Match Colors Across Different Layers
Matching colors across the image layers ensures a cohesive look throughout your composition.
Start by using the color selector tool to select the target color from one of your image layers.
Next, create a new adjustment layer, specifically working with the hue slider and saturation slider to align the hues of different image layers effectively.
To match complex colors or gradients precisely, utilize a combination of multiple adjustment image layers, each set with an appropriate blend mode. This helps merge various hues and tones naturally.
Applying Selective Color Corrections and Saturation Sliders
Selective color correction is essential when you need to fix or enhance specific colors within an image without affecting others.
This technique typically involves using masks along with layers such as hue/saturation or selective color.
To begin, add a hue/saturation adjustment layer and selectively target colors via the properties panel. Focus on individual colors like reds or greens for modification.
Add a layer mask, then paint over areas you don’t want to be affected with black on the mask; this keeps changes confined only where needed.
Efficient steps include:
- Creating a new hue/saturation adjustment layer.
- Using the hand tool from the options bar, click on areas needing adjustments.
- Isolate those regions with a layer mask and brush tool.
Troubleshooting Common Issues with Color Changes
When working with colors in Photoshop, certain common issues can affect your desired output.
Understanding how to resolve these problems effectively helps maintain the quality of your images without the additional need to sharpen your images.
We’ll cover methods for handling oversaturated colors (aka desaturation techniques), unexpected color shifts, and the loss of color details in shadows and highlights.
Fixing Oversaturated Colors
Oversaturation can make your images look unnaturally bright and gaudy, which might not be what you envisioned.
The key is subtlety when utilizing a hue saturation adjustment layer. Initially, add an adjustment layer from the layers panel, reducing the saturation slider until the colors look more realistic.
Another efficient technique involves applying a solid color layer with a complementary hue.
Set this layer’s blend mode to ‘color’ and adjust opacity to dial back color intensity gently.
- Open the layers panel
- Add a new hue saturation adjustment layer
- Decrease saturation using the slider
- If necessary, use a solid color layer for fine adjustments
Restoring Color Details in Shadows and Highlights
Loss of detail in shadows or highlights tends to make an image appear flat.
A technique called ‘dodging and burning‘ selectively lightens (dodging) shadows or darkens (burn) highlights to increase depth and dimensionality without affecting overall hue.
This precision is achievable through a dedicated dodge/burn layer mask, where you can finely control each effect’s impact area.
Further refinement is possible by carefully adjusting individual areas within a selected range via targeted hue saturation layers tailored specifically for shadow recovery or highlight enhancements.
- Apply dodge/burn techniques with a dedicated adjustment layer mask
- Enhance details further using local adjustments on respective areas
Frequently Asked Questions

How do I change the color of one layer in Photoshop?
To change the color of a specific part of a layer in Photoshop, you can use the Hue/Saturation adjustment layer.
Here’s a simple step-by-step guide:
- Select the area you want to change using the Quick Selection tool or any other selection tool that suits your needs.
- Go to the Adjustments panel and click the Hue/Saturation icon. This creates a new adjustment layer.
- In the Properties panel, adjust the Hue and Saturation sliders to change the color. If the original color tints the new color too much, check the Colorize option and readjust the settings as needed.
- If you need to fine-tune the affected area, you can paint on the mask with black or white to decrease or increase the effect
How do I change the color of an entire layer?
Changing the color of an entire layer can be done using a few different methods. One of the most common methods is using a fill layer:
- Select the layer you want to change.
- Go to Layer > New Fill Layer > Solid Color.
- Choose your desired color from the Color Picker that appears.
- Click OK, and your layer will be filled with the new color.
How do you recolor layers in Photoshop?
Recoloring layers can be achieved through several methods, depending on the desired outcome.
Here are a couple of effective techniques:
- Go to Image > Adjustments > Replace Color.
- Use the Eyedropper tool to select the color you want to change.
- Adjust the Fuzziness slider to control the range of colors affected.
- Use the Hue, Saturation, and Lightness sliders to change the color to your desired hue.
- Click OK to apply the changes
How do I change the color of a layer shape in Photoshop?
To change the color of a shape layer, you can use the following method:
- Select the shape layer you want to change.
- Go to the Layers panel and double-click the shape layer thumbnail. This will open the Color Picker.
- Choose your desired color from the Color Picker and click OK.

Conclusion
Reflecting on my personal journey with Photoshop, I recall how changing the color of a layer boosted both my project’s visual appeal and my confidence.
I was designing for a friend’s startup and, by adjusting the Hue/Saturation, transformed a plain background into a vibrant part of the brand’s identity
If you’re looking to enhance your Photoshop skills, our comprehensive courses are the perfect starting point.
Photoshop Course and Lightroom Course today to unlock your creative potential and bring your designs to life. Start your journey to mastering these powerful tools now!
Read more about Photoshop:


Course

Light Effect Photoshop


Lightroom Course 2025

Adobe Photoshop Course 2025

Photo Editing Course


