Remove Blemishes In Photoshop: Everything You Need to Know
Remove Blemishes In Photoshop: Everything You Need to Know
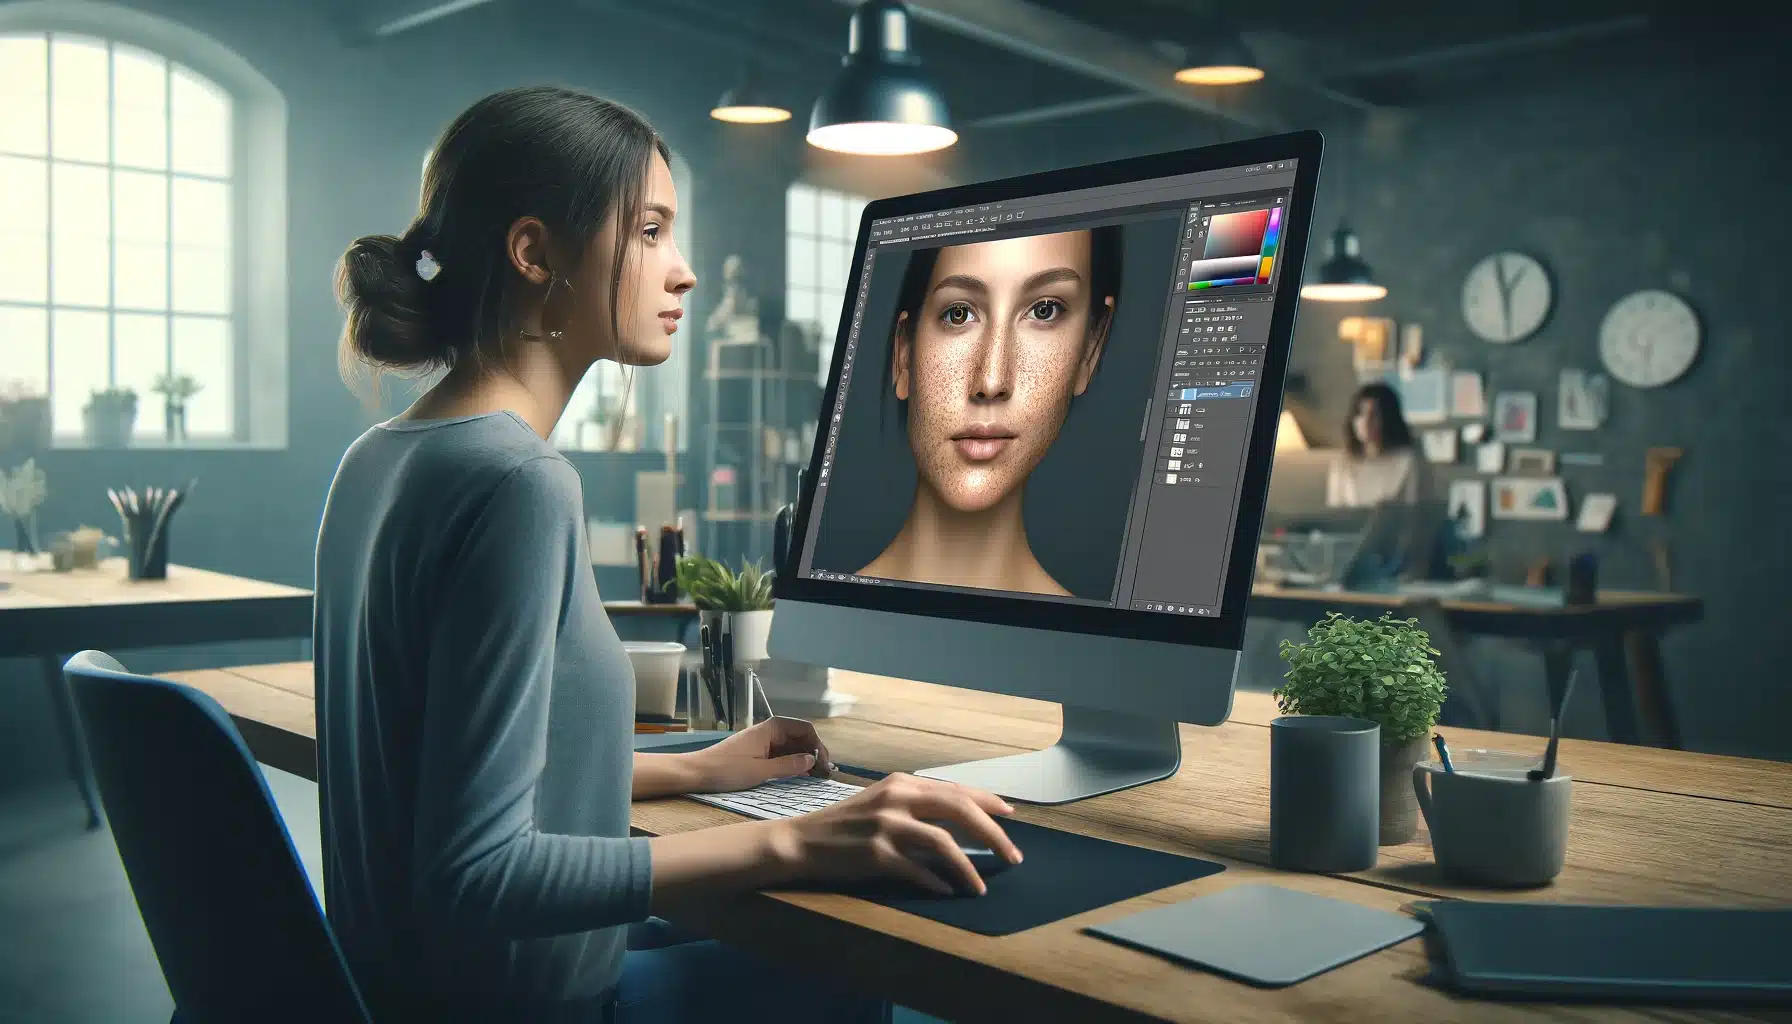
Struggling with skin blemishes in your photos? Learning to remove them in Photoshop can be a total game-changer!
This guide will take you through easy, step-by-step instructions to master this essential skill.
You’ll be able to clean up imperfections and highlight the beauty in every shot. Our tips ensure your pictures always look flawless. Let’s dive in and make your photos stunning together!
Table of Contents
Step-by-Step Guide to Remove Blemishes in Photoshop
Photoshop offers a variety of essential tools to remove blemishes and perfect your photographs with precision.
Whether you’re retouching a portrait or enhancing a landscape, following this guide will help you achieve flawless results.
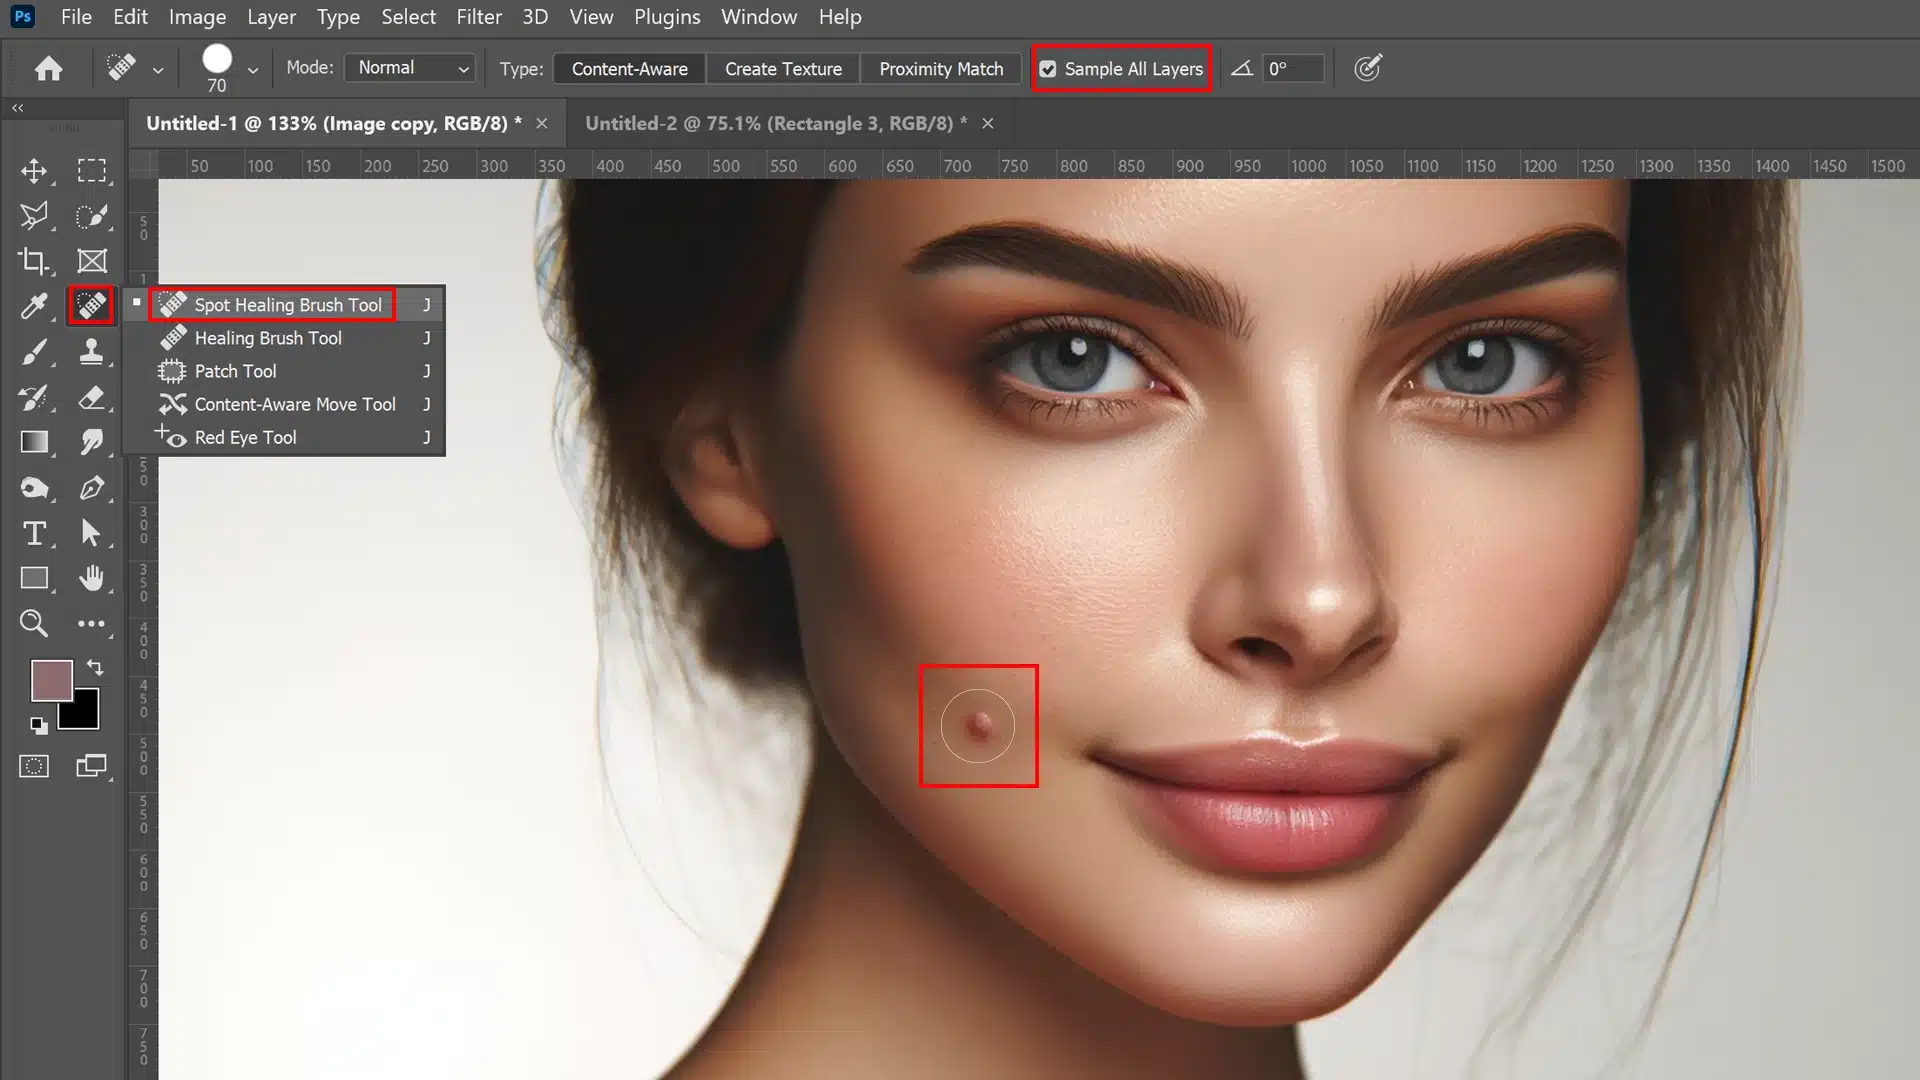
Using the Spot Healing Brush Tool Effectively
The Spot Healing Brush Tool is ideal for quick fixes on skin blemishes, functioning efficiently with just a few clicks to provide clear, smooth skin.
Before starting:
1. Create a new layer above the background layer to work non-destructively.
2. Adjust the brush size to slightly larger than the blemish.
3. Activate “Sample All Layers” in the options bar to blend corrections smoothly.
Begin by positioning your brush over the target area and click; Photoshop will automatically sample from surrounding pixels to cover up any imperfection seamlessly.
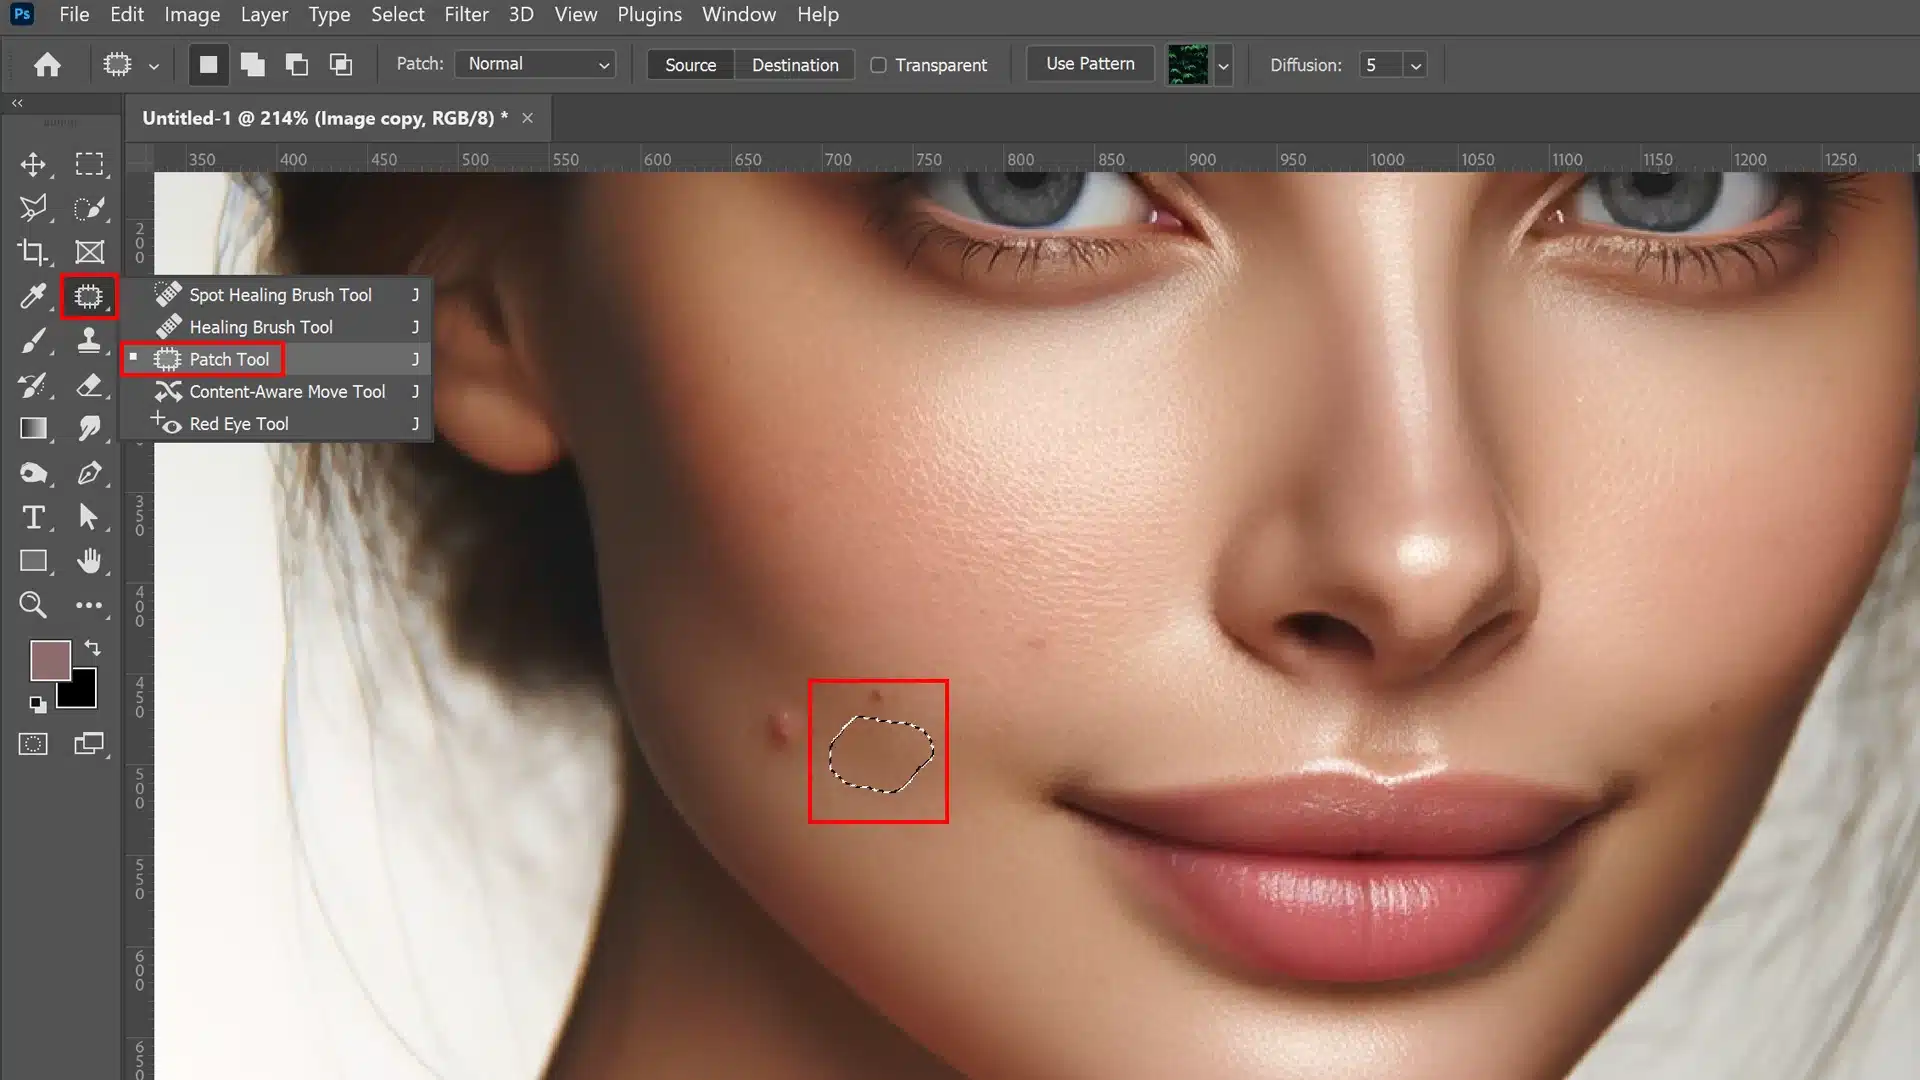
Enhancing Images with the Patch Tool
For sections of skin or backgrounds that require texture matching, leveraging the Patch Tool on a new layer provides control over seamlessly selecting and replacing areas of unwanted texture with preferred ones.
This way, any changes can be refined or removed without affecting the original background.
Here’s how you can employ it:
1. Select Patch Tool from the toolbox
2. Draw around imperfection
3. Drag the selected area to a similar texture location
When executed well, this replaces unwanted textural components perfectly aligning new ones creating consistent surface integrity across treated spaces.
Adjusting Patch Tool Settings for Optimal Results
Adjustments in the Patch tool’s settings are vital:
Feather: Increases transition smoothness between original patched areas
Structure & Color Adaptation: Fine-tunes patch conformity along edges, ensuring blended integration visually harmonious outcomes
For nuanced enhancements such as these possibilities arise within enthusiasts eagerly exploring how setting deviations affect output delivery, leading to inspiring artistic expression and expressive touch outputs via their graphic works!
Advanced Techniques for Blemish Removal
When striving for professional and clean results in portrait photography, mastering advanced techniques that lead to smooth skin and remove blemishes is crucial to achieving a flawless appearance.
The focus here extends beyond the basics; we delve into precise methods that enhance texture while keeping photo quality intact.
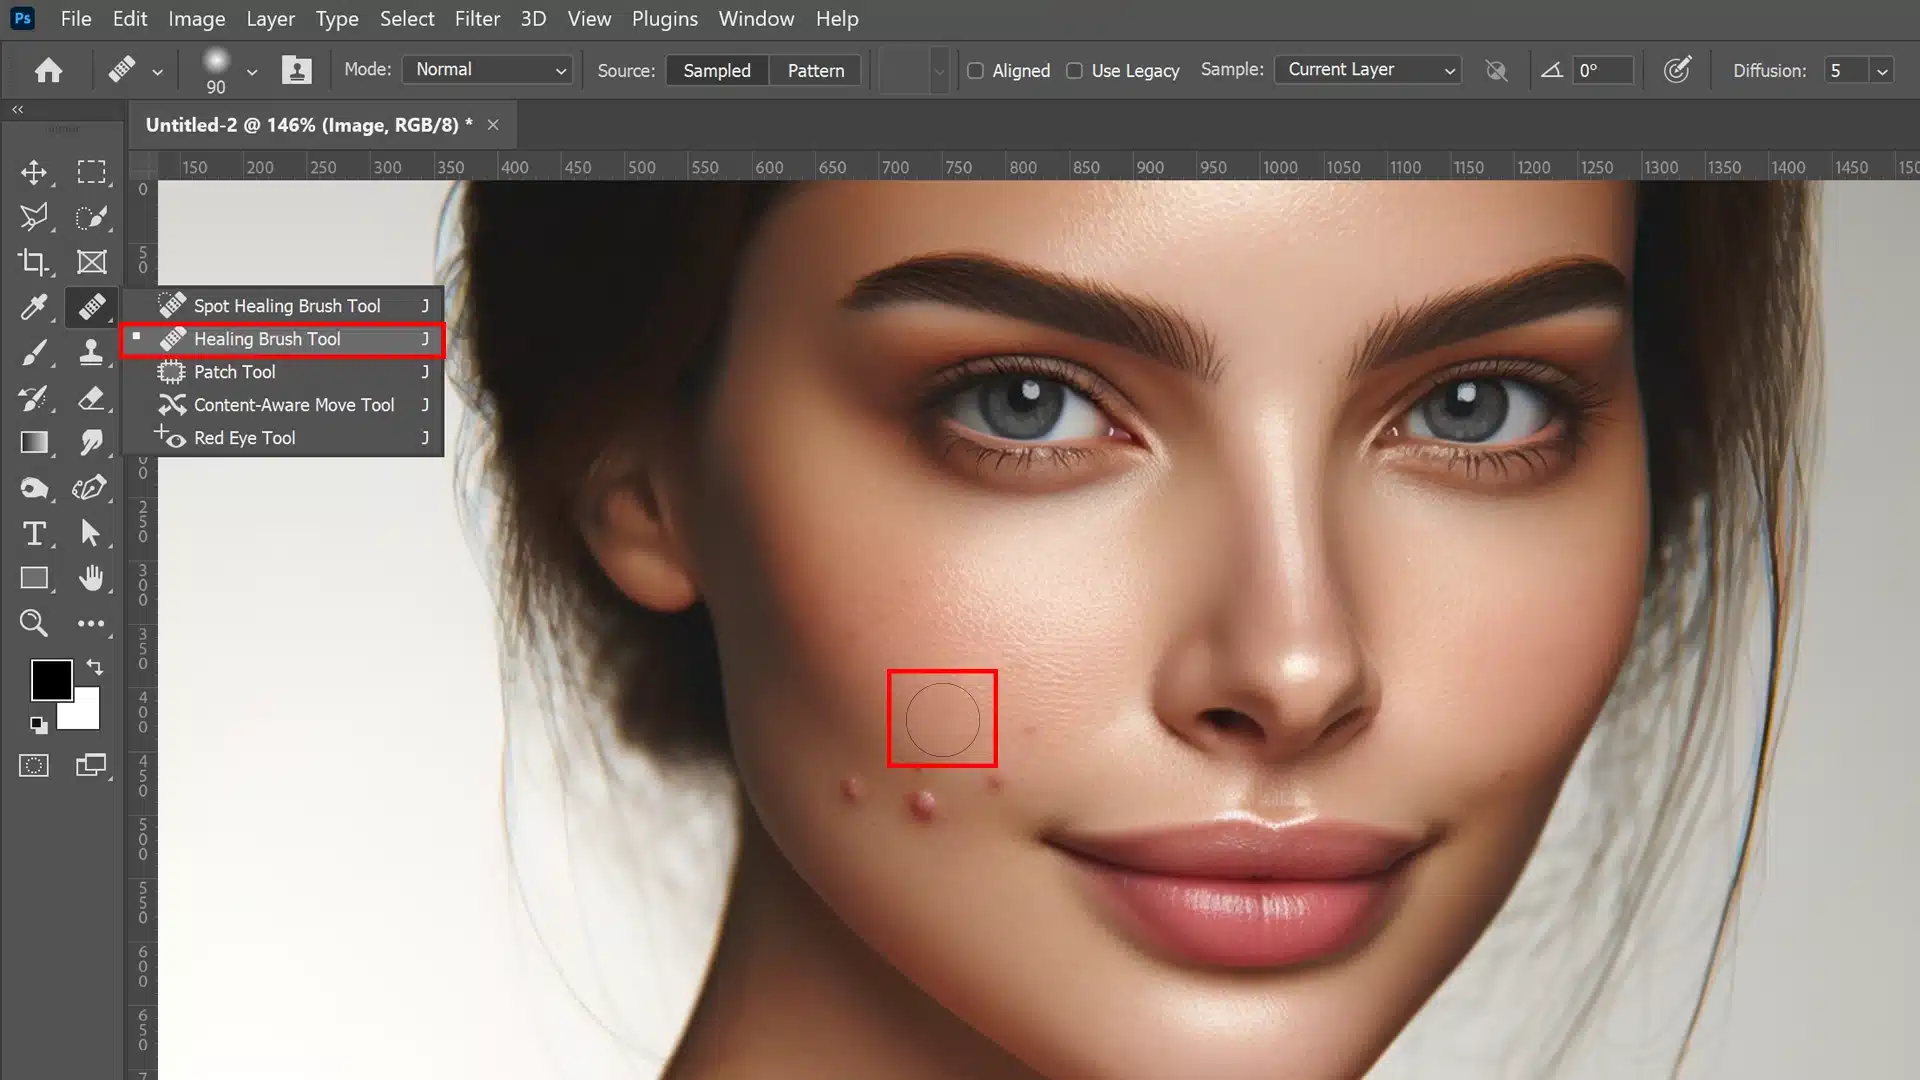
Utilizing the Healing Brush for Precise Edits
The healing brush tool is a powerful ally when you need to remove blemishes from Photoshop and Lightroom with precision.
Unlike the Spot Healing Brush, this tool gives you control over the source area used to heal imperfections.
For best practice:
1. Select the Healing Brush Tool from the Photoshop Tools palette.
2. In the options bar, ensure you have the correct brush settings.
3. Alt-click (using the Alt key) on an area of good texture near the blemish to sample it.
4. Carefully brush over the blemish; adjust your brush size as needed to keep changes subtle.
The trick is blending in corrections seamlessly by sampling multiple points around the defect using slightly varied tones and textures from adjacent skin areas.
Frequency Separation for Skin Texture Preservation
Frequency separation divides an image into two layers: one holds color and tone details, and another captures textures.
This technique allows you to create texture on the high-frequency layer, focusing on enhancing details such as skin pores, thus maintaining and refining the natural skin integrity without the colors interfering.
Here’s how you can achieve this:
1. Begin by creating a new blank layer above your background layer in the Layers Panel.
2. Duplicate this into two more layers; one will be your Low Frequency (color) layer, and another High Frequency (details).
3. ApplyGaussian Blur on low frequency; it is just enough to smooth out colors but not details.
4. Use high-pass on High Frequency to isolate fine details.
This approach keeps both spectrums hand-in-hand working harmoniously.
Correcting Skin Tone After Blemish Removal
To achieve uniform skin tones, particularly after removing facial skin blemishes, using the Spot Healing Brush judiciously allows for minor texture corrections that help in blending the edited areas with the surrounding skin.
This technique ensures that the color transitions are smooth and the overall effect remains natural.
Matching Skin Tones with Adjacent Areas
Achieving a uniform skin tone after using tools like the spot healing brush or healing brush tool can be tricky but is essential for a natural look.
Once you’ve removed any unwanted blemishes, pay close attention to the color and brightness of the skin.
Ensure that the edits blend seamlessly into the background layer, maintaining the authenticity of the overall image.
A useful technique involves sampling colors from nearby skin that has a desirable tone and applying it to discolored areas.
Select the clone stamp tool from the Photoshop tools palette, set your brush size appropriately, and then alt-click on an ideal spot to sample the color.
This allows for precise control over the color and texture, ensuring seamless integration.
Next, apply a gentle brush stroke over the area where tones need matching, using the blended color to achieve a uniform appearance.
Ensure that the blending mode is set to 'Color' to avoid altering texture.
Adjust the brush settings softly to blend effectively.
Using Adjustment Layers for Tone Correction
For more precise control over color correction, adjustment layers are your best choice.
They allow non-destructive editing and easy tweaks without affecting the base images in your layers panel.
1. Before adding any adjustment layers, always start by creating a new layer to serve as a base for these adjustments.
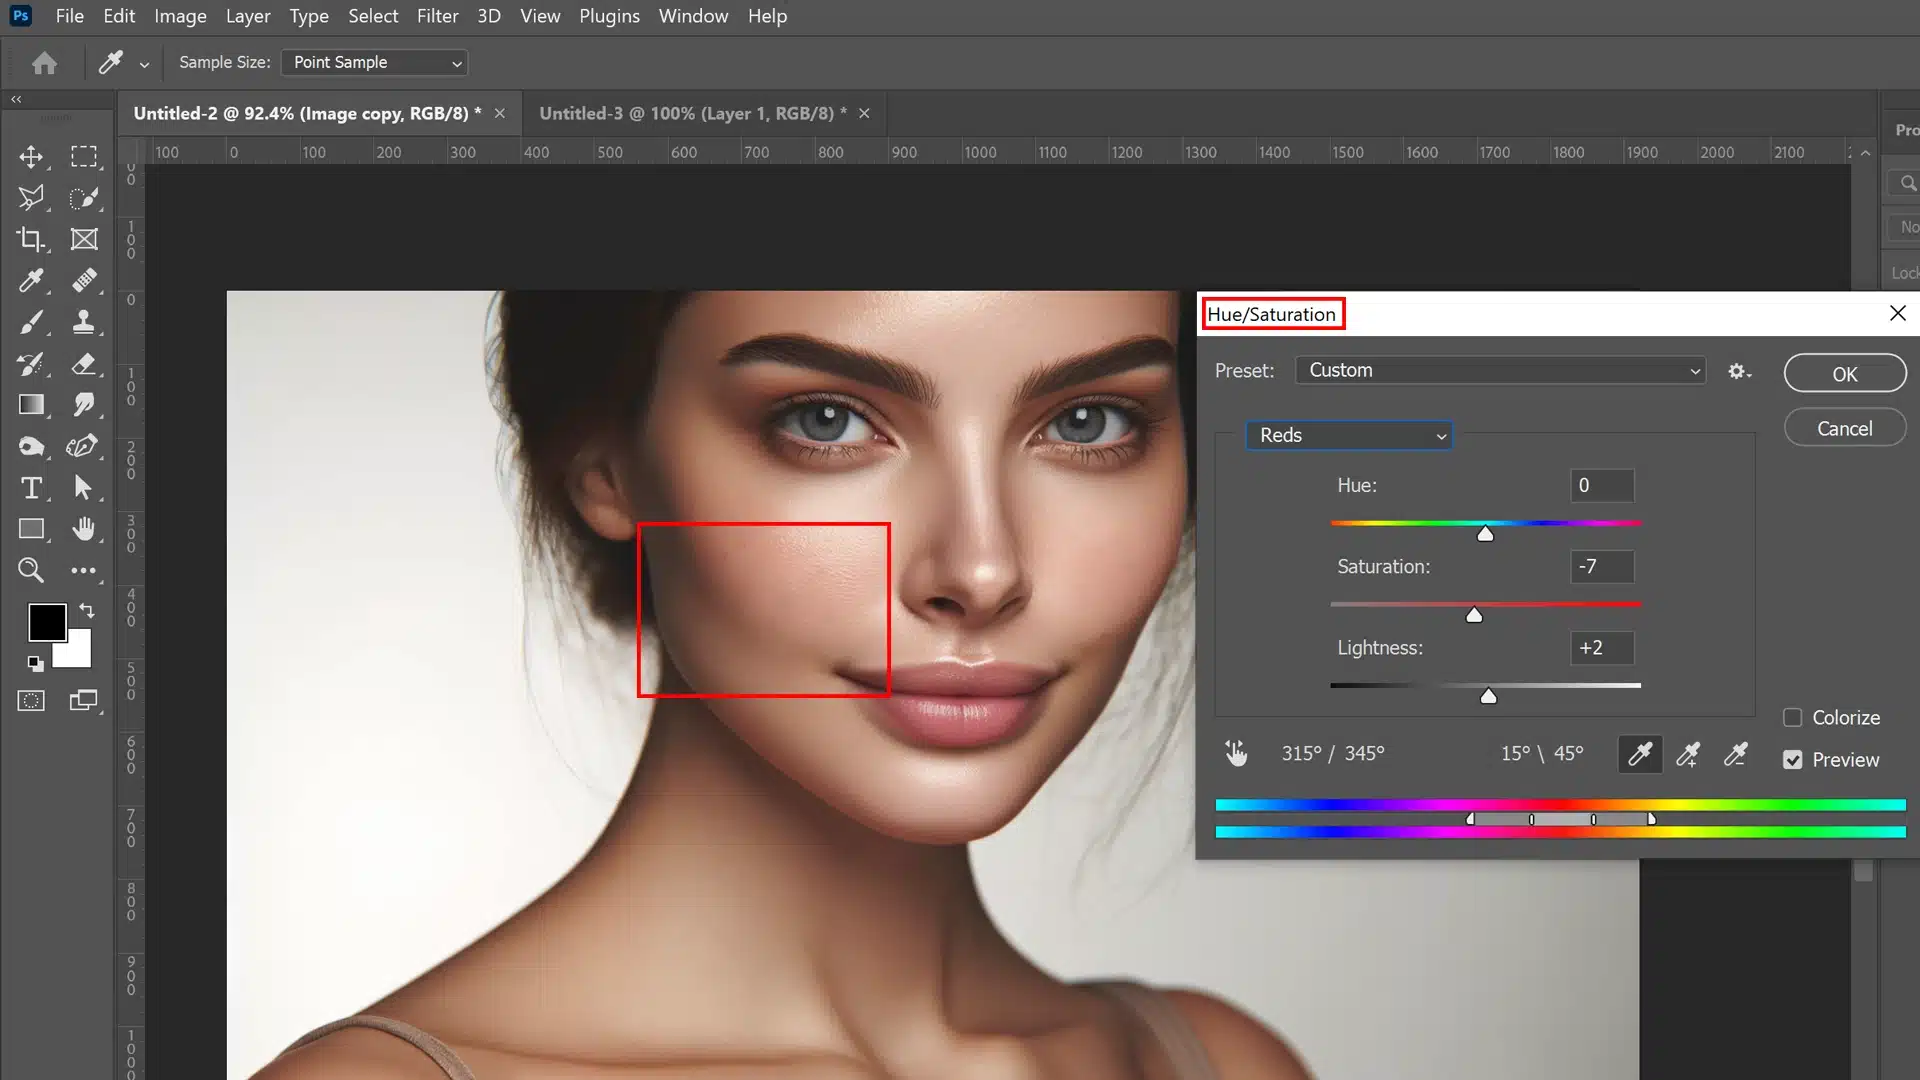
2. Then, within the options bar, click on the New Adjustment Layer icon. Choose ‘Curves‘ or ‘Hue/Saturation‘ based on how drastic the color mismatches are (this action can be done quickly through the options bar for efficiency).
3. Choose ‘Curves‘ or ‘Hue/Saturation‘ based on how drastic the color mismatches are.
4. Use these layers to tweak colors until they overlap seamlessly with natural skin tones in unedited areas of your image.
5. Play around with modifying different values while keeping an eye on both target points and surrounding areas for a uniform appearance across all visible layers.
Remember:
Always create a new blank layer if direct adjustments on certain spots are needed apart from general tone corrections.
Utilize masks within adjustment layers to restrict changes only to necessary regions without disturbing neighboring pixels.
Using these advanced techniques allows for refined corrections in post-process skin retouching practices, giving polished results comparable to professional standards.
Removing Complex Blemishes and Scars
When addressing complex skin issues like deep blemishes or scars in Photoshop, precision, and the right tools are vital.
The techniques vary based on the severity and type of skin blemish you’re encountering, but mastering these can drastically enhance your photo-retouching skills.
Techniques for Tough Blemish Cases
Sometimes, basic corrections aren’t enough for severe cases like deep scars or oversized blemishes.
This is where advanced tools such as the healing brush tool, spot healing brush, and patch tool come into play.
For such tough cases:
1. Begin with the spot healing brush to make initial corrections. This tool is ideal for small blemishes where you can simply click or paint over the flaw.
2. For larger, more irregular problems, shift to the patch tool. Select around the problem area, then drag it to a similar texture within the image.
3. Occasionally, low-opacity cloning from nearby areas using a clone stamp tool might be necessary to blend harsh edges seamlessly.
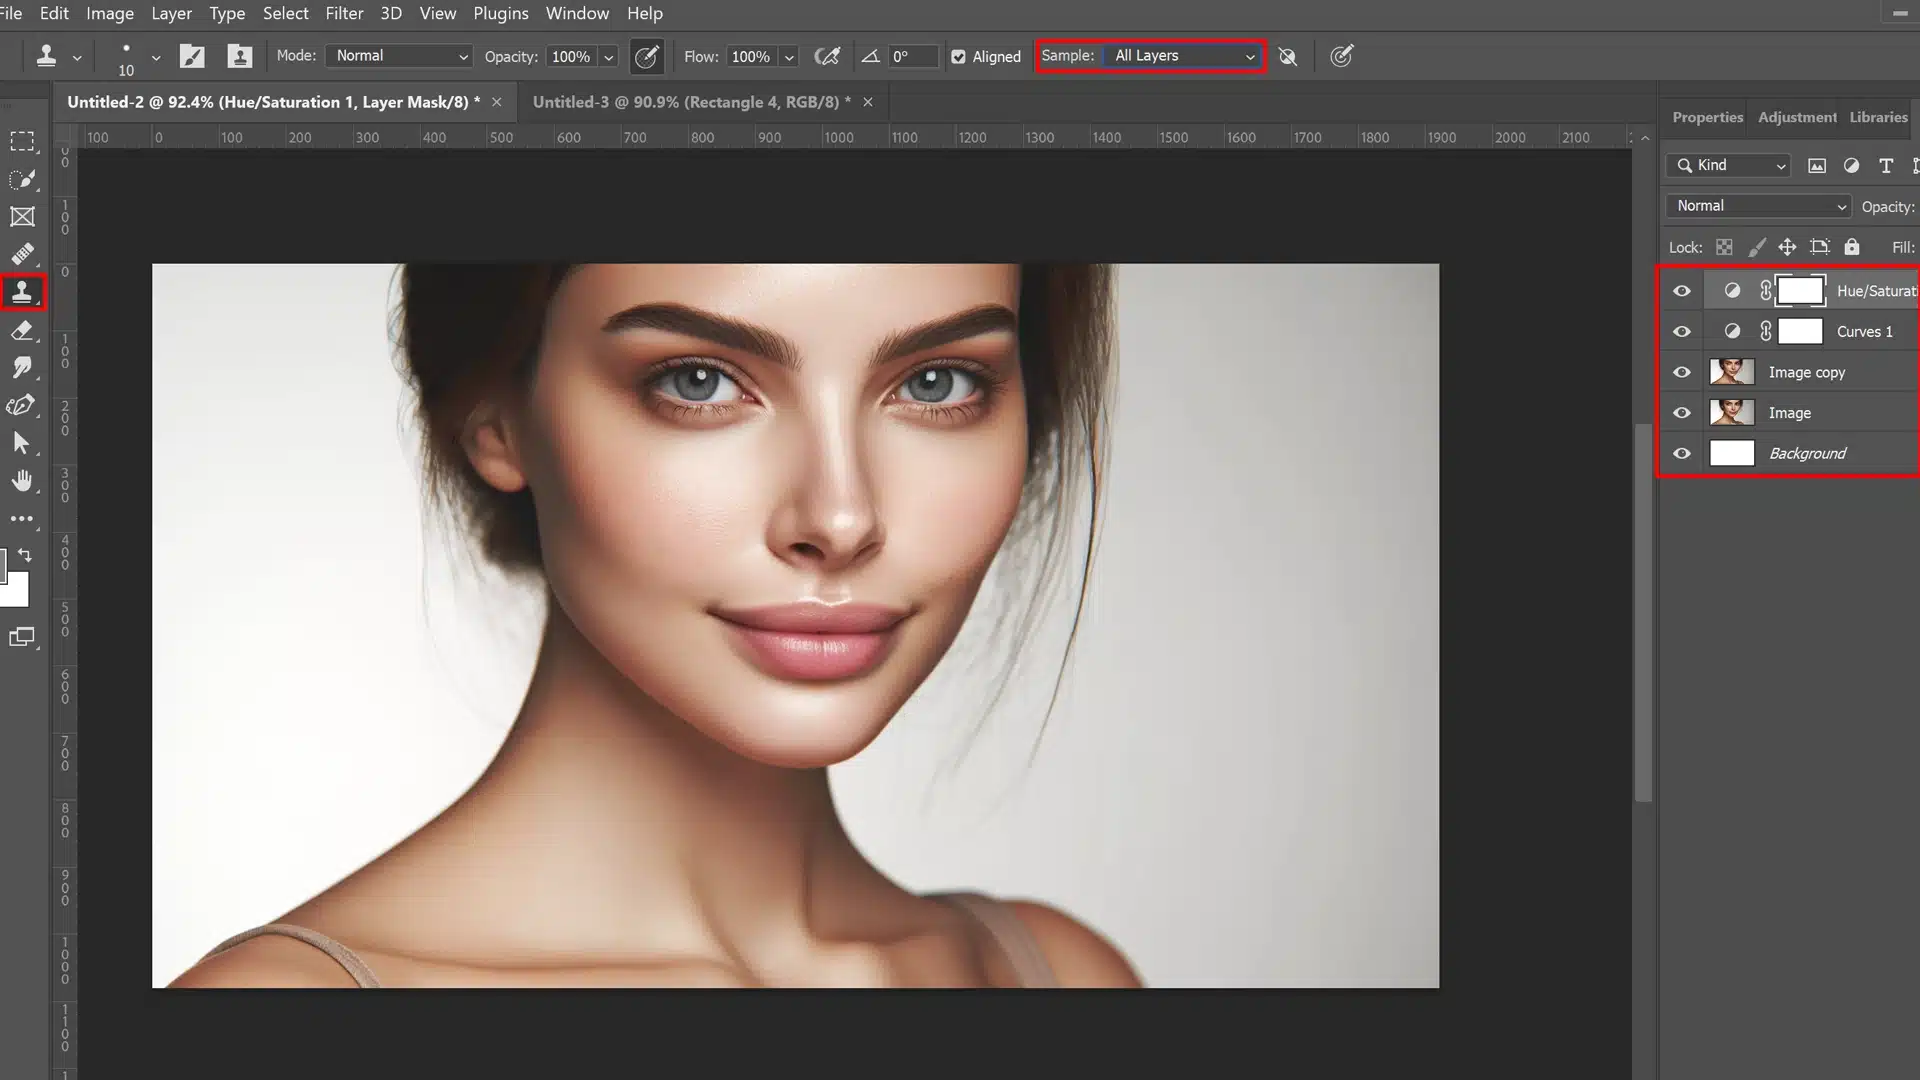
Using layers effectively is crucial here; always work on a new layer above your original so you can edit non-destructively.
It’s also beneficial to use “sample all layers” in your tool settings so that all changes accumulate across visible layers without altering the foundational image.
Blending Modes to Improve Texture
Blending modes in Photoshop can be powerful allies in tackling textured imperfections by integrating pinched textures smoothly over problematic areas:
1. After application of tools like healing brushes or clone stamps on a new blank layer, ensure to set your tool to ‘sample all layers‘ in the options bar before changing the blending mode of this layer. This will help match new textures with underlying ones more effectively.
2. Common modes for delicate texture blending include “Soft Light” and “Overlay,” which moderate intensity and merge details finely.
Employ soft brush strokes and adjust opacities judiciously to keep things looking natural.
This approach is not just about lens correction but enhancement as well, bringing out an inherently better version of the original without traceable signs of digital alterations.
Maintaining Natural Skin Appearance
In the realm of photo editing, achieving a balance between correcting imperfections and maintaining the natural appearance of skin in portraits is crucial.
Over-editing can lead to results that appear synthetic, which diminishes the photo’s authenticity and appeal.
Avoiding Over-Editing: Balancing Perfection and Realism
When using powerful tools like the spot healing brush or healing brush, it’s easy to get carried away.
The key to preserving realism while refining skin is to use these tools judiciously.
A common technique involves using the spot healing brush, which is perfect for small blemishes by seamlessly blending them with surrounding textures.
However, caution is required not to blur essential details that contribute to individual uniqueness.
For larger issues, such as damaged or unwanted texture from scars or folds, employing a texture replacement tool can be effective yet needs a careful approach to avoid creating an unnaturally smooth texture that clashes with the rest of the picture.
Tips for Photo Editing Workflows
1. Start on a new layer: Always work on a new layer; this allows you to make changes without altering the original image.
2. Adjustment layers: Utilize adjustment layers for tone and color modifications. They provide flexibility in editing without permanent changes.
3. Advanced techniques: If detailed fixes are needed beyond what simple brushing can achieve, consider methods like frequency separation for more control over textures.
Tips for Retaining Natural Skin Features
Maintaining natural skin features during editing should always focus on enhancement rather than alteration.
Effective use of Photoshop’s tools, such as layers panel, aids this process significantly:
Layer Control: Utilize a transparent approach by closely managing your layers panel and opacity settings. This helps strike an ideal blend between correction and originality.
Moderate Touch: Subtly apply corrections using minimal brush strokes at reduced opacity. This involves less aggressive application of cloning or healing actions.
Key Techniques:
Detail Retention: To retain crucial facial characteristics, use light touches with tools like the clone stamp only when absolutely necessary.
Harmonizing Edits: Merge your edits smoothly with the existing elements (e.g., gently fading corrections into surrounding areas).
Mastering the Use of Layers in Blemish Removal
When retouching photos, layers are your best ally, especially for non-destructive edits.
This technique allows you to remove skin blemishes efficiently without harming the original image quality.
Organizing Layers for Non-Destructive Editing
Before diving into specific tools like the spot healing brush or the healingbrush, understanding how to organize your layers in Photoshop is crucial.
Begin by creating a new layer above the background layer; this ensures that all changes can be modified or removed without affecting the original image.
Use the layer icon to easily manage and identify each layer’s purpose.
To maintain a clean workspace and ensure every edit is reversible, use adjustment layers for color corrections or exposure adjustments.
Remember to consistently label each layer; this not only helps keep track of your edits but also streamlines the workflow.
Frequently Asked Questions
How do you remove unwanted spots in Photoshop?
To remove unwanted spots in Photoshop, use the Spot Healing Brush Tool. It’s ideal for quick fixes as it intelligently samples surrounding areas. Select the tool, adjust the brush size to cover the spot, and click on the blemish. The Spot Healing Brush effortlessly blends the area.
How to erase imperfections in a photo?
Erase imperfections using the Healing Brush Tool. First, choose the Healing Brush Tool from the toolbar. Set the brush size, and then Alt-click (Windows) or Option-click (Mac) to sample a flawless area of skin. Gently paint over the imperfection to blend it naturally with the surrounding area.
Which Photoshop tool is used to remove skin blemishes, scars, etc.?
The Healing Brush Tool is the superhero in Photoshop for removing blemishes, scars, and other skin imperfections. It allows for precise control by letting you select the source area, ensuring a more seamless fix. Simply sample an ideal skin texture and paint over the imperfection.
What tools can you use to remove blemishes in an image?
To remove blemishes in an image, Photoshop offers several tools:
– Spot Healing Brush Tool for automatic texture matching
– Healing Brush Tool for manual sampling and correction
– Patch Tool for selecting and replacing larger imperfection areas
– Clone Stamp Tool for duplicating exact details from one area to another.
In my personal journey with photography, learning to skillfully remove blemishes using Photoshop has dramatically improved the quality of my portraits.
Recently, I faced a challenge with a portrait where the subject had noticeable acne.
Employing the Healing Brush Tool, I seamlessly restored the natural look of the skin, transforming the photo into a flawless piece my client loved.
If you’re looking to enhance your photo editing skills further, consider exploring our comprehensive Photoshop and Lightroom courses.
They’re designed to equip you with advanced techniques to bring your creative visions to life.
If this article has helped you, then Like and Share it with your friends!
$2,061.00Original price was: $2,061.00.$1,061.00Current price is: $1,061.00. 27584
Download Your Free Guide Now!
Discover the secrets of photography with our printable guide! Master essential techniques like aperture, shutter speed, and ISO to create stunning images. Get your free printable PDF now and start turning your snapshots into masterpieces!