Pixel Art Resizer: Perfecting Your Pixel Art with Precision
Pixel Art Resizer: Perfecting Your Pixel Art with Precision
Resizing pixel art can be a bit challenging, but with the right approach, you can keep those crisp lines intact.
If you’re looking to master the pixel art resizer in Photoshop, you’re in the right place.
I’ll guide you through the few step to ensure your tiny masterpieces become larger without losing their sharpness.
Let’s dive in and get started!
Table of Contents
Pixel Art Step-by-Step Guide
Each step is designed to help you navigate the resizing process efficiently, ensuring that your pixelart retains its distinctive clarity and precision.
Step 1: Open Your Pixel Art in Photoshop
First, open Photoshop. Then, click on ‘File’ at the top-left. Select ‘Open’, and choose your pixel art file from your computer. Now, you have your canvas ready.
Step 2: Access the Image Size Dialog Box
Next, go to the ‘Image’ tab at the top. From the drop-down menu, select ‘Image Size’. This dialog box shows the current measurements of your pixel art.
Step 3: Adjust the Image Size Settings
In the dialog box, you’ll see fields for width and height. Check the constrain proportions option. This maintains the aspect ratio.
For example, if you want to double the size, input two times the original width and height. This technique is essential when dealing with different digital cameras as they have varying resolutions.
Moreover, understanding how to resize images can be crucial when working with RAW or JPEG format files to ensure you maintain the quality of your photos.
Step 4: Choose the Right Resampling Method
At the bottom-left, there’s a drop-down menu for resampling. Select ‘Nearest Neighbor’. This keeps the sharp edges of your pixel art intact, avoiding any blurriness.
Step 5: Apply the Changes
When you’re happy with the settings, hit OK. Your pixel art resizes according to your input.
Save your result by going to ‘File’ and then clicking ‘Save As’. Choose a format like PNG or JPEG.
Always save as a new file to keep the original size safe.
Pro Tip: Always work with a copy of the original size. It keeps your details intact and provides better accuracy for each resizing attempt.
For more advanced edits, consider using essential tools in Photoshop like the patch tool or the content-aware fill feature.
Mastering Pixel Art Resizing in Photoshop
When resizing pixel art in Photoshop, achieving the desired result requires attention to detail. By clicking through the Image Size dialog box, you can set specific pixel dimensions for your images.
This section is crucial for maintaining the integrity of your artwork.
Learning how to navigate these settings ensures that each adjustment enhances rather than detracts from your pixel art’s quality.
Using 'Nearest Neighbor' for Sharp Results
One of the key settings to master is ‘Nearest Neighbor’ interpolation. This method is found to preserve the crisp edges that define pixel art.
When applied correctly, it prevents blurriness and retains the pixelated charm of your image.
It’s important to learn where to find this option and how to apply it effectively to achieve optimal results in your resizing process.
Exploring Advanced Techniques for Pixel Art
To further enhance your pixel art resizing skills, exploring advanced techniques is essential.
Clicking through different sections in Photoshop can lead you to discover powerful tools like the patch tool and content-aware fill.
These tools are invaluable for refining and perfecting your artwork.
Learning how to leverage them can elevate your pixel art from basic to professional–grade quality.
When exploring advanced techniques for pixel art, it’s inspiring to look at innovative creators.
Check out the top 10 NFT artists who push the boundaries of digital artistry.
Their work offers valuable insights into mastering pixel art techniques.
Experimenting with Point Adjustments
In the Image Size dialog box, point adjustments play a crucial role in fine–tuning your pixel art.
By carefully adjusting these settings, you can refine the dimensions of your images without compromising their clarity.
This section allows you to learn how to make precise changes that enhance the overall composition of your pixel art. It’s a pivotal step in mastering the art of resizing.
Choosing the Right Resizing Option
Selecting the right resizing option is crucial for maintaining the sharpness of your pixel art.
In Photoshop, you need to set the resampling method to.
The “Nearest Neighbor” option is often the best choice option for preserving the pixelated effect.
To access this option, go to the Image Size dialog box, and under the Resample menu, choose “Nearest Neighbor”
Pro Tip: This method is especially useful when working with different types of lenses that capture varying levels of detail.
Setting Width and Height for Precision
One of the important aspects of resizing pixel art is accurately setting the width and height.
When you increase the size of your artwork, you must ensure that the width and height are adjusted proportionally.
This is where the “Constrain Proportions” setting comes into play.
By keeping the width and height in sync, you avoid distortions and maintain the quality of your pixel art.
Advanced Techiniques to Resize Your Pixel Art
Follow these step-by-step to resize your pixel art effectively:
Open the Image: Start by opening your pixel art file in Photoshop. Click on 'File' and select 'Open' to choose your image.
Access Image Size Dialog Box: Navigate to the 'Image' tab and select 'Image Size' to bring up the resizing option.
Set Dimensions: Enter the new width and height for your image. Ensure that the "Constrain Proportions" option is checked to maintain the aspect ratio.
Choose Resampling Option: From the Resample drop-down menu, select 'Nearest Neighbor' to preserve the crisp edges of your pixel art
Apply Changes: Click 'OK' to apply the changes and then save your resized image.
Common Issues and How to Fix Them
Sometimes, resizing pixel art can lead to unexpected issues. If you find that your artwork is not looking as expected, double-check the following:
Time Taken: Ensure you give yourself enough time to carefully adjust the width and height. Rushing the resize process can lead to mistakes.
Found Settings: Verify that you have found the correct settings for your resize. Any incorrect setting can affect the final output.
Works Properly: Confirm that the resizing works properly by previewing the result before saving.
By following these steps and utilizing the right settings, you can enhance the resizing process of your pixel art.
Remember, precision and attention to detail are vital to achieving the best results.
Common Mistakes to Avoid
Let’s talk about some common mistakes you should avoid when resizing pixel art in Photoshop.
Follow these tips for best results.
Not Using Nearest Neighbor Resampling
One big mistake is not using the ‘Nearest Neighbor’ option for resampling.
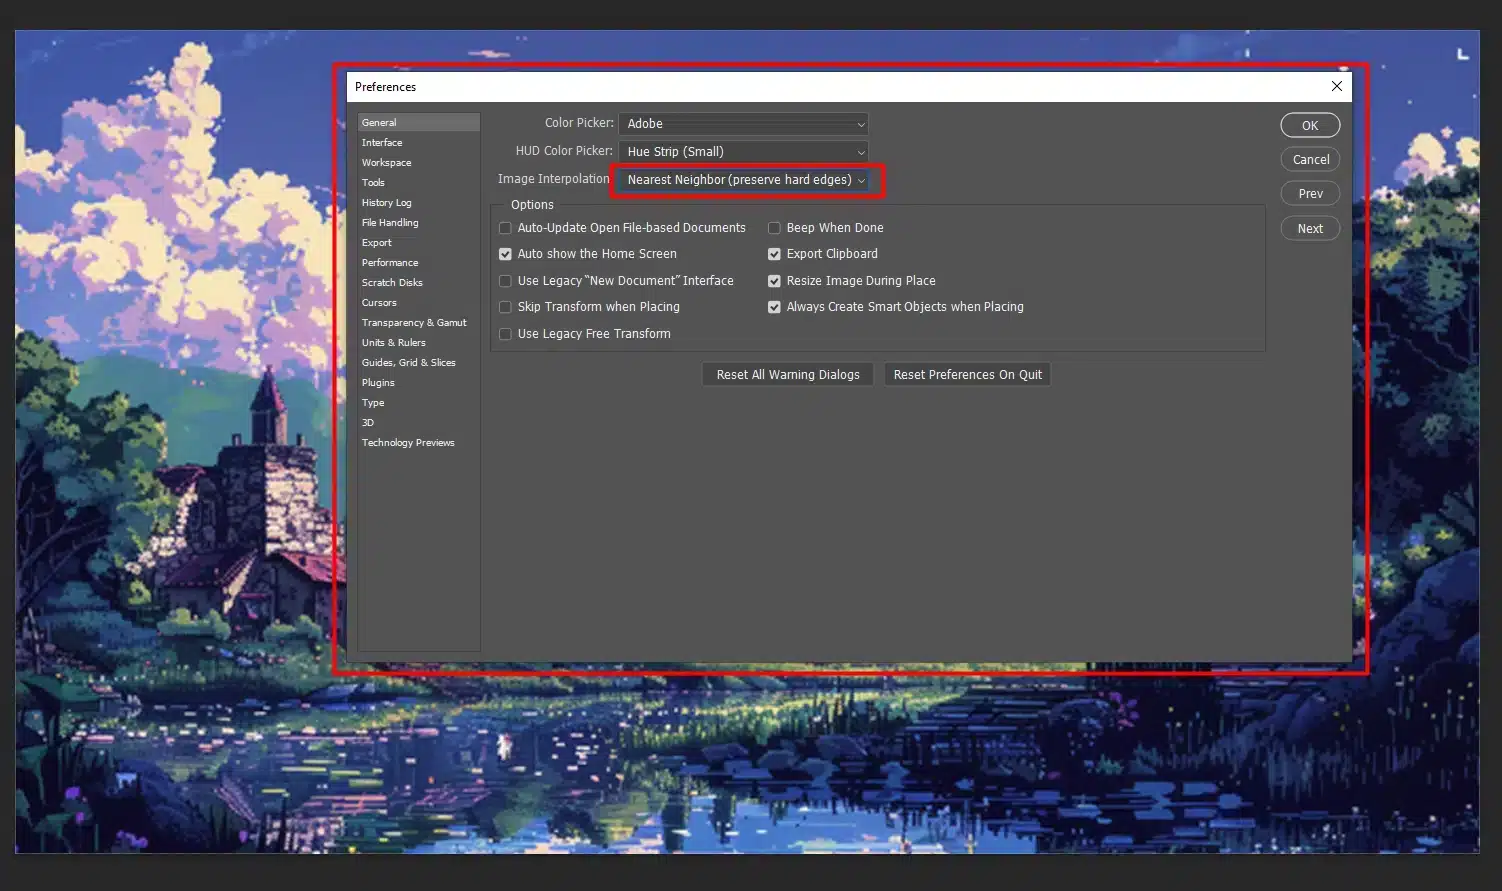
This option keeps those crisp edges intact. To set it, go to Edit > Preferences > General and choose ‘Nearest Neighbor’ in the Image Interpolation menu.
This setting ensures that both the width and height of your image scale together, preventing distorted images.
Using the Wrong File Format
Saving your pixel art in the wrong format can ruin your hard work. Always save in PNG format to keep the quality intact. JPEG might compress the image too much, making it look blurry.
Saving pixel art in formats like JPEG can introduce compression artifacts, which affect the quality of the artwork.
For more control over your image quality, consider learning about different image file types and their uses.
Simple solotution is to save your resized pixel art in PNG format to preserve the sharpness and avoid any compression that might blur the detail.
Over-Resizing Small Pixel Artwork
It’s tempting to enlarge your artwork as big as possible.
But overdoing it can make your pixel art look pixelated and unattractive.
Keep the enlargement within reasonable bounds.
Ignoring the Original Size
Always keep a copy of the original file size. Working directly on the enlarged version might lead to loss of detail.
Having a backup ensures you can start over if something goes wrong.
Pro Tip: Use layers in Photoshop to make non-destructive edits. It keeps your original artwork intact while allowing you to make changes on separate layers.
This technique offers better control and flexibility.
There you have it, folks! By avoiding these common mistakes, you’ll create stunning pixel art every time.
Have fun experimenting and creating beautiful art pieces with these tips.
Pixel art resizer tools can help but understanding the basics always gives you the upper hand.
Not Saving a Backup
Working directly on your original file without creating a backup can lead to loss of the initial quality if mistakes are made during resizing.
Always save a copy of the original pixel art before resizing.
This allows you to revert to the original if needed and experiment with different resizing options without risking your initial work.
Tips for Keeping Your Pixel Art Sharp When Resizing
When resizing pixel art, it’s essential to maintain the sharpness and quality of your artwork.
Different resampling methods and formats can have varied effects on your image. Below is a comparison of the key methods to keep your pixel art sharp when resizing:
Method
Effect
Nearest Neighbor
Maintains sharp edges
Bicubic Resampling
Smooths out pixels (blurry)
Aspect Ratio Lock
Prevents distortion
PNG Format
Keeps quality intact
JPEG Format
May cause compression loss
Hey there! Let’s talk about how to keep your pixel art looking sharp when you resize it. Here are some practical tips to help you get the best results without losing quality.
Pick the Right Interpolation
First, choose the right interpolation method. In Photoshop, go for ‘Nearest Neighbor.’
This keeps those crisp edges that make pixel art special. Trust me, it saves your image from looking blurry.
Keep Aspect Ratios
Always keep the width and height in sync. Check the ‘Constrain Proportions’ box when resizing. This prevents your artwork from looking warped.
A few clicks can save your art from distortions.
Pro Tip: Knowing how to properly resize images helps when using the replace color tool in Photoshop, ensuring that your adjustments are applied accurately without compromising the quality of your art.
Avoid Over-Enlarging
Want to make your art huge? Hold on! Over-enlarging can ruin the quality. It’s better to enlarge in stages—like 200%, then 400%. Small steps give best results.
Save a Backup
Always save the original before making changes. Having a backup means you can start over if something goes wrong.
Click ‘Save As’ and create a copy of the file. Better safe than sorry!
Use PNG Formats
When saving, use PNG. This format keeps your images sharp and free from compression artifacts. JPEG might squish your pixels, which is not good for pixel art.
Understanding the difference between NEF or JPEG format can also be beneficial for different types of photography.
Pro Tip: Keep an eye on your adjustments and make small tweaks. For the best results, always zoom in to check details. Don’t just rely on the overall view. Using essential tools in Lightroom can help you make precise adjustments.
Remember, these are simple steps to maintain the quality of your artwork.
Why Resizing Pixel Art is Different
Resizing pixel art is different from resizing regular images. When done wrong, you lose the magic of pixel precision.
Important points to have on mind:
Sharp Lines Matter: Pixel art relies on sharp, clean lines. Each pixel stands out.
Nearest Neighbor Tip: Use the nearest neighbor option in Photoshop to maintain those sharp edges. It’s like upgrading your favorite toy without losing its charm.
Avoid Blurring: Other resizing options in Photoshop will blur those crisp lines, turning your art into a mushy mess.
Aspect Ratio: Adjust the width and height to maintain the aspect ratio so nothing looks stretched or squished.
Imagine you have a small 16×16 pixel sprite.
By enlarging it to 32×32 using the nearest neighbor, your lines stay clean. If you don’t use this method, your pixels blend, ruining the brilliant detail.
This technique isn’t just for video game sprites. Any pixel art benefits from the correct techniques in Photoshop.
Pro Tip: Different types of edits, such as creating an old paper texture, require different types of pixel dimensions.
Why This Matters:
Learning to resize correctly makes your artwork look professional.
Using the right settings ensures that your time and effort pay off.
Pro Tip: Always save a copy of your original artwork before making any changes. This way, you can experiment freely without losing your initial masterpiece.
Yes, pixel art can be resized. However, due to its unique style, special care is needed to maintain the quality and appearance.
How Do I Upscale a Pixel Image?
To upscale a pixel image, you can use specialized software like Adobe Photoshop or free tools like GIMP that offer ‘Nearest Neighbor’ scaling to retain the pixelated effect.
How Do You Turn Pixel Art into High-Resolution?
Turning pixel art into high-resolution involves increasing the image size while preserving its blocky, pixelated look. This is typically done using scaling tools that don’t blur the pixels.
Is Pixel Art Scalable?
Pixel art is scalable but requires appropriate techniques to ensure that the art doesn’t lose its characteristic style. Techniques include adjusting pixel size proportionally and using suitable scaling methods.
Mastering the pixel art resizer in Photoshop has transformed how I handle artwork resizing.
It’s decisive to maintain the sharpness and unique style of pixel art, ensuring each enlargement retains its original charm.
By following these simple steps, I’ve learned to upscale my pixel art while preserving its integrity, avoiding common pitfalls like blurriness or distortion.
If you’re eager to delve deeper into Photoshop and Lightroom, explore my Photoshop course and Lightroom course.
For those looking to get started with Photoshop, check out Adobe’s Photoshop and Photoshop Lightroom products.
Happy editing!
If this article has helped you, then Like and Share it with your friends
$2,061.00Original price was: $2,061.00.$1,061.00Current price is: $1,061.00. 27582
Download Your Free Guide Now!
Discover the secrets of photography with our printable guide! Master essential techniques like aperture, shutter speed, and ISO to create stunning images. Get your free printable PDF now and start turning your snapshots into masterpieces!