When it comes to enhancing your digital art, the Photoshop symmetry tool is a game-changer. This tool mirrors your brush strokes, creating balanced and harmonious designs effortlessly.
In this article, I’ll guide you through the basics and advanced techniques of using the Photoshop symmetry tool, helping you create stunning, symmetrical designs with ease.
Ready to dive in and explore the endless creative possibilities?
Let’s get started!
Table of Contents
What is the Photoshop Symmetry Tool?
The Symmetry Tool in Photoshop helps you draw symmetrical designs easily.
It mirrors your drawing on one side of the canvas to the other.
This is great for patterns like mandalas.
Why Use Symmetry in Your Art?
Symmetry adds balance and harmony to your art. It’s useful for creating mandala symmetry and other symmetrical designs.
These designs are pleasing to the eye and make your work look polished.
Benefits of Using Symmetry:
- Builds complex patterns quickly.
- Maintain balance in your designs.
- Make your artwork look professional.
Exploring Symmetry Options in Photoshop
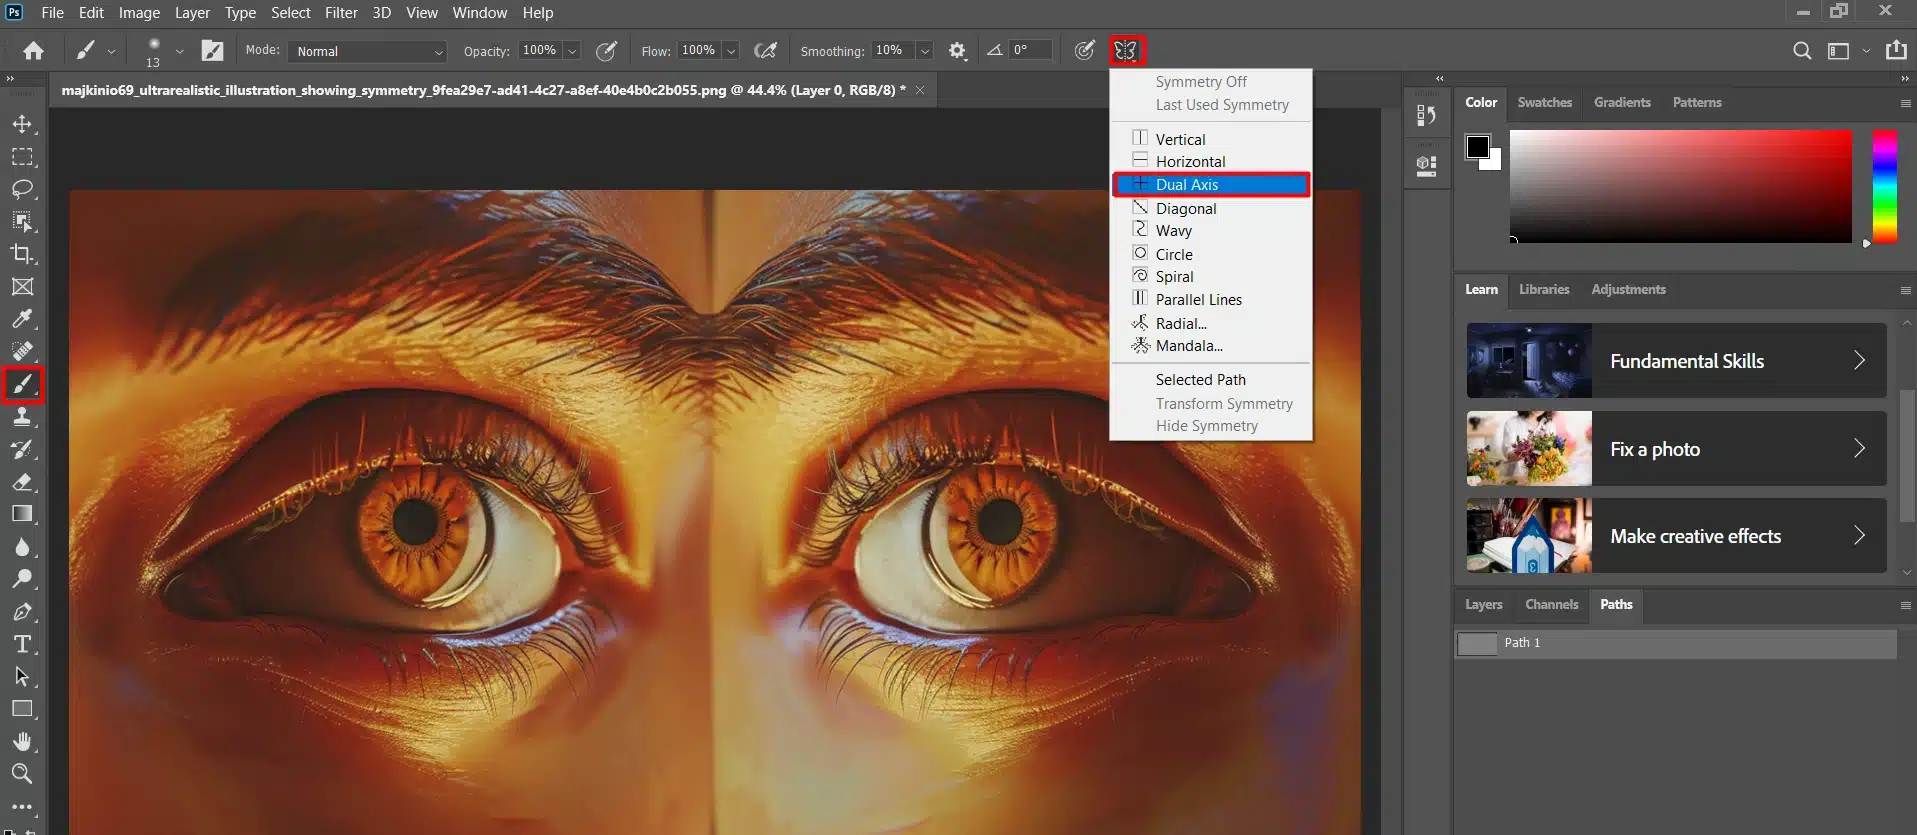
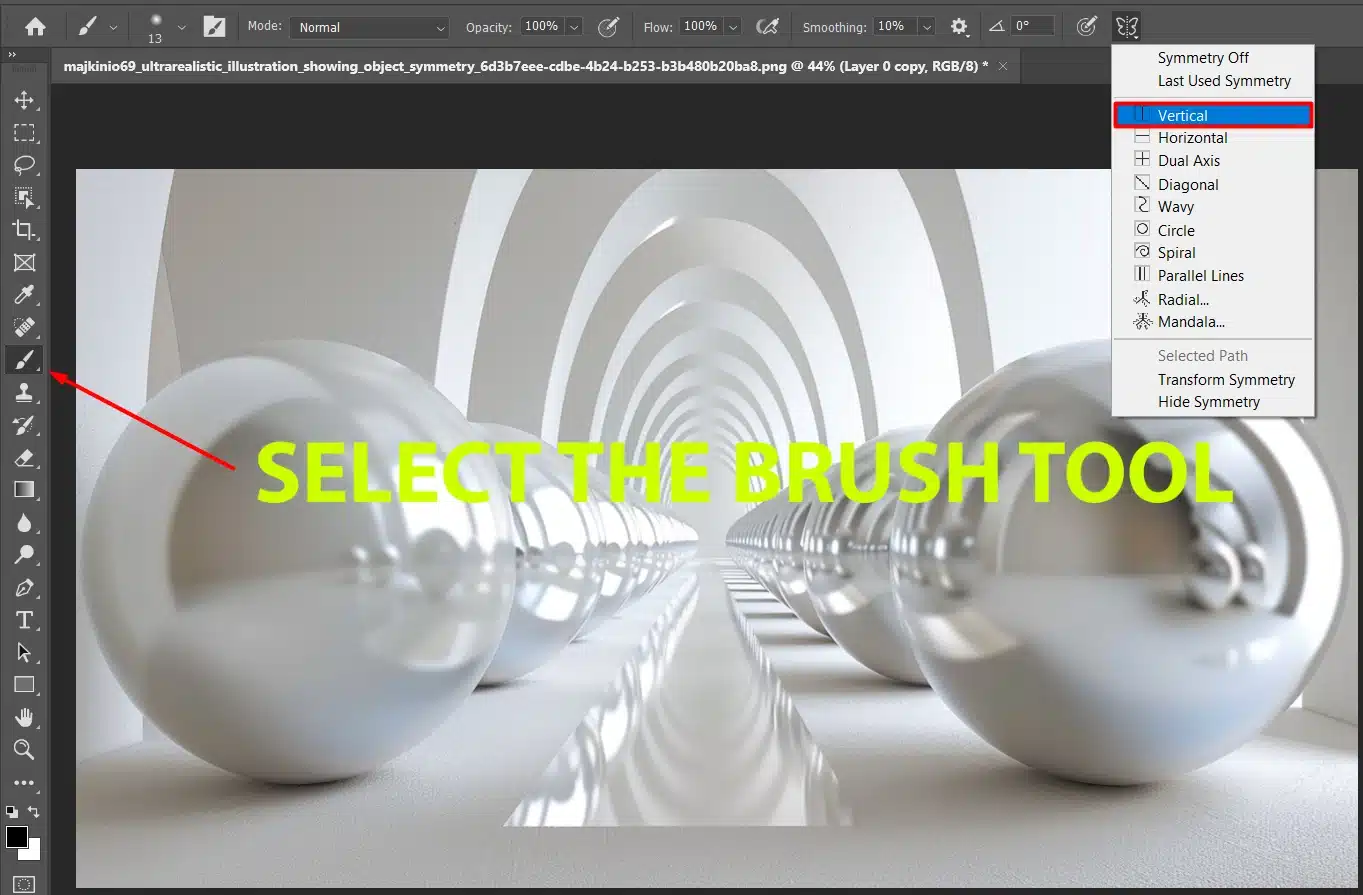
Open Photoshop and select the brush tool. In the options bar, click the butterfly icon to find symmetry options.
Choose from modes like vertical, horizontal, dual axis, and radial symmetry.
Using Symmetry Modes
This table outlines the different symmetry modes in Photoshop and their ideal uses.
Each mode provides unique mirroring effects to enhance various design projects:
| Symmetry Mode | Description | Best For | Example Uses |
|---|---|---|---|
| Vertical Symmetry | Mirrors brush strokes vertically | Portraits, patterns | Symmetrical faces, mirrored designs |
| Horizontal Symmetry | Mirrors brush strokes horizontally | Landscapes, patterns | Reflections in water, mirrored landscapes |
| Dual Axis Symmetry | Mirrors brush strokes both vertically and horizontally | Complex designs | Grid patterns, geometric designs |
| Radial Symmetry | Mirrors brush strokes from a central point | Mandalas, circular patterns | Mandalas, kaleidoscopic designs |
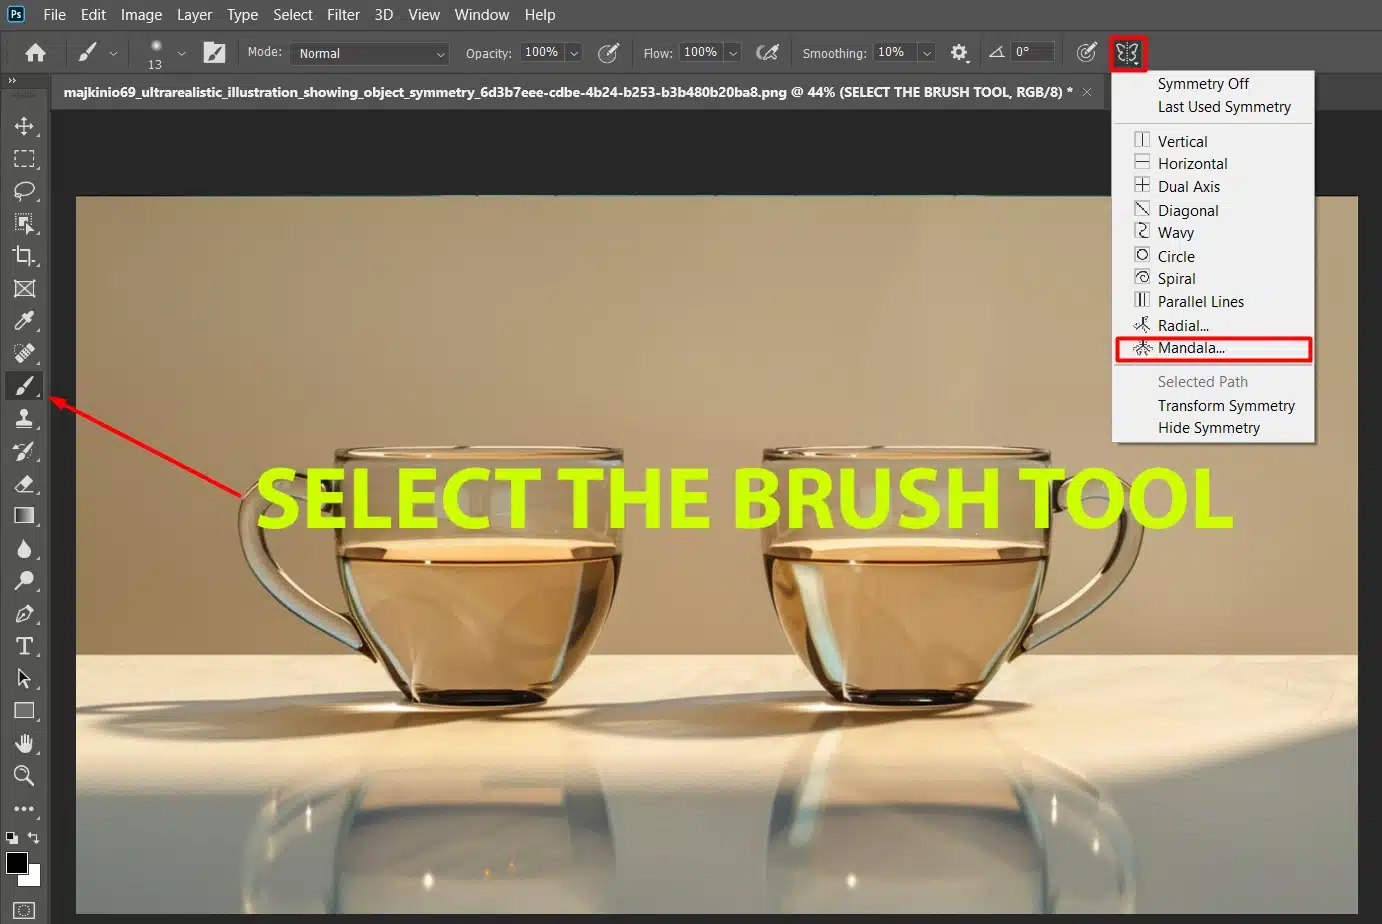
Click on a path, like mandala symmetry or radial, to produce different patterns. The mandala symmetry makes circular patterns, while the radial path forms lines from the center.
Repeating patterns are a game-changer in Photoshop, perfect for adding unique designs to any project. If you want to learn how to master repeating patterns in Photoshop and Photoshop mirror layer tips, this technique can be extremely useful for creating symmetry in your designs.
Integrating this technique effectively elevates the visual appeal of your work, making it stand out.
Tips for Better Results With Paint Symmetry
Start with a new layer before painting to keep organized. Use the layer masking to hide parts of your design if needed.
Adjust the segment count in the options bar to control sections in your design.
This is useful for detailed work like mandala symmetry.
Pro Tip: Try different brushes with the photoshop symmetry tool for unique textures and styles. You can also use the eraser symmetrically to refine your design.
Using the content-aware fill feature, you can seamlessly blend and enhance your designs, ensuring flawless symmetry and consistency in your artwork.
Additionally, learning Photoshop shortcuts can significantly speed up your workflow.
Getting Started with the Symmetry Tool
Photoshop’s symmetry tool might seem tricky at first, but it’s quite fun.
I’ll walk you through the basics.
Enabling the Symmetry Tool
First, turn on the symmetry tool. This helps you paint evenly.

- Open Photoshop CC and pick the brush tool.
- In the options bar, find the butterfly icon and click it.
- You'll see options like vertical, horizontal, dual axis, and radial symmetry.
Choose your symmetry mode, and a guideline appears on your canvas. This shows Photoshop how to copy your brush strokes.
If you want to make precise touch-ups while maintaining symmetry, you can use the spot healing brush tool to seamlessly correct imperfections.
Choosing a Symmetry Type
Now, let’s pick a symmetry type. You have several choices:
- Vertical Symmetry
- Horizontal Symmetry
- Dual Axis
- Radial Symmetry
For mandala designs, go with radial symmetry. Photoshop will mirror your brush strokes from a central point.
For instance, when working on these designs, employing sparkle Photoshop techniques can also enhance the intricate details and add a dazzling effect that complements the symmetrical patterns.
Adjust the segment count in the options bar to change your design’s complexity.
For simple projects, vertical, horizontal and radial symmetry works well. They mirror one side to the other.
Use these for parallel lines or patterns for your image background.
Creating symmetric designs is easier with these tools. Just focus on one segment, and Photoshop does the rest.
Pro Tip: Use layer masks to hide symmetry markings while you paint.
When choosing a symmetry type for your artwork, it’s important to adjust white balance for accurate colors.
Utilizing the white balance feature ensures that your symmetrical designs maintain color consistency, enhancing the overall quality and visual appeal of your creations.
Using the Symmetry Tool Effectively
Mastering the symmetry tool can significantly improve your digital art by ensuring balanced and harmonious designs.
This tool allows you to create perfectly mirrored shapes and patterns, saving time and enhancing precision in your artwork.
Basic Symmetry Techniques

First, the basics. The photoshop symmetry tool lets you paint symmetrically easily.
Open Photoshop CC and pick the brush tool.
Find the butterfly icon in the options bar. Click it to see different symmetry modes.
Symmetry Modes
These options are great for making parallel lines or simple patterns. They make symmetrical painting easy.
- Pick vertical symmetry to split the canvas and mirror your brush strokes.
- For horizontal symmetry, the canvas is split horizontally, duplicating brush strokes from top to bottom.
- Dual axis mode creates symmetry both vertically and horizontally.
Advanced Symmetry Techniques
Exploring advanced symmetry techniques can take your digital art to the next level.
These methods include radial symmetry, mandala creation, and complex pattern designs.
By mastering these techniques, you can create intricate and visually stunning artwork that showcases your skills and creativity.
Radial Symmetry
With radial symmetry, your brush strokes come from a central point, making complex designs.
Change the segment count of the brush in the options bar for more detail.
You can create mirrored patterns with one brush stroke, making your art look amazing.
Mandala Symmetry

Mandala symmetry lets you make circular, kaleidoscopic designs. Pick this symmetry mode, and your brushes will mirror across multiple axes, making detailed patterns with the brush.
Use radial symmetry path for realistic mandalas, this mode handles the hard parts for you.
- Start with a clean layer.
- Try different brushes for unique textures.
- Use the layer mask to hide symmetry markings.
Creating intricate designs with mandala symmetry becomes effortless when using Photoshop masking.
This technique helps isolate specific areas, allowing for precise and detailed symmetrical patterns.
Pro Tip: Understanding what fine art photography is can enhance your approach to mandala symmetry.
Practical Applications of Symmetry Tool
The Photoshop symmetry tool is incredibly versatile and can be used in a variety of practical applications.
From creating balanced logo designs to developing intricate patterns for textiles, the symmetry tool helps ensure precision and harmony in your projects.
It is also invaluable in architectural drawings, mandala art, and even in designing user interfaces, providing a consistent and professional finish.
Steps to Create Symmetrical Designs
Using the Photoshop symmetry tool can make anyone look like a design expert. Even if you’re not into art, this tool makes symmetry easy.
- Grab the brush tool.
- Look for the butterfly icon in the options bar.
- Click it, and you'll see symmetry options!
- Choose radial, vertical, or horizontal symmetry modes based on your design needs.
- For circular designs, choose radial symmetry. Your brush strokes will follow the chosen symmetry path.
- Adjust the segment count in the options bar for more angles and pieces.
Mandala designs become easy with mandala symmetry modes. Paint symmetrically, one click at a time, and watch your design come to life.
Steps to Enhance Digital Art
Next, let’s improve your digital art. Photoshop makes enhancing artwork simple. The symmetry tool helps here too.

- Open Photoshop CC, and use symmetry modes to improve details.
- Pick the best symmetry mode for your project: mandala, vertical, or horizontal.
- A single brush stroke on one side reflects on the other side, creating balanced, polished art effortlessly.
- If you mess up, use a layer mask to hide errors.
- The paths panel lets you control and refine symmetry paths while you work.
Pro Tip: Combine the eraser tool with symmetry modes for creative effects. Clean up sections and experiment with layers for stunning results.
The Photoshop paint symmetry feature is versatile. From creating beautiful designs to enhancing existing art, mastering it makes Photoshop fun and efficient.
For more inspiration on digital art, check out the top NFT artists to keep an eye on.
Tips and Tricks for Better Symmetry
Now, let’s talk about making your designs look balanced with Photoshop’s symmetry feature.
Common Mistakes to Avoid
We’ve all been there – trying to create a design but ending up with a mess. Here are some common mistakes folks make when using symmetry in Photoshop:
- Skipping the butterfly icon: You need to click this icon in the options bar to find the right symmetry mode.
- Ignoring symmetry paths: Setting these paths right is important. They tell Photoshop CC how to mirror your brush strokes. You don't want your design looking off-balance.
- Not using layers: Always work on separate layers. This makes it easy to edit parts without ruining other segments of your design.
- Using the wrong brush tool: Different brushes give different effects. Experiment until you find the one brush that works best for your project.
- Forgetting to adjust segment count: If you’re working on mandala symmetry, adjusting the segment count can change the look completely.
Avoid these pitfalls, and you’ll find your designs looking cleaner and more professional in no time.
To ensure better symmetry, be mindful of common photo editing mistakes such as inconsistent brush settings or improper alignment, which can disrupt the overall balance of your design.
Also, use the path selection tool in Photoshop to ensure your symmetry paths are precise and aligned properly with your brush strokes.
Expert Tips for Perfect Symmetry
Okay, now let’s move onto some expert tips. These will really make your symmetrical designs shine:
- Pick the right symmetry mode: Different projects need different types of symmetry. Vertical for portraits, radial for mandalas – choose wisely.
- Symmetry path perfection: Adjusting these paths ensures your design mirrors perfectly. Small tweaks here can make a big difference.
- Leverage the paths panel: This lets you control and refine your symmetry paths for even better results. Think of the paths panel as your control room.
- Experiment with different brushes: Different textures and styles can give your design unique looks. Don’t be afraid to try something new!
- Use masking techniques: Layer masks hide parts of your design. They are great for making corrections without starting over.
- Segment count adjustments: In mandala symmetry, changing the segment count can provide stunning effects and details.
With these tips, you’ll be creating balanced, professional-looking designs in no time.
Pro Tip: Don’t hesitate to use the eraser tool symmetrically. It helps in refining your design by cleaning up specific areas without affecting the whole piece.
You can also use the pixel art resizer to make fine adjustments, ensuring that every pixel aligns with your brush strokes for a crisp, clean design.
For achieving perfect symmetry, consider using the shape tool to create precise geometric elements.
This tool can help you easily draw symmetrical shapes and maintain consistency throughout your design
For more advanced photo editing techniques, learn how to blur background in Lightroom.
Frequently Asked Questions (FAQs)

Is there a symmetry tool in Photoshop?
- Yes, Photoshop includes a symmetry tool that allows you to create balanced and symmetrical designs easily.
How do I make a symmetrical pattern in Photoshop?
- Open a new document and select the Brush Tool.
- Go to the Options bar and click on the butterfly icon to choose a symmetry type.
- Draw on one side of the line, and Photoshop will automatically replicate the pattern on the other side.
What does the symmetry tool do?
- The symmetry tool mirrors your brush strokes along a line or radial axis, helping you create precise symmetrical patterns and designs.
Is there a mirror brush in Photoshop?
- While Photoshop does not have a specific "mirror brush," the photoshop symmetry tool acts like a mirror by reflecting brush strokes across a symmetry line.
Conclusion
The symmetry tool in Adobe has changed the way I create digital art.
It makes creating balanced and professional designs, whether intricate mandalas or simple patterns, much easier.
If you want to improve your digital art skills, I highly recommend taking my Photoshop Course and Lightroom Course. These courses walk you through the essentials and more advanced techniques that can help you get the most out of Adobe tools.
Ready to take your art to the next level? Check out Adobe Photoshop and Photoshop Lightroom to explore even more creative possibilities. Embrace these tools and watch your digital art come to life!
Read more about Photoshop:


