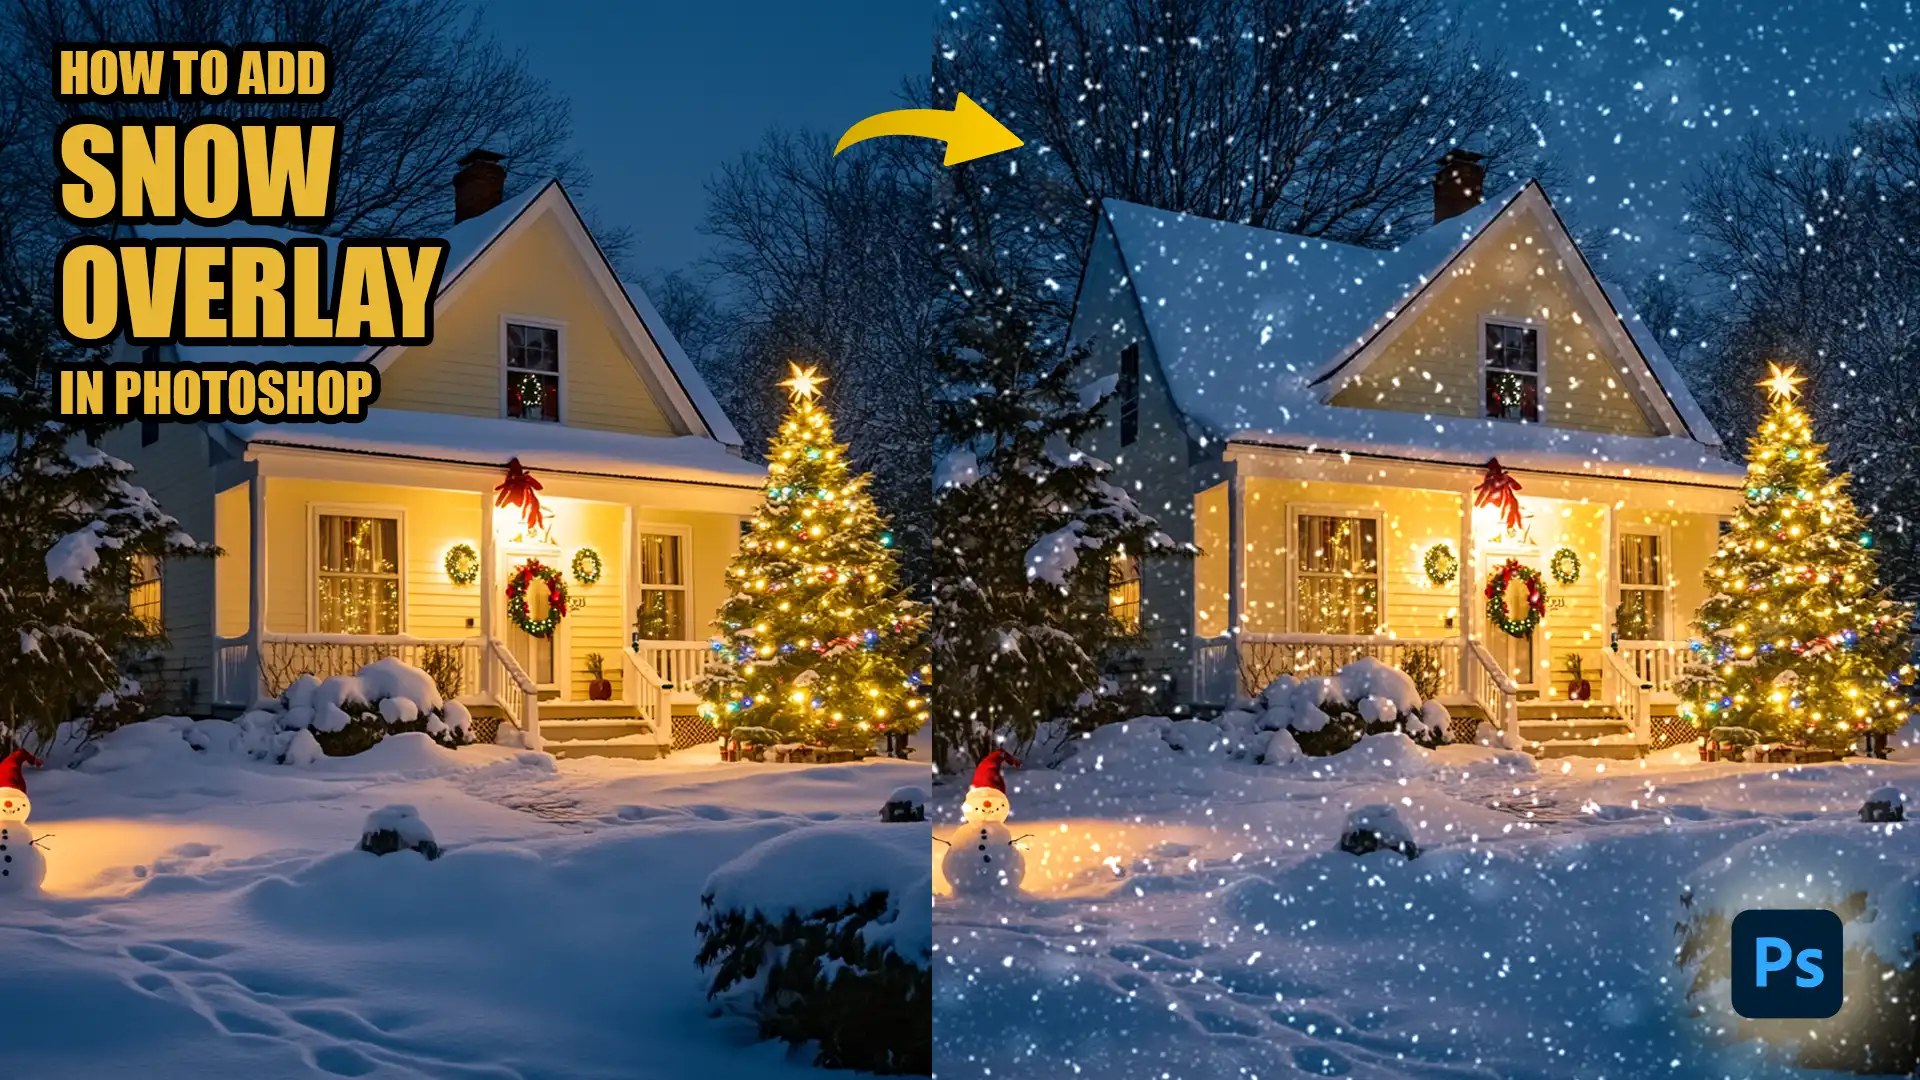
Are you looking to design mesmerizing winter scenes in your photos? Using a Photoshop snow overlay can transform your images into stunning snowy christmas landscapes effortlessly.
Imagine the magic of adding a gentle snowfall or a blizzard effect to your pictures, making them look straight out of a winter wonderland.
In this article, I’ll guide you through the steps to master this technique, ensuring your photos captivate and delight.
From selecting the perfect overlay to blending it seamlessly, you’ll learn all the tips and tricks to bring your vision to life.
Let’s dive in and make your photos sparkle with the beauty of snow!
Table of Contents
How to Add a Photoshop Snow Overlay
Snow overlays are a simple and effective way to add a wintery touch to your images.
Adding a Photoshop snow overlay or rain overlay is straightforward and gives your photos that festive christmas feeling.
Choosing the Right Snow Overlay
Firstly, it’s important to choose the right snow overlay. Different overlays offer various looks, so it’s key to pick one that suits your vision.
Types of Snow Overlays for Photoshop
There are many types of snow overlays. You can find ones with heavy snowfall, light snowfall, or even blizzards.
Each type gives a distinct look to your photo. When selecting, think about the scene you want to produce.
| Overlay Type | Description | Best For |
|---|---|---|
| Light Snowfall | Subtle, gentle snowfall effect | Adding a soft winter touch |
| Heavy Snowfall | Dense, dramatic snow coverage | Creating a blizzard effect |
| Snowflakes | Individual snowflakes scattered | Detailed snow effects on close-ups |
| Blizzard | Intense snow with strong winds | Dramatic, winter storm scenes |
Where to Find Free Snow Overlays
The good news is you can find free snow overlays online. Websites, forums, and even some social media groups offer these files for download.
Search “free snow overlays” to get started.
Downloading multiple options can help you find the perfect match for your project.
Applying Snow Overlays for Photoshop
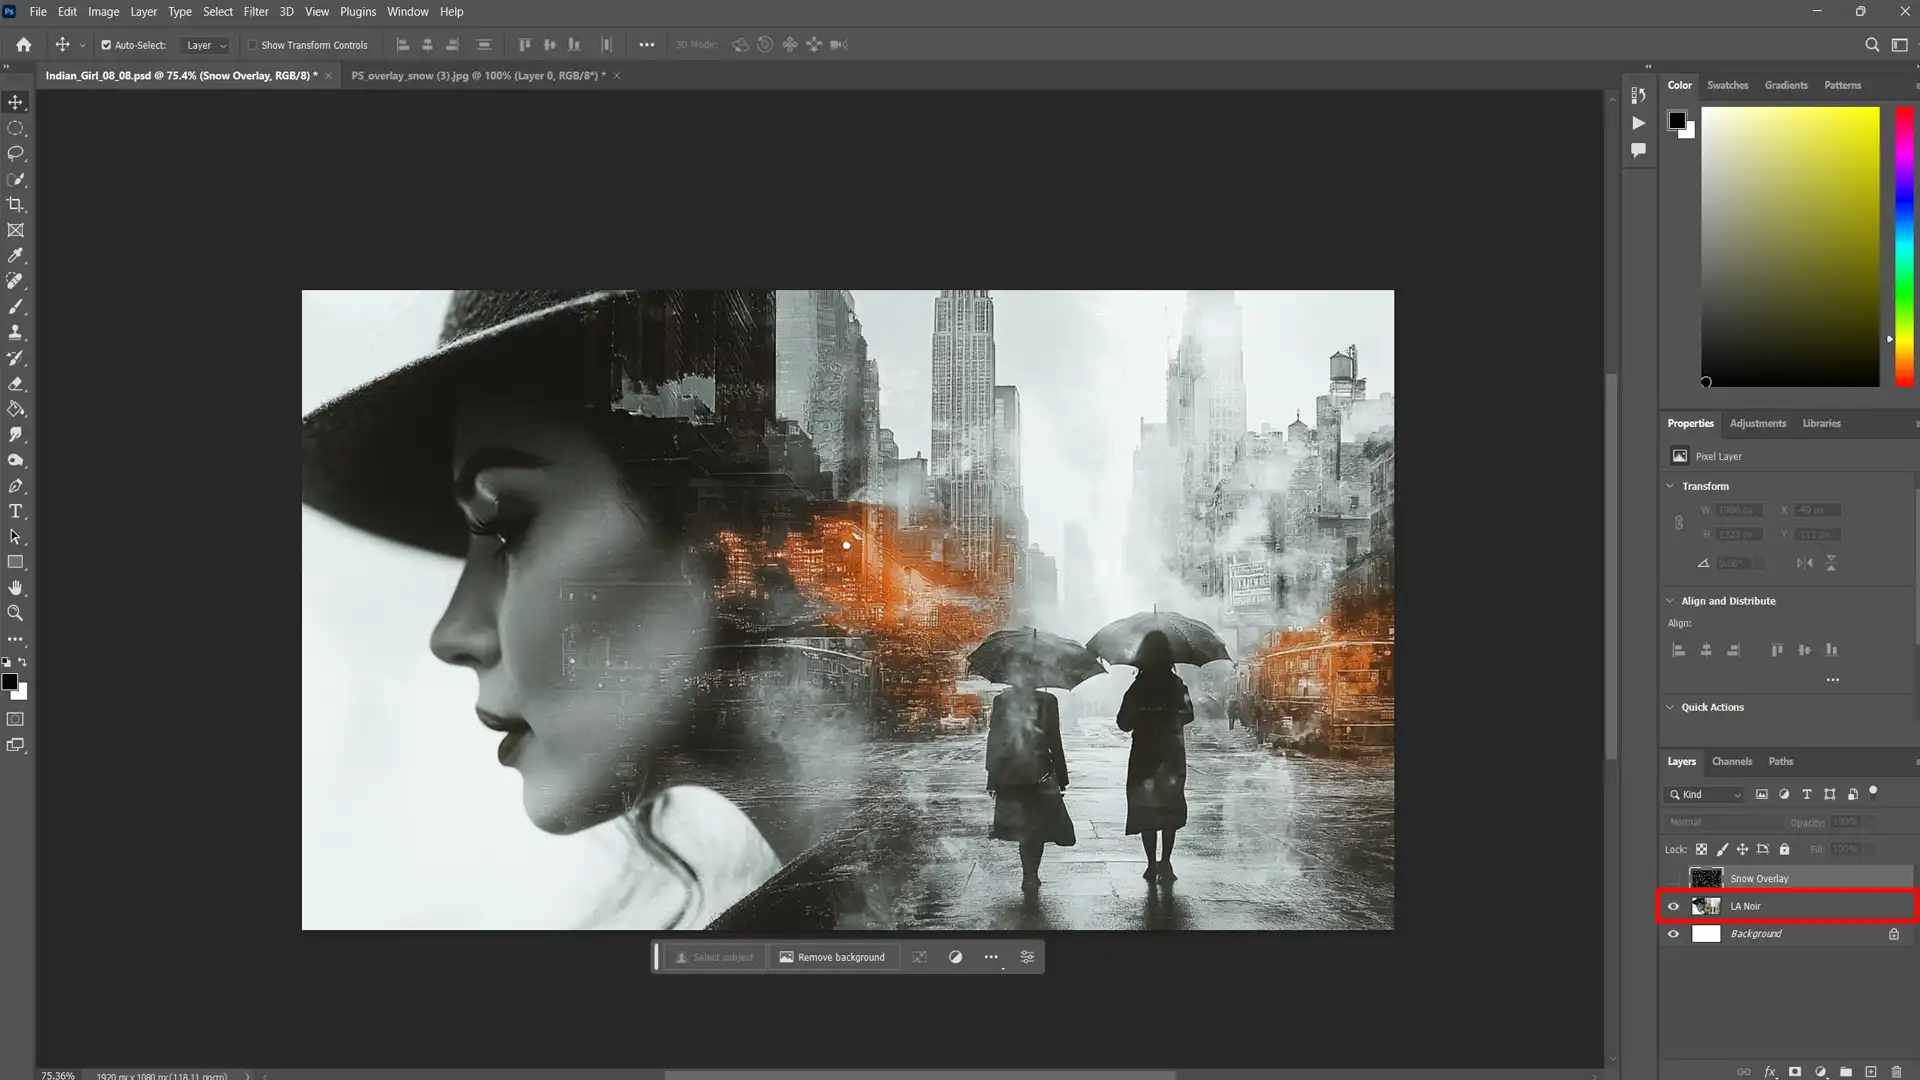
Once you have your overlay, applying it in Photoshop is the next step.
When applying snow overlays, using Photoshop’s content-aware fill can help blend the effect seamlessly with your image.
This technique ensures a natural look for your winter scenes.
This will make your snow overlays appear more realistic and integrated into your photos.
Here’s how to do it effectively.
Step-by-Step Guide to Adding Snow Overlays for Photoshop
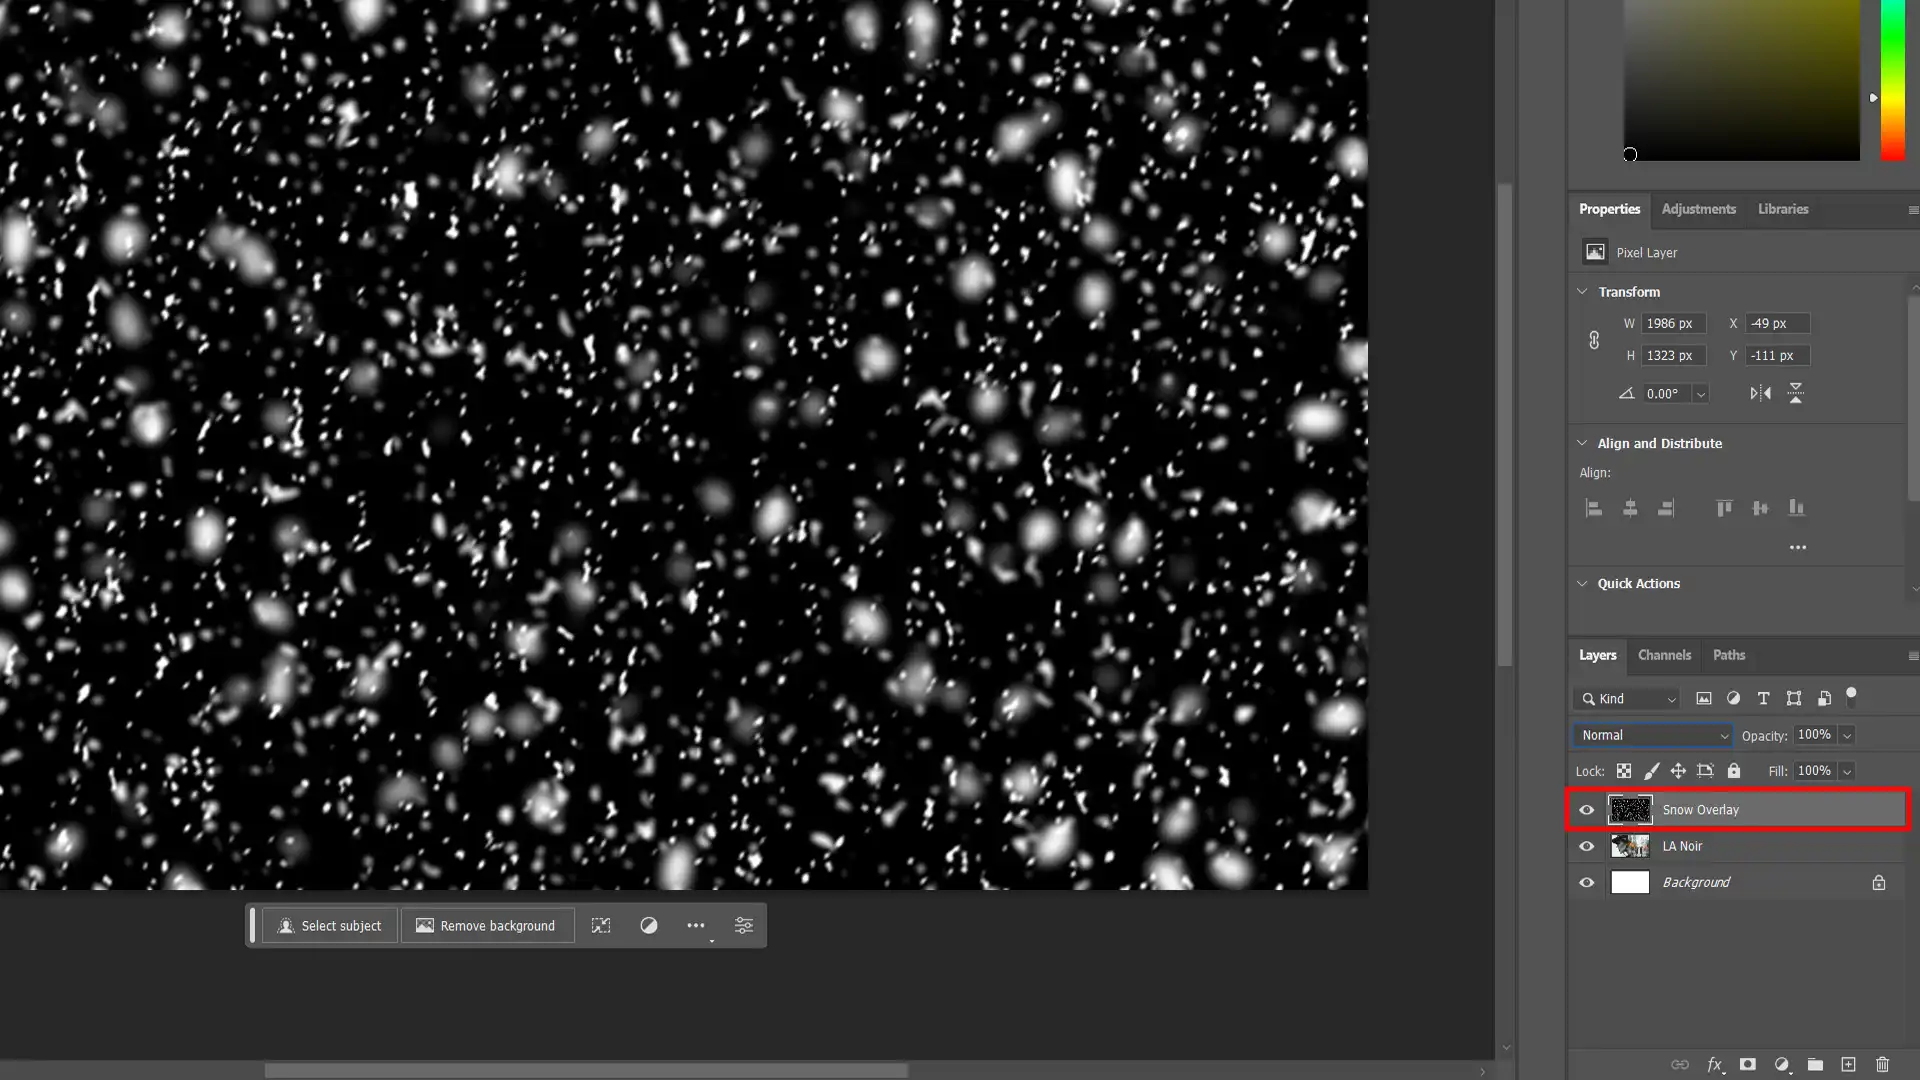
- Open your photo in Photoshop.
- Import your chosen snow overlay. Usually, this is a separate photo file.
- Drag the overlay onto your main photo. Place it as a new layer.
- Resize and position the overlay to fill your image. If needed, use the transform tool (Ctrl+T or Cmd+T).
Using Blend Mode for Realistic Winter Wonderland Effects
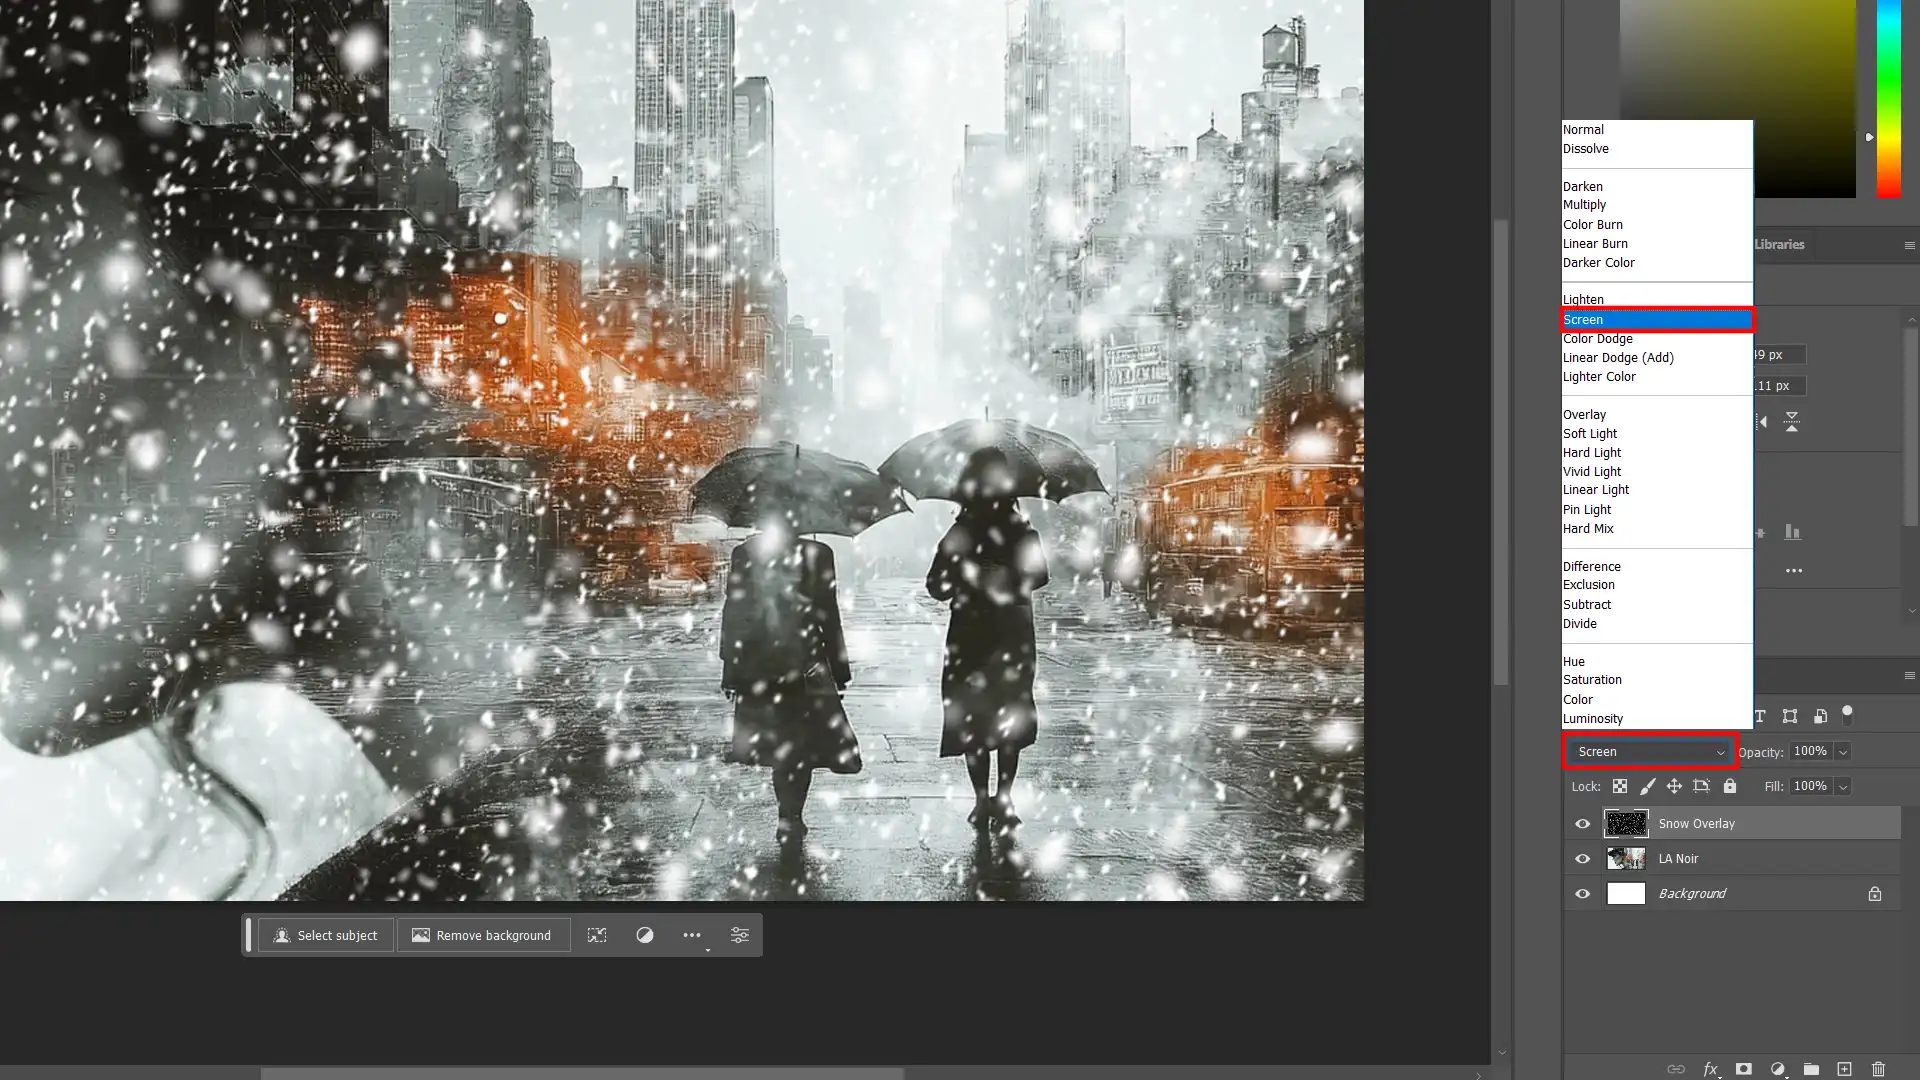
To make the snow look natural, set the layer’s blending mode to “Screen”. This blend mode hides the black areas and keeps the white snowflakes visible.
It gives a realistic winter wonderland effect that blends well with your background photos.
Adjusting the Overlay for Perfect Results
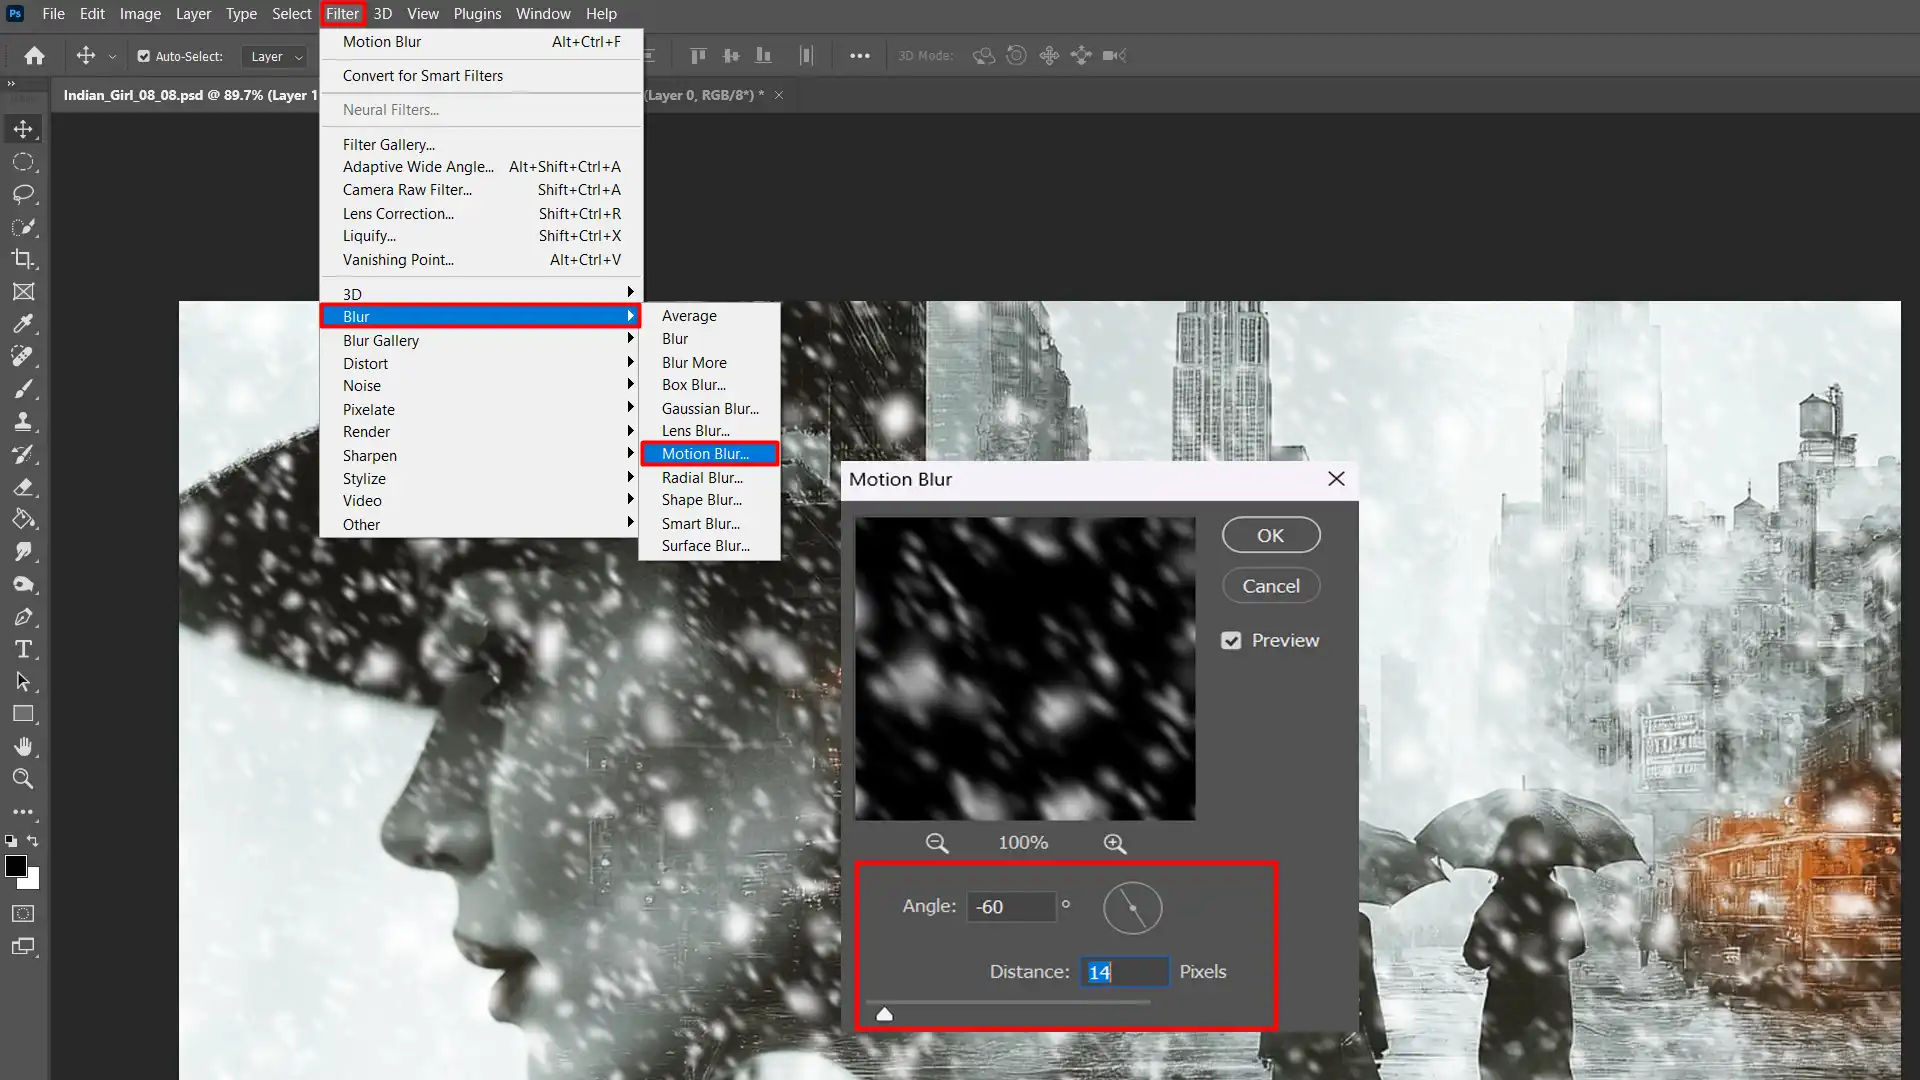
Don’t be afraid to fine-tune the snow overlay. Modify opacity to make the snow more subtle or intense. Use the motion blur filter to make a sense of moving snow.
Experiment until you achieve the desired effect.
Using Photoshop Actions for Snow Effects
If you frequently use snow overlays for photoshop or want to speed up your workflow, Photoshop Action can be a great tool.
What Are Photoshop Actions?
Photoshop Action is pre-recorded sequences of steps that automate repetitive tasks. By using actions, you can apply a snow or blizzard effect with just a click, saving time and ensuring consistency across multiple images.
Creating Falling Snow Effect
Making falling snow dynamic adds a magical touch to your images or greeting cards.
Let’s explore how to make this effect.
Animating Snow Overlays for Photoshop
Animating snow overlays involves a few more steps but is quite rewarding. Use Photoshop’s timeline feature to move the snow overlay across the display.
Make keyframes that vary position and opacity for a realistic falling snow or blizzard effect.
Tips for Realistic Falling Snow
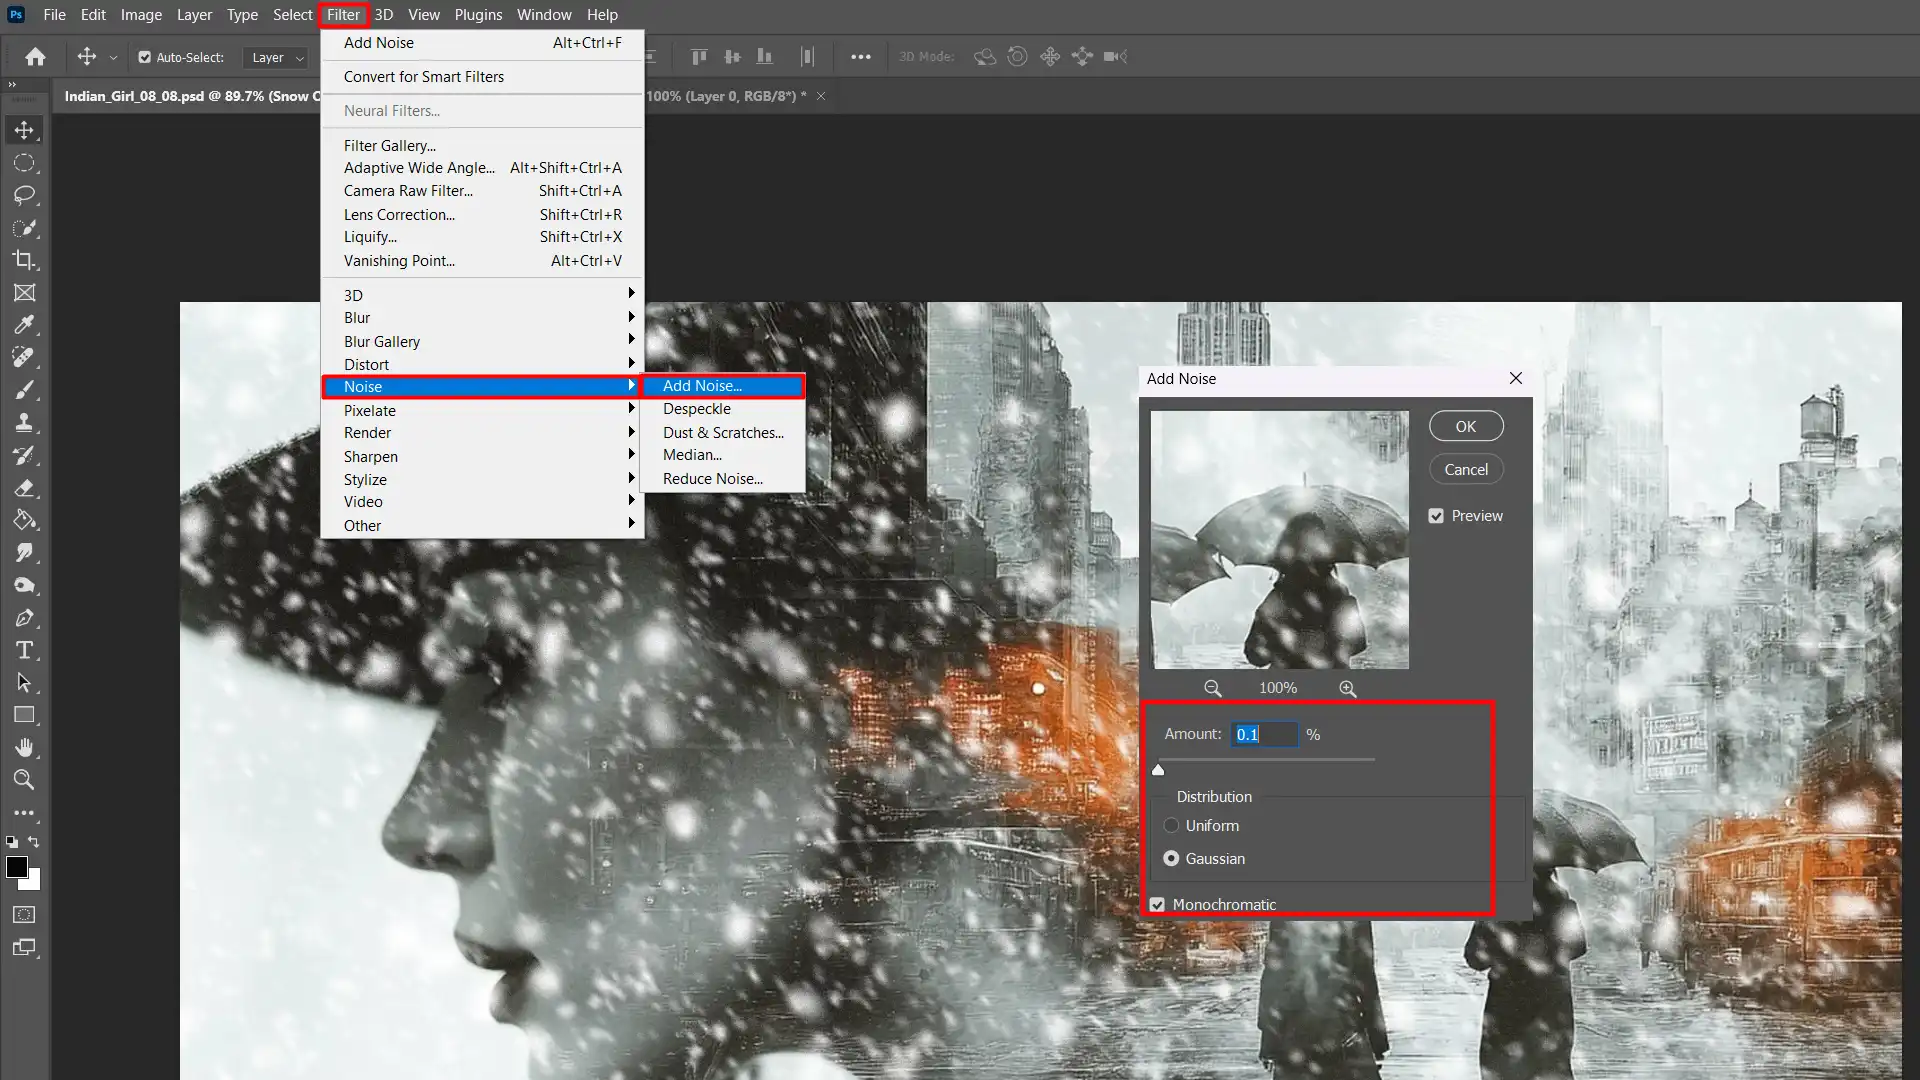
For authenticity, remember that falling snow varies in size and speed. Add a little variety to your snowflakes. Use the add noise filter sparingly to enhance the texture.
Layering different snowfalls can also add depth and dimension to the image.
Pro Tip: Using multiple snow overlays can significantly enhance the depth and realism of your final image. It mimics how snow falls in layers in real life.
Learn Photoshop layering styles for a better understanding.
For additional tips on how to enhance your photos, consider learning about Photoshop shortcuts and how to remove an object in Photoshop. These skills can help you refine your editing process and achieve professional results.
Enhancing Snow Effects with Camera Lens and Creative Cloud
For a polished and professional finish to your snowy christmas images, consider using additional tools and features from Adobe Cloud.
Camera Lens Effects
Adding lens effects can enhance the realism of your snow overlay. Use the Lens Blur or Gaussian Blur tools in Photoshop to make depth and simulate the look of snowflakes falling in the foreground or background.
Modify the blur to match the perspective and focus of your image.
Capturing stunning snow photography often involves more than just a snow overlay. Integrating camera lens effects can enhance the depth and realism of your snowy scenes.
By combining effective lens techniques with snow overlays, you can create captivating winter images.
Creative Cloud Integration
Adobe Cloud offers powerful tools that complement your snow overlays. Use Adobe Lightroom for fine-tuning exposure and contrast, ensuring that your snowy winter wonderland effect blends naturally with the rest of your image.
Additionally, explore Adobe Stock for high-quality snow overlay assets and Cloud Libraries to manage and access your overlays efficiently.
Extra Touch of Winter Magic
To add an extra touch of winter magic to your photos, consider incorporating frost effects and snowflakes using Photoshop alternative GIMP.
Frost overlays can add a delicate ice pattern effect on your photos, adding a layers of chilly texture that complements your snow scene.
In GIMP, you can use filters and brushes to apply frost effects,make snowflakes and enhance the wintery feel.
Additionally, snowflake textures can be added to simulate pragmatic snowfall.
By combining these elements, you can achieve a visually striking winter wonderland that brings your photos to life with a frosty charm.
To enhance your frost effect, adding a metallic effect, or making metallic text in general, can give your winter photos a unique shine. This combination makes the frost look more realistic and striking.
Blending these effects creates a visually captivating winter scene.
To capture the true essence of winter magic in your landscape photos, mastering editing techniques is key.
Adding a snow overlay can transform your scenes into enchanting winter vistas. Blending these techniques with winter effects can turn any landscape into a magical winter scene.
Frequently Asked Questions

How do you make a snow overlay in Adobe Photoshop?
- Open your base photo in Photoshop.
- Create a new layer: Go to Layer > New > Layer.
- Fill this new layer with black: Use the Paint Bucket Tool.
- Add Noise: Go to Filter > Noise > Add Noise. Choose 'Gaussian' and check the 'Monochromatic' box. Modify the amount to around 25% to create the snow effect.
- Change the blending mode: Set the layer to 'Screen' to make the black background transparent, leaving only the white noise visible.
- Modify opacity: Modify the noise layer’s opacity if the effect is too strong.
- Optional: Add a Gaussian Blur by going to Filter > Blur > Gaussian Blur to make the snowflakes look softer and to add motion blur filter.
How to make it look like it's snowing in Photoshop?
Follow the steps above to create a snow overlay:
- Open the Timeline window: Go to Window > Timeline.
- Create Frame Animation: Click 'Create Frame Animation' and convert your static frame into an animation frame.
- Simulate falling snow: Duplicate the snow layer and move it slightly.
- Create multiple frames: For each frame, make slight adjustments in the snow layer positions.
- Set frame timing: Modify the timing for each frame to control the snow fall speed.
- Play the animation: Preview to see the snowing effect.
How to put snow effects on photos?
- Start by creating a snow overlay following the steps outlined in the first question.
- Modify effects: Modify visibility and blending modes of the snow layer to tweak the effect.
- Use layer masks: Remove snow from specific areas (e.g., faces or certain objects).
- Enhance mood: Modify the photo’s color balance and brightness to depict a cold, snowy christmas day.
How to do overlay effects in Photoshop?
- Open both images: Your base photo and the overlay photo in Photoshop.
- Drag overlay image: Use the Move Tool to drag the overlay onto the base image.
- Resize/reposition: Use Edit > Free Transform to resize or move the overlay image.
- Adjust blending mode: In the Layers panel, set a blending mode (e.g., 'Multiply', 'Screen', 'Overlay') for the overlay image.
- Modify layer opacity: Adjust opacity to achieve the desired effect.
- Use layer masks: Apply the effect selectively on certain parts of the base photo if needed.
Conclusion
Adding a snow overlay in Photoshop can really bring your winter photos to life. I remember when I first started using Photoshop snow overlays, it was amazing how a simple effect could transform a photo into a winter wonderland.
It’s pretty easy to do once you get the hang of it, and it can add a special touch to your images.
If you want to dive deeper into Photoshop and Lightroom, check out my Photoshop Course and Lightroom Course. Both courses offer great tips and techniques to help you get the most out of these tools.
And if you don’t have Photoshop or Lightroom yet, you can grab them directly from Adobe: Photoshop and Lightroom or you can explore Adobe’s website for more info.
Happy editing!
Read more about Photoshop:


