Each small stroke can make a significant difference.
Don’t forget to save your progress regularly.
Pro Tip: Always work on high-resolution images.
More pixels allow for detailed edits and better-quality image outputs.
Comparing the Remove Tool with Other Tools
When editing photos in Photoshop, it’s important to choose the right tool for the job.
The remove tool is excellent for eliminating unwanted elements, but other tools can also be effective depending on the situation.
In this section, we’ll compare the remove tool with alternatives like the spot healing brush, clone stamp, and healing brush tools.
Tool
Purpose
Best For
Pros
Cons
Remove Tool
Automatically removes unwanted elements
Larger objects and background distractions
Quick and easy to use; minimal manual adjustment
May not handle complex textures well
Spot Healing Brush
Fixes small imperfections
Blemishes, small spots
Great for minor corrections; seamless blending
Limited control over large areas
Clone Stamp
Manually copies pixels from one area to another
Covering larger areas with similar content
High control over pixel placement; versatile
Time-consuming; requires precision
Healing Brush
Blends corrected areas with surrounding pixels
Repairing textured areas
Effective for detailed edits; blends well
Can be tricky for complex patterns
Remove Tool vs Spot Healing Brush Tool
The remove tool and the spot healing brush tool have distinct purposes.
The remove tool focuses on eliminating larger unwanted elements, which is helpful for photo enhancement.
This restoration tool is better for minor flaws like blemishes.
Tip: For intricate tasks, consider layering both tools to achieve a seamless touch-up without over-editing the target area.
Remove Tool vs Clone Stamp Tool
The clone stamp tool allows users to manually create areas that blend smoothly into the image. On the other hand, the remove tool automates the process, aiming for efficiency. This tool offers more precision; however, it takes practice.
Pro Tip: Use this tool alongside the remove tool to hone in on detailed edits for high-quality images.
Remove Tool vs Healing Brush Tool
Both tools are great for editing. This restoration tool, similar to the healing brush, targets small areas by blending them seamlessly into the surroundings.
Conversely, the remove tool is more robust and faster for large edits.
Tip: If your object has a tricky pattern or texture, use the Restoration Tool for finer adjustments after using the remove tool.
Always create layers before starting any editing. This way, you can experiment without risking the original photography.
For advanced edits, consider using the Content-Aware Fill in Photoshop to automatically generate realistic replacements for removed objects.
Real-World Applications of the Photoshop Remove Tool
The Photoshop Remove Tool is incredibly versatile, with a range of practical applications in everyday photo editing.
Whether you’re enhancing portraits, cleaning up landscape photos, or removing distractions from product shots, this tool is designed to make complex edits easier.
Editing Portraits
Editing portraits is one of the most common uses of the remove tool. Whether it’s removing a stray hair or a skin blemish, this tool has got you covered.
Steps to Edit Portraits:
Open your image in Photoshop.
Select the remove tool from the toolbar.
Make minor adjustments with a few clicks to greatly enhance the overall appearance.
For better results, use remove after each stroke to see immediate improvements. Additionally, consider using the content-aware fill feature for more complex edits.
In exploring real-world applications , the quick selection tool can greatly enhance your editing efficiency. It allows you to precisely isolate and remove elements, making complex edits simpler and faster.
Removing Unwanted Objects
Ever taken a beautiful photo only to notice an unwanted objects?
The remove tool comes in handy for such situations.
By simply selecting the object you wish to eliminate, Photoshop does the hard work for you.
Benefits of Using the Remove Tool:
No need for expert skills to perfect it.
With practice, you’ll be amazed by your results.
When applied correctly, this can make your photos look professional with minimal effort.
For even better results, you might want to explore the patch tool for more intricate removals or if you need just to remove object then use the object selection tool for fast result.
Removing unwanted objects, mastering how to remove objects efficiently is vital for your workflow.
This technique helps clean up your images seamlessly.
Enhancing Landscape Photos
Landscape photography often deals with elements that disrupt the natural beauty of the scene: power lines, garbage, or people.
Use the remove tool to enhance the natural allure of your landscape photos.
Steps to Enhance Landscape Photos:
Select the unwanted items.
Let Photoshop generate realistic replacements.
Remember to remove after each stroke to prevent overwriting mistakes.
This small habit ensures that each correction improves the overall composition.
Pro Tip: Always work on duplicate layers to safeguard your original image.
That way, you can experiment freely without fear of permanently altering your photo.
Frequently Asked Questions
How do you get the remove tool in Photoshop?
Open your Photoshop application.
Navigate to the toolbar on the left side of the screen.
Look for the healing brush or the content-aware fill option, depending on what you need.
Select the tool to activate it for use in your project.
How do I remove tools from Photoshop?
Right-click on the tool you wish to remove from the toolbar.
Choose 'Edit Toolbar' from the context menu.
In the dialog box that appears, drag the tool you want to remove from the toolbar to the extra tools column.
Click 'Done' to save your changes.
Where is the remove tool in Photoshop?
Open Photoshop.
Access the toolbar on the left side of your workspace.
The remove tool can typically be found as part of the healing brush tools or under the 'Edit' menu then 'Content-Aware Fill'.
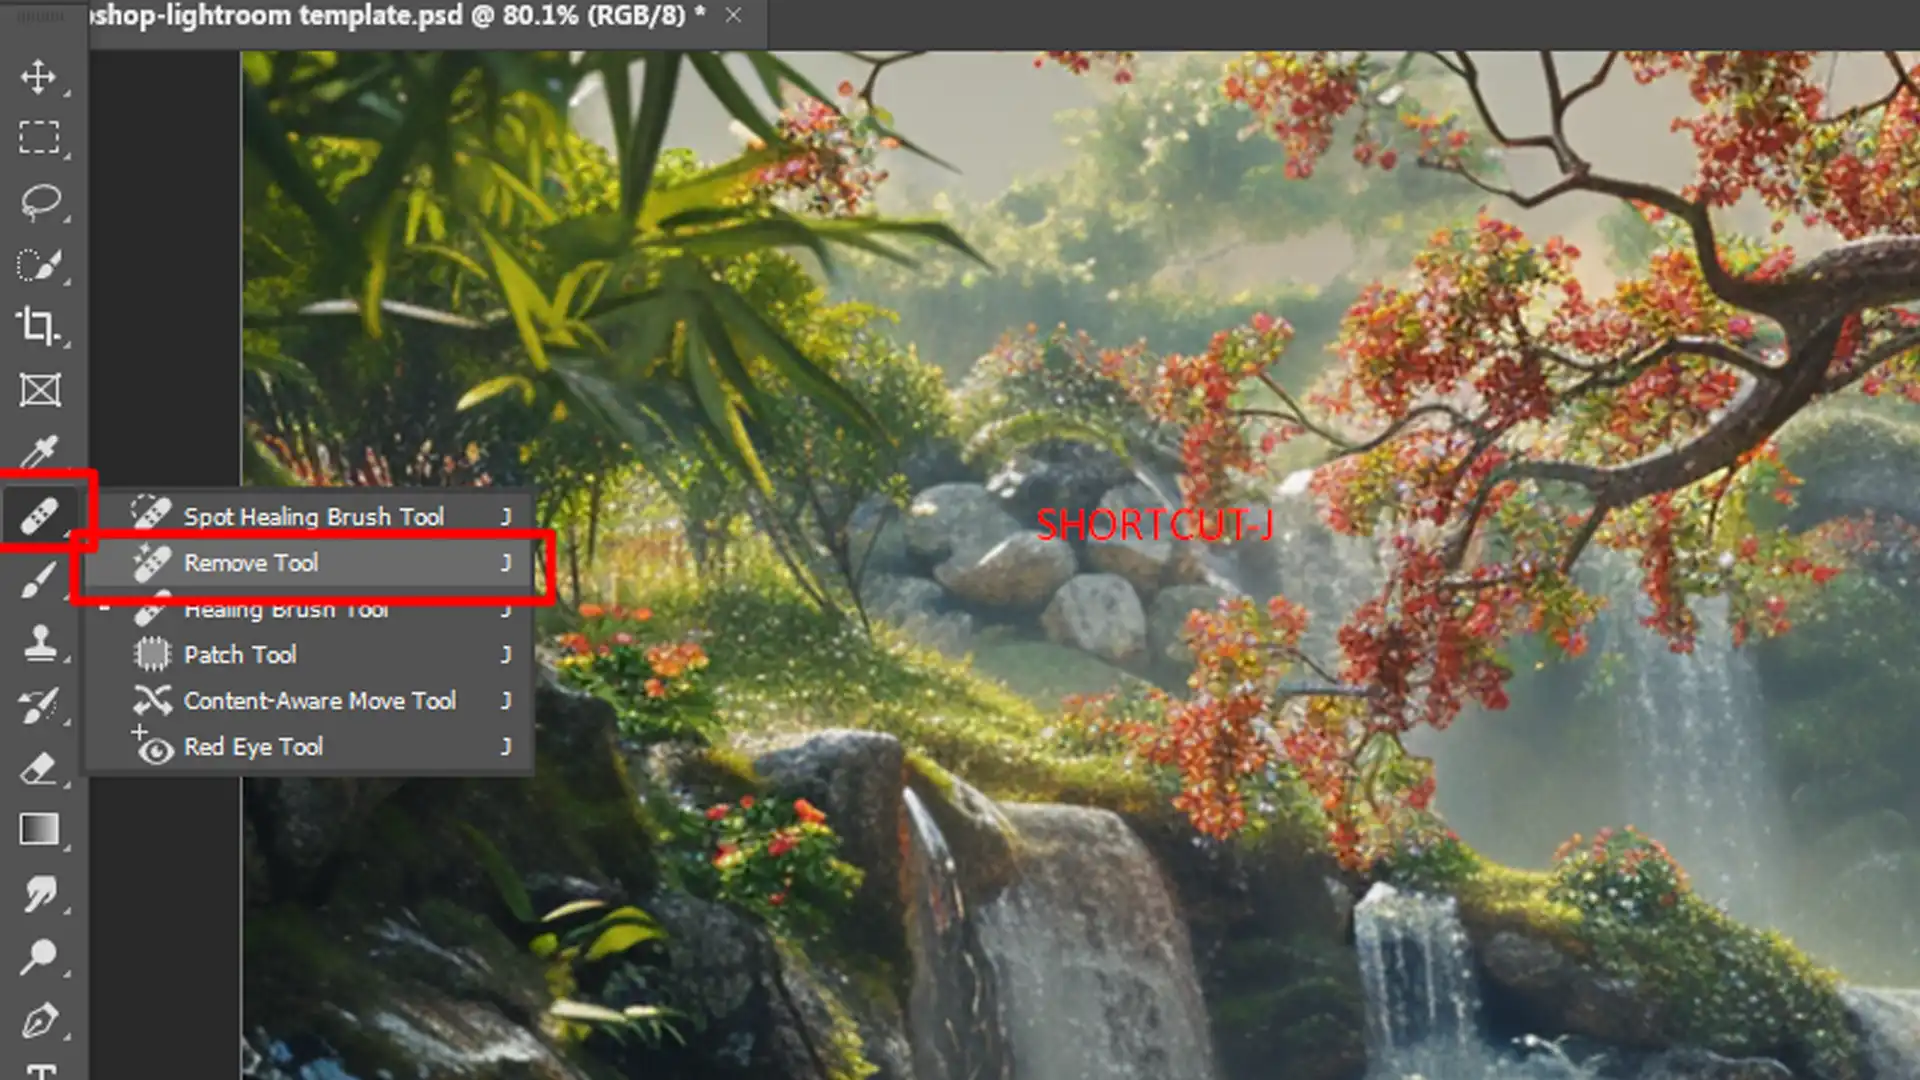
What is the shortcut for the remove tool in Photoshop?
The shortcut will vary depending on the specific remove tool you are using.
For the spot healing brush, the shortcut is typically 'J'.
Check Photoshop's 'Keyboard Shortcuts' under the 'Edit' menu to customize or verify the shortcut keys.
In conclusion, the Photoshop Remove Tool has truly transformed how I handle photo edits. It’s a game-changer for removing unwanted objects and shadows with ease.
My personal experience shows that using this tool makes the process much smoother and faster.
For those looking to dive deeper into photo editing,
$2,061.00Original price was: $2,061.00.$1,061.00Current price is: $1,061.00. 27585
Download Your Free Guide Now!
Discover the secrets of photography with our printable guide! Master essential techniques like aperture, shutter speed, and ISO to create stunning images. Get your free printable PDF now and start turning your snapshots into masterpieces!