Photoshop Pattern: A Complete Guide to Pattern Design

Creating a stunning Photoshop pattern often starts with the right tools and techniques.

When it comes to adding intricate details and textures, nothing beats a well-crafted Photoshop pattern.

In this article, I’ll guide you through the essential steps to create and utilize Photoshop patterns that can elevate your projects to a professional level.

Keep reading to unlock the secrets to mastering this versatile tool!

Table of Contents

Creating a Custom Pattern in Photoshop

Designing your own custom pattern in Photoshop is a powerful way to add unique elements to your projects.

This process begins with setting up your document and defining its size and resolution.

Once your canvas is ready, you can start designing the pattern by using various shapes, lines, and textures.

Setting Up Your Document

New document window with resolution set to 300 pixels per inch being set up to make a pattern.

To start, open Photoshop and create a new document. You define the size based on your needs.

Larger documents offer more detail, while smaller ones are easy to manage.

Focus on the settings like resolution and color mode.

Typically, 300 dpi and RGB color work well. This sets the foundation for your custom pattern.

If you are a photographer, and want to make custom pattern in photoshop, understanding composition rules in photography is crucial for crafting visually appealing images.

Similarly, a custom pattern enhances your designs by adding unique textures and depth.

Designing Your Pattern

Now, let’s get creative. Use various design elements to shape your pattern

Lines, shapes, and textures can add uniqueness. 

Each element should flow seamlessly into the next. Making a your own personal pattern packs, so you can reuse and repeat pattern.

When designing your pattern in Photoshop, using the shape tool can significantly simplify the process. 

This tool helps create precise shapes and elements for your patterns.

You can make geometric pattern in photoshop with smart object and then save them in photoshop.The patterns are saved in a pat file format.

Keep the elements within the borders to create seamless patterns

Snap to Grid is useful here. Also, you might want to use the paint bucket tool to fill in larger areas quickly.

Using the Define Pattern Dialog Box

Define Pattern option in Photoshop

Once you’re satisfied, it’s time to save. Go to Edit > Define Pattern. The dialog box lets you name your photoshop pattern. 

Choose something descriptive so you can easily find it later.

This step saves your design as a new pattern in Photoshop. From here, you can use it in other projects by selecting it from the Preset Patterns menu. 

Its like having a pattern packs of your new patterns and you can easily repeat pattern to another entire image.

Pro Tip:  Preview the pattern before saving it. Use the Pattern Preview feature to ensure it tiles correctly and appears as intended before finalizing.

Using the Pattern Preview Tool

Photoshop patterns unlock endless designs and textures for your projects.

In this guide, let’s explore the Pattern Preview Tool. It’s a game-changer for creating seamless designs with minimal fuss.

Activating Pattern Preview

Activating the preview tool in Adobe

First, open Photoshop and create your photoshop document. Adjust dimensions and resolution as needed.

To activate Pattern Preview, go to View > Pattern Preview. This automatically select
the preview mode.

Now, anything you draw inside the document will repeat in tiles, allowing you to visualize how it looks as a seamless pattern.

Adjusting Your Pattern

Creating a Photoshop pattern involves using various tools. Let’s dive in:

When adjusting your pattern in Photoshop, it’s essential to know how to add shapes effectively. Incorporating new shapes can refine and enhance your pattern.

Applying Photoshop Patterns

Creating patterns in Photoshop is a fun process that adds visually compelling elements to your designs. 

Let’s dive into some practical ways to use them.

Using the Pattern Fill Tool

Fill Patterns option in Photoshop

The Pattern Fill is one of the essential tools in Photoshop that offers a simple way to insert a pattern into your design:

You can always undo or adjust as needed.

Pro Tip: Utilize the essential tools in Lightroom for a more proficient workflow as well!

Applying Patterns to Layers

Adding patterns directly to layers offers more flexibility:

You can easily manage and adjust layers without changing the original image. This approach is especially useful for creating repeat-patterns.

Pro Tip: Experiment with combining different Photoshop pattern packs to find unique textures and styles.

Use the power of blending options to craft striking backgrounds and designs.

Ensure you make the most out of Photoshop’s capabilities and use Photoshop shortcuts as well as Lightroom shortcuts to be more efficient with time.

For more advanced techniques, consider exploring the content-aware fill in Photoshop to seamlessly blend patterns with the rest of your design.

Practical Tips for Using Adobe Photoshop

When working with Adobe Photoshop, understanding the various tools and techniques can significantly enhance your efficiency and output

This overview will help you choose the right tools for your projects, ensuring you make the most out of Photoshop’s capabilities.

Feature Photoshop Tool/Technique Advantages Disadvantages
Layer Management Layers Easy editing and adjustments; non-destructive Can become complex with many layers
Smart Objects Convert to Smart Object Retains quality when resizing; non-destructive edits Larger file sizes
Keyboard Shortcuts Shortcuts Speeds up workflow; improves efficiency Requires memorization
Content-Aware Fill Content-Aware Fill Seamlessly removes unwanted elements May require manual adjustments
Pattern Preview Tool Pattern Preview Visualizes pattern tiling; ensures seamless design Can be resource-intensive on large files

Mastering tools in Photoshop involves practice. 

Here are some tips:

Pro Tip: Always preview your photoshop patterns using the Pattern Preview Tool before finalizing to ensure they tile perfectly. This saves time and enhances the final result.

Troubleshooting Common Issues

Even with careful design, you might encounter problems when working with patterns in Photoshop. 

This section addresses some common issues you might face, such as patterns that don’t tile seamlessly or aren’t showing up as expected. 

We’ll cover practical solutions to help you resolve these problems and ensure your patterns look professional.

Pattern Not Seamless

Patterns not aligning? It happens. Your pattern may have edges that don’t blend. First, verify your pattern’s edges match up. Zoom in for a closer look. Use the Offset filter to check. Go to Filter > Other > Offset.

Adjust horizontal and vertical settings to see seams. If visible, use the clone stamp tool. Blend those imperfections. 

Avoid large jumps in color or texture. Blending is key. You want a smooth transition between repeated elements.

Sometimes, a slight blur on the edges helps. Apply a mask and use a soft brush to paint black on the seam areas. 

This hides rough transitions.

Patterns Not Showing Up

A common frustration, your photoshop patterns isn’t appearing? 

Don’t stress. Let’s work through it. 

Ensure you’re on the right layer. Patterns apply to the selected layer. If unsure, double-check the Layers panel.

Another point: check opacity settings. Layer opacity might be too low. Increase it and see if the patterns shows.

If still missing, review blending mode. Sometimes, the mode impacts photoshop pattern visibility. 

Normal is auto select but toggle between options such as Multiply, or Overlay. See what works.

Also, make sure your new layer isn’t locked. A locked layer can prevent changes. Verify it by checking the padlock icon in the Layer panel. Unlock it if necessary.

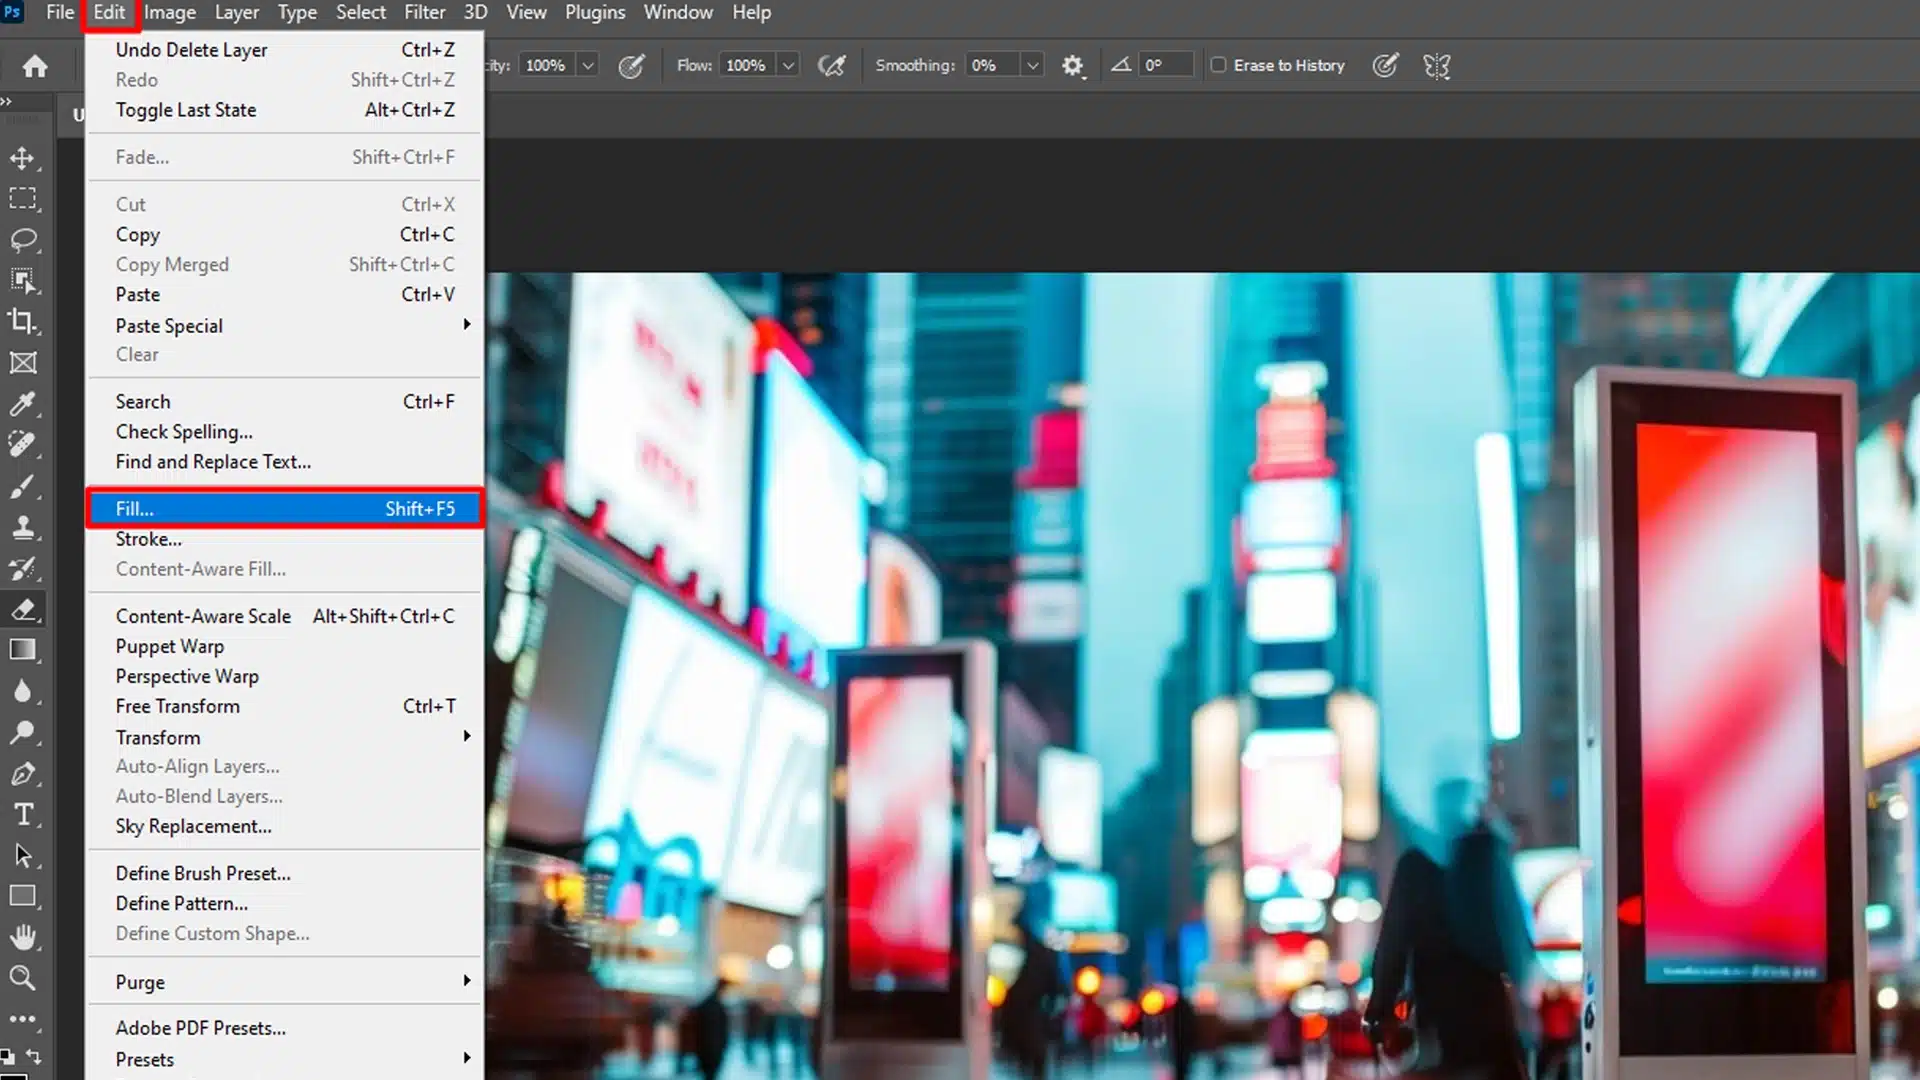
Still not there? Try reapplying the pattern. Select the area, go to Edit > Fill, choose Pattern, and pick your desired pattern. Make sure “Preserve Transparency” is unchecked.

Finally, it might be worth restarting Photoshop. Occasionally, glitches happen. A restart often clears these up.

Patterns can be tricky. But with these tips, you’ll troubleshoot effectively!

Pro tip: Keep your patterns organized in photoshop pattern packs. It saves time and keeps you efficient.

Frequently Asked Questions

PC in a modern office setting with FAQ displayed on the screen

How do you make a pattern in Photoshop?

Where to find patterns in Photoshop?

How to make a repeat pattern in Photoshop?

How to create a hatch pattern in Photoshop?

Conclusion

In conclusion, working with Photoshop patterns has truly enhanced my design projects. 

By following the steps outlined in this guide, you can create, use, and troubleshoot Photoshop patterns effectively.

I’ve found that mastering these techniques really helps in making my designs stand out. 

If you want to dive deeper into Photoshop or Lightroom, check out my Photoshop Course and Lightroom Course.

For the latest tools, consider Adobe Photoshop and Adobe Lightroom. With these resources, you’ll be set to create designs that truly pop.

Happy designing!

If this article has helped you, then Like and Share it with your friends
Facebook
Twitter
LinkedIn
Pinterest

Read more about Photoshop: 

Download Your Free Guide Now!

Discover the secrets of photography with our printable guide! Master essential techniques like aperture, shutter speed, and ISO to create stunning images. Get your free printable PDF now and start turning your snapshots into masterpieces!