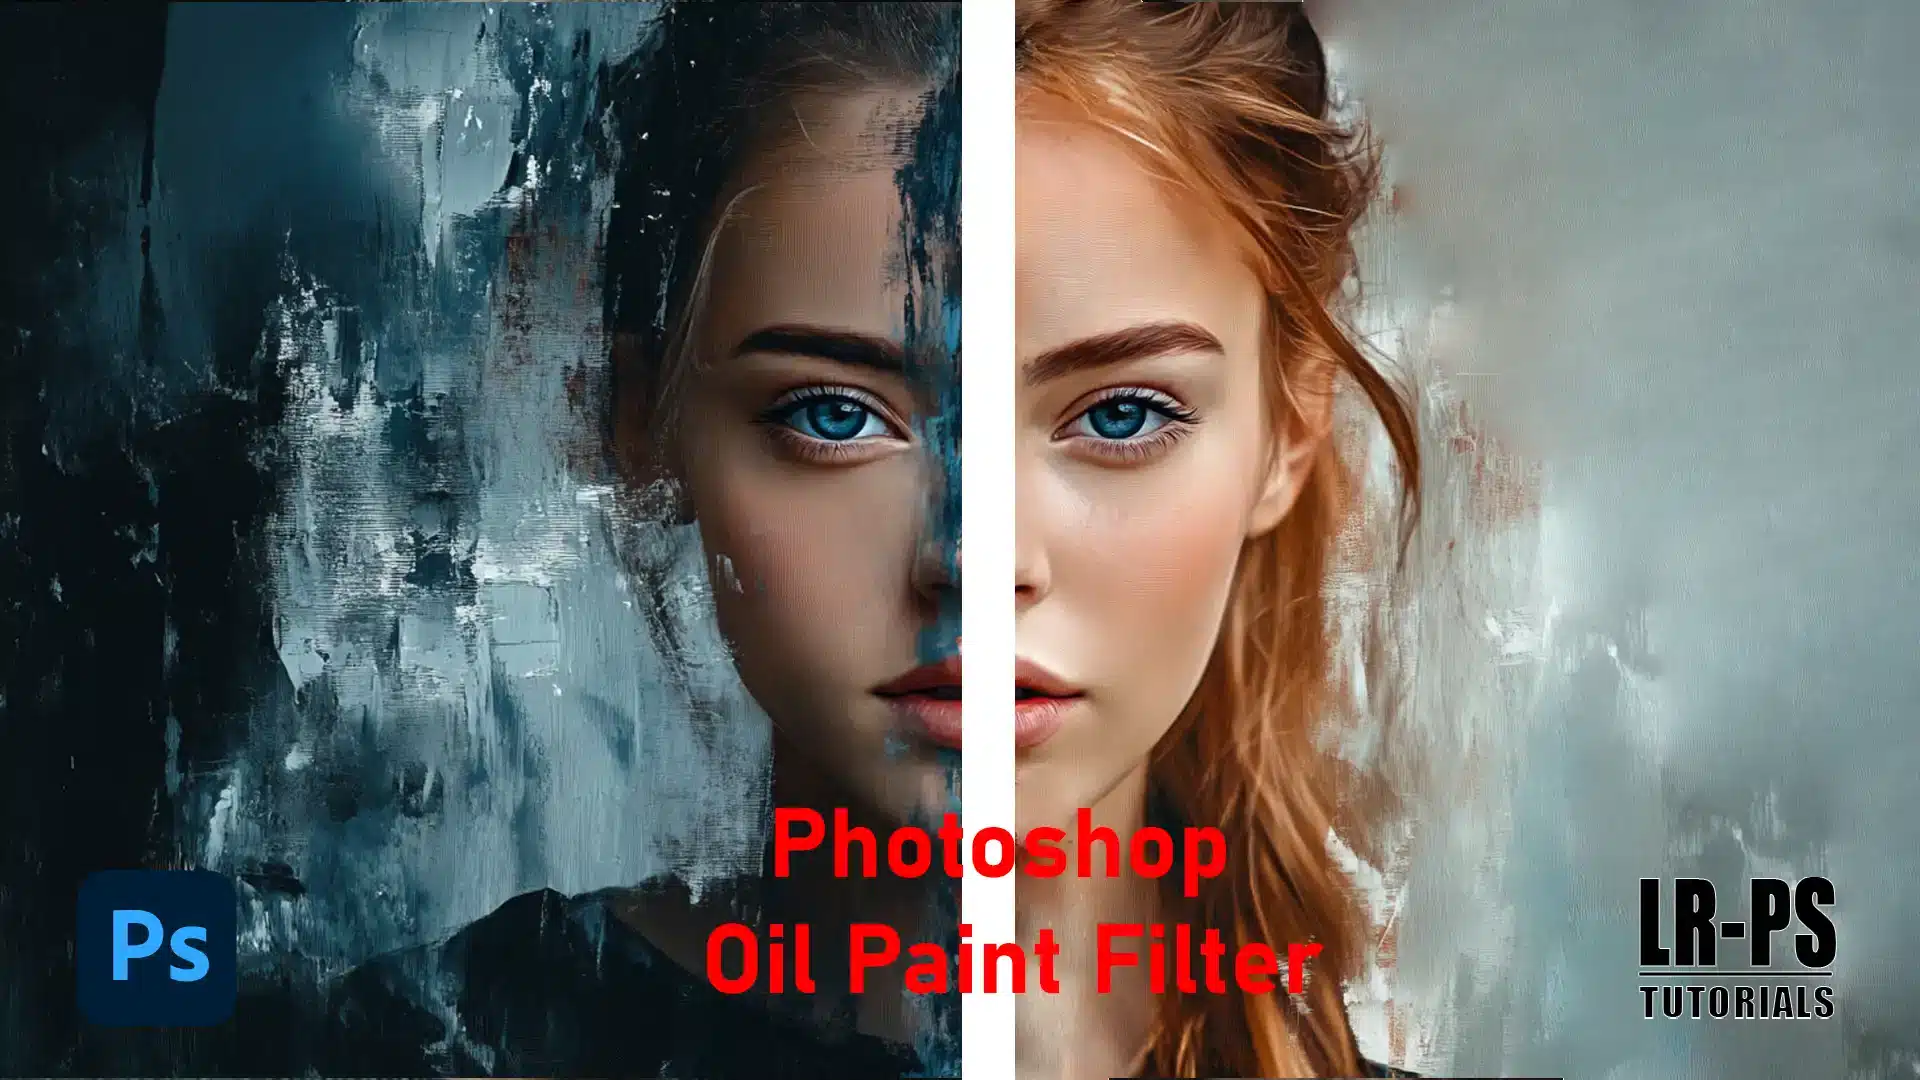
Have you ever wondered how to transform your photos into stunning pieces of art using the Photoshop oil paint filter effect? In this article, I’ll guide you through the steps to achieve that oil paint filter effect that makes your images stand out.
Imagine turning your favorite snapshots into masterpieces that look like they’ve been behind the Filter. Learn how to make the effect here:
Table of Contents
How to Use the Photoshop Oil Paint Filter
Explore how to enhance your photos with the dynamic capabilities of the Photoshop Oil Paint Filter tutorial. Next, learn the important steps to get started and achieve stunning results.
Getting Started With Photoshop Oil Paint Filter
First, open your Image in Photoshop. Make sure it’s clear. The oil paint effect works best with good details.
Convert to a Smart Object
Before applying the oil paint effect, convert your layer into a smart object. Smart object helps you go back and modify settings if needed. Also use the smart selection tool for optimizing your work flow twice than usual !
Find the Oil Paint Filter
Go to the Filter menu. Click on Stylize, then select Oil Paint Filter. A new window opens with the oil paint filter options.
Oil Paint Filter Options:
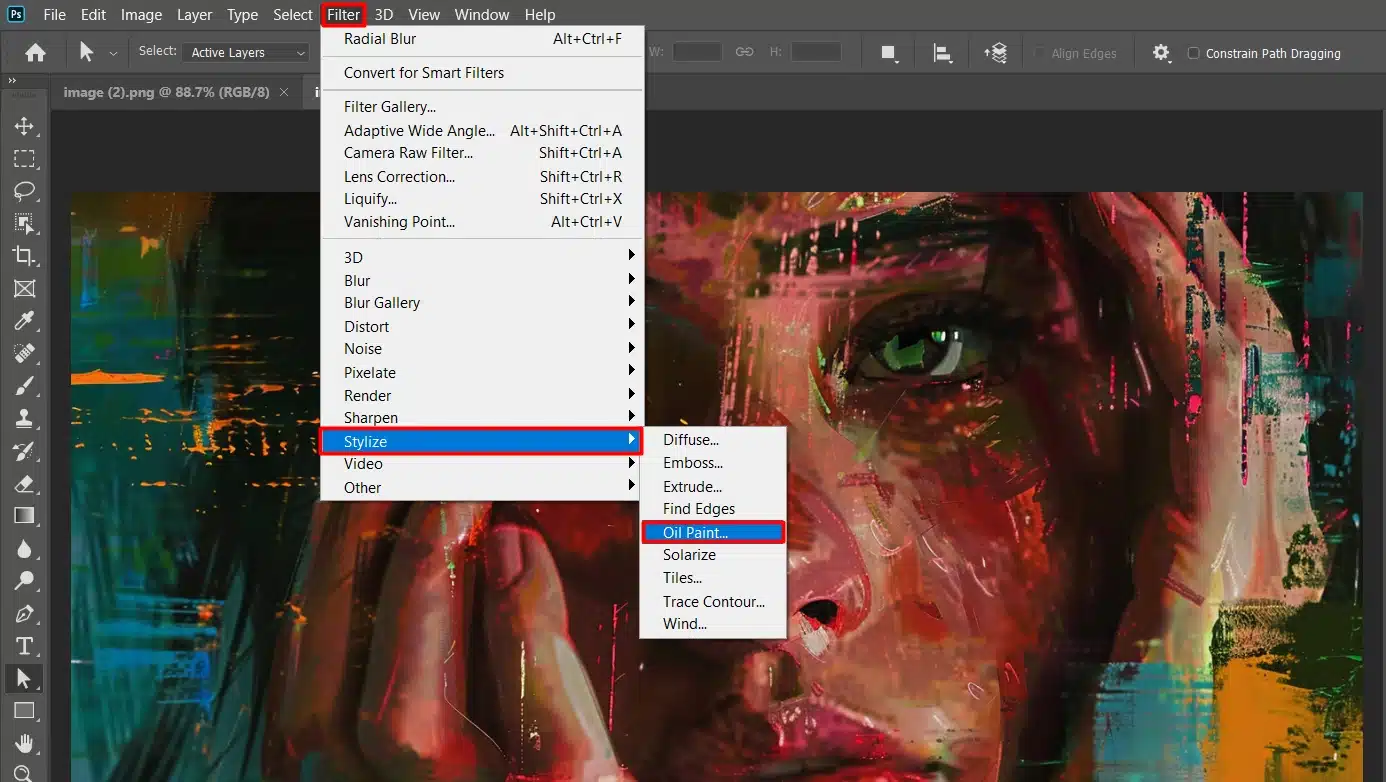
- Brush: Adjust the brush strokes. Try different settings to see how they change your photo.
- Cleanliness: Controls the smoothness of the strokes. Higher values tend to make smoother strokes; lower values keep more details.
- Scale: Modify the size of the brush strokes. Larger scales give bigger strokes; smaller scales add fine details.
- Bristle Detail: Focuses on the detail of the bristles and strokes. Higher values tend to show each bristle detail clearly.
- Lightness: Adjusts the direction and shine of the light source. This changes how shiny your painting looks.
- Stylization and Angular Direction: Shapes and twists the brush strokes. Balance these settings for a consistent look.
Apply and Tweak
Press OK to apply the filter. If needed, double-click the smart object to revisit the filters settings and tweak them. Implementing a smart object gives flexibility that ensures you get the best results.
Implementing a Layer Mask
If you want the oil paint effect on only part of the Image, use a layer mask. Paint out the oil paint effect where you don’t like it.
Pro Tips: For a more vibrant look, duplicate your layer mask before applying the oil paint filter. Blend it back with the original layer mask using lower opacity, creating a unique, nuanced oil paint effect while using a layer mask.
Additionally, using lens flare can add a dramatic or artistic effect to your photographs by simulating the appearance of lightness reflecting inside the camera lens.
To further enhance and bring out more detail in your Image, consider using the dodge and burn tools.
Preparing Your Image for the Oil Paint Filter
Before diving into choosing the Right Image, consider your goal for applying the oil paint filter. Ensuring your image meets certain criteria will enhance the final result.
Choosing the Right Image
When working with distortion techniques, it’s important to follow best practices to achieve the most stunning results. Here’s a quick guide on important aspects and their best practices:
| Aspect | Best Practices |
|---|---|
| Subject | Landscapes, portraits |
| Contrast | Strong contrasts |
| Detail | Clear, precise details |
| Light Source | Defined light source |
| Pre-Adjustments | Brightness, contrast, exposure, color tweaks |
Pick an image with strong contrasts and precise details. Landscapes and portraits work best. The more distinct the subject, the better the oil painting effect.
Look for the light source in your photo. A defined light source adds depth to your painting.
If your Image lacks these, make some basic adjustments first.
Basic Image Adjustments
Before using the oil painting effect, make some initial tweaks:
- Modify brightness and contrast to make your photo stand out. You don't need to be an expert to do this.
- Go to the "Adjustments" menu. Fine-tune your Image's exposure to bring out more detail and enhance shadows.
- Use the sliders to tweak colors if needed. This prep helps the oil paint look better.
Now that your Image is ready let’s apply the oil paint effect. Convert your layer to a smart object and save your work as a smart object for non-destructive edits.
Pro Tip: Use and drag a layer mask to selectively apply the oil paint effect. This allows you to manage over which areas look painted and which stay natural.
Additionally, consider using the patch tool that allows you to quickly remove imperfections from images by replacing them with nearby texture and color and then drag it to blend seamlessly.
For further refinement, explore different shortcuts to speed up your workflow. Happy editing!
Applying the Photoshop Oil Paint Filter
Before delving deeper, it’s important to understand how to navigate Photoshop’s menu and tools effectively. This tutorial ensures a smooth process when applying the oil painting effect to your images.
Accessing the Oil Paint Effect in Photoshop
First, open your photo in Photoshop CC. Go to the Filter menu, choose Stylize, then Oil Paint. This filter makes your photo look like a painting. It’s fun and easy.
Adjusting the Oil Paint Settings
In the Oil Paint panel, you’ll see several sliders. Each slider changes a part of the oil paint filter effect:
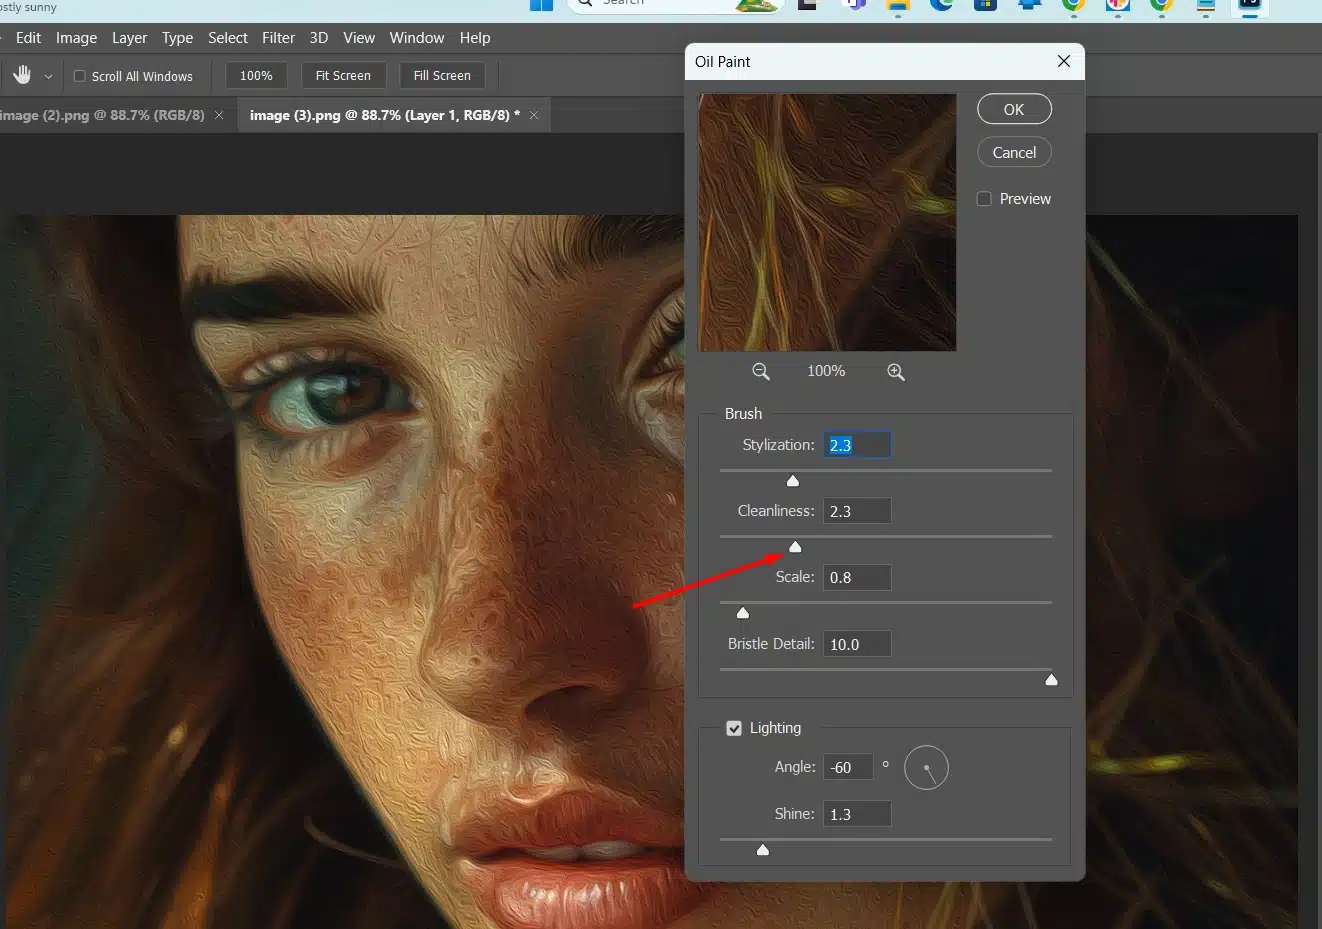
- Brush Size: Change the brush strokes' size. Adjust it to get the look you want.
- Cleanliness: Makes the brush strokes smoother or rougher. Play around with the brush settings until you're happy.
Fine-Tuning the Oil Paint Filter Effect
Fine-tuning helps get the best result the oil paint artwork:
- Convert your photo into a smart object and save your photo as a Smart Object to make non-destructive edits.
- Use a Layer Mask to apply the oil paint effect only where you want it. This way, some parts of the photo stay untouched.
- If there are any problems, fix them with the Patch Tool before applying the filter. You'll see a big improvement in your final Image.
Pro Tip: A defined light source can make your oil paint filter effect stand out. It adds depth and makes your Image more interesting.
To further enhance your photo editing capabilities, consider utilizing smart filters for non-destructive edits. Smart filters allow you to apply non-destructive filters to your images, enabling you to make adjustments and fine-tune effects without altering the original image data.
Enhancing the Oil Paint Effect
Before exploring further, mastering the details of enhancing the Oil Paint effect can elevate your images to new painting artistic heights. Understanding these adjustments ensures your final results meet your creative vision.
Oil Paint Layer Adjustments
So, you’ve applied the oil paint filter, and it looks pretty good. But let’s make it even better.
Layer Management for Non-Destructive Editing
- Use layers: Turn your Image into a smart object. Smart object keeps your edits non-destructive so that you can tweak things later.
- Multiple layers: Use and drag multiple layers to adjust parts of the Image without messing up the whole thing. For instance, create a new layer for highlights and shadows. Make sure you drag this new layer is above your original one.
Adding Texture for the Oil Paint Filter
Steps for Adding Texture to your Digital Painting:
- Choose a brush and texture: Select a brush and a texture that matches your Image.
- Layer mask: A layer mask is handy here. It lets you paint specific strokes in certain areas of the painting. Think of it like deciding which parts of your painting canvas get what texture.
- Brush sizes: Use different brush sizes for different textures. A big brush for broad brush strokes and a small brush for details.
Pro Tip: Use the “Preview” option in the oil paint filter settings. This lets you see changes as you make them, saving you time and effort by allowing you to modify brush strokes as needed.
Mastering Dodge and Burn for Depth
To add the finishing touches, consider using the Dodge and Burn tools.
These tools help you enhance the highlights and shadows, giving your painting image more depth and realism.
Steps for Dodge and Burn:
- Select the Dodge Tool: Use it to brighten the highlights.
- Select the Burn Tool: Use it to darken the shadows.
- Adjust Exposure: Set the exposure level to control the intensity of the oil paint filter effect.
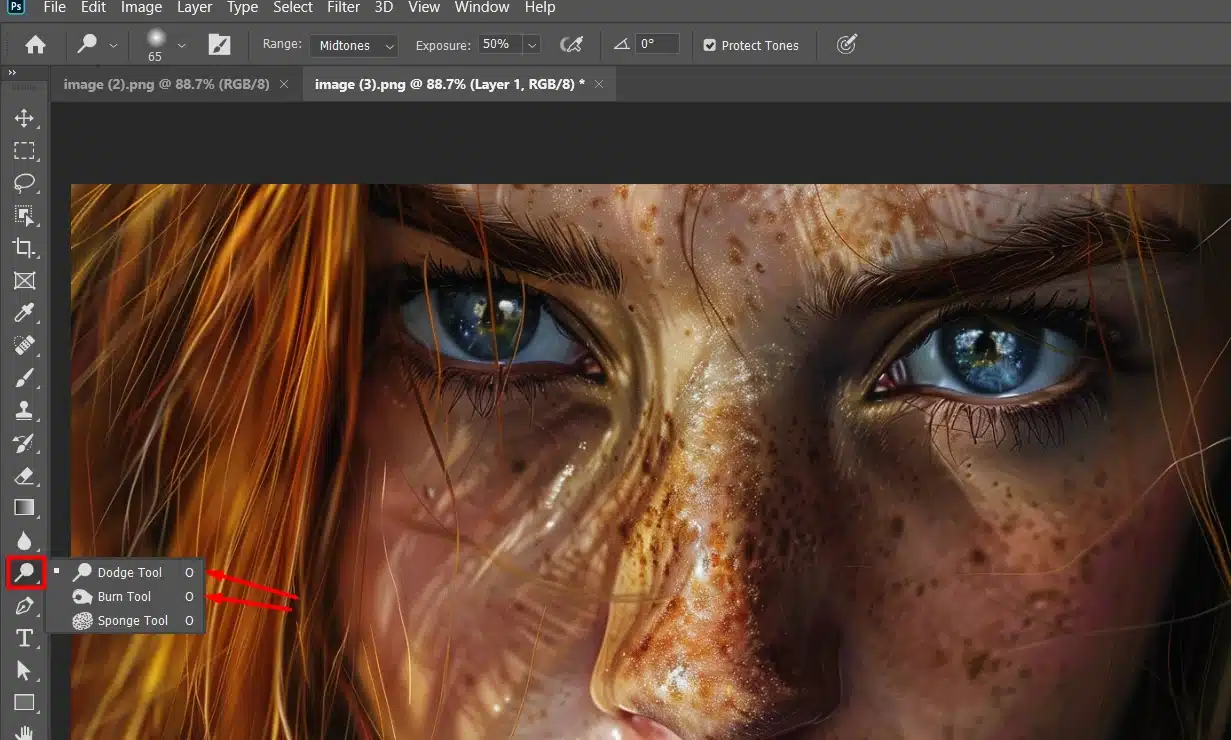
With these techniques, your oil paint effect will look more polished and professional.
Saving and Exporting Your Image
Saving and exporting your painting image can be tricky, but I have your back. We want your work to look great both online and in print.
Choosing the Right Format
When saving your Image, the format is important. You can pick JPEG, PNG, or TIFF:
- JPEG - Good for online use but loses some quality.
- PNG - Keeps more details but has a larger file size.
- TIFF - Best for high-quality prints.
Optimizing for Web
To load your image online, click ‘File‘ and select ‘Save for Web.’ Drag the sliders to adjust settings like quality and size.
Find the subtle balance between saving bandwidth and keeping that oil paint effect. You can see changes in real time. You can drag the slider to see changes in real time.
Pro tip: Always use a layer mask when applying filters. It keeps things clean and gives you more control over your final look.
Best Lightroom Export Settings for Instagram
Using the best Lightroom export settings is important if you want to share your work on social media, especially Instagram.
Go to ‘File’> ‘Export’ and set the resolution to 1080 pixels on the longest side.
Choose a JPEG format with a quality setting of around 80-85 to balance file size and image quality.
Using Photoshop Shortcuts
Speed up your workflow by mastering some important Photoshop shortcuts. For instance, press ‘Ctrl+S’ (Cmd+S on Mac) to save your work quickly.
Use ‘Ctrl+Shift+Alt+S’ (Cmd+Shift+Option+S on Mac) to open the ‘Save for Web‘ dialog box instantly. These shortcuts can save you time and make your editing process more efficient.
Additional Tips for Using the Photoshop Oil Paint Filter
Before diving into techniques for refining your painting images, consider these additional tips for maximizing the Photoshop Oil Paint Filter’s potential.
These insights can help you achieve a more polished and artistic result.
Experiment with Different Brush Sizes
One of the important aspects of achieving a realistic oil paint filter effect is experimenting with different brush sizes and strokes.
Start with a larger brush size to establish the basic brush strokes, then switch to a smaller brush to add finer details.
This technique mimics the approach of traditional painters, who often use a range of brush sizes to create depth and texture in their brush strokes.
Adjust the Stylization Settings
The stylization setting in the oil paint filter allows you to control the overall style of the brush strokes. Higher stylization values result in more fluid and smooth strokes, while lower tend to values give a more rigid and detailed appearance.
Experiment with these settings to find the perfect balance that suits the subject of your digital painting.
Play with the Lighting Angle
The lighting angle can significantly impact the final look of your oil paint filter effect.
Changing the lighting direction can enhance the three-dimensional appearance of the brush strokes.
Try different angles to see how the shadows and highlights shift, giving your artwork a dynamic and lifelike quality.
Use Blend Modes for Creative Oil Paint Filter Effect
After applying the oil paint filter, experiment with different blend modes in the Layers panel.
Overlay, Soft Light, and Multiply can produce a unique oil paint filter effect by blending the layer with the original photo.
Adjust the opacity to fine-tune the intensity of the oil paint filter effect.
Incorporate Additional Filters
Don’t be afraid to combine the oil paint filter with other Photoshop filters.
For instance, the Gaussian Blur filter can soften the edges, while the High Pass filter can enhance the details. Layer multiple filters to create a complex and captivating final photo.
Enhance Colors with Adjustment Layers
Adjustment layers such as Hue/Saturation, Vibrance, and Color Balance can help you enhance the colors of your Image.
These adjustments allow you to fine-tune the hues and intensities, making your artwork more vibrant and visually appealing.
Utilize the History Brush
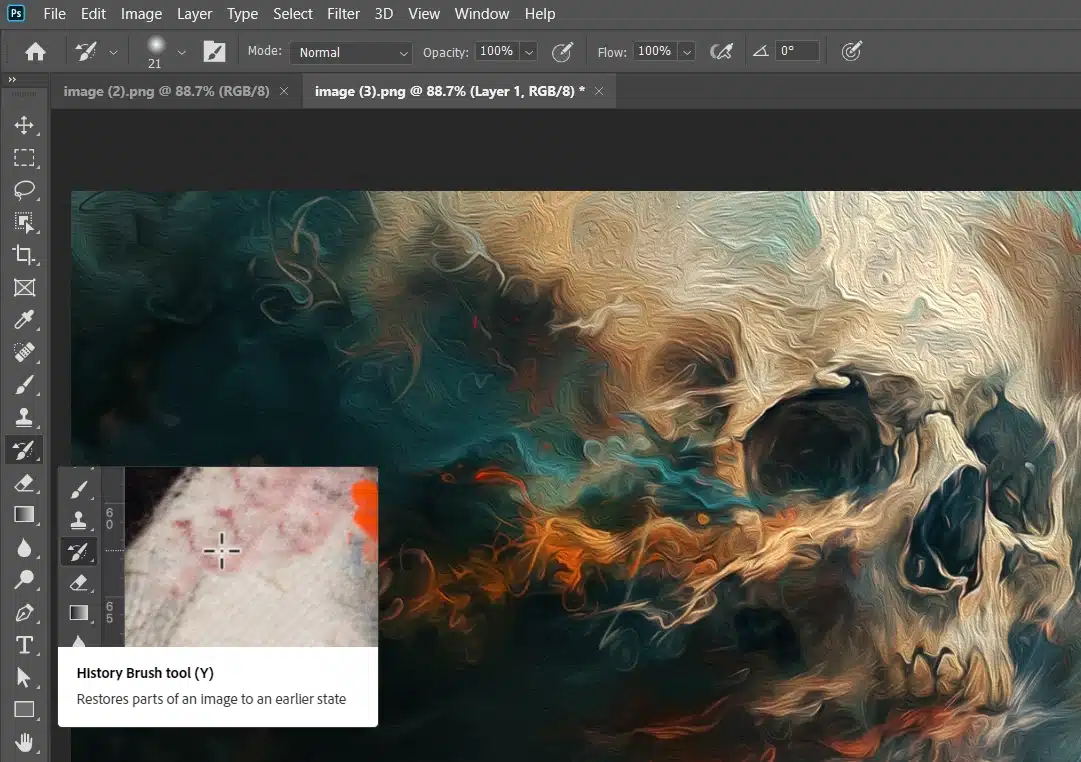
The history brush tool is handy for selectively undoing parts of your edits.
After applying the oil paint filter, you can use the History Brush to restore certain areas to their original state.
This brush is great for maintaining the focus on the subject while having a painted background.
Also, to remove a background in Photoshop, you can use tools like the Background Eraser tool or the Pen tool for more precise selections, ensuring your subject stands out against a transparent or new background.
Experiment with Different Subjects
While landscapes and portraits are popular choices for the oil paint filter, don’t hesitate to experiment with other subjects.
Still life, architecture, and abstract compositions can also benefit from this oil paint filter effect.
Each subject will interact differently with the filter, offering endless creative possibilities.
Learn from Traditional Art Techniques
Studying traditional oil paintings can provide valuable insights into how lightness, shadow, and texture create depth and realism.
Try to incorporate these techniques into your digital artwork.
Observing famous oil paintings’ brush strokes, palettes, and compositions can inspire your creations.
Practice Non-Destructive Editing
Always work with a smart object and adjustment layers to keep your editing non-destructive.
This approach allows you to make subtle changes to the smart object at any stage without losing the original image quality.
Non-destructive editing is important for maintaining flexibility in your workflow.
Save Presets for Consistency
If you find a set of oil paint filter settings you like, save them as a preset.
This way, you can apply the same settings to multiple images for a consistent look across your projects.
Presets are a great time-saver and ensure uniformity in your artwork.
Share Your Work and Get Feedback
Once you’ve created your painted masterpieces, share them on social media platforms and photography forums.
Constructive feedback from other photographers and artists can help you refine your techniques and discover new approaches to using the oil paint filter.
Keep Practicing and Experimenting
Like any artwork form, mastering the oil paint filter takes practice. Keep experimenting with different settings, techniques, and subjects.
Over time, you’ll develop a unique style and become more proficient in transforming your photos into stunning digital artwork pieces.
Join a Photoshop Community
Joining online communities and forums dedicated to Photoshop can provide valuable resources and support.
Engage with other members, participate in challenges, and learn from tutorials and discussions.
Being part of a community can inspire you and help you stay updated with the latest techniques and trends.
Stay Updated with Software Versions
Adobe frequently updates Photoshop with new features and improvements.
Keep your software up-to-date to benefit from the latest tools and enhancements.
Staying current with software updates ensures access to the best resources for digital painting projects.
Frequently Asked Questions (FAQs)

Where is the Oil Paint Filter in Photoshop?
- Open Photoshop and go to the Filter menu.
- Hover over the Stylize option.
- Click on Oil Paint to activate the filter.
How to Make a Photo Look Like an Oil Painting in Photoshop?
- Load your photo into Photoshop.
- Navigate to Filter > Stylize > Oil Paint
- Adjust the settings in the Oil Paint dialog to achieve the desired oil paint filter effect.
- Click OK to apply the filter.
Why is the Oil Paint Filter Grayed Out in Photoshop?
- Ensure your document is in RGB mode. Go to Image> Mode and select RGB Color.
- Check that your Photoshop version supports the Oil Paint filter.
- Make sure your computer's graphics processor is enabled. Go to Edit > Preferences > Performance and ensure the Use Graphics Processor is checked.
Does Photoshop CS6 Have the Oil Paint Filter?
- Yes, Photoshop CS6 initially included the Oil Paint filter.
- Note that in some updates, the oil paint filter may not be available depending on graphics hardware support.
Conclusion
In conclusion, the Photoshop oil paint filter has transformed my editing process, adding a unique artistic touch to my photos.
It’s an easy way to turn images into eye-catching masterpieces. Using blend modes, adjustment layers, and additional Photoshop filters can enhance your results even more.
Adjustment layers like Hue/Saturation and Color Balance can enrich your palette, making your artwork more vibrant.
If you want to dive deeper into these tools, I highly recommend checking out my Photoshop course and Lightroom course. These resources have been invaluable in honing my skills, and they could do the same for you.
Read more about Photoshop & Lightroom:


