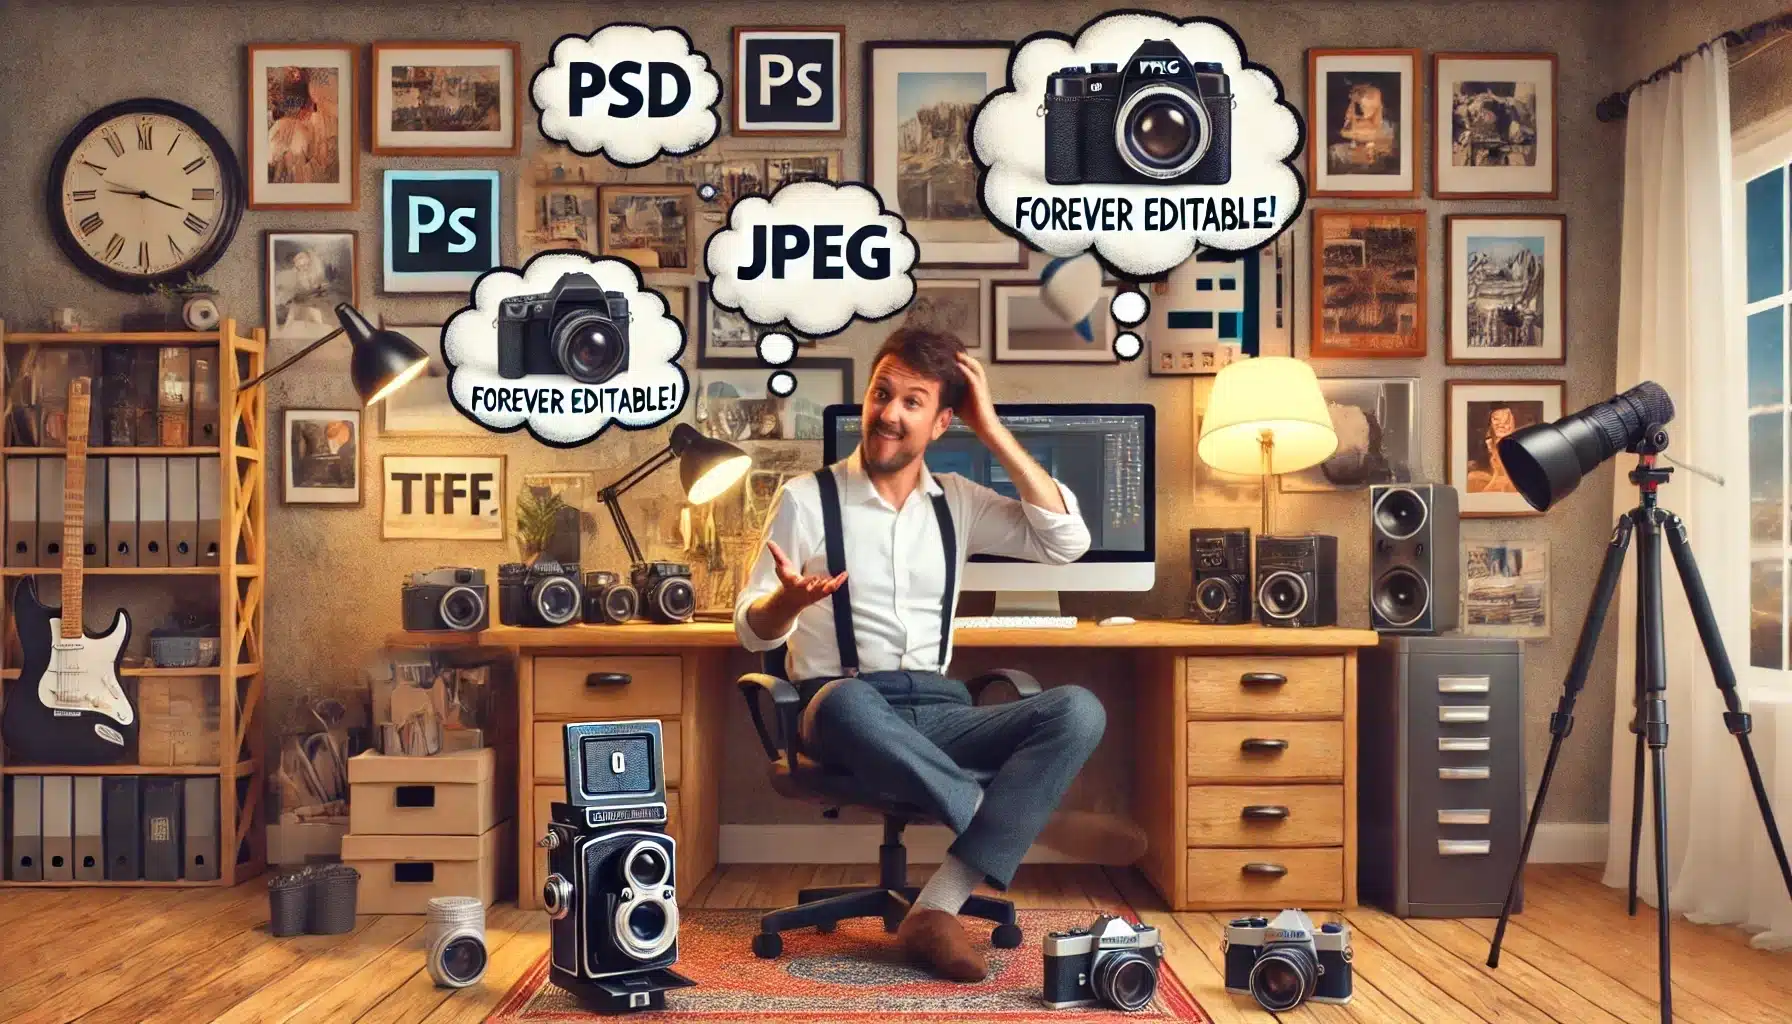
Understanding the Photoshop file extension is essential for anyone working with digital images.
Have you ever wondered why your Photoshop files have different extensions and what each one means?
In this article, I’ll walk you through the various photoshop file extensions associated with Photoshop, helping you grasp their unique purposes and benefits.
Imagine being able to choose the right file type effortlessly, ensuring your projects always look their best.
By the end of this read, you’ll not only be familiar with these extensions but also confident in deciding which one suits your needs.
Let’s get started!
Table of Contents
Understanding Photoshop File Extensions
Photoshop supports a variety of file extensions, each suited to different needs and purposes.
Here’s a quick guide to understanding the most commonly used Photoshop file extensions:
What is a Photoshop File Extension?
Photoshop file extensions identify the type of file and its compatibility with other programs.
Each extension shows how Photoshop stores the image data, including layers, color settings, and other details.
PSD files, for example, are Adobe Photoshop’s native file format.
Common Photoshop File Extensions
Here are some common photoshop file extensions you will encounter
- PSD: The default photoshop document format. It retains layers, adjustment layers, and other editable properties.
- PSB: Known as the large document format. It handles bigger files and extensive detail.
- JPEG: Common for web images. Compresses the file size but loses some quality.JPEG files can be scan line compressed separately, which helps reduce file size further but may affect image quality.
- PNG: Web-friendly, supports transparency, and doesn't lose quality due to compression.
- TIFF: Stands for tagged image file format. Preserves quality but creates large files.
- PDF: Compatible with the portable document format. Useful for sharing documents that need print-ready quality.
Why Photoshop File Extensions Matter
Choosing the right file format impacts your editing and sharing process.
PSD files retain editable properties, making them ideal for ongoing projects.
For web use, JPEGs are smaller and faster to load, while PNGs are perfect for graphics needing transparency.
TIFFs are suitable for high-quality prints, and PDFs are great for sharing documents without losing quality.
Each file format serves a purpose depending on the needs of your project.
Pro Tip: Always save your work in the appropriate file format.
For ongoing projects, use PSD files; for sharing or web use, choose the format that best fits your purpose.
Additionally, understanding the difference between Photoshop and Lightroom can help you decide which software to use for specific tasks, as each has unique strengths.
Working with PSD Files and Photoshop File Extensions
PSD files, or Photoshop Document files, are the native format for Adobe Photoshop.
They offer numerous advantages for editing and managing complex images.
| Feature | Description | Benefit |
|---|---|---|
| PSD File | Native Photoshop format, retains layers, text, masks | Ideal for complex image editing |
| File Header | Contains fundamental details like file size and mode | Organizes image data |
| Color Mode Data | Holds information about the image's color mode (RGB, CMYK, grayscale) | Keeps color data sorted |
| Image Resource Section | Stores settings like thumbnails and resolution | Maintains consistency and accuracy |
| Layer and Mask Info | Includes the arrangement of layers and masks | Allows for non-destructive editing |
| Layer Info | Details each layer's name, type, position, and effects | Ensures precise image reconstruction |
| How to Open | Drag into Photoshop or use 'Open' command | Loads all layers and adjustments for editing |
| Editing Capabilities | Modify layers, adjust colors, add text, apply filters | Full control over image components |
| Saving PSD Files | Keep layers intact, use 'Save As' for different stages, flatten for web formats | Preserves editing flexibility, useful for sharing |
What is a PSD File?
A PSD file, or Photoshop Document, is Adobe Photoshop’s native file format. It retains all the layers, text, masks, and other features, making it ideal for editing.
Let’s explore its structure and purpose.
PSD File Format Specifications
The PSD format excels in maintaining the complexity of your work by storing multiple image layers, channels, paths, and more.
This makes it versatile for detailed editing, an essential feature for most creators.
File Header
The file header contains fundamental details like file size and mode. Think of it as the table of contents for your PSD file.
Without it, accessing your image data would be chaotic.
Color Mode Data Section
Color Mode Data Section holds information about the image’s color mode. Whether you’re working with RGB, CMYK, or grayscale, this section keeps it sorted.
Image Resource Section
The Image Resource Section stores additional settings and properties like thumbnails and resolution.
These are vital for fine-tuning and previewing your design.
The Image Resource Section also helps maintain consistency and accuracy throughout the editing process, making it easier to achieve your desired outcome.
Layer and Mask Information
This section is the heart of your PSD file. It includes the arrangement of layers and masks, which allows for non-destructive editing.
You can tweak parts of your image without altering the original composition.
Layer Info
Layer Info provides specific details about each layer, such as its name, type, position, and effects.
Each layer’s data ensures you can reconstruct your image exactly as designed.
How to Open a PSD File
To open a PSD file:
- Drag it into Adobe Photoshop or use the 'Open' command.
- This action loads all the layers, text, and adjustments, ready for further editing.
Other apps such as GIMP also support it, albeit with limited functionality.
For a comparison, check out Photoshop vs GIMP.
Editing PSD Files
Editing PSD files allows you to modify all aspects of your image.
You can:
- Rearrange layers
- Adjust colors
- Add text
- Apply filters without restrictions
Always keep an eye on the layers panel; it’s your best friend in this process.
Saving PSD Files
When saving PSD files:
- Make sure to keep all the layers intact for future edits.
- Use the 'Save As' option if you wish to keep different stages of your work.
- Saving into formats like JPEG or PNG flattens the layers but is useful for sharing or uploading the image online.
Pro Tip: If you’re working with high-resolution images or extensive layers, consider using the Large Document Format (PSB). It handles files exceeding 2 GB, ensuring you don’t lose any detail.
How to Convert a PSD File
Converting a PSD file can seem like a daunting task, especially if you’re new to Adobe Photoshop.
Worry not. I’m here to guide you through this.
| Aspect | Overview |
|---|---|
| PSD File Definition | Native format for Adobe Photoshop, retaining all editing elements. |
| File Header | Contains basic details like file size and mode. |
| Color Mode Data | Information on image's color mode (RGB, CMYK, etc.). |
| Layers and Masks | Non-destructive editing with detailed layer information. |
| How to Open | Open in Photoshop or GIMP (limited functionality). |
| Saving Options | Save with layers or flatten for sharing (JPEG, PNG). |
Step 1: Open the PSD File
Firstly, open your PSD file in Adobe Photoshop. Simply drag it into the workspace or use the ‘Open’ command from the ‘File’ menu.
Make sure all your layers and adjustments are intact.
Step 2: Prepare Your Layers
Ensure all the necessary layers are visible.
Adjust any text, images, or adjustment layers to your liking. It’s crucial to finalize everything before converting.
You might also want to use essential tools in Photoshop like the clone stampt tool or the quick selection tool to make precise adjustments.
Step 3: Choose Your Desired Format
- JPEG: Great for web use. Lossy compression but maintains quality.
- PNG: Perfect for graphics with transparency. Lossless compression.
- TIFF: Ideal for high-quality prints. Lossless and retains layers.
Step 4: Export the File
Go to ‘File’ -> ‘Export’ -> ‘Export As’ Select the desired file format.
Adjust settings like image resolution and quality.
Click ‘Export’ to save your new file.
Why Convert PSD Files?
- Compatibility: Not everyone has Adobe Photoshop. Converting makes sharing easier.
- File Size: Other formats like JPEG or PNG generally have smaller sizes.
- Performance: Different file formats can improve loading times and performance online.
Pro Tip: Always keep a copy of the original PSD file. It allows you to make changes later without losing any of your original image data.
There you have it , a quick and easy guide to converting your PSD files!
Managing Image Data and Photoshop File Extensions
When working with various Photoshop file extensions and managing image data, it’s crucial to understand the different file formats available.
Each format serves a unique purpose and has its own set of benefits and drawbacks.
The table below provides a quick overview of common image file formats, including PSD, JPEG, PNG, TIFF, and PDF.
| File Format | Description | Best For | Advantages | Disadvantages |
|---|---|---|---|---|
| PSD | Photoshop's native format with full editability. | Complex edits and layers. | Preserves all layers and effects. | Large file size, not widely supported. |
| JPEG | Compressed format for photographs. | Web and print. | Small file size, widely supported. | Lossy compression affects quality. |
| PNG | Lossless format with support for transparency. | Web images with transparency. | High quality, supports transparency. | Larger file size compared to JPEG. |
| TIFF | Versatile format with high quality. | Professional printing. | Excellent image quality, flexible. | Very large file size. |
| Document format that can include images. | Sharing documents. | Maintains layout and quality. | Not ideal for high-quality image edits. |
Managing image data effectively is crucial for optimizing your workflow in Adobe Photoshop.
Image data refers to the collection of pixels that make up your digital images.
Understanding Image Data
Image data forms the foundation of any digital image you work with. It’s the collection of pixels that create the picture, and without it, images cannot exist.
In Adobe Photoshop, you deal with raw image data, often obtained from cameras or scanners.
The format of this data can vary, but its core remains the same: tiny squares of color called pixels.
When you open a photo in Photoshop, you’re essentially opening a file containing this pixel information.
Different file formats store this data in their unique ways:
- JPEGs compress it
- PNGs preserve it without losing quality
- PSD files keep everything intact
Such formats impact not just the appearance but also performance and compatibility.
How Photoshop Handles Image Data
Adobe Photoshop’s powerful engine processes image data efficiently. The software arranges it into layers, each holding different elements of your project.
Think of layers as transparent sheets stacked on top of each other. You can modify one layer without affecting the others, allowing for intricate edits.
Photoshop uses its native file format, the PSD format, to save projects with multiple layers, effects, and other vital information.
This includes variable image resources, which are essential for managing different elements and settings within the file.
When you save your work in a PSD file, you retain all these features. This is why professionals prefer the PSD format, it keeps everything editable.
Moreover, Photoshop supports various file formats for exporting your final images.
Whether it’s JPEG for web use or TIFF for high-quality prints, there’s a format for every need.
Understanding these options helps you choose the right format based on your requirements.
Optimizing Image Data for Performance
To ensure your projects run smoothly, it’s crucial to optimize image data.
Start by adjusting the image resolution and size.
Lower resolutions make files smaller but can reduce quality, while higher resolutions maintain detail but increase size.
Finding a balance is key.
Next, utilize Photoshop’s features to streamline performance:
- Use adjustment layers instead of direct edits; they offer non-destructive adjustments, meaning you can always revert changes.
- Compress file sizes without significant quality loss by choosing efficient formats like JPEG and PNG for finished projects.
Lastly, organize your layers and image resources.
A well-structured project loads faster and is easier to work on.
Group related layers, name them clearly, and purge unnecessary data. By taking these steps, you’ll enhance both performance and workflow.
Pro Tip: Convert your PSD files to JPEG or PNG for everyday use, but always keep the original PSD for edits. This ensures you have a lightweight version and an editable backup.
This approach helps old people learn Photoshop and Lightroom more effectively, making the complex world of image data simpler and more manageable.
With practice, they’ll become proficient in no time!
Exploring Various File Formats and Photoshop File Extensions
When working with Adobe Photoshop, you’ll encounter a range of file formats, each serving a specific purpose.
Understanding these formats helps you manage your images more effectively and choose the right one for your needs.
Overview of Photoshop File Extensions and Formats
Photoshop uses different file formats to handle image data effectively. Among them, the PSD format stands out as Photoshop’s native file format.
It is used for storing all layers and settings within a project. This ensures that users can return to their work for further edits without loss of quality.
JPEG and PNG are common file formats for sharing images online.
JPEG compresses the image, which can result in quality loss, but the file size is smaller.
On the other hand, PNG preserves the image quality and supports transparency, making it perfect for web graphics with transparent backgrounds.
Another important format is TIFF, which keeps image pixel data intact, suitable for professional photographers who need high–quality prints.
For older users, remembering these main types – PSD, JPEG, PNG, and TIFF – makes it easier to manage and understand their purposes.
Choosing the Right File Format
Understanding when to use each file format is crucial:
- PSD files should be your go-to when working on a project that requires constant editing. This is because the PSD file retains layers, adjustments, and all modifications.
- When you want to share images online, converting them to JPEG or PNG is a better option to balance quality and file size.
- For high-resolution printing, use TIFF. This format handles large document formats efficiently and keeps all the image data.
Exploring and understanding the capabilities of each format helps in making better decisions while saving or sharing your work from Adobe Photoshop.
Converting Between File Formats
Switching between file formats might seem tricky, but it’s quite straightforward in Photoshop. Open your photoshop document, go to ‘File’ and choose ‘Save As’.
From there, select the desired format. Convert PSD to JPEG format for easy sharing or PNG for transparent backgrounds.
Keep a copy of the original PSD file for edits. It’s like keeping a master key to all the doors so you can go back and make changes without starting over.
This approach can simplify your learning of Photoshop and help with organizing your work better.
Pro tip: Always save a backup in the PSD format before converting it to different image file types, ensuring you retain all details for future edits.
Additional File Formats and Photoshop File Extensions
Beyond the common document file formats, there are several Additional File Formats in Photoshop that can be useful for specific tasks.
| File Format | Description | Key Features | Usage |
|---|---|---|---|
| Actions | Streamline repetitive tasks by recording and applying them with a click. | Saves time, reusable, automates processes. | Ideal for tasks like resizing images or adding watermarks. |
| Arbitrary Map | Provides greater control over color adjustments with custom curves. | Fine-tunes contrast, corrects exposure, precise edits. | Useful for precise color correction and contrast adjustments. |
| Color Table | Stores indexed colors, useful for web design and optimizing images for devices. | Reduces file size, retains essential details. | Best for GIFs and images with limited color ranges. |
| EPS (Encapsulated PostScript) | Saves vector and raster images for high-quality printing. | Retains high-quality data, compatible with graphic design programs. | Ideal for printing, less support for advanced PSD features. |
| TIFF (Tagged Image File Format) | Preserves raw image data and layers for complex designs. | Excellent detail, no quality compromise, preserves layers. | Top choice for photographers and designers. |
Actions
Actions in Photoshop streamline repetitive tasks. Save your frequently used processes as actions and apply them with a click.
For example, resizing images or adding a watermark usually takes time when done manually. By creating an action, you simply press ‘Play’ and Photoshop repeats your task automatically.
This approach saves significant time, especially in projects with many images.
Always save these actions for future use.
Arbitrary Map
Arbitrary map mode provides greater control over color adjustments. It allows mapping specific input levels to output levels through a custom curve.
This technique manipulates your image data to obtain real-time results.
Utilize arbitrary maps for fine-tuning contrast or correcting exposure errors.
Although the adjustment might seem complex initially, it’s invaluable for precise edits.
Color Table
The color table stores indexed colors for an image. Initially designed for screens with limited color displays, it remains useful in web design and optimizing images for varying devices.
By reducing the number of colors, you minimize file size while retaining essential details. Use the color table for ( graphics interchange format ) GIFs or images requiring limited color ranges.
Pro Tip: When working on large projects, always keep a backup of your original Photoshop document. This practice ensures you have an editable version for future tweaks or changes.
Additionally, consider using the content–aware fill in photoshop for seamless background edits and the patch tool in photoshop for precise touch-ups.
Other Document File Formats and Photoshop File Extensions
When working with digital images in Photoshop, it’s useful to be familiar with various document file formats beyond the standard ones like PSD.
Other Document File Formats include options such as TIFF, PDF, and EPS, each offering unique features for different needs.
Photoshop EPS files
We use Photoshop EPS file to save vector and raster images. EPS stands for Encapsulated PostScript, a file format that retains high-quality image data.
It is great for printing since it’s compatible with many graphic design programs. Remember, EPS is versatile but might not support some advanced features found in PSD files.
Key Points:
- EPS stands for Encapsulated PostScript.
- Retains high-quality image data.
- Great for printing and compatible with many graphic design programs.
- May not support some advanced features found in PSD files.
TIFF files
TIFF, or Tagged Image File Format, remains one of the most flexible formats for saving raw image data. It preserves layers, making it useful for complex designs.
TIFF files maintain excellent detail and are a top choice for photographers and designers alike. Many professionals love
TIFF because it doesn’t compromise on quality.
Advantages of TIFF files:
- Preserves layers for complex designs.
- Maintains excellent detail.
- Preferred by photographers and designers.
- Doesn't compromise on quality.
Photoshop-specific TIFF Tags
Photoshop-specific TIFF tags store extra image resources.
They include layer data, paths, and other settings unique to a Photoshop document.
This customization makes editing easier and more precise. It’s a handy way to keep all necessary information in one file.
Benefits of Photoshop-specific TIFF Tags:
- Stores extra image resources.
- Includes layer data, paths, and other settings.
- Makes editing easier and more precise.
- Keeps all necessary information in one file.
TIFF Files on Mac OS
On Mac OS, handling TIFF files is straightforward. The operating system is well-integrated with Adobe software.
This means you can open and edit TIFF files seamlessly.
Additionally, Mac’s native Preview app supports basic TIFF viewing and editing, allowing quick adjustments outside of Adobe Photoshop.
For those who need to make quick edits, learning Lightroom shortcuts can be incredibly beneficial.
Working with TIFF Files on Mac OS:
- Seamless integration with Adobe software.
- Open and edit TIFF files easily.
- Mac’s Preview app supports basic TIFF viewing and editing.
- Allows quick adjustments outside of Adobe Photoshop.
Pro Tip: Always save a copy in another format, like (portable network graphics) PNG, JPEG or RAW files, for easy sharing and compatibility with other devices.
Halftone Screens
Halftone screens play a crucial role in printing.
They break down images into dots, creating the illusion of gradients and shades.
Adobe Photoshop offers powerful tools to create these screens. You need to master how to use them effectively.
Getting Started with Halftone Screens
First, open your image in Adobe Photoshop. It’s best to start with a high–resolution photo for better results when you apply the halftone effect.
Step-by-Step Guide:
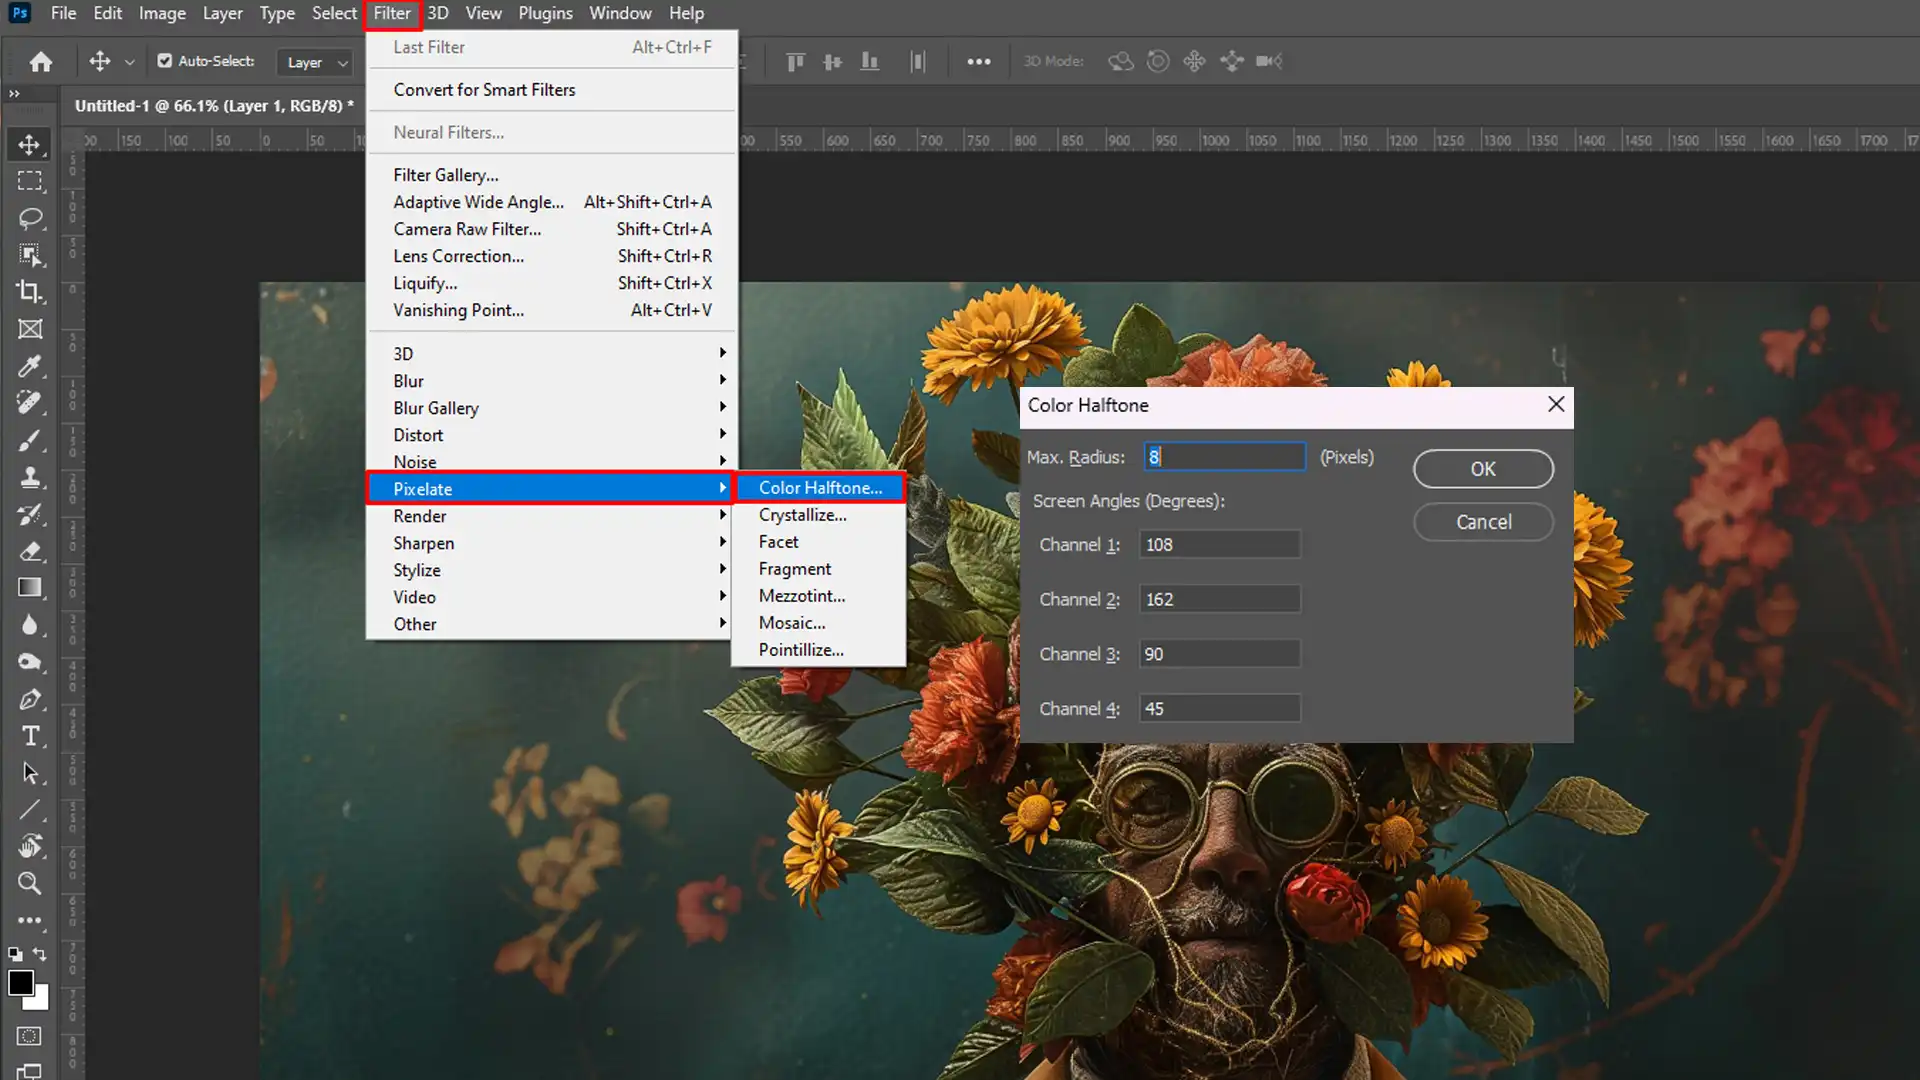
- Select your image and open it as a Photoshop document.
- Convert the image to grayscale by going to Image > Mode > Grayscale.
- Open the halftone filter by navigating to Filter > Pixelate > Color Halftone.
- Adjust the settings, including dot size, angle, and frequency. Experiment until you achieve the desired results.
Don’t forget to save your work as a PSD file to preserve all layers and settings for future edits.
Using Adjustment Layers
- Adjustment layers are helpful for fine-tuning your halftone screen effects.
- You can adjust brightness and contrast by going to Layer > New Adjustment Layer > Brightness/Contrast.
- Apply different filters and experiment with color adjustments to enhance your design.
Remember, PSD files retain these layers, which helps with non-destructive editing. You can always go back and tweak your design later.
Pro Tip: Keep an eye on your image resolution.
Lower resolutions can make halftone dots look pixelated, while higher resolutions provide smoother gradients.
Duotone Options and Photoshop File Extensions
Adobe Photoshop offers a variety of duotone options for users wanting to enhance their images.
This technique applies two colors, transforming your photos into captivating pieces of art.
Selecting Your Starting Image
Begin with a high-resolution image.
This ensures quality results.
Open your photo in Adobe Photoshop, and get ready to explore duotone magic.
Converting to Grayscale
First, convert your image to grayscale.
This step prepares the image for duotone effects.
Follow these steps:
- Navigate to Image.
- Select Mode.
- Choose Grayscale.
Your photo will lose color, but don’t worry, it’s all part of the journey.
Accessing Duotone Settings
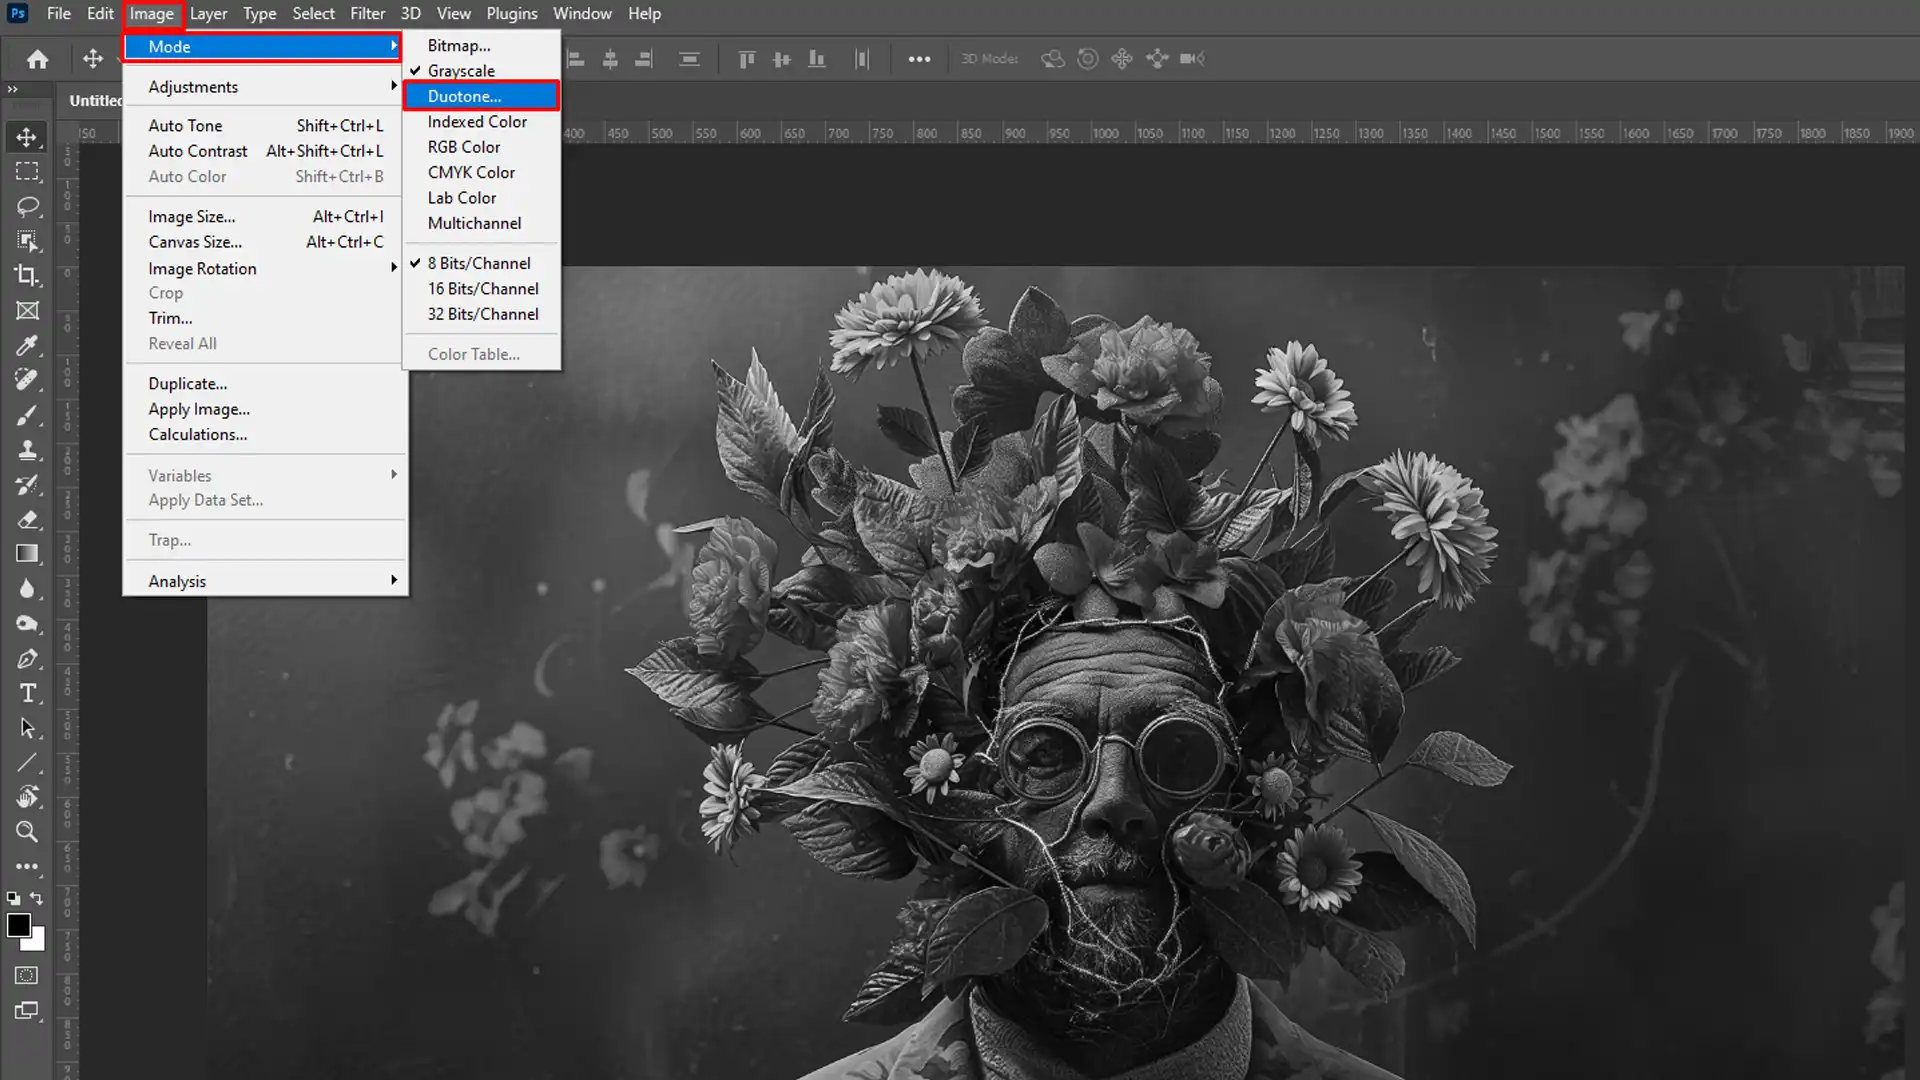
After converting to grayscale, access the duotone settings. Head to Image > Mode > Duotone.
This opens a dialog box for configuring duotone options:
- Go to Image.
- Click Mode.
- Select Duotone.
Picking Colors and Adjusting Curves
Choose your two colors for the duotone effect.
You can experiment with different combinations to see what looks best.
Adjusting the duotone curves lets you tweak how the colors mix and interact:
- Pick your primary color.
- Pick your secondary color.
- Adjust curves for desired effect.
Saving Your Work
PSD files are an excellent way to save your progress.
This format preserves layers and settings, allowing for non-destructive editing.
Ensure your hard work remains intact by saving regularly:
- Go to File.
- Select Save As.
- Choose PSD format.
Pro Tip: Always retain a copy of your original image.
This allows you to start fresh if needed.
Storing your raw image data can be a lifesaver.
Curves and Photoshop File Extensions
Okay, let’s get into curves.
Curves are a powerful tool in Adobe Photoshop.
They help you adjust the brightness and contrast of your image.
Understanding the Basics of Photoshop File Extensions
First, open your image in Photoshop.
You can use a photoshop file extension like .psd files. It’s photoshop’s native file format.
You got it? Great!
Accessing the Curves Tool
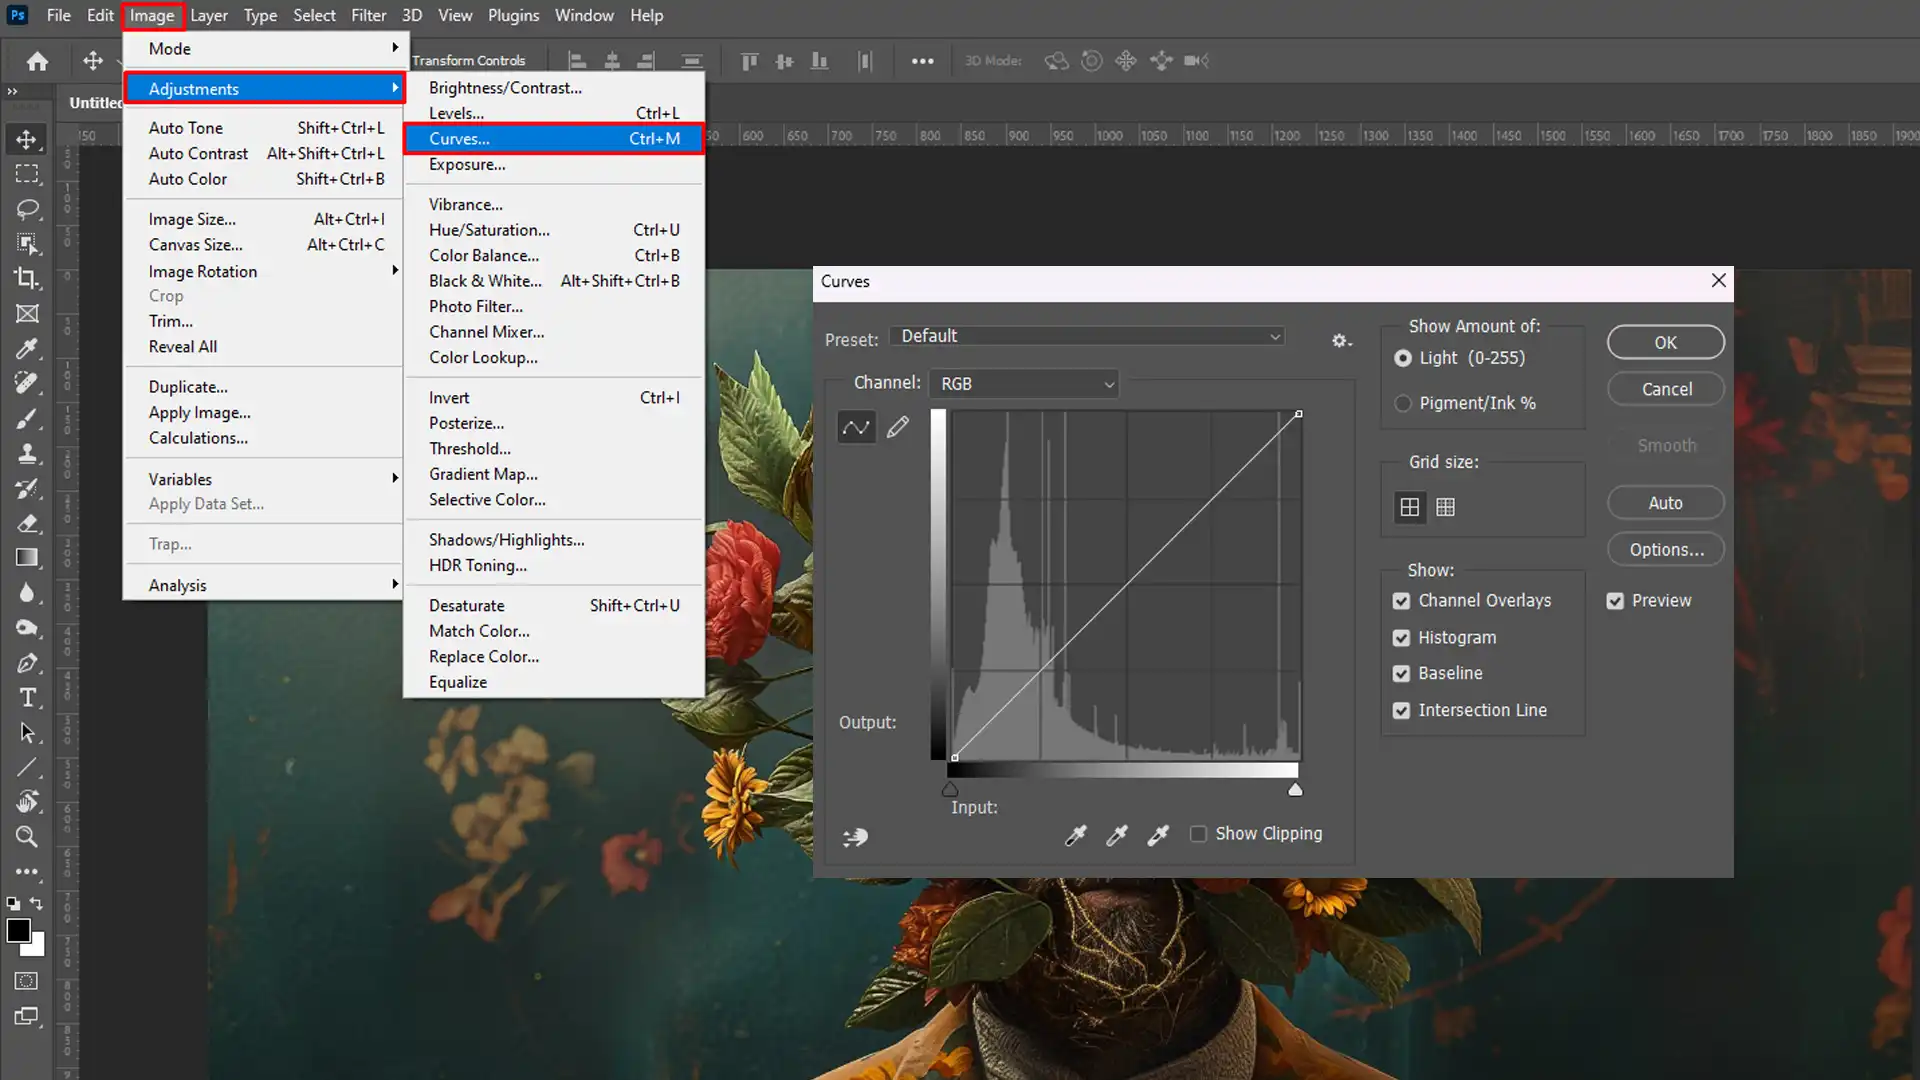
Navigate to Image > Adjustments > Curves. You see a graph with a diagonal line.
This line represents the tonal range of your image.
The bottom-left of the graph controls shadows. The top-right manages highlights.
Making Adjustments
- To brighten the image, click on the diagonal line and drag upward.
- To darken, click on the line and drag downward.
- You can create multiple points on the line for more control.
Why Use Curves?
Curves give you precision that other tools lack. You can target specific tonal ranges.
This is particularly handy when dealing with raw format or adjusting variable channel image data.
Saving Your Work
Always save your work in .psd files.
This retains adjustment layers, image resources, and other essential image data.
Use File > Save As and choose PSD format.
Pro Tip: Want to apply the same curve adjustment to multiple images? Save your curve settings! You can find this option in the Curves dialog box.
Additional Tips for Photoshop File Extensions
For those who want to dive deeper into photo editing, consider learning about Lightroom Shortcuts and Essential Tools in Photoshop.
These can significantly speed up your workflow and enhance your editing capabilities.
Now, go ahead and experiment with curves. It’s fun and can make a big difference in your photos.
Custom Kernel Photoshop File Extensions
Creating a custom kernel in Adobe Photoshop document is crucial for image editing.
Before we dive in, let’s break it down simply.
Initial Setup
First, open your Photoshop document. Save it initially in PSD file format to retain all the image data.
Trust me, this keeps your work intact.
Why Use Custom Kernels?
Custom kernels let you control specific image adjustments. Think of them as fine-tuning tools, they’re like seasoning your food perfectly.
You don’t just use salt, you use various spices.
Same thing here.
Steps to Create a Custom Kernel

- Open your PSD file in Adobe Photoshop.
- Go to Filter > Other > Custom. This is where the magic starts.
- You'll see a grid matrix. Each value here impacts your image differently. Play around with these to get the hang of it.
- After setting your values, click OK. Your custom kernel is applied!
- Save your work again in PSD file format. Always keep your image data safe.
Advantages of Custom Kernels
- Precise control over image resources.
- Ability to target image pixel data.
- Enhanced editing capabilities compared to pre-set filters.
Pro Tip: Save often. It’s easy to get lost in tweaks, but regular saving ensures that your Photoshop document retains those perfect adjustments.
Plus, if something goes wrong, you won’t lose all your hard work!
Stay curious, experiment with your custom kernel, and enjoy the editing process. You’re on your way to creating masterpieces!
CMYK Setup and Photoshop File Extensions
If you want your prints to look their best, you need to understand CMYK. CMYK stands for Cyan, Magenta, Yellow, and Black.
These colors mix together in printing to create other colors.
Let’s dive in!
Why CMYK?
When you print, your image turns out differently compared to how it looks on the screen.
Your computer uses RGB, which stands for Red, Green, and Blue. But printers use CMYK.
That’s why knowing CMYK setup is crucial for accurate prints.
Setting Up CMYK in Adobe Photoshop
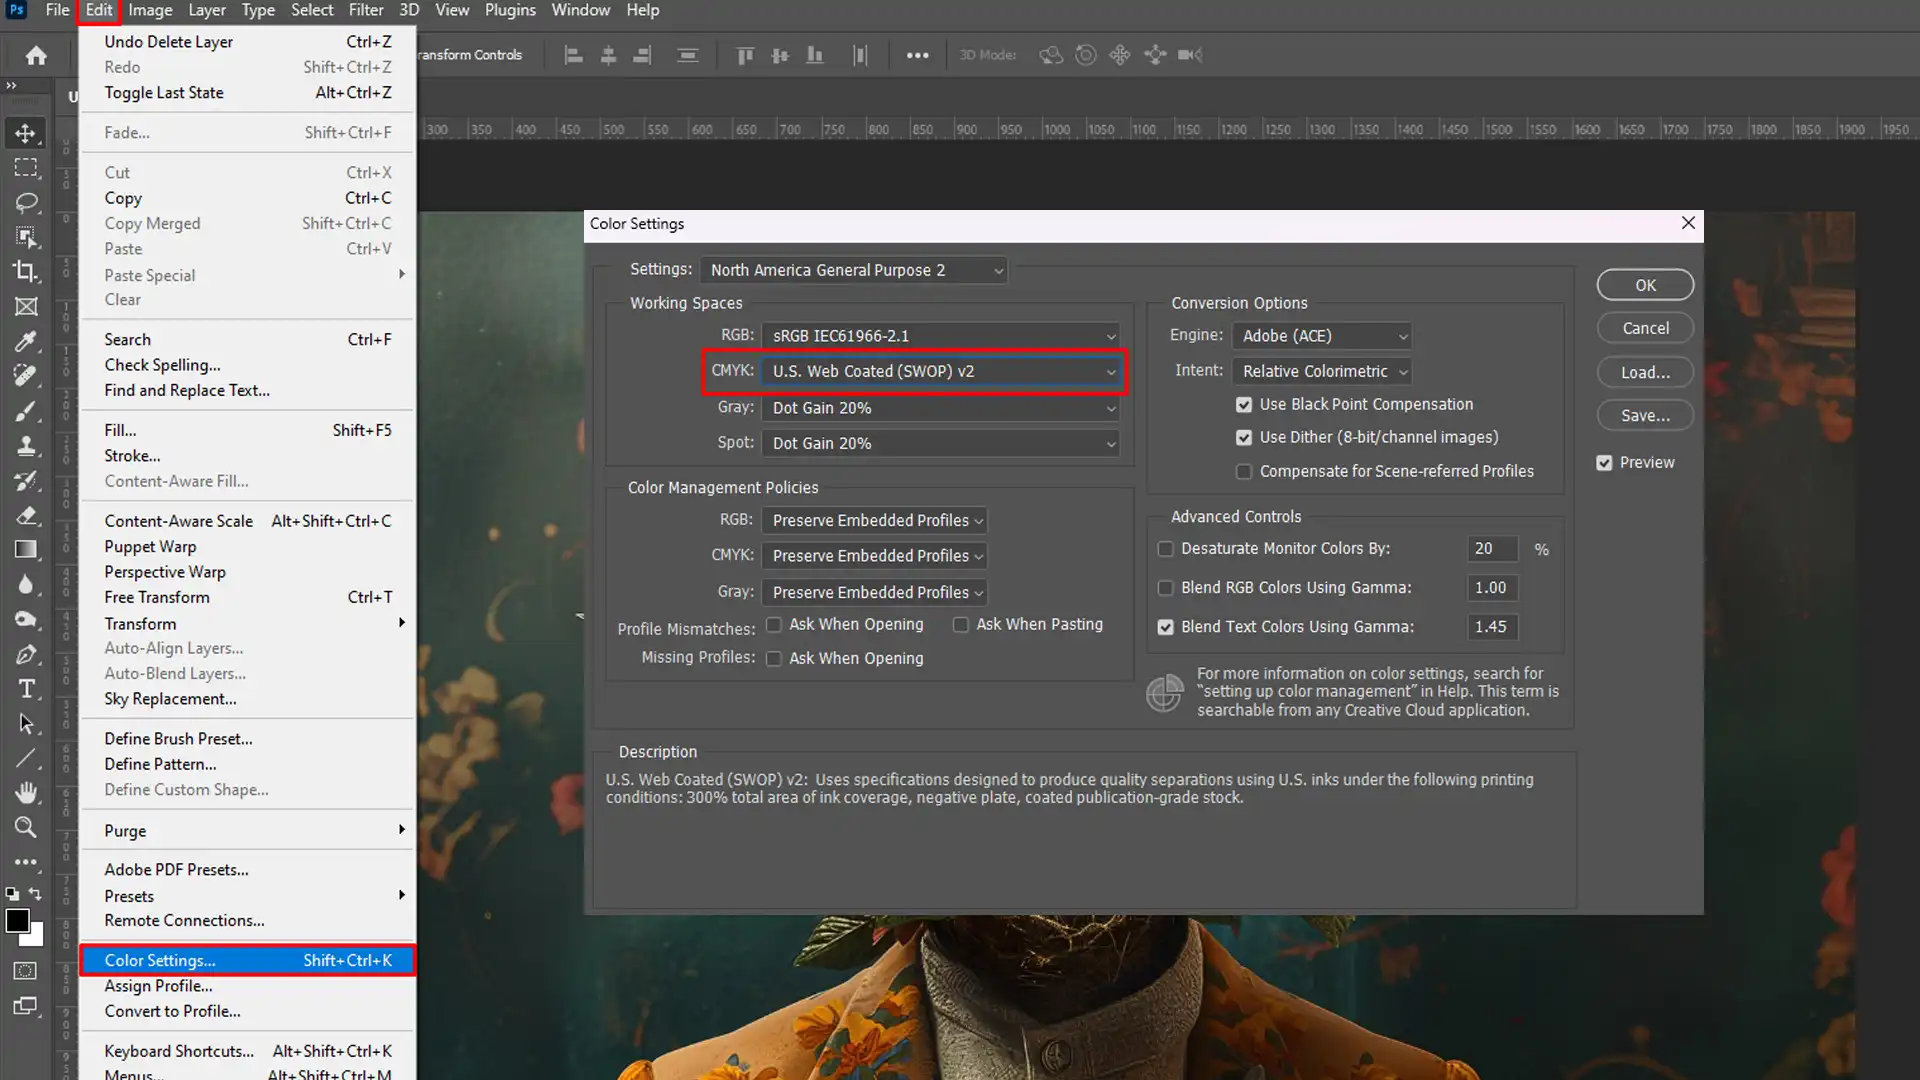
When you print, your image turns out differently compared to how it looks on the screen.
Your computer uses RGB, which stands for Red, Green, and Blue. But printers use CMYK.
That’s why knowing CMYK setup is crucial for accurate prints.
- Go to Edit.
- Click on Color Settings.
- Select the CMYK option.
- Pick a CMYK profile that matches your printer's settings.
Your document is now set up in CMYK.
Double-check your colors to ensure everything looks right.
Sometimes, you’ll need to tweak them using essential tools in Photoshop.
Saving Your Work
Always save your work. The best way to do this is by using the PSD file format, which preserves all your layers and adjustments.
If you’re working with larger files, consider the Large Document Format. It handles everything without losing your data.
Image Resources
Adjusting image resources can impact your final print quality.
Keeping an eye on the image data records helps you get the best results. Correctly managing image pixel data ensures clean and crisp prints.
Final Thoughts
By understanding CMYK, you make sure your prints come out just the way you see them on your screen. It’s a small step but makes a big difference.
Pro Tip: Always have a hard copy proof before doing a full print run. This helps you catch any color shifts or issues before it’s too late.
Ready to create stunning prints? Try setting up your next project in CMYK!
Color Books and Photoshop File Extensions
In Photoshop, Color Books are collections of standardized color values used to ensure color consistency across various media and print processes.
These color books, such as Pantone or CMYK color guides, provide a reference for selecting and matching colors accurately.
One thing that’s super important to get a grip on is something called “Color Books” Let’s break it down in a way that doesn’t make your head spin.
What Are Color Books?
Imagine Color Books as a library of colors.
Each book is a set of colors used for different types of projects. These books help you stay consistent and accurate with color choices.
Now, why should you care? Well, because if you want your prints to pop or your digital work to look its best, understanding and using Color Books is key.
Finding Color Books in Adobe Photoshop File Extensions
In Adobe Photoshop, you can find the Color Books through the “Color Library” option.
This is where you can select a specific set of standardized colors, like Pantone colors, which are widely used in print industries.
The good thing about using these predefined sets is that they are universally recognized, so your work retains its intended hues across different mediums.
Steps to Set Up Color Books
- Open your Adobe Photoshop.
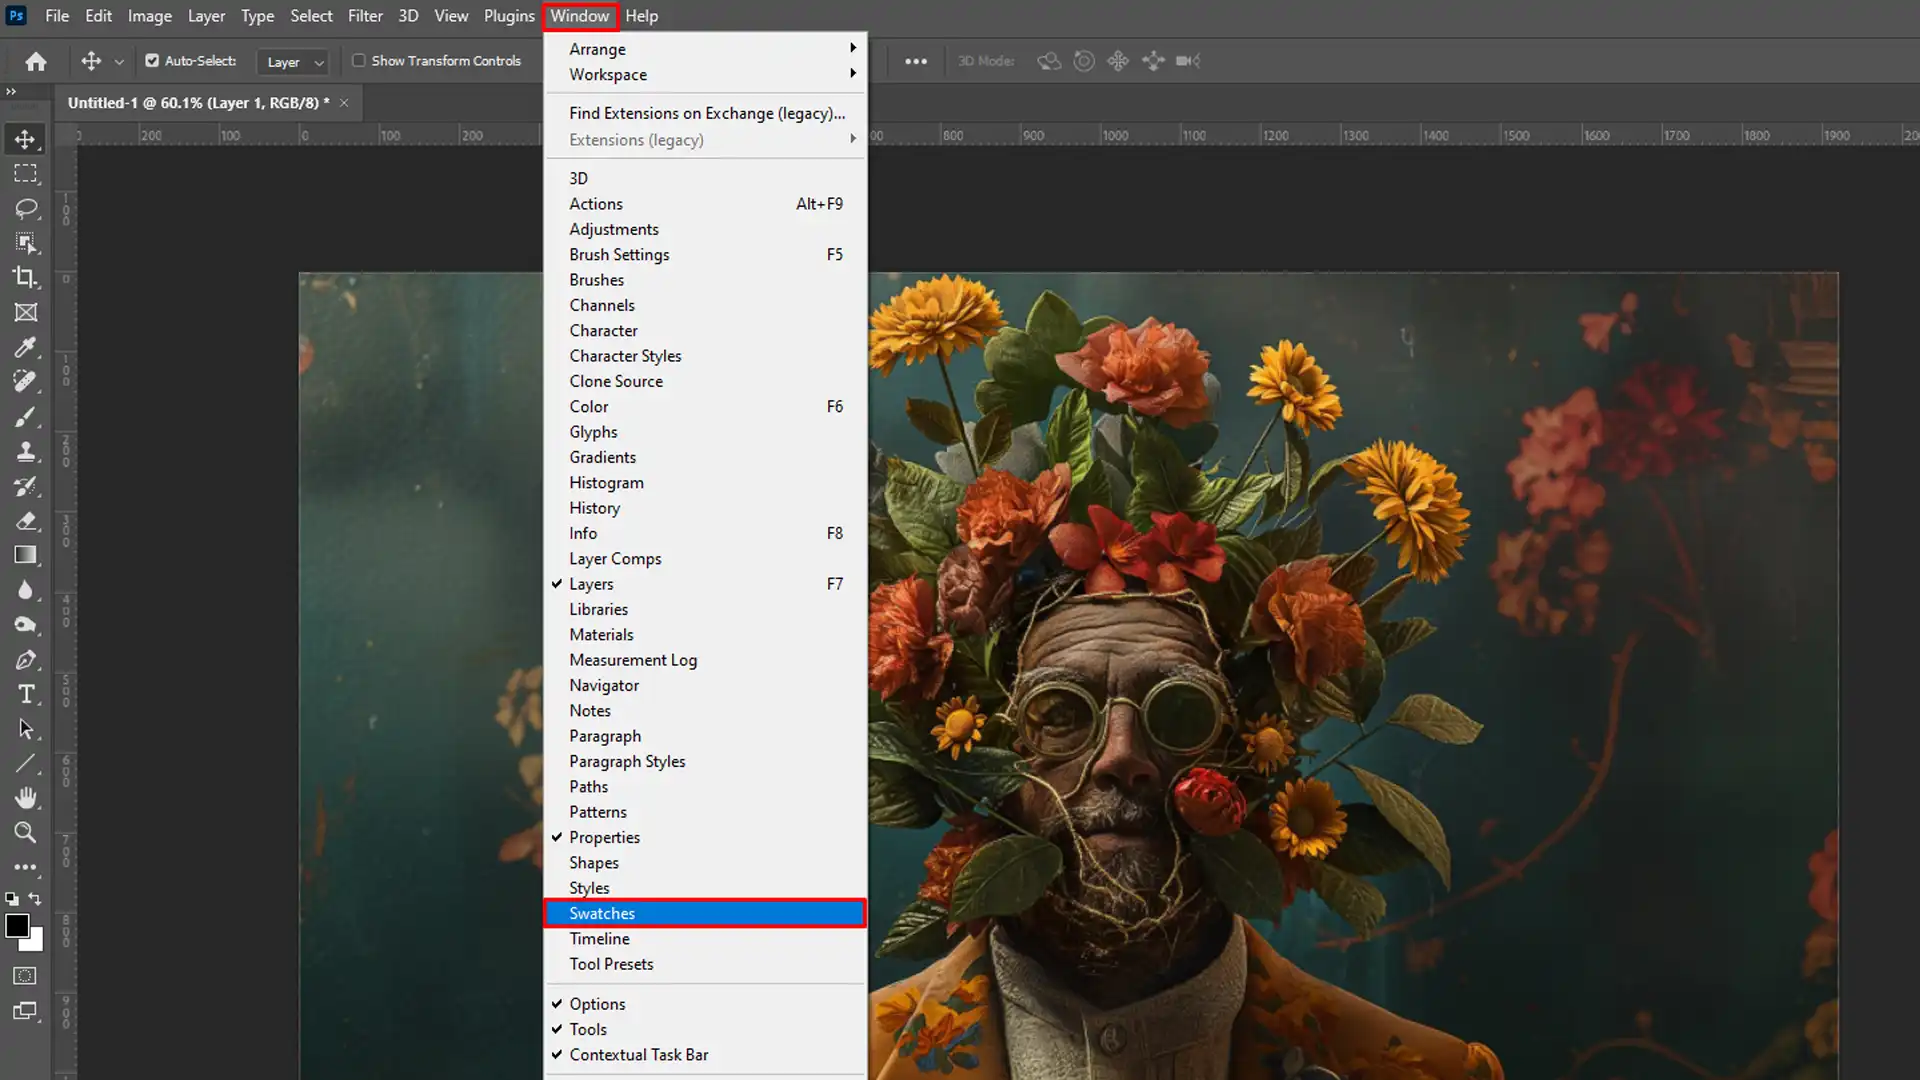
- Go to the menu bar and click on "Window" then select "Swatches"
- In the Swatches panel, you'll see a small menu icon on the top right corner.
- Click that and choose "Color Books"
- Select the Color Book you need, like Pantone, and voila, your palette updates with those colors.
Why Is This Important?
When working with different file formats like PSD files or tagged image file format (TIFF), color consistency can sometimes get messed up due to different software interpreting colors in various ways.
Using Color Books minimizes this issue.
Pro Tip: Get a printed sample before doing a large print run.
Colors on screen can be deceptive, so it’s always good to see an actual physical copy to ensure accuracy.
Color Table and Photoshop File Extensions
Let’s get straight to the point.
You’ve got your Color Books nailed down, now what’s next?
The Color Table is where you go to fine-tune your color game in Photoshop and Lightroom.
Think of it as your ultimate toolbox for managing colors within your projects.
Let’s walk through why this matters and how to use it effectively.
Why Should You Care About the Color Table?
It’s essential for keeping your work consistent.
Different file formats like PSD files or portable document format (PDF) can interpret colors differently.
Using the Color Table can help to ensure that what you see is what you get, whether you’re dealing with psd file or portable network graphics (PNG) format.
How to Access the Color Table
Let’s dive into it:
- Open your project in Photoshop.
- Go to the "Image" menu and select "Mode"
- Opt for "Indexed Color" The Color Table is now accessible.
- You can also import existing tables or create new ones based on your project's needs.
Why Is It Important?
The Color Table is crucial when converting complex images, like those with detailed image data.
It helps in maintaining color consistency across various file formats such as TIFF or the photoshop file format.
This makes it easier to manage image resources and raw format in a streamlined manner.
Pro Tip: You can save your color table for future use.
This ensures that any new project maintains the same color integrity, making your work process quick and efficient.
Get comfortable with your Color Table and watch your projects come to life. It’s all about consistency and accuracy.
And remember, practice makes perfect.
Color Swatches and Photoshop File Extensions
Ah, the world of Color Swatches.
This is where your journey in mastering Photoshop and Lightroom truly begins.
Imagine them as the palette of a painter, but instead of carrying around messy paint tubes, you have a neat digital collection of colors.
What are Color Swatches?
You can think of swatches as saved colors that you can easily reuse in your projects.
This makes your workflow efficient and keeps colors consistent across different assets.
It’s crucial for creating cohesive designs, whether you’re working on psd files, image data, or any other file format.
Accessing Color Swatches
In Photoshop, accessing Color Swatches is straightforward. Head to the “Window” menu, then click “Swatches” Voilà!
You’ve got a library of colors at your fingertips. This is handy when you’re repeatedly using specific colors.
No need to remember color codes or fiddle around with the color picker every time.
Lightroom users, don’t feel left out. You can create custom swatches by saving your favorite colors.
This applies color grading and adjustments consistently. It’s like having your own color toolbox ready for use.
Steps to Create and Use Color Swatches
- Open Photoshop or Lightroom.
- Choose a color you like from the color picker.
- In Photoshop, click the "Add to Swatches" button. In Lightroom, save the color in your custom swatch panel.
- Name your swatch something memorable. Trust me, you'll thank yourself later.
- Use these saved colors by simply clicking on the swatch whenever needed.
Why Care About Color Swatches?
Color Swatches ensure consistency and efficiency. Whether you’re working on a single psd file or managing multiple image resources, having a library of predefined colors speeds up your workflow. It reduces the chances of color discrepancies across different file formats.
Moreover, saving colors as swatches can help when working with different image data types. When dealing with the photoshop file format or even portable document format, maintaining color accuracy becomes simpler with predefined swatches.
Contours and Photoshop File Extensions
Contour lines are key in image editing.
They create outlines of shapes and details in pictures.
If you’ve got a photo where the edges aren’t clear, contours come to the rescue.
Let’s break down how to use them in Photoshop and Lightroom.
What are Contours?
Contours are lines that map the edges and details within your image.
Think of them as the skeleton of your image, highlighting crucial areas.
By identifying these lines, you can make precise adjustments without affecting the rest of the image.
This is useful when handling various file formats, like psd files or large document format.
Using Contours in Adobe Photoshop
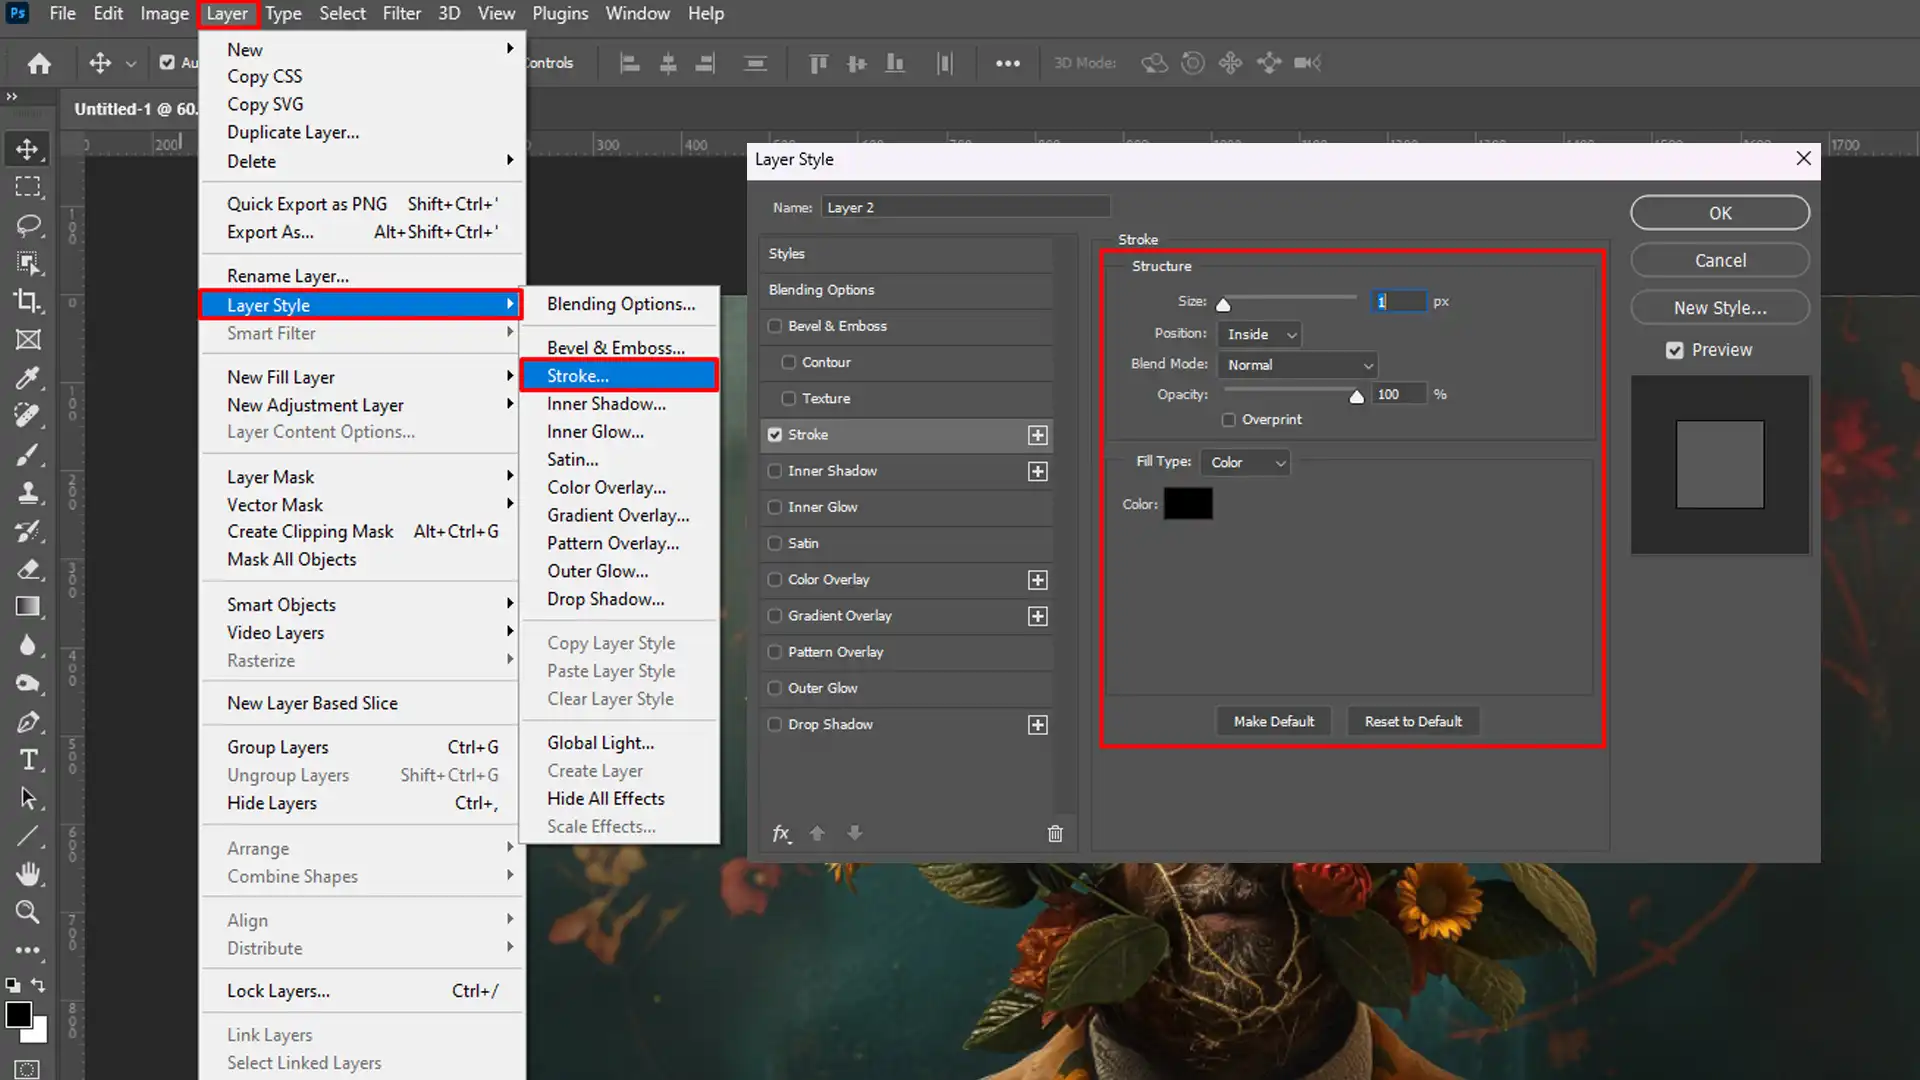
- Open your image in Photoshop.
- Navigate to the "Layer Style" panel.
- Select "Stroke" and choose the right size and color for your contour lines.
- Adjust the opacity to see other layers beneath if needed.
- Click "OK" to apply the changes.
This technique works best for various images, especially those saved in photoshop file format or needing specific pick-up points.
Using this method, the contours are added smoothly without distorting the image data.
Using Contours in Lightroom
- Import your image into Lightroom.
- Go to the "Develop" module.
- Locate the "Tone Curve" panel and adjust the points to highlight the contour lines.
- Utilize the "Clarity" slider to sharpen the lines further.
Lightroom also allows you to maintain the native file integrity while making these adjustments.
It’s a great way to work non-destructively with your image resources and raw formats.
Why Use Contours?
Alright, let’s get practical. Contours help you bring out hidden details. These lines can make or break the look of your image.
They’re especially important when handling psd format or large document format images, ensuring you have a clear outline to manage edits efficiently.
It helps maintain the image data’s integrity while providing subtle enhancements.
Pro Tip: If you’re unsure about the size or color of your contour lines, start small.
Experiment with them before committing.
You can always tweak or remove them if needed.
Frequently Asked Questions (FAQs)

Can I open a PSD file without Photoshop?
Yes, you can open a PSD file without using Photoshop. There are several alternative graphics software options available such as GIMP, Photopea, and Paint.NET that can handle PSD files.
What is a Photoshop PSD file?
A PSD file is Adobe Photoshop file format, widely used for graphic design and digital art. It preserves layers, allowing for flexible editing and adjustments.
What is a .psb file?
A PSB file, which stands for Photoshop Big, is similar to a PSD file but is optimized for larger images that exceed Photoshop’s size limits for PSD files.
What is the Photoshop file for?
Photoshop files, typically PSDs, are used to create, edit, and save detailed graphic design projects. They support various layers, effects, and other elements that are crucial in professional-grade image editing.

Conclusion
Understanding the Photoshop file extension is key to making the most of your digital images.
Whether you’re working with PSD, PSB, JPEG, PNG, or TIFF files, each format has its role and benefits.
From my own experience, using the right file type can make a huge difference in both your editing process and the final result.
For instance, I often use PSD files for detailed work where I need to keep layers and adjustments, while JPEGs and PNGs are my go-to for web use.
If you want to dive deeper into Photoshop and Lightroom, check out these helpful resources. My Photoshop course and Lightroom course offer step-by-step guides to mastering these tools.
For the best software experience, you can also explore Adobe Photoshop and Adobe Photoshop Lightroom.
Happy editing!
Read more about Photoshop:


Course

Light Effect Photoshop


Lightroom Course 2025

Adobe Photoshop Course 2025

Photo Editing Course


