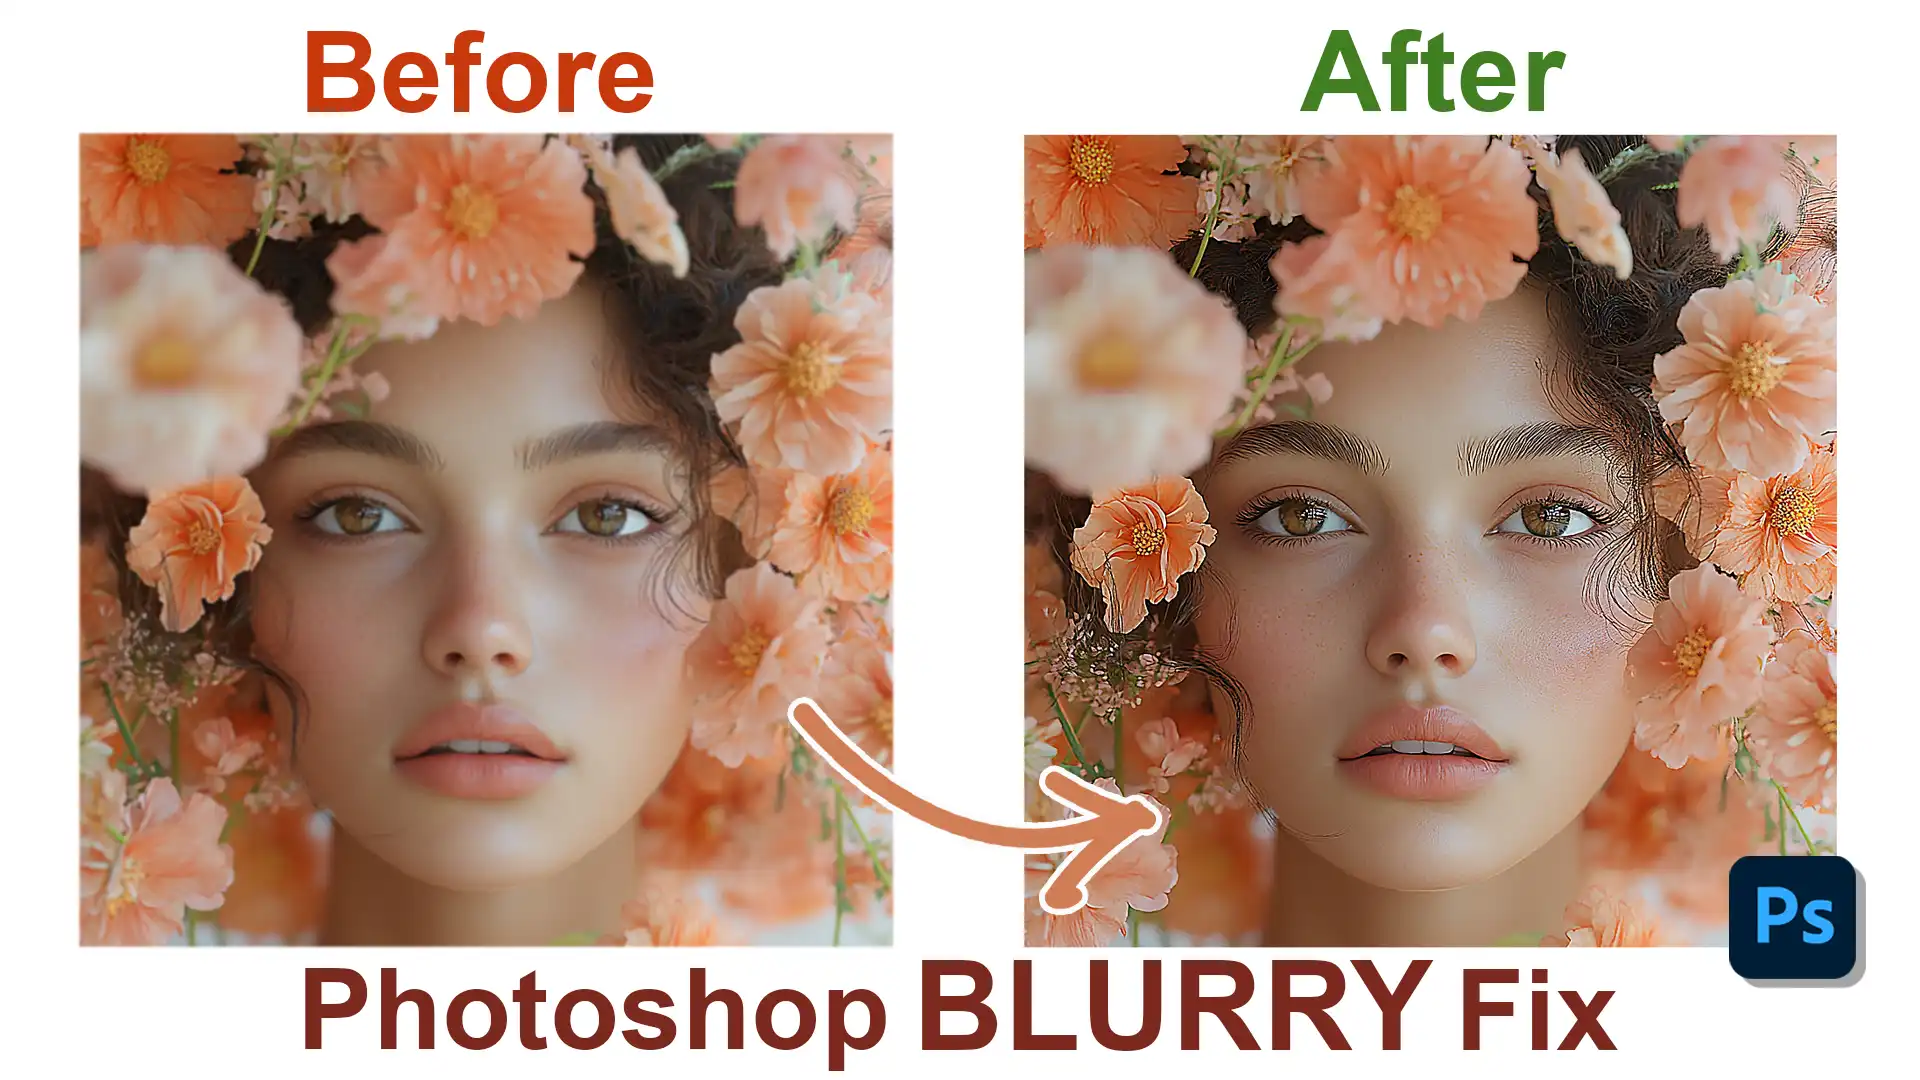
Ever wondered how to tackle a “Photoshop blurry picture fix“? You’re not alone. Blurry photos can be incredibly frustrating, especially when you’ve captured a moment you can’t recreate. But don’t worry;
I’m here to guide you through the straightforward steps to sharpen those images using Photoshop and Lightroom. This article will not only address your needs but also provide a solution that’s easy to follow, even if you’re new to these tools.
As you read on, you’ll discover the techniques and tips that can make a significant difference in your photo editing skills. Stay with me, and by the end of this guide, you’ll be equipped to fix those blurry pictures like a pro.
Table of Contents
Understanding Blurry Images
Blurry images can be frustrating, especially when you want them to be clear and sharp.
Whether you’re trying to capture a moment with friends or editing photos for work, understanding why images blur gives you control over the final result.
Grasping the reasons will help you avoid common pitfalls and correct the ones that have already snuck into your work.
What Causes a Blurry Image?
Blurry images happen for several reasons. Camera motion is one of them. Imagine shooting a photo while moving – even slightly – the result could be motion blur.
Poor lighting often leads to slower shutter speeds, which might cause camera shake. It matters to know that image noise can contribute to a perceived lack of sharpness too.
Another factor is focusing problems, especially if you’re using a phone camera or a digital camera. Ensure your subject is in focus; otherwise, you might end up unhappy with blurry photos.
Additionally, lower resolution settings can make your photo pixelated, causing a loss of detail.
Photoshop Blurry Picture Fix: Common Mistakes Leading to Blurry Pictures
One frequent mistake is not holding your device steady enough. If you struggle with this, consider using a tripod to stabilize.
Also, misjudging the lighting conditions can lead to unwanted blurring. Good lighting can make a world of difference.
Editing Mistakes
Before you start editing, be mindful of common mistakes that can affect your results. Here are some main pitfalls to avoid, ensuring you achieve the best outcome in your projects.
- Overusing the unsharp mask filter without carefully adjusting the settings. The unsharp mask dialog box allows for detail precision, but it's important to tweak it according to your original image for ideal results.
- Over-reliance on the smart sharpen filter without testing its limits might also spoil a shot.
- Working on only the active layer when all of them are needed can flatten the depth of field. Always keep an eye on the layers panel.
- Pay attention while toggling the blending mode. These are small yet impactful actions to keep in mind.
Pro Tip: When editing, try the shake reduction filter in Photoshop for regaining lost details. It’s like adding the perfect spice to your dish – not too much, not too little.
For those looking to enhance their editing skills further, learning about Photoshop shortcuts can significantly speed up your workflow.
Additionally, understanding the difference between Photoshop and Lightroom can help you choose the right tool for your specific needs.
Step-by-Step Guide to Fix Blurry Pictures in Photoshop
Fixing blurry pictures in Photoshop can be simple with the right tools. Before diving into the details of using tools like the unsharp mask, let’s make sure your workspace is set up for editing your image in Photoshop smoothly.
Setting Up Your Workspace
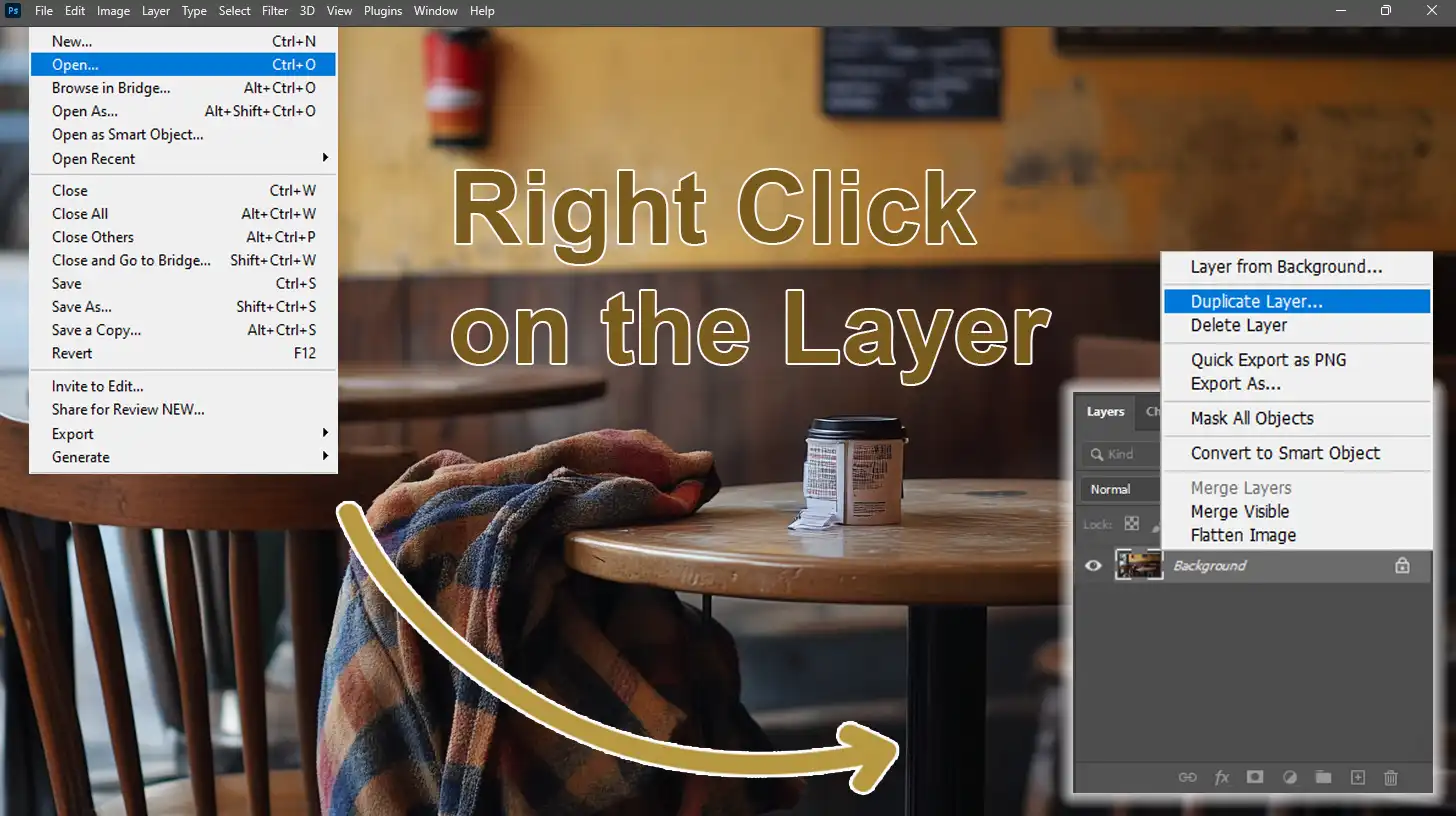
First things first, let’s set up your workspace. Open that blurry photo in Photoshop. This might sound simple, but trust me, having the right start makes all the difference.
Navigate to the layers panel. This area is your command center for working on image layers. Not seeing it? Hit Window from the top menu and enforce layers.
Here, you can duplicate layer so you’re working non-destructively. It’s like making a safety net just in case things turn south.
Applying Filters Effectively
Here are the steps on how to apply the filters effectively:
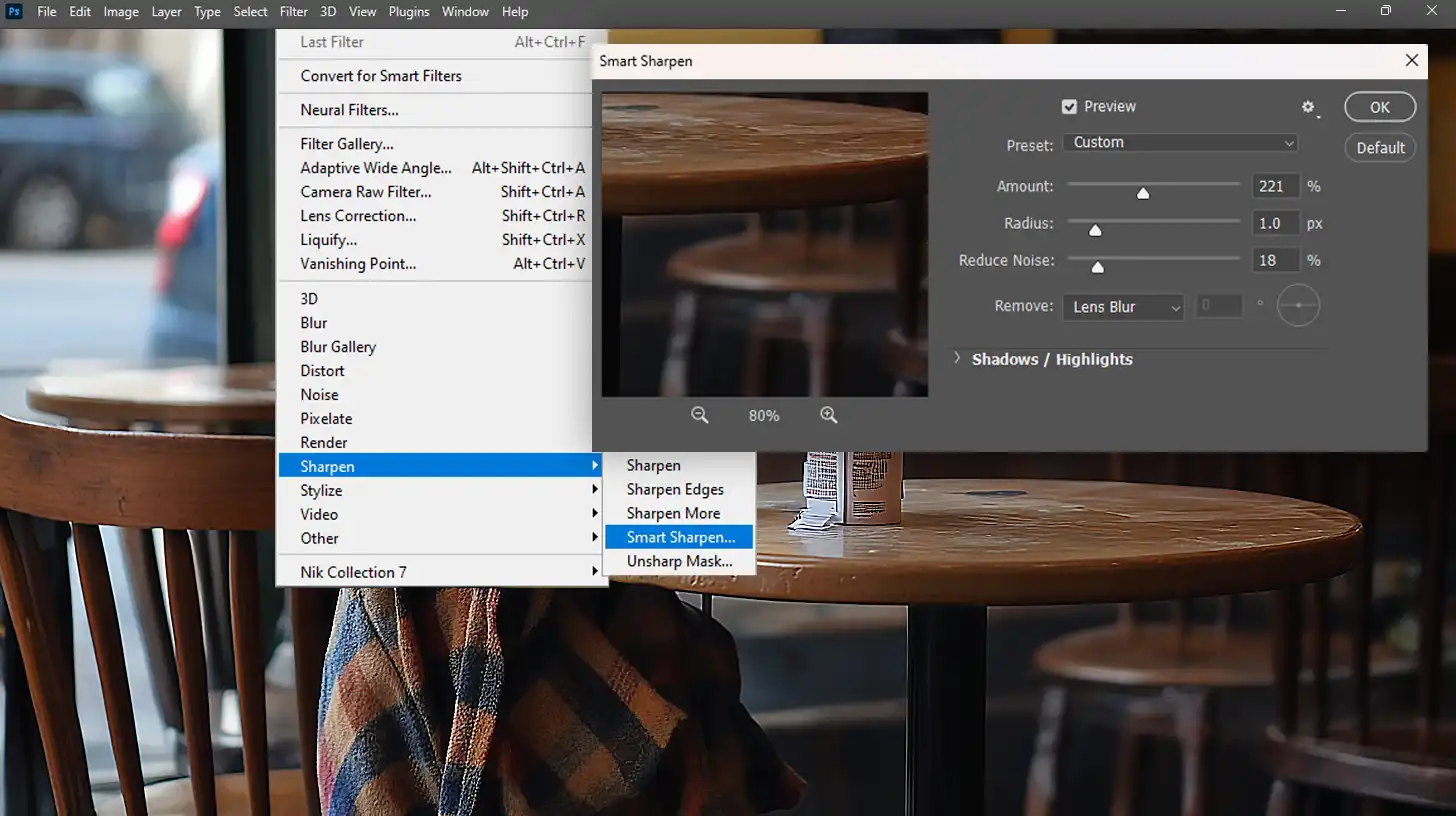
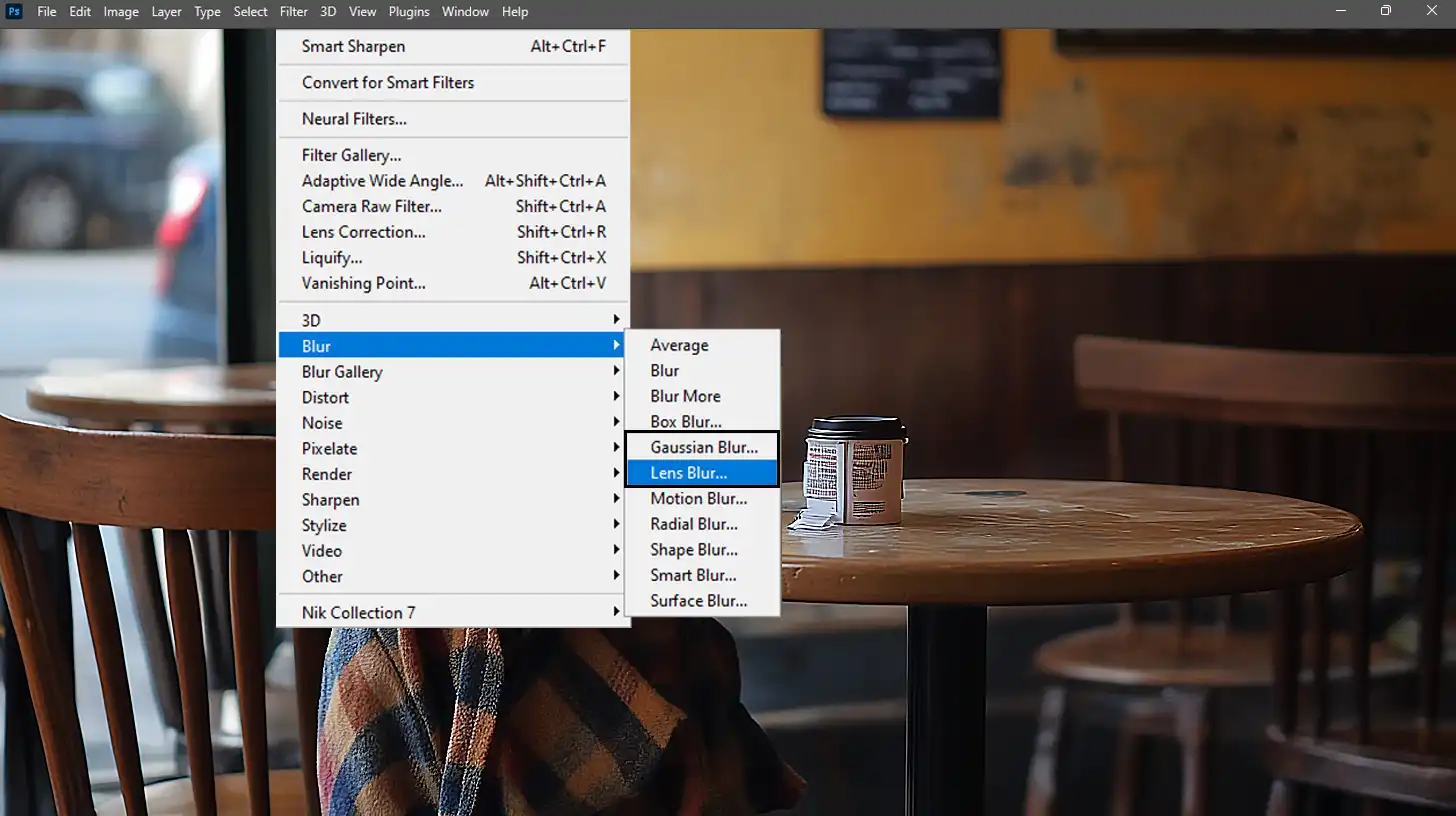
Now onto the fun stuff fixing those blurry photos. Go to Filter at the top menu. No magic wand here, folks, but we’ve got the unsharp mask filter at our fingertips.
This tool increases image sharpness by finding contrast edges and amplifying them.
Choose Smart Sharpen from the Filter dropdown. A neat dialog box pops up where you can customize settings. Adjust until that blur says goodbye, and clarity winks its eye.
For tougher cases of motion blur, check the lens blur effect for fine-tuning. Sometimes, gaussian blur creeps into your picture, softened during edits.
Correct it here effortlessly. Want another layer of precision? Your unsharp mask comes to the rescue again.
Steps to Fix Blurry Pictures
To restore clarity to your blurry photos, follow these quick and easy steps using Photoshop’s powerful tools.
- Adjust the smart sharpen settings. Ensure you don't overdo it; nobody likes crispy, over-enhanced edges.
- Switch to blending modes like soft light from your layers panel. It's subtle yet powerful, enhancing without overpowering the entire image.
- Use the blur tool and lens blur to subtly refocus blurred images. Add a layer mask to apply changes selectively, ignoring other regions.
- Utilize the camera raw filter for a final touch, working towards perfection until your image beams with full quality.
Remember to save your masterpiece, preserving photos once the haze fades and outshines inferiority.
Pro Tip: For more advanced techniques, consider exploring the content-aware fill in Photoshop to seamlessly remove unwanted elements or the patch tool in Photoshop for precise corrections.
Photoshop Blurry Picture Fix Techniques
When it comes to fixing blurry images in Photoshop, there are several techniques to sharpen and improve clarity.
One effective method is using the unsharp mask, which can help bring out the details in your image in Photoshop. Let’s dive into how this tool works.
Using the Unsharp Mask
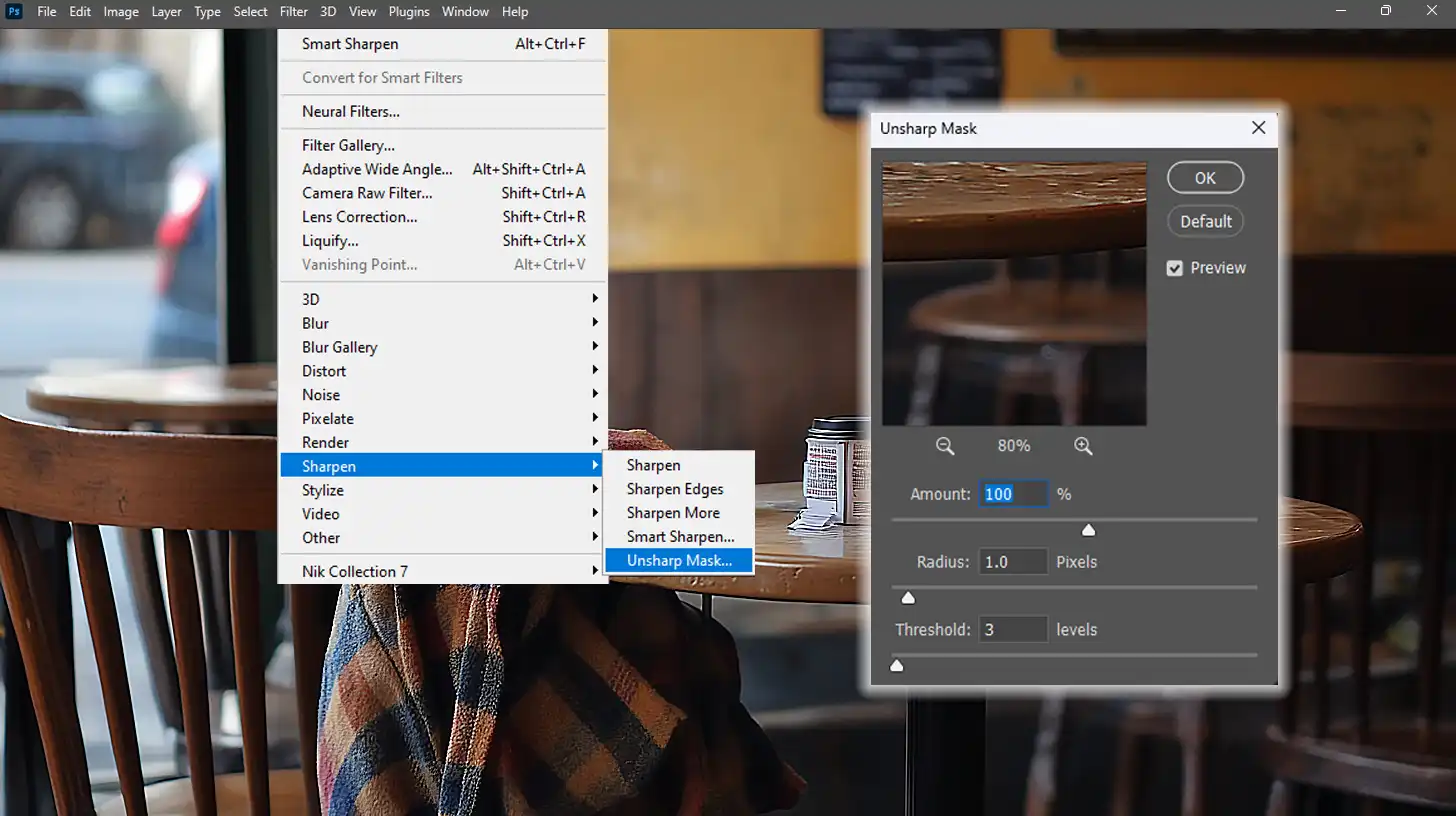
The unsharp mask stands as a distinguished contender when it comes to enhancing blurry images in Photoshop. Despite its name, this tool doesn’t make the image less sharp.
Instead, it crisply defines lines by using a method involving contrast enhancement. We start by opening our desired image in Photoshop and engaging in that real tinkering work.
With the layers panel, duplicate the image layer to maintain safety, just in case you stumble across unpredictable outcomes.
The unsharp mask filter helps clarify those pesky blurred photos. Found nestled under the filter tab, it opens up a dialog box.
This tool requires delicacy; too much, and you risk creating a chaotic mess instead of a masterpiece.
Advanced Photoshop Tools for Blurry Pictures
Moving beyond basic tactics, we explore advanced tools designed for the diligent yet semi-lazy enthusiast like you and me. Enter the world of smart sharpen, a powerful tool.
Its role goes beyond that of the unsharp mask. It offers more control over reducing noise, an ally for those finer details.
Adjust the sliders, fine-tune those settings, and you’ll fix blurry images effectively!
We’ve also got to showcase lens blur. This tool is new-age art. It’s meant to refocus areas of blurry photos selectively.
When combined with a blending mode, it’s suitable for producing sophisticated effects and amplifying picture quality.
Pro Tip: When learning how to sharpen an image in Photoshop, start by making small adjustments with tools like the unsharp mask and smart sharpen to avoid over-sharpening.
In Lightroom, refine photos with subtle tweaks using sharpening sliders to achieve a natural look.
Understanding how to sharpen photos in Lightroom alongside Photoshop provides additional flexibility, ensuring your images maintain clarity and detail across both platforms.
Alternative Methods to Fix Blurry Pictures
Blurry pictures can be frustrating, but there are several ways to sharpen them and improve the clarity. Let’s explore some alternative methods to help bring your photos back to life.
Here’s a quick comparison of some popular online tools and mobile apps that can help you fix blurry pictures with minimal effort.
| Aspect | Overview |
|---|---|
| Fotor’s Sharpen Tool | Upload your blurry image, adjust the sharpness slider, and instantly improve your photo’s clarity. |
| PineTools’ Image Sharpening Function | Fix blurry images with just a few clicks, no advanced skills required, for quick and easy corrections. |
| Adobe Photoshop Express | Use the unsharp mask filter to correct blurry images on the go, along with other advanced editing features. |
| Snapseed by Google | A user-friendly app that includes a sharpen tool to enhance fine details in your photos. |
| Afterlight | Offers a blurring fix function alongside other creative tweaks, perfect for on-the-go editing. |
Online Tools for Blurry Image Correction
When it comes to fixing blurry photos, online tools can be your best friend. They are straightforward and often free, making them a practical choice. All you typically need is an Internet connection, and you’re good to go.
- Fotor's Sharpen Tool: Simply upload your blurry image, and the tool will work its magic. Usually, there’s a slider to adjust the sharpness level – easy-peasy.
- PineTools' Image Sharpening Function: With these, you don't need a degree in Photoshop. Just a few clicks, and you've got a clearer image.
Mobile Apps to Fix Blurry Photos
If you’re always on the move hey, who isn’t these days? Mobile apps offer quick fixes. Having a handy app means you can fix a blurry photo when inspiration strikes or boredom hits.
- Adobe Photoshop Express: It's got the unsharp mask filter that snaps blurry pictures in Photoshop back to life. Plus, with features like the Content-Aware Fill in Photoshop, you can seamlessly remove unwanted elements.
- Snapseed by Google: Features an efficient sharpen tool that's great for refining those little details.
- Afterlight: Offers some extra creative tweaks with its blurring fix function. Perfect when you’re commuting or just chilling at a café.
Using these programs on the go might become habit-forming. It’s almost too easy to enhance images, and the results are pretty satisfying.
Pro Tip: When using Adobe Photoshop Express or any other app to fix blurry photos, always make duplicate image layers before fiddling around.
This way, you never lose the original image and can always revert to your starting point if needed.
Photoshop Blurry Picture Fix: Preventing Blurry Images in the Future
Blurry images can be frustrating, but I’ve discovered some simple techniques to keep my photos sharp. Let me share these tips to help you capture clear and focused shots every time.
Tips for Capturing Sharp Photos
Steady hands are important to prevent image blurring while taking photos.
Always ensure stability when pressing the shutter button, and a tripod can greatly help with this.
Mind your focus. Before pressing the shutter, double-check that your focal point is sharp. This ensures your subject stands out against any competing backdrop.
For those using different digital cameras, understanding the difference between RAW or JPEG format can also impact the clarity of your images.
Lighting is everything. Natural light, just before dusk or dawn, adds clarity without overexposure.
These simple tips transform your amateur clicks into professional-quality photos.
Camera Settings to Avoid Blurriness
To capture sharp images and reduce the chances of blurriness, tweaking your camera settings can make a big difference.
Here are some quick adjustments you can make before you start shooting.
- Shoot with a higher shutter speed. It freezes action, reducing motion blur.
- Adjust ISO settings wisely. High ISO can lead to grainy images; find that sweet spot between clarity and brightness.
- Enable the unsharp mask on your camera. This feature enhances definition even before the editing phase.
After exploring all these strategies, remember that a little practice goes a long way. Taking various shots at different settings helps you discover what works best.
Pro Tip: When working on photo focus mastery in Photoshop, always duplicate the image layer before using tools like smart sharpen or unsharp mask.
This helps maintain your original photo, especially during retouching, in case edits go unexpectedly wild!
When to Seek Professional Help for Photoshop Blurry Picture Fix
Photos capture special moments, yet a blurry image can ruin the memory.
Feeling frustrated by your own editing skills? Maybe it’s time to reach out for expert assistance.
Professionals make this process easier and help every step feel rewarding.
Evaluating the Severity of Blurriness
Begin by assessing your photo’s clarity. If the blurred photo hides significant details, professional help saves time.
Sometimes, minor tweaks like using the unsharp mask in editing software solve small issues on your own.
Finding a Professional Photo Editor
No idea where to look for experts? Don’t worry, you’re not alone. Trust images to professionals with substantial experience in editing software.
You’re investing in capturing memories right. An editor skilled in tools like smart sharpen or unsharp mask enhances an image in Photoshop better than trial and error.
Steps to Find a Professional Editor
Follow these quick steps in Photoshop to restore clarity to your blurry images effectively.
- Search careers online.
- Get reviews.
- Ask for portfolios.
This is a good path to finding that skillful touch.
Understanding the range of options allows you to make informed decisions, saving personal time and struggle.
These experts don’t just edit; they create magic for your pictures. They help you sharpen images deftly and restore their impact. So, cherish the task resolved satisfactorily rather than left incomplete.
Feeling overwhelmed when dealing with photography repairs? Professional editors have the tools and patience you might lack.
Pro Tip: When editing an image in Photoshop, always work non-destructively. Start with a ‘smart object‘ layer to keep the original untouched.
Frequently Asked Questions

Can you fix blurry photos in Photoshop?
- Yes, Photoshop offers several tools to fix blurry photos, such as the 'Sharpen' filter and the 'Camera Shake Reduction' feature.
How do I unblur a photo in Photoshop?
- Select the 'Filter' menu, then 'Sharpen', and choose 'Shake Reduction'.
- Adjust the sliders in the Shake Reduction dialog to improve the photo's clarity.
What steps can I take to make a blurry picture clear?
- Use the 'Smart Sharpen' or 'Unsharp Mask' tools found under the 'Filter' -> 'Sharpen' menu.
How to sharpen the image in Photoshop?
- Open the 'Filter' menu, select 'Sharpen', and then choose either 'Smart Sharpen' or 'Unsharp Mask'.
- Adjust the settings to achieve the desired sharpness.
Conclusion
The “Photoshop blurry picture fix” has really helped me turn frustrating, blurry photos into clear, beautiful images. I’ve had moments where I captured something special, only to be disappointed by the lack of sharpness.
However, with Photoshop’s tools, I was able to sharpen the details and bring those memories back to life.
If you want to improve your editing skills, I highly recommend these resources. The Photoshop Course and Lightroom course have been incredibly useful for me. They offer easy-to-follow guides that can make a big difference.
You can also explore Adobe’s Photoshop and Lightroom for the best software options. These tools and courses helped me rescue my images, and I’m sure they’ll work for you, too.
Read more about Photoshop:


