Brighten Your Smile: How to Whiten Teeth in Photoshop
Brighten Your Smile: How to Whiten Teeth in Photoshop
Everyone wants a smile that sparkles, but sometimes our teeth don’t always cooperate. Luckily, with the help of powerful image editing software, achieving that gleaming grin is within reach. In this article, we will guide you through how to whiten teeth in Photoshop, ensuring your photos always feature a bright, radiant smile.
Incorporating essential tools and features such as layers, select adjustments, and saturation controls in Adobe Photoshop can transform any dull photography element into an eye-catching masterpiece.
Beyond just providing theoretical knowledge, In this guide I will include the necessary elements to ensure comprehension at every step of your Photoshop journey. So prepare yourself for an exciting exploration into how to make smiles brighter with few clicks!
Table of Contents
Mastering Teeth Whitening in Photoshop
Learning Adobe Photoshop can be quite an adventure, especially when it comes to perfecting a smile. With the right techniques, you can transform a good portrait into a stunning one by simply enhancing the brightness of a smile.
In this section, we’ll explore some lesser-known methods for achieving brilliantly white teeth in your photos.
Introduction to Teeth Whitening
Before diving into the more advanced techniques, let’s revisit the basics. Teeth whitening in Photoshop is about understanding the subtle interplay of shadows and highlights that contribute to a realistic enhancement.
Start by gently selecting the teeth using the Selection Tools in Photoshop.
Next, use an adjustment layer to tweak the brightness and contrast for a more natural look.
Remember to refine the edges of your object selection tool to avoid a harsh transition between the whitened teeth and the rest of the photo.
Step-by-Step Guide for Whitening Teeth in Photoshop
A step-by-step approach ensures you don’t miss any critical phases in during this process. Here’s a streamlined method to follow:
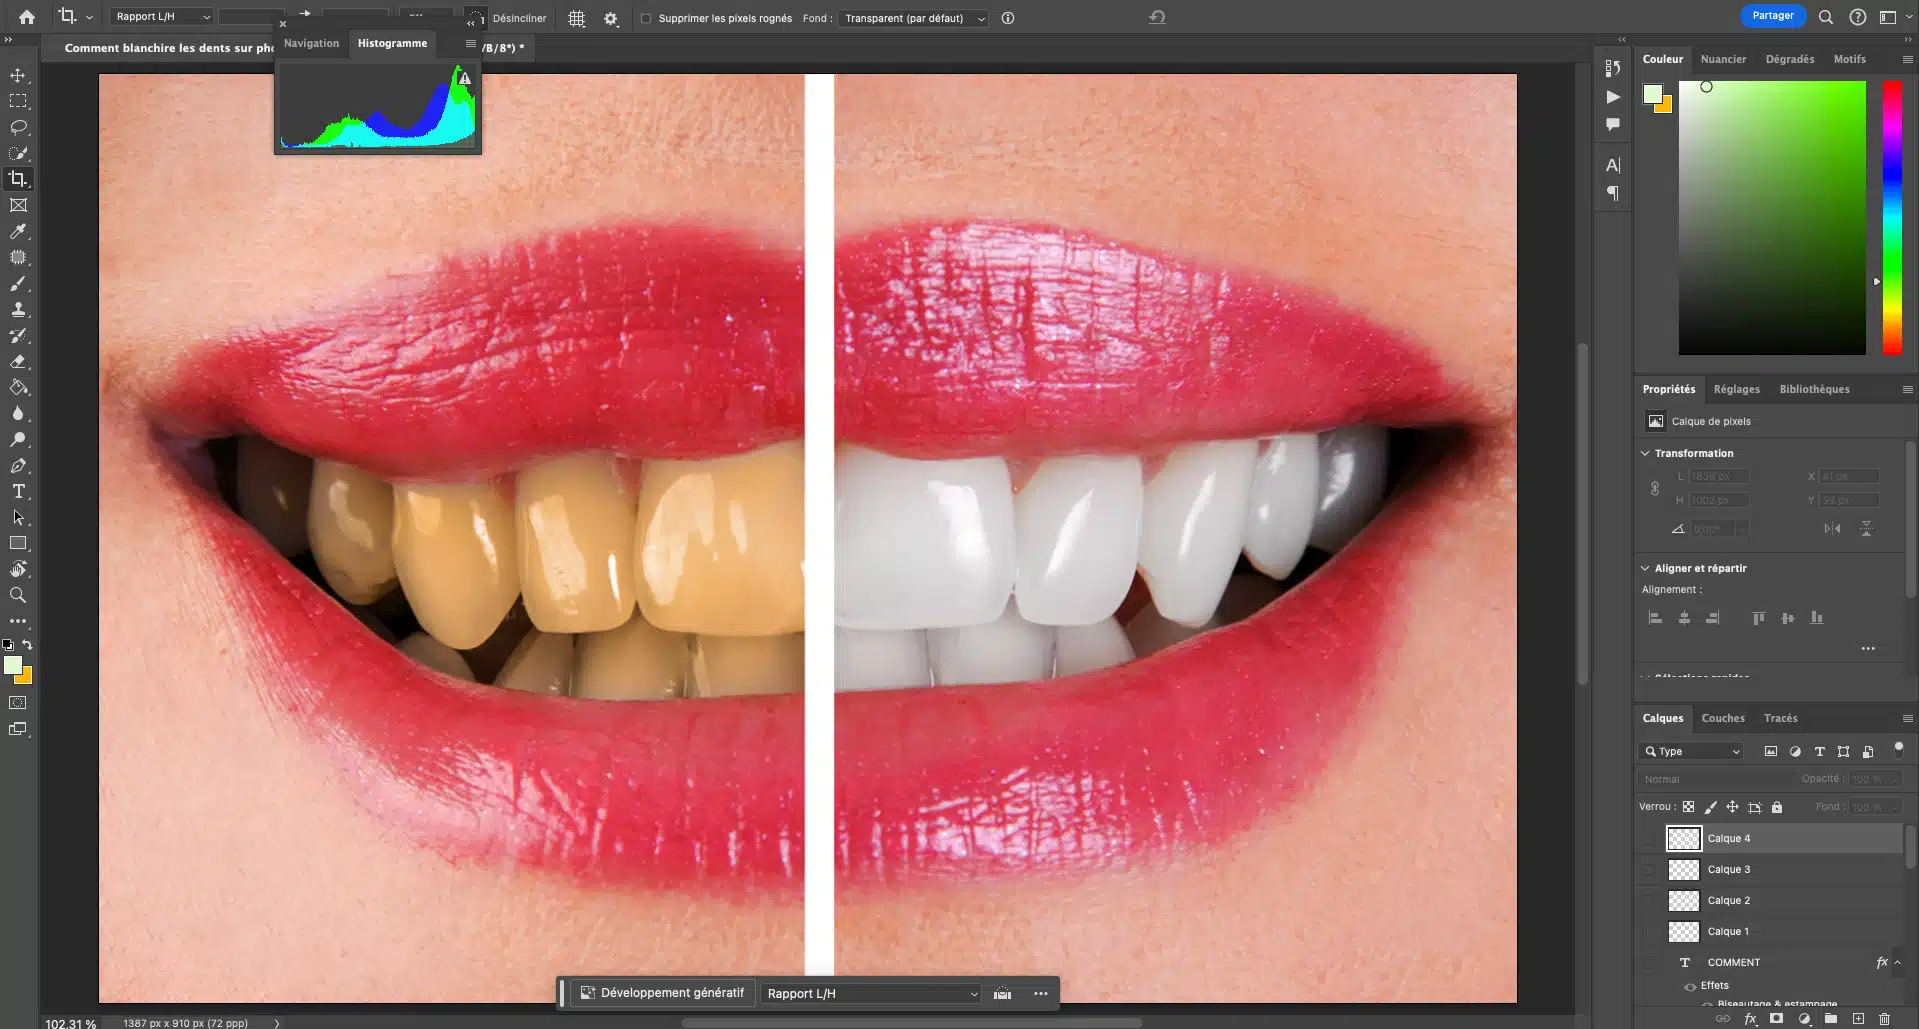
With the teeth selected, create a new adjustment layer for Hue/Saturation .
Subtly desaturate the yellow tones without affecting the overall color of the photo and effectively maintaining white balance.
Use the lightness slider to whiten the teeth, checking the before and after to maintain realism.
Consider using the Quick Selection tool for greater control over the area you're working on.
Adjusting Hue and Saturation for Natural Teeth Whitening Results in Photoshop
Achieving a natural look is all about subtlety. It’s tempting to push the sliders to their extremes, but the secret lies in the details:
Adjust the hue to remove unwanted color casts.
Alter saturation to dial down intense yellows, but be wary of making teeth look gray.
Use the sponge tool sparingly to desaturate specific areas that may appear too vibrant.
Following these nuanced steps, you’ll ensure that the teeth in your portraits are not just white, but believably so.
Incorporating these techniques, like the selection tool, into your workflow and learning these tips on photography lightning; Will not only improve the aesthetics of your portraits but also increase your proficiency in Photoshop.
The goal is not to just design perfect images but to also improve on your skillset as a whole.
Building on the basics of teeth whitening in Photoshop, let’s explore some advanced techniques that can take your photo retouching to the next level.
These methods will help you achieve a more professional and refined look, ensuring that smiles in your pictures are both beautiful and believable.
One advanced technique involves utilizing layer masking to selectively apply changes to specific areas of the teeth, allowing for precise control over the whitening process.
Additionally, you can employ frequency separation to separate texture from tone, enabling you to whiten teeth while preserving natural texture and avoiding a plastic-like appearance.
Experimenting with blending modes and opacity settings can also yield subtle yet effective results, ensuring that your enhancements seamlessly integrate with the rest of the image.
With these advanced techniques in your toolkit, you’ll be able to achieve stunning, natural-looking smiles that enhance the overall quality of your photos
Lets see the table for better and easier comparison.
Technique
Description
Layer Masking
Selectively apply changes to specific areas of the teeth for precise control over the whitening process.
Frequency Separation
Separate texture from tone, enabling you to whiten teeth while
preserving natural texture and avoiding a plastic-like appearance.
Blending Modes and Opacity Settings
Experiment with blending modes and opacity settings to yield subtle yet
effective results, ensuring that your enhancements seamlessly integrate
with the rest of the image.
Using Layers for Precise Whitening
When it comes to fine-tuning the brightness of a smile or refining edges, layers are your best friend. Here’s how to use them effectively:
Create a new layer to work non-destructively. This way, you can always revert to the original image if needed.
Use the Brush or lasso tool with a soft edge and low opacity to gradually build up the whitening effect.
To maintain a natural look, vary the opacity as you paint over different areas of the teeth, paying attention to the natural highlights and shadows. Consider using a Layer Mask to cleanly erase any whitening that spills over onto the gums or lips.
The Sponge Tool for Subtle Adjustments
The Sponge Tool can be a secret weapon for subtly desaturating the yellowness of a smile.
Here’s how to whiten your teeth using this Lightroom feature:
Select the Sponge Tool from the toolbar and set it to "Desaturate."
Adjust the flow to a low percentage to ensure the effect is gradual and controllable.
Carefully drag the tool over the teeth, watching the yellow tones fade away.
Use the Opacity slider in the Layers panel to fine-tune the intensity of the effect.
Saving and Sharing Your Edited Images
Once you’re satisfied with the whitening, it’s important to save and share your work properly: Save your work in PSD format to preserve the layers for future edits.
When ready to share, export the image in a web-friendly format like JPEG or PNG. Use the ‘Save for Web‘ option to optimize the image quality while keeping the file size manageable.
Incorporating these advanced techniques into your photography workflow will ensure your edited photos look professional and the smiles genuinely radiant.
If you’re looking to expand your knowledge, consider our resources on how to add shapes in Photoshop for creative composites.
Frequently Asked Questions
How to do teeth whitening in Photoshop?
Teeth whitening in Photoshop is a simple process. Here’s how you can do it:
Open Your Photo: Start by opening the image in Photoshop.
Select the Teeth: Use the Lasso Tool or the Quick Selection Tool to carefully select the teeth.
Create a New Layer: Go to Layer > New > Layer via Copy to make a copy of the selection.
Adjust Hue/Saturation: With the new layer selected, go to Image > Adjustments > Hue/Saturation. Lower the Saturation to remove any yellow tones.
Brighten the Teeth: Still in the Hue/Saturation menu, increase the Lightness to brighten the teeth. Be careful not to overdo it to keep the look natural.
Refine Your Work: If needed, use the Eraser Tool to clean up any areas that may have been over-whitened.
This method will give you a natural-looking smile in your photos.
How can I change my teeth whiter in a picture?
To make your teeth look whiter in a picture, follow these simple steps:
Open Your Image: Load your photo in Photoshop.
Zoom In:Zoom in to get a better view of your teeth.
Select the Teeth: Use the Brush Tool to paint over your teeth with a soft white color on a new layer. Be precise to avoid the gums and lips.
Change Blend Mode: Set the layer's blend mode to "Overlay" or "Soft Light" to blend the white with your teeth naturally.
Adjust Opacity: Lower the opacity of the layer until the teeth look naturally white.
Refine: Use the Eraser Tool to clean up any excess white from the surrounding areas.
How do you whiten teeth with a brush in Photoshop?
Whitening teeth with a brush in Photoshop is straightforward. Here’s how to do it
Open Your Photo: Load the image into Photoshop.
Add a New Layer: Create a new layer by clicking the “New Layer” icon at the bottom of the Layers panel.
Select the Brush Tool: Choose the Brush Tool from the toolbar. Set the brush hardness to a low value and pick a soft white color.
Paint Over the Teeth: Carefully paint over the teeth. Adjust the brush size as needed to stay within the teeth area.
Change the Blend Mode: Set the blend mode of the layer to “Overlay” or “Soft Light” to blend the white with the teeth naturally.
Adjust Opacity: Lower the opacity of the layer until the teeth look naturally white.
Refine: Use the Eraser Tool to clean up any areas that might have been painted over accidentally.
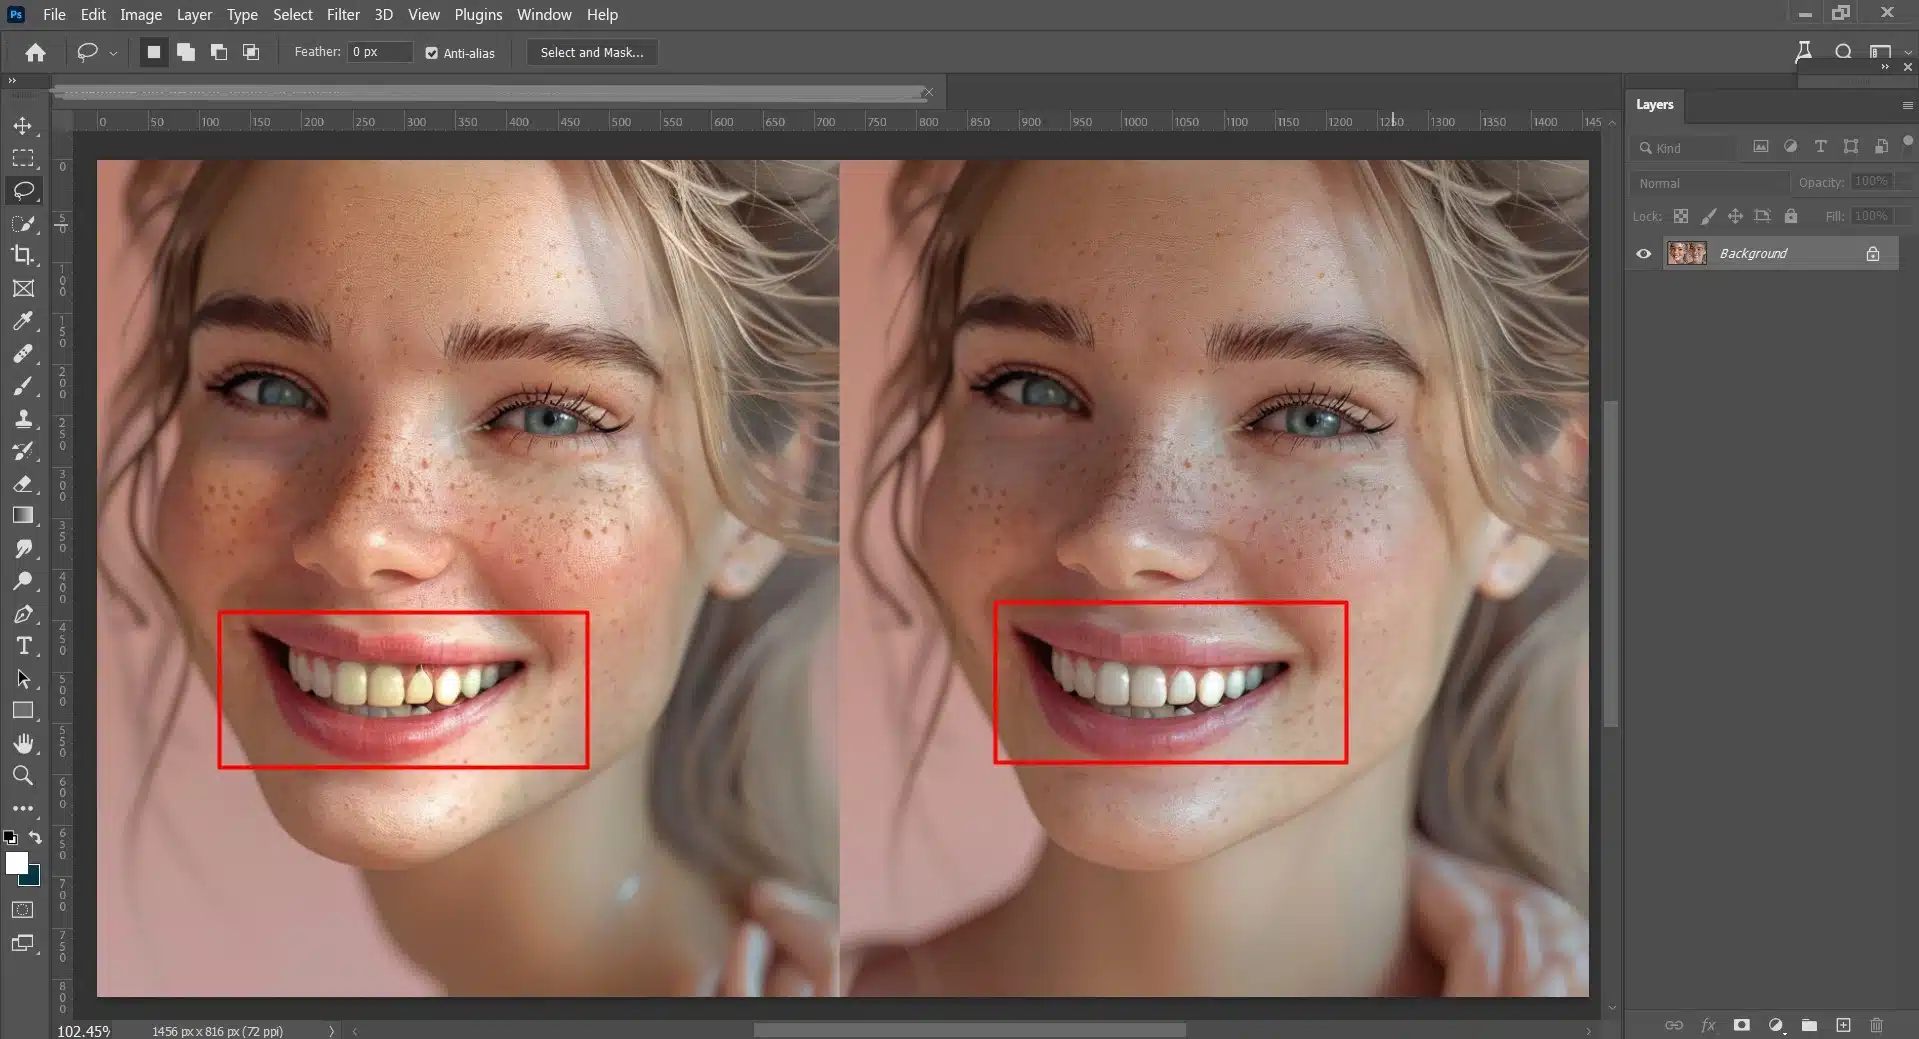
After carefully following the steps outlined in this guide, I went on my own Photoshop journey to transform a family photo that held special significance for me.
The smiles were genuine, but the lighting conditions had left the teeth looking less than their best.
Applying the techniques of Photoshop masking, subtle hue adjustments, and employing the sponge tool, using the black and white shortcut I was amazed at how the smiles in the photo were revitalized, making the entire image come alive with warmth and joy.
It was a striking reminder of the power of Photoshop to not only enhance images but also to preserve precious moments in their best light.
For those inspired to dive deeper into the world of photo editing and wish to master the craft, the journey doesn’t stop here.
Whether you’re looking to refine your skills in teeth whitening or expand your expertise to other aspects of Photoshop and Lightroom, our comprehensive courses are designed to guide you every step of the way.
Go on your learning adventure today by exploring our Photoshop Course and Lightroom Course. With our expert-led tutorials, you’re not just learning; you’re elevating your creative potential to new heights. Join us, and let’s create something beautiful together.
If this article has helped you, then Like and Share it with your friends
$2,061.00Original price was: $2,061.00.$1,061.00Current price is: $1,061.00. 27585
Download Your Free Guide Now!
Discover the secrets of photography with our printable guide! Master essential techniques like aperture, shutter speed, and ISO to create stunning images. Get your free printable PDF now and start turning your snapshots into masterpieces!