Have you ever wondered how to photoshop someone out of a picture seamlessly?
Whether it’s an ex from a favorite photo or an unexpected photobomber, removing someone from an image can transform your photo memories.
In this guide, I’ll walk you through the steps to Photoshop someone out of a picture and achieve a flawless edit using Photoshop.
Imagine the satisfaction of perfecting your images with ease. Let’s dive in and unlock the secrets to mastering this significant photo-editing skill!
Table of Contents
How to Photoshop Someone Out of a Picture
Removing someone from a photo can seem challenging, but with the right tools and techniques, you can achieve seamless results. Follow this guide to master the process quickly.
Step-by-Step Guide to Photoshop Someone out of a Picture for Just a Few Seconds
Ready to quickly learn how to photoshop someone out of a picture and effectively remove unwanted people from your photo?
Follow these steps to make it happen in a few seconds.
1. Open Your Image File
First, open Adobe Photoshop and load your image file. You face better odds using a high-resolution photo.
This feature will automatically fill the selected area with surrounding pixels.
5. Fine-Tune the Edits
To Photoshop someone out of a picture, use tools like the brush and healing brush tool to ensure the area looks seamless.
For further guidance, you can learn how to use healing brush in Lightroom, which works similarly in removing unwanted objects while maintaining a natural appearance.
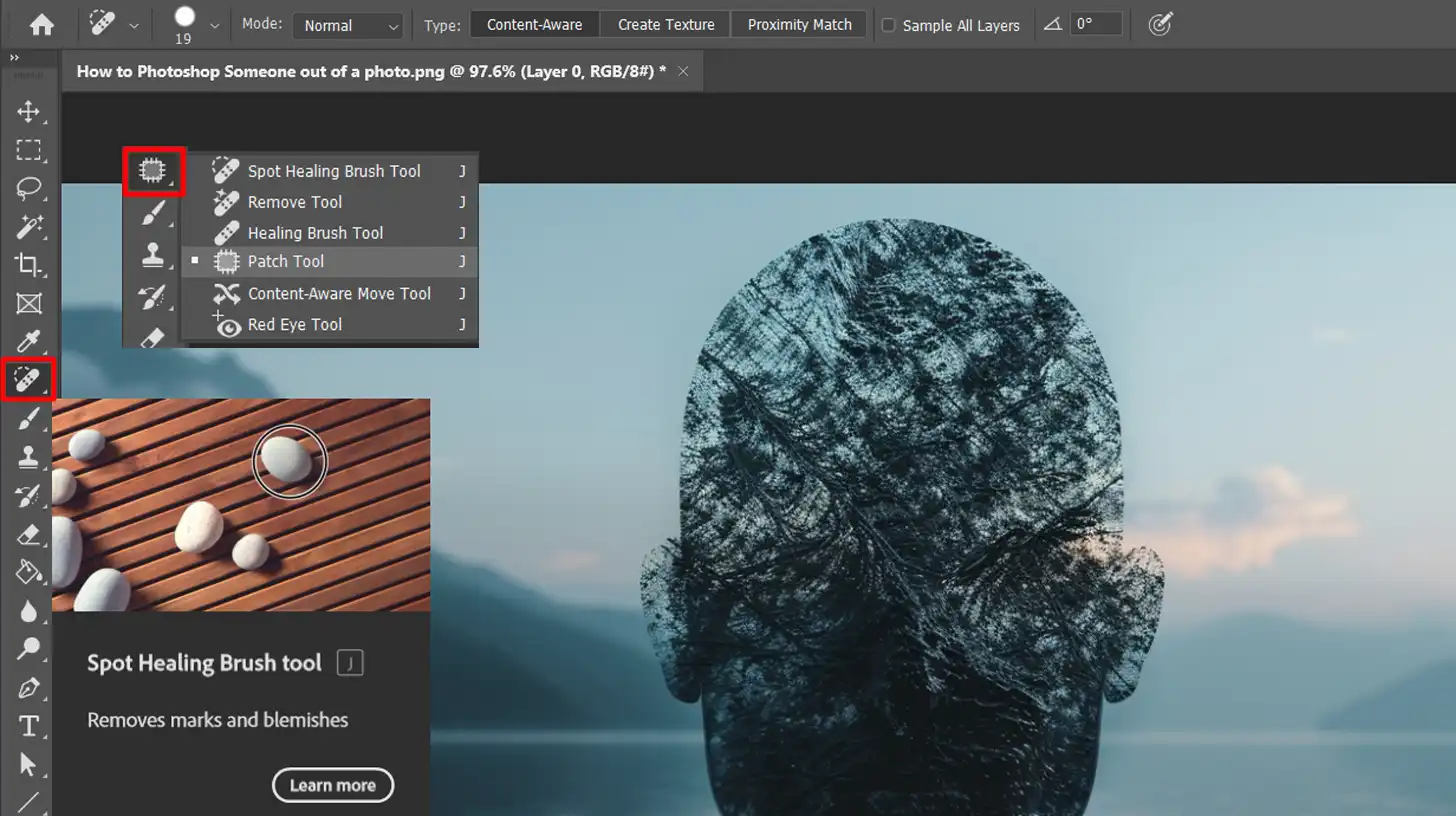
Implementing Content-Aware Fill
This removal tool is a powerful feature in Photoshop that allows you to effortlessly remove a person. Let’s explore how to photoshop someone out of a picture with this tool and when to use it.
This tool is amazing. It helps remove a person in just a few seconds. This is ideal for basic backgrounds.
Make a precise selection.
Choose Edit > Fill.
Ensure Content-Aware is selected.
Click OK. Watch the magic happen!
Use this feature when dealing with clean areas or simple backgrounds. Complex backgrounds may need manual techniques.
Manual Techniques with Editing Tools for Removing Someone from an Image
In situations where automated tools fall short, manual techniques can provide a more precise touch.
This section covers various editing tools that allow you to refine your photo edits and remove unwanted elements effectively
Use the Patch Tool to drag and replace larger areas.
Tips for Manual Techniques with Editing Tools
Zoom in for more precision. Adjust the opacity and hardness of your brush to blend better. Practice makes perfect!
Pro Tip: For tricky backgrounds, try using multiple layers. This helps you work non-destructively and gives you more control over your edits.
Advanced Techniques in Adobe Photoshop Fix
Discover how to photoshop someone out of a picture to enhance your image editing skills with advanced methods in Adobe Photoshop.
These techniques can help you tackle more complex fixes and achieve professional-quality results.
Layer Masking
Layer masking helps you control which parts of a layer are visible. It’s like having an eraser you can undo at any time.
To use a layer mask:
Select the layer you want to work on.
Click the "Add Layer Mask" button at the bottom of the Layers panel.
Use a brush to paint over areas you want to hide. White reveals black conceals.
You can also use gradients for smooth transitions and blending. Experiment with different opacities for varied effects. Layer masking offers non-destructive editing, so your original image stays intact. No stress if you make a mistake, just adjust the mask.
Mastering the Clone Stamp for Object Removal
The Clone Stamp Tool is your best friend when it comes to object removal or when you want to remove somenone out of a picture. It acts as a removal tool by copying pixels from one part of your image to another.
To use it:
Select the tool from the toolbar.
Hold the Alt key and click to sample an area.
Paint over the area you want to replace.
Pay attention to textures and lighting to make sure everything blends seamlessly. Adjust the brush size for better control.
It’s not just for object removal; you can also use it for touching up imperfections or even duplicating elements in your photo.
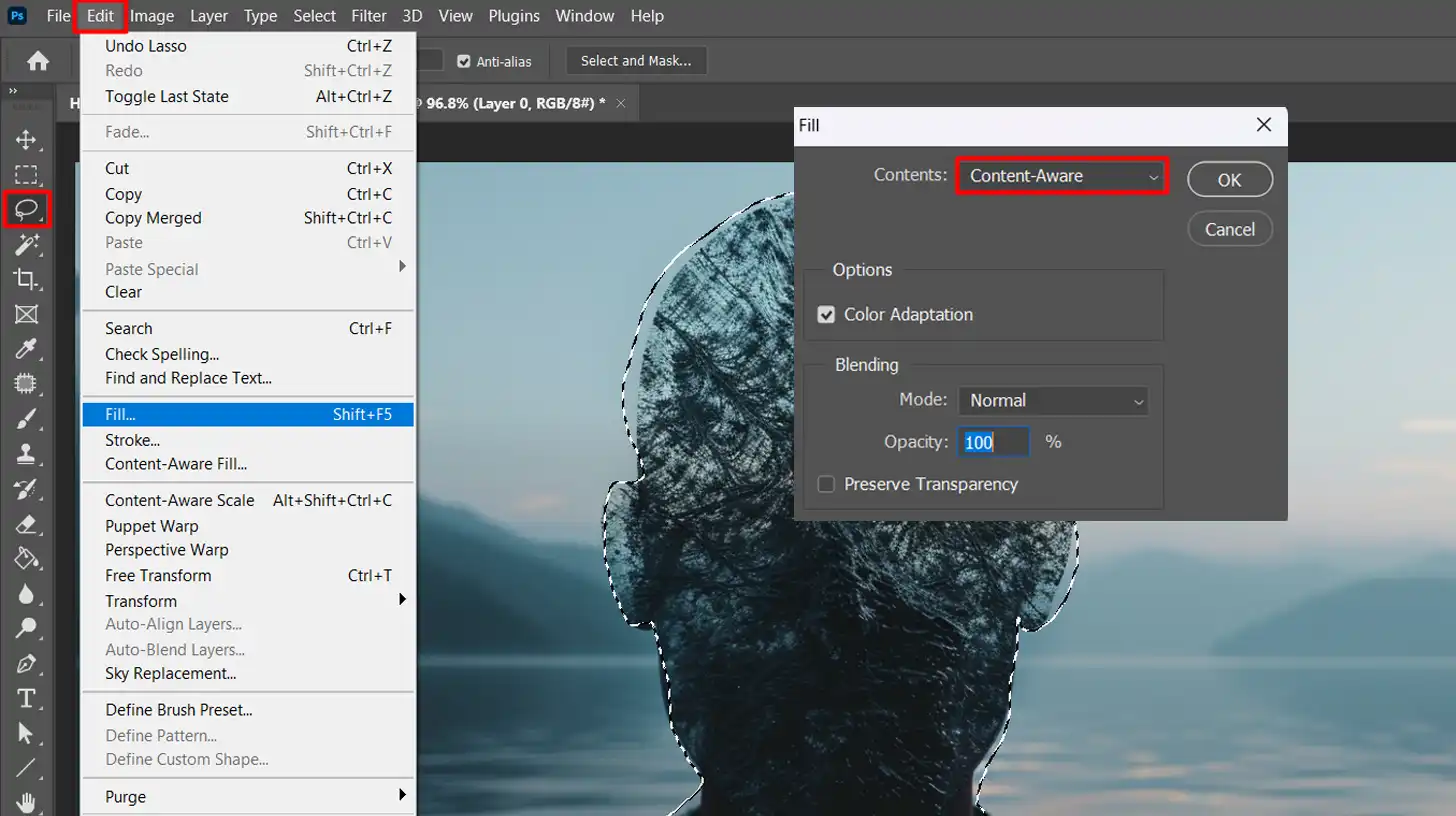
Automating Object Removal with Content-Aware Fill
This tool is a great way to automate the object removal process. This feature analyzes the surrounding pixels to fill in gaps.
To use it:
Select the area you want to remove a person with the Lasso Tool or the Quick Selection.
Go to Edit > Fill, and choose Content-Aware from the dropdown menu.
Check your work afterward. Sometimes small adjustments with the Healing Brush or Clone Stamp Tool can make a big difference.
If you’re dealing with complex backgrounds, you might need to combine this tool with others for the best results.
It’s like magic but requires some manual touch-ups for perfection.
Perfecting Your Edits with the Healing Brush
The spot healing brush tool helps blend imperfections seamlessly. It’s excellent for smaller areas that need precise corrections.
To use it:
Select the tool from the toolbar.
Hold Alt and click to sample an area.
Paint over the imperfection.
Like the Clone Stamp Tool, but smarter. It matches textures, lighting, and shading automatically.
It’s perfect for getting rid of those pesky imperfections without affecting other parts of your image.
Efficiently Repairing Larger Areas with the Patch Tool
The patch tool combines features of the healing brush and lasso tools. It’s ideal for larger areas.
To use it:
Draw a selection around the area you want to fix.
Drag it to a clean section of the photo to patch it up.
This tool is handy when you want to replace part of an image but maintain consistent texture and color. It’s a quick way to fix larger sections without sacrificing quality.
The Power of Multiple Layers
Using multiple layers in Photoshop gives you immense control over your edits. Imagine you’re building a sandwich; each layer has something different.
You can adjust each ingredient without disturbing the whole.
Multiple layers let you make sophisticated edits without worrying about mistakes.
You can blend, mask, or hide each layer as needed. This way, you can try various techniques non-destructively.
Pro Tip: Experiment with different tools to find what works best for your project. For instance, understanding the difference between Photoshop and Lightroom can help you decide which software to use for specific tasks.
Maximize your editing efficiency with these helpful techniques. This is otherwise perfect moment to dive into some tips that will speed up your workflow and make your editing process smoother.
Using Keyboard Shortcuts
Let’s dive right into it. Using keyboard shortcuts speeds up your work. Imagine not having to click around forever.
Significant Shortcuts for Adobe Photoshop:
Ctrl + J (Cmd + J on Mac) to duplicate a layer.
Ctrl + T (Cmd + T on Mac) to transform a layer.
Ctrl + S (Cmd + S on Mac) to save your work.
Ctrl + Z (Cmd + Z on Mac) to undo an action.
These shortcuts cut your editing time considerably. No more hunting for tools or commands. Also, memorizing these basics can make you feel like a Photoshop wizard in no time.
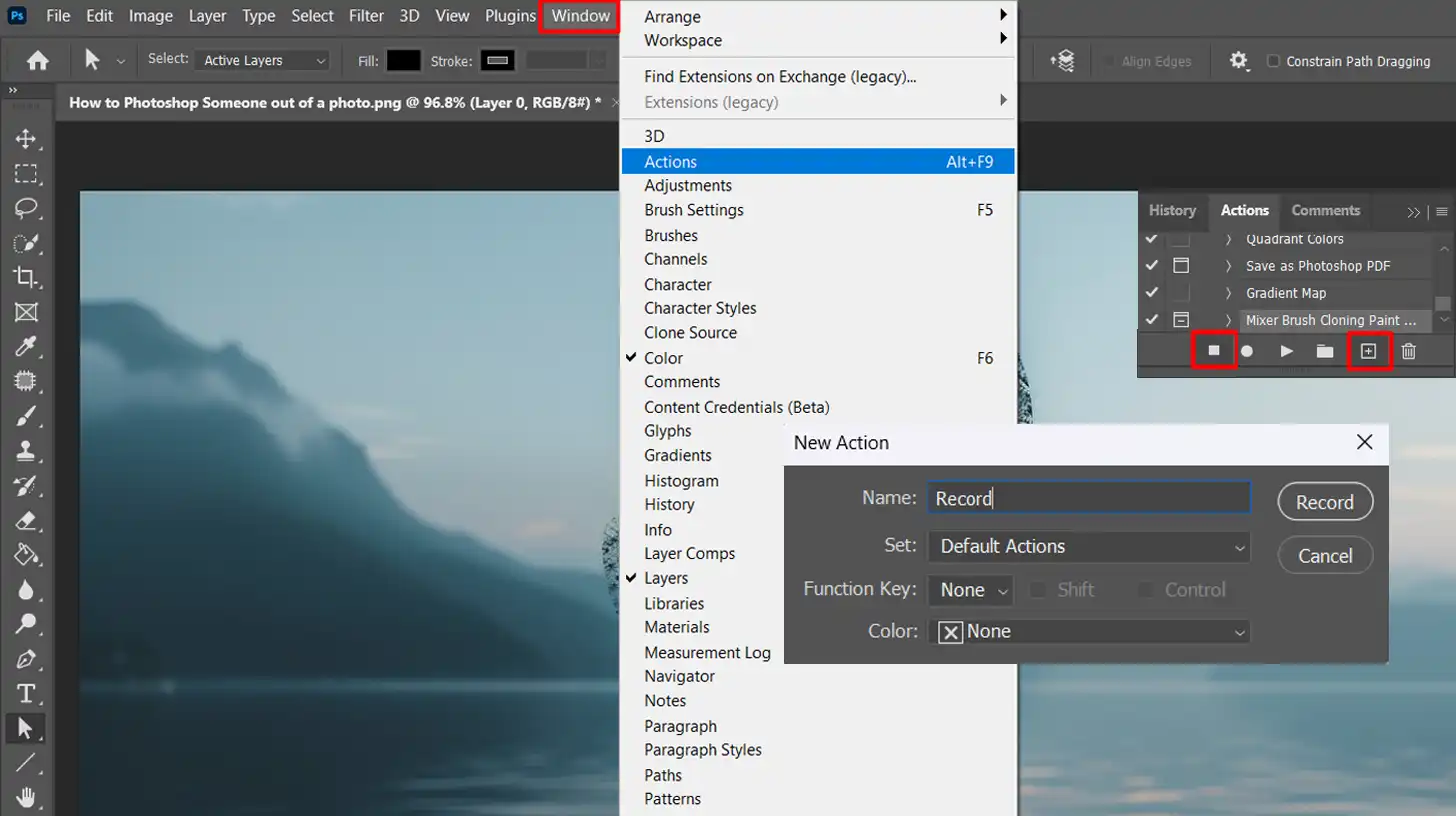
Saving Time with Actions
Now, let’s talk about Photoshop actions. They are like macros for a photo editing app. You record a series of steps and then play them back.
To Create an Action in Photoshop:
Open the Actions panel from Window > Actions.
Click the "Create New Action" button.
Name your action and hit "Record."
Perform the steps you want to automate.
Click "Stop" when done to save the Action.
Photoshop actions reduce repetitive tasks and let you focus on creative work.
Set up Actions for standard processes like resizing or watermarking. Trust me, using Actions can save you countless hours.
Pro Tip: Always keep an original copy of your image. Use features like Photoshop smart fill to auto correct areas you want to fix.
It can even remove unwanted objects from your photos.
Keep experimenting with different simple techniques, including those in Lightroom, to learn what works best for each situation. You’ll be surprised at how efficient you can get.
Best Image Editing Software Alternatives
Alright, let’s dive right in. You’re searching for the best photo editing software, aren’t you? Everyone knows Photoshop is top-notch, but alternatives exist.
When choosing the best software for photo editing, it’s helpful to compare your options to find the right fit for your needs.
Below is a quick comparison of popular image editing tools GIMP, Affinity Photo, and Pixlr, to help you make an informed decision based on cost, features, and user experience
Feature
GIMP
Affinity Photo
Pixlr
Cost
Free
One-time purchase
Free with paid options
Interface
Less intuitive
Clean and user-friendly
Simple and easy to navigate
Features
Advanced editing tools
Advanced editing with a focus on quality
Basic edits and quick fixes
Community Support
Large but less intuitive
Growing, less extensive
Limited to online resources
Learning Curve
Steep for beginners
Moderate, user-friendly
Easy to learn
Top Alternatives to Adobe Photoshop
Explore these great options if you’re looking for powerful image editing software other than Photoshop. These alternatives offer a range of features to suit different needs and budgets.
GIMP
First up, we have GIMP. It’s free, open-source, and offers a lot of editing features. You won’t find it lacking in tools if you’re familiar with Photoshop.
However, the difference between Photoshop and GIMP lies in the user interface and community support.
Affinity Photo
Another solid choice is Affinity Photo. This editing app has a clean interface and a one-time purchase model. No subscriptions, just straightforward access.
It’s a great alternative for those who want advanced features without recurring costs.
Pixlr
For simpler tasks, try Pixlr. This online tool can help with basic edits. It’s quick, easy, and good for those who don’t need heavy-duty software.
If you’re looking to remove an object in Photoshop or remove a person from a photo, Pixlr can handle similar tasks with ease.
Pros and Cons of Each Software to Photoshop Someone Out of a Picture
Understanding the strengths and weaknesses of each software can help you choose the best one for your editing needs.
Let’s take a closer look at GIMP.
Evaluating GIMP
Pros:
Free
Powerful for an online tool
Cons:
Less intuitive interface
Somewhat steep learning curve for beginners
Assessing Affinity Photo
Pros:
An array of advanced editing features
Simple interface
Cons:
Lacks community support present in more established apps like Photoshop
Evaluating Pixlr
Pros:
Ease of use
Great for quick fixes like to remove unwanted people or remove objects
Cons:
Lacks some advanced features found in desktop programs
Pro Tip: When using any software, always keep an original copy of your image. Experiment with different apps to find the one that suits your needs best.
Frequently Asked Questions
How do I Photoshop someone out of a picture?
Here are the steps to removing someone out of a picture:
Open your photo editing software.
Select the 'Clone' or 'Heal' tool.
Brush over the person you want to remove, sourcing pixels from the surrounding area to blend.
Refine the edges and save your edited, clean photo.
How do you Photoshop someone out of a picture for free?
Download free software like GIMP or use an online service like Photopea.
Upload your photo to the platform.
Use the 'Clone' or 'Healing' tool to paint over the person you want to remove.
Adjust the texture and background blend if necessary.
Save the edited image to your device.
How to cut someone from a photo in Photoshop?
Here are the steps to cut someone out of a picture:
Open the image in Photoshop.
Select the 'Pen' or 'Lasso' for precise area selection around the person.
Once selected, right-click and choose 'Layer via Cut' to separate the person into a new layer.
Hide or delete the layer with the person.
Use the 'Clone Stamp' tool to fill in the background.
Finalize your changes by saving the photo.
How do I remove a person from a photo without Photoshop?
Choose a free editing tool like GIMP or use an app on your smartphone.
Import the photo you wish to edit.
Select tools like 'Heal' or 'Clone' to cover the person.
Smooth out the edited areas to match the surrounding background.
In conclusion, learning how to Photoshop someone out of a picture has been a game-changer for me. It’s not just about removing unwanted elements but also about enhancing the overall quality of my photos.
Whether I’m working on professional projects or personal snapshots, these skills have allowed me to create flawless images that truly stand out.
If you’re looking to elevate your photo editing abilities, I highly recommend checking out my Photoshop course and Lightroom course that have been invaluable resources that have significantly improved my workflow and results.
Investing the time to learn these techniques has been incredibly rewarding, and I’m confident you’ll find the same value in mastering them.
If this article has helped you, then Like and Share it with your friends
$2,061.00Original price was: $2,061.00.$1,061.00Current price is: $1,061.00. 27584
Download Your Free Guide Now!
Discover the secrets of photography with our printable guide! Master essential techniques like aperture, shutter speed, and ISO to create stunning images. Get your free printable PDF now and start turning your snapshots into masterpieces!