How To Make Smart Object Editable : A Beginners Guide
How To Make Smart Object Editable : A Beginners Guide
Wondering how to make smart object editable in Photoshop? I’ve been there, too, and it can be frustrating when you can’t tweak your designs the way you want.
But don’t worry, you’re in the right place! By the time you finish reading this, you’ll be able to effortlessly edit any smart object, giving you the creative freedom you crave. Imagine the possibilities: fine-tuning every detail, customizing elements, and making your work stand out.
Ready to unlock these secrets? Let’s dive in and transform your editing skills!
Table of Contents
How to Create Smart Objects
Smart objects revolutionize the way we manage layers in Photoshop.
They provide flexibility, non-destructive editing, and the ability to maintain image resolution. Let’s dive straight into how to harness their power.
Creating Smart Objects from Layers
To create a new smart object from layers, follow these steps:
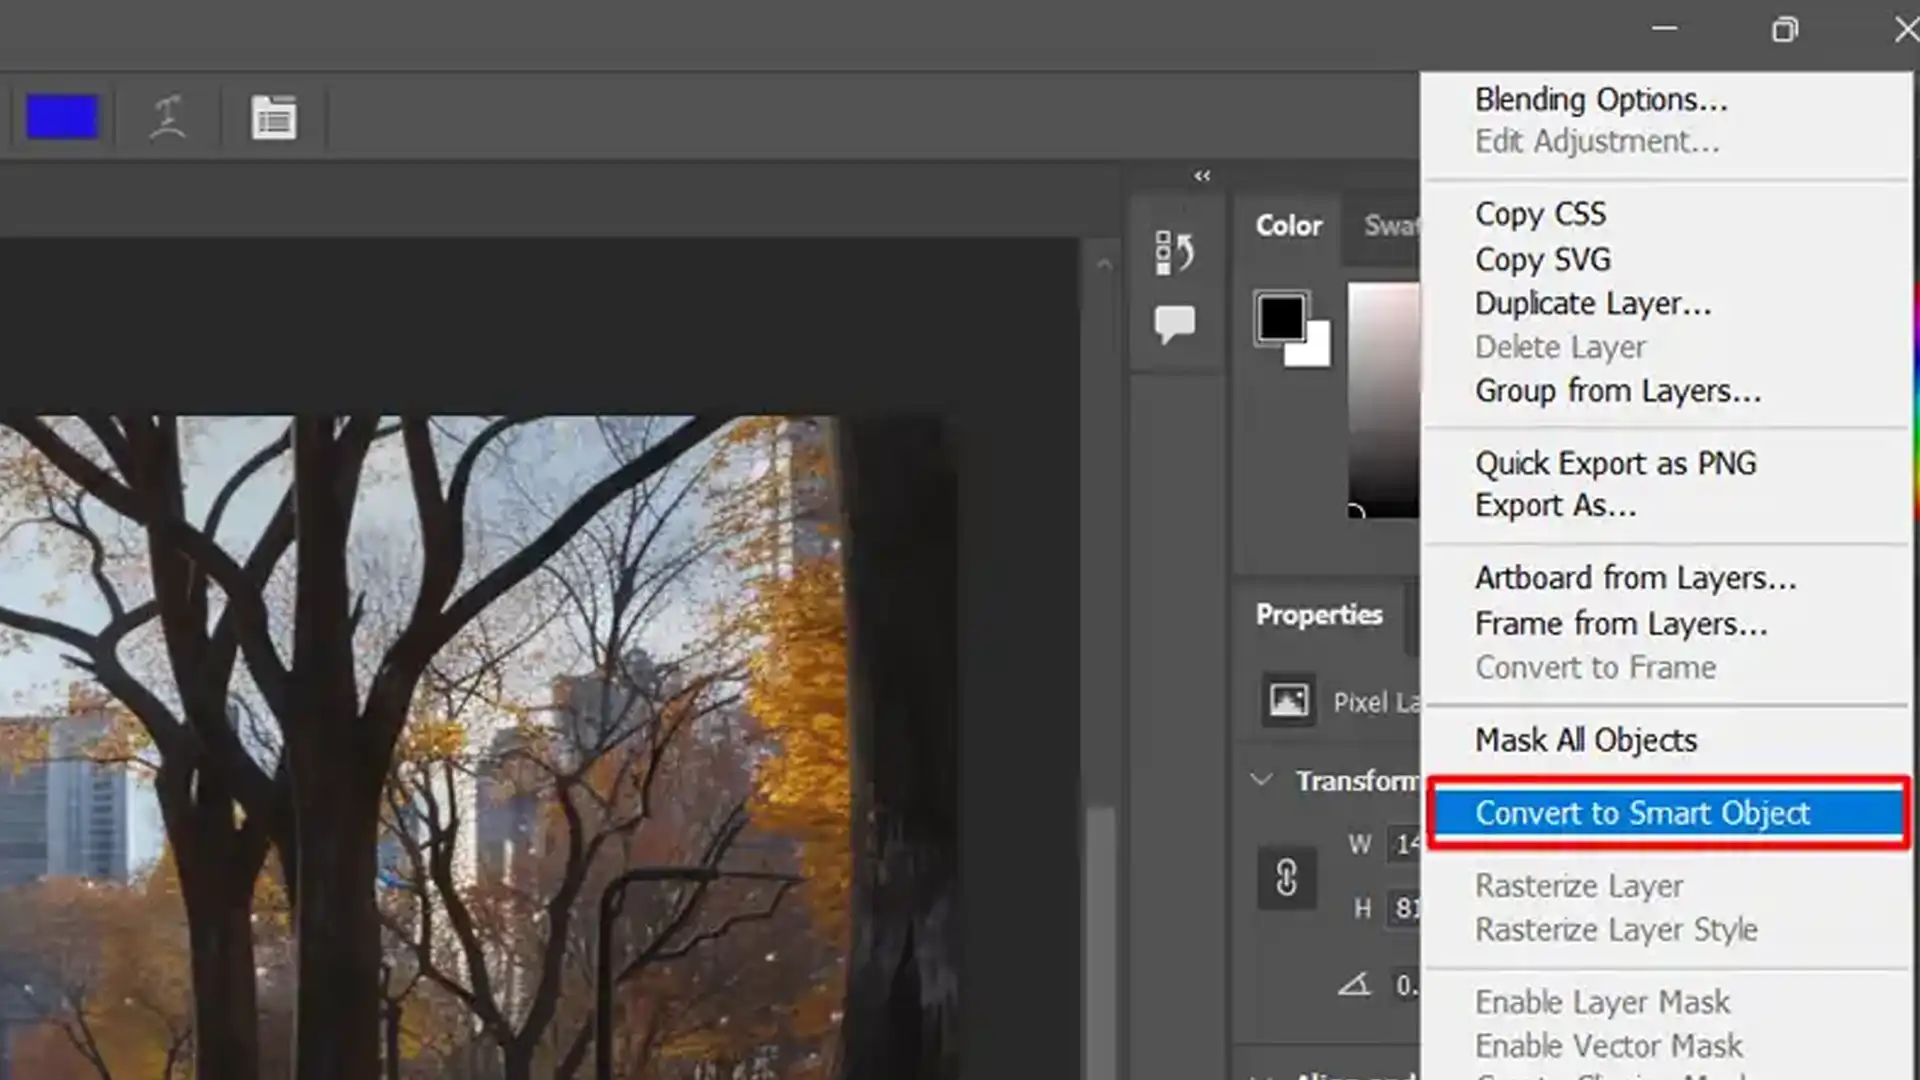
Select the layers you want to convert within your layers panel.
Right-click and choose Convert to Smart Object.
Notice the new linked smart object layer in the layers panel.
Creating smart objects from layers allows easy scaling, transforming, and applying filters without losing quality.
Remember, smart objects retain the original image data, which means more flexibility.
Here’s a quick comparison of creating new smart objects versus converting existing layers:
Task
Creating New Smart Objects
Converting Existing Layers
Steps
Select layers, right-click, Convert to Smart Object
Locate layer, right-click, Convert to Smart Object
Flexibility
High flexibility with original data retention
Preserves edits and allows non-destructive effects
Usage
Ideal for starting new projects
Best for existing layers needing flexibility
Converting Existing Layers to Smart Objects
Sometimes, you need to convert an existing layer into a smart object. Here’s how:
In the layers panel, locate the layer you want to convert.
Right-click on the layer and select Convert to Smart Object.
Observe the smart object icon that appears on the layer thumbnail.
Converting existing layers to smart objects preserves your edits and applies non-destructive effects.
If you ever want to edit a smart object, just double-click its thumbnail in the layers panel.
Using Smart Objects in Your Workflow
Incorporating smart objects into your workflow can streamline your editing process. Here are some practical tips:
Create Smart Objects at the Start: Begin your project by converting important layers into smart objects. This provides flexibility for future adjustments.
Non-destructive editing: Apply filters and adjustments without altering original image data, ensuring you can always revert if needed.
Edit Multiple Instances: One smart object can be used multiple times in your project. Any changes to the original will reflect across all instances.
You can integrate linked smart objects to minimize file size and facilitate updates across multiple documents.
However, be mindful of potential broken smart object links if files are moved or deleted. Make sure to embed linked smart objects before sharing to avoid issues.
Pro Tip: When working with complex projects, logically name your linked smart object layer. This saves time when navigating through the layers panel.
Also, you can try using the object selection tool for mastering smart selection that quickly isolates and converts elements into smart objects, making your workflow more efficient and flexible.
Mastering smart objects in Photoshop enhances your creative control and efficiency especially when adding noise to texture. Experiment with converting different layers and integrating smart objects into your workflow.
Mastering Smart Objects in Photoshop Document
Understanding how to work with smart objects can significantly enhance your Photoshop skills.
Let’s explore how to make smart objects editable for more creative control.
Editing Contents of a Smart Object
When you have an embedded smart object layer, double-click on its thumbnail in the layers panel.
The contents open in a new window. Edit as needed and save changes.
Return to your original document to see updates. This is one of the essential tools in Photoshop that enhances your workflow.
Updating Linked Smart Objects
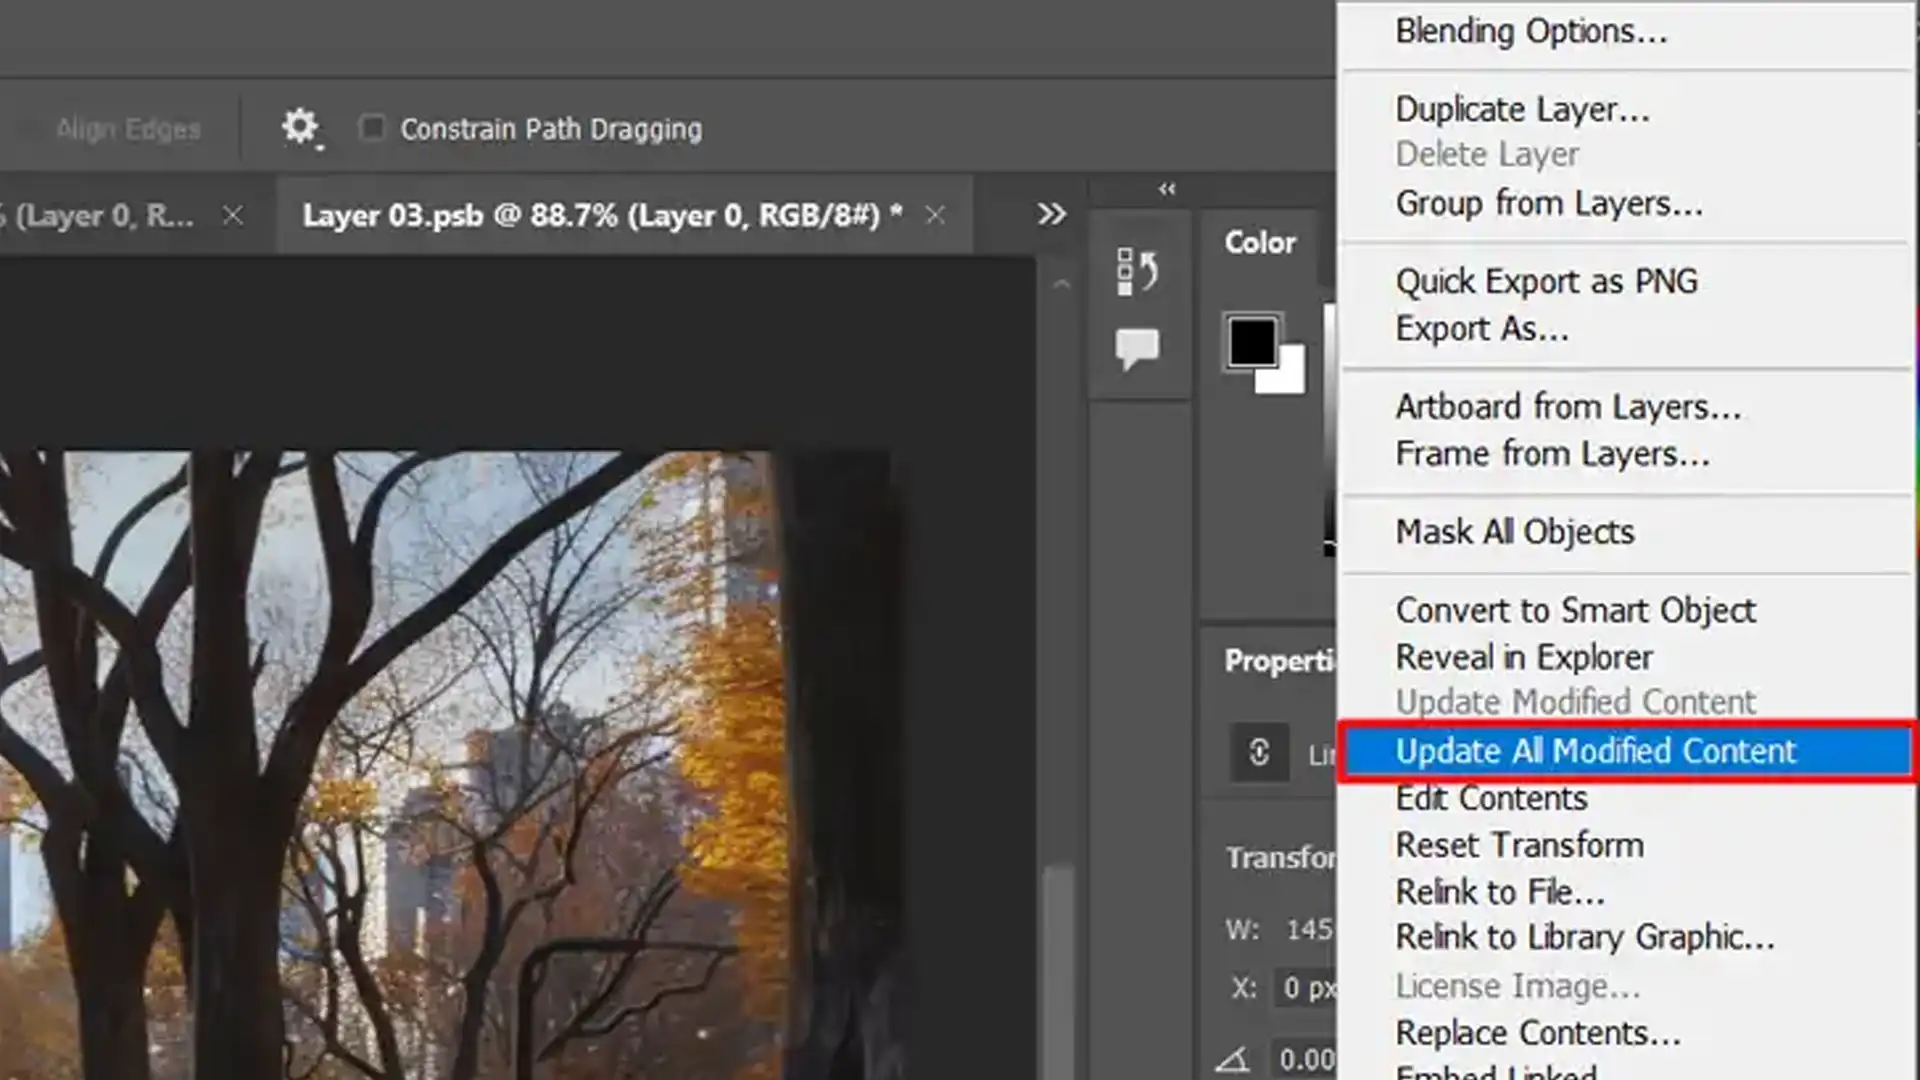
Linked smart objects allow for easy updating. If you change the original file, the linked instances update automatically.
Right-click and select ‘Update All Modified Content‘ to ensure everything is current.
This feature is handy when working with complex compositions video, linked smart objects, or when you need to use the replace the color tool in Photoshop.
Troubleshooting: Smart Object is Not Directly Editable
It’s frustrating when your linked smart object layer isn’t directly editable.
Let’s explore how to solve this.
Common Issues and Solutions for Smart Object Editing
Here are some common photo editing mistakes you might encounter with smart objects and their solutions to help you navigate these challenges effectively:
Issue: You might see an error saying the linked smart object is not directly editable.
Solution: Ensure it's a raster image, not a vector or text layer. Convert it by right-clicking, then 'Rasterize.'
Issue: Unable to apply certain filters or adjustments.
Solution: Use 'Convert for Smart Filters' first.
Tips for Smooth Editing
Follow these tips to ensure a smooth and efficient editing process with smart objects in Photoshop:
Use descriptive names for your smart objects. This keeps your layers panel organized.
Permanently save a copy of the original file before making extensive changes. It's a good backup plan.
Use the 'Convert to Smart Object' command to maintain quality for frequently edited elements.
Pro Tip: Before sharing or moving your Photoshop document, package linked smart objects to avoid broken links.
With these tips, making a smart object editable becomes straightforward. Stay creative without compromising on quality.
Advanced Techniques with Smart Objects
Exploring advanced techniques with smart objects can significantly improve your Photoshop skills.
One powerful feature is using smart filters to apply non-destructive effects to your images.
How to Effectively Use Smart Filters
Smart filters are important for non-destructive editing.
You can apply multiple filters to create a linked smart object layer, reorder them, or adjust their settings without altering the original image.
Steps to use smart filters:
Select the smart object.
Go to the Filter menu and choose any filter you need.
Adjust its settings in the dialog box and click OK.
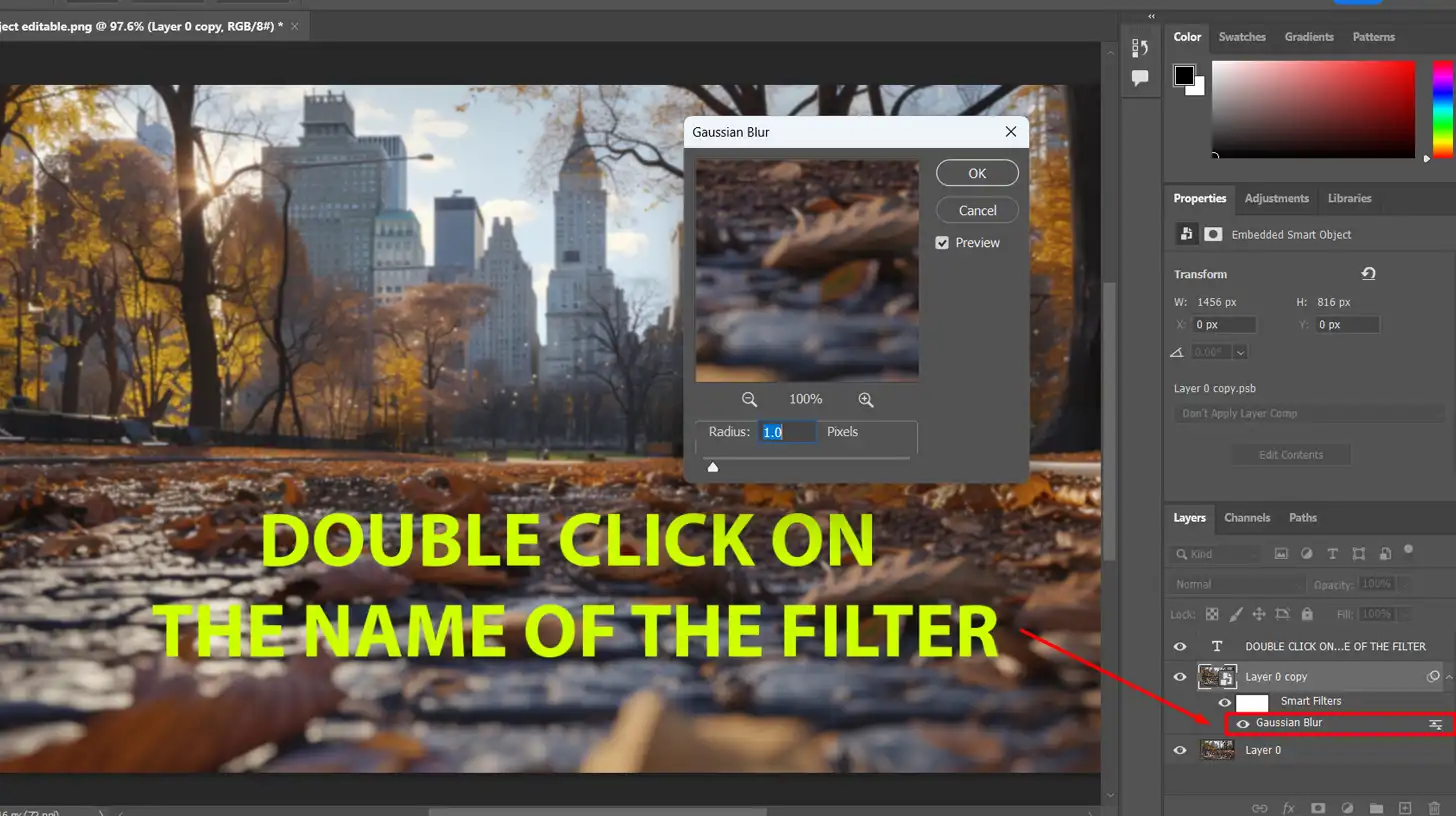
To edit the smart filters:
Double-click the filter name under the smart object layer in the layers panel. This opens the settings for further modifications.
Click the eye icon to disable or enable the smart filter easily.
Nesting Smart Objects
Nesting smart objects involves placing one smart object inside another. This technique helps organize complex files and keep your edits manageable.
Steps to nest smart objects:
Right-click on your smart object.
Select 'Convert to Smart Object' to nest it within another smart object.
This method enables you to apply different adjustments or transformations at various levels inside the Photoshop document.
It is also helpful for creating reusablecomponents like icons or buttons, which you can update simultaneously across multiple instances.
Replacing Contents in Smart Objects
Replacing the contents of a smart object keeps your designs flexible.
Steps to replace contents:
Double-click on the smart object's thumbnail to open the embedded smart object.
Replace the image or content.
Save the changes and see the updated version in your main Photoshop document.
This feature is particularly useful when working on different versions of a design.
You can maintain all your settings, smart filters, and adjustments without redoing everything from scratch each time you replace image data.
Your layers panel will stay tidy as the replaced content updates automatically.
With these advanced techniques, you can leverage the true power of smart objects.
They enhance your workflow and maintain the quality of your images. Keep experimenting and see how smartobjects transform your design process.
Pro Tip: Always save your original Photoshop document and its linked smart objects to avoid any loss of data or a broken smart object link.
To streamline your workflow when replacing contents in smart objects, familiarize yourself with Photoshop shortcuts and Lightroom shortcuts to quickly access and edit your elements.
Create Embedded Smart Objects
Creating smart objects allows you to harness their full potential in Photoshop.
By understanding smart object properties and smart object benefits, you can enhance your editing workflow and maintain high image quality.
Understanding Smart Object Integration
Creating smart objects in Photoshop can greatly streamline your workflow and help keep things organized.
But what are these embedded smart objects, and how do you make one? Let’s dive in and cover the basics.
Smart objects are like magic containers that hold your images, art, and designs.
They help you work non-destructively, meaning you don’t mess up the original file while editing.
This is particularly useful when applying filters or transformations without making permanent changes.
Steps to Create Embedded Smart Objects
Follow these simple steps to create embedded smart objects in Photoshop:
First, open your Photoshop document.
Select the layer you want to convert in the Layers panel.
Right-click the layer and choose 'Convert to Smart Object'. Voilà! You've just made an embedded smart object.
The beauty of using smart objects is in their versatility.
You can apply filters, transformations, and effects without permanent changes. Want to adjust a previously applied filter? No problem!
Create Linked Smart Objects
While working with smart objects, you can also create linked smart objects. These are smart objects saved separately, often better for massive projects.
Select your layer and right-click it.
Choose 'Convert to Linked.' You've made a relevant linked smart object that references an external file!
What if you need to update linked smart objects? Simple! Just update the external file, and Photoshop will automatically reflect the changes.
Pro Tip: Always name your layers. This will help you find and manage any smart object layer quickly!
Add a dash of humor or a lighthearted comment to keep your readers engaged while being respectful and concise.
Smart Object Layer Management
Managing layers effectively is important for a smooth workflow in Photoshop. Let’s look at how smart objects can help you organize layers more efficiently.
Organizing Layers with Smart Objects
In Photoshop, managing layers can be daunting.
A smart object layer helps keep things tidy. Converting a layer to a smart object is simple.
Just right-click your desired layer in the Layers panel and select “Convert to Smart Object“. This action preserves the original content.
Using smart objects offers flexibility. You can apply filters and transformations without altering the original layer.
This means adjustments can be modified or removed at any time. For example, tweak lighting or colors, knowing you can always revert if needed.
Embedded smart object layers are beneficial. They maintain embedded content within the Photoshop file itself.
This avoids broken links and missing files. Additionally, for frequently updated elements, linked smart objects are an excellent choice.
They let you maintain external files, and any changes to them update automatically within your project.
The smart organization goes a long way in keeping your workspace efficient.
Steps to Convert a Layer to a Smart Object
Follow these simple steps to convert a layer in Photoshop:
Right-click your desired layer in the Layers panel.
Select "Convert to Smart Object".
Working with Multiple Smart Object Layers
Handling several smart object layers might seem tricky, but it’s manageable.
First, label each layer clearly. Clear labels help in finding layers quickly.
When using linked smart object layers, ensure that external files are stored in accessible locations. That way, updates are seamless and efficient.
Optimizing Workflow with Linked and Duplicated Smart Objects
Use these steps to create linked smart objects in Photoshop:
Select your layer.
Right-click and choose "Convert to Linked".
This creates a reference layer pointing to an external file. The linked smart object size remains small since the content isn’t embedded within the Photoshop document.
For massive projects, this approach keeps file sizes manageable.
Duplicating a smart object can also optimize workflow. Right-click on an existing smart object layer and select “New Smart Object via Copy”.
This creates a duplicate smart object which can be edited independently. This method is advantageous when multiple versions of a single element are needed.
Pro Tip: Always back up your relevant linked smart objects in a secure location. If the external file is moved or deleted, the reference in Photoshop breaks, leading to lost work.
When working with multiple smart object layers, organize your layers efficiently and consider using Lightroom for additional adjustments to streamline your workflow.
Other Common Photoshop Errors
Photoshop users often encounter various errors that can disrupt their workflow.
Let’s start by addressing the common issue of program errors and how to resolve them.
1. Could Not Complete Your Request Because of a Program Error
We all encounter this classic error from time to time. It usually happens when the program runs into an unexpected problem.
Check first if your software is up-to-date. Outdated versions often cause glitches.
Next, reset your preferences by holding down Ctrl+Alt+Shift (Windows) or Command+Option+Shift (Mac) as you launch Photoshop.
Still no luck? Try the "Purge" command in the "Edit" menu to clear the memory cache. This sometimes solves the issue.
2. Could Not Complete Your Request Because It Is Not a Valid Photoshop Document
This error means the file you’re trying to open isn’t recognized.
Ensure the file extension is correct. Photoshop primarily uses .psd and supports formats like JPEG and PNG.
If the file is valid, rename it and try again.
Opening the file using "Open As" (found in the File menu) and selecting the correct format may also help.
3. Could Not Complete Your Request Because of a Problem Parsing the JPEG Data
JPEG parsing issues are another common headache. Corrupted files are usually the cause.
Try opening the JPEG in another viewer to see if it works there.
If the file opens elsewhere, resave it with a different name and try again in Photoshop.
For more stubborn cases, convert the JPEG to another format using an online converter before opening it again in Photoshop.
Pro Tip: When working with large projects, use smart objects. They preserve the quality of your layers through countless edits and transformations.
Additionally, linked smart objects maintain a dynamic connection to your external files, ensuring you always work with the latest version.
Remember, embedding content within Photoshop makes managing your files easier by preventing broken links.
Understanding how to make smart object editable in Photoshop has been a game-changer for me.
It has allowed me to maintain the quality of my images while making non-destructive edits.
By converting layers into smart objects, I can apply filters and transformations without losing the original data. This approach has significantly streamlined my workflow.
If you’re looking to enhance your skills further, I highly recommend checking out these comprehensive Photoshop course and Lightroom course, these resources have been invaluable in mastering the intricacies of these powerful tools.
If this article has helped you, then Like and Share it with your friends
$2,061.00Original price was: $2,061.00.$1,061.00Current price is: $1,061.00. 27584
Download Your Free Guide Now!
Discover the secrets of photography with our printable guide! Master essential techniques like aperture, shutter speed, and ISO to create stunning images. Get your free printable PDF now and start turning your snapshots into masterpieces!