Mastering Photoshop Shadows: Create Depth and Drama in Your Designs
Mastering Photoshop Shadows: Create Depth and Drama in Your Designs
Adding shadow in Photoshop can elevate your images and make them more realistic.
Interested in learning how to do it?
Keep reading as we dive into straightforward techniques that can transform your photos, making each new element pop with depth and dimension.
Table of Contents
Why Add Shadows in Photoshop?
When you add shadow in Photoshop it makes your images look three-dimensional.
Flat images can appear lifeless. By adding shadows, you make them come alive.
Benefits of Adding Shadows
If you work with an isolated object layer selected, shadows add depth and realism, subtly emphasizing its presence especially drop shadow.
Shadows help objects interact with the backgroundlayer, preventing them from floating in space.
Shadows guide the viewer’s attention. This effect directs the eye to important parts of your image.
Think of it as reading a sign in dim light versus having a spotlight on it. A well-placed drop shadow makes elements stand out.
Understanding Light Principles
To add shadows effectively, understand the principles of light:
Where is the light source?
How strong is it?
Natural shadows vary based on these factors. A consistent light source improves your photo editing.
Adding Shadows in Photoshop
In Adobe Photoshop, follow these steps:
Access the layers panel.
Right-click on the layer you want to work with.
Choose "Drop Shadow" from the menu.
Customize the effect in the drop shadow settings.
Adjust size, spread, and distance to achieve your preferred look.
Fine-Tuning for Realism
To achieve a realistic shadow, it is important to pay attention to fine-tuning.
There is rarely an identical drop shadow in real life.
Use the dialog box to make minute adjustments and observe how these changes impact the overall image.
Fine-tuning involves tweaking opacity and angles to get those darker shadows looking just right, and you can learn more about how blending modes can help in this process.
Sharp lines rarely make convincing shadows. Instead, softer, diffuse boundaries give a more natural appearance.
Pro Tip: Use layer masks to erase portions of your drop shadow layer subtly. This achieves a lifelike result. Also, use multiple shadows if needed.
Textured surfaces often require different drop shadow effects to appear believable. Layermasks offer precise control over what parts of the shadow should be visible.
Improving Your Skills
Improving your shadow creation skills enhances the depth and quality of your images. Practice now and see the difference in your Photoshop project outcomes!
Pro Tip: Always review your work under different lighting conditions to ensure shadows remain effective and realistic.
Also, as an advice, It’s really beneficial to learn Lightroom in addition to Photoshop.
Lightroom has been a valuable tool for enhancing photos. Its powerful features allow to adjust colors, tones, and contrasts to achieve vivid and polished results.
Ready to improve your photo editing skills? Start experimenting today!
Steps to Implement Shadows in Photoshop
First, open your photo in Adobe Photoshop. Make sure the object you want to add a shadow to is on a separate layer. This makes things easier.
Creating Drop Shadow
To add a drop shadow:
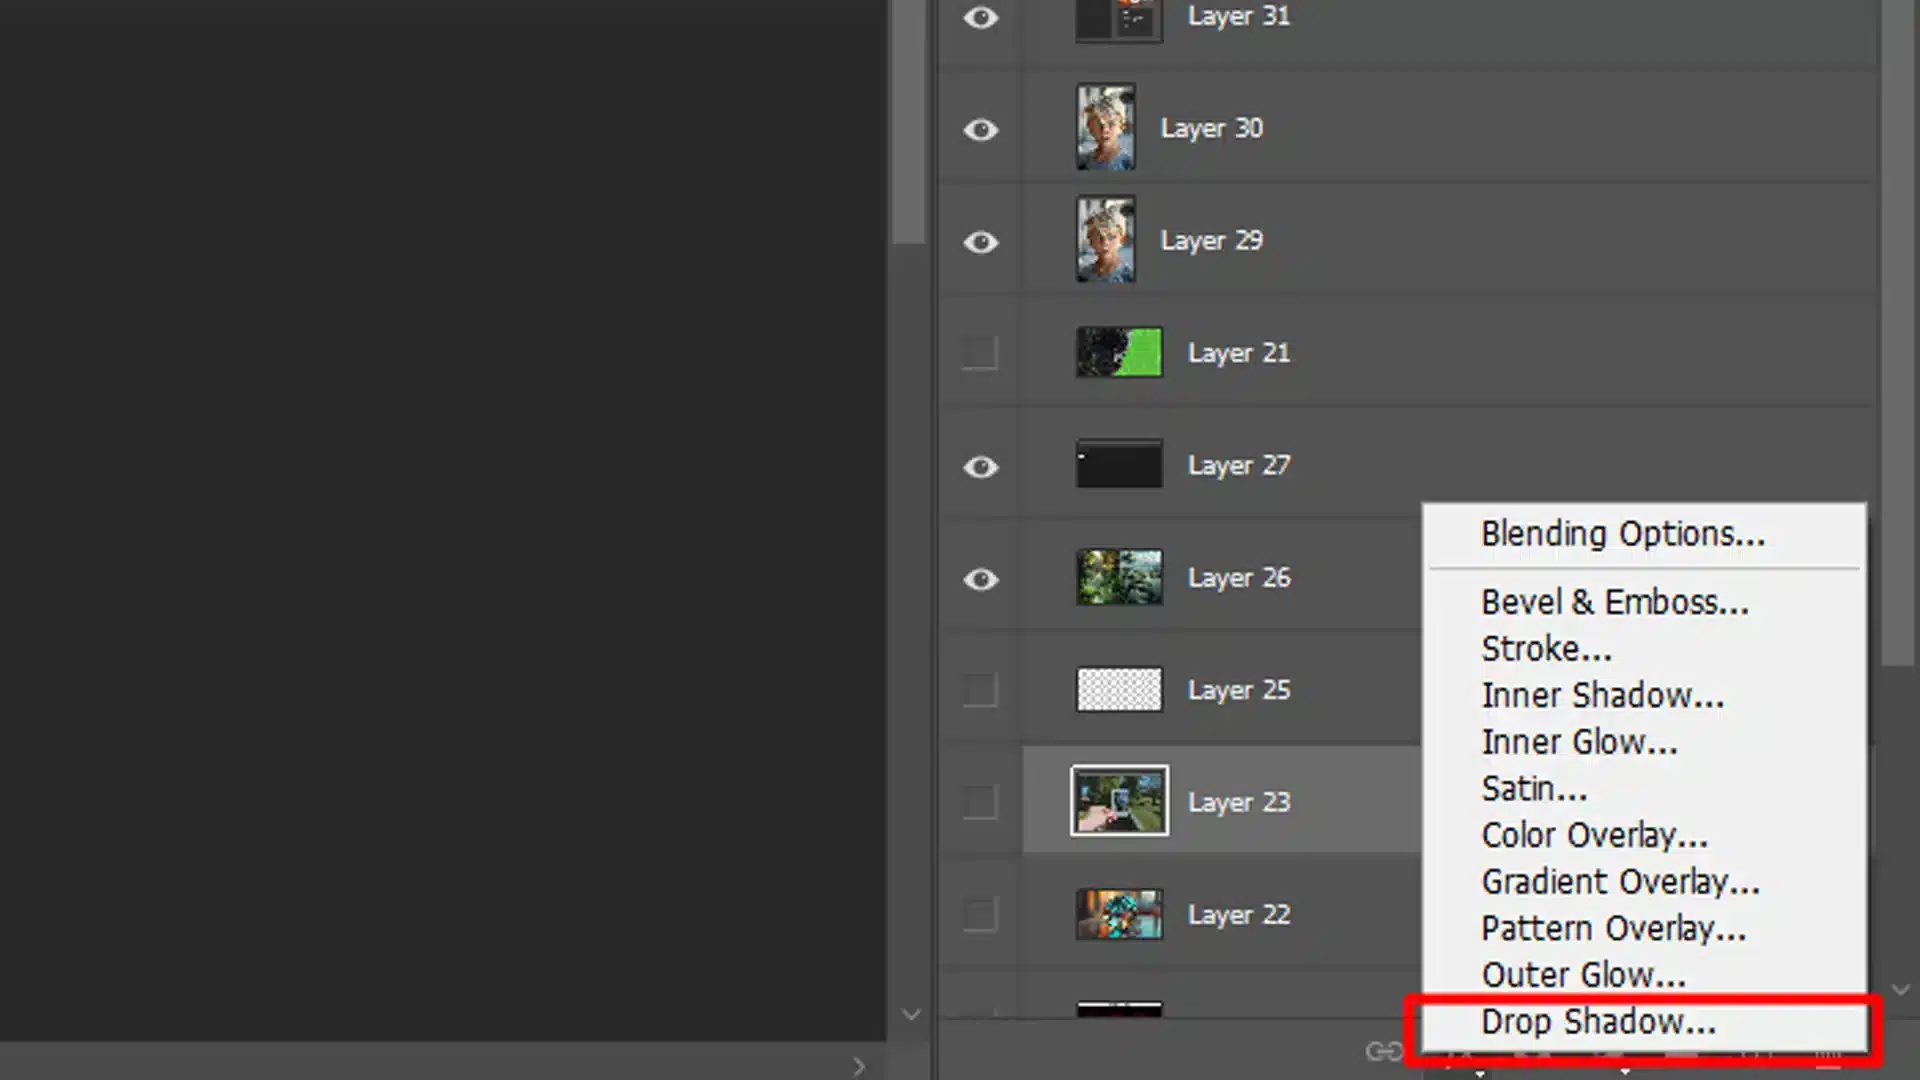
Right-click on the layer and select "Blending Options."
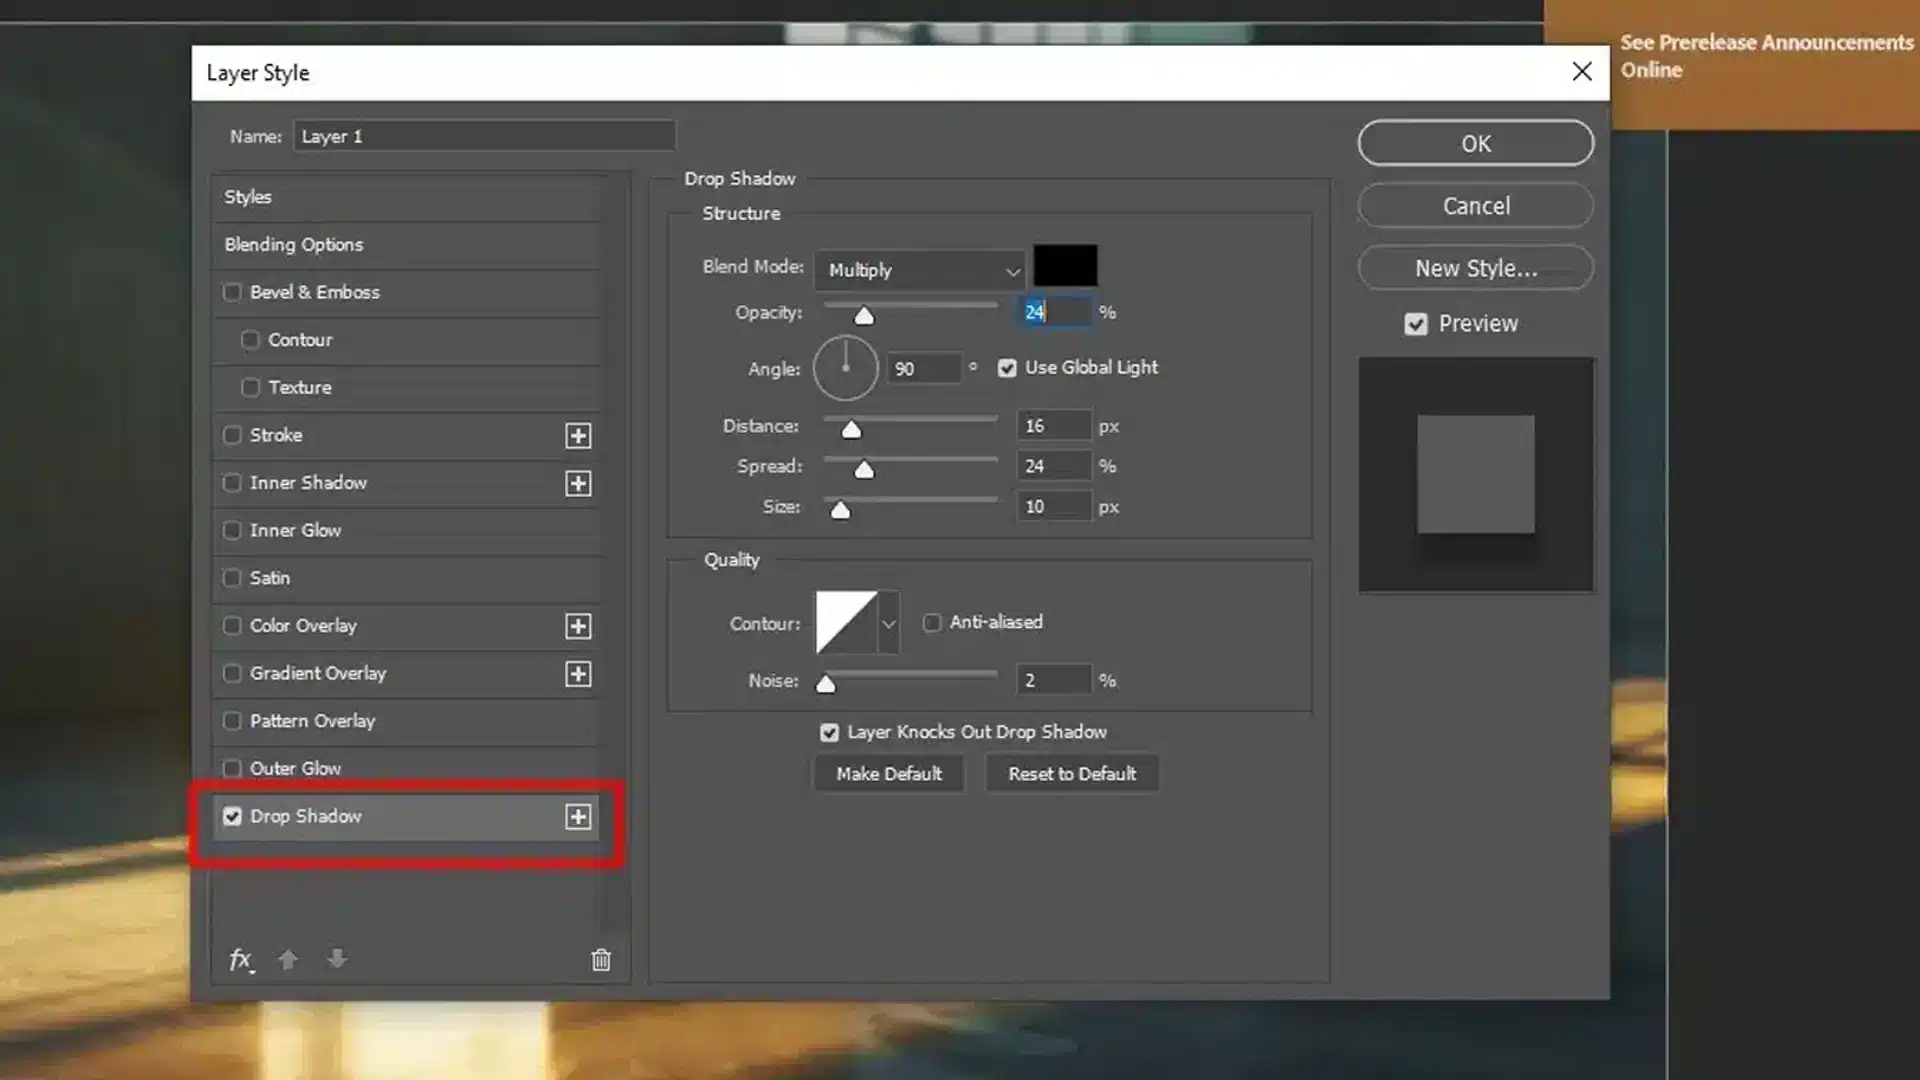
Check the "Drop Shadow" box. This opens the layer style settings.
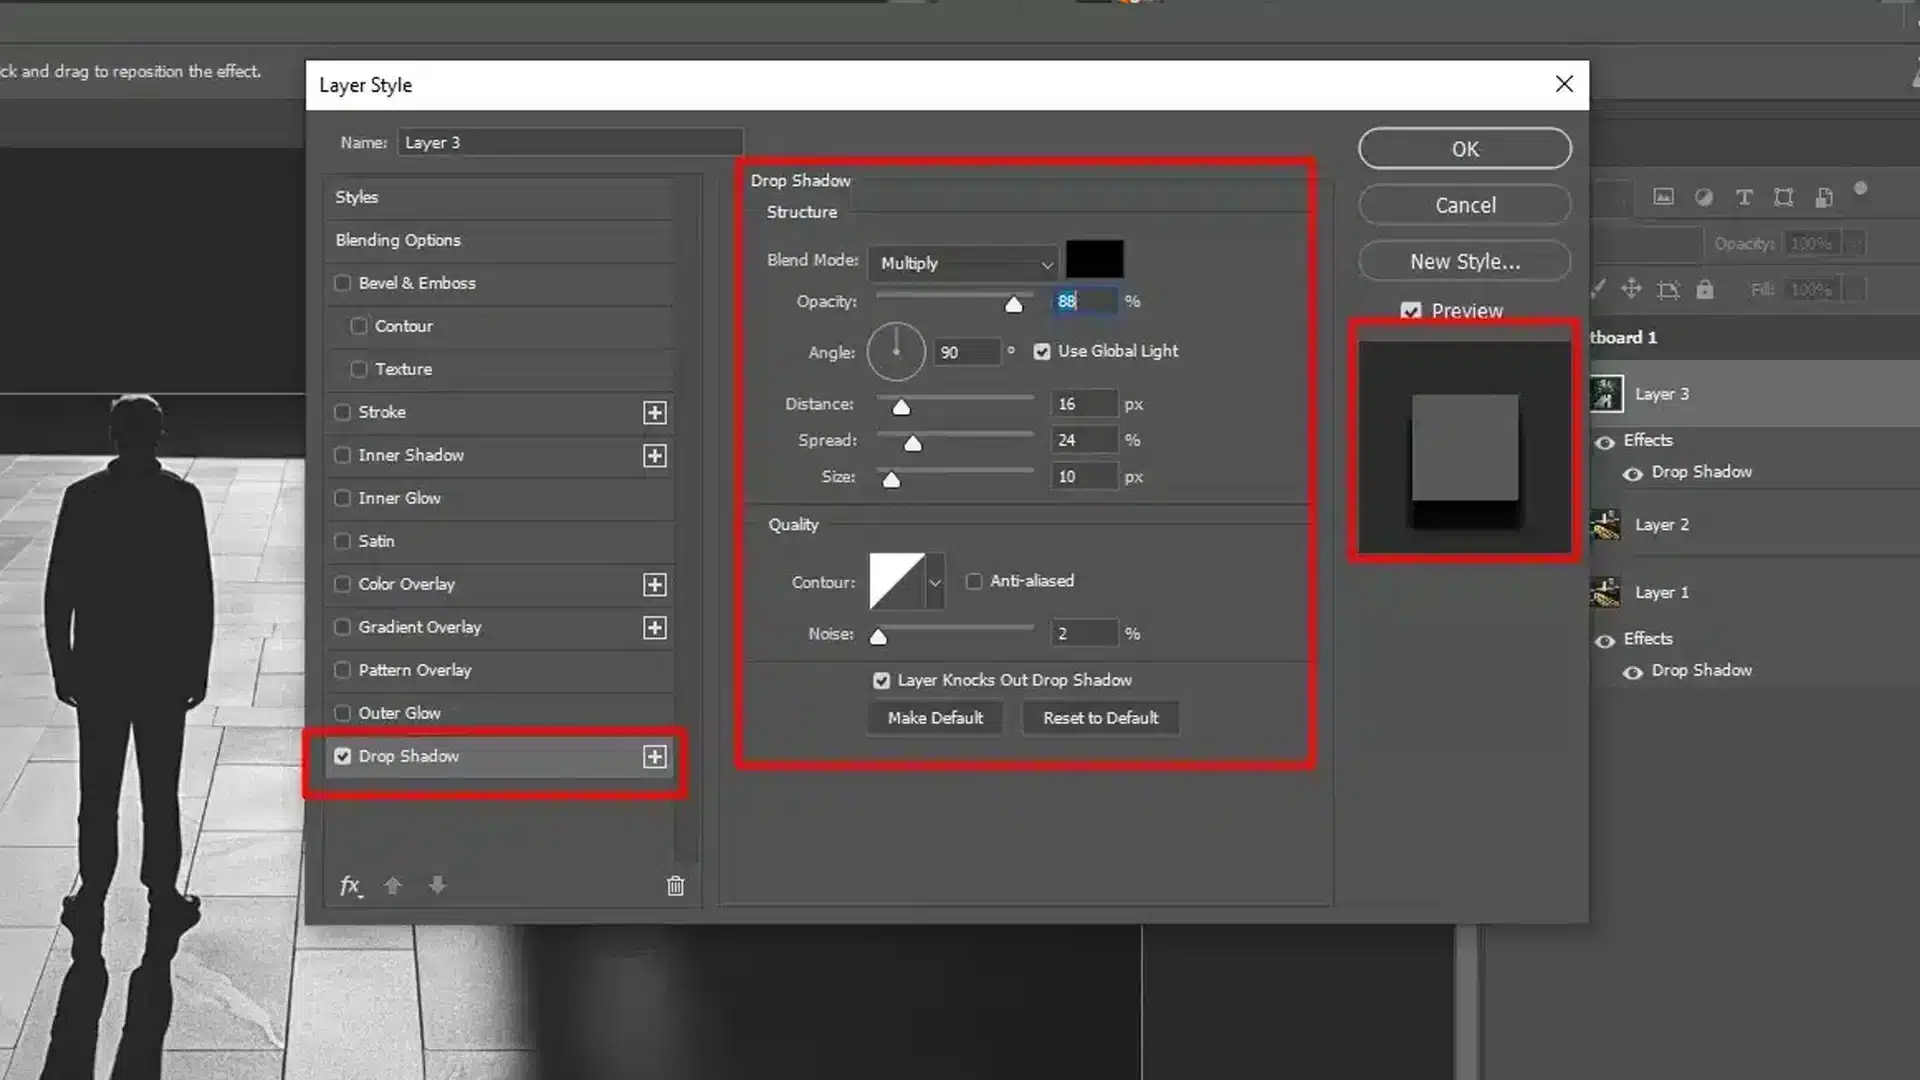
Adjusting Shadow Settings
Inside the dialog box, adjust the following settings:
Distance: Adjust to change how far the shadow is from the object.
Spread: Increase for a denser shadow, decrease for a lighter shadow.
Size: Increase for a softer shadow, decrease for a sharper shadow.
Duplicating the Layer
To duplicate the layer of the object you are working with:
Press Ctrl+J (Windows) or Command+J (Mac). This creates an identical layer.
Transforming the Shadow
Select the duplicated layer and:
Press Ctrl+T (Windows) or Command+T (Mac) to transform it.
Distort it to match the direction of the light source.
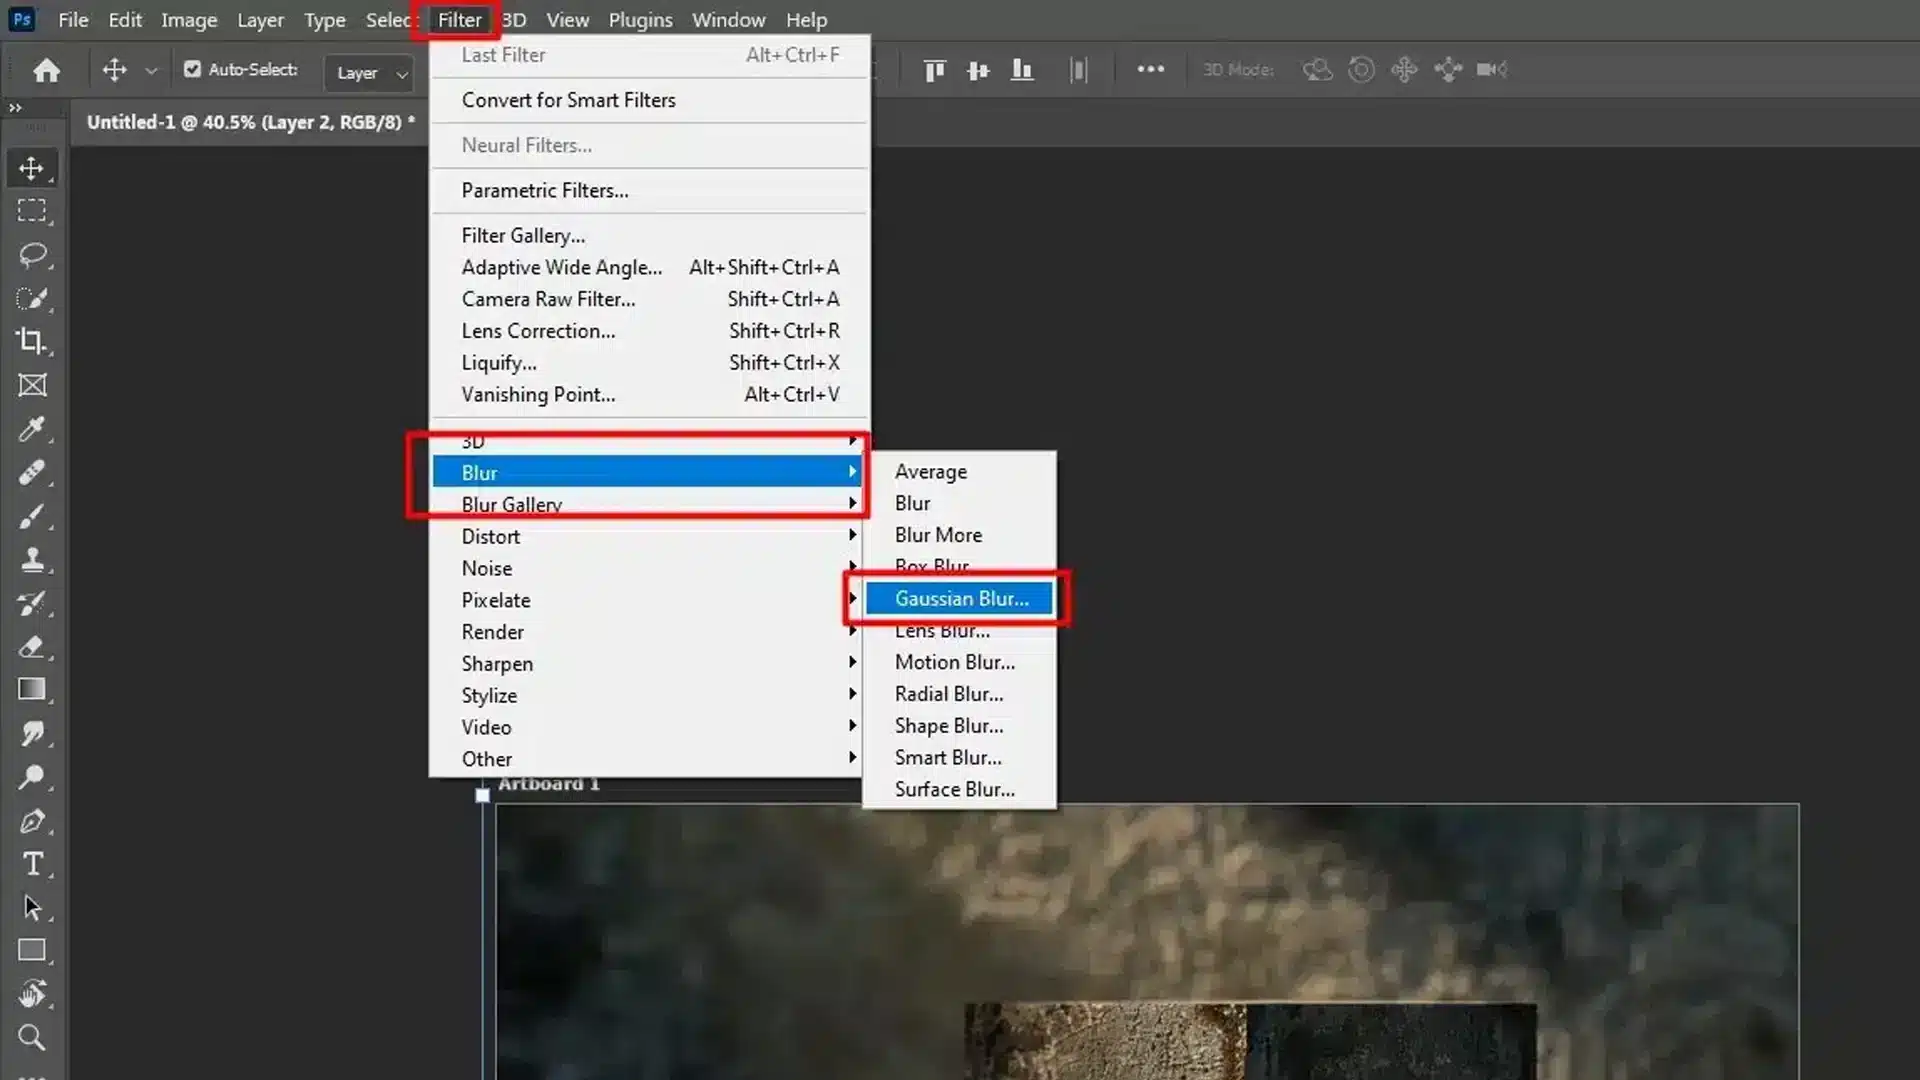
Blurring the Shadow
To blur the shadow:
Go to Filter > Blur > Gaussian Blur.
Adjust the blur level until it looks natural. A blurred shadow makes your photo look more real.
Creating Inner Shadows
To add an inner shadow:
Right-click on the layer and select "Blending Options".
Check the "Inner Shadow" box in the layer styles menu.
Adjusting Inner Shadow Settings
Adjust the following settings until you get the effect you want:
Distance: Change how far the shadow is from the edge.
Choke: Adjust for the density of the shadow.
Size: Adjust for the softness of the shadow.
Pro Tip: When you’re happy with your shadows, use the eraser tool on low opacity to refine the edges. This adds a final touch of realism.
Practice makes perfect. Create shadows that can transform flat images into dynamic ones. A well-placed shadow improves the realism of your work.
Types of Shadows in Photoshop
When enhancing your designs, understanding the various shadow types and their purposes can greatly improve the visual impact of your work.
Shadows add depth, realism, and emphasis to elements, making them stand out.
Below is a table summarizing different shadow types, their purposes, difficulty levels, and significant features:
Shadow Type
Purpose
Difficulty
Significant Features
Drop Shadow
Adds depth and makes objects stand out
Easy
Quick to apply, customizable
Cast Shadow
Creates realistic lighting
Moderate
Requires duplication, transformation
Inner Shadow
Adds depth inside an object
Easy
Great for recessed or pressed looks
Drop Shadow Effect
Drop shadow effect is the easiest type of shadow to add in Photoshop.
They make your object or text appear as if it’s floating above the background, with a drop shadow that follows its outline.
To add a drop shadow, select the layer you want to work with.
Click on the fx icon at the bottom of the layers panel and choose Drop Shadow.
This opens the layer style options where you can adjust settings such as distance, spread, and size.
Adjust the drop shadow dialog box to match the lighting and depth of the original image for a seamless drop shadow blend.
The shadow follows the shape of your object and adds depth to it.
Pro Tip: To enhance the realism of the object, apply a drop shadow. This can be done by selecting the object’s layer and adding a drop shadow from the Layer Style options.
Casting Shadows
Cast shadows are a bit more advanced but great for realistic lighting.
This kind of shadow looks like your object is blocking the light and casting a shadow onto another surface.
Start by duplicating the photoshop layer of the object you want to add a shadow to.
Transform this duplicate layer so it lies flat on the ground, matching the direction of your light source.
Use the opacity settings to make the shadow more transparent, and the blur filters to soften the edges.
This adds a lifelike touch, especially when you want the object to seem grounded and part of the scene.
Inner Shadow Technique
Inner shadows add depth inside an object rather than outside. They create the illusion that parts of the object’s interior are recessed or hollow.
To add an inner shadow, select the layer of your object and click on the fx icon again.
Choose "Inner Shadow". You can adjust angle, distance, choke, and size in the layer style settings.
Inner shadows are handy for making buttons look pressed or for giving text a more embossed look. This subtle effect makes your object look more detailed and dimensional.
Pro Tip: Knowing how to use lens correction in Lightroom can further enhance the overall effect by correcting any distortions, ensuring your shadows look natural. Additionally, familiarizing yourself with different digital cameras can help you better understand how shadows and lighting interact in photography.
Tips and Tricks for Realistic Shadows
Grasping additional elements that enhance the realism of your shadows can significantly elevate your skill level and transform your visual presentations.
Understanding Light Source
First off, know where your light comes from. Picture it in your head. If your light is on the left, shadows fall to the right. Simple but easy to mess up.
To accurately select areas for applying highlights or deepening shadows, learn to use the object selection tool with our dedicated tutorial.
Start with Drop Shadows
Drop shadows are quick fixes. Select your layer, hit the “fx” icon at the bottom of the layers panel, and choose “Drop Shadow” play with Distance, Spread, and Size to get it right.
For a more polished look, consider combining this technique with content-aware fill in Photoshop to seamlessly blend shadows with the background. Additionally, using smart filters in Photoshop can help you make non-destructive edits, allowing for greater flexibility and control over the final appearance.
Use drop shadows on text effects or objects to make them stand out.
Customize Shadow Settings In Layers Panel
Tweak those settings. Adjust Opacity to make your shadow darker or lighter. Lower opacity gives a soft look. Change the Angle to match your light source. It helps your image feel real.
Mastering perspective is crucial for creating realistic effects, especially when you add shadows.
Understanding how light interacts with objects from different angles enhances the believability of your compositions.
When you customize shadow settings, you can enhance depth and realism in your compositions, ensuring your designs are visually compelling and accurate.
Layering Multiple Shadow Effects
To add depth with more than one shadow in Photoshop, start by duplicating your layer.
Apply different shadow settings to each copy, experimenting with various angles, distances, and opacity levels. This method may require extra time and effort, but the resulting visual depth will significantly enhance your image.
Want it to look super real? Go for cast shadows. Duplicate your object’s layer and transform it. Use Ctrl+T (Command+T on Mac) to distort and angle the shadow layer.
Adjust Opacity and apply a Gaussian Blur to soften edges. This step adds a realistic touch.
Understanding photography lighting is important for capturing realistic images. Properly utilizing light to cast shadows for realism adds depth and dimension, enhancing the authenticity and visual impact of your photographs.
Using Layer Masks for Advanced Effects
To refine shadows, use layer masks. They let you control which parts of the shadow show. Perfect for shadows that need to fade or appear gradually.
For instance, if you are working on a design with a metallic effect, you might want to refine the shadows to enhance the realism.
Apply a mask and use a soft brush to paint away unwanted parts.
Precision Adjustments for Shadow Effects
Don’t skip touch-ups. Small adjustments can make a big difference. Zoom in and make sure shadows line up. Check from different angles and distances for consistency.
Pro Tip: Always keep a backup of your original layers. Fixing mistakes is easier without starting over.
And save your work regularly, nothing is worse than a crash mid-edit!
When it comes to fine-tuning your images, mastering techniques like removing shadows is really important. This skill allows for precise adjustments, enhancing clarity and improving the overall quality of your photos.
Frequently Asked Questions (FAQs)
What are the steps to manually draw shadows in Photoshop?
Follow these steps to manually draw shadows:
Select the layer: Choose the layer containing the object you want to add a shadow to.
Create a new layer: Place this new layer below the object's layer.
Use the Brush tool: Pick a soft brush and set the color to black or a dark shade.
Draw the shadow: Paint gently where you want the shadow to appear, considering the light source.
Adjust the opacity: Lower the opacity of the shadow layer to make it more realistic.
Blur the edges: Use the Gaussian Blur for a softer shadow edge.
How do you add shadows to an object?
Select the object: Click on the layer with the object.
Layer style: Right-click the layer and choose 'Blending Options'.
Drop Shadow: In the Layer Style dialog box, select 'Drop Shadow' and adjust the settings like distance, spread, and size to your liking.
Preview and apply: Check the preview and if satisfied, click OK to apply the shadow.
How to add highlights and shadows in Photoshop?
If you want to add highlights and shadows, follow these instructions:
Open the 'Layers' panel and select the layer you wish to modify.
Choose 'Dodge Tool' for highlights or 'Burn Tool' for shadows from the toolbar.
Adjust the brush size, range, and exposure from the options bar.
Gently paint over the areas where you want to add highlights or deepen shadows.
Fine-tune the effect by changing the layer's opacity or blending mode if needed.
How do you inset shadows in Photoshop?
Select your layer: Double click on the layer where the inset shadow will be applied.
Access blending options: Right-click the layer and select 'Blending Options'.
Inner Shadow: From the list of styles, choose 'Inner Shadow'. Adjust the settings like angle, distance, choke, and size to create the desired depth and intensity.
Experiment with settings: Modify the blend mode and opacity to refine the shadow's appearance.
Apply and save: Once satisfied with the inset shadow, click OK to apply the changes.
$2,061.00Original price was: $2,061.00.$1,061.00Current price is: $1,061.00. 27584
Download Your Free Guide Now!
Discover the secrets of photography with our printable guide! Master essential techniques like aperture, shutter speed, and ISO to create stunning images. Get your free printable PDF now and start turning your snapshots into masterpieces!