Have you ever wondered, “What is opacity in Photoshop?” If so, you’re not alone.
Opacity is a fundamental concept that’s pivotal for creating stunning visuals and mastering photo editing.
By understanding how to control opacity and fill, you can elevate your designs, making them more dynamic and professional.
This article will delve into the nuances of opacity, offering practical insights and tips that will transform your approach to Photoshop.
Curious about how this simple adjustment can revolutionize your work?
Keep reading to discover its full potential!
Table of Contents
Understanding Opacity in Photoshop
Understanding opacity is crucial for anyone working with Photoshop because it allows you to control how visible or transparent different layers are in your project.
Mastery of opacity lets you blend images seamlessly, create intricate effects, and adjust the prominence of elements in your design.
What is Opacity in Photoshop?
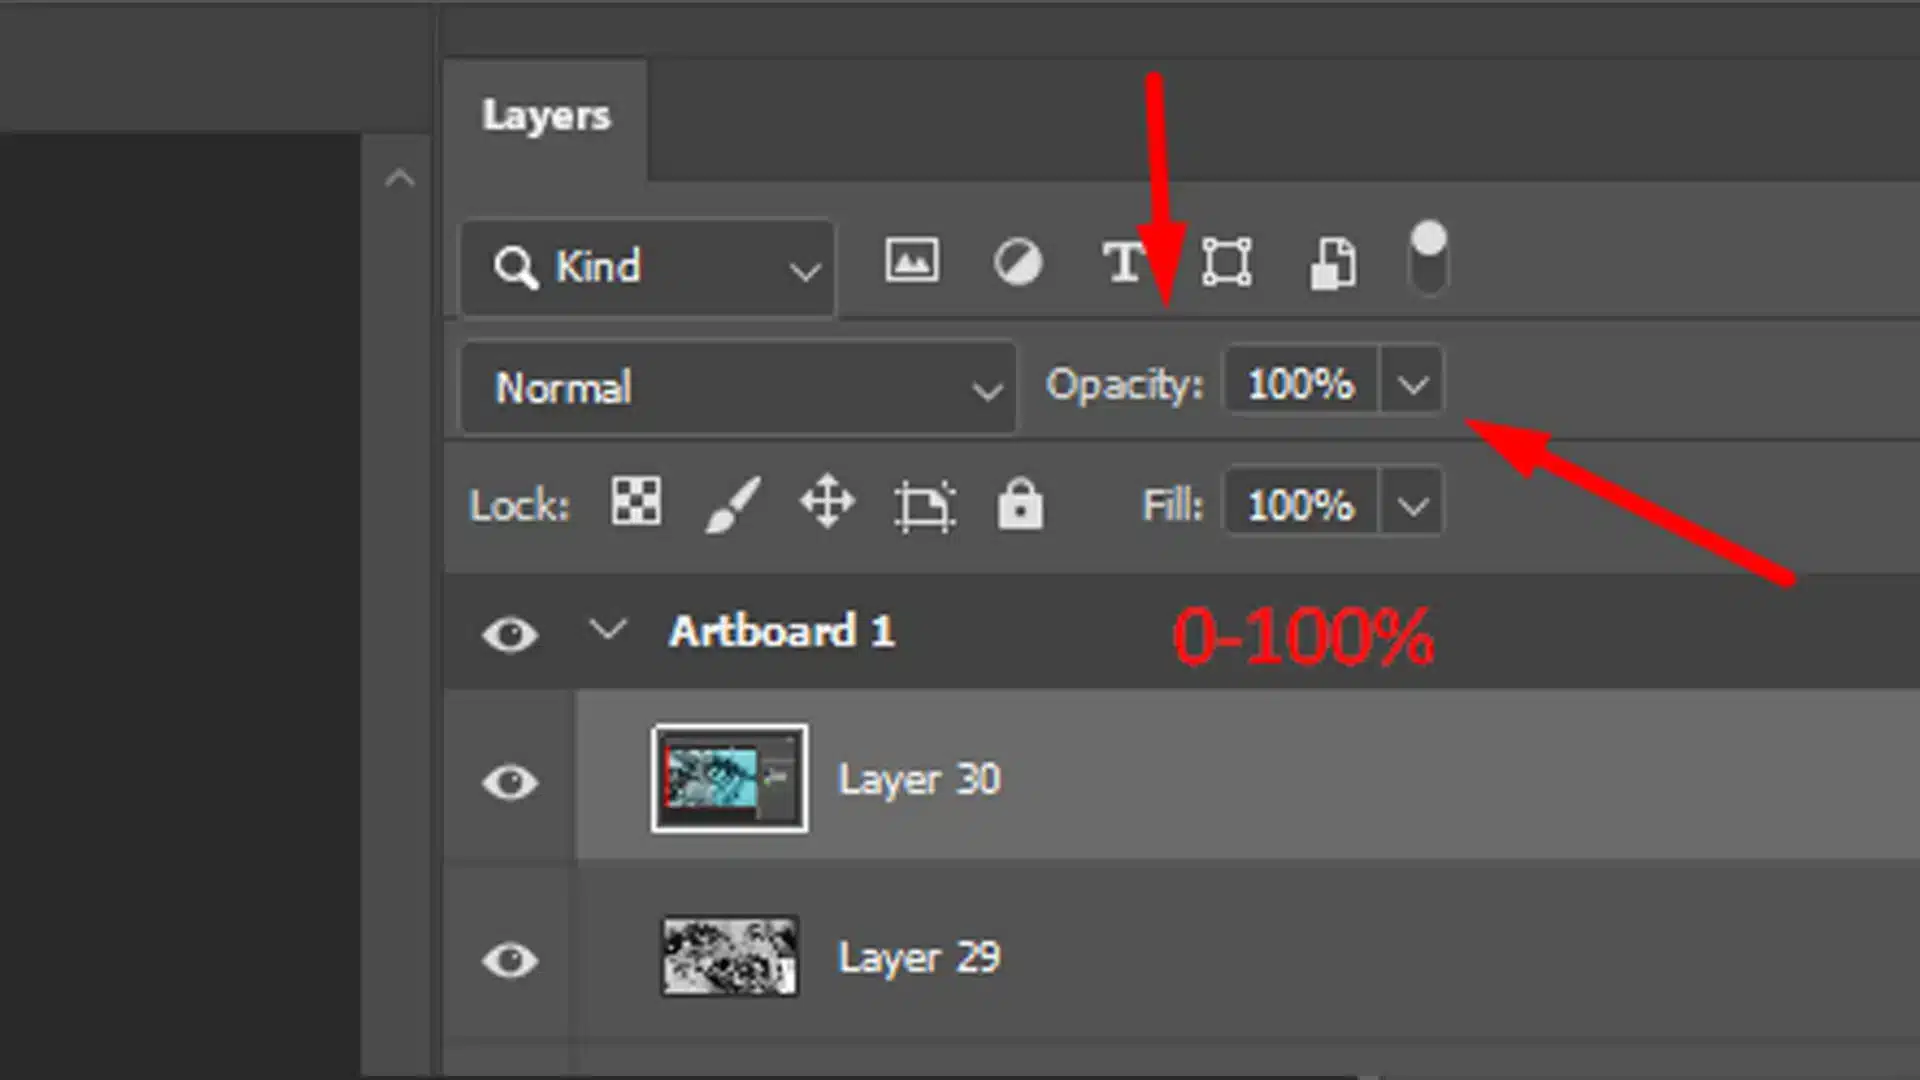
Opacity in Photoshop refers to how transparent an element is. If the opacity is set to 100%, the layer is completely opaque. At 0%, it becomes completely transparent.
You control this with the opacity slider, found in the layers panel. This tool allows us to blend elements without fully hiding or revealing.
Difference Between Opacity and Fill

This one confuses many. Opacity decreases the transparency of everything in a layer, including layer styles applied like drop shadow and outer glow.
On the other hand, fill opacity affects the layer content only, leaving layer styles untouched.
For example, reducing the opacity of a text layer makes both text and any shadow effect see-through.
Lowering the fill opacity just affects the text but keeps the shadow sharp.
Why Use Opacity in Photoshop?
Using opacity effectively can enhance your Photoshop workflow in several ways:
- Creating subtle effects: Adjusting layer opacity can make elements blend better with underlying layers.
- Focusing on crucial parts of your design: Making other parts less prominent by lowering their opacity can keep the focus where it's needed.
- Working with multiple layers: Blending and layering different images smoothly ensures no harsh transitions, creating a cohesive final image.
Quick Tips for Using Opacity:
- Use the opacity filter in the layers panel to adjust transparency.
- Experiment with lowering layer opacity and fill to balance your design.
- To create subtle effects, combine opacity adjustments with blend mode.
- Use layer masking to selectively hide parts of a layer without changing the opacity.
Pro Tip: Always duplicate your selected layer before making major changes. This keeps your original layer intact, allowing for easier adjustments if needed.
For more advanced techniques, you might want to explore other essential tools in Photoshop, such as the patch tool or the content-aware fill feature, which can further refine your edits and enhance your workflow.
You can also familiarize the essential tools in Lightroom to further enhance your workflow.
How to Adjust Opacity in Photoshop
Adjusting opacity in Photoshop is a fundamental skill that allows you to control the transparency of layers and elements in your design.
By modifying opacity, you can create subtle blends, enhance layering effects, and achieve the desired visual impact.
Using the Layers Panel
The layers panel is your go-to spot for adjusting opacity.
Found on the right side of the screen, it lists all your layers.
Each layer can be thought of like a stack compared to other layers. If you’ve created a new project, you might see the background layer locked by default.
Unlock it by clicking the padlock icon next to the layer.
This allows you to tweak its opacity.
Using the layers panel, select the layer whose opacity you want to adjust.
When you click on the layer, it becomes active.
Now look at the top of the layers panel and find the slider or the percentage field for opacity.
Slide to the left to lower the opacity and to the right to increase it.
As you move the slider, you’ll see your layer become more transparent or more opaque, adjusting in real-time.
Adjusting Layer Opacity

To specifically adjust a text layer, follow the same steps using the layers panel.
Select your text layers, then alter the opacity filter, that’s how you make the text transparent.
Use the blend mode dropdown above the opacity filter to experiment with how this text integrates with other layers.
Want to adjust the fill, instead?
Find the Fill setting, usually beneath the opacity slider. When you reduce “Fill”, you only affect the layer content.
Keep layer styles applied, such as a drop shadow, unchanged.
Blend modes play a huge role when adjusting opacity and fill.
For more creative effects, combine different blend modes like Multiply or Screen to see unique ways layers interact.
Applying multiple layer styles together like drop shadow, inner glow, outer glow ,changes the look entirely.
Understanding the Background Layer
A locked layer like the background layer isn’t adjustable as is. Click the padlock icon to unlock and start tweaking.
Reducing opacity here, say to 50%, makes it more transparent.
This helps when you want to place emphasis elsewhere or blend the background smoothly with elements on top.
Remember, the layer effects you apply, like that drop shadow, are crucial in digital photography and graphic design.
They give depth to otherwise flat images. You can customize these effects to create a more dynamic and visually appealing composition.
Practical Applications of Opacity
Opacity in Photoshop is not just about making layers see-through, it’s a powerful tool that can enhance your creative projects in various ways like adding watermark on your project .
Creating Soft Edges with Opacity in Photoshop
Opacity is a valuable tool in creating soft edges. When you want to merge two images or elements smoothly, lowering the opacity of one element helps.
Use the Brush Tool with a soft brush tool on a Layer Mask to fade edges seamlessly.
For instance, if you have a picture and you need only a part of it to blend with a background, a lower opacity will aid in merging.
This method works best in delicate transitions, eliminating harsh edges.
Using Opacity for Layer Masks
Layer masks are incredibly useful when applied with opacity tweaks. They give you control over what part of a layer is visible. For beginners, start by:
- Creating a New Layer
- Applying a mask on it
- Using the Brush Tool to hide certain parts of the adjustment layer by adjusting the opacity
This technique lets you achieve precise edits without permanently altering the original image.
A little practice, and it becomes second nature.
Adding Drop Shadow with Opacity

Drop shadows add depth, making your text or elements pop out.
Adjusting the opacity in the Blend Mode settings allows you to add realistic shadows.
A drop shadow with opacity lowered subtly integrates the element with its surroundings.
Try blending layers beneath your content for a more complex visual effect.
Using Layer Styles such as drop shadow and inner glow can produce stunning results when combined with the right opacity.
Pro Tip: Don’t forget the power of the Eraser Tool in combination with opacity adjustments.
It provides a quick way to erase parts of an image, offering another layer of control over your design.
Next time you work on a Photoshop document, experiment with opacity and fill settings to see the impact on your project.
Additionally, consider exploring other essential tools in Photoshop to further enhance your editing skills.
Advanced Opacity Techniques
When working with layers in image editing software, understanding how to manipulate both blending modes and opacity is essential for creating dynamic and visually appealing effects.
Blending modes and opacity adjustments are powerful tools that allow you to control how layers interact with one another and how visible they are.
| Technique | Blending Modes vs. Opacity |
|---|---|
| Definition | Determines how a layer blends with layers underneath. Controls the transparency of a layer. |
| Effect | Changes the way colors and tones mix between layers. Adjusts the overall visibility of a layer. |
| Common Modes | Multiply, Screen, Overlay. |
| Use Case | Create various visual effects by blending different layers. Make a layer partially transparent to blend with background. |
| Adjustment Impact | Alters interactions and appearance based on blend mode selected. Directly changes layer transparency regardless of underlying layers. |
By grasping these concepts, you can enhance your ability to achieve the desired results in your projects
Blending Modes and Opacity in Photoshop

Understanding how blending modes and opacity work together opens up a world of creative possibilities.
By altering the blend mode of a layer, you can control how it interacts with the layers under.
Common blend filters like Multiply, Screen, and Overlay can drastically change how images look.
Combine these with opacity adjustments to blend an image seamlessly without removing details.
For instance, use Multiply to darken your layer, then adjust the opacity to fine-tune its appearance.
Additionally, using Photoshop shortcuts and Lightroom shortcuts can speed up your workflow when toggling between different blend mode and opacity settings.
Opacity in Layer Styles
Adjusting opacity within layer styles creates striking visual effects. Many layer styles, such as drop shadows and glows, have separate opacity settings; which is why sometimes you might even need to remove a shadow or two.
Lowering the opacity on these elements adds subtlety and depth.
For instance, a drop shadow with opacity lowered makes text or objects appear to float naturally, adding dimension without being too harsh.
Experimenting with layer effects like this helps customize the look of your designs subtly yet effectively.
Combining opacity with other effects is essential for achieving flawless results.
For example, when learning how to whiten teeth, adjusting opacity can help blend the effect naturally.
Combining Opacity with Other Effects
Combining opacity with other Photoshop tools enhances creative control.
Using a brush tool on a layer mask allows for gradual blending of images. Similarly, incorporating a clipping mask controls which parts of your layer are visible while adjusting the opacity for added flair.
Adjustment layers also offer immense flexibility.
They enable you to apply various changes across multiple layers without affecting the original images.
Integrating blending options with opacity and fill settings allows unique customization of design elements.
Pro Tip: Always review your work in different view modes to ensure the opacity settings look consistent across various devices and screens.
For more advanced techniques, consider exploring the difference between Photoshop and Lightroom to understand how each software can complement your editing process.
When combining opacity with other effects, understanding how to manipulate shapes in Photoshop is crucial.
By adjusting opacity, you can blend shapes seamlessly, enhancing your design with depth and complexity.
Frequently Asked Questions (FAQs)

What does opacity mean in Photoshop?
Opacity in Photoshop refers to the transparency level of a layer. At 100%, the layer is fully visible; at 0%, it is completely transparent, allowing the layers beneath to show through.
What does the opacity tool do?
The opacity tool in Photoshop allows you to adjust the transparency of a layer. By changing the opacity, you can control how much of the layer below is visible, creating effects from fully opaque to completely transparent.
What does opacity mean in editing?
- In editing, opacity is used to control how much a particular element or layer stands out in the composition.
- Adjusting opacity can help in fine-tuning the visual impact of different components in your project.
What is the opacity of an image?
- The opacity of an image describes the overall transparency of the image.
- An image’s opacity setting determines how much background or other elements can be seen through it.
Conclusion
Understanding opacity in Photoshop has truly changed the way I edit my images.
By adjusting opacity, I can blend layers smoothly and create designs with depth.
It’s amazing how a simple adjustment can make such a big difference in how your project turns out.
I’ve found that mastering opacity not only helps in blending but also in focusing attention where it matters most in your design.
If you’re eager to dive deeper into these techniques, I highly recommend checking out the Photoshop course and the Lightroom course.
They’ve been incredibly helpful in my own editing journey.
Plus, for the latest tools, visit Adobe Photoshop and Adobe Photoshop Lightroom to explore their latest features and updates.
Happy Editing!
Read more about Photoshop:


