As a Photoshop expert, I’m excited to share how resizing images in Photoshop can transform your projects.
Whether you’re adjusting photos for a blog or preparing them for print, mastering the skill of resizing can elevate your work.
In this guide, I’ll walk you through the essential techniques, from basic resizing to advanced methods, ensuring every image fits perfectly without losing quality. Dive in and unlock the potential of your photographs with these straightforward steps.
Table of Contents
How to Resize an Image in Photoshop
When you need to adjust the image size, canvas size, or pixel dimensions of your photos, Adobe Photoshop offers essential tool that make this task straightforward.
Whether you’re preparing layers for print or web, resizing is a fundamental skill in photo editing.
Step-by-Step Instructions to Scale Images
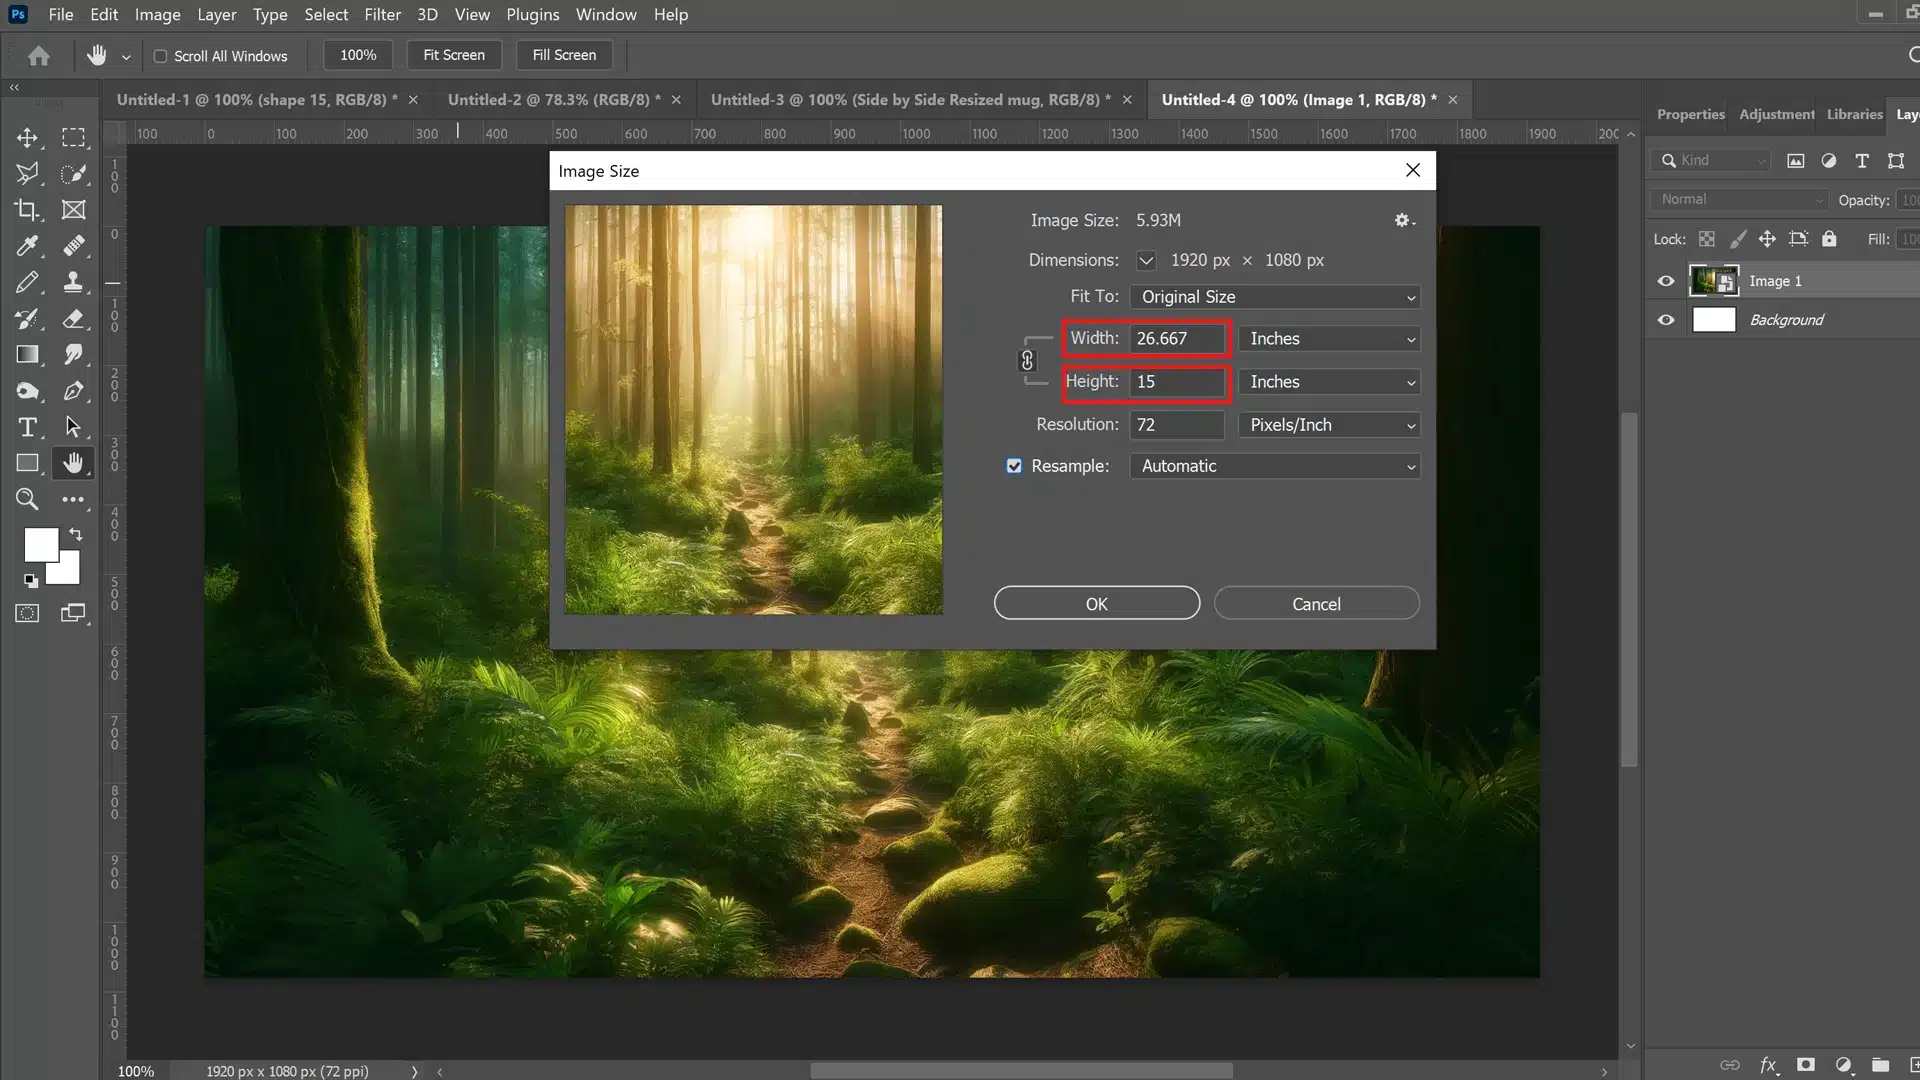
- Firstly, open your image in Photoshop and select 'Image' from the menu bar. Choose 'Image Size' to open the image size dialog box. Here, you can change both the pixel dimensions and resolution of the image.

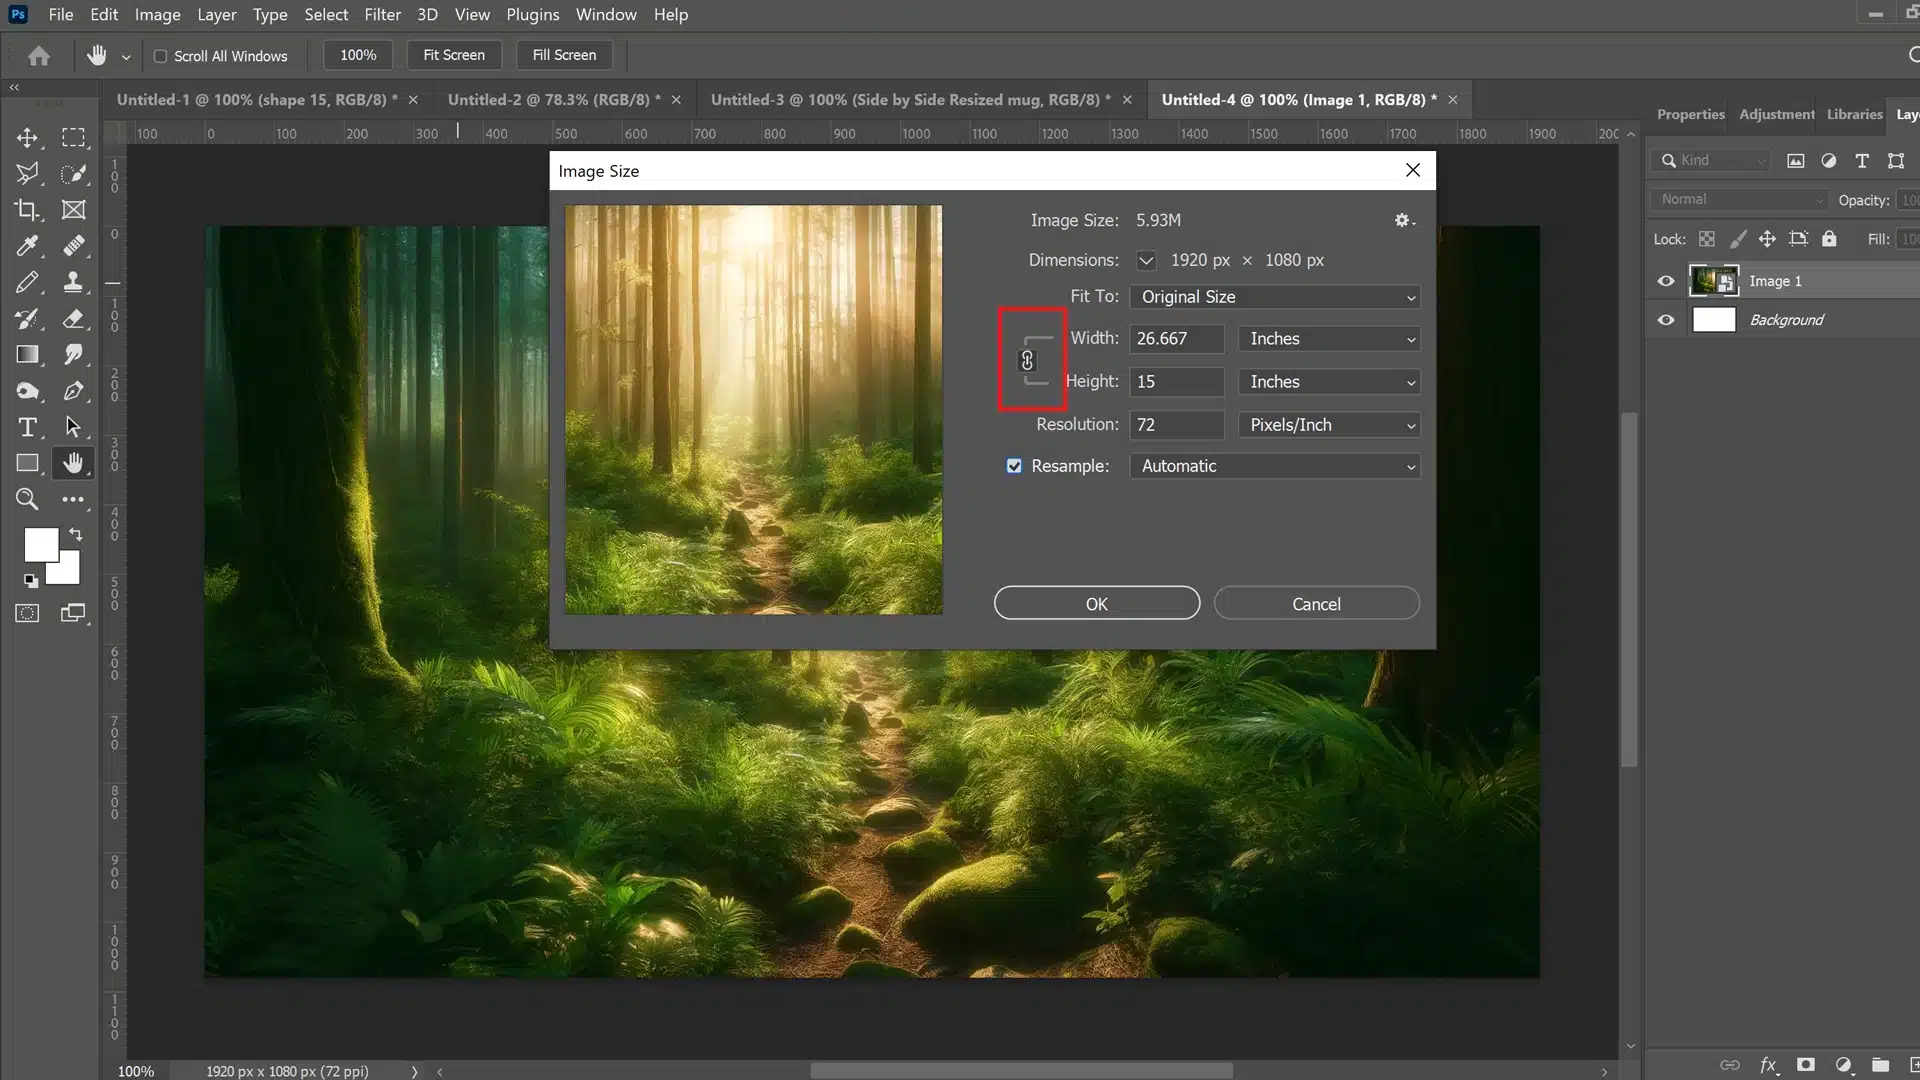
- Second, to maintain the original image and aspect ratio, ensure the link icon between width and height is activated.

- Lastly, adjusting the pixel dimensions will change the scale of your image without affecting its actual physical size unless you also alter those settings.

This method provides a precise way to resize an image, ensuring clarity isn’t compromised, which can be crucial when aiming for a high-quality print.
Using Preset Image Sizes for Quick Resizing
Adobe Photoshop includes several preset sizes that are ideal for quick jobs:
- Navigate to 'File,' then ‘Automate,’ and choose ‘Fit Size.’ The pre-defined sizes can be used for common tasks like resizing for social media or blog posts.
- Accessing this feature saves time and ensures consistency across visuals in design work that requires uniform image sizes across documents.
Selecting these presets automatically adjusts both resolution and scale, streamlining your workflow significantly in Photoshop.
Adjusting Resolution During Resizing
Changing an image’s resolution is vital when transitioning between mediums (e.g., from web display where low resolution suffices to a printed format or RAW or JPEG format where higher resolution is necessary).
1. First, open the Dialog Box again by going through ‘Image’ followed by ‘Image Size.’
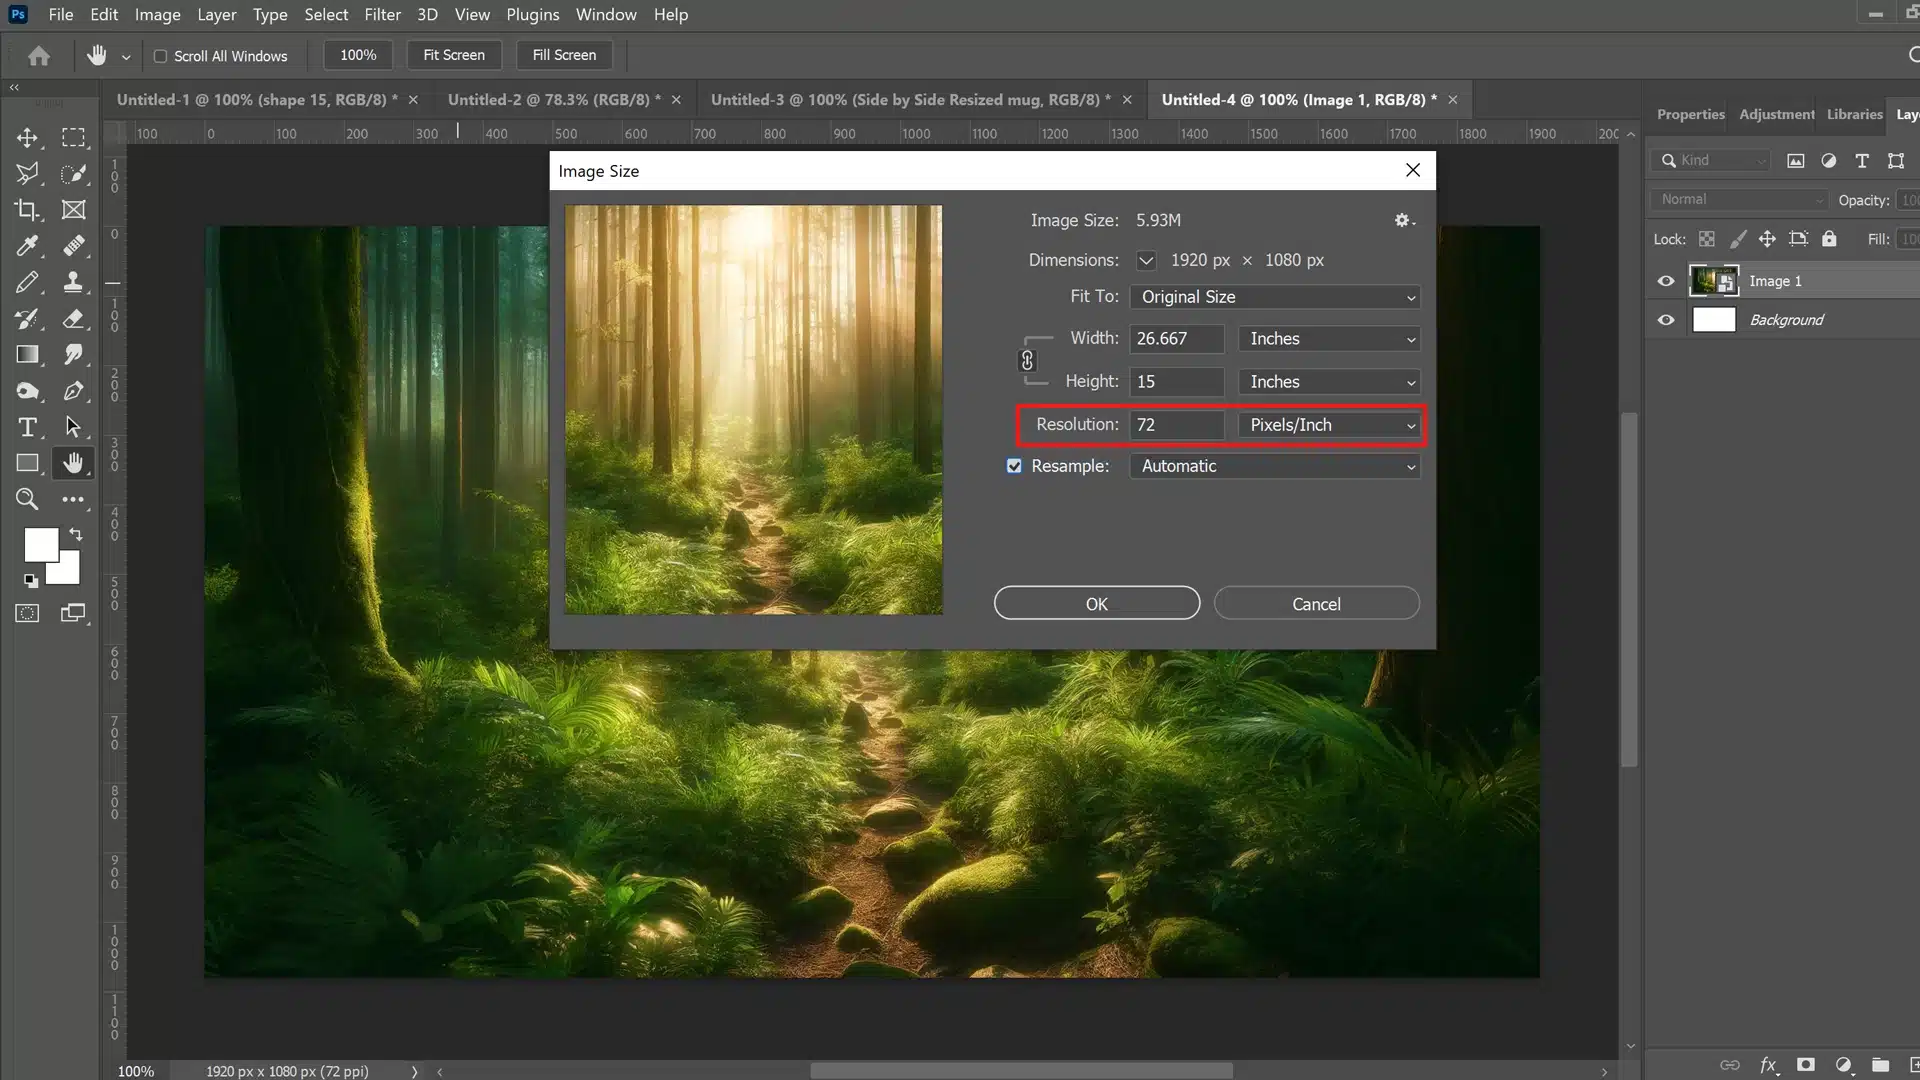
2. Then, directly below, where you input new dimensions, provides an option titled “Resolution,” which allows modification without altering dimension settings.
3. Lastly, remember that increasing resolution typically increases file size but enhances detail viewing quality on high-density display devices.
Tips for Maintaining Image Quality
- Navigate to 'File,' then ‘Automate,’ and choose ‘Fit Size.’ The pre-defined sizes can be used for common tasks like resizing for social media or blog posts.
- Accessing this feature saves time and ensures consistency across visuals in design work that requires uniform image sizes across documents.
Maintaining quality while changing document size or adapting file attributes will keep your creative outputs looking professional regardless of medium specifics.
Potential degradation will be kept at bay with tools specifically designed to handle complex variations intricately associated with visual data management inside Photoshop’s ecosystem.
Optimal Settings to Resize Images

When you aim to resize an image in Adobe Photoshop, setting the correct parameters ensures that your final product retains its quality and suits your intended use.
Navigating through the settings can be challenging, but by focusing on image resolution, pixel dimensions, and a resampling method, you can master this task efficiently.
Choosing the Right Resolution Settings
Resolution is crucial when resizing images for various outputs, such as digital screen displays or high-quality prints.
The necessary resolution settings should match your endpoint requirements:
- If direct enlarging images introduce too much pixelation or distortion, always opt for gradual scaling up using small increments.
- Use features such as 'Smart Objects' that preserve details better during transformation processes.
Remember, using the correct resolution is paramount to avoiding quality loss.
The Image Size dialog box in Photoshop allows you to adjust the resolution precisely without altering other aspects of your image.
Understanding Pixels and Dimensions
Surrounding pixels affect how much detail an image possesses and its image file size. Here are some quick tips:
- Access the 'Image Size' option under Adobe Photoshop's 'Image’ menu.
- To maintain your image’s aspect ratio, ensure the chain link icon between the height and width boxes is activated.
- If altering for web use where file size might be a concern, aim for smaller pixel dimensions while monitoring visual fidelity.
- Utilize this function effectively by ensuring the width and height boxes reflect desired values that suit your application, whether enhancing clarity or compressing size.
|
Details | |
|---|---|---|
| 1920 x 1080 |
|
|
| 1280 x 720 |
|
|
| 800 x 600 |
|
|
| 400 x 300 |
|
|
| Custom (e.g., 1600 x 900) |
|
Implications of Resampling Methods
Resampling adjusts the pixel count within your image, which inevitably impacts both document size and quality.
Selecting a suitable resampling method in Photoshop can dramatically influence outcome aesthetics:
- Digital Display: Typically, resolutions of 72 to 96 DPI (dots per inch) are sufficient.
- Bicubic Smoother: Ideal for enlargements as it produces smoother gradations.
- High-Quality Print: A DPI setting of 300 or higher is recommended to ensure crisp and clear print outputs.
These options available in the drop-down menu via the Image Size dialog box offer flexibility based on specific needs, whether increasing sizes without losing quality or aiming for detailed manipulations requiring meticulous pixel treatment.
By choosing appropriate settings and understanding their effects within Adobe Photoshop, you ensure that when you resize images meet expectations without compromising on visibility or intent.
No matter if you’re reducing file sizes for faster website load times or adapting resolutions for sharp prints, every step requires mindful adjustments, confirming that end results align with the original image in Photoshop and visions.
Pro Tip: Utilize the dropdown menu to combine different tools, such as the text box, during your work process.
Batch Processing for Multiple Image Resizing

When you have multiple images to prepare for a presentation, website, or archive, manual resizing can be time-consuming.
Automating the process in Photoshop using batch editing saves both time and effort.
Setting Up a Batch Resize Process
To begin setting up batch resizing, you’ll first need to ensure all your images are in one accessible folder.
This organization is crucial as it allows the image processor in Photoshop to locate and modify each file efficiently.
1. First, open Photoshop and navigate to File > Scripts > Image Processor.
2. Then, select the folder where your images are stored.
3. Lastly, specify the location where the processed files will be saved.
Here, you can define the image size, opting to maintain ratios using constrained proportions settings to avoid losing quality due to distortion.
Decide on a consistent resolution, which influences both the detail and file size a key factor if aiming for print or web use.
If you want to learn more, read about how to make collage in Lightroom.
Automating the Resize Workflow in Photoshop
- Use an action record.
- Open an image, go to Window > Actions, and create a new action recording your resize steps: Image > Image Size, adjust desired sizes, keeping an eye on maintaining the aspect ratio for consistency.
- You can apply this action within the Image Processor settings selected earlier by choosing 'Run Action' under Photoshop Actions prior to executing your batch process.
Frequently Asked Questions

How do I adjust the size of an image in Photoshop?
- Go to the “Image” menu and select “Image Size.”
- In the dialog box, you can adjust the dimensions by entering new values for width and height.
- Choose a resampling method, such as “Bicubic Smoother” for enlargement or “Bicubic Sharper” for reduction.
- Click “OK” to apply the changes.
How do you resize an image in a layer in Photoshop?
- Select the layer you want to resize in the Layers panel.
- Press Ctrl+T (Windows) or Cmd+T (Mac) to activate Free Transform.
- Drag the corner handles while holding the Shift key to maintain the aspect ratio.
- Press Enter (Windows) or Return (Mac) to apply the transformation.
Why can't I resize an image in Photoshop?
If you can’t resize an image in Photoshop, it might be due to:
- The layer being locked. Check the Layers panel and unlock the layer if necessary by clicking the lock icon.
- The image mode not supporting resizing. Ensure the image is in a mode that allows resizing, such as RGB Color.
- Insufficient permissions or the file being read-only. Verify the file permissions and make sure it is writable.
- Resample being unchecked in the Image Size dialog box. Ensure that the “Resample” option is checked to enable resizing.
How do you resize an image in Photoshop without losing quality?
To resize an image in Photoshop without losing quality:
- Open the “Image Size” dialog box from the Image menu.
- Ensure the “Resample” option is checked.
- Choose “Preserve Details 2.0” as the resampling method from the dropdown menu.
- Adjust the dimensions as needed. Using “Preserve Details 2.0” helps maintain the quality by minimizing the loss of details.
Conclusion
In my experience, mastering the resizing of images in Photoshop has been incredibly rewarding.
Just last week, I was preparing a photo for a friend’s wedding invitation, and using these resizing techniques allowed me to optimize the image for the desired print size and digital use without losing quality.
The knowledge of correct settings and methods, such as using the Bicubic Smoother for enlarging images, ensured that the final product was flawless.
Whether you are a beginner or looking to refine your expertise, these courses on Adobe Photoshop and Lightroom offer comprehensive guidance to elevate your digital creations.
Dive into these resources today and transform the way you handle images! Explore the Photoshop course and the Lightroom course.
Read more about Photoshop:


