Are you looking for a quick Photoshop guide to enhance your photos effortlessly?
In this article, I’ll walk you through some essential tips and tricks to transform your images in no time.
Imagine being able to turn ordinary pictures into stunning works of art with just a few clicks.
Whether you’re a beginner or someone looking to brush up on your skills, this guide is designed to capture your interest and make learning Photoshop enjoyable.
Let’s dive in and explore how you can achieve professional-quality edits swiftly and easily.
Table of Contents
Getting Started with Adobe Quick Photoshop
Getting Started with Adobe Photoshop photo editor involves installing the software from the Adobe website and setting up your workspace to fit your needs.
Begin by exploring basic tools and features, like the Move Tool and Brush Tool, to familiarize yourself with the interface and start editing your images effectively.
Installing Adobe Photoshop
First, you need to download Adobe Photoshop from the official Adobe website.
Once you’ve downloaded the installer, open it and follow the on-screen instructions.
Ensure that your system meets the minimum requirements for installation.
You might need to sign up for a Creative Cloud account if you don’t have one yet.
Once installed, open Photoshop to begin.
For effective Adobe Photoshop training, it’s crucial to understand the basic tools and features. Mastering these essentials through our training program can significantly enhance your photo editing skills.
Setting Up Your Workspace
Upon launching Photoshop, you will see the default workspace.
To customize it, go to “Window” at the top menu and select “Workspace”. Choose “Essentials” for a basic setup or “Photography” if you’re working on photos.
You can also move panels around by clicking and dragging them.
Basic Tools and Features

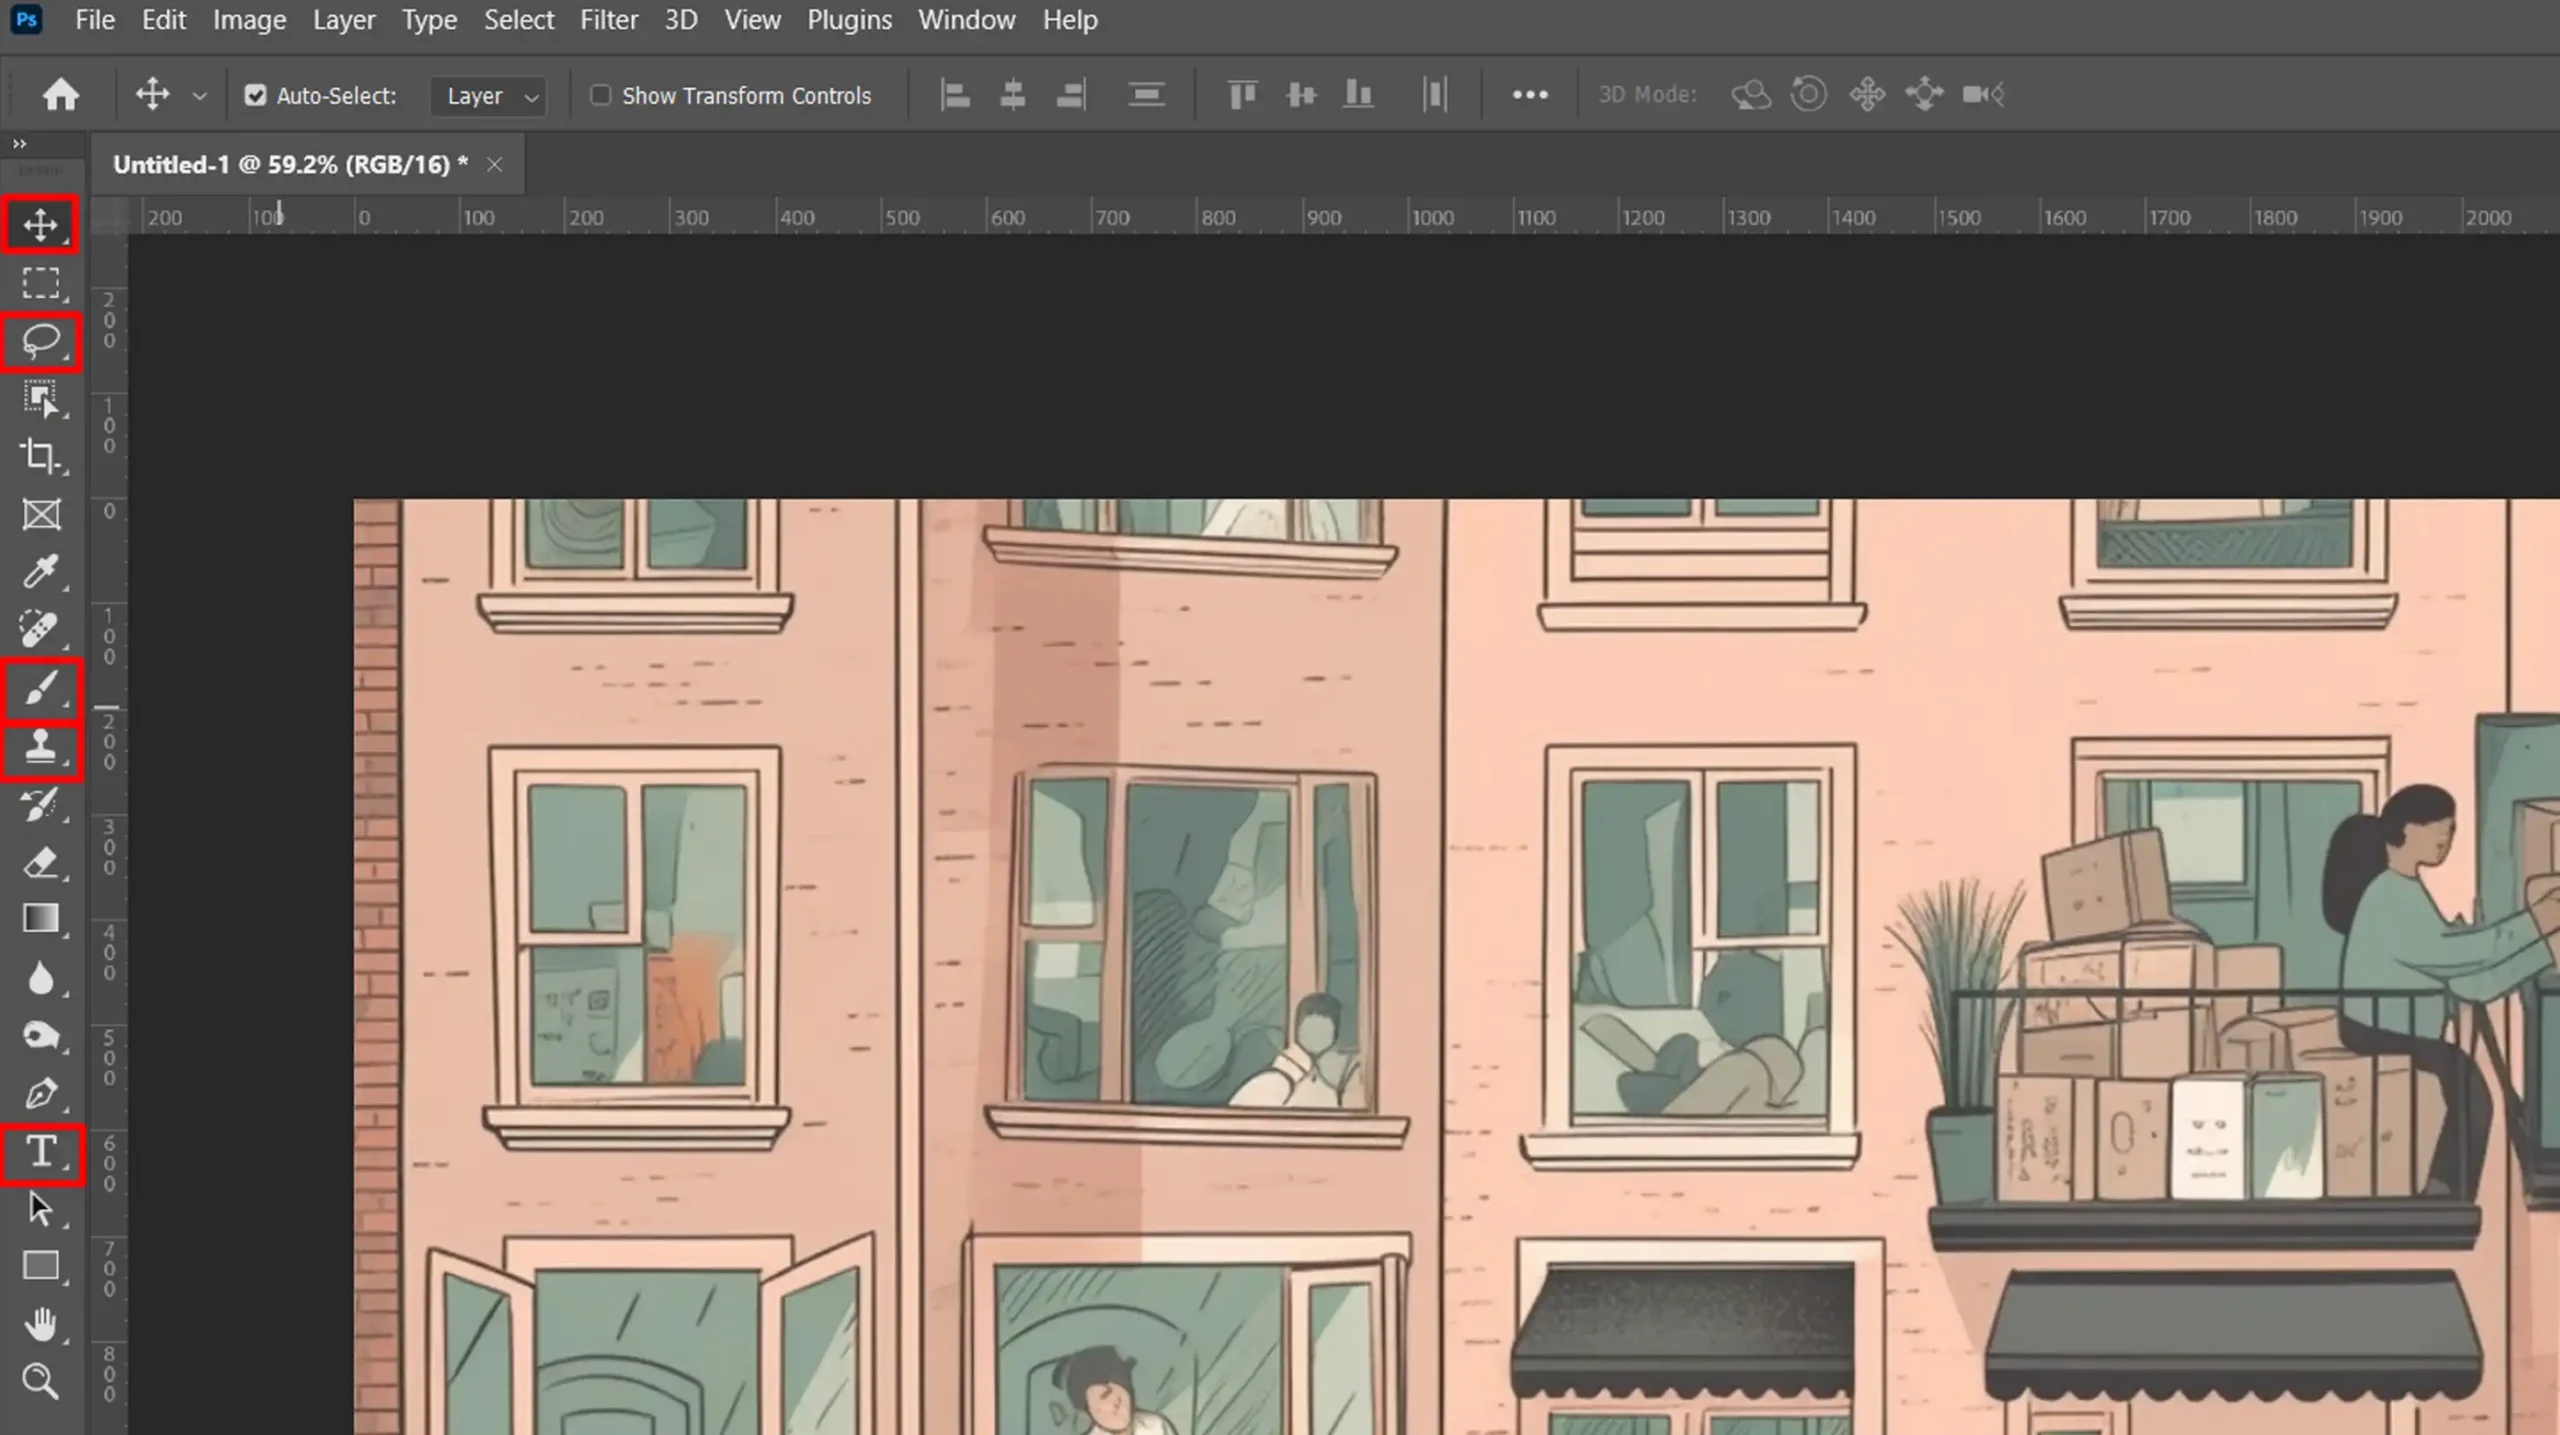
Photoshop offers a variety of photo editing tools:
- Move Tool: Helps you move objects within the workspace.
- Lasso Tool: Allows you to select specific parts of an images by drawing freehand segments.
- Brush Tool: Great for painting and adding custom effects.
- Clone Stamp Tool: Useful for duplicating parts of an image.
- Type Tool: Allows you to create and customize text using a wide range of custom fonts to enhance your design.
Explore these tools by testing them on your own photos.
Utilize Adobe’s free version to get familiar without committing financially immediately. It includes many features to support beginner and intermediate users.
For more advanced options, you can explore Creative Cloud plan subscriptions.
Pro Tip: Always save your work frequently to avoid losing progress, and make use of PSD files for layered editing.
Additionally, familiarize yourself with essential tools in Photoshop like the Patch Tool and the content-aware fill feature to enhance your editing capabilities.
By understanding these basics, you can effectively start creating and fine-tunes your photo editing skills.
With practice and exploration, Adobe becomes a powerful tools in your photo editing journey.
Essential Photo Editing Tools for Quick Photoshop Guides
Essential tools include an all-in-one editor that integrates graphic design capabilities with content creation tools.
By utilizing latest features like text prompts for customized editing and incorporating music tracks into your projects, you can enhance your work with both important features and creative flexibility.
Cropping and Resizing Images

Cropping and resizing images are fundamental skills in photo editing.
Adobe Photoshop makes it easy to handle these tasks with its built-in tools.
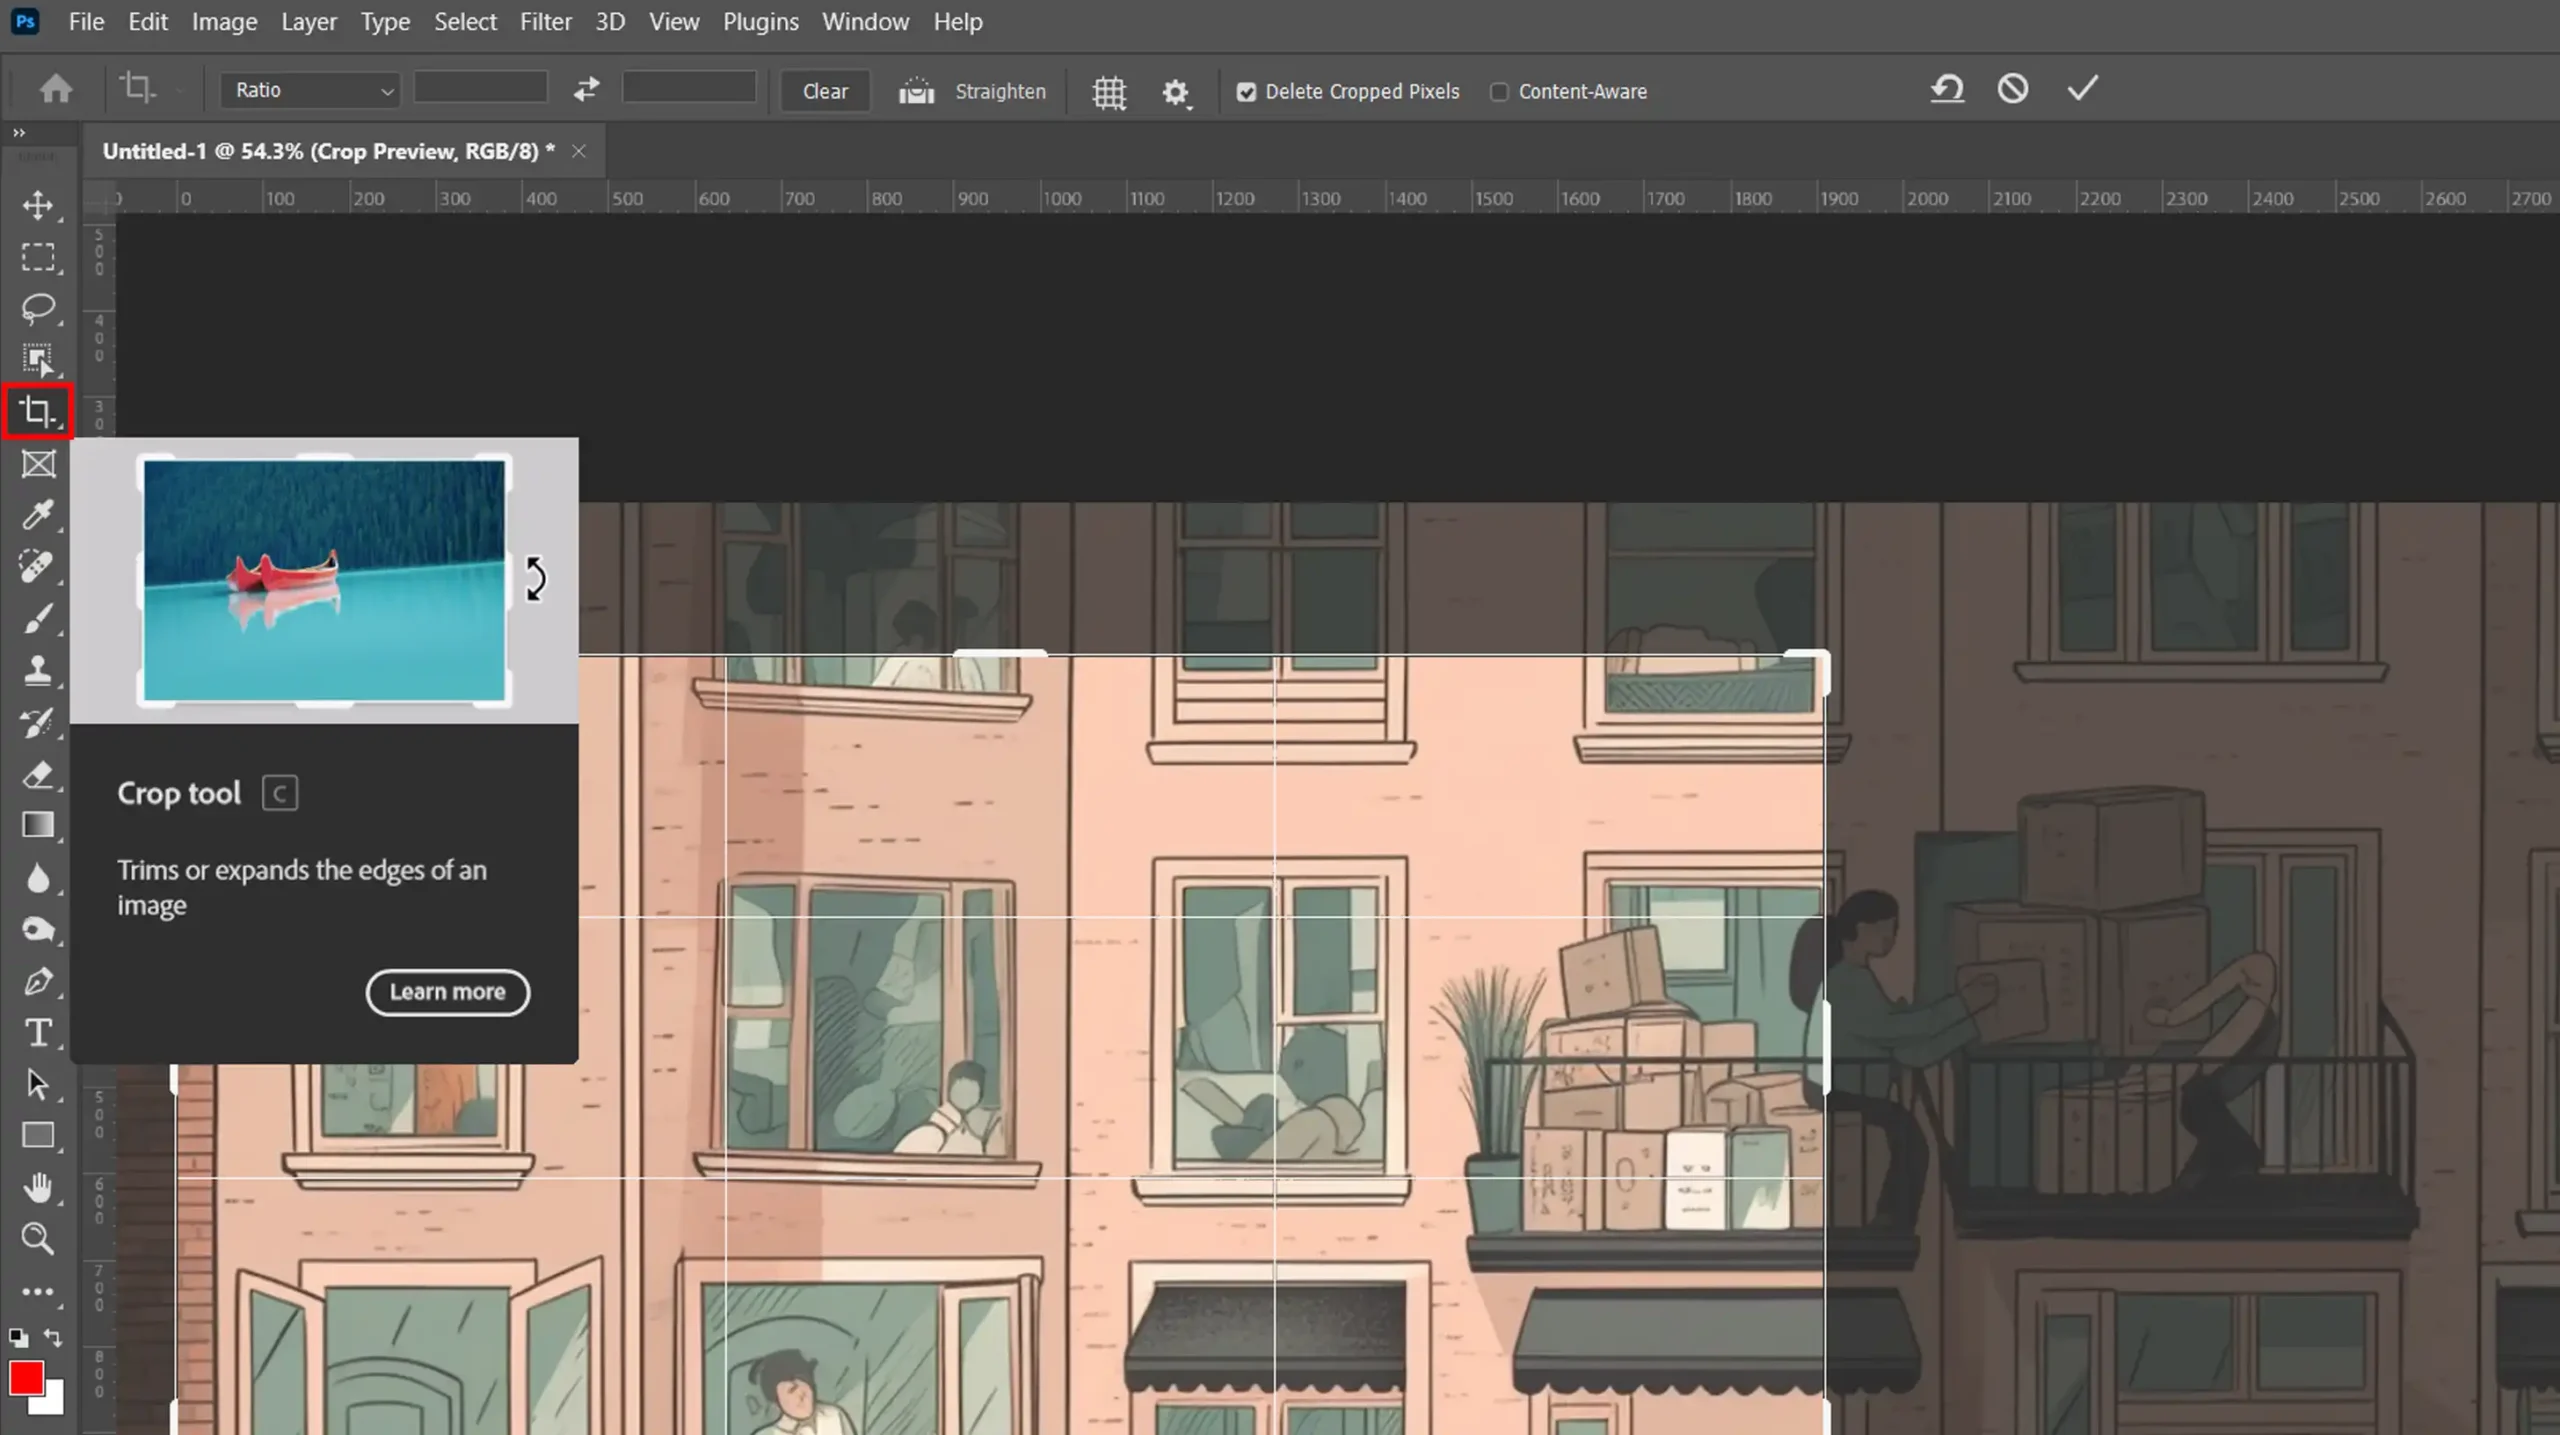
To crop an image:
- Select the Crop Tool from the toolbar.
- Drag the corners to select the area you want to keep.
- Press Enter to apply the crop.
As you fine-tunes your skills, you may also want to learn how to use custom brushes for more creativity.
For resizing:
- Go to Image > Image Size.
- Enter the new dimensions.
- Keep the "Constrain Proportions" box checked to maintain the aspect ratio.
Cropping and resizing help focus on the subject and improve composition.
Now, you’re ready to tackle more advanced tools like the content-aware fill in Photoshop, which can intelligently fill in gaps when you resize or crop your images.
When it comes to cropping your images effectively, the select subject feature can be incredibly useful.
This tool helps you precisely isolate and crop your main subject, enhancing your edits.
Adjusting Brightness and Contrast

Brightness and contrast adjustments can significantly enhance your photos.
In Photoshop, this is straightforward:
- Navigate to Image > Adjustments > Brightness/Contrast.
- Use the sliders to adjust these elements to your liking.
Small tweaks can make a big difference.
Brightness affects the overall lightness of the image, making it appear lighter or darker.
Contrast changes the difference between the light and dark areas.
Higher contrast makes the image look more vivid, while lower contrast softens it.
Remember, it’s essential not to overdo these adjustments to keep the photo looking natural.
Using Layers and Masks

Layers and masks are powerful features in Adobe Photoshop.
They allow for non-destructive editing, which means you can make changes without altering the original image.
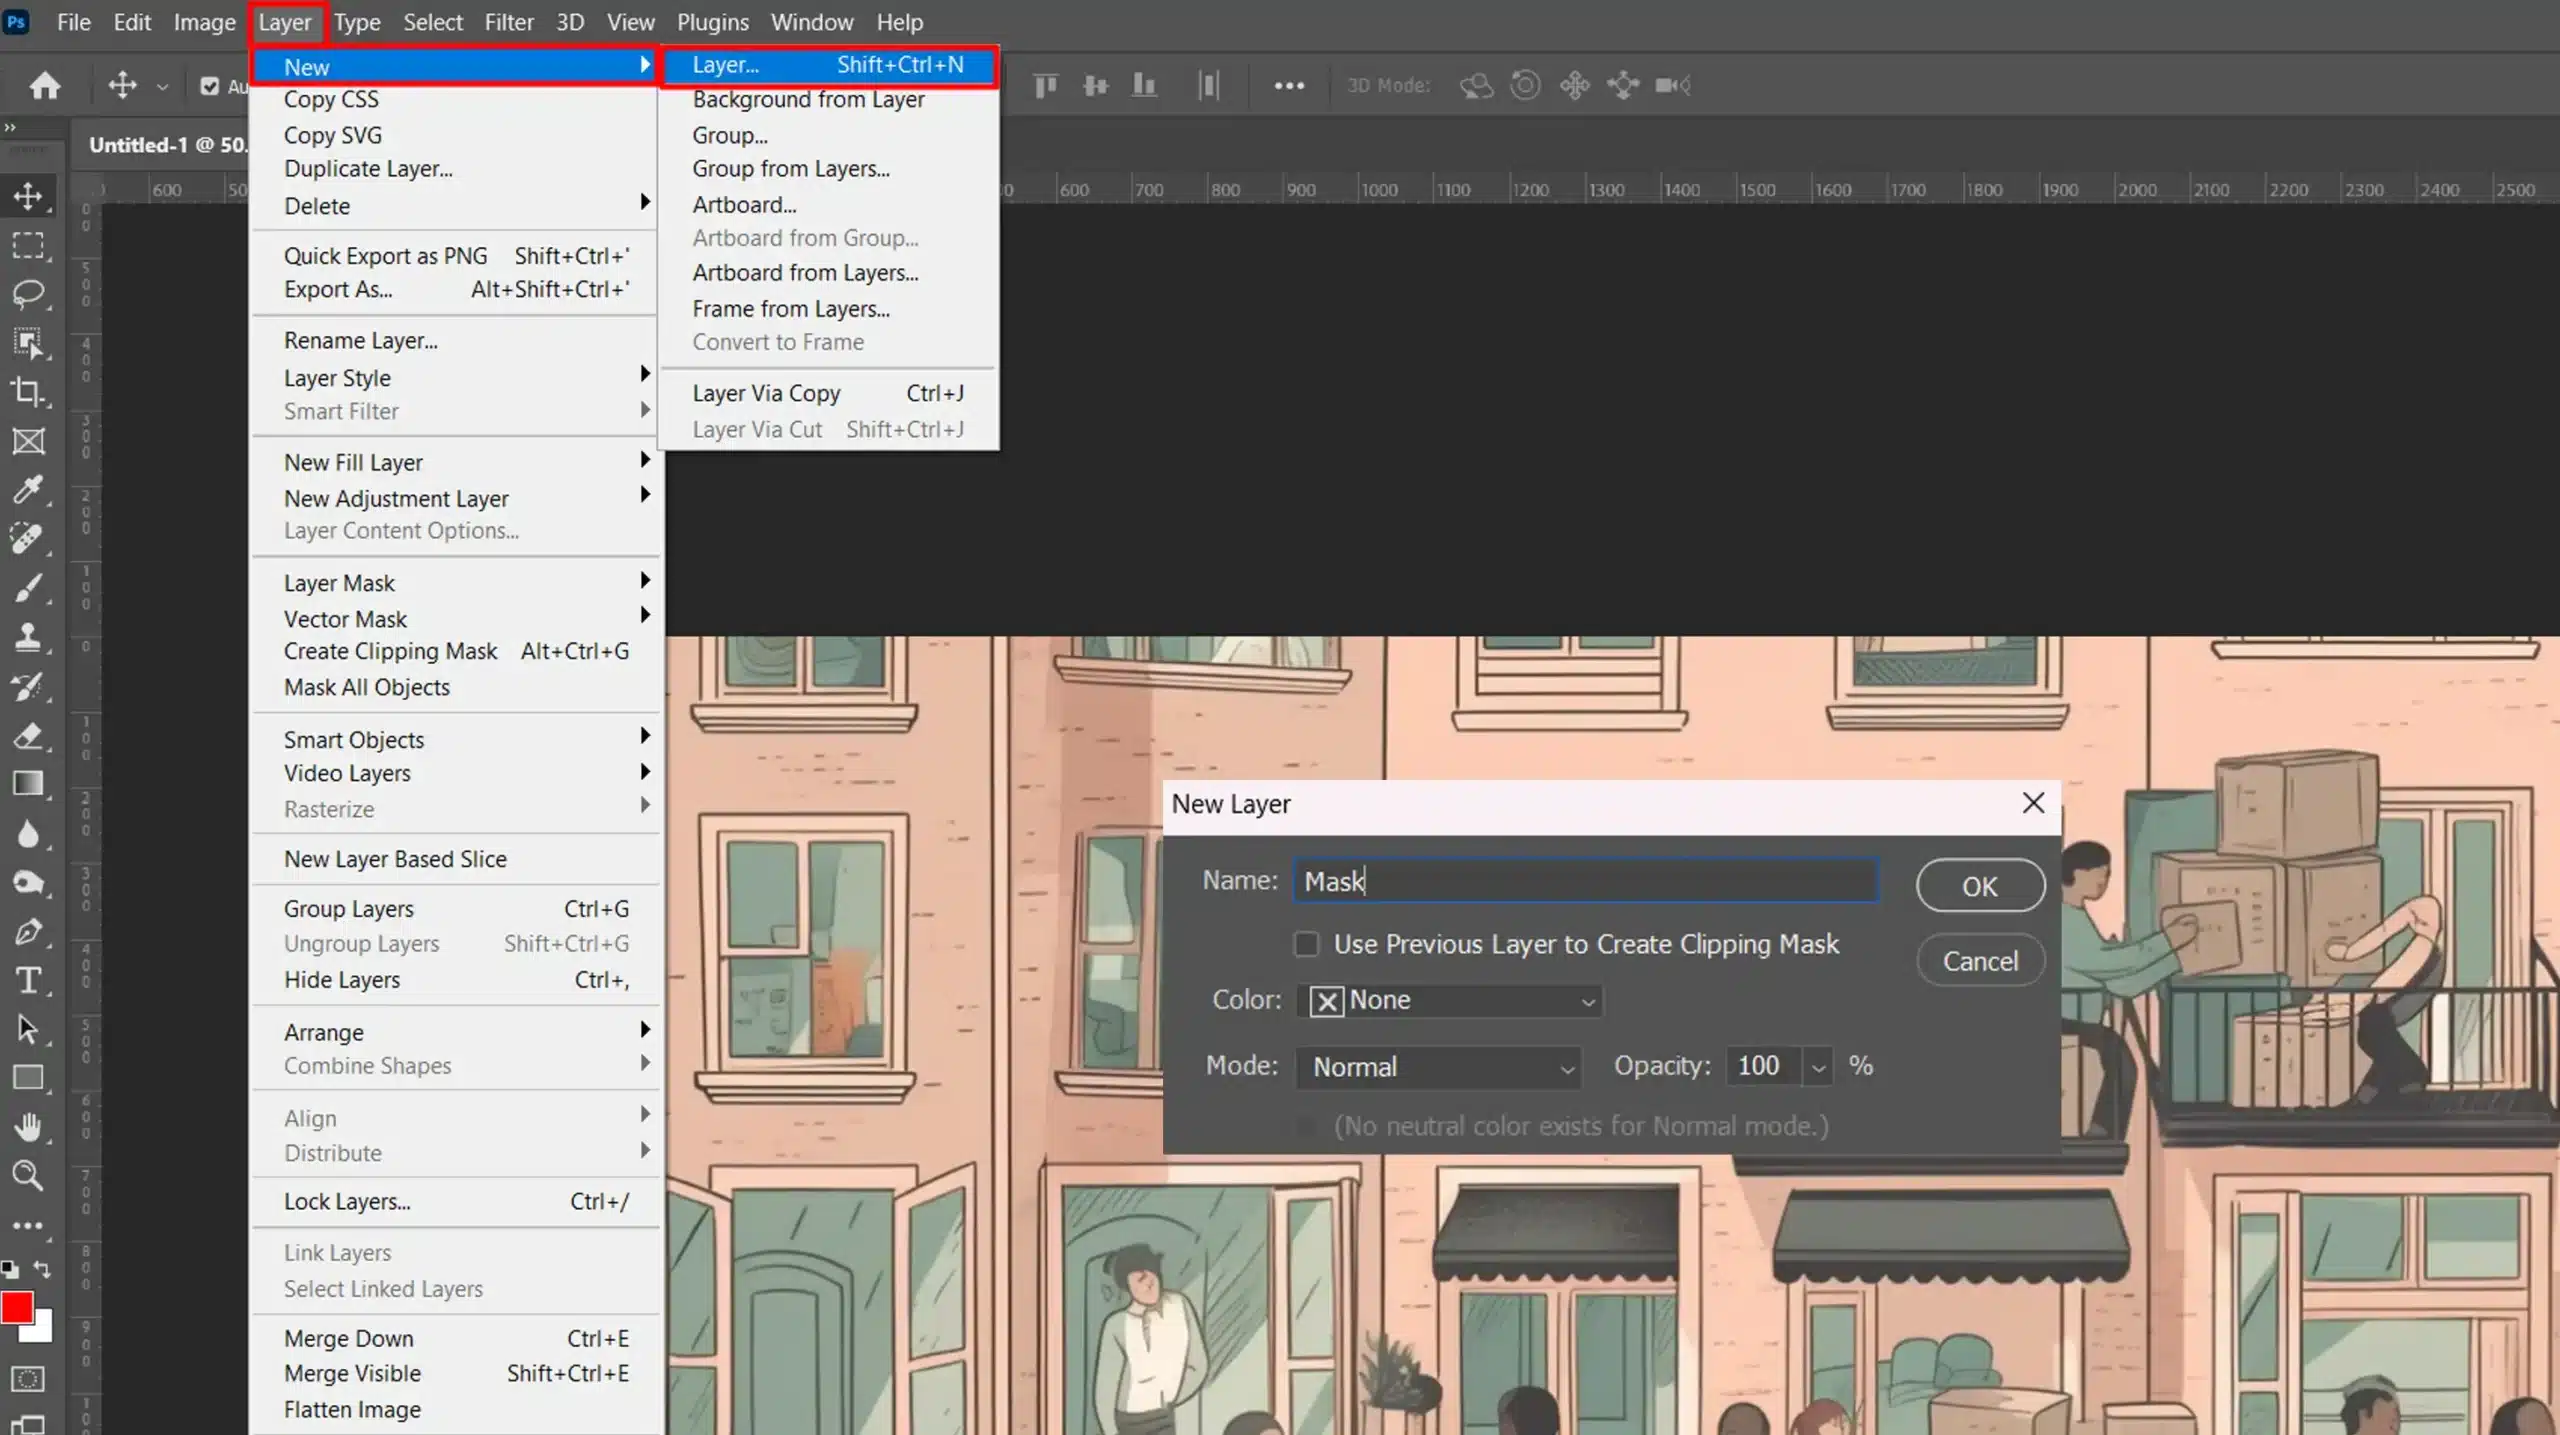
To start with layers:
- Open your image.
- Go to Layer > New > Layer.
- Add elements, text, or effects without changing the base image.
Layers stack on top of each other, and you can rearrange them as needed.
Masks offer even more control:
- Add a mask to a layer by clicking the mask icon at the bottom of the Layers panel.
- Use the Brush Tool to paint over the mask. Black hides parts of the layer, white reveals them.
This technique lets you blend multiple images seamlessly.
Mastering layers and masks opens endless possibilities for your photo editing projects.
For even more advanced techniques, consider exploring the patch tool in Photoshop to fix imperfections or remove unwanted objects from your images.
Pro Tip: Start with Adobe Express if you’re new to photo editing. It’s a versatile tool and easier to use. T
hen, transition to more advanced options like Creative Cloud applications when you’re ready for more features.
One more of the essential tools in Photoshop is the quick selection tool or smart selection tool. This tool simplifies the process of selecting parts of your image, making editing faster and more precise.
Exploring Free Photo Software for Quick Photoshop Editing
When exploring free photo editing software, consider the innovative capabilities of generative AI tools.
These programs offer powerful features that can serve as a Photoshop alternative, providing creative options like generative fill to enhance your images.
While traditional software like Photoshop remains a staple, free alternatives with AI-driven functionalities can deliver impressive results without the cost.
Top Free Photo Editing Software
When looking for the best free photo editing apps that are photoshop alternative, several options come to mind.
Here are some best free photo editor few:
- GIMP: It's a powerful Photoshop alternative and allows for extensive editing.
- Pixlr: It is a web app that offers many Photoshop-like tools.
- Adobe Express: This provides a lighter version of Photoshop, perfect for quick edits.
- Canva: Great for beginners and useful to create graphics quickly.
Comparing Free Version vs Paid Versions
The choice between free and paid versions of photo editors can be critical.
Free versions offer basic tools but may lack more advanced features. For instance, Adobe Photoshop Express provides basic editing tools but misses out on more sophisticated tools like generative fill, which the full Creative Cloud offers.
Furthermore, free versions often come with ads or limited export options.
Paid versions, like full Photoshop, provide extensive AI tools and numerous custom brush tools.
Experiment with different model architectures and hyperparameters to optimize the performance and creativity of your generative AI features.
Choosing between them depends on your needs.
If you’re doing simple photo edits, a free version can suffice. However, if you need advanced editing images, a paid version might be better.
Text to image technology allows you to effortlessly convert written descriptions into vivid visuals.
By using text to image tools, you can quickly bring your creative ideas to life with detailed and accurate imagery.
Pros and Cons of Free Photo Editing Softwares for Quck Photoshop Editing
Using free photo editing softwares has its benefits and drawbacks:
Pros:
- Cost-free: No financial investment required.
- Accessible: Easy to download and use immediately.
- Good for beginners: Basic tools make it easy to learn photo editing.
Cons:
- Limited Features: Lacks advanced tools, such as generative AI features.
- Ads: Many free versions have constant ads.
- Export Restrictions: Some free versions restrict image quality or formats when saving.
Pro Tip: If you’re new to photo editing, start with Adobe Express to get familiar with basic tools before moving to more advanced ones.
Use diverse and high-quality datasets to train your generative AI features and model for more accurate and creative outputs.
Once you’ve mastered the basics, you can consider upgrading to Creative Cloud for access to a wider range of features.
Creative Cloud offers powerful tools that can help you take your editing skills to the next level.
Many users find Creative Cloud to be an essential upgrade as they advance in their photo editing journey.
When exploring free photo editing options, don’t forget to consider how mobile apps can offer powerful tools on the go.
The 5 Best Free Photoshop Alternatives for Quick Photoshop Editing
For those diving into the world of photo editing, you don’t always need to start with expensive software.
There are plenty of free options that mimic Photoshop’s powerful features.
| Feature | GIMP | Pixlr | Adobe Photoshop Express | Canva | Photopea |
|---|---|---|---|---|---|
| Interface | Advanced, customizable | Intuitive, web-based | Simplified, mobile-friendly | Drag-and-drop, user-friendly | Similar to Photoshop, web-based |
| File Formats Supported | Various, including PSD | Common formats, some PSD support | JPEG, PNG, and others | Common formats, not PSD | PSD and other common formats |
| Key Features | Advanced editing, customizations | Basic and intermediate tools | Quick edits, basic adjustments | Graphic design, templates | Extensive photo editing tools |
| Accessibility | Downloadable software | Web-based, accessible from any device | Mobile app, part of Adobe Creative Cloud | Web-based, easy to use | Web-based, no download required |
| Best For | Detailed work, customizations | Beginners, quick edits | Simple, on-the-go edits | Graphics creation, social media | Those needing Photoshop-like tools |
| Limitations | Steeper learning curve, complex | Limited advanced features | Lacks advanced tools | Limited photo editing features | Limited advanced features, ads |
Adobe Photoshop Express
Adobe Photoshop Express is a stripped-down version of Photoshop. This app is fantastic for quick edits and is part of the Adobe Creative Cloud suite.
While it lacks advanced tools, it’s perfect for simple adjustments and on-the-go edits.
Why Choose Free Software?
- Cost-Free: These tools are wallet-friendly.
- Accessibility: No subscriptions required.
- Good for Beginners: Learn the basics before upgrading.
Drawbacks of Free Software
- Limited Features: They can't match paid software in functionality.
- Ads: Some versions may have intrusive ads.
- Export Restrictions: You might face limitations when exporting files.
One tip for those new to these apps: Start with Adobe Photoshop Express. It gives you a taste of Adobe’s ecosystem and prepares you for more advanced tools in the Creative Cloud.
Adobe Firefly is Adobe’s suite of generative AI tool designed to streamline and enhance creative workflows. Integrated into Adobe Creative Cloud,
This powerful toolset allows for intuitive and efficient creation, offering innovative features that automate and inspire creativity
Making it a valuable addition for both professionals and enthusiasts in the creative industry.
Pro Tip: When you feel comfortable, explore AI tools in these apps. They fine-tunes your skills and save time!
Advanced Techniques in Quick Photoshop
Advanced Techniques involve mastering tools like Content-Aware Fill and utilizing layer masks for intricate edits.
These techniques enable precise adjustments and creative enhancements, allowing for professional-quality results in less time.
Advanced Layer Techniques for Rapid Photoshop Tips
Layers make a big difference in Photoshop. Think of layers like clear sheets of paper stacked on top of each other. Each sheet can have different elements like text, drawings, or images.
Steps to Work with Layers:
- Duplicate your background layer: This step ensures you always have the original image safe. To duplicate, right-click on the background layer, select Duplicate Layer.
- Use adjustment layers: Click on the adjustment layer icon at the bottom of the layers panel. Choose an adjustment type – brightness, contrast, or color balance. Adjustment layers let you tweak without altering the original image.
- Experiment with blend modes: Blend modes allow you to change how layers interact. Click on the dropdown menu in the layers panel to experiment. Modes like Multiply darken an image while Screen lightens it. Pick modes based on your desired effect.
- Utilize masks: Masks hide or reveal parts of a layer. Click on the Add Layer Mask button and paint with black to hide areas or white to reveal them. This method provides flexibility and non-destructive editing.
Using Filters and Effects
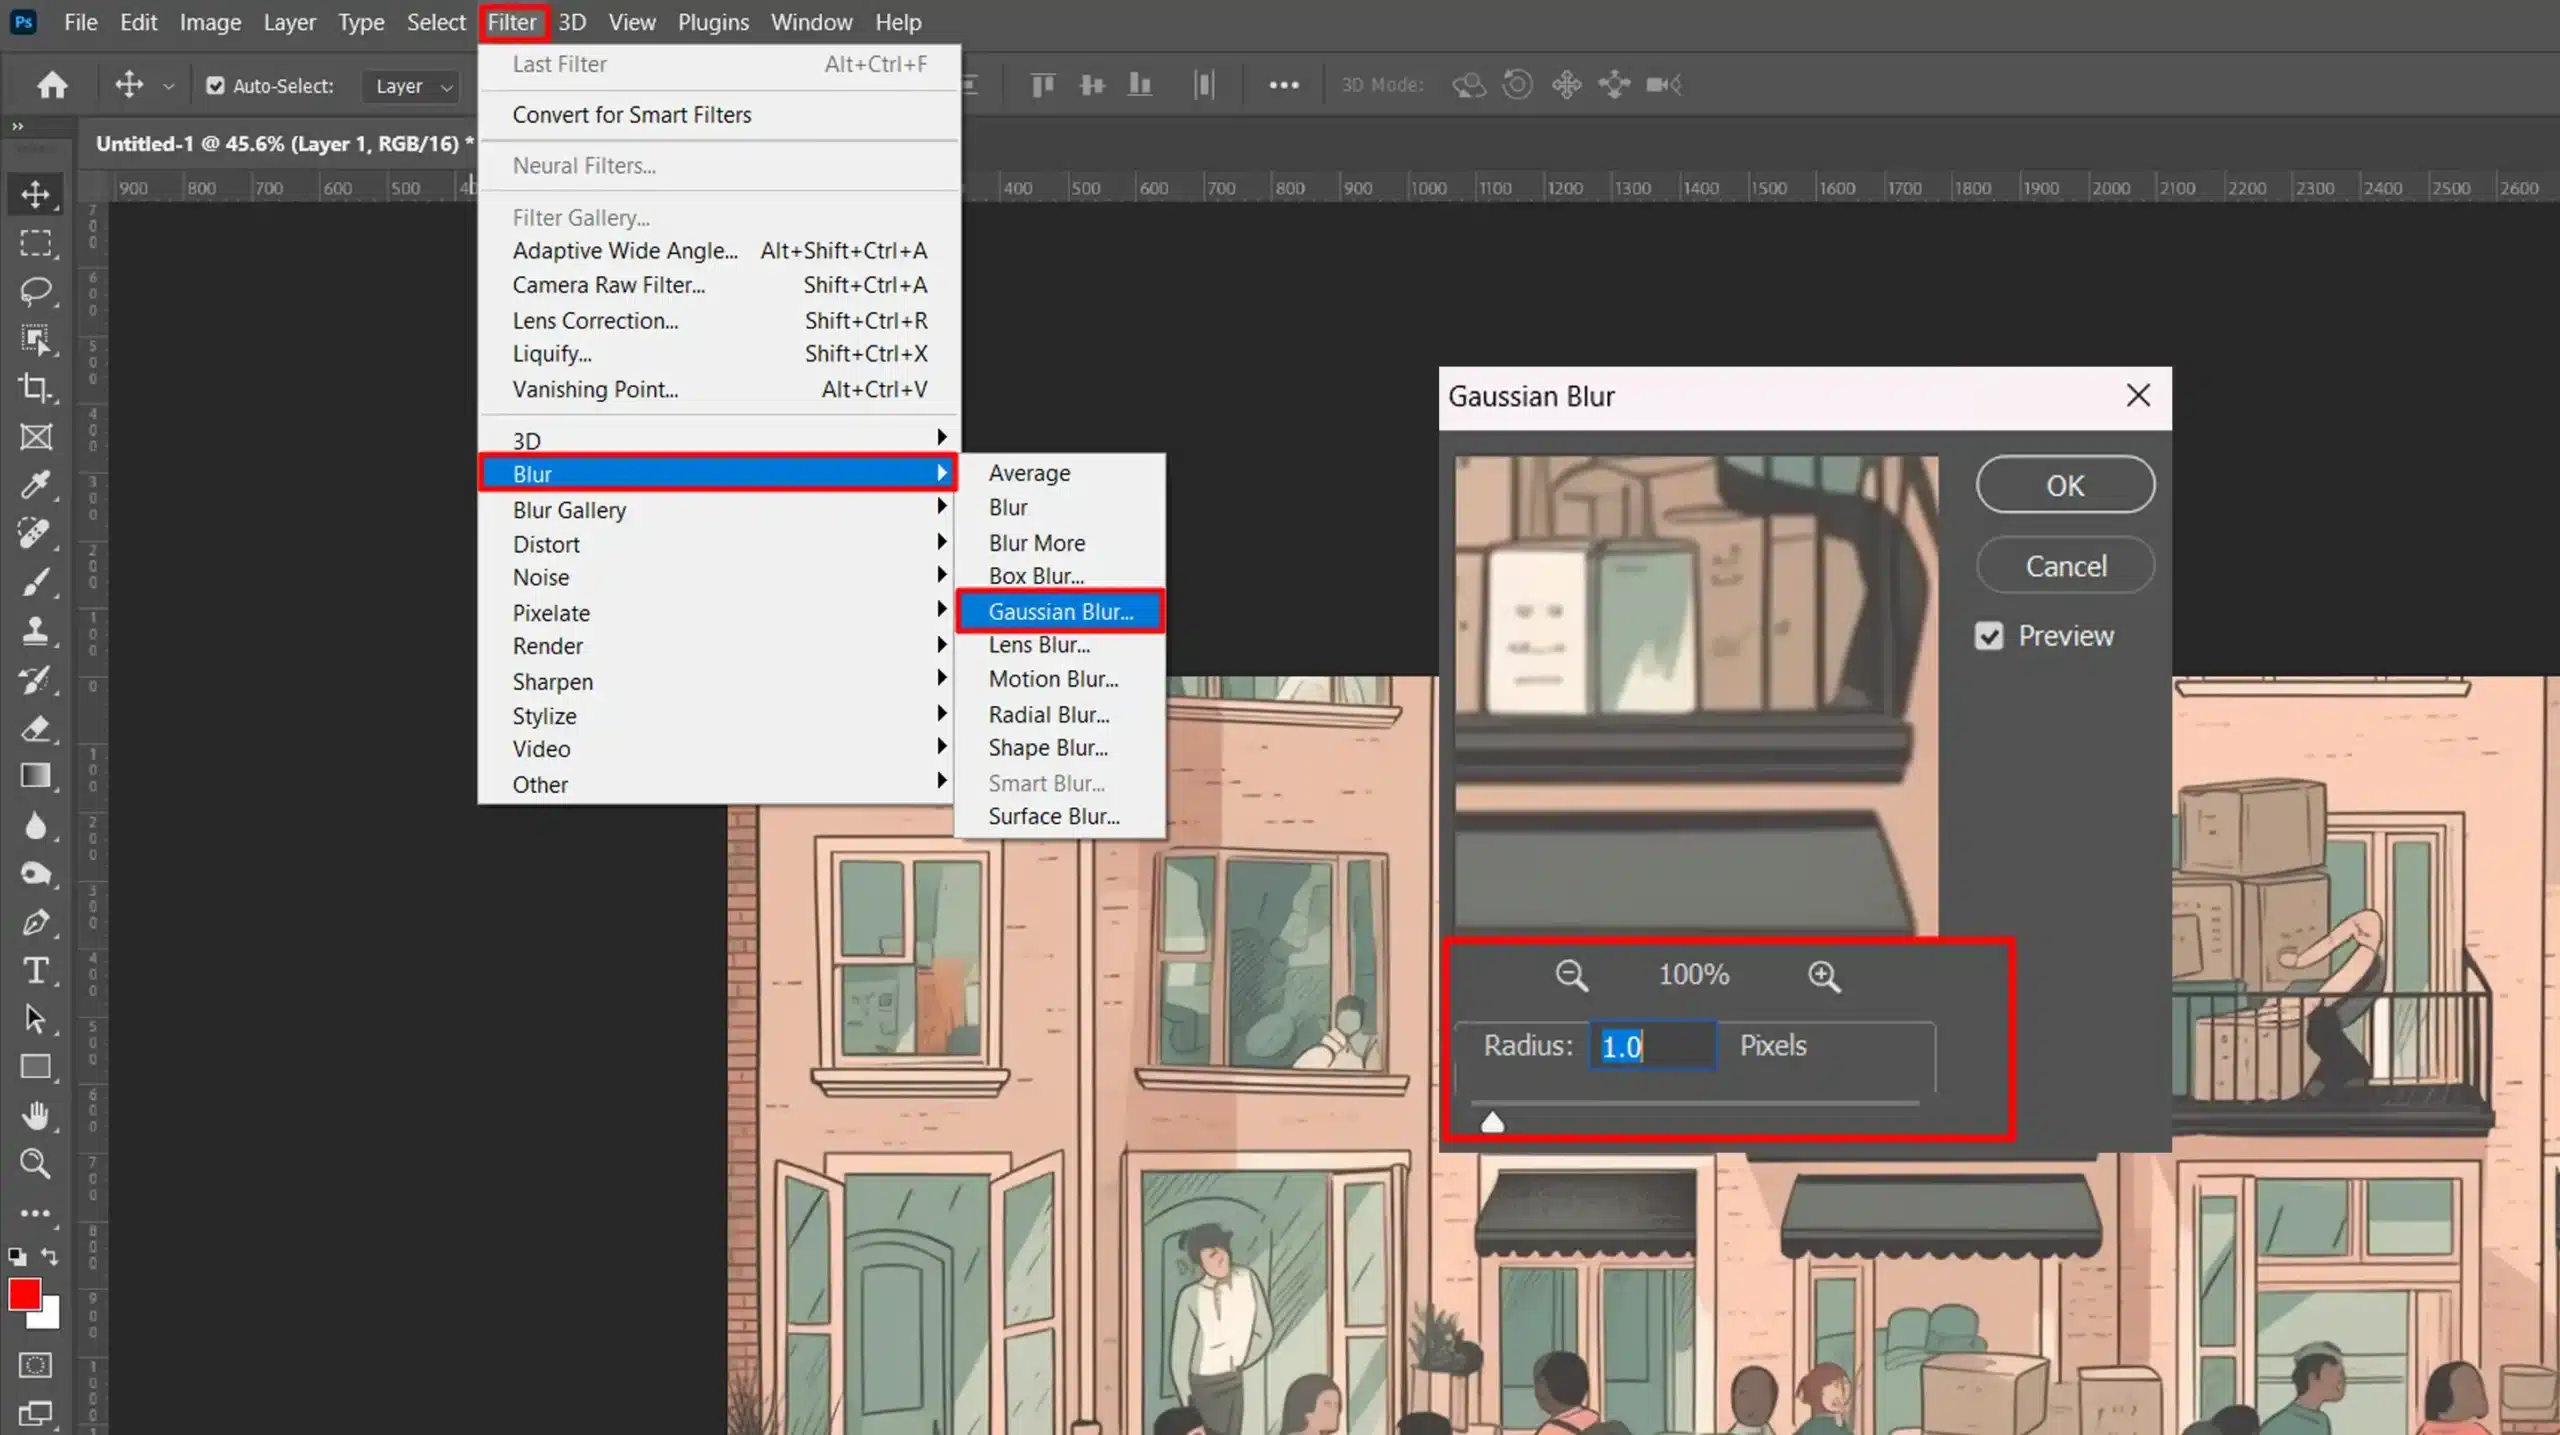
Filters and effects can transform photos into artworks. They add flair. To begin, go to Filter in the top menu. Here, you’ll find a range of options – blur, sharpen, distort. Experimenting helps find what works best.
Popular Filters and Effects

Here are some popular filters:
- Gaussian Blur: Apply it to soften images. Go to Filter > Blur > Gaussian Blur. Adjust the radius slider until satisfied. This filter works great for backgrounds.
- Smart filters: Convert your layer to a smart object first (right-click and choose Convert to Smart Object). Then apply filters. This method lets you edit or remove filters later without harm to the original image.
- Filter Gallery: Explore this for artistic effects. You'll find options mimicking paintings, sketches, and more preselected effects. This section allows visual experimentation with various styles.
Creating Custom Brushes
Custom brush let your creativity flow. You can design unique strokes, patterns, or textures.
Getting started is simple.
Steps to Create Custom Brushes:
- Draw or import the pattern: It can be anything - shapes, textures, or logos.
- Select your design: Use the marquee tool. Then go to Edit > Define Brush Preset. Name your brush and hit OK. It now appears in the brush preset panel.
- Fine-tune your brush: Open Brush Settings. Adjust size, spacing, and shape dynamics. These settings give you control over the behavior of your custom brush. Experiment as you create brushes fitting your style.
- Install pre-made brush sets: Download from Adobe Stock or other sites and load them into Photoshop via the brush preset panel. These brushes offer various effects, saving time and enhancing creativity.Exploring the extensive collection on Adobe Stock can provide unique and high-quality brushes that elevate your work.
Remember that brushes aren’t solely for painting. They’re versatile. Use them for erasing, masking, or even creating textures. Custom brush truly expand what you can accomplish.
Pro Tip: Always back up your work regularly. Mistakes happen. Keeping backups ensures your creative progress stays safe!
Frequently Asked Questions (FAQs)

Where is Quick Mode in Photoshop?
- Open Photoshop.
- Look for the ‘Quick’ button in the options bar at the top of your screen when in the ‘Edit’ workspace.
- Click on it to enter Quick Mode, which simplifies the tool options and panels for easier use.
Is there an easy version of Photoshop?
- Yes, Adobe offers Photoshop Elements, which is a simpler version of Photoshop designed for basic photo editing and is user-friendly for beginners.
How to do Quick Select in Photoshop?
- Open your image in Photoshop.
- Select the 'Quick Selection Tool' from the toolbox or press ‘W’ on your keyboard.
- Click and drag over the area of the image you want to select. The tool automatically detects and selects similar color ranges.
How can I use Photoshop for free?
- Adobe offers a free trial of Photoshop which you can download from their official website.
- After the trial period, you will need to purchase a subscription to continue using Photoshop.
- Alternatively, consider using free software like GIMP, which offers similar features.
Conclusion
In conclusion, mastering quick Photoshop techniques can significantly streamline your photo editing process.
With the tips and tools we’ve covered, you’ll be able to transform your images efficiently and effectively.
I’ve found that learning these essential techniques makes photo editing much more enjoyable and less time–consuming. If you’re eager to dive deeper, check out my Photoshop Course and Lightroom Course for more in-depth tutorials.
And for the latest software, you can explore and learn about Adobe Lightroom on the Adobe Website for more editing techiques.
Happy editing!
Read more about Photoshop:


